

Используйте библиотеку car-ui-lib для запуска самосогласованных автомобильных информационно-развлекательных систем (IVI). В этом практическом занятии вы познакомитесь с библиотекой car-ui-lib и узнаете, как использовать наложения ресурсов во время выполнения (RRO) для настройки компонентов библиотеки.
Что вы узнаете
Как это сделать:
- Включите компоненты
car-ui-libв ваше Android-приложение. - Используйте Gradle для сборки приложений Android и RRO.
- Используйте RRO с
car-ui-lib.
В этом практическом задании не описывается, как работают RRO (Return on Resources). Для получения дополнительной информации см. разделы «Изменение значений ресурсов приложения во время выполнения» и «Устранение неполадок с наложением ресурсов во время выполнения» .
Прежде чем начать
Предварительные требования
Прежде чем начать, убедитесь, что у вас есть:
Компьютер с командной строкой (машина под управлением Linux, Mac или Windows с подсистемой Windows для Linux).
Подключите к компьютеру устройство Android или эмулятор. См. разделы «Загрузка исходного кода Android» и «Сборка Android» .
Базовые знания о RRO (организациях, занимающихся исследованиями и контролем качества).
Создайте новое приложение для Android.
Продолжительность: 15 минут
В этом разделе вы создадите новый проект Android Studio.
В Android Studio создайте приложение с помощью
EmptyActivity.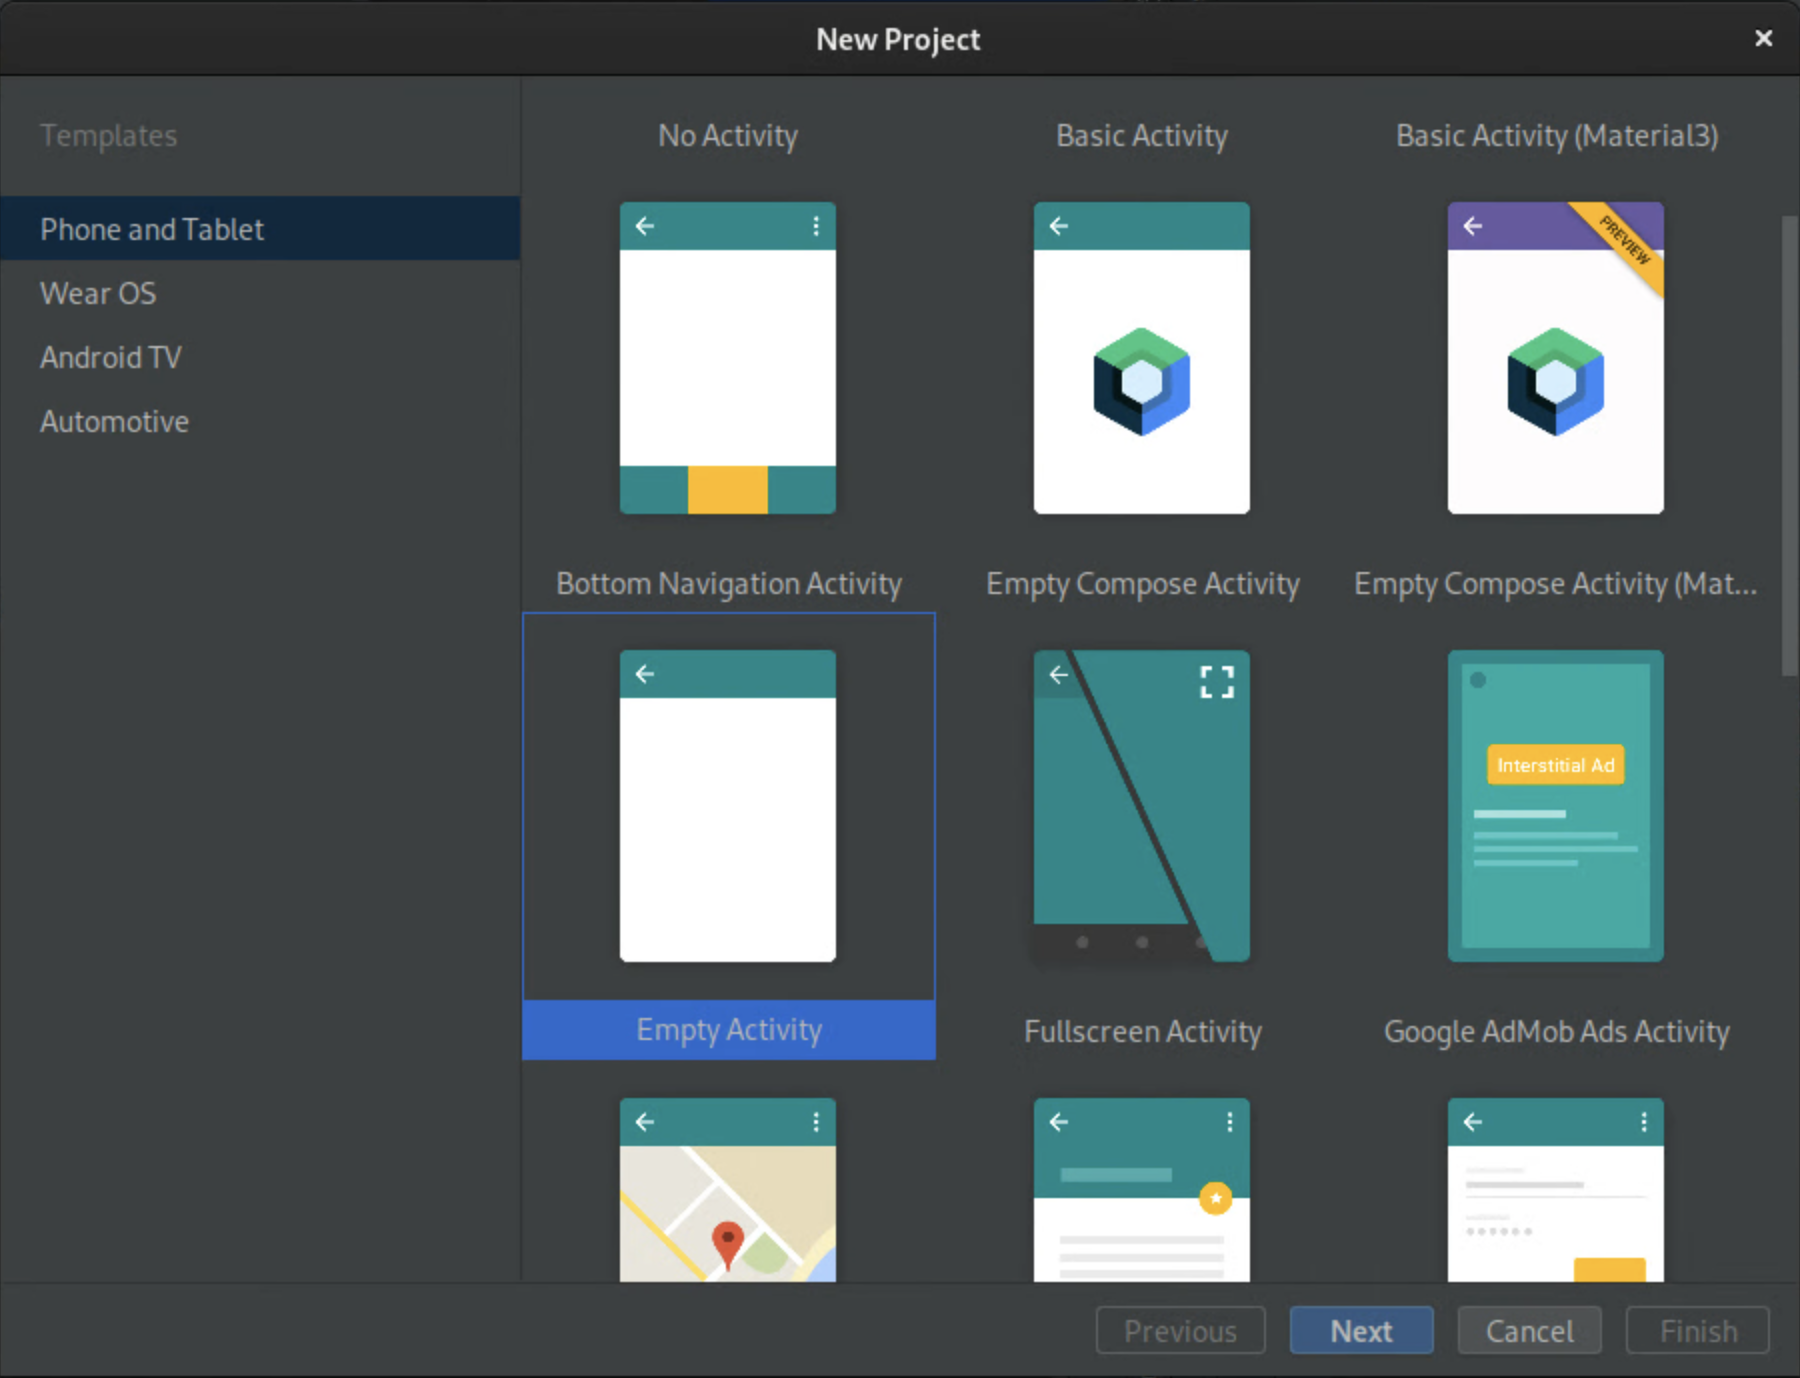
Рисунок 1. Создание пустой активности. Назовите приложение
CarUiCodelab, а затем выберите язык Java. При желании вы также можете указать местоположение файла. Примите значения по умолчанию для остальных настроек.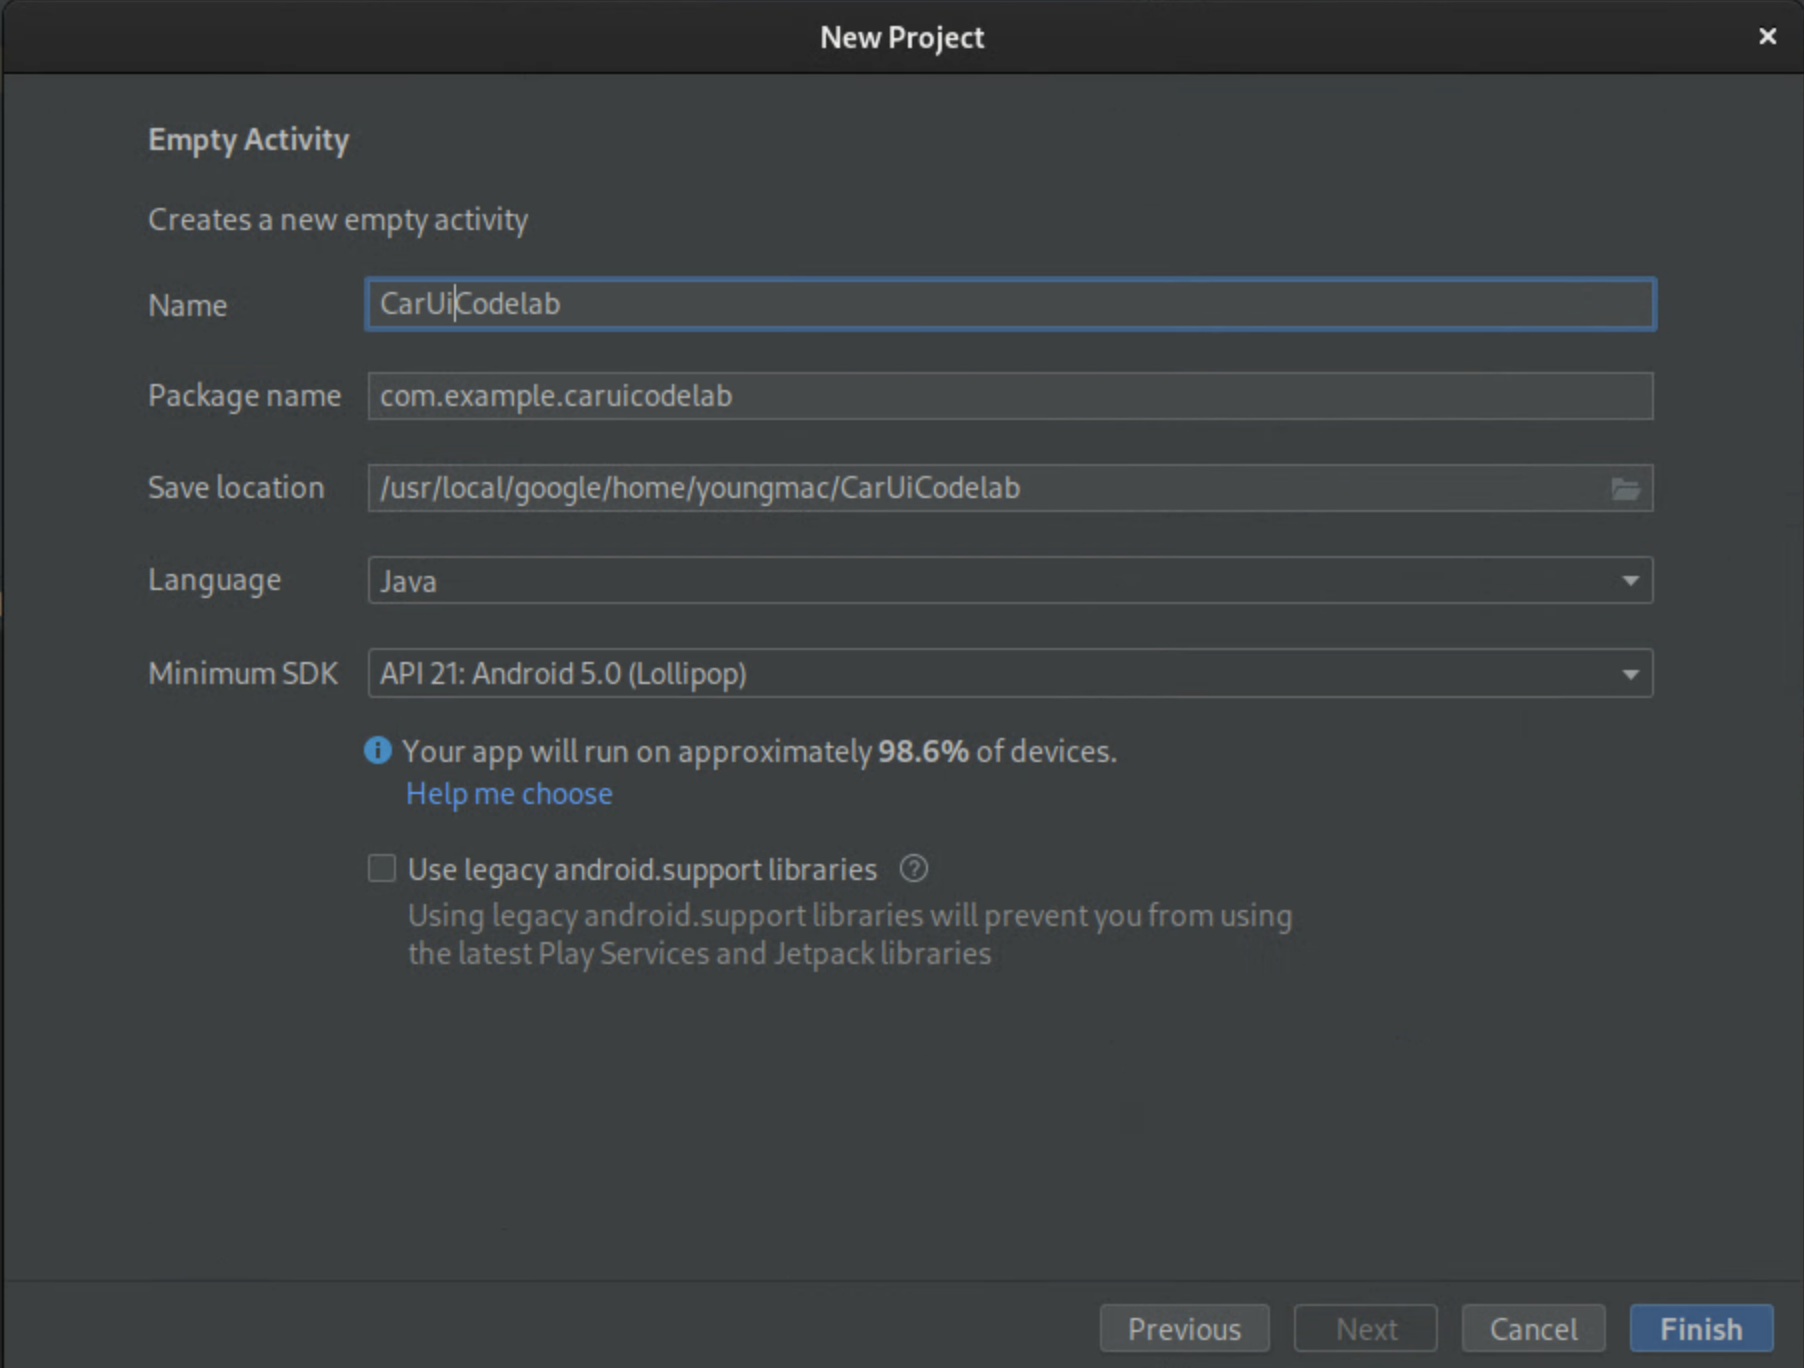
Рисунок 2. Назовите свое приложение. Замените файл
activity_main.xmlследующим блоком кода:<?xml version="1.0" encoding="utf-8"?> <androidx.constraintlayout.widget.ConstraintLayout xmlns:android="http://schemas.android.com/apk/res/android" xmlns:app="http://schemas.android.com/apk/res-auto" xmlns:tools="http://schemas.android.com/tools" android:layout_width="match_parent" android:layout_height="match_parent" tools:context=".MainActivity"> <TextView android:id="@+id/textView" android:layout_width="wrap_content" android:layout_height="wrap_content" android:text="@string/sample_text" app:layout_constraintBottom_toBottomOf="parent" app:layout_constraintEnd_toEndOf="parent" app:layout_constraintStart_toStartOf="parent" app:layout_constraintTop_toTopOf="parent" /> </androidx.constraintlayout.widget.ConstraintLayout>В этом блоке кода отображается строка
sample_text, которая не определена.Добавьте строку ресурса
sample_textи установите для нее значение "Hello World!" в файлstrings.xml. Чтобы открыть этот файл, выберите app > src > main > res > values > strings.xml .<?xml version="1.0" encoding="utf-8"?> <resources> <string name="app_name">CarUiCodelab</string> <string name="sample_text">Hello World!</string> </resources>Чтобы собрать приложение, нажмите зеленую кнопку «Play» в правом верхнем углу. Это автоматически установит APK-файл на ваш эмулятор или устройство Android через Gradle.
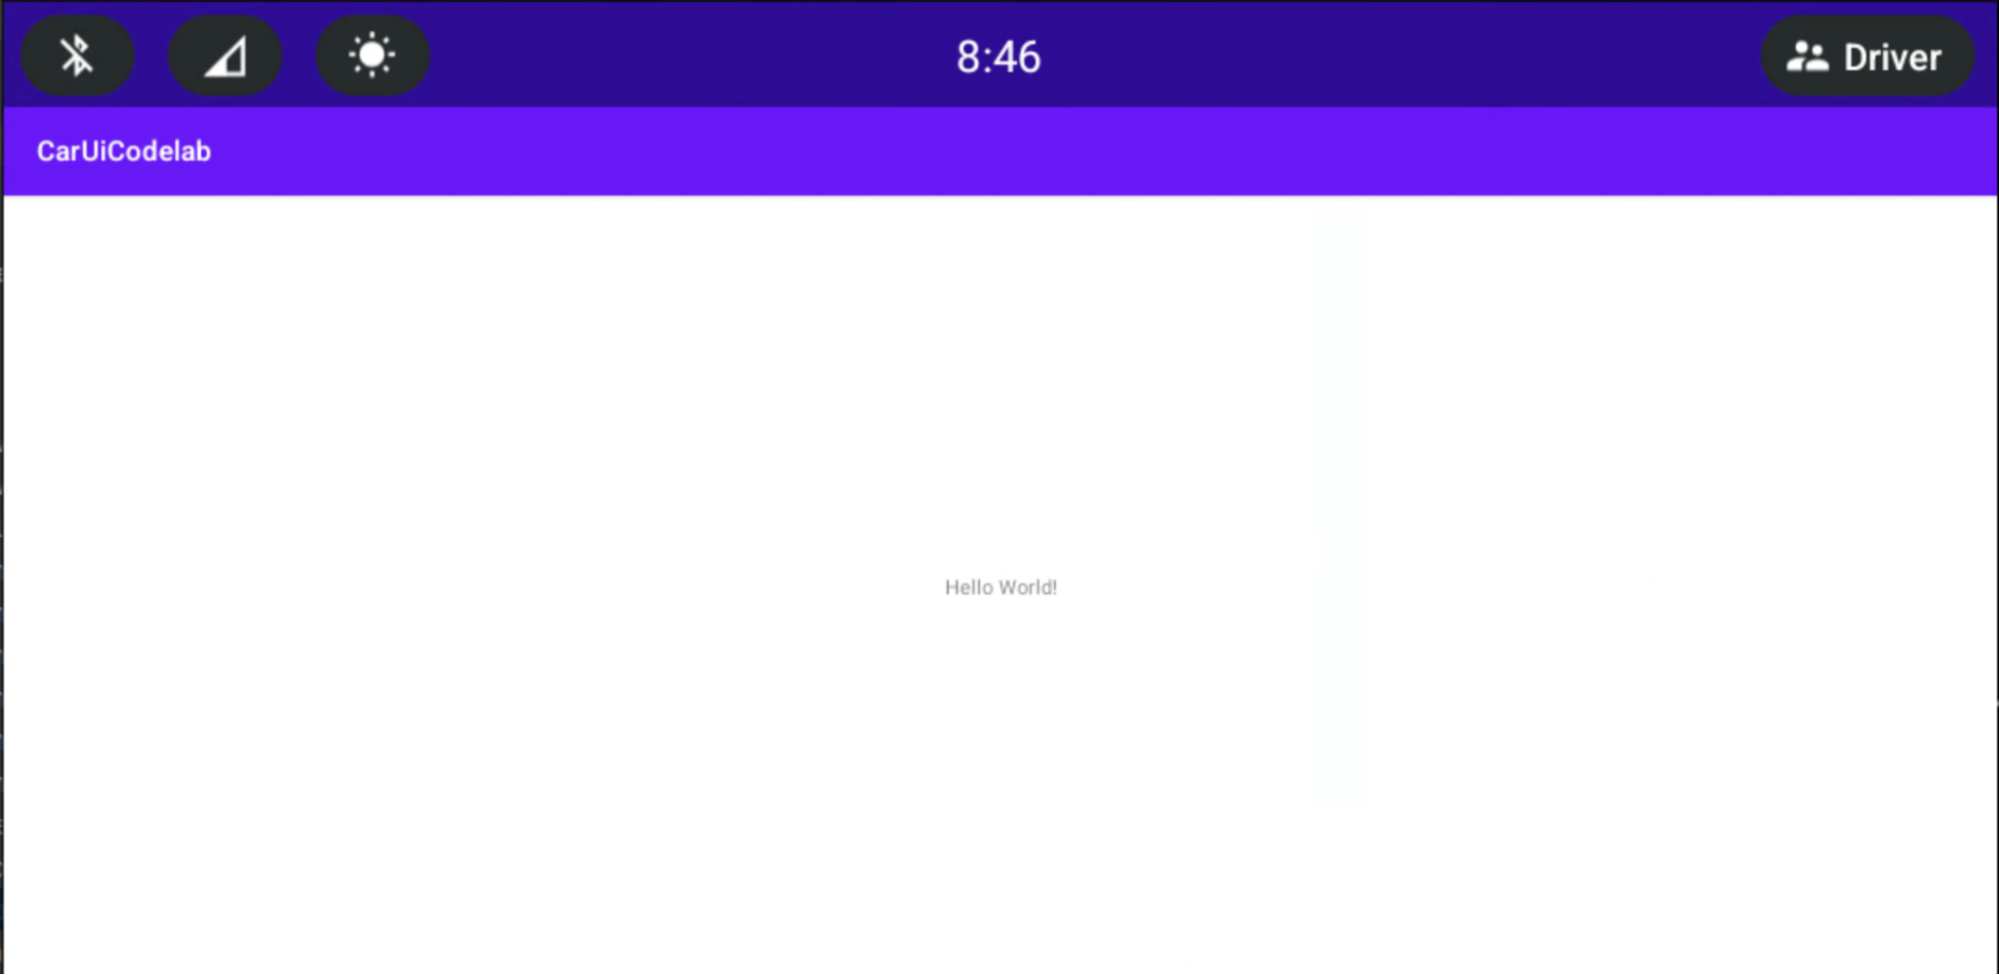
Новое приложение должно автоматически открыться на вашем эмуляторе или устройстве Android. Если этого не произошло, откройте приложение CarUiCodelab из панели запуска приложений, которая теперь установлена. Оно выглядит примерно так:
Добавьте car-ui-lib в ваше Android-приложение
Продолжительность: 15 минут
Добавьте car-ui-lib в ваше приложение:
Чтобы добавить зависимость
car-ui-libв файлbuild.gradleвашего проекта, выберите app > build.gradle . Ваши зависимости должны выглядеть следующим образом:dependencies { implementation 'com.android.car.ui:car-ui-lib:2.0.0' implementation 'androidx.appcompat:appcompat:1.4.1' implementation 'com.google.android.material:material:1.4.0' implementation 'androidx.constraintlayout:constraintlayout:2.1.4' }
Используйте компоненты car-ui-lib в своем Android-приложении.
Теперь, когда у вас есть car-ui-lib , добавьте панель инструментов в ваше приложение.
В файле
MainActivity.javaпереопределите методonCreate:@Override protected void onCreate(Bundle savedInstanceState) { super.onCreate(savedInstanceState); setContentView(R.layout.activity_main); // Get the toolbar controller instance. ToolbarController toolbar = CarUi.getToolbar(this); // Set the title on toolbar. toolbar.setTitle(getTitle()); // Set the logo to be shown with the title. toolbar.setLogo(R.mipmap.ic_launcher_round); }Обязательно импортируйте
ToolbarController:import com.android.car.ui.core.CarUi; import com.android.car.ui.toolbar.ToolbarController;Чтобы использовать тему
Theme.CarUi.WithToolbar, выберите app > src > main > AndroidManifest.xml , а затем обновите файлAndroidManifest.xmlследующим образом:<?xml version="1.0" encoding="utf-8"?> <manifest xmlns:android="http://schemas.android.com/apk/res/android" xmlns:tools="http://schemas.android.com/tools" package="com.example.caruicodelab"> <application android:allowBackup="true" android:dataExtractionRules="@xml/data_extraction_rules" android:fullBackupContent="@xml/backup_rules" android:icon="@mipmap/ic_launcher" android:label="@string/app_name" android:roundIcon="@mipmap/ic_launcher_round" android:supportsRtl="true" android:theme="@style/Theme.CarUi.WithToolbar" tools:targetApi="31"> <activity android:name=".MainActivity" android:exported="true"> <intent-filter> <action android:name="android.intent.action.MAIN" /> <category android:name="android.intent.category.LAUNCHER" /> </intent-filter> </activity> </application> </manifest>Чтобы собрать приложение, нажмите зеленую кнопку «Играть» , как и раньше.
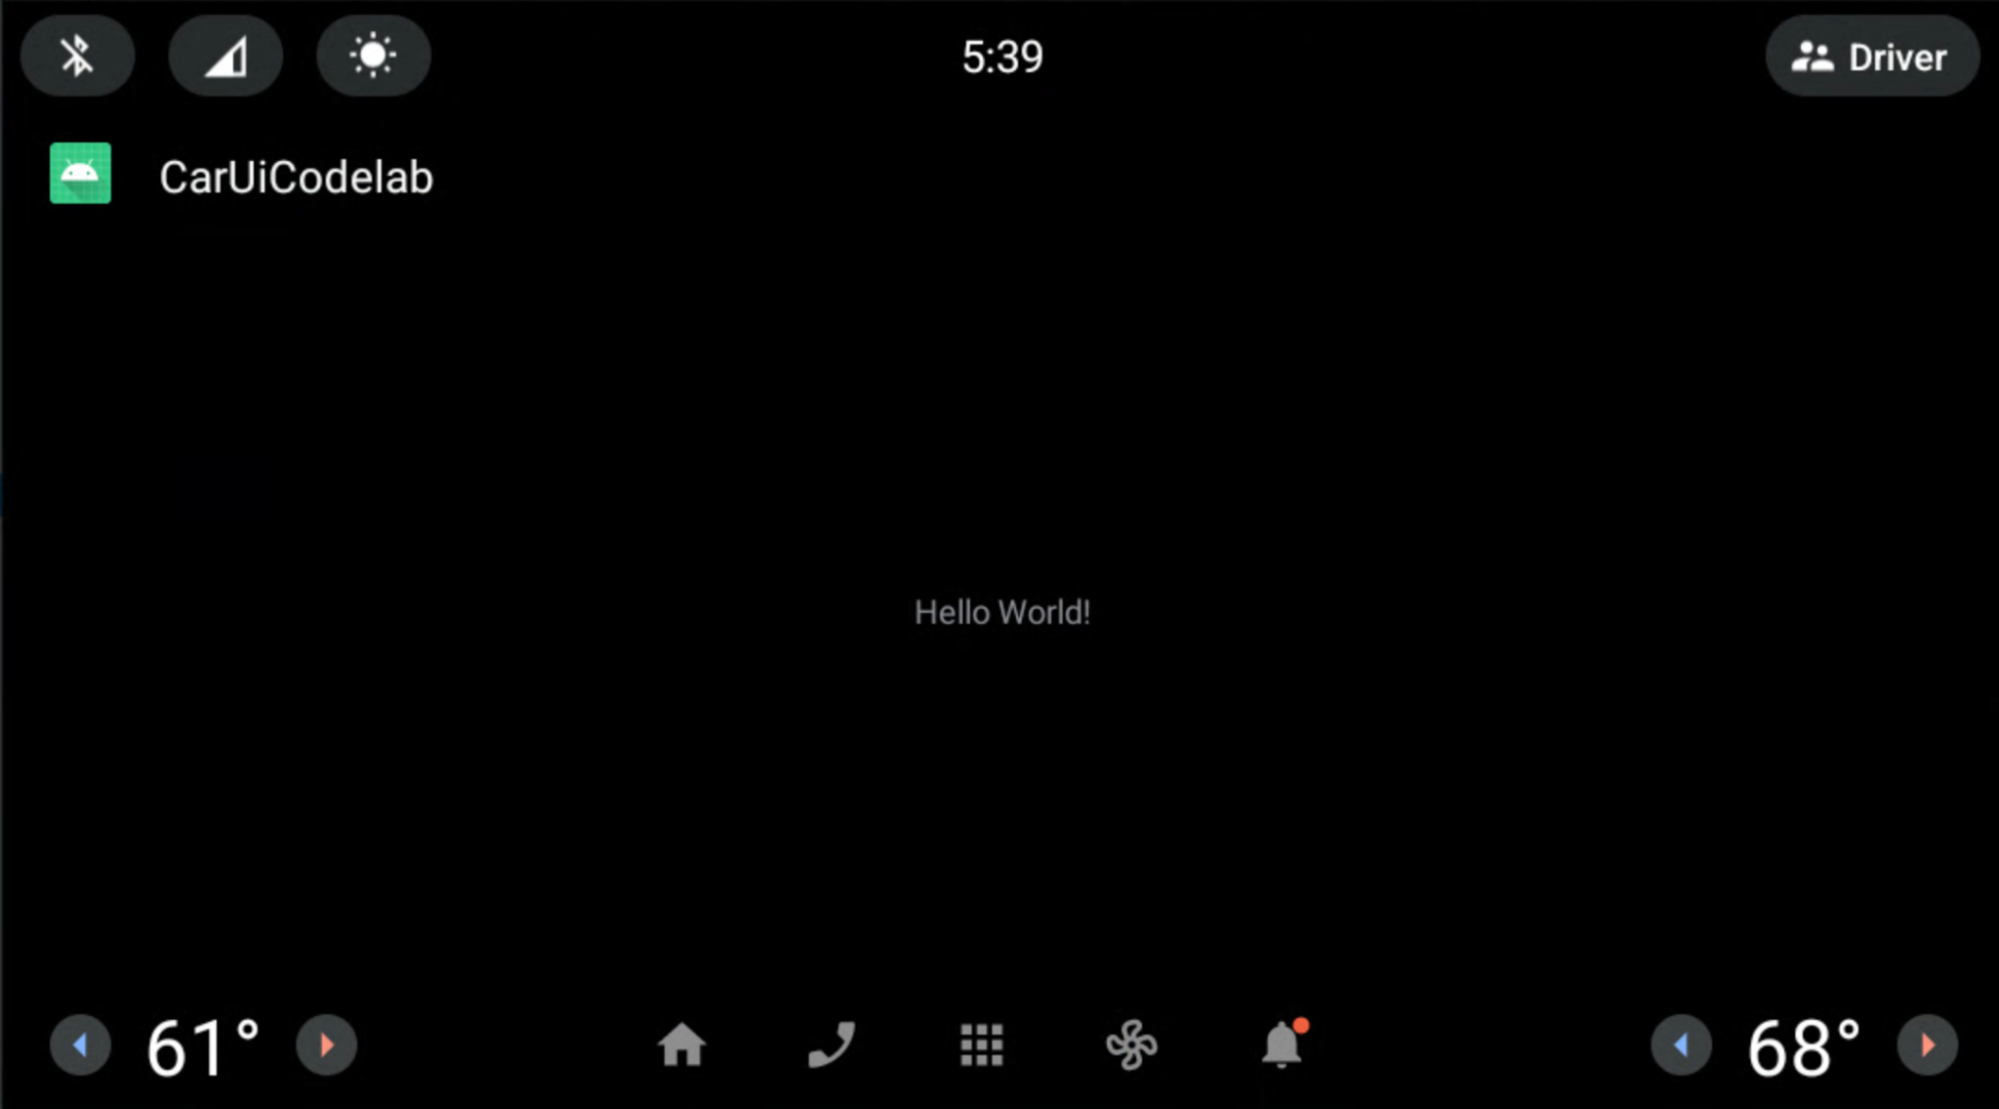
Добавьте RRO в ваше приложение
Продолжительность: 30 минут
Если вы знакомы с RRO, перейдите к следующему разделу « Добавление контроллера разрешений в ваше приложение» . В противном случае, чтобы узнать основы RRO, см. раздел «Изменение значений ресурсов приложения во время выполнения» .
Добавьте контроллер разрешений в ваше приложение.
Чтобы контролировать, какие ресурсы перекрываются пакетом RRO, добавьте файл с именем overlayable.xml в папку /res вашего приложения. Этот файл служит контроллером разрешений между вашим приложением ( целевым объектом ) и вашим пакетом RRO ( перекрывающимся объектом ).
Добавьте файл
res/values/overlayable.xmlв ваше приложение и скопируйте в него следующее содержимое:<?xml version="1.0" encoding="utf-8"?> <resources> <overlayable name="CarUiCodelab"> <policy type="public"> <item type="string" name="sample_text"/> </policy> </overlayable> </resources>Поскольку строковый
sample_textдолжен быть доступен для наложения с помощью RRO, укажите имя ресурса в файле overlayable.xml приложения.Ваш файл
overlayable.xmlДОЛЖЕН находиться в папкеres/values/. В противном случаеOverlayManagerServiceне сможет его найти.Чтобы узнать больше о накладываемых ресурсах и способах их настройки, см. раздел «Ограничение накладываемых ресурсов» .
Создайте пакет RRO
В этом разделе вы создадите пакет RRO, чтобы изменить отображаемую выше строку с "Hello World!" на "Hello World RRO".
Чтобы создать новый проект, выберите Файл > Создать > Новый проект . Обязательно выберите «Без активности» вместо «Пустая активность», поскольку пакеты RRO содержат только ресурсы.
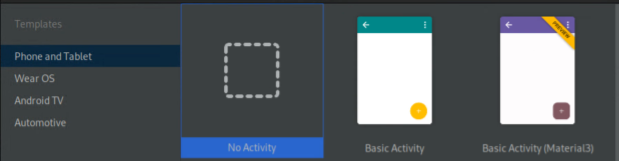
Ваши настройки выглядят примерно так, как показано ниже. Место их сохранения может отличаться:
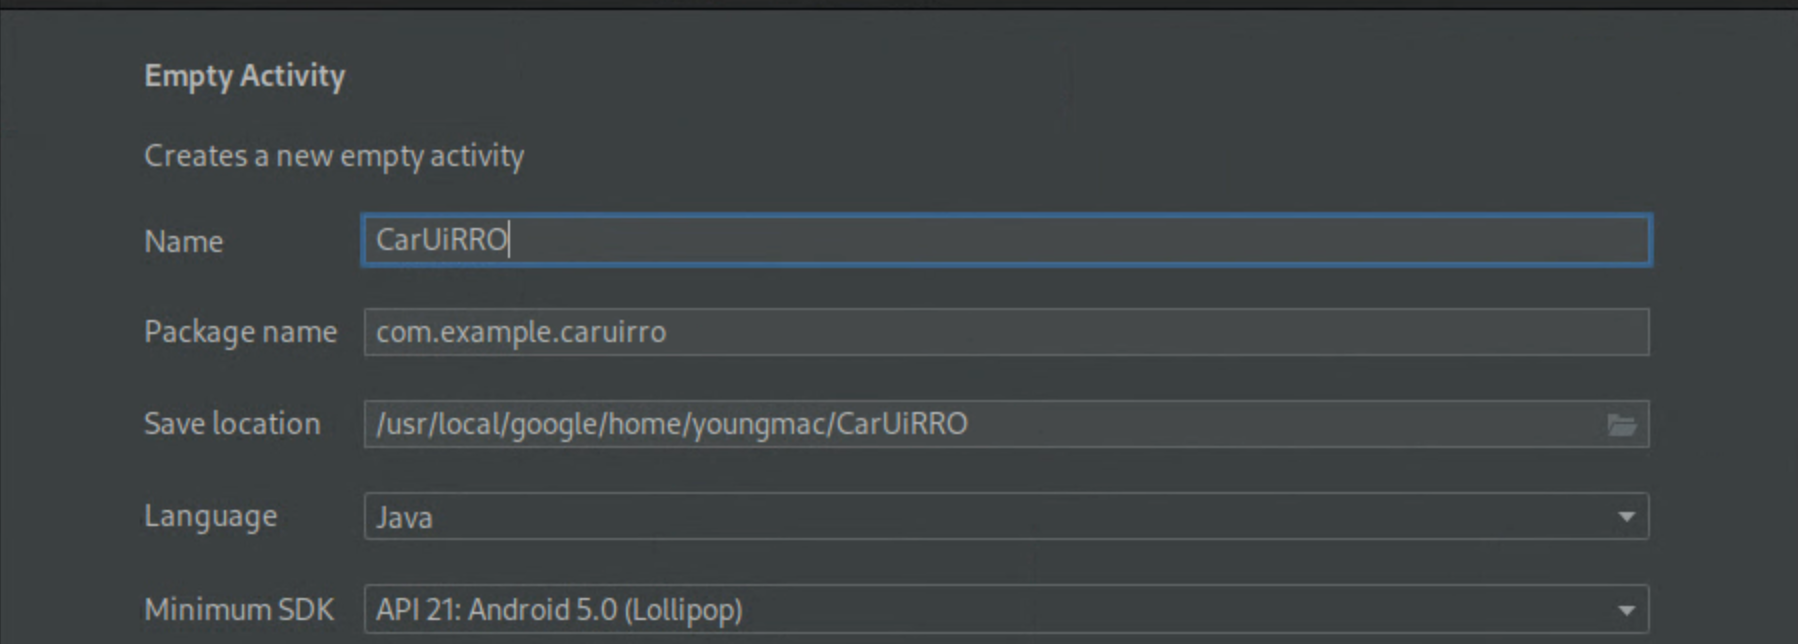
После создания нового проекта
CarUiRROобъявите его как RRO, изменив файлAndroidManifest.xml.<?xml version="1.0" encoding="utf-8"?> <manifest xmlns:android="http://schemas.android.com/apk/res/android" package="com.example.caruirro"> <application android:hasCode="false" /> <uses-sdk android:minSdkVersion="29" android:targetSdkVersion="29"/> <overlay android:targetPackage="com.example.caruicodelab" android:targetName="CarUiCodelab" android:isStatic="false" android:resourcesMap="@xml/sample_overlay" /> </manifest>Это приводит к ошибке с
@xml/sample_overlay. ФайлresourcesMapсопоставляет имена ресурсов из целевого пакета с пакетом RRO. Установка флагаhasCodeв значениеfalseобязательна для пакетов RRO. Кроме того, пакеты RRO не должны содержать файлы DEX.Скопируйте следующий блок кода в файл
…/res/xml/sample_overlay.xml:<?xml version="1.0" encoding="utf-8"?> <overlay> <item target="string/sample_text" value="@string/sample_text"/> </overlay>Добавьте
sample_textв файл…/res/values/strings.xml:<?xml version="1.0" encoding="utf-8"?> <resources> <string name="app_name">CarUiRRO</string> <string name="sample_text">Hello World RRO</string> </resources>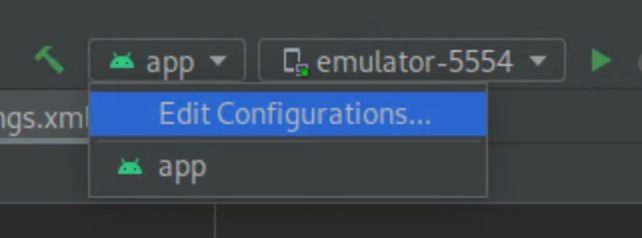
Чтобы собрать целевой объект RRO, нажмите зеленую кнопку «Play» , чтобы создать сборку RRO с помощью Gradle на вашем эмуляторе или устройстве Android.
Чтобы убедиться в правильности установки RRO, выполните следующую команду:
shell:~$ adb shell cmd overlay list --user current | grep -i com.example
com.example.caruicodelab
[ ] com.example.caruirro
Эта команда отображает полезную информацию о состоянии пакетов RRO в системе.
-
[ ]означает, что RRO установлен и готов к активации. -
---указывает на то, что RRO установлен, но содержит ошибки. -
[X]означает, что RRO установлен и активирован.
Если в вашем файле RRO обнаружены ошибки, перед продолжением ознакомьтесь с разделом «Устранение неполадок, связанных с наложением ресурсов среды выполнения» .
-
Чтобы включить RRO и убедиться в его включении:
shell:~$ adb shell cmd overlay enable --user current com.example.caruirro
shell:~$ adb shell cmd overlay list --user current | grep -i com.example
com.example.caruicodelab
[x] com.example.caruirro
Ваше приложение отображает строку "Hello World RRO".
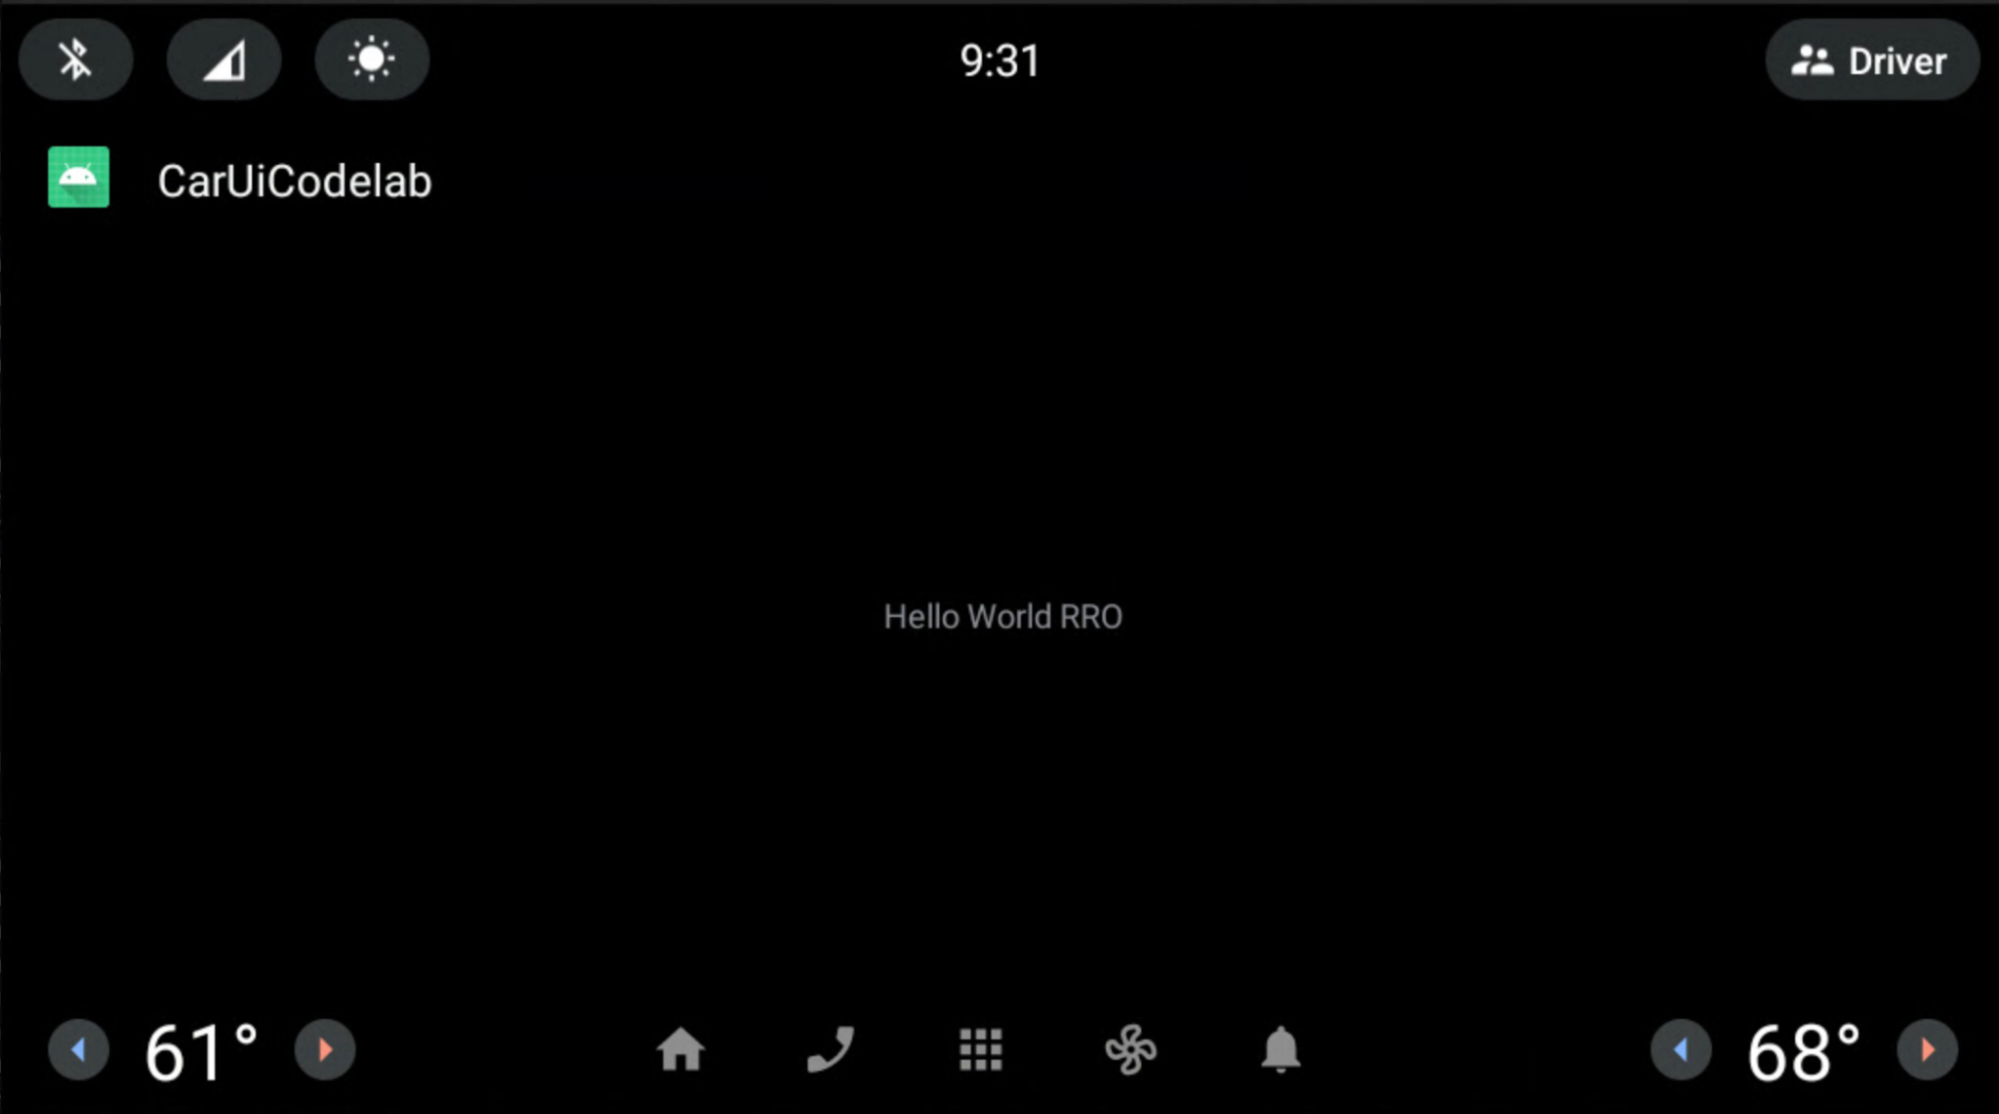
Поздравляем! Вы создали свой первый RRO.
При использовании RRO (Resource Resource Remover) может потребоваться использовать флаги --no-resource-deduping и --no-resource-removal инструмента Android Asset Packaging Tool (AAPT2), описанные в разделе «Параметры компоновки» . В этом примере добавлять эти флаги необязательно, но мы рекомендуем использовать их в ваших RRO, чтобы избежать удаления ресурсов (и проблем с отладкой). Вы можете добавить их в файл build.gradle вашего RRO следующим образом:
android {
    …
    aaptOptions {
        additionalParameters "--no-resource-deduping", "--no-resource-removal"
    }
}
Чтобы узнать больше об этих флагах, см. разделы «Сборка пакета» и «AAPT2» .
Модифицируйте компоненты car-ui-lib с помощью RRO в вашем Android-приложении.
На этой странице описано, как использовать наложение ресурсов во время выполнения (RRO) для изменения компонентов из библиотеки car-ui-lib в вашем Android-приложении.
Установить цвет фона панели инструментов
Продолжительность: 15 минут
Чтобы изменить цвет фона панели инструментов:
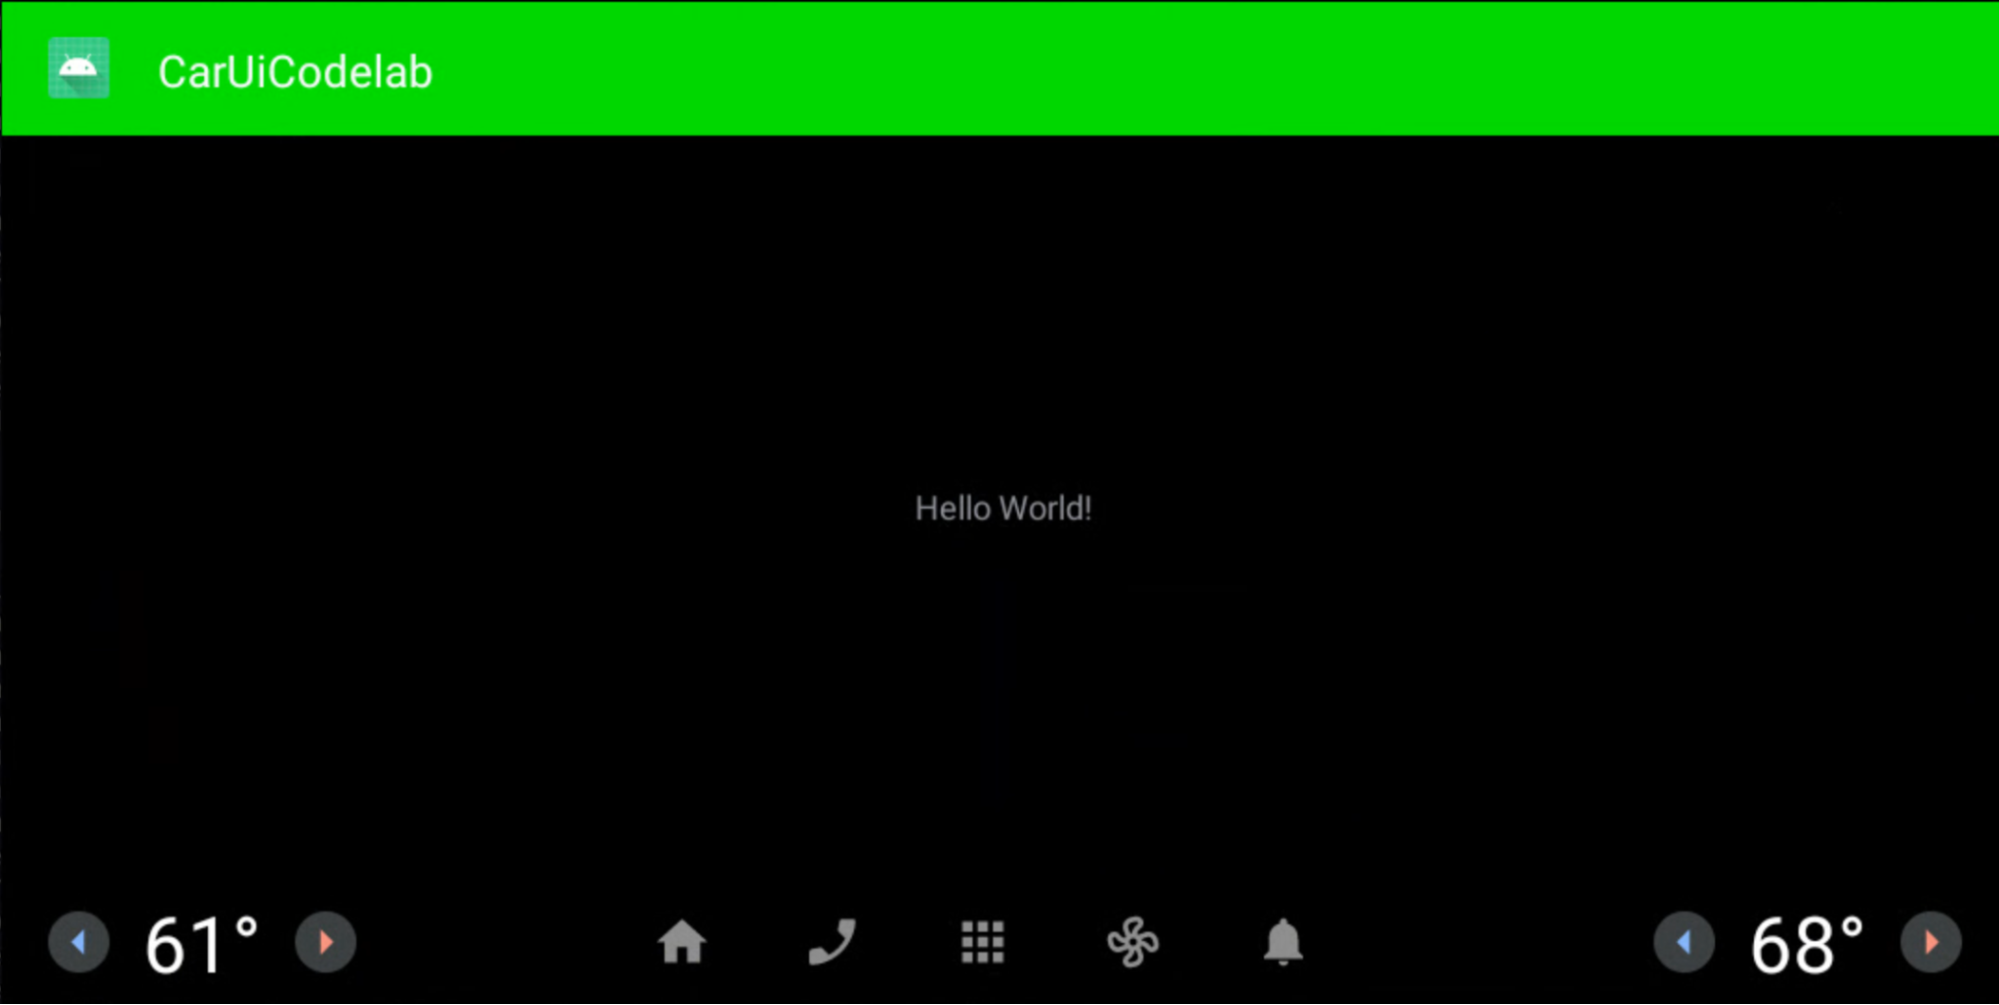
Добавьте следующее значение в ваше приложение RRO и установите для ресурса ярко-зеленый цвет (
#0F0):<?xml version="1.0" encoding="utf-8"?> <resources> <drawable name="car_ui_toolbar_background">#0F0</drawable> </resources>Библиотека
car-ui-libсодержит ресурс с именемcar_ui_toolbar_background. Если этот ресурс включен в конфигурацию RRO, панель инструментов не изменяется, поскольку используется неверное значение.В файле
AndroidManifest.xmlдля вашего RRO обновитеtargetName, указав путь кcar-ui-lib:… android:targetName="car-ui-lib" …Для каждого целевого пакета, который вы хотите подвергнуть RRO, ОБЯЗАТЕЛЬНО необходимо создать новый пакет RRO. Например, при создании наложений для двух разных целевых устройств необходимо создать два APK-файла наложений.
Сборку, проверку, установку и активацию RRO следует производить тем же способом, что и раньше.
Ваше приложение выглядит следующим образом:
Макеты и стили RRO
Продолжительность: 15 минут
В этом упражнении вы создадите новое приложение, аналогичное тому, которое вы создали ранее. Это приложение позволяет накладывать элементы интерфейса друг на друга. Выполните те же шаги, что и раньше, или модифицируйте существующее приложение.
Обязательно добавьте следующие строки в
overlayable.xml:<?xml version="1.0" encoding="utf-8"?> <resources> <overlayable name="CarUiCodelab"> <policy type="public"> <item type="string" name="sample_text"/> <item type="layout" name="activity_main"/> <item type="id" name="textView"/> </policy> </overlayable> </resources>Убедитесь, что
activity_main.xmlимеет следующий вид:<?xml version="1.0" encoding="utf-8"?> <androidx.constraintlayout.widget.ConstraintLayout xmlns:android="http://schemas.android.com/apk/res/android" xmlns:app="http://schemas.android.com/apk/res-auto" xmlns:tools="http://schemas.android.com/tools" android:layout_width="match_parent" android:layout_height="match_parent" tools:context=".MainActivity"> <TextView android:id="@+id/textView" android:layout_width="wrap_content" android:layout_height="wrap_content" android:text="@string/sample_text" app:layout_constraintBottom_toBottomOf="parent" app:layout_constraintEnd_toEndOf="parent" app:layout_constraintStart_toStartOf="parent" app:layout_constraintTop_toTopOf="parent" /> </androidx.constraintlayout.widget.ConstraintLayout>В вашем приложении RRO создайте файл
res/layout/activity_main.xmlи добавьте в него следующее:<?xml version="1.0" encoding="utf-8"?> <FrameLayout xmlns:android="http://schemas.android.com/apk/res/android" android:layout_width="match_parent" android:layout_height="match_parent"> <TextView android:id="@+id/textView" android:layout_width="wrap_content" android:layout_height="wrap_content" android:text="@string/sample_text" android:textAppearance="@style/TextAppearance.CarUi" android:layout_gravity="center_vertical|center_horizontal"/> </FrameLayout>Обновите файл
res/values/styles.xml, чтобы добавить наш стиль в RRO:<?xml version="1.0" encoding="utf-8"?> <resources> <style name="TextAppearance.CarUi" parent="android:TextAppearance.DeviceDefault"> <item name="android:textColor">#0f0</item> <item name="android:textSize">100sp</item> </style> </resources>Измените значение
targetNameв файлеAndroidManifest.xml, указав в нем имя вашего нового приложения:… android:targetName="CarUiCodelab" …Добавьте ресурсы в файл
sample_overlay.xmlв вашем RRO:<?xml version="1.0" encoding="utf-8"?> <overlay> <item target="string/sample_text" value="@string/sample_text"/> <item target="id/textView" value="@id/textView"/> <item target="layout/activity_main" value="@layout/activity_main"/> </overlay>Соберите и установите приложение и RRO тем же способом, что и раньше (зеленая кнопка «Играть» ). Обязательно включите RRO.
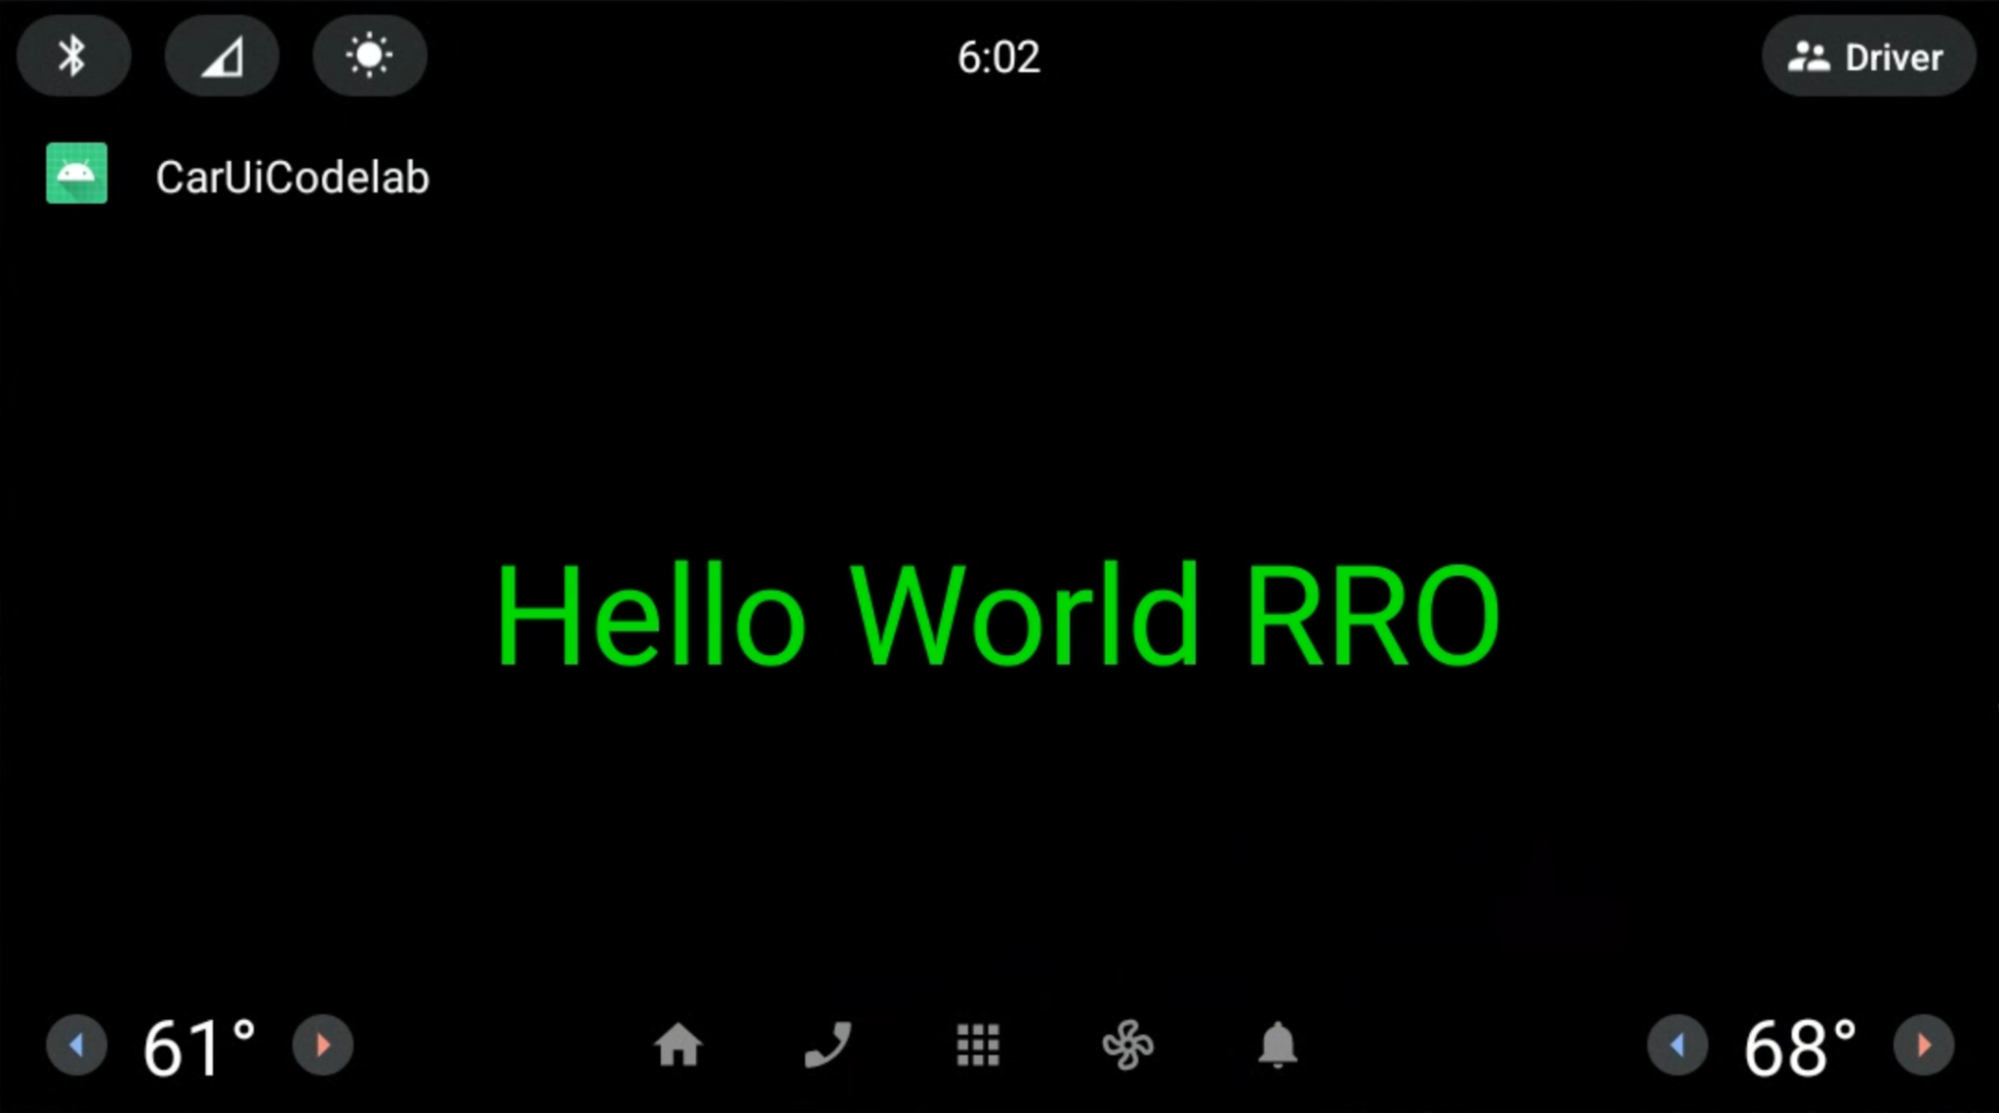
Приложение и RRO отображаются следующим образом. Текст RRO «Hello World» зелёный и центрирован, как указано в макете RRO.
Добавьте CarUiRecyclerView в ваше приложение.
Продолжительность: 15 минут
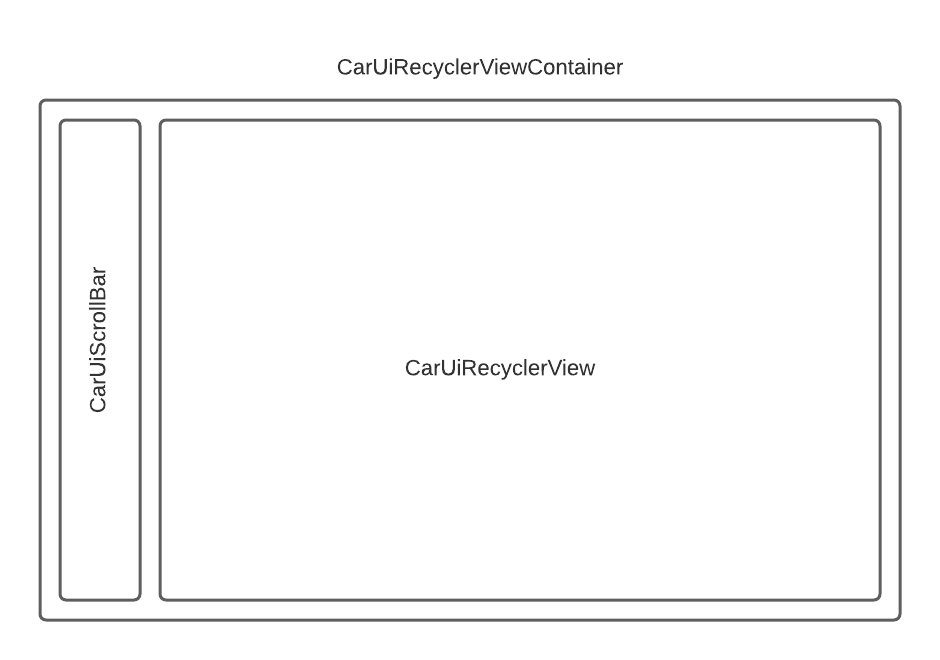
Интерфейс CarUiRecyclerView предоставляет API для доступа к RecyclerView , настраиваемому с помощью ресурсов car-ui-lib . Например, CarUiRecyclerView проверяет флаг во время выполнения, чтобы определить, следует ли включать полосу прокрутки или нет, и выбирает соответствующий макет.
Чтобы добавить
CarUiRecyclerView, добавьте его в файлыactivity_main.xmlиMainActivity.java. Вы можете либо создать новое приложение с нуля, либо изменить существующее. Если вы изменяете существующее приложение, обязательно удалите необъявленные ресурсы изoverlayable.xml.activity_main.xml<?xml version="1.0" encoding="utf-8"?> <com.android.car.ui.recyclerview.CarUiRecyclerView android:id="@+id/list" android:layout_width="match_parent" android:layout_height="match_parent"/>Может появиться следующая ошибка, которую вы можете проигнорировать:
Cannot resolve class com.android.car.ui.recyclerview.CarUiRecyclerViewЕсли название вашего класса написано правильно и вы добавили
car-ui-libв качестве зависимости, вы можете собрать и скомпилировать свой APK-файл. Чтобы устранить ошибку, выберите Файл > Очистить кэш, затем нажмите Очистить и перезапустить.Добавьте следующее в
MainActivity.javapackage com.example.caruicodelab; import android.app.Activity; import android.os.Bundle; import com.android.car.ui.core.CarUi; import com.android.car.ui.recyclerview.CarUiContentListItem; import com.android.car.ui.recyclerview.CarUiListItem; import com.android.car.ui.recyclerview.CarUiListItemAdapter; import com.android.car.ui.recyclerview.CarUiRecyclerView; import com.android.car.ui.toolbar.ToolbarController; import java.util.ArrayList; /** Activity with a simple car-ui layout. */ public class MainActivity extends Activity { private final ArrayList<CarUiListItem> mData = new ArrayList<>(); private CarUiListItemAdapter mAdapter; @Override protected void onCreate(Bundle savedInstanceState) { super.onCreate(savedInstanceState); setContentView(R.layout.activity_main); ToolbarController toolbar = CarUi.getToolbar(this); toolbar.setTitle(getTitle()); toolbar.setLogo(R.mipmap.ic_launcher_round); CarUiRecyclerView recyclerView = findViewById(R.id.list); mAdapter = new CarUiListItemAdapter(generateSampleData()); recyclerView.setAdapter(mAdapter); } private ArrayList<CarUiListItem> generateSampleData() { for (int i = 0; i < 20; i++) { CarUiContentListItem item = new CarUiContentListItem(CarUiContentListItem.Action.ICON); item.setTitle("Title " + i); item.setPrimaryIconType(CarUiContentListItem.IconType.CONTENT); item.setIcon(getDrawable(R.drawable.ic_launcher_foreground)); item.setBody("body " + i); mData.add(item); } return mData; }Соберите и установите приложение, как и раньше.
Теперь вы видите CarUiRecyclerView :
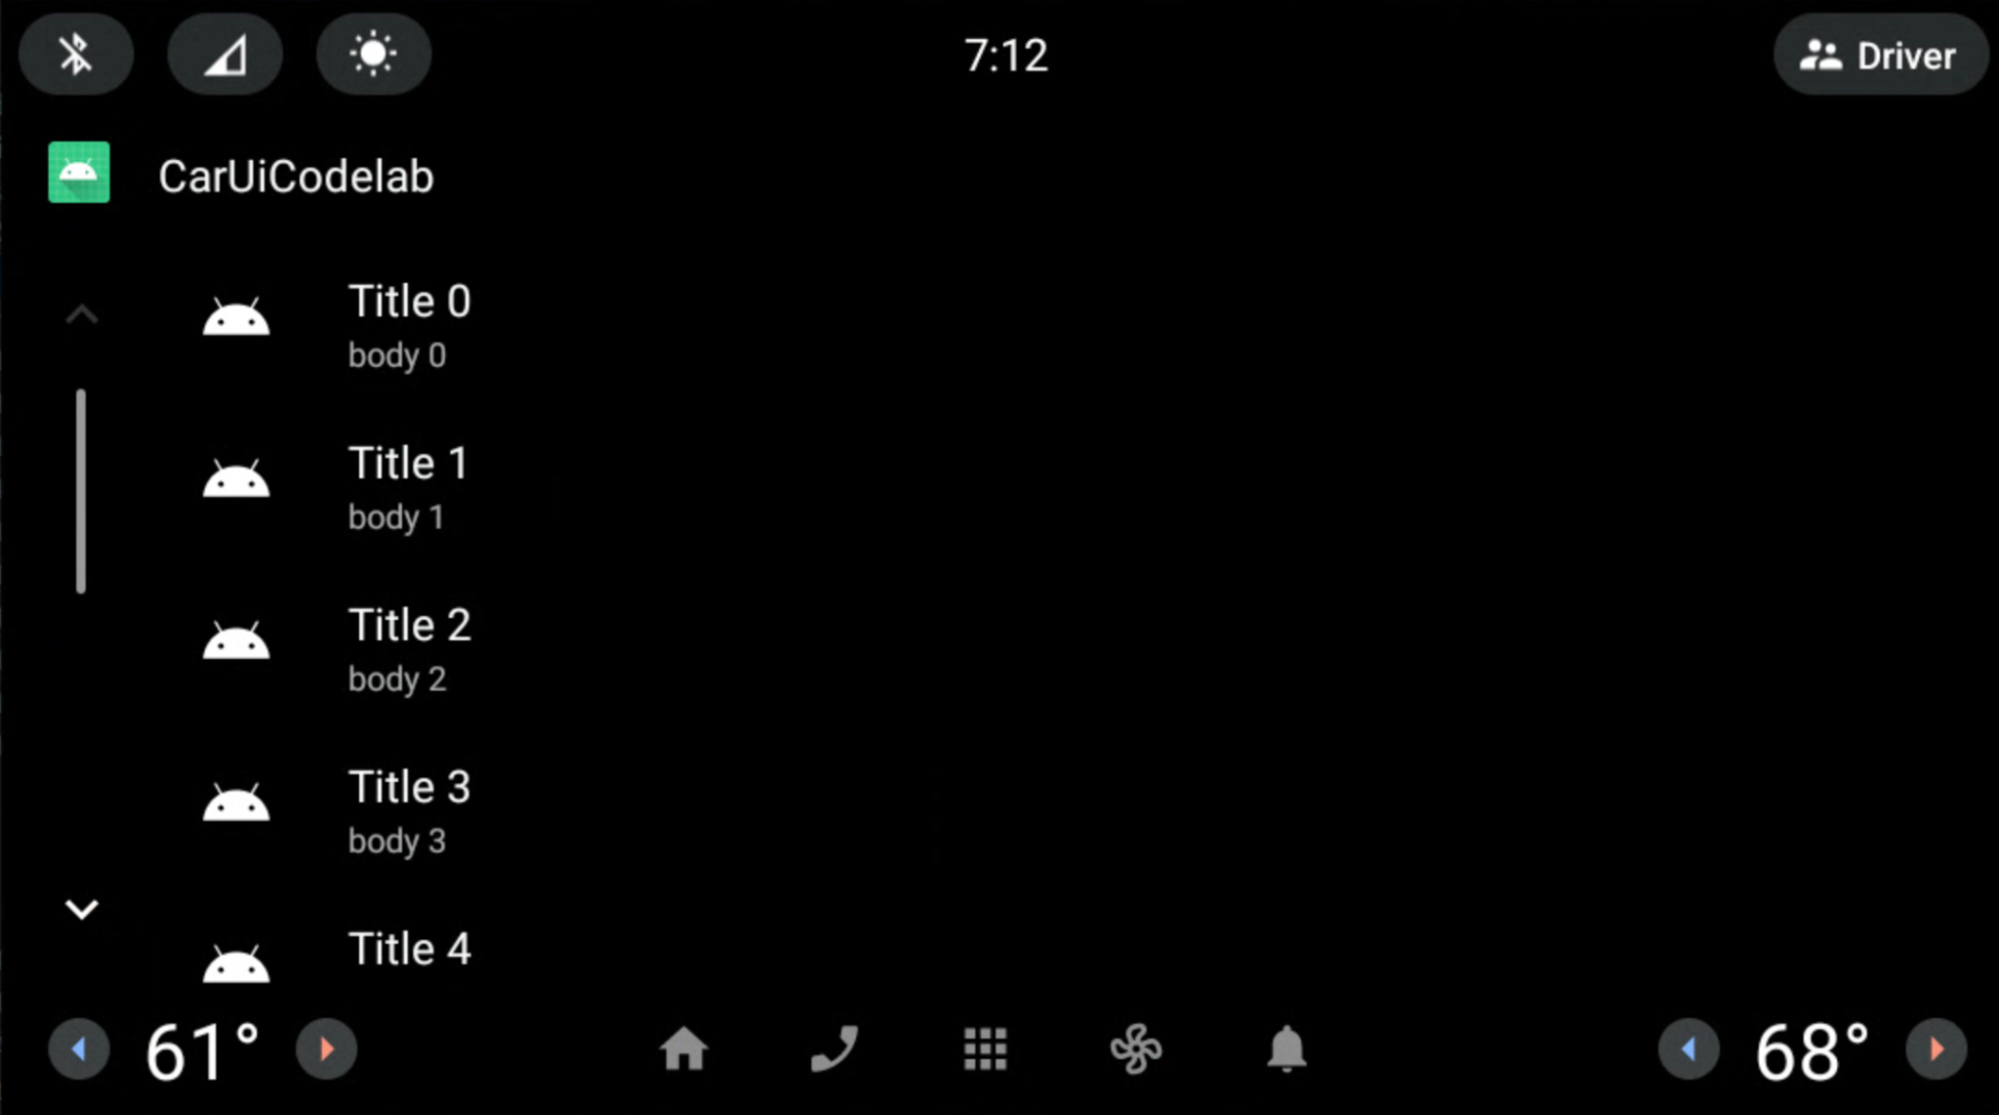
Используйте RRO для удаления полосы прокрутки.
Продолжительность: 10 минут
В этом упражнении показано, как использовать RRO для удаления полосы прокрутки из CarUiRecyclerView .
В вашем файле RRO добавьте и измените следующие файлы:
AndroidManifest.xml<?xml version="1.0" encoding="utf-8"?> <manifest xmlns:android="http://schemas.android.com/apk/res/android" package="com.example.caruirro"> <application android:hasCode="false" /> <uses-sdk android:minSdkVersion="29" android:targetSdkVersion="29"/> <overlay android:targetPackage="com.example.caruicodelab" android:targetName="car-ui-lib" android:isStatic="false" android:resourcesMap="@xml/sample_overlay" /> </manifest>res/values/bools.xml<?xml version="1.0" encoding="utf-8"?> <resources> <bool name="car_ui_scrollbar_enable">false</bool> </resources>Ресурс
car_ui_scrollbar_enable— это логический ресурс из библиотекиcar-ui-lib, который определяет, присутствует ли оптимизированная для автомобилей полоса прокрутки с кнопками «Вверх» и «Вниз» вCarUiRecyclerView. Если установлено значениеfalse,CarUiRecyclerViewработает какRecyclerViewAndroidX.res/xml/sample_overlay.xml<?xml version="1.0" encoding="utf-8"?> <overlay> <item target="bool/car_ui_scrollbar_enable" value="@bool/car_ui_scrollbar_enable"/> </overlay>
Соберите и установите приложение, как и раньше. Полоса прокрутки теперь удалена из CarUiRecyclerView :
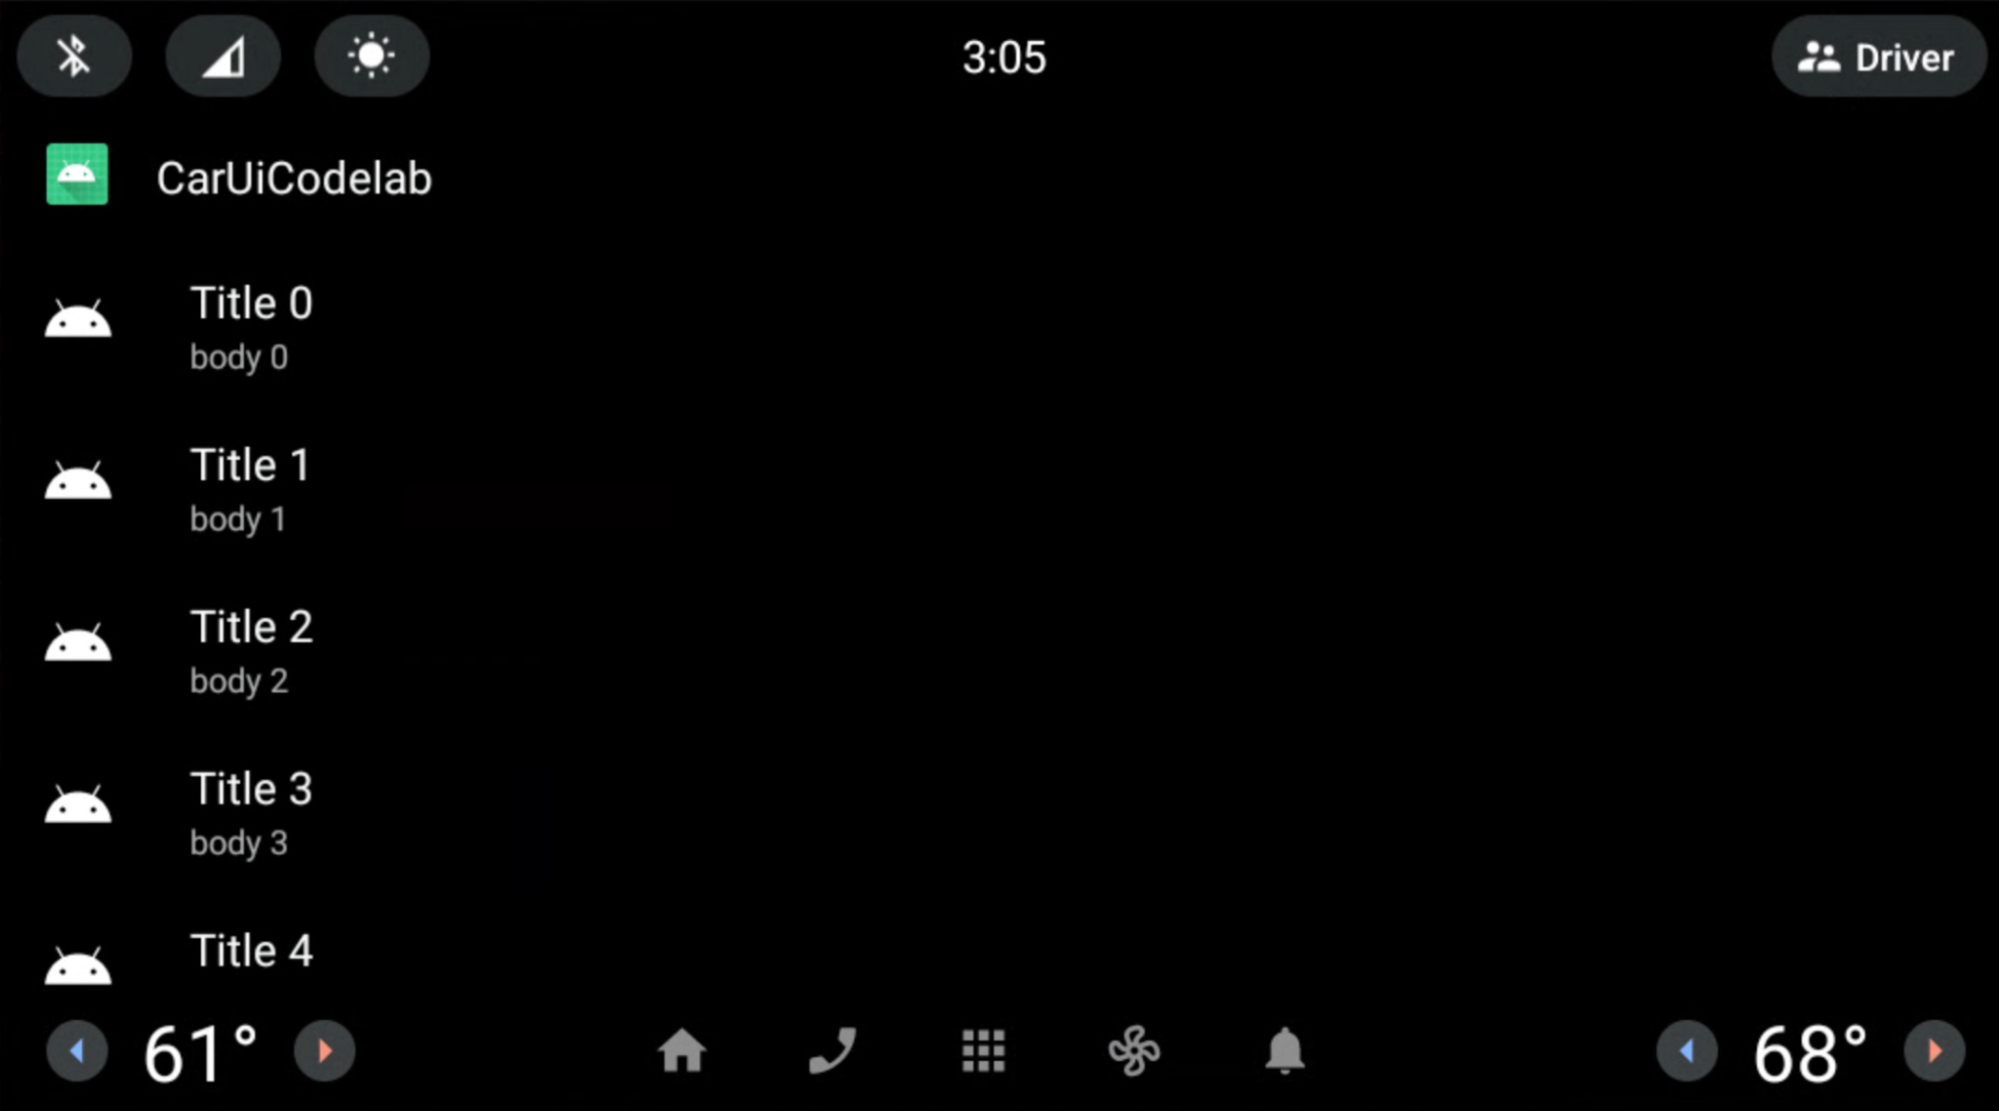
Используйте макет для наложения полосы прокрутки CarUiRecyclerView.
Продолжительность: 15 минут
В этом упражнении вы изменяете расположение полосы прокрутки CarUiRecyclerView .
Добавьте и измените следующие файлы в вашем приложении RRO.
res/layout/car_ui_recycler_view_scrollbar.xml<?xml version="1.0" encoding="utf-8"?> <RelativeLayout xmlns:android="http://schemas.android.com/apk/res/android" android:layout_width="112dp" android:layout_height="match_parent" android:id="@+id/car_ui_scroll_bar"> <!-- View height is dynamically calculated during layout. --> <View android:id="@+id/car_ui_scrollbar_thumb" android:layout_width="6dp" android:layout_height="20dp" android:layout_alignParentTop="true" android:layout_centerHorizontal="true" android:background="@drawable/car_ui_recyclerview_scrollbar_thumb"/> <View android:id="@+id/car_ui_scrollbar_track" android:layout_width="10dp" android:layout_height="match_parent" android:layout_marginTop="10dp" android:layout_centerHorizontal="true" android:layout_above="@+id/car_ui_scrollbar_page_up"/> <View android:layout_width="2dp" android:layout_height="match_parent" android:layout_marginTop="10dp" android:background="#323232" android:layout_toLeftOf="@+id/car_ui_scrollbar_thumb" android:layout_above="@+id/car_ui_scrollbar_page_up" android:layout_marginRight="5dp"/> <View android:layout_width="2dp" android:layout_height="match_parent" android:layout_marginTop="10dp" android:background="#323232" android:layout_toRightOf="@+id/car_ui_scrollbar_thumb" android:layout_above="@+id/car_ui_scrollbar_page_up" android:layout_marginLeft="5dp"/> <ImageView android:id="@+id/car_ui_scrollbar_page_up" android:layout_width="75dp" android:layout_height="75dp" android:focusable="false" android:hapticFeedbackEnabled="false" android:src="@drawable/car_ui_recyclerview_ic_up" android:scaleType="centerInside" android:background="?android:attr/selectableItemBackgroundBorderless" android:layout_centerHorizontal="true" android:layout_above="@+id/car_ui_scrollbar_page_down"/> <ImageView android:id="@+id/car_ui_scrollbar_page_down" android:layout_width="75dp" android:layout_height="75dp" android:focusable="false" android:hapticFeedbackEnabled="false" android:src="@drawable/car_ui_recyclerview_ic_down" android:scaleType="centerInside" android:background="?android:attr/selectableItemBackgroundBorderless" android:layout_centerHorizontal="true" android:layout_alignParentBottom="true"/> </RelativeLayout>Для наложения файла макета необходимо добавить все идентификаторы и атрибуты пространства имен в файл
overlay.xmlвашего RRO. См. файлы ниже.res/xml/sample_overlay.xml<?xml version="1.0" encoding="utf-8"?> <overlay> <item target="drawable/car_ui_recyclerview_ic_down" value="@drawable/car_ui_recyclerview_ic_down"/> <item target="drawable/car_ui_recyclerview_ic_up" value="@drawable/car_ui_recyclerview_ic_up"/> <item target="drawable/car_ui_recyclerview_scrollbar_thumb" value="@drawable/car_ui_recyclerview_scrollbar_thumb"/> <item target="id/car_ui_scroll_bar" value="@id/car_ui_scroll_bar"/> <item target="id/car_ui_scrollbar_thumb" value="@id/car_ui_scrollbar_thumb"/> <item target="id/car_ui_scrollbar_track" value="@id/car_ui_scrollbar_track"/> <item target="id/car_ui_scrollbar_page_up" value="@id/car_ui_scrollbar_page_up"/> <item target="id/car_ui_scrollbar_page_down" value="@id/car_ui_scrollbar_page_down"/> <item target="layout/car_ui_recyclerview_scrollbar" value="@layout/car_ui_recyclerview_scrollbar"/> </overlay>res/drawable/car_ui_recyclerview_ic_up.xml<?xml version="1.0" encoding="utf-8"?> <vector xmlns:android="http://schemas.android.com/apk/res/android" android:width="48dp" android:height="48dp" android:viewportWidth="48.0" android:viewportHeight="48.0"> <path android:pathData="M14.83,30.83L24,21.66l9.17,9.17L36,28 24,16 12,28z" android:fillColor="#0000FF"/> </vector>res/drawable/car_ui_recyclerview_ic_down.xml<?xml version="1.0" encoding="utf-8"?> <vector xmlns:android="http://schemas.android.com/apk/res/android" android:width="48dp" android:height="48dp" android:viewportWidth="48.0" android:viewportHeight="48.0"> <path android:pathData="M14.83,16.42L24,25.59l9.17,-9.17L36,19.25l-12,12 -12,-12z" android:fillColor="#0000FF"/> </vector>res/drawable/car_ui_recyclerview_scrollbar_thumb.xml<?xml version="1.0" encoding="utf-8"?> <shape xmlns:android="http://schemas.android.com/apk/res/android" android:shape="rectangle"> <solid android:color="#0000FF" /> <corners android:radius="100dp"/> </shape>Рекомендуется изучить, как эти файлы взаимодействуют друг с другом.
Для простоты размеры и цвета заданы жестко. Однако рекомендуется объявлять эти значения в файлах
dimens.xmlиcolors.xmlили даже указывать их в качестве файлов цветов в папкеres/color/. Более подробную информацию можно найти в разделе «Стиль кода AOSP Java для участников проекта» .Соберите и установите приложение, как и раньше. Вы создали
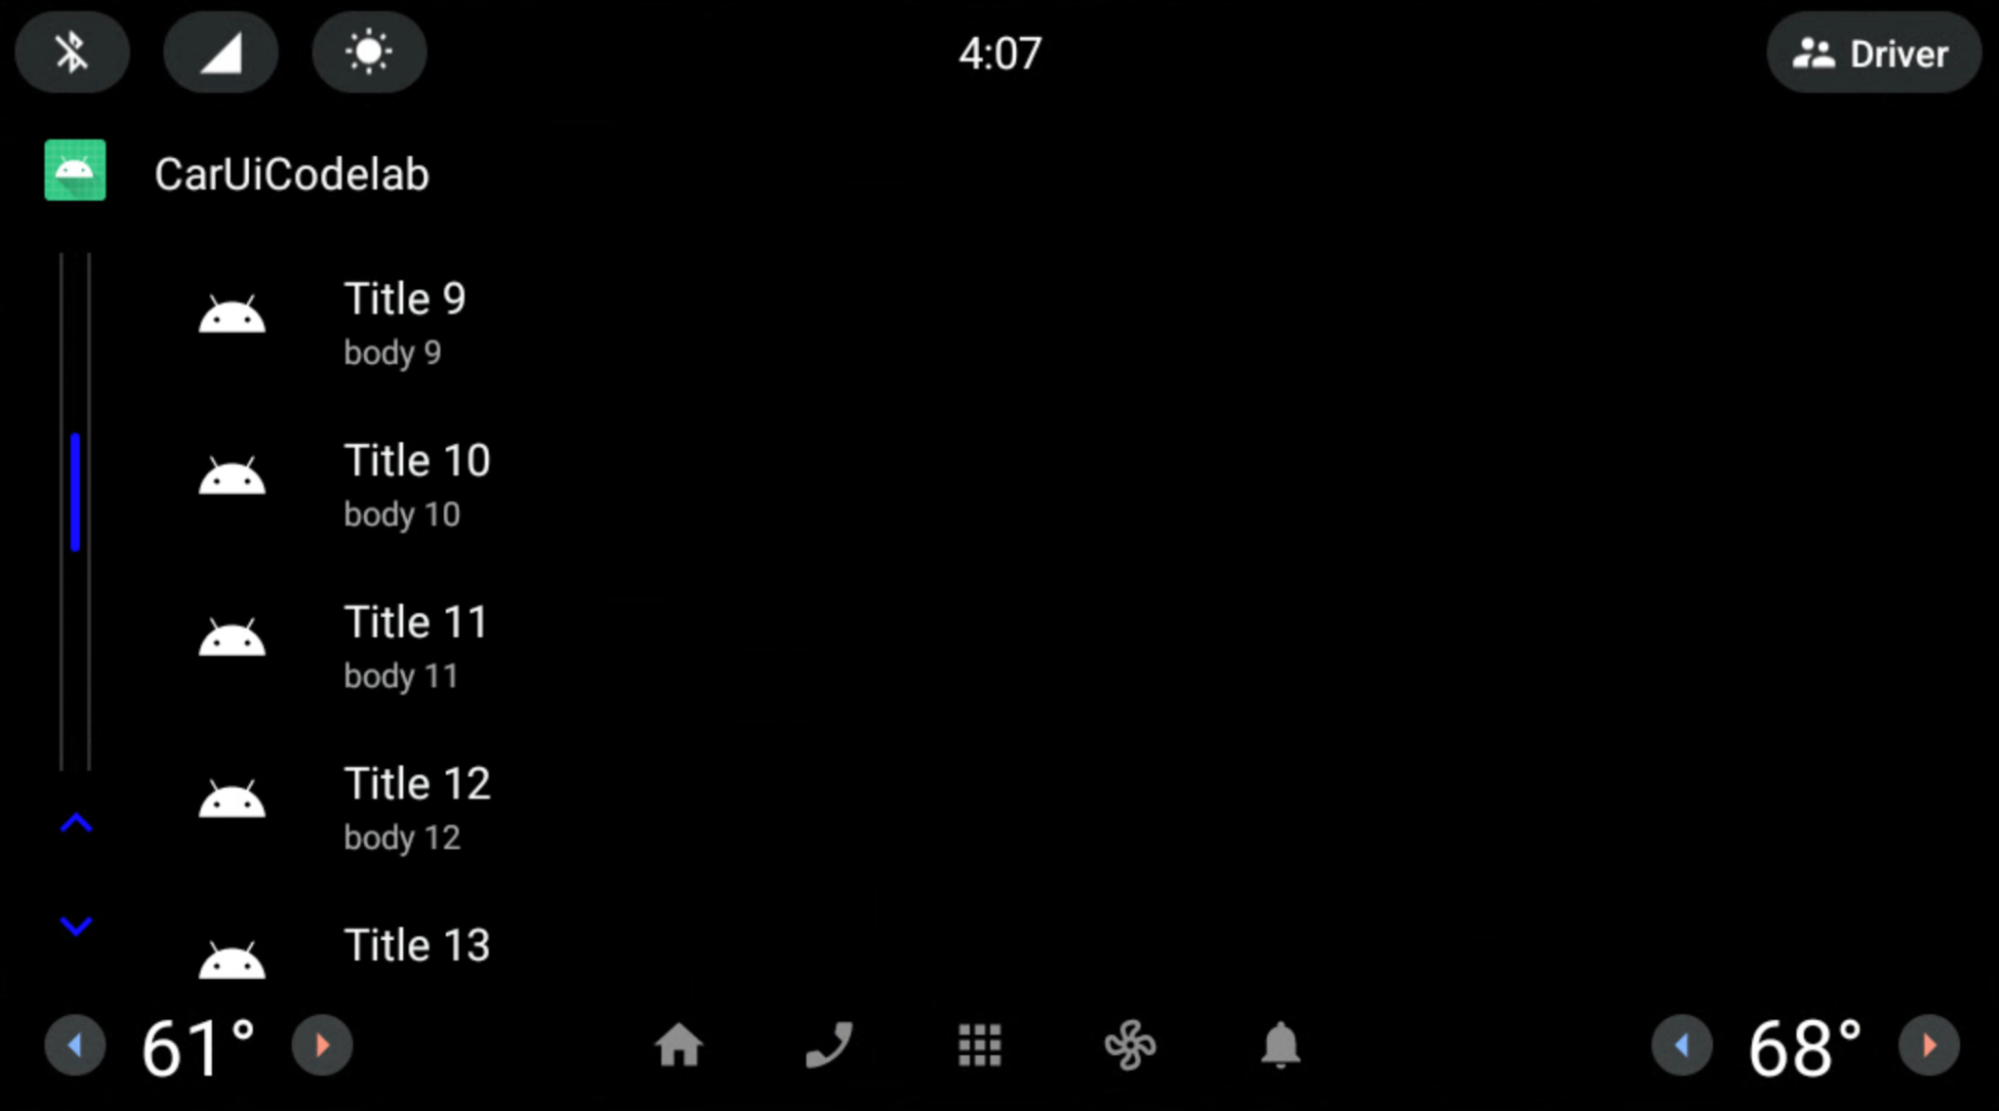
CarUiRecyclerViewс синей полосой прокрутки и серыми направляющими.
Поздравляем! Обе стрелки появляются внизу полосы прокрутки. Вы успешно применили RRO к файлу ресурсов макета car-ui-lib с помощью системы сборки Gradle через Android Studio.
Пункты списка RRO
Продолжительность: 15 минут
До этого момента вы применяли RRO к компонентам car-ui-lib используя компоненты фреймворка (а не AndroidX). Чтобы использовать компоненты AndroidX в RRO, необходимо добавить зависимости этого компонента как в приложение, так и в файл build.gradle. Также необходимо добавить attrs этого компонента в файл overlayable.xml вашего приложения, а также в файл sample_overlay.xml вашего RRO.
Наша библиотека ( car-ui-lib ) использует ConstraintLayout , а также другие компоненты AndroidX, поэтому её overlayable.xml может выглядеть примерно так:
<?xml version='1.0' encoding='UTF-8'?>
<resources>
    <overlayable name="car-ui-lib">
        …
        <item type="attr" name="layout_constraintBottom_toBottomOf"/>
        <item type="attr" name="layout_constraintBottom_toTopOf"/>
        <item type="attr" name="layout_constraintCircle"/>
        <item type="attr" name="layout_constraintCircleAngle"/>
        <item type="attr" name="layout_constraintCircleRadius"/>
        <item type="attr" name="layout_constraintDimensionRatio"/>
        <item type="attr" name="layout_constraintEnd_toEndOf"/>
        <item type="attr" name="layout_constraintEnd_toStartOf"/>
        <item type="attr" name="layout_constraintGuide_begin"/>
        <item type="attr" name="layout_constraintGuide_end"/>
        <item type="attr" name="layout_constraintGuide_percent"/>
        <item type="attr" name="layout_constraintHeight_default"/>
        <item type="attr" name="layout_constraintHeight_max"/>
        <item type="attr" name="layout_constraintHeight_min"/>
        <item type="attr" name="layout_constraintHeight_percent"/>
        <item type="attr" name="layout_constraintHorizontal_bias"/>
        <item type="attr" name="layout_constraintHorizontal_chainStyle"/>
        <item type="attr" name="layout_constraintHorizontal_weight"/>
        <item type="attr" name="layout_constraintLeft_creator"/>
        <item type="attr" name="layout_constraintLeft_toLeftOf"/>
        <item type="attr" name="layout_constraintLeft_toRightOf"/>
        <item type="attr" name="layout_constraintRight_creator"/>
        <item type="attr" name="layout_constraintRight_toLeftOf"/>
        <item type="attr" name="layout_constraintRight_toRightOf"/>
        <item type="attr" name="layout_constraintStart_toEndOf"/>
        <item type="attr" name="layout_constraintStart_toStartOf"/>
        <item type="attr" name="layout_constraintTag"/>
        <item type="attr" name="layout_constraintTop_creator"/>
        <item type="attr" name="layout_constraintTop_toBottomOf"/>
        <item type="attr" name="layout_constraintTop_toTopOf"/>
        <item type="attr" name="layout_constraintVertical_bias"/>
        <item type="attr" name="layout_constraintVertical_chainStyle"/>
        …
    </overlayable>
</resources>
Измените расположение элементов списка в
CarUiRecyclerViewс помощьюConstraintLayout. Добавьте или измените следующие файлы в вашем RRO:res/xml/sample_overlay.xml<?xml version="1.0" encoding="utf-8"?> <overlay> <item target="id/car_ui_list_item_touch_interceptor" value="@id/car_ui_list_item_touch_interceptor"/> <item target="id/car_ui_list_item_reduced_touch_interceptor" value="@id/car_ui_list_item_reduced_touch_interceptor"/> <item target="id/car_ui_list_item_start_guideline" value="@id/car_ui_list_item_start_guideline"/> <item target="id/car_ui_list_item_icon_container" value="@id/car_ui_list_item_icon_container"/> <item target="id/car_ui_list_item_icon" value="@id/car_ui_list_item_icon"/> <item target="id/car_ui_list_item_content_icon" value="@id/car_ui_list_item_content_icon"/> <item target="id/car_ui_list_item_avatar_icon" value="@id/car_ui_list_item_avatar_icon"/> <item target="id/car_ui_list_item_title" value="@id/car_ui_list_item_title"/> <item target="id/car_ui_list_item_body" value="@id/car_ui_list_item_body"/> <item target="id/car_ui_list_item_action_container_touch_interceptor" value="@id/car_ui_list_item_action_container_touch_interceptor"/> <item target="id/car_ui_list_item_action_container" value="@id/car_ui_list_item_action_container"/> <item target="id/car_ui_list_item_action_divider" value="@id/car_ui_list_item_action_divider"/> <item target="id/car_ui_list_item_switch_widget" value="@id/car_ui_list_item_switch_widget"/> <item target="id/car_ui_list_item_checkbox_widget" value="@id/car_ui_list_item_checkbox_widget"/> <item target="id/car_ui_list_item_radio_button_widget" value="@id/car_ui_list_item_radio_button_widget"/> <item target="id/car_ui_list_item_supplemental_icon" value="@id/car_ui_list_item_supplemental_icon"/> <item target="id/car_ui_list_item_end_guideline" value="@id/car_ui_list_item_end_guideline"/> <item target="attr/layout_constraintBottom_toBottomOf" value="@attr/layout_constraintBottom_toBottomOf"/> <item target="attr/layout_constraintBottom_toTopOf" value="@attr/layout_constraintBottom_toTopOf"/> <item target="attr/layout_constraintEnd_toEndOf" value="@attr/layout_constraintEnd_toEndOf"/> <item target="attr/layout_constraintEnd_toStartOf" value="@attr/layout_constraintEnd_toStartOf"/> <item target="attr/layout_constraintGuide_begin" value="@attr/layout_constraintGuide_begin"/> <item target="attr/layout_constraintGuide_end" value="@attr/layout_constraintGuide_end"/> <item target="attr/layout_constraintHorizontal_bias" value="@attr/layout_constraintHorizontal_bias"/> <item target="attr/layout_constraintLeft_toLeftOf" value="@attr/layout_constraintLeft_toLeftOf"/> <item target="attr/layout_constraintLeft_toRightOf" value="@attr/layout_constraintLeft_toRightOf"/> <item target="attr/layout_constraintRight_toLeftOf" value="@attr/layout_constraintRight_toLeftOf"/> <item target="attr/layout_constraintRight_toRightOf" value="@attr/layout_constraintRight_toRightOf"/> <item target="attr/layout_constraintStart_toEndOf" value="@attr/layout_constraintStart_toEndOf"/> <item target="attr/layout_constraintStart_toStartOf" value="@attr/layout_constraintStart_toStartOf"/> <item target="attr/layout_constraintTop_toBottomOf" value="@attr/layout_constraintTop_toBottomOf"/> <item target="attr/layout_constraintTop_toTopOf" value="@attr/layout_constraintTop_toTopOf"/> <item target="attr/layout_goneMarginBottom" value="@attr/layout_goneMarginBottom"/> <item target="attr/layout_goneMarginEnd" value="@attr/layout_goneMarginEnd"/> <item target="attr/layout_goneMarginLeft" value="@attr/layout_goneMarginLeft"/> <item target="attr/layout_goneMarginRight" value="@attr/layout_goneMarginRight"/> <item target="attr/layout_goneMarginStart" value="@attr/layout_goneMarginStart"/> <item target="attr/layout_goneMarginTop" value="@attr/layout_goneMarginTop"/> <item target="attr/layout_constraintVertical_chainStyle" value="@attr/layout_constraintVertical_chainStyle"/> <item target="layout/car_ui_list_item" value="@layout/car_ui_list_item"/> </overlay>res/layout/car_ui_list_item.xml<?xml version="1.0" encoding="utf-8"?> <androidx.constraintlayout.widget.ConstraintLayout xmlns:android="http://schemas.android.com/apk/res/android" xmlns:app="http://schemas.android.com/apk/res-auto" android:layout_width="match_parent" android:layout_height="wrap_content" android:tag="carUiListItem" android:minHeight="@dimen/car_ui_list_item_height"> <!-- The following touch interceptor views are sized to encompass the specific sub-sections of the list item view to easily control the bounds of a background ripple effects. --> <com.android.car.ui.SecureView android:id="@+id/car_ui_list_item_touch_interceptor" android:layout_width="0dp" android:layout_height="0dp" android:background="@drawable/car_ui_list_item_background" app:layout_constraintBottom_toBottomOf="parent" app:layout_constraintEnd_toEndOf="parent" app:layout_constraintStart_toStartOf="parent" app:layout_constraintTop_toTopOf="parent" /> <!-- This touch interceptor does not include the action container --> <com.android.car.ui.SecureView android:id="@+id/car_ui_list_item_reduced_touch_interceptor" android:layout_width="0dp" android:layout_height="0dp" android:background="@drawable/car_ui_list_item_background" android:visibility="gone" app:layout_constraintBottom_toBottomOf="parent" app:layout_constraintEnd_toStartOf="@id/car_ui_list_item_action_container" app:layout_constraintStart_toStartOf="parent" app:layout_constraintTop_toTopOf="parent" /> <androidx.constraintlayout.widget.Guideline android:id="@+id/car_ui_list_item_start_guideline" android:layout_width="wrap_content" android:layout_height="wrap_content" android:orientation="vertical" app:layout_constraintGuide_begin="@dimen/car_ui_list_item_start_inset" /> <FrameLayout android:id="@+id/car_ui_list_item_icon_container" android:layout_width="@dimen/car_ui_list_item_icon_container_width" android:layout_height="0dp" app:layout_constraintBottom_toBottomOf="parent" app:layout_constraintStart_toStartOf="@+id/car_ui_list_item_start_guideline" app:layout_constraintTop_toTopOf="parent"> <ImageView android:id="@+id/car_ui_list_item_icon" android:layout_width="@dimen/car_ui_list_item_icon_size" android:layout_height="@dimen/car_ui_list_item_icon_size" android:layout_gravity="center" android:visibility="gone" android:scaleType="fitCenter" /> <ImageView android:id="@+id/car_ui_list_item_content_icon" android:layout_width="@dimen/car_ui_list_item_content_icon_width" android:layout_height="@dimen/car_ui_list_item_content_icon_height" android:layout_gravity="center" android:visibility="gone" android:scaleType="fitCenter" /> <ImageView android:id="@+id/car_ui_list_item_avatar_icon" android:background="@drawable/car_ui_list_item_avatar_icon_outline" android:layout_width="@dimen/car_ui_list_item_avatar_icon_width" android:layout_height="@dimen/car_ui_list_item_avatar_icon_height" android:layout_gravity="center" android:visibility="gone" android:scaleType="fitCenter" /> </FrameLayout> <CarUiTextView android:id="@+id/car_ui_list_item_title" android:layout_width="0dp" android:layout_height="wrap_content" android:layout_marginStart="@dimen/car_ui_list_item_text_start_margin" android:singleLine="@bool/car_ui_list_item_single_line_title" android:textAppearance="@style/TextAppearance.CarUi.ListItem" android:layout_gravity="right" android:gravity="right" android:textAlignment="viewEnd" app:layout_constraintBottom_toTopOf="@+id/car_ui_list_item_body" app:layout_constraintEnd_toStartOf="@+id/car_ui_list_item_action_container" app:layout_constraintStart_toEndOf="@+id/car_ui_list_item_icon_container" app:layout_constraintTop_toTopOf="parent" app:layout_constraintVertical_chainStyle="packed" app:layout_goneMarginStart="@dimen/car_ui_list_item_text_no_icon_start_margin" /> <CarUiTextView android:id="@+id/car_ui_list_item_body" android:layout_width="0dp" android:layout_height="wrap_content" android:layout_marginStart="@dimen/car_ui_list_item_text_start_margin" android:textAppearance="@style/TextAppearance.CarUi.ListItem.Body" android:layout_gravity="right" android:gravity="right" android:textAlignment="viewEnd" app:layout_constraintBottom_toBottomOf="parent" app:layout_constraintEnd_toStartOf="@+id/car_ui_list_item_action_container" app:layout_constraintStart_toEndOf="@+id/car_ui_list_item_icon_container" app:layout_constraintTop_toBottomOf="@+id/car_ui_list_item_title" app:layout_goneMarginStart="@dimen/car_ui_list_item_text_no_icon_start_margin" /> <!-- This touch interceptor is sized and positioned to encompass the action container --> <com.android.car.ui.SecureView android:id="@+id/car_ui_list_item_action_container_touch_interceptor" android:layout_width="0dp" android:layout_height="0dp" android:background="@drawable/car_ui_list_item_background" android:visibility="gone" app:layout_constraintBottom_toBottomOf="@id/car_ui_list_item_action_container" app:layout_constraintEnd_toEndOf="@id/car_ui_list_item_action_container" app:layout_constraintStart_toStartOf="@id/car_ui_list_item_action_container" app:layout_constraintTop_toTopOf="@id/car_ui_list_item_action_container" /> <FrameLayout android:id="@+id/car_ui_list_item_action_container" android:layout_width="wrap_content" android:minWidth="@dimen/car_ui_list_item_icon_container_width" android:layout_height="0dp" app:layout_constraintBottom_toBottomOf="parent" app:layout_constraintEnd_toEndOf="@+id/car_ui_list_item_end_guideline" app:layout_constraintTop_toTopOf="parent"> <View android:id="@+id/car_ui_list_item_action_divider" android:layout_width="@dimen/car_ui_list_item_action_divider_width" android:layout_height="@dimen/car_ui_list_item_action_divider_height" android:layout_gravity="start|center_vertical" android:background="@drawable/car_ui_list_item_divider" /> <Switch android:id="@+id/car_ui_list_item_switch_widget" android:layout_width="wrap_content" android:layout_height="wrap_content" android:layout_gravity="center" android:clickable="false" android:focusable="false" /> <CheckBox android:id="@+id/car_ui_list_item_checkbox_widget" android:layout_width="wrap_content" android:layout_height="wrap_content" android:layout_gravity="center" android:clickable="false" android:focusable="false" /> <RadioButton android:id="@+id/car_ui_list_item_radio_button_widget" android:layout_width="wrap_content" android:layout_height="wrap_content" android:layout_gravity="center" android:clickable="false" android:focusable="false" /> <ImageView android:id="@+id/car_ui_list_item_supplemental_icon" android:layout_width="@dimen/car_ui_list_item_supplemental_icon_size" android:layout_height="@dimen/car_ui_list_item_supplemental_icon_size" android:layout_gravity="center" android:scaleType="fitCenter" /> </FrameLayout> <androidx.constraintlayout.widget.Guideline android:id="@+id/car_ui_list_item_end_guideline" android:layout_width="wrap_content" android:layout_height="wrap_content" android:orientation="vertical" app:layout_constraintGuide_end="@dimen/car_ui_list_item_end_inset" /> </androidx.constraintlayout.widget.ConstraintLayout>В файле
car_ui_list_item.xmlсодержатся ссылки на несколько компонентов/ресурсов, которые не включены в качестве зависимостей приложения. Это ресурсыcar-ui-lib. Вы можете исправить это, добавивcar-ui-libв качестве зависимости к вашему RRO-приложению вapp/build.gradle:dependencies { implementation 'com.android.car.ui:car-ui-lib:2.0.0' implementation 'androidx.appcompat:appcompat:1.4.1' implementation 'com.google.android.material:material:1.4.0' }
Теперь заголовок и основной текст выравниваются по правому краю, а не по левому.
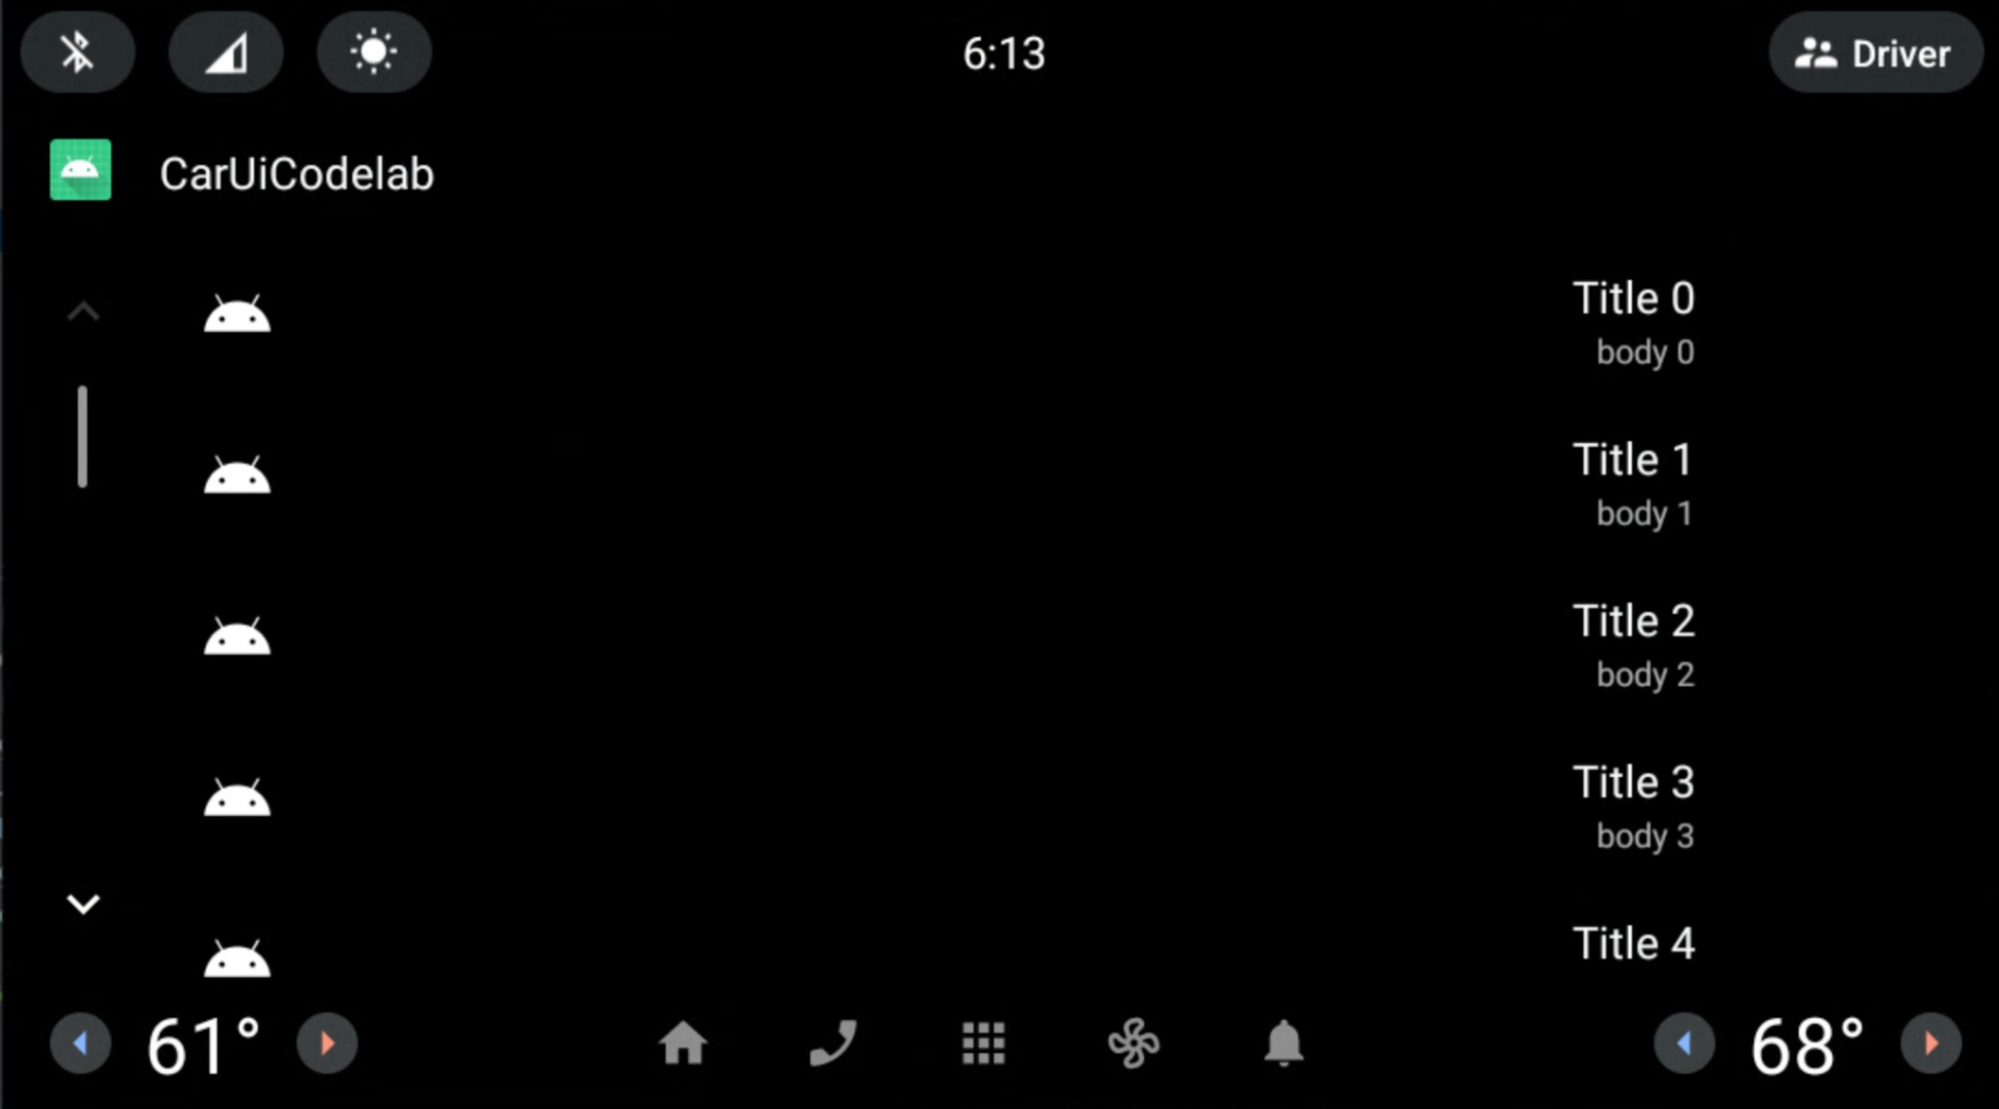
Мы применяли RRO к car-ui-lib с использованием компонентов AndroidX ( ConstraintLayout ) только в том случае, если его атрибуты присутствовали в файле car-ui-lib с именем overlayable.xml , а также в файле RRO sample_overlay.xml . Аналогичное можно сделать и в вашем приложении. Просто добавьте все соответствующие attrs в overlayable.xml вашего приложения, как это сделано в car-ui-lib .
Однако, невозможно выполнить RRO для приложения, использующего компоненты AndroidX, если в build.gradle приложения указана зависимость car-ui-lib (когда приложение использует компоненты car-ui-lib ). Поскольку сопоставление атрибутов уже определено в overlayable.xml библиотеки car-ui-lib , добавление их в файл overlayable.xml вашего приложения с зависимостью от car-ui-lib приведет к ошибке mergeDebugResources подобной приведенной ниже. Это связано с тем, что эти атрибуты присутствуют в нескольких файлах overlayable.xml :
org.gradle.api.tasks.TaskExecutionException: Execution failed for task ':app:mergeDebugResources'