
このページでは、Android互換性テストスイート(CTS)ベリファイアの一部であるCamera Image Test Suite(ITS)でのテストの包括的なリストを提供します。 ITSテストは機能テストです。つまり、画質は測定されませんが、宣伝されているすべてのカメラ機能が期待どおりに機能しています。このドキュメントにより、開発者とテスターは、個々のテストの機能とテストの失敗をデバッグする方法を理解できます。
テストは、次のようにシーンごとにグループ化されます。
- シーン0 :メタデータ、ジッター、ジャイロスコープ、バイブレーションをキャプチャします
- シーン1 :露出、感度、EV補正、YUVとJPEG / RAW
- シーン2 :顔検出
- シーン3 :エッジエンハンスメント、レンズの動き
- シーン4 :アスペクト比、トリミング、視野
- シーン5 :レンズシェーディング
- シーン6 :ズーム
- Sensor_fusion :カメラ/ジャイロスコープのタイミングオフセット
各シーンの説明については、個々のセクションを参照してください。
シーン0
Scene0テストでは、特定のシーン情報は必要ありません。ただし、ジャイロスコープと振動テストのために、電話は静止している必要があります。
test_burst_capture
キャプチャパイプライン全体がフルサイズキャプチャの速度とCPU時間に追いつくことができることを確認します。
テストされたAPI:
パス:フルサイズの画像のバーストをキャプチャし、カメラはタイムアウトを回避するのに十分な速度です。
test_capture_result_dump
キャプチャ結果が手動キャプチャから返されることをテストしてから、それをダンプします。
テストされたAPI:
パス:キャプチャを完了し、キャプチャ結果をダンプします。
test_gyro_bias
デバイスが静止しているときにジャイロの出力が安定しているかどうかをテストします。データは、20個のデータポイントの平均としてプロットされます。
テストされたAPI:
合格:ジャイロ測定値のデルタは、時間の経過とともに0.01未満です。
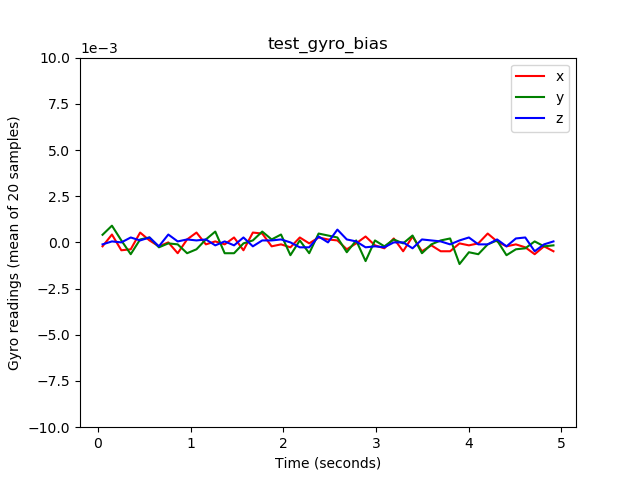
test_gyro_bias_plot.png
test_jitter
カメラのタイムスタンプのジッターを測定します。
テストされたAPI:
-
android.hardware.camera2.CaptureResult#SENSOR_TIMESTAMP -
android.hardware.camera2.CaptureRequest#CONTROL_AE_TARGET_FPS_RANGE
パス:フレーム間に少なくとも30ミリ秒のデルタがあります。
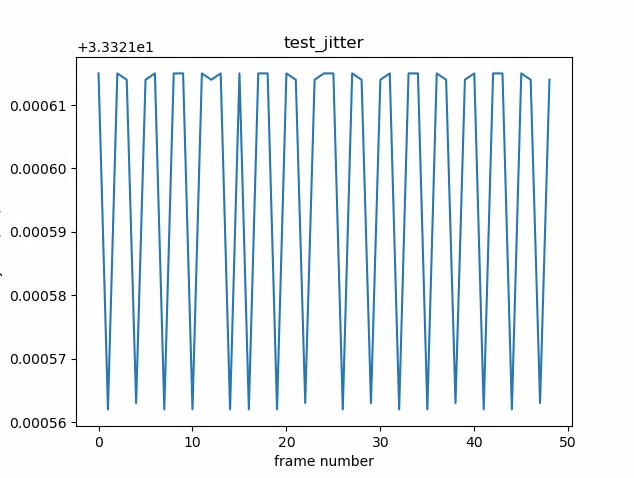
test_jitter_plot.png(y軸の範囲が小さいことに注意してください。このプロットでは実際にはジッタが小さくなっています。)
test_metadata
メタデータエントリの有効性をテストします。キャプチャ結果とカメラ特性オブジェクトを確認します。このテストでは、画像の内容は重要ではないため、 auto_capture_request露出値とゲイン値を使用します。
テストされたAPI:
-
android.hardware.camera2.CameraCharacteristics#INFO_SUPPORTED_HARDWARE_LEVEL -
android.hardware.camera2.CameraCharacteristics#SCALER_CROPPING_TYPE -
android.hardware.camera2.CameraCharacteristics#SENSOR_BLACK_LEVEL_PATTERN -
android.hardware.camera2.CameraCharacteristics#SENSOR_INFO_TIMESTAMP_SOURCE -
android.hardware.camera2.CaptureRequest#SENSOR_FRAME_DURATION -
android.hardware.camera2.CaptureResult#SENSOR_ROLLING_SHUTTER_SKEW
パス:ハードウェアレベル、 rollingShutterSkew 、 frameDurationタグ、 timestampSource 、 croppingType 、 blackLevelPattern 、 pixel_pitch 、FOV、過焦点距離が存在し、有効な値を持っています。
test_param_sensitivevity_burst
android.sensor.sensitivityパラメーターがバーストで適切に適用されていることをテストします。出力メタデータのみを検査します。
テストされたAPI:
-
android.hardware.camera2.CameraCharacteristics#SENSOR_INFO_SENSITIVITY_RANGE -
android.hardware.camera2.CaptureRequest#SENSOR_SENSITIVITY
合格:出力データの許容誤差は0.2%未満です。
test_read_write
キャプチャメタデータを読み戻すことにより、デバイスが正しい露出値とゲイン値を書き込むことをテストします。
テストされたAPI:
-
android.hardware.camera2.CameraCharacteristics#SENSOR_INFO_EXPOSURE_TIME_RANGE -
android.hardware.camera2.CameraCharacteristics#SENSOR_INFO_SENSITIVITY_RANGE -
android.hardware.camera2.CaptureRequest#SENSOR_EXPOSURE_TIME -
android.hardware.camera2.CaptureRequest#SENSOR_SENSITIVITY -
android.hardware.camera2.CaptureResult#SENSOR_EXPOSURE_TIME -
android.hardware.camera2.CaptureResult#SENSOR_SENSITIVITY
パス:読み取り値と書き込み値は、すべてのショットで一致します。
test_sensor_events
デバイスがセンサーフュージョンサポートをアドバタイズするデバイスのセンサーイベントを照会して出力することをテストします。予想されるセンサーは、加速度計、ジャイロスコープ、磁力計です。このテストは、画面がオンになっている場合、つまりデバイスがスタンバイモードになっていない場合にのみ機能します。
テストされたAPI:
パス:各センサーのイベントが受信されます。
test_solid_color_test_pattern
カメラのミューティング用に単色のテストパターンが適切に生成されることをテストします。カメラのミュートがサポートされている場合は、単色のテストパターンをサポートする必要があります。カメラのミュートがサポートされていない場合、単色のテストパターンは、機能がアドバタイズされている場合にのみテストされます。
RAW画像がサポートされている場合は、色の割り当てもテストされます。テストされた色は、黒、白、赤、青、および緑です。 RAW画像をサポートしていないカメラの場合、黒のみがテストされます。
テストされたAPI:
-
android.hardware.camera2.CameraCharacteristic#SENSOR_AVAILABLE_TEST_PATTERN_MODES -
android.hardware.camera2.CaptureResult#SENSOR_TEST_PATTERN_DATA -
android.hardware.camera2.CaptureResult#SENSOR_TEST_PATTERN_MODE
合格:サポートされているソリッドテストパターンは正しい色であり、画像の変動は少ないです。
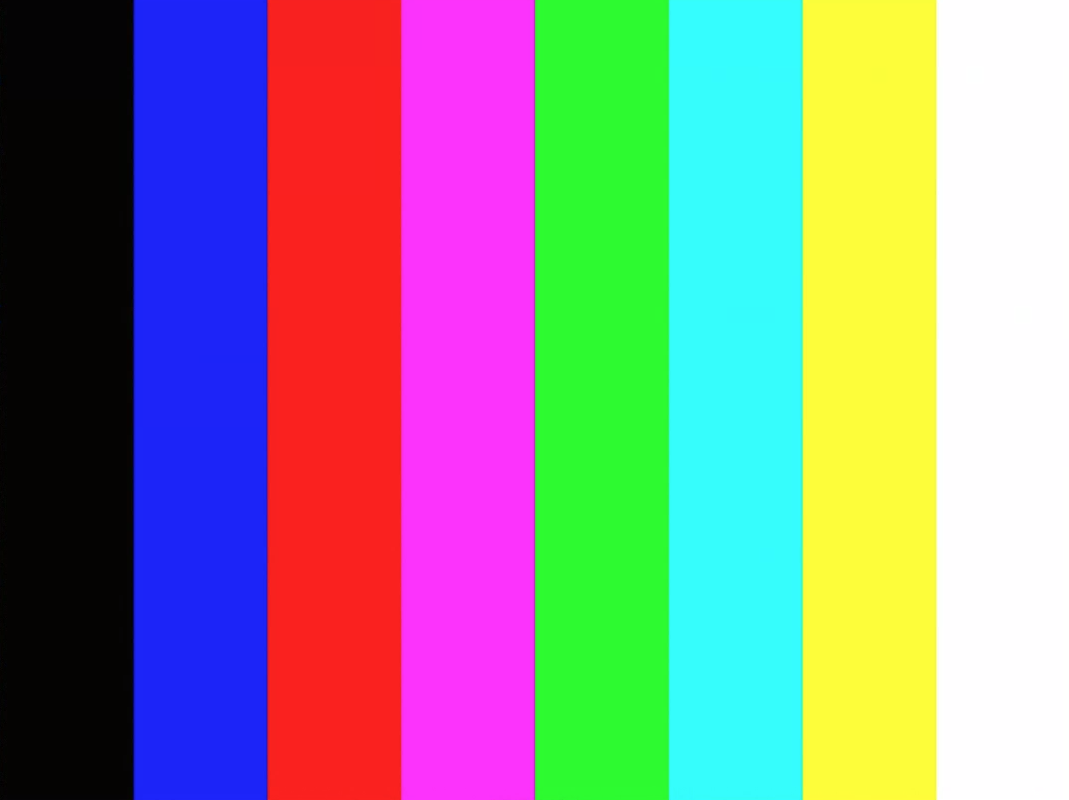
test_test_pattern
android.sensor.testPatternModeパラメーターをテストして、有効なテストパターンごとにフレームをキャプチャし、フレームが単色とカラーバーに対して正しく生成されていることを確認します。このテストには、次の手順が含まれます。
- サポートされているすべてのテストパターンの画像をキャプチャします。
- 単色テストパターンとカラーバーの簡単な正確性チェックを実行します。
テストされたAPI:
-
android.hardware.camera2.CameraCharacteristic#SENSOR_AVAILABLE_TEST_PATTERN_MODES -
android.hardware.camera2.CaptureResult#SENSOR_TEST_PATTERN_MODE
合格:サポートされているテストパターンが正しく生成されます。

test_test_patterns_2.jpg
test_tonemap_curve
線形トーンマップを使用して、RAWからYUVへのテストパターンの変換をテストします。このテストでは、トーンマップ変換用の完全な画像パターンを生成するためにandroid.sensor.testPatternMode = 2 (COLOR_BARS)が必要です。パイプラインに線形トーンマップと理想的な画像入力を備えた適切なカラー出力があることを確認します( test_test_patternsに依存します)。
テストされたAPI:
-
android.hardware.camera2.CaptureRequest#DISTORTION_CORRECTION_MODE -
android.hardware.camera2.CaptureRequest#SENSOR_TEST_PATTERN_MODE -
android.hardware.camera2.CaptureRequest#TONEMAP_CURVE -
android.hardware.camera2.CaptureRequest#TONEMAP_MODE
パス: YUVとRAWは互いに似ています。
test_tonemap_curve_raw_2.jpg
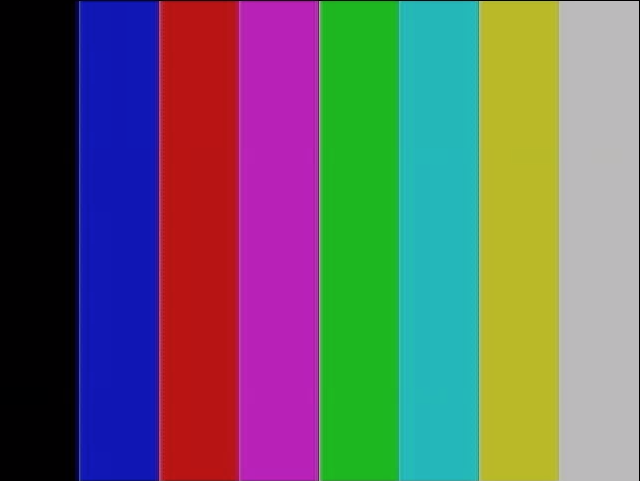
test_tonemap_curve_yuv_2.jpg
test_unified_timestamp
画像とモーションセンサーのイベントが同じ時間領域にあるかどうかをテストします。
テストされたAPI:
-
android.hardware.camera2.CaptureResult#SENSOR_TIMESTAMP -
android.hardware.Sensor -
android.hardware.SensorEvent -
android.hardware.Sensor#TYPE_ACCELEROMETER -
android.hardware.Sensor#TYPE_GYROSCOPE
パス:モーションタイムスタンプは、2つの画像タイムスタンプの間にあります。
test_vibration_restriction
デバイスの振動が期待どおりに機能しているかどうかをテストします。
テストされたAPI:
-
android.hardware.Sensor -
android.hardware.SensorEvent -
android.hardware.Sensor#TYPE_ACCELEROMETER -
android.os.Vibrator -
android.hardware.camera2.CameraDevice#setCameraAudioRestriction
パス:カメラの音声制限APIによってミュートされている場合、デバイスは振動しません。
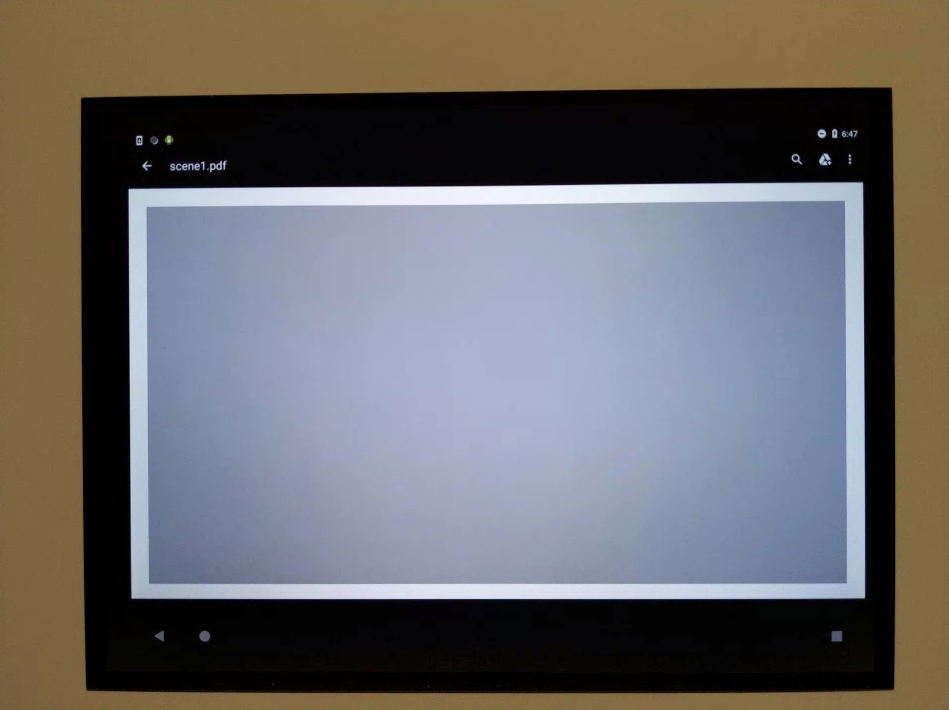
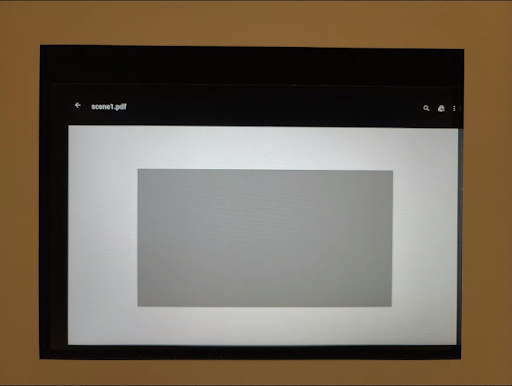
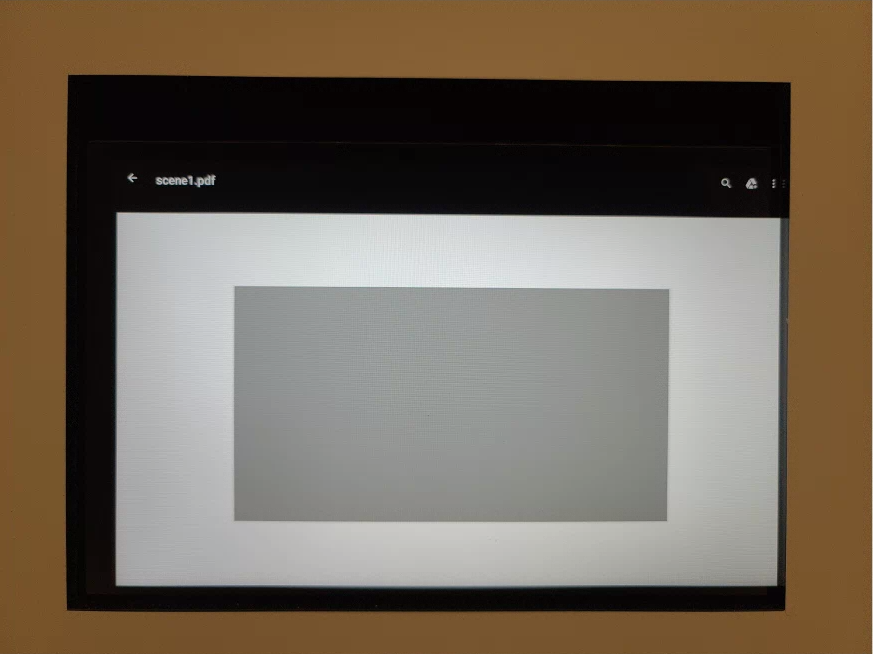
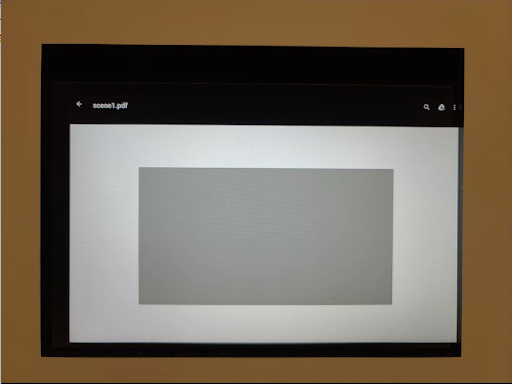
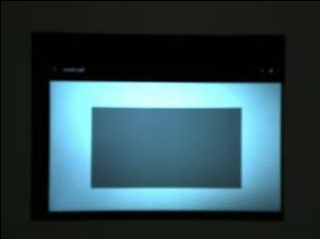
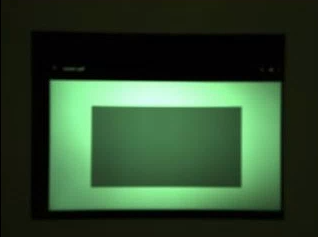
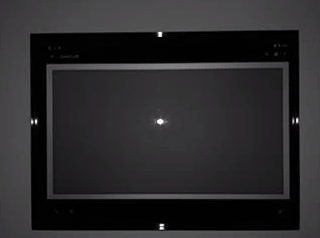
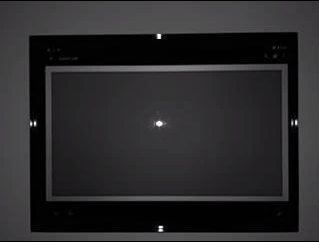
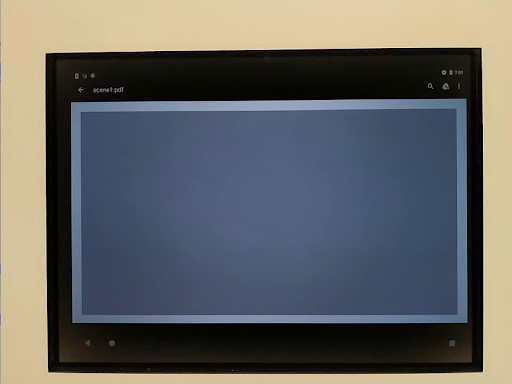
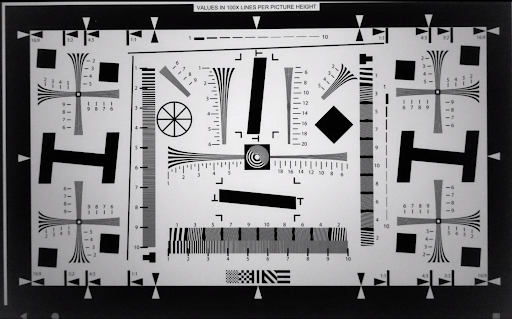
シーン1
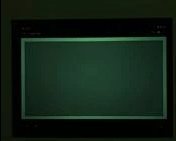
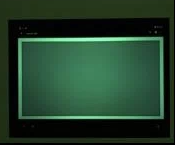
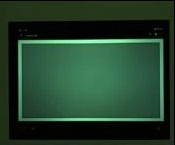
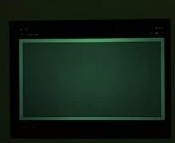
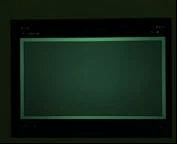
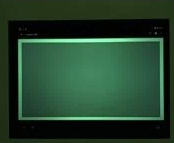
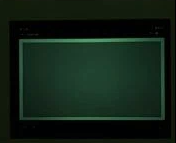
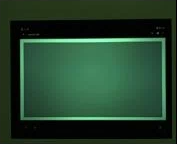
シーン1は灰色のグラフです。灰色のグラフは、カメラの視野の中央30%をカバーする必要があります。中央の領域には機能がないため、灰色のグラフは3A(自動露出、自動ホワイトバランス、自動フォーカス)に適度に挑戦すると予想されます。ただし、キャプチャ要求は、3Aが収束するのに十分な機能を含むシーン全体を指定します。
RFoVカメラは、WFoVまたはRFoVテストリグでテストできます。 RFoVカメラがWFoVテストリグでテストされる場合、チャートは2/3でスケーリングされ、3Aが収束するのを助けるためにFoVの灰色のチャートの境界が確保されます。

シーン1:フルサイズのチャート(左)。 ⅔縮尺チャート(右)。
test_3a
適度に挑戦的なターゲットで3Aの収束をテストします。
テストされたAPI:
-
android.hardware.camera2.CaptureRequest#CONTROL_AE_MODE -
android.hardware.camera2.CaptureRequest#CONTROL_AF_MODE -
android.hardware.camera2.CaptureRequest#CONTROL_AWB_MODE
パス: 3Aが収束し、返された3A値は有効です。
test_ae_af
3A自動露出(AE)およびオートフォーカス(AF)アルゴリズムを個別にテストします。
テストされたAPI:
-
android.hardware.camera2.CaptureRequest#CONTROL_AE_MODE -
android.hardware.camera2.CaptureRequest#CONTROL_AF_MODE -
android.hardware.camera2.CaptureRequest#CONTROL_AWB_MODE
パス: 3Aは収束し、返された3A値は有効です。
test_ae_precapture_trigger
プレキャプチャトリガーを使用するときにAEステートマシンをテストします。 AEを無効にして5つの手動リクエストをキャプチャします。最後のリクエストにはAEプリキャプチャトリガーがありますが、AEが無効になっているため、無視する必要があります。
テストされたAPI:
-
android.hardware.camera2.CaptureRequest#CONTROL_AE_MODE -
android.hardware.camera2.CaptureRequest#CONTROL_AE_PRECAPTURE_TRIGGER -
android.hardware.camera2.CaptureResult#CONTROL_AE_STATE
パス: AEが収束します。
test_auto_vs_manual
自動ショットと手動ショットをキャプチャしたテストは同じように見えます。
テストされたAPI:
-
android.hardware.camera2.CaptureRequest#COLOR_CORRECTION_GAINS -
android.hardware.camera2.CaptureRequest#COLOR_CORRECTION_TRANSFORM -
android.hardware.camera2.CaptureResult#TONEMAP_CURVE -
android.hardware.camera2.CaptureResult#TONEMAP_MODE
パス:各キャプチャ結果で報告される手動ホワイトバランスゲインと変換は、カメラの3Aアルゴリズムからの自動ホワイトバランスestimate一致します。
test_auto_vs_manual_auto.jpg
test_auto_vs_manual_wb.jpg
test_auto_vs_manual_manual_wb_tm.jpg
test_black_white
デバイスが完全な白黒画像を生成することをテストします。 2つのキャプチャを取得します。1つ目は非常に低いゲインと短時間露光で黒の写真になり、2つ目は非常に高いゲインと長時間露光で白の写真になります。
テストされたAPI:
-
android.hardware.camera2.CaptureRequest#SENSOR_EXPOSURE_TIME -
android.hardware.camera2.CaptureRequest#SENSOR_SENSITIVITY
パス:白黒画像を生成します。
 |  | |
| test_black_white_black.jpg | test_black_white_white.jpg |
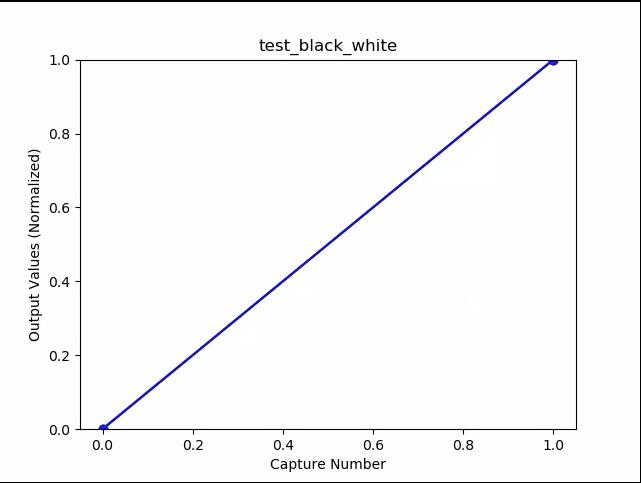
test_black_white_plot_means.png
test_burst_sameness_manual
手動キャプチャ設定で50枚の画像を5回バーストし、それらがすべて同一であることを確認します。このテストは、異なる方法で処理された、またはアーティファクトがある散発的なフレームがあるかどうかを識別するために使用できます。
テストされたAPI:
-
android.hardware.camera2.CameraMetadata#REQUEST_AVAILABLE_CAPABILITIES_MANUAL_SENSOR -
android.hardware.camera2.CameraMetadata#SYNC_MAX_LATENCY_PER_FRAME_CONTROL
パス:画像は視覚的にもRGB値でも同じです。
失敗:各バーストの開始時にRGB平均チャートのスパイクまたはドロップを表示します
first_API_level<30の場合の許容値は3%ですfirst_API_level> = 30の場合の許容値は2%です
test_burst_sameness_manual_mean.jpg

test_burst_sameness_manual_plot_means.png
test_capture_result
有効なデータがCaptureResultオブジェクトに返されることをテストします。自動、手動、および自動キャプチャを実行します。
テストされたAPI:
-
android.hardware.camera2.CaptureRequest#CONTROL_AE_MODE -
android.hardware.camera2.CaptureRequest#CONTROL_AE_REGIONS -
android.hardware.camera2.CaptureRequest#CONTROL_AF_MODE -
android.hardware.camera2.CaptureRequest#CONTROL_AF_REGIONS -
android.hardware.camera2.CaptureRequest#CONTROL_AWB_MODE -
android.hardware.camera2.CaptureRequest#CONTROL_AWB_REGIONS -
android.hardware.camera2.CaptureRequest#CONTROL_MODE -
android.hardware.camera2.CaptureRequest#COLOR_CORRECTION_GAINS -
android.hardware.camera2.CaptureRequest#COLOR_CORRECTION_TRANSFORM -
android.hardware.camera2.CaptureRequest#COLOR_CORRECTION_MODE -
android.hardware.camera2.CaptureRequest#SENSOR_EXPOSURE_TIME -
android.hardware.camera2.CaptureRequest#SENSOR_SENSITIVITY -
android.hardware.camera2.CaptureResult#STATISTICS_LENS_SHADING_CORRECTION_MAP -
android.hardware.camera2.CaptureRequest#STATISTICS_LENS_SHADING_MAP_MODE -
android.hardware.camera2.CaptureRequest#TONEMAP_CURVE -
android.hardware.camera2.CaptureRequest#TONEMAP_MODE
パス:メタデータはすべてのキャプチャに有効であり、手動設定が2番目の自動キャプチャに漏れることはありません。キャプチャのレンズシェーディング補正をプロットします。
test_capture_result_plot_lsc_auto_ch0.png
test_channel_saturation
画像の飽和領域での色合いを排除するために、RGBチャネルが均一に飽和することをテストします。
テストされたAPI:
-
android.hardware.camera2.CameraCharacteristics#SENSOR_INFO_EXPOSURE_TIME_RANGE -
android.hardware.camera2.CameraCharacteristics#SENSOR_INFO_SENSITIVITY_RANGE -
android.hardware.camera2.CaptureRequest#SENSOR_EXPOSURE_TIME -
android.hardware.camera2.CaptureRequest#SENSOR_SENSITIVITY
合格:飽和チャネルのRGB値は[255、255、255]で、許容誤差は1%未満です。

test_channel_saturation.jpg
test_crop_region_raw
RAWストリームがトリミングできないことをテストします。
テストされたAPI:
-
android.hardware.camera2.CameraCharacteristics#SENSOR_INFO_ACTIVE_ARRAY_SIZE -
android.hardware.camera2.CaptureResult#SCALER_CROP_REGION -
android.hardware.camera2.CaptureRequest#SCALER_CROP_REGION
パス: YUV画像は中央でトリミングされますが、RAW画像は取得されません。
test_crop_region_raw_comp_raw_crop.jpg
test_crop_region_raw_comp_raw_full.jpg

test_crop_region_raw_comp_yuv_crop.jpg
test_crop_region_raw_yuv_full.jpg
test_crop_regions
作物の領域が機能することをテストします。完全な画像を撮影し、5つの異なる領域(コーナーと中央)のパッチを作成します。5つの領域にトリミングを設定して画像を撮影します。パッチとトリミング画像の値を比較します。
テストされたAPI:
-
android.hardware.camera2.CameraCharacteristics#SENSOR_INFO_ACTIVE_ARRAY_SIZE -
android.hardware.camera2.CaptureRequest#SCALER_CROP_REGION
パス:トリミングされた領域の画像は、トリミングされた画像に対応するパッチと一致します。
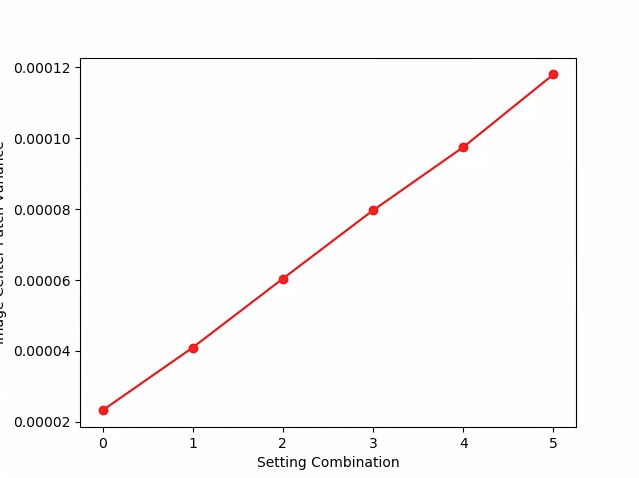
test_dng_noise_model
DNGrawモデルパラメータが正しいことを確認します。プロットは、ある範囲の感度でキャプチャされた生のショットでグレーカードの中央パッチの測定された分散を示し、これらの値をカメラHALのDNGノイズモデルによって各感度で期待される分散と比較します(キャプチャ結果オブジェクトで返されるO、Sパラメータ)。 DNGノイズモデルの詳細については、DNGノイズモデルに関する次のドキュメントをダウンロードしてください。
テストされたAPI:
-
android.hardware.camera2.CameraCharacteristics#SENSOR_INFO_SENSITIVITY_RANGE -
android.hardware.camera2.CameraCharacteristics#SENSOR_INFO_WHITE_LEVEL -
android.hardware.camera2.CameraCharacteristics#SENSOR_MAX_ANALOG_SENSITIVITY -
android.hardware.camera2.CaptureResult#SENSOR_NOISE_PROFILE -
android.hardware.camera2.CaptureRequest#SENSOR_SENSITIVITY
合格: DNGrawモデルのパラメーターは正しいです。予想されるRGB値は、測定された実際のRGB値の値と一致します。

test_dng_noise_model_plog.png
test_ev_compensation_advanced
露出値(EV)補正が適用されていることをテストします。このテストでは、露出を8段階で増やし、測定された明るさと予想される明るさを比較します。期待値は、EV補正が適用されていない画像の画像の明るさから計算され、計算値が実際の画像値の範囲を超えると、期待値は飽和します。期待値と測定値が一致しないか、5ステップ以内に画像が露出オーバーになると、テストは失敗します。
テストされたAPI:
パス:画像は、5ステップ以内に露出オーバーすることなく露出が増加することを示しています。
test_ev_compensation_advanced_plot_means.png
test_ev_compensation_basic
CONTROL_AE_COMPENSATION_STEPで作成された範囲を使用してEV補正が適用されることをテストします。各補正値で8フレームがキャプチャされます。
テストされたAPI:
-
android.hardware.camera2.CameraCharacteristics#CONTROL_AE_COMPENSATION_STEP -
android.hardware.camera2.CaptureRequest#CONTROL_AE_EXPOSURE_COMPENSATION -
android.hardware.camera2.CaptureRequest#CONTROL_AE_LOCK -
android.hardware.camera2.CaptureResult#CONTROL_AE_EXPOSURE_COMPENSATION -
android.hardware.camera2.CaptureResult#CONTROL_AE_STATE
パス: EV補正設定を増やすと、輝度の増加をキャプチャします。各EV補正設定でキャプチャされた8つのフレームは、安定した輝度値を持ちます。
test_ev_compensation_basic.png
test_exposure
ISOと露光時間が変化するにつれて、一定の露光が達成されることをテストします。 ISOと露出時間をバランスよく選択した一連のショットを撮ります。結果は同じ明るさになるはずですが、シーケンス全体で画像のノイズが大きくなるはずです。サンプルピクセルの平均値が互いに近いことを確認します。画像が0または1にクランプされていないことを確認します(これにより、画像が平らな線のように見えます)。構成ファイルでdebugフラグを設定することにより、RAWイメージを使用してテストを実行することもできます。
テストされたAPI:
-
android.hardware.camera2.CaptureRequest#SENSOR_EXPOSURE_TIME -
android.hardware.camera2.CaptureRequest#SENSOR_SENSITIVITY
合格:画像の明るさは同じですが、ISOが高いほどノイズが多くなります。 ISO *露光の値がテストされたゲイン空間にわたって一定である場合、RGBプレーンはフラットです。
test_exposure_plot_means.png
 |  | |
| test_exposure_mult = 1.00.jpg | test_exposure_mult = 64.00.jpg |
test_jpeg
YUV画像とデバイスのJPEG画像を変換したテストは同じように見えます。テストでは、画像の中央の10%を取得し、RGB値を計算して、それらが一致することを確認します。
テストされたAPI:
合格:各画像間の平均RGB差は3%未満です。
 |  | |
| test_jpeg_fmt = jpg.jpg | test_jpeg = fmt = yuv.jpg |
test_latching
FULLおよびLEVEL_3カメラの設定(露出とゲイン)が右側のフレームにラッチすることをテストします。連続したリクエストを使用して一連のショットを撮影し、ショット間でキャプチャリクエストのパラメータを変更します。画像に期待されるプロパティがあることを確認します。
テストされたAPI:
合格:画像[2、3、6、8、10、12、13]は、ISOまたは露出が増加し、 test_latching_plot_means.pngでより高いRGB平均で表示されます。
 |  |  | |
| test_latching_i = 00.jpg | test_latching_i = 01.jpg | test_latching_i = 02.jpg | |
 |  |  | |
| test_latching_i = 03.jpg | test_latching_i = 04.jpg | test_latching_i = 05.jpg | |
 |  |  | |
| test_latching_i = 06.jpg | test_latching_i = 07.jpg | test_latching_i = 08.jpg | |
 |  |  | |
| test_latching_i = 09.jpg | test_latching_i = 10.jpg | test_latching_i = 11.jpg | |
 | |||
| test_latching_i = 12.jpg |
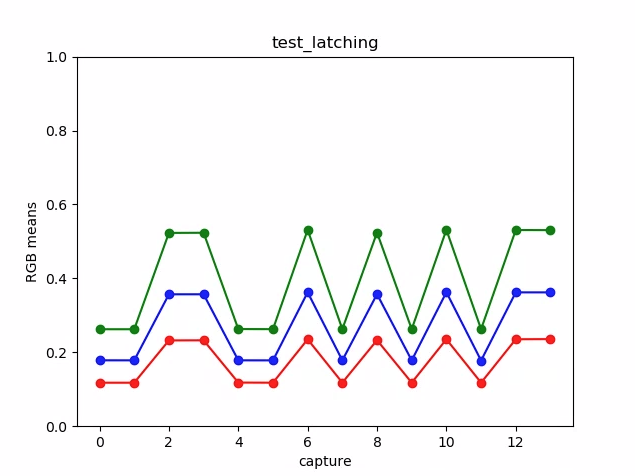
test_latching_plot_means.png
test_linearity
デバイス処理を線形ピクセルに反転できることをテストします。デバイスを均一なターゲットに向けて一連のショットをキャプチャします。
テストされたAPI:
-
android.hardware.camera2.CameraCharacteristics#SENSOR_INFO_SENSITIVITY_RANGE -
android.hardware.camera2.CaptureRequest#BLACK_LEVEL_LOCK -
android.hardware.camera2.CaptureRequest#SENSOR_SENSITIVITY -
android.hardware.camera2.CaptureRequest#TONEMAP_CURVE -
android.hardware.camera2.CaptureRequest#TONEMAP_MODE
パス: R、G、Bの値は、感度の増加に伴って直線的に増加する必要があります。
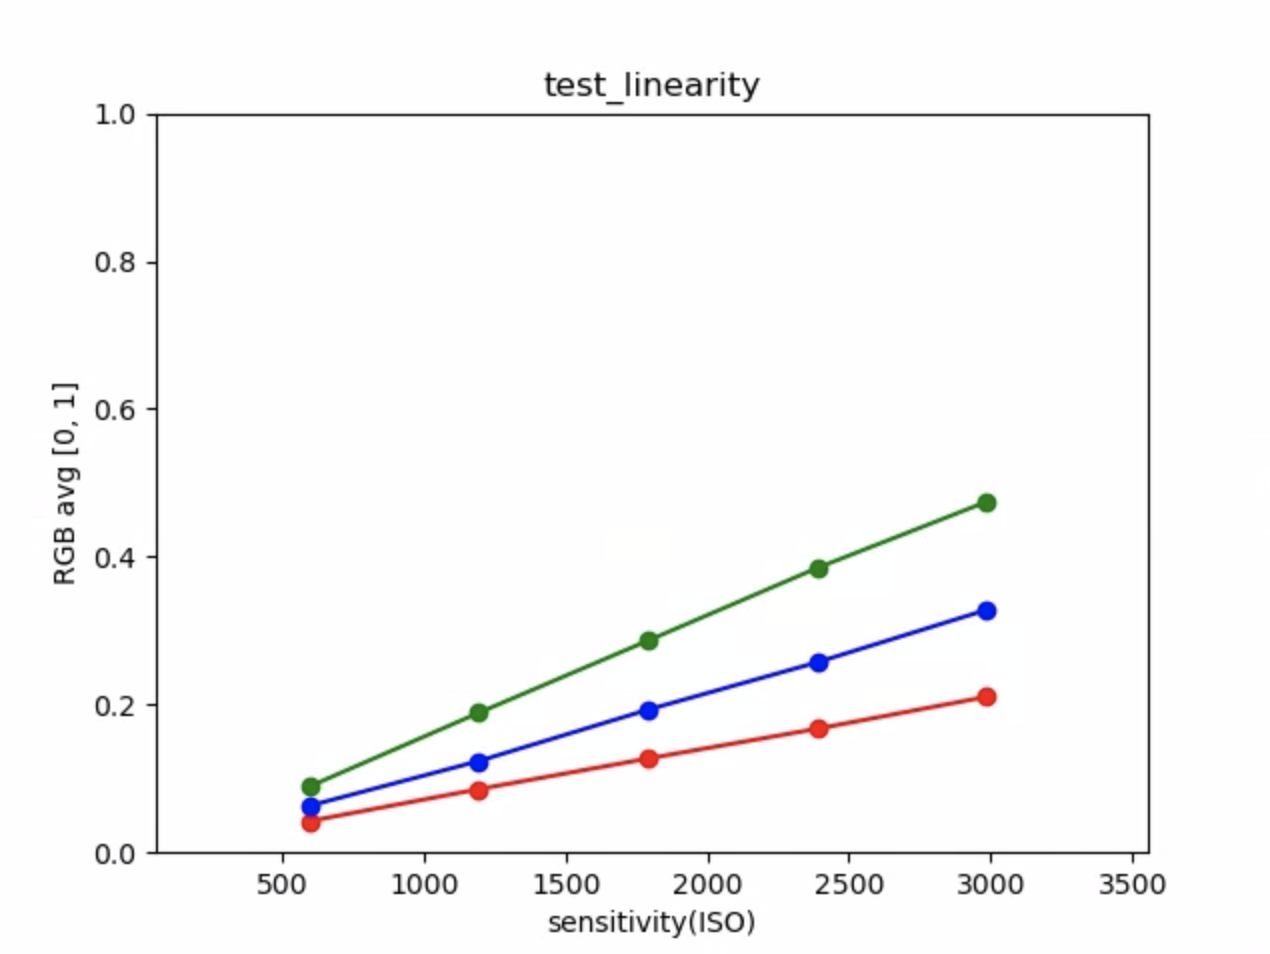
test_linearity_plot_means.png
test_locked_burst
3AロックとYUVバーストをテストします(自動設定を使用)。このテストは、 MANUAL_SENSORまたはPER_FRAME_CONTROLSを持たない限られたデバイスでも合格するように設計されています。このテストでは、フレームレートチェックがCTSで行われているときに、YUV画像の整合性をチェックします。
テストされたAPI:
-
android.hardware.camera2.CaptureRequest#CONTROL_AE_LOCK -
android.hardware.camera2.CaptureRequest#CONTROL_AWB_LOCK
パス:キャプチャは一貫しているように見えます。
test_locked_burst_frame0.jpg
test_locked_burst_frame1.jpg
test_locked_burst_frame2.jpg
test_multi_camera_match
デバイス上のマルチカメラがグレーパッチに対して同様のRGB値を提供するかどうかを確認するためのテスト。
テストされたAPI:
-
android.hardware.camera2.CameraCharacteristics#getPhysicalCameraIds() -
android.hardware.camera2.CameraCharacteristics#LENS_INFO_AVAILABLE_FOCAL_LENGTHS -
android.hardware.camera2.CameraMetadata#REQUEST_AVAILABLE_CAPABILITIES_LOGICAL_MULTI_CAMERA -
android.hardware.camera2.CaptureRequest#LENS_FOCAL_LENGTH
パス:異なるカメラは、同じグレーパッチに対して同様のRGB値を生成します。

test_multi_camera + match_yuv_fl = 4.38.jpg
test_param_color_correction
設定時にandroid.colorCorrection.*パラメーターが適用されることをテストします。変換値とゲイン値が異なるショットを撮り、それに応じて外観が異なることをテストします。変換とゲインは、出力がますます赤または青になるように選択されます。線形トーンマップを使用します。トーンマッピングは、画像処理で使用される手法で、ある色のセットを別の色にマッピングして、ダイナミックレンジがより制限されたメディア内の高ダイナミックレンジの画像の外観を近似します。
テストされたAPI:
-
android.hardware.camera2.CaptureRequest#COLOR_CORRECTION_GAINS -
android.hardware.camera2.CaptureRequest#COLOR_CORRECTION_MODE -
android.hardware.camera2.CaptureRequest#COLOR_CORRECTION_TRANSFORM
パス: RとBの値は変換に従ってブーストします。
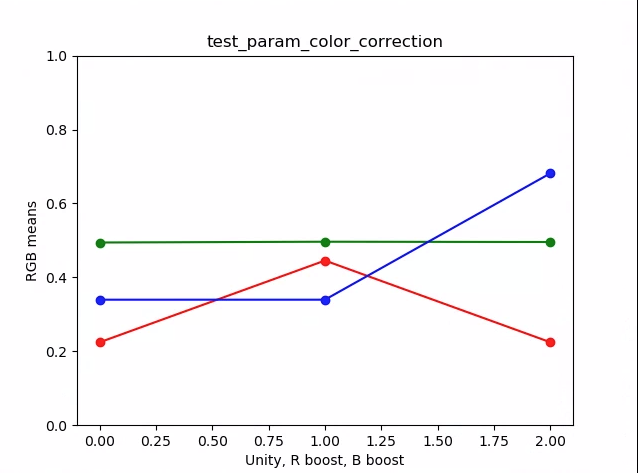
test_param_color_correction_plot_means.png
* x軸はキャプチャリクエストです:0 =ユニティ、1 =赤のブースト、2=青のブースト
test_param_color_correction_req = 0.jpg
test_param_color_correctness_req = 1.jpg(Rブースト)
test_param_color_correction_req = 2.jpg(Bブースト)
test_param_exposure_time
android.sensor.exposureTimeパラメーターが適用されていることをテストします。
テストされたAPI:
パス:各ショットは前のショットよりも明るくなっています。
test_param_exposure_time_frame0.jpg

test_param_exposure_time_plot.png
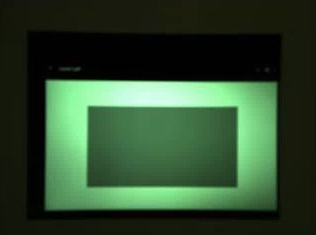
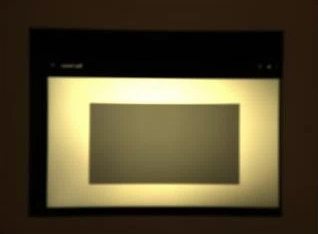
test_param_flash_mode
android.flash.modeパラメーターが適用されていることをテストします。手動で露出を暗く設定し、フラッシュが発光したかどうかがわかるようにし、リニアトーンマップを使用します。タイル画像で中央をチェックして、フラッシュが発光したかどうかを確認するために作成された大きなグラデーションがあるかどうかを確認します。
テストされたAPI:
パス:タイル画像の中央に大きなグラデーションがあり、フラッシュが発光したことを意味します。
test_param_flash_mode_1.jpg

test_param_flash_mode_1_tile.jpg
test_param_flash_mode_2.jpg

test_param_flash_mode_2_tile.jpg
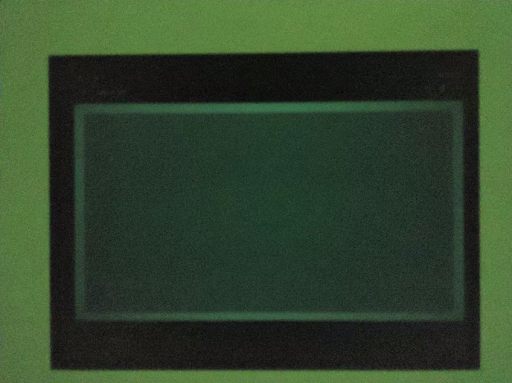
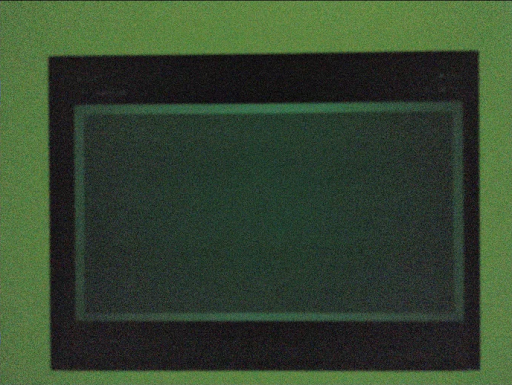
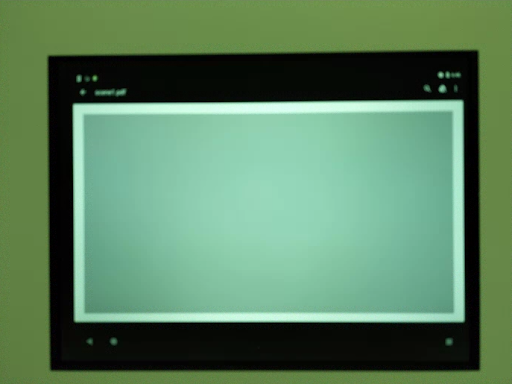
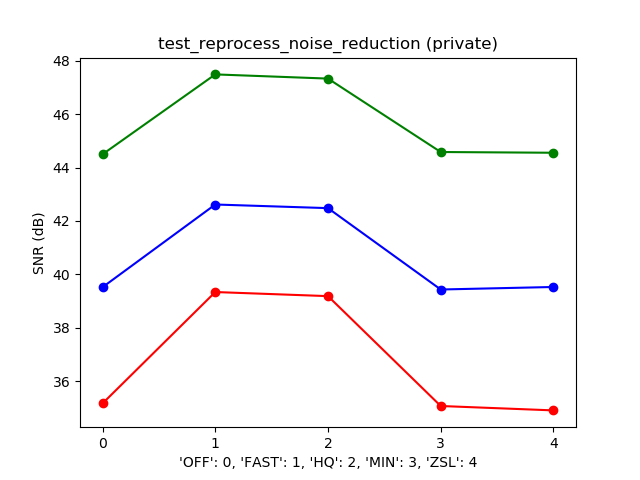
test_param_noise_reduction
設定時にandroid.noiseReduction.modeパラメーターが正しく適用されることをテストします。薄暗いカメラで画像を撮影します。高いアナログゲインを使用して、キャプチャされた画像にノイズが発生するようにします。 NRオフ、「高速」、「高品質」の3つの画像をキャプチャします。また、ゲインが低くNRがオフの画像をキャプチャし、この分散をベースラインとして使用します。 SNR(信号対雑音比)が高いほど、画質は向上します。
テストされたAPI:
合格: SNRはノイズリダクションモードによって異なり、下のグラフと同じように動作します。
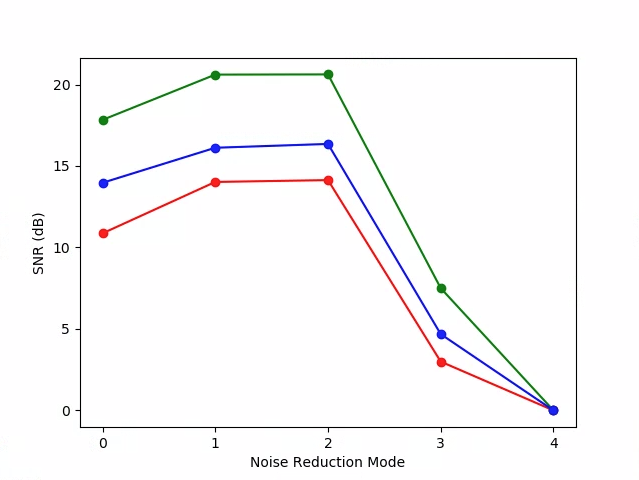
test_param_noise_reduction_plot_SNRs.png
0:オフ、1:高速、2:本社、3:最小、4:ZSL

test_param_noise_reduction_high_gain_nr = 0.jpg
test_param_noise_reduction_high_gain_nr = 1.jpg

test_param_noise_reduction_high_gain_nr = 2.jpg
test_param_noise_reduction_high_gain_nr = 3.jpg
test_param_noise_reduction_low_gain.jpg
test_param_sensitivevity
android.sensor.sensitivityパラメーターが適用されていることをテストします。このテストでは、各ショットの露出を固定して、感度を5ステップで向上させます。
テストされたAPI:
パス:中央のRGB平均10%は、感度が上がると明るくなります。
test_param_sensitivevity_iso = 0055.jpg
test_param_sensitivevity_iso = 1819.jpg
test_param_sensitivevity_iso = 3583.jpg
test_param_sensitivevity_iso = 5347.jpg
test_param_sensitivevity_iso = 7111.jpg

test_param_sensitivevity_plot.png
test_param_shading_mode
android.shading.modeパラメーターが適用されていることをテストします。
テストされたAPI:
-
android.hardware.camera2.CaptureRequest#SHADING_MODE -
android.hardware.camera2.CaptureRequest#STATISTICS_LENS_SHADING_MAP_MODE -
android.hardware.camera2.CaptureResult#STATISTICS_LENS_SHADING_CORRECTION_MAP
パス:シェーディングモードが切り替えられ、レンズのシェーディングマップが期待どおりに変更されます。
test_param_shading_mode_ls_maps_mode_0_loop_0.png
test_param_shading_mode_ls_maps_mode_1_loop_0.png
test_param_shading_mode_ls_maps_mode_2_loop_0.png
test_param_tonemap_mode
android.tonemap.modeパラメーターが適用されていることをテストします。各R、G、Bチャネルに異なるトーンマップ曲線を適用し、出力画像が期待どおりに変更されていることを確認します。このテストは、test1とtest2の2つのテストで構成されています。
テストされたAPI:
-
android.hardware.camera2.CaptureRequest#TONEMAP_CURVE -
android.hardware.camera2.CaptureRequest#TONEMAP_MODE
合格:
- test1:両方の画像は線形トーンマップを持っていますが、n=1はより急な勾配を持っています。 G(緑)チャネルは、n=1の画像の方が明るくなります。
- test2:トーンマップは同じですが、長さが異なります。画像は同じです。
 |  | |
| test_param_tonemap_mode_n = 0.jpg | test_param_tonemap_mode_n = 1.jpg |
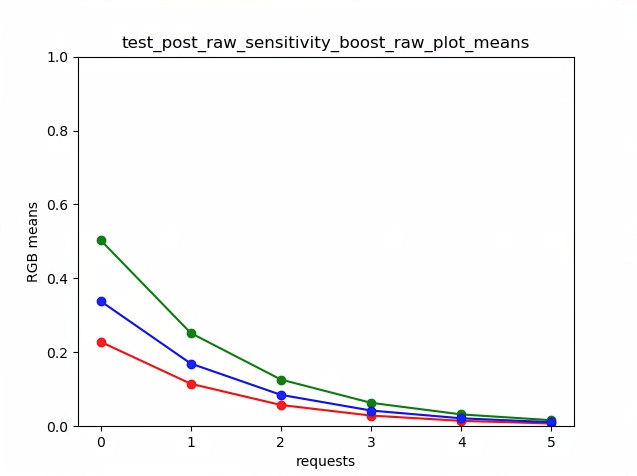
test_post_raw_sensitivevity_boost
RAW感度ブースト後をチェックします。感度の異なるRAW画像とYUV画像のセットをキャプチャし、RAW感度ブーストの組み合わせを投稿し、出力ピクセルの平均がリクエスト設定と一致するかどうかを確認します。
テストされたAPI:
-
android.hardware.camera2.CameraCharacteristics#CONTROL_POST_RAW_SENSITIVITY_BOOST_RANGE -
android.hardware.camera2.CameraMetadata#REQUEST_AVAILABLE_CAPABILITIES_RAW -
android.hardware.camera2.CaptureRequest#CONTROL_POST_RAW_SENSITIVITY_BOOST -
android.hardware.camera2.CaptureRequest#SENSOR_SENSITIVITY
パス:ブーストが増加するとRAW画像は暗くなりますが、YUV画像の明るさは一定に保たれます
test_post_raw_sensitivevity_boost_raw_s = 3583_boost = 0100.jpg

test_post_raw_sensitivevity_boost_raw_s = 1792_boost = 0200.jpg

test_post_raw_sensitivevity_boost_raw_s = 0896_boost = 0400.jpg

test_post_raw_sensitivevity_boost_raw_s = 0448_boost = 0800.jpg

test_post_raw_sensitivevity_boost_raw_s = 0224_boost = 1600.jpg

test_post_raw_sensitivevity_boost_raw_s = 0112_boost = 3199.jpg
test_post_raw_sensitivevity_boost_raw_plot_means.png
test_post_raw_sensitivevity_boost_yuv_s = 0112_boost = 3199.jpg

test_post_raw_sensitivevity_boost_yuv_s = 0448_boost = 0800.jpg

test_post_raw_sensitivevity_boost_yuv_s = 0896_boost = 0400.jpg

test_post_raw_sensitivevity_boost_yuv_s = 1792_boost = 0200.jpg

test_post_raw_sensitivevity_boost_yuv_s = 3585_boost = 0100.jpg
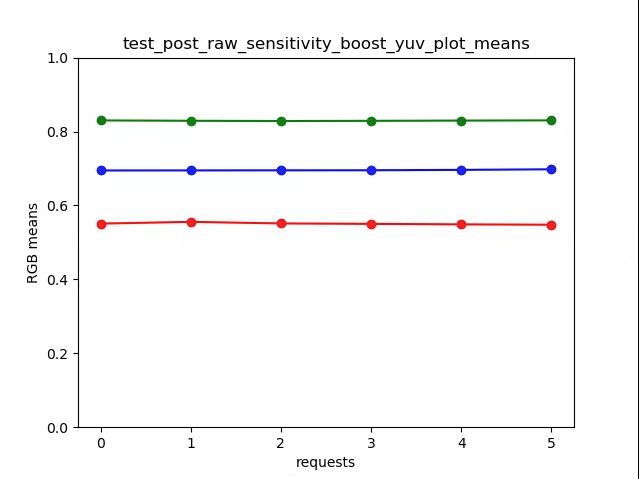
test_post_raw_sensitivevity_boost_yuv_plot_means.png
test_raw_burst_sensitivevity
ゲインを上げながら生の画像のセットをキャプチャし、ノイズを測定します。生のみをバーストでキャプチャします。
テストされたAPI:
-
android.hardware.camera2.CameraCharacteristics#SENSOR_INFO_ACTIVE_ARRAY_SIZE -
android.hardware.camera2.CameraCharacteristics#SENSOR_INFO_SENSITIVITY_RANGE -
android.hardware.camera2.CameraCharacteristics#SENSOR_INFO_WHITE_LEVEL -
android.hardware.camera2.CameraCharacteristics#SENSOR_MAX_ANALOG_SENSITIVITY -
android.hardware.camera2.CameraMetadata#REQUEST_AVAILABLE_CAPABILITIES_RAW
パス:ゲインが増加するため、各ショットは前のショットよりもノイズが多くなります。
中央の統計グリッドセルの分散を使用します。
test_raw_burst_sensitivevity_variance.png
test_raw_exposure
露光時間を増やしながら生の画像のセットをキャプチャし、ピクセル値を測定します。
テストされたAPI:
-
android.hardware.camera2.CameraMetadata#REQUEST_AVAILABLE_CAPABILITIES_RAW -
android.hardware.camera2.CaptureRequest#SENSOR_EXPOSURE_TIME
パス: ISO(ゲイン)を大きくすると、ピクセルが光に対してより敏感になるため、プロットは左に移動します。
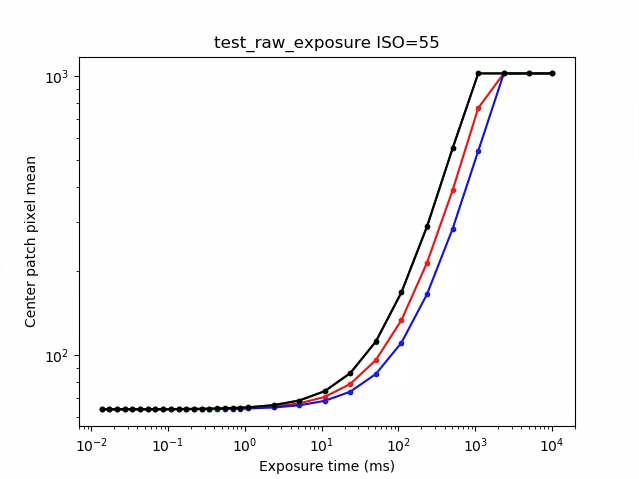
test_raw_exposure_s = 55.png
(10⁰は1ミリ秒、10¹は10ミリ秒、10⁻¹は0.1ミリ秒)
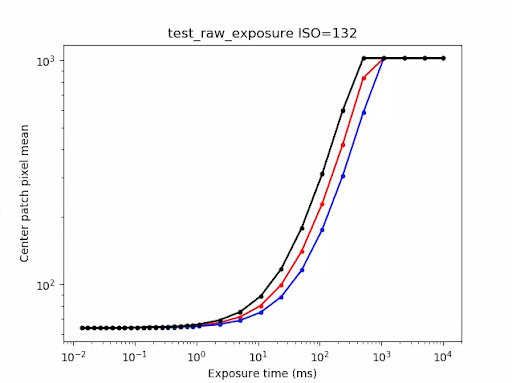
test_raw_exposure_s = 132.png
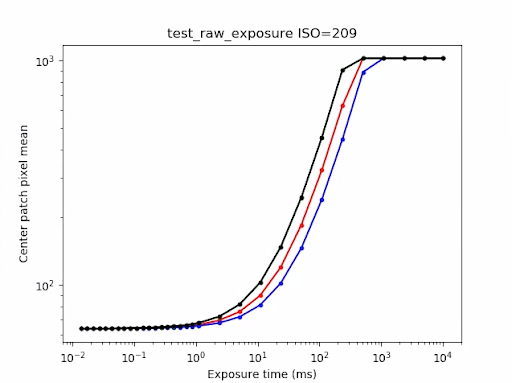
test_raw_exposure_s = 209.png
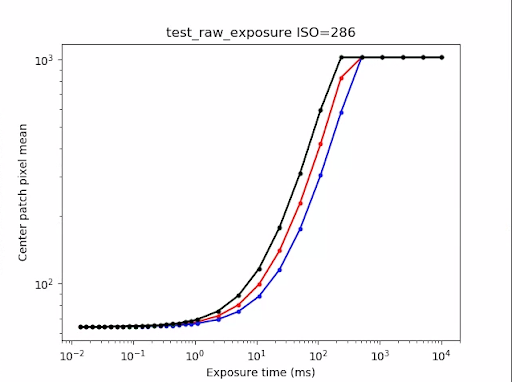
test_raw_exposure_s = 286.png
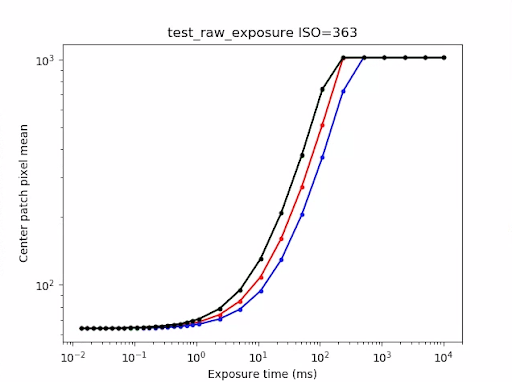
test_raw_exposure_s = 363.png
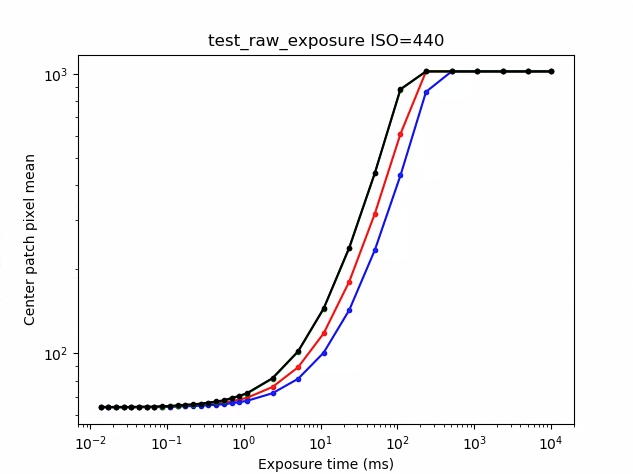
test_raw_exposure_s = 440.png
test_raw_sensitivevity
感度を上げて生の画像のセットをキャプチャし、画像の中央の10%のノイズ(分散)を測定します。各ショットが前のショットよりもノイズが多いことをテストします。
テストされたAPI:
-
android.hardware.camera2.CameraCharacteristics#SENSOR_INFO_PRE_CORRECTION_ACTIVE_ARRAY_SIZE -
android.hardware.camera2.CameraCharacteristics#SENSOR_INFO_SENSITIVITY_RANGE -
android.hardware.camera2.CameraCharacteristics#SENSOR_INFO_WHITE_LEVEL -
android.hardware.camera2.CameraCharacteristics#SENSOR_MAX_ANALOG_SENSITIVITY -
android.hardware.camera2.CameraMetadata#REQUEST_AVAILABLE_CAPABILITIES_RAW
パス:分散はショットごとに増加します。
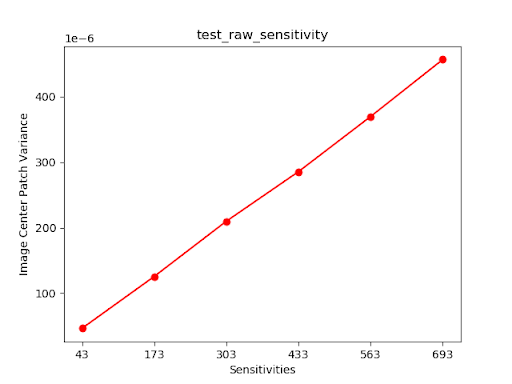
test_raw_sensitivevity_variance.png
test_reprocess_noise_reduction
android.noiseReduction.modeが再処理リクエストに適用されていることをテストします。カメラを薄暗い状態で再処理した画像をキャプチャします。高いアナログゲインを使用して、キャプチャ画像にノイズが多いことを確認します。 NRオフ、「高速」、「高品質」の3つの再処理された画像をキャプチャします。低ゲインとNRオフで再処理された画像をキャプチャし、これの分散をベースラインとして使用します。
テストされたAPI:
パス: FAST> = OFF、HQ> = FAST、HQ >> OFF
典型的なSNR対NR_MODEプロット
test_tonemap_sequence
さまざまなトーンマップ曲線を使用して一連のショットをテストします。リニアトーンマップで3つの手動ショットをキャプチャします。デフォルトのトーンマップで3つの手動ショットをキャプチャします。連続する各フレームペア間のデルタを計算します。
テストされたAPI:
パス: 3つの同一のフレームがあり、その後に3つの同一のフレームの異なるセットが続きます。

test_tonemap_sequence_i = 0.jpg
test_tonemap_sequence_i = 1.jpg
test_tonemap_sequence_i = 2.jpg
test_tonemap_sequence_i = 3.jpg
test_tonemap_sequence_i = 4.jpg
test_tonemap_sequence_i = 5.jpg
test_yuv_jpeg_all
報告されたすべてのサイズとフォーマットが画像キャプチャで機能することをテストします。線形トーンマップを使用した手動リクエストを使用して、its.imageモジュールで変換したときにYUVとJPEGが同じように見えるようにします。画像はデフォルトでは保存されませんが、 debug_modeを有効にすることで保存できます。
テストされたAPI:
-
android.hardware.camera2.CaptureRequest#TONEMAP_CURVE -
android.hardware.camera2.CaptureRequest#TONEMAP_MODE -
android.graphics.ImageFormat#JPEG
合格:すべての画像中心には、最高解像度のYUV画像の3%のRGB変換画像で最大RMS(信号の二乗平均平方根値)の差があります。
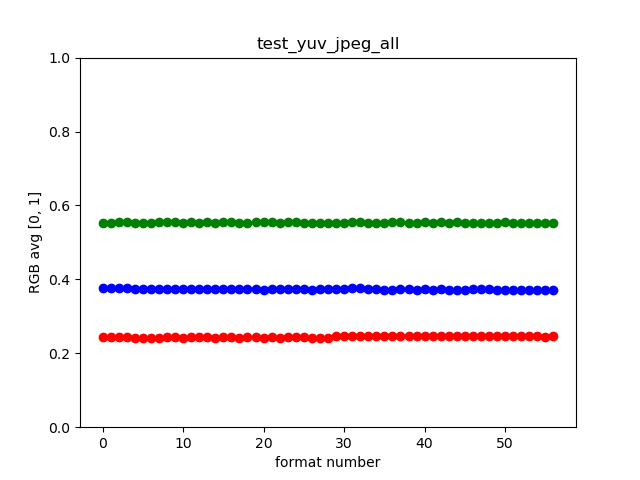
test_yuv_jpeg_all.png
test_yuv_plus_dng
報告された画像キャプチャのサイズと形式が機能することをテストします。
テストされたAPI:
合格:テストが完了し、要求された画像が返されます。
test_yuv_plus_dng.jpg
test_yuv_plus_jpeg
YUV出力とJPEG出力の両方として単一のフレームをキャプチャすることをテストします。 YUVとJPEGが同じように見えるように線形トーンマップを使用した手動リクエストを使用します( its.imageモジュールによって変換された場合)。
テストされたAPI:
-
android.hardware.camera2.CaptureRequest#TONEMAP_CURVE -
android.hardware.camera2.CaptureRequest#TONEMAP_MODE -
android.graphics.ImageFormat#JPEG
合格: YUV画像とJPEG画像は類似しており、RMS(信号の二乗平均平方根値)の差は1%未満です。
 |  | |
| test_yuv_plus_jpg_jpg.jpg | test_yuv_plus_jpeg_yuv.jpg |
test_yuv_plus_raw
RAW出力とYUV出力の両方として単一のフレームをキャプチャすることをテストします。リニアトーンマップを使用した手動リクエストを使用するため、RAWとYUVは同じであると予想されます。 RGB変換された画像の中央の10%RGB値を比較します。 android.shading.modeをログに記録します。
テストされたAPI:
-
android.hardware.camera2.CameraMetadata#REQUEST_AVAILABLE_CAPABILITIES_RAW -
android.hardware.camera2.CaptureRequest#COLOR_CORRECTION_MODE -
android.hardware.camera2.CaptureRequest#COLOR_CORRECTION_GAINS -
android.hardware.camera2.CaptureRequest#COLOR_CORRECTION_TRANSFORM -
android.hardware.camera2.CaptureRequest#CONTROL_AWB_MODE -
android.hardware.camera2.CaptureRequest#CONTROL_MODE -
android.hardware.camera2.CaptureRequest#SHADING_MODE -
android.hardware.camera2.CaptureRequest#TONEMAP_CURVE -
android.hardware.camera2.CaptureRequest#TONEMAP_MODE
合格: YUV画像とJPEG画像は類似しており、RMS(信号の二乗平均平方根値)の差は3.5%未満です。
 |  | |
| test_yuv_plus_raw_shading = 1_raw.jpg | test_yuv_plus_raw_shading = 1_yuv.jpg |
test_yuv_plus_raw10
RAW10とYUVの両方の出力として単一のフレームをキャプチャするテスト。リニアトーンマップを使用した手動リクエストを使用するため、RAWとYUVは同じであると予想されます。 RGB変換された画像の中央の10%RGB値を比較します。 android.shading.modeをログに記録します。
テストされたAPI:
-
android.hardware.camera2.CameraMetadata#REQUEST_AVAILABLE_CAPABILITIES_RAW -
android.hardware.camera2.CaptureRequest#COLOR_CORRECTION_MODE -
android.hardware.camera2.CaptureRequest#COLOR_CORRECTION_GAINS -
android.hardware.camera2.CaptureRequest#COLOR_CORRECTION_TRANSFORM -
android.hardware.camera2.CaptureRequest#CONTROL_AWB_MODE -
android.hardware.camera2.CaptureRequest#CONTROL_MODE -
android.hardware.camera2.CaptureRequest#SHADING_MODE -
android.hardware.camera2.CaptureRequest#TONEMAP_CURVE -
android.hardware.camera2.CaptureRequest#TONEMAP_MODE -
android.hardware.graphics.ImageFormat#RAW10
合格: RAW10画像とYUV画像は類似しており、RMS(信号の二乗平均平方根値)の差は3.5%未満です。
 |  | |
| test_yuv_plus_raw10_shading = 1_raw.jpg | test_yuv_plus_raw10_shading = 1_yuv.jpg |
test_yuv_plus_raw12
RAW12とYUVの両方の出力として単一のフレームをキャプチャするテスト。リニアトーンマップを使用した手動リクエストを使用するため、RAWとYUVは同じであると予想されます。 RGB変換された画像の中央の10%RGB値を比較します。 android.shading.modeをログに記録します。
テストされたAPI:
-
android.hardware.camera2.CameraMetadata#REQUEST_AVAILABLE_CAPABILITIES_RAW -
android.hardware.camera2.CaptureRequest#COLOR_CORRECTION_MODE -
android.hardware.camera2.CaptureRequest#COLOR_CORRECTION_GAINS -
android.hardware.camera2.CaptureRequest#COLOR_CORRECTION_TRANSFORM -
android.hardware.camera2.CaptureRequest#CONTROL_AWB_MODE -
android.hardware.camera2.CaptureRequest#CONTROL_MODE -
android.hardware.camera2.CaptureRequest#SHADING_MODE -
android.hardware.camera2.CaptureRequest#TONEMAP_CURVE -
android.hardware.camera2.CaptureRequest#TONEMAP_MODE -
android.hardware.graphics.ImageFormat#RAW12
合格: RAW12画像とYUV画像は類似しており、RMS(信号の二乗平均平方根値)の差は3.5%未満です。
 |  | |
| test_yuv_plus_raw12_shading = 1_raw.jpg | test_yuv_plus_raw12_shading = 1_yuv.jpg |
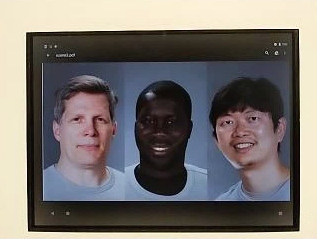
シーン2_a
Scene2_aには、背景が灰色でニュートラルな服を着た3つの顔があります。顔は幅広い肌の色合いになるように選択されています。
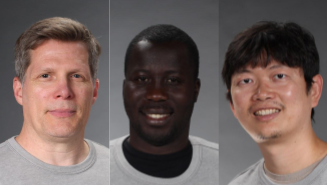
シーン2_a
test_effects
サポートされているカメラ効果のフレームをキャプチャし、それらが正しく生成されているかどうかを確認します。このテストでは、エフェクトOFFとMONOのみがチェックされますが、サポートされているすべてのエフェクトの画像が保存されます。
テストされたAPI:
-
android.hardware.camera2.CameraCharacteristics#CONTROL_AVAILABLE_EFFECTS -
android.hardware.camera2.CaptureRequest#CONTROL_EFFECT_MODE
パス:エフェクトがOFFのシーン画像と、エフェクトがMONOに設定されたモノクロ画像をキャプチャします。
test_effects_MONO.jpg
test_faces
顔検出をテストします。画像は保存されますが、ボックスとランドマークの情報はtest_faces_stdout.txtに一覧表示されます。
テストされたAPI:
-
android.hardware.camera2.CaptureResult#STATISTICS_FACES -
android.hardware.camera2.CaptureResult#STATISTICS_FACE_DETECT_MODE
合格:画像から少なくとも1つの顔を検出します。
test_format_combos
出力形式のさまざまな組み合わせをテストします。
テストされたAPI:
android.hardware.camera2.CameraCharacteristics#SCALER_STREAM_CONFIGURATION_MAPandroid.hardware.camera2.params.StreamConfigurationMap#getOutputSizes()android.hardware.camera2.CameraCaptureSession#captureBurst()
合格:すべての組み合わせが正常にキャプチャされます。
test_jpeg_quality
カメラのJPEG圧縮品質をテストします。 android.jpeg.qualityを介してJPEG品質をステップ実行し、量子化テーブルが正しく変更されるようにします。
テストされたAPI:
合格:量子化マトリックスは、品質の向上とともに減少します。 (行列は除算係数を表します。)
Pixel4リアカメラの輝度/彩度DQTマトリックス平均とJPEG品質
失敗したテスト例
非常に低品質の画像(jpeg.quality <50)の場合、量子化マトリックスの圧縮率は増加しないことに注意してください。
test_num_faces
顔検出をテストします。
テストされたAPI:
-
android.hardware.camera2.CaptureResult#STATISTICS_FACES -
android.hardware.camera2.CaptureResult#STATISTICS_FACE_DETECT_MODE
パス: 3つの顔を検索します。
test_num_faces_fd_mode_1.jpg
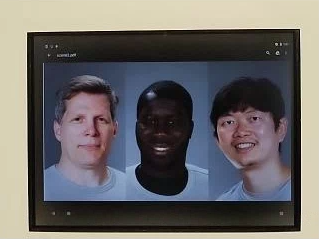
シーン2_b
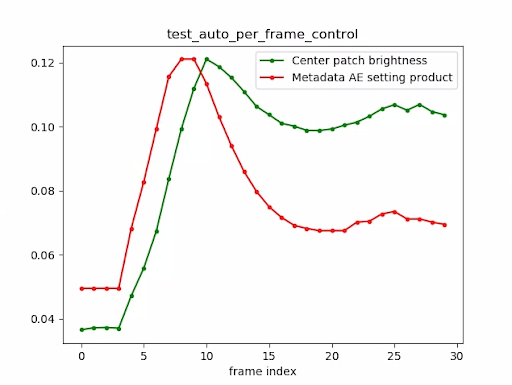
test_auto_per_frame_control
自動キャプチャ要求のPER_FRAME_CONTROLプロパティをテストします。
テストされたAPI:
-
android.hardware.camera2.CaptureRequest#COLOR_CORRECTION_GAINS -
android.hardware.camera2.CaptureRequest#COLOR_CORRECTION_TRANSFORM -
android.hardware.camera2.CaptureResult#CONTROL_AE_STATE -
android.hardware.camera2.CaptureResult#CONTROL_AWB_STATE -
android.hardware.camera2.CaptureRequest#CONTROL_POST_RAW_SENSITIVITY_BOOST -
android.hardware.camera2.CaptureRequest#LENS_FOCUS_DISTANCE -
android.hardware.camera2.CaptureRequest#SENSOR_EXPOSURE_TIME -
android.hardware.camera2.CaptureRequest#SENSOR_SENSITIVITY -
android.hardware.camera2.CaptureRequest#STATISTICS_LENS_SHADING_MAP_MODE -
android.hardware.camera2.CaptureResult#STATISTICS_LENS_SHADING_CORRECTION_MAP -
android.hardware.camera2.CaptureRequest#TONEMAP_CURVE -
android.hardware.camera2.CaptureRequest#TONEMAP_MODE
パス:すべてのPER_FRAME_CONTROLプロパティが存在します。
test_auto_per_frame_control_frame_1.jpg
test_auto_per_frame_control_frame_10.jpg
test_auto_per_frame_control_frame_29.jpg
test_auto_per_frame_control_plot.png
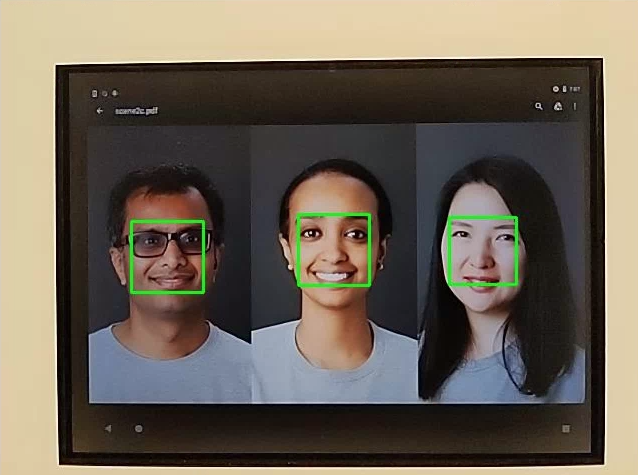
test_num_faces
顔のシーンで肌の色の多様性を高めて顔検出をテストします。
テストされたAPI:
-
android.hardware.camera2.CaptureResult#STATISTICS_FACES -
android.hardware.camera2.CaptureResult#STATISTICS_FACE_DETECT_MODE
パス: 3つの顔を検索します。
test_num_faces_fd_mode_1.jpg
シーン2_c
test_num_faces
顔のシーンで肌の色の多様性を高めて顔検出をテストします。
テストされたAPI:
-
android.hardware.camera2.CaptureResult#STATISTICS_FACES -
android.hardware.camera2.CaptureResult#STATISTICS_FACE_DETECT_MODE
パス: 3つの顔を検索します。
test_num_faces_fd_mode_1.jpg
test_jpeg_capture_perf_class
CDDのセクション2.2.7.2カメラで指定されているSパフォーマンスクラスのJPEGキャプチャレイテンシをテストします。
合格:両方のプライマリカメラのITS照明条件(3000K)でCTSカメラPerformanceTestによって測定された、1080p解像度のcamera2JPEGキャプチャレイテンシ<1000msである必要があります。
test_camera_launch_perf_class
セクション2.2.7.2CDDのカメラで指定されているように、Sパフォーマンスクラスのカメラ起動遅延をテストします。
合格:両方のプライマリカメラのITS照明条件(3000K)でCTSカメラPerformanceTestによって測定された場合、camera2の起動待ち時間(最初のプレビューフレームまでカメラを開く)が600ms未満である必要があります。
シーン2_d
test_num_faces
顔のシーンで肌の色の多様性を高めて顔検出をテストします。
テストされたAPI:
-
android.hardware.camera2.CaptureResult#STATISTICS_FACES -
android.hardware.camera2.CaptureResult#STATISTICS_FACE_DETECT_MODE
パス: 3つの顔を検索します。
シーン2_e
test_continuous_picture
50 VGA解像度のフレームは、キャプチャ要求の最初の設定android.control.afMode = 4 (CONTINUOUS_PICTURE).
テストされたAPI:
android.hardware.camera2.CaptureRequest#CONTROL_CAPTURE_INTENTandroid.hardware.camera2.CaptureResult#CONTROL_POST_RAW_SENSITIVITY_BOOST
パス: 3Aシステムは、50フレームのキャプチャの最後に落ち着きます。
test_num_faces
顔のシーンで肌の色の多様性を高めて顔検出をテストします。
テストされたAPI:
-
android.hardware.camera2.CaptureResult#STATISTICS_FACES -
android.hardware.camera2.CaptureResult#STATISTICS_FACE_DETECT_MODE
パス: 3つの顔を検索します。
シーン3
Scene3はISO12233チャートを使用し、ほとんどのテストはチャート抽出メソッドを使用してシーン内のチャートを検索します。このため、保存された画像のほとんどには、シーン1、2、または4の画像のように境界線がなく、チャートのみがあります。
test_3a_consistency
3Aの整合性をテストします。
テストされたAPI:
-
android.hardware.camera2.CaptureRequest#COLOR_CORRECTION_GAINS -
android.hardware.camera2.CaptureRequest#COLOR_CORRECTION_TRANSFORM -
android.hardware.camera2.CaptureRequest#LENS_FOCUS_DISTANCE -
android.hardware.camera2.CaptureResult#SENSOR_EXPOSURE_TIME -
android.hardware.camera2.CaptureResult#SENSOR_SENSITIVITY
パス: 3Aは、露出、ゲイン、awb(自動ホワイトバランス)、およびfd(焦点距離)について、許容範囲内で3回収束します。
test_edge_enhancement
android.edge.modeパラメーターが正しく適用されていることをテストします。エッジモードごとに非再処理画像をキャプチャし、出力画像の鮮明度とキャプチャ結果のメタデータを返します。指定されたエッジモード、感度、露出時間、焦点距離、および出力面パラメータを使用してキャプチャ要求を処理します。
パス:高速モードは、HQ(高品質)モードよりもシャープではありません。
テストされたAPI:
影響を受けるカメラパラメータ:
-
EDGE_MODE
test_edge_enhancement_edge = 0.jpg

test_edge_enhancement_edge = 1.jpg(高速モード)

test_edge_enhancement_edge = 2.jpg(高品質モード)
test_flip_mirror
CDDセクション7.5.2正面カメラ[C-1-5]に従って画像が適切に方向付けられているかどうかをテストします。
ミラーリング、フリップ、またはローテーションされた画像は、中央付近のひし形の特徴で識別できます。
パス:画像は反転、ミラーリング、または回転されません。
test_flip_mirror_scene_patch.jpg
test_lens_movement_reporting
レンズ移動フラグが適切に報告されているかどうかをテストします。最適な焦点距離(3Aで検出)の最初の12フレームと、最小の焦点距離の最後の12フレームで24枚の画像のバーストをキャプチャします。フレーム12の周りでレンズが動き、シャープネスが低下します。レンズが最終位置に移動すると、シャープネスは最終的に安定します。 The lens movement flag should be asserted in all frames where the sharpness is intermediate to sharpness in the first 10 frames with the lens stationary at optimum focal distance, and the final 10 frames where the lens is stationary in the minimum focal distance. The exact frame the lens moves isn't important: what is checked is that the movement flag is asserted when the lens is moving.
APIs tested:
-
android.hardware.camera2.CameraCharacteristics#LENS_INFO_MINIMUM_FOCUS_DISTANCE -
android.hardware.camera2.CaptureResult#LENS_STATE -
android.hardware.camera2.CaptureResult#LENS_FOCUS_DISTANCE -
android.hardware.camera2.CaptureResult#SENSOR_TIMESTAMP -
android.hardware.camera2.CaptureRequest#LENS_FOCUS_DISTANCE
Pass: Lens movement flag is True in the frame with sharpness change.
test_lens_position
Tests if the focus position is properly reported for moving lenses.
APIs tested:
-
android.hardware.camera2.CameraCharacteristics#LENS_INFO_HYPERFOCAL_DISTANCE -
android.hardware.camera2.CameraCharacteristics#LENS_INFO_MINIMUM_FOCUS_DISTANCE -
android.hardware.camera2.CaptureResult#LENS_STATE -
android.hardware.camera2.CaptureResult#SENSOR_TIMESTAMP
Pass: Correct focus positions are reported.
test_reprocess_edge_enhancement
Returns sharpness of the output images and the capture result metadata. Processes a capture request with a given edge mode, sensitivity, exposure time, focus distance, output surface parameter, and reprocess format.
APIs tested:
-
android.hardware.camera2.CaptureRequest#EDGE_MODE -
android.hardware.camera2.CaptureRequest#REPROCESS_EFFECTIVE_EXPOSURE_FACTOR
Pass: Sharpness for the different edge modes is correct.
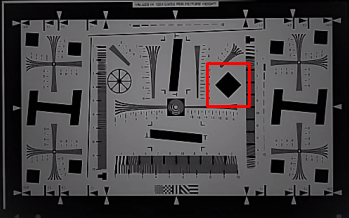
scene4
Scene4 consists of a black circle on a white background inside a square.
scene4
test_aspect_ratio_and_crop
Takes pictures of a circle inside of a square over all formats. Verifies that the aspect ratio of the circle doesn't change, the cropped images keep the circle in center, and the circle size doesn't change for a constant format or with different resolution (field of view check).
APIs tested:
-
android.hardware.camera2.CaptureResult#LENS_DISTORTION -
android.hardware.camera2.CaptureResult#LENS_FOCAL_LENGTH -
android.hardware.camera2.CaptureResult#LENS_INTRINSIC_CALIBRATION
Pass: Images aren't stretched, the center of images don't differ by more than 3%, and the maximum possible FOV (field of view) is preserved.
test_multi_camera_alignment
Tests the multi camera system parameters related to camera spacing. Using the multi-camera physical sub-cameras, takes a picture with one of the physical cameras. Finds the circle center. Projects the circle center to the world coordinates for each camera. Compares the difference between the cameras' circle centers in world coordinates. Reprojects the world coordinate back to pixel coordinates and compares against originals as a validity check. Compares the circle sizes checking if the focal lengths of the cameras are different.
APIs tested:
-
android.hardware.camera2.CameraCharacteristics#getPhysicalCameraIds() -
android.hardware.camera2.CameraCharacteristics#LENS_DISTORTION -
android.hardware.camera2.CameraCharacteristics#LENS_INTRINSIC_CALIBRATION -
android.hardware.camera2.CameraCharacteristics#LENS_POSE_ROTATION -
android.hardware.camera2.CameraCharacteristics#LENS_POSE_TRANSLATION -
android.hardware.camera2.CameraMetadata#REQUEST_AVAILABLE_CAPABILITIES_LOGICAL_MULTI_CAMERA -
android.hardware.camera2.CaptureRequest#SCALER_CROP_REGION -
android.hardware.camera2.CaptureRequest#DISTORTION_CORRECTION_MODE
Pass: Focal lengths and circles sizes are consistent.
scene5/diffuser
test_lens_shading_and_color_uniformity
Tests that the lens shading correction is applied appropriately, and color of a monochrome uniform scene is evenly distributed. Performs this test on a YUV frame with auto 3A. Lens shading is evaluated based on the y channel. Measures the average y value for each sample block specified, and determines pass or fail by comparing with the center y value. The color uniformity test is evaluated in r/g and b/g space.
APIs tested:
-
android.hardware.camera2.CaptureRequest#CONTROL_AE_MODE -
android.hardware.camera2.CaptureRequest#CONTROL_AWB_MODE
Pass: At the specified radius of the image, the variance of r/g and b/g value must be less than 20% to pass the test.
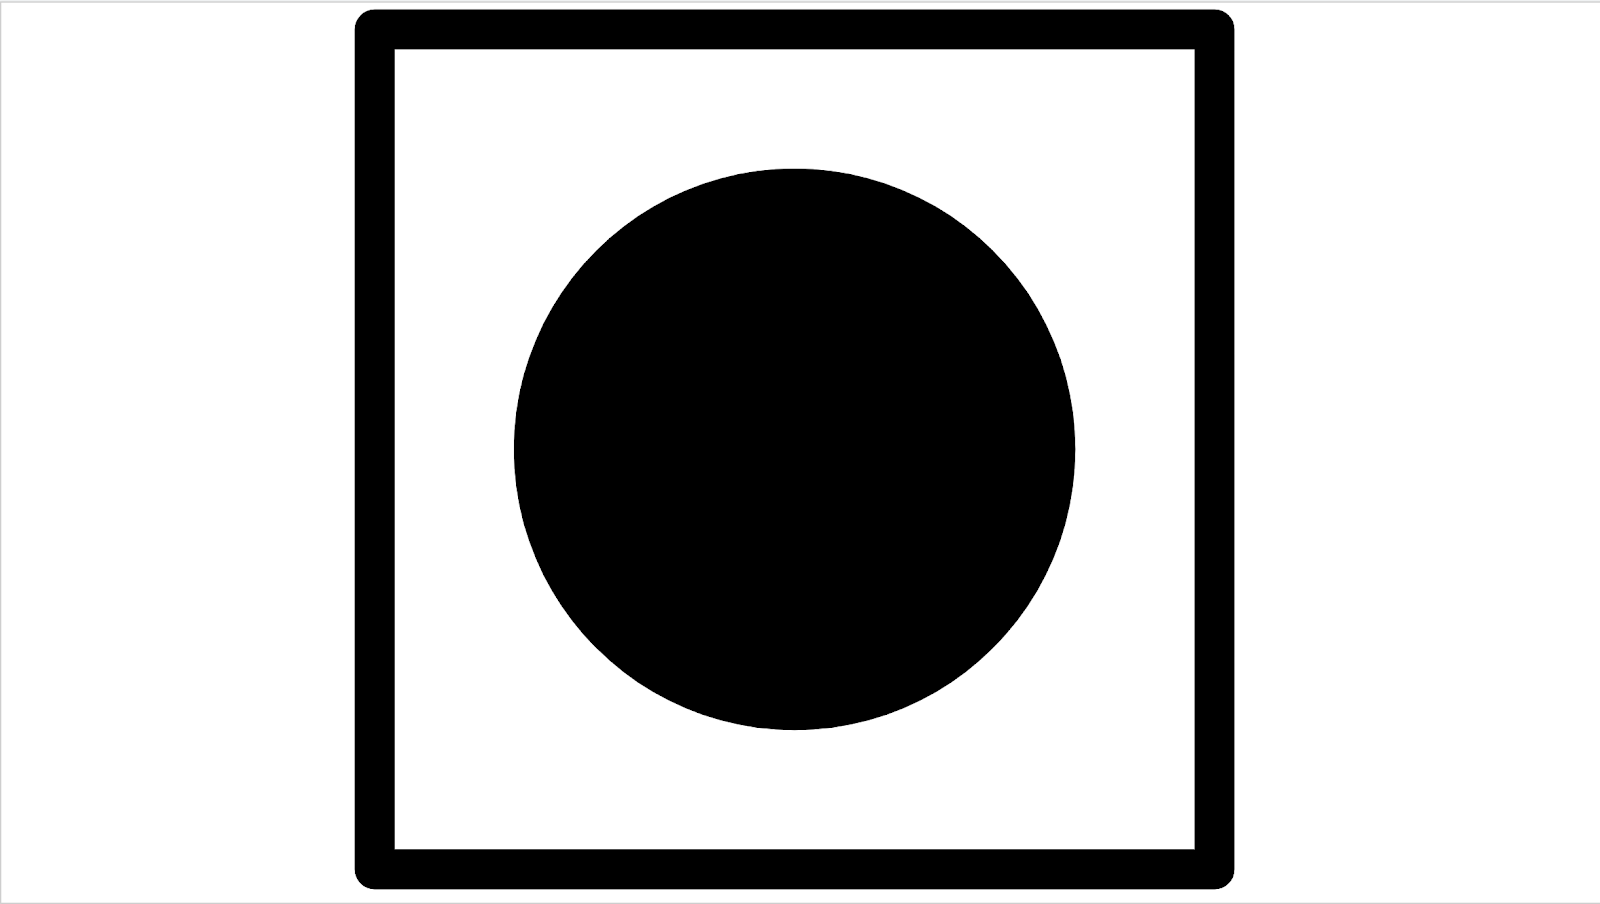
scene6
Scene6 is a grid of small circles with a square in one corner to indicate orientation. The small circles are needed to test zoom function over a large range.
scene6
test_zoom
Tests the camera zoom behavior. Takes captures over the zoom range and checks if the circles get bigger as the camera zooms in.
APIs tested:
-
android.hardware.camera2.CameraCharacteristics#CONTROL_ZOOM_RATIO_RANGE -
android.hardware.camera2.CameraCharacteristics#LENS_INFO_AVAILABLE_FOCAL_LENGTHS -
android.hardware.camera2.CaptureRequest#CONTROL_ZOOM_RATIO -
android.hardware.camera2.CaptureResult#LENS_FOCAL_LENGTH
Pass: Relative size of captured circle is accurate against requested zoom ratio to ensure camera is zooming correctly.
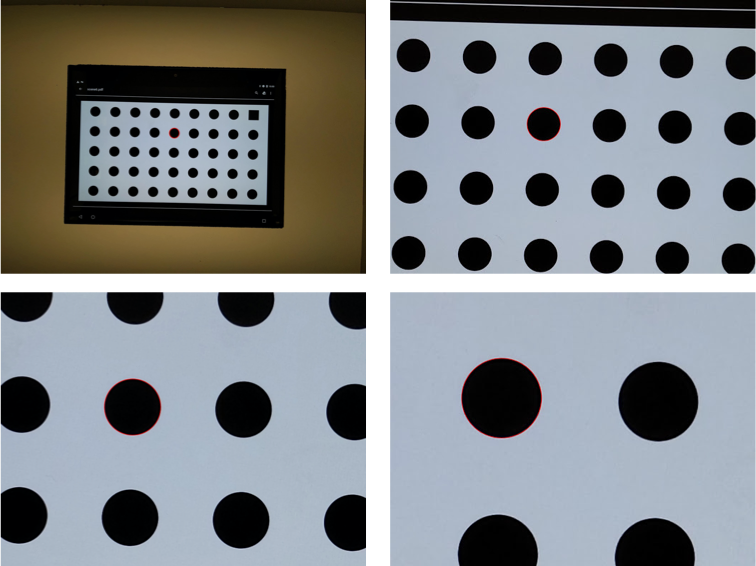
test_zoom to find the contour of the circle closest to the center.
scene_change
test_scene_change
The scene change makes use of the tablet displaying a face scene and then turns the tablet on and off to create a scene change. The scene reuses scene2_e, but is in a separate scene because of the required tablet control. Additionally, for manual testing, the scene change can be accomplished by waving your hand in front of the camera.
APIs tested:
Pass: The android.control.afSceneChange flag is asserted with a scene change.
sensor_fusion
Sensor fusion tests require specific phone movement in front of a checkerboard pattern. The sensor_fusion tests can be automated with the Sensor Fusion Box .
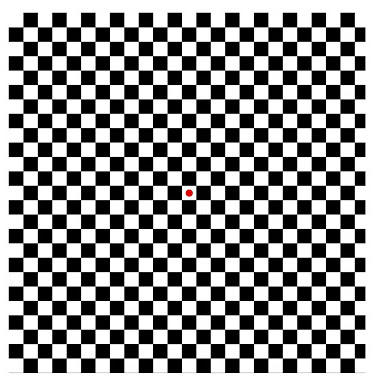
Image of checkerboard
test_multi_camera_frame_sync
Tests that frame timestamps captured by logical camera are within 10 ms by computing angles of squares within the checkerboard to determine the timestamp.
APIs tested:
-
android.hardware.camera2.CameraCharacteristics#LOGICAL_MULTI_CAMERA_SENSOR_SYNC_TYPE -
android.hardware.camera2.CameraCharacteristics#getPhysicalCameraIds() -
android.hardware.camera2.CameraMetadata#REQUEST_AVAILABLE_CAPABILITIES_LOGICAL_MULTI_CAMERA -
android.hardware.camera2.params.OutputConfiguration#setPhysicalCameraId()
Pass: Angle between images from each camera doesn't change appreciably as phone is rotated.
test_sensor_fusion
Tests the timestamp difference between the camera and the gyroscope for AR and VR applications. Phone is rotated 90 degrees 10 times in front of the checkerboard pattern. Motion is about 2 s round trip. This test is skipped if no gyroscope is included or if the REALTIME parameter is not enabled.
The test_sensor_fusion test generates a number of plots. The two most important plots for debugging are:
test_sensor_fusion_gyro_events: Shows the gyroscope events for the phone during the test. Movement in the x and y direction implies the phone isn't securely mounted on the mounting plate, reducing the probability of the test passing. The number of cycles in the plot depends on the write speed for saving frames.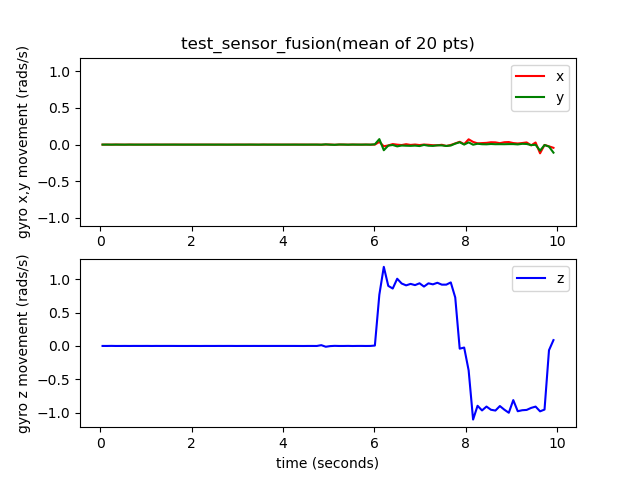
test_sensor_fusion_gyro_events
test_sensor_fusion_plot_rotations: Shows the alignment of the gyroscope and camera events. This plot must show matching movement between camera and gyroscope to +/-1 ms.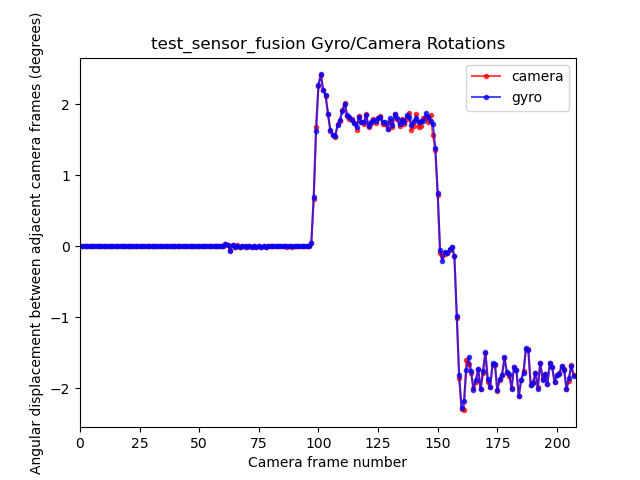
test_sensor_fusion_plot_rotations
APIs tested:
-
android.hardware.camera2.CameraCharacteristics#LENS_FACING -
android.hardware.camera2.CaptureRequest#CONTROL_AE_TARGET_FPS_RANGE -
android.hardware.camera2.CaptureRequest#SENSOR_FRAME_DURATION -
android.hardware.camera2.CaptureRequest#SENSOR_TIMESTAMP -
android.hardware.camera2.CaptureResult#SENSOR_ROLLING_SHUTTER_SKEW
Pass: Camera and gyroscope timestamps' offset is less than 1 ms as per CDD section 7.3.9 High Fidelity Sensors [C-2-14] .