

Verwenden Sie die car-ui-lib-Bibliothek, um in sich konsistente Infotainmentsysteme (In-Vehicle Infotainment, IVI) zu starten. In diesem Codelab erfahren Sie mehr über car-ui-lib und wie Sie Laufzeit-Ressourcen-Overlays (RROs) verwenden können, um Komponenten in der Bibliothek anzupassen.
Lerninhalte
Anleitung:
car-ui-lib-Komponenten in Ihre Android-App einbinden- Android-Apps und RROs mit Gradle erstellen
- RROs mit
car-ui-libverwenden
In diesem Codelab wird nicht im Detail beschrieben, wie RROs funktionieren. Weitere Informationen finden Sie unter Den Wert der Ressourcen einer App zur Laufzeit ändern und Fehlerbehebung bei Ressourcen-Overlays zur Laufzeit.
Vorbereitung
Vorbereitung
Bevor Sie beginnen, benötigen Sie Folgendes:
Computer mit Befehlszeile (Linux-Computer, Mac oder Windows-Computer mit Windows-Subsystem für Linux).
Ein Android-Gerät oder ‑Emulator ist mit Ihrem Computer verbunden. Weitere Informationen finden Sie unter Android-Quellcode herunterladen und Android erstellen.
Grundkenntnisse zu RROs.
Neue Android-App erstellen
Dauer:15 Minuten
In diesem Abschnitt erstellen Sie ein neues Android Studio-Projekt.
Erstellen Sie in Android Studio eine App mit einem
EmptyActivity.
Abbildung 1.Leere Aktivität erstellen Benennen Sie die App
CarUiCodelabund wählen Sie die Sprache Java aus. Sie können bei Bedarf auch einen Speicherort für die Datei auswählen. Übernehmen Sie für die restlichen Einstellungen die Standardwerte.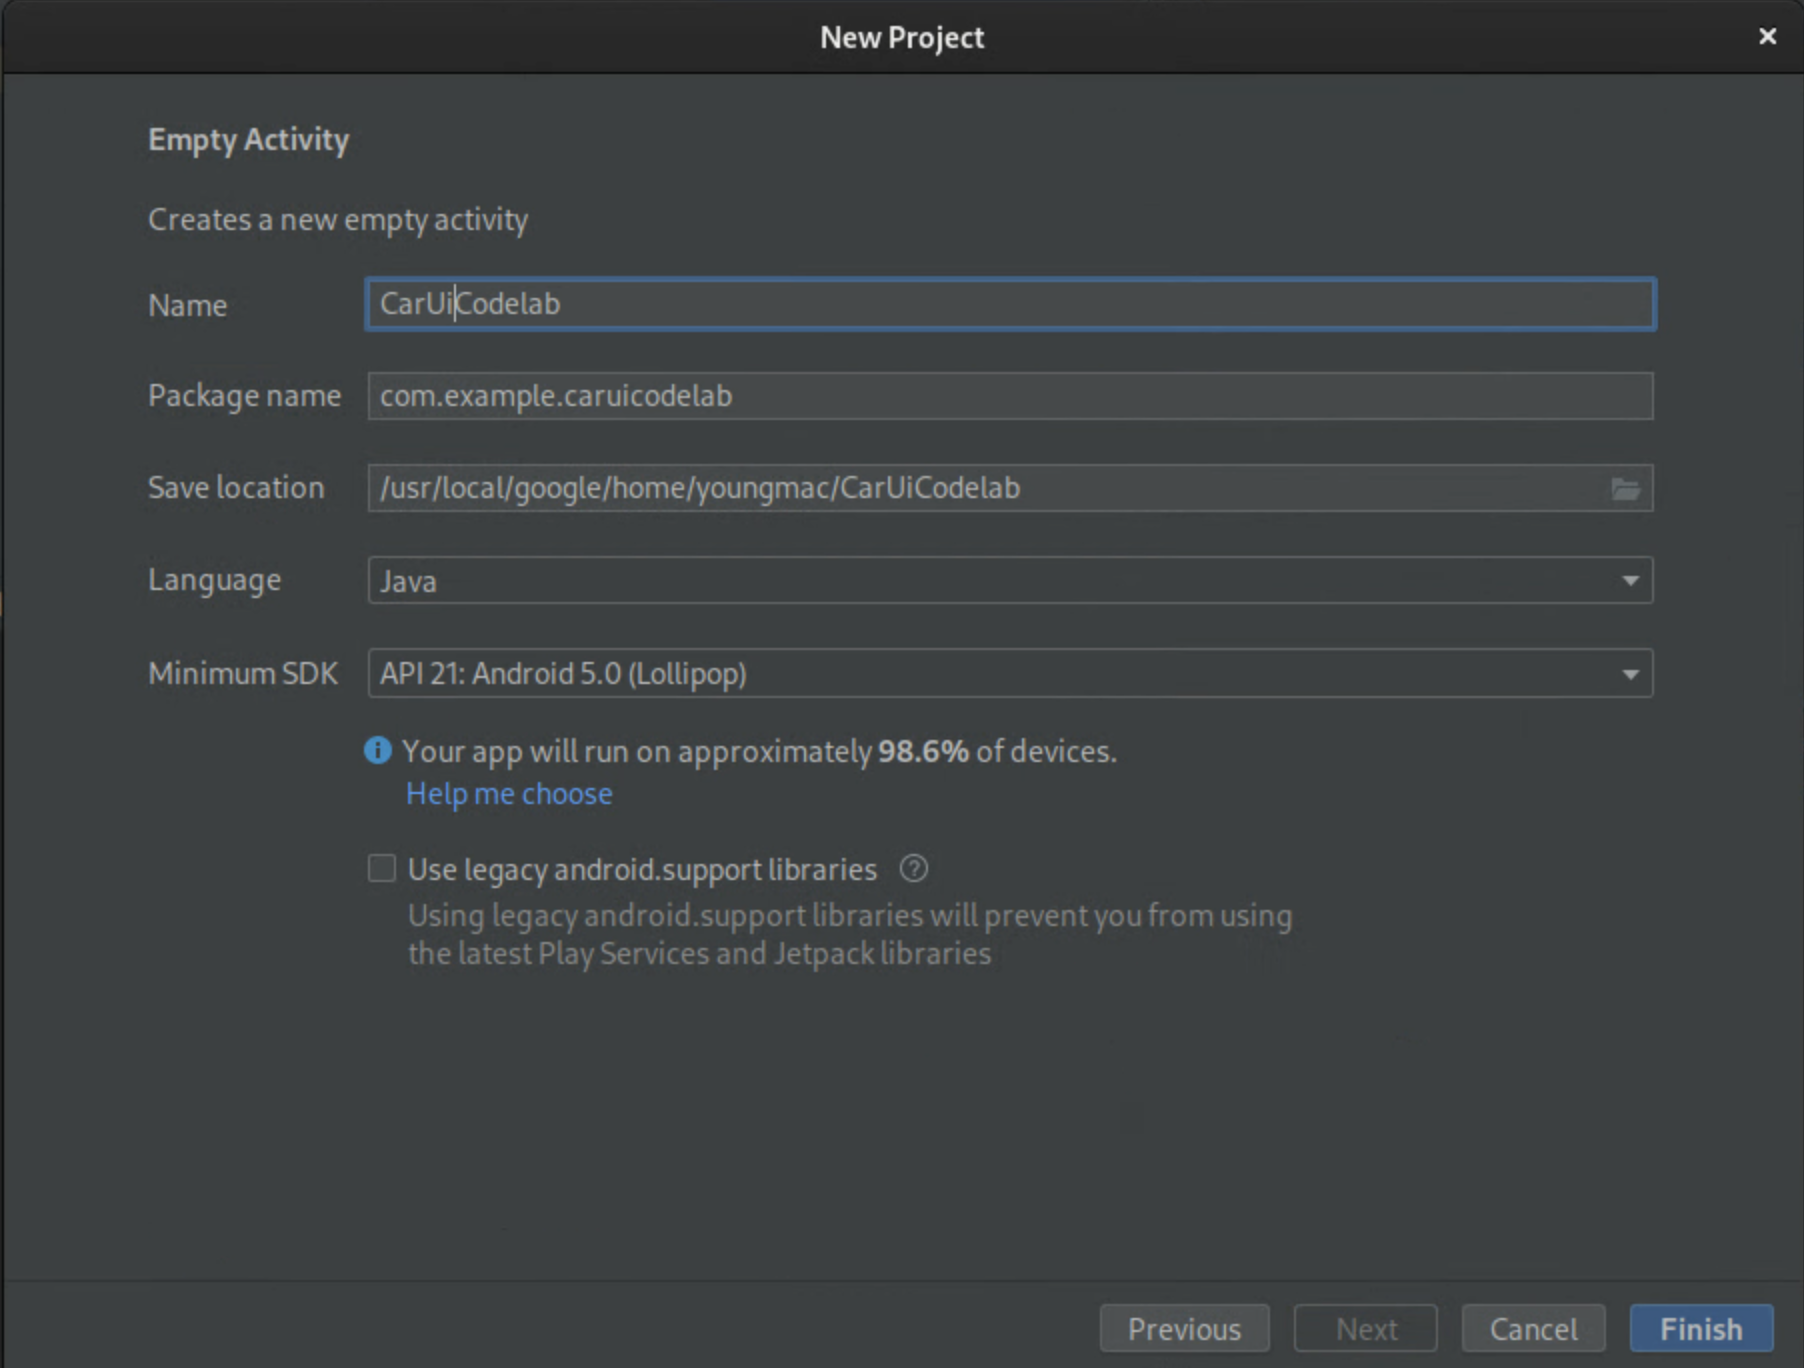
Abbildung 2. App benennen Ersetzen Sie
activity_main.xmldurch den folgenden Codeblock:<?xml version="1.0" encoding="utf-8"?> <androidx.constraintlayout.widget.ConstraintLayout xmlns:android="http://schemas.android.com/apk/res/android" xmlns:app="http://schemas.android.com/apk/res-auto" xmlns:tools="http://schemas.android.com/tools" android:layout_width="match_parent" android:layout_height="match_parent" tools:context=".MainActivity"> <TextView android:id="@+id/textView" android:layout_width="wrap_content" android:layout_height="wrap_content" android:text="@string/sample_text" app:layout_constraintBottom_toBottomOf="parent" app:layout_constraintEnd_toEndOf="parent" app:layout_constraintStart_toStartOf="parent" app:layout_constraintTop_toTopOf="parent" /> </androidx.constraintlayout.widget.ConstraintLayout>In diesem Codeblock wird der String
sample_textangezeigt, der nicht definiert ist.Fügen Sie der Datei
strings.xmlden Ressourcenstringsample_texthinzu und legen Sie ihn auf „Hello World!“ fest. Wählen Sie zum Öffnen dieser Datei app > src > main > res > values > strings.xml aus.<?xml version="1.0" encoding="utf-8"?> <resources> <string name="app_name">CarUiCodelab</string> <string name="sample_text">Hello World!</string> </resources>Klicken Sie rechts oben auf den grünen Button Play (Ausführen), um die App zu erstellen. Dadurch wird die APK-Datei automatisch über Gradle auf Ihrem Emulator oder Android-Gerät installiert.
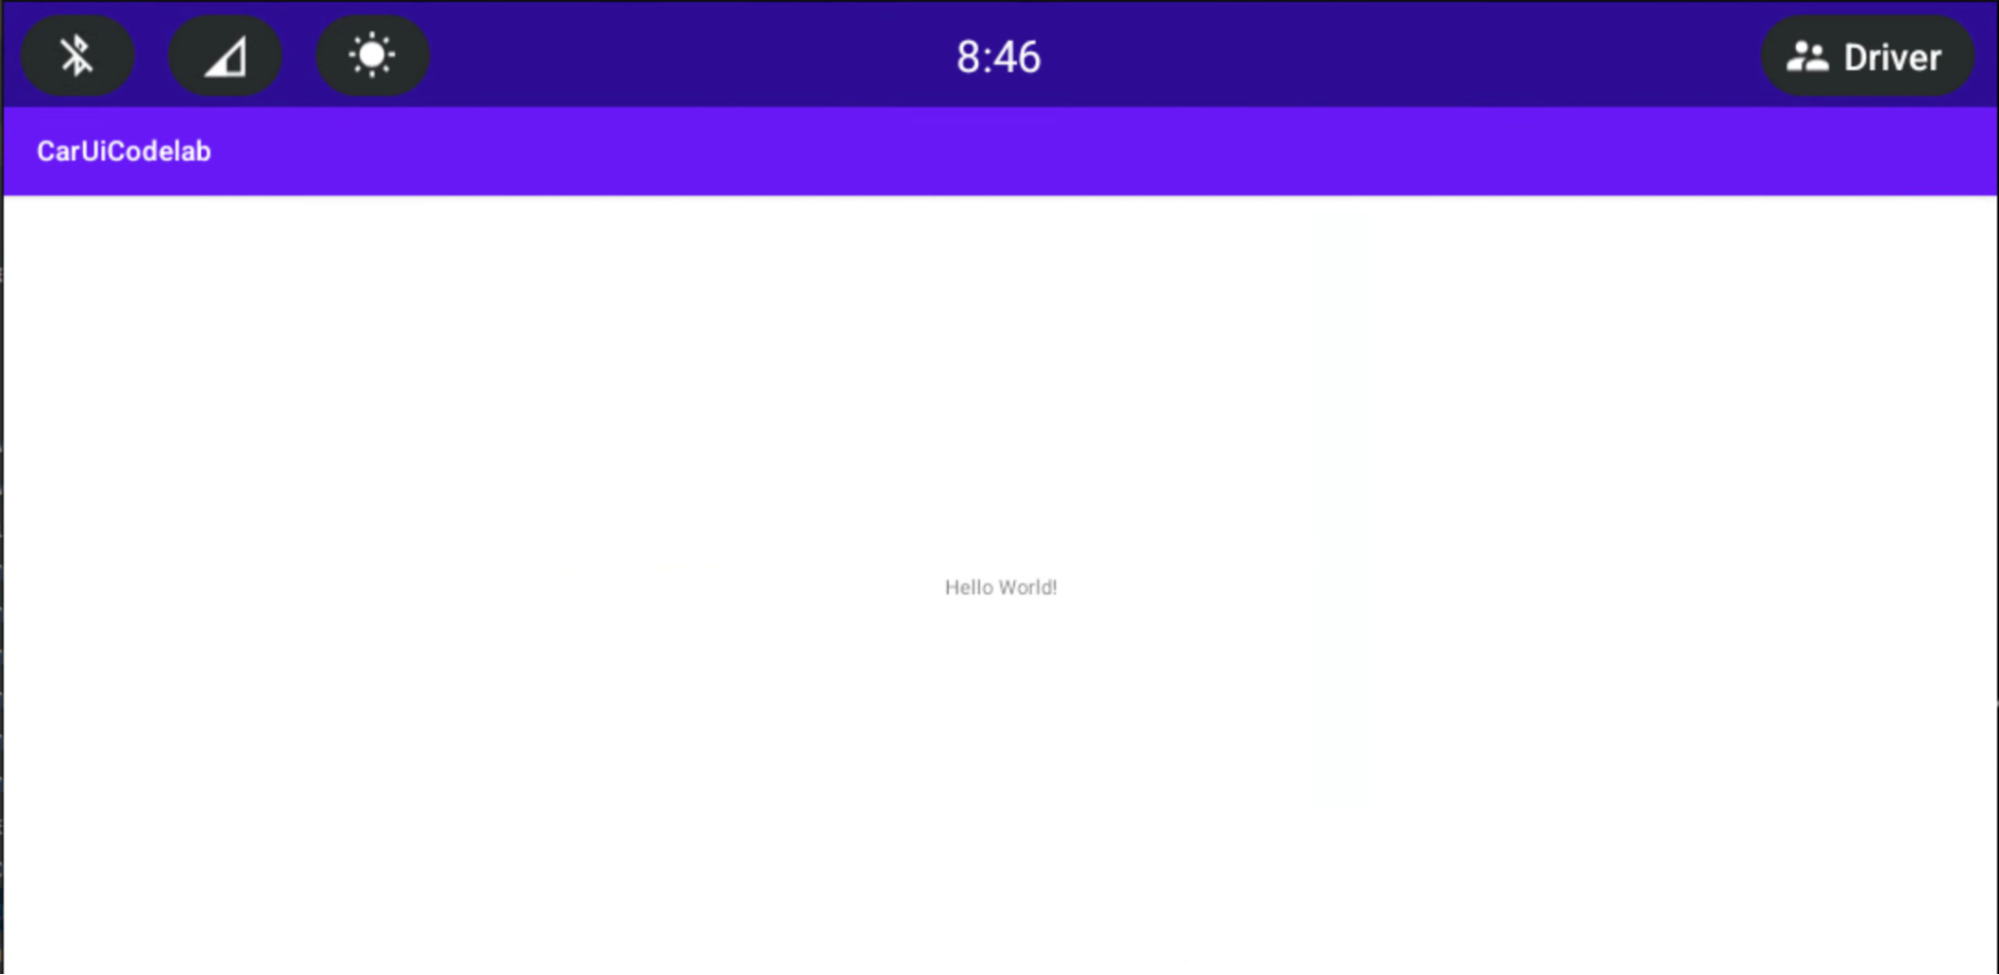
Die neue App sollte sich automatisch auf Ihrem Emulator oder Android-Gerät öffnen. Falls nicht, öffnen Sie die CarUiCodelab App über den App Launcher, der jetzt installiert ist.
Sie sieht so aus:
car-ui-lib zu Ihrer Android-App hinzufügen
Dauer:15 Minuten
Fügen Sie car-ui-lib zu Ihrer App hinzu:
Wenn Sie die
car-ui-lib-Abhängigkeit der Dateibuild.gradleIhres Projekts hinzufügen möchten, wählen Sie app > build.gradle aus. Ihre Abhängigkeiten sollten so aussehen:dependencies { implementation 'com.android.car.ui:car-ui-lib:2.0.0' implementation 'androidx.appcompat:appcompat:1.4.1' implementation 'com.google.android.material:material:1.4.0' implementation 'androidx.constraintlayout:constraintlayout:2.1.4' }
car-ui-lib-Komponenten in Ihrer Android-App verwenden
Nachdem Sie car-ui-lib haben, fügen Sie Ihrer App eine Symbolleiste hinzu.
Überschreiben Sie in der Datei
MainActivity.javadie MethodeonCreate:@Override protected void onCreate(Bundle savedInstanceState) { super.onCreate(savedInstanceState); setContentView(R.layout.activity_main); // Get the toolbar controller instance. ToolbarController toolbar = CarUi.getToolbar(this); // Set the title on toolbar. toolbar.setTitle(getTitle()); // Set the logo to be shown with the title. toolbar.setLogo(R.mipmap.ic_launcher_round); }Achten Sie darauf,
ToolbarControllerzu importieren:import com.android.car.ui.core.CarUi; import com.android.car.ui.toolbar.ToolbarController;Wenn Sie das
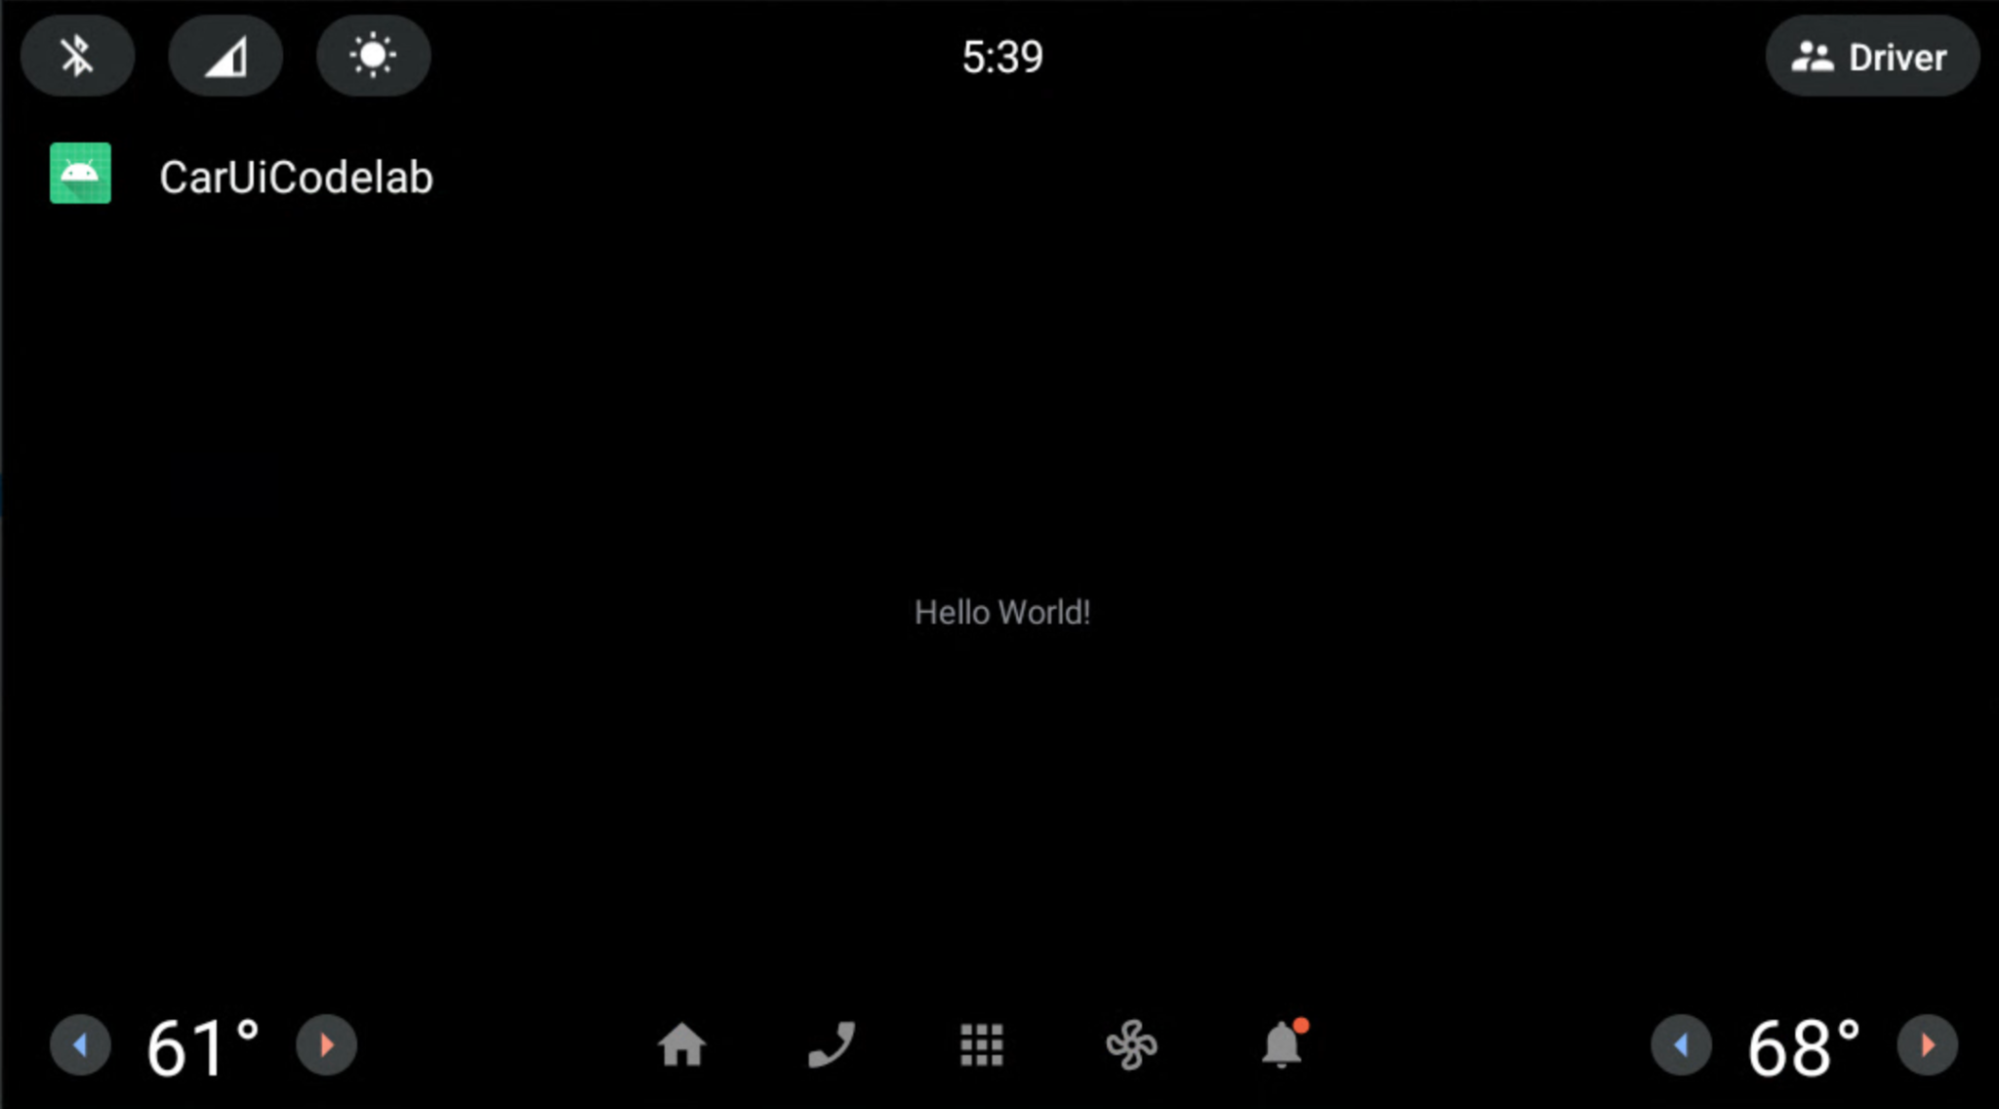
Theme.CarUi.WithToolbar-Design verwenden möchten, wählen Sie app > src > main > AndroidManifest.xml aus und aktualisieren SieAndroidManifest.xmlwie folgt:<?xml version="1.0" encoding="utf-8"?> <manifest xmlns:android="http://schemas.android.com/apk/res/android" xmlns:tools="http://schemas.android.com/tools" package="com.example.caruicodelab"> <application android:allowBackup="true" android:dataExtractionRules="@xml/data_extraction_rules" android:fullBackupContent="@xml/backup_rules" android:icon="@mipmap/ic_launcher" android:label="@string/app_name" android:roundIcon="@mipmap/ic_launcher_round" android:supportsRtl="true" android:theme="@style/Theme.CarUi.WithToolbar" tools:targetApi="31"> <activity android:name=".MainActivity" android:exported="true"> <intent-filter> <action android:name="android.intent.action.MAIN" /> <category android:name="android.intent.category.LAUNCHER" /> </intent-filter> </activity> </application> </manifest>Drücken Sie zum Erstellen der App wie zuvor auf den grünen Button Play (Wiedergabe).
RROs in Ihre App einfügen
Dauer:30 Minuten
Wenn Sie sich mit RROs auskennen, fahren Sie mit dem nächsten Abschnitt Berechtigungscontroller in Ihre App einfügen fort. Andernfalls finden Sie die Grundlagen zu RROs unter Laufzeitwert der Ressourcen einer App ändern.
Berechtigungscontroller zur App hinzufügen
Wenn Sie steuern möchten, welche Ressourcen durch ein RRO-Paket überschrieben werden, fügen Sie dem Ordner /res Ihrer App eine Datei mit dem Namen overlayable.xml hinzu. Diese Datei dient als Berechtigungscontroller zwischen Ihrer App (dem Ziel) und Ihrem RRO-Paket (dem Overlay).
Fügen Sie Ihrer App
res/values/overlayable.xmlhinzu und kopieren Sie den folgenden Inhalt in die Datei:<?xml version="1.0" encoding="utf-8"?> <resources> <overlayable name="CarUiCodelab"> <policy type="public"> <item type="string" name="sample_text"/> </policy> </overlayable> </resources>Da der String
sample_textdurch ein RRO überlagert werden muss, muss der Ressourcenname in der Datei „overlayable.xml“ der App enthalten sein.Ihre
overlayable.xml-Datei MUSS sich inres/values/befinden. Andernfalls kannOverlayManagerServiceden Standort nicht ermitteln.Weitere Informationen zu Ressourcen, die überlagert werden können, und zur Konfiguration finden Sie unter Ressourcen einschränken, die überlagert werden können.
RRO-Paket erstellen
In diesem Abschnitt erstellen Sie ein RRO-Paket, um den oben angezeigten String von „Hello World!“ in „Hello World RRO“ zu ändern.
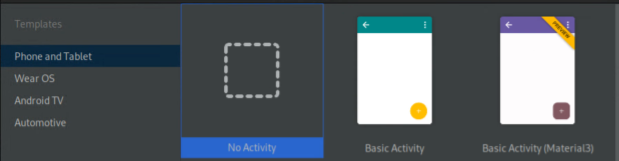
Wenn Sie ein neues Projekt erstellen möchten, wählen Sie File > New > New Project (Datei > Neu > Neues Projekt) aus. Wählen Sie No Activity (Keine Aktivität) anstelle von „Empty Activity“ (Leere Aktivität) aus, da RRO-Pakete nur Ressourcen enthalten.
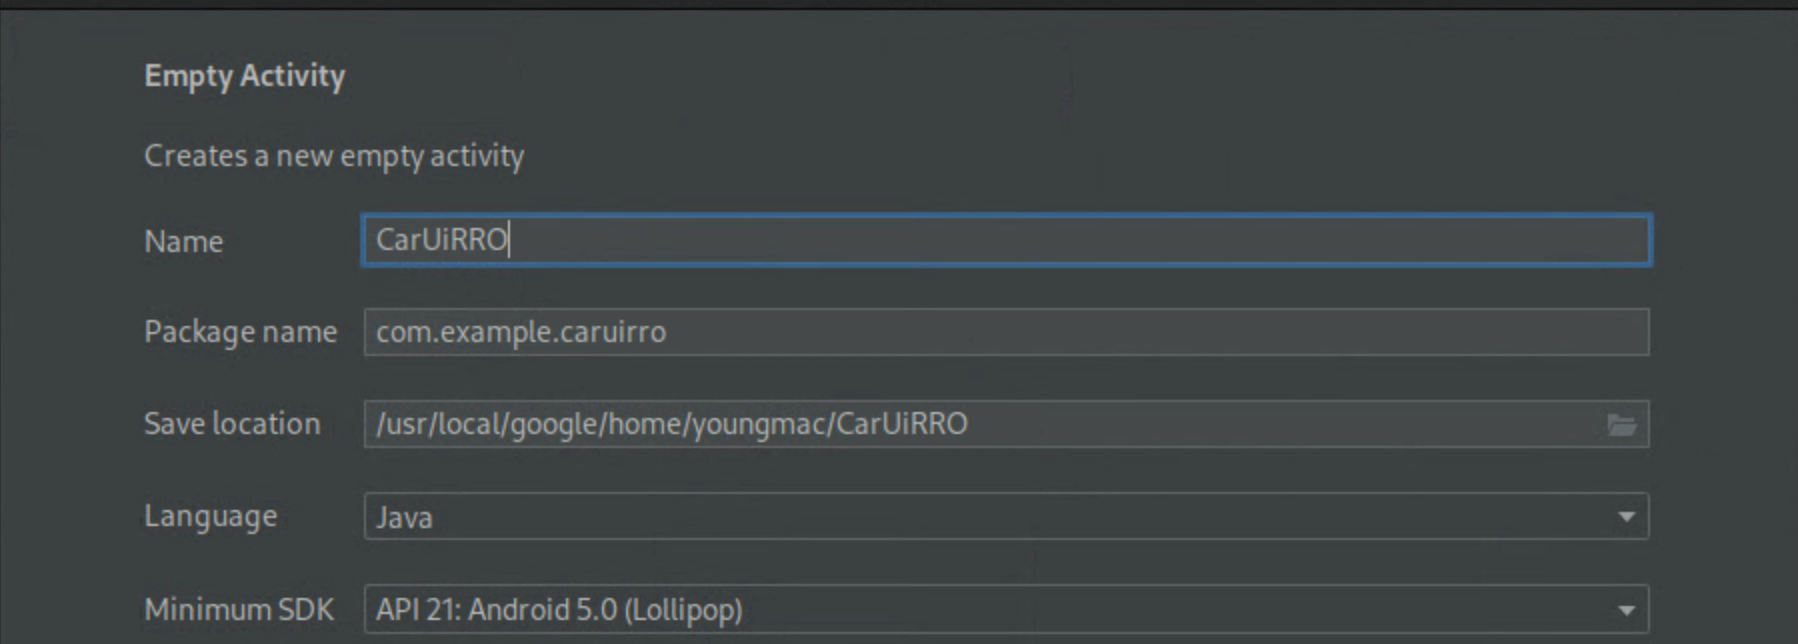
Ihre Konfigurationen sehen ähnlich wie unten dargestellt aus. Der Speicherort kann variieren:
Nachdem Sie das neue
CarUiRRO-Projekt erstellt haben, deklarieren Sie es als RRO, indem SieAndroidManifest.xmländern.<?xml version="1.0" encoding="utf-8"?> <manifest xmlns:android="http://schemas.android.com/apk/res/android" package="com.example.caruirro"> <application android:hasCode="false" /> <uses-sdk android:minSdkVersion="29" android:targetSdkVersion="29"/> <overlay android:targetPackage="com.example.caruicodelab" android:targetName="CarUiCodelab" android:isStatic="false" android:resourcesMap="@xml/sample_overlay" /> </manifest>Dadurch wird ein Fehler mit
@xml/sample_overlayerstellt. In der DateiresourcesMapwerden Ressourcennamen aus dem Zielpaket dem RRO-Paket zugeordnet. Das Setzen des FlagshasCodeauffalseist für RRO-Pakete obligatorisch. Außerdem dürfen RRO-Pakete keine DEX-Dateien enthalten.Kopieren Sie den folgenden Codeblock in
…/res/xml/sample_overlay.xml:<?xml version="1.0" encoding="utf-8"?> <overlay> <item target="string/sample_text" value="@string/sample_text"/> </overlay>sample_textzu…/res/values/strings.xmlhinzufügen:<?xml version="1.0" encoding="utf-8"?> <resources> <string name="app_name">CarUiRRO</string> <string name="sample_text">Hello World RRO</string> </resources>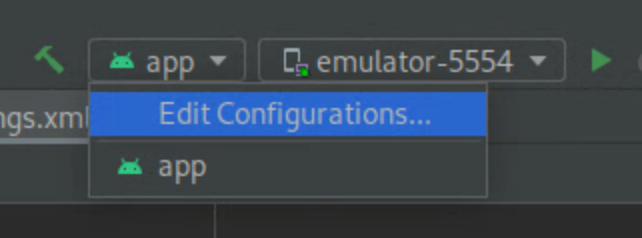
Wenn Sie Ihr RRO-Zielvorhaben erstellen möchten, drücken Sie die grüne Play-Schaltfläche, um einen Gradle-Build Ihres RRO auf Ihrem Emulator oder Android-Gerät zu erstellen.
Führen Sie Folgendes aus, um zu prüfen, ob Ihr RRO richtig installiert ist:
shell:~$ adb shell cmd overlay list --user current | grep -i com.example
com.example.caruicodelab
[ ] com.example.caruirro
Mit diesem Befehl werden nützliche Informationen zum Status von RRO-Paketen im System angezeigt.
[ ]gibt an, dass das RRO installiert ist und aktiviert werden kann.---gibt an, dass das RRO installiert ist, aber Fehler enthält.[X]bedeutet, dass das RRO installiert und aktiviert ist.
Wenn Ihr RRO Fehler enthält, lesen Sie den Abschnitt Fehlerbehebung bei Laufzeit-Ressourcen-Overlays, bevor Sie fortfahren.
So aktivieren Sie das RRO und prüfen, ob es aktiviert ist:
shell:~$ adb shell cmd overlay enable --user current com.example.caruirro
shell:~$ adb shell cmd overlay list --user current | grep -i com.example
com.example.caruicodelab
[x] com.example.caruirro
In Ihrer App wird der String „Hello World RRO“ angezeigt.
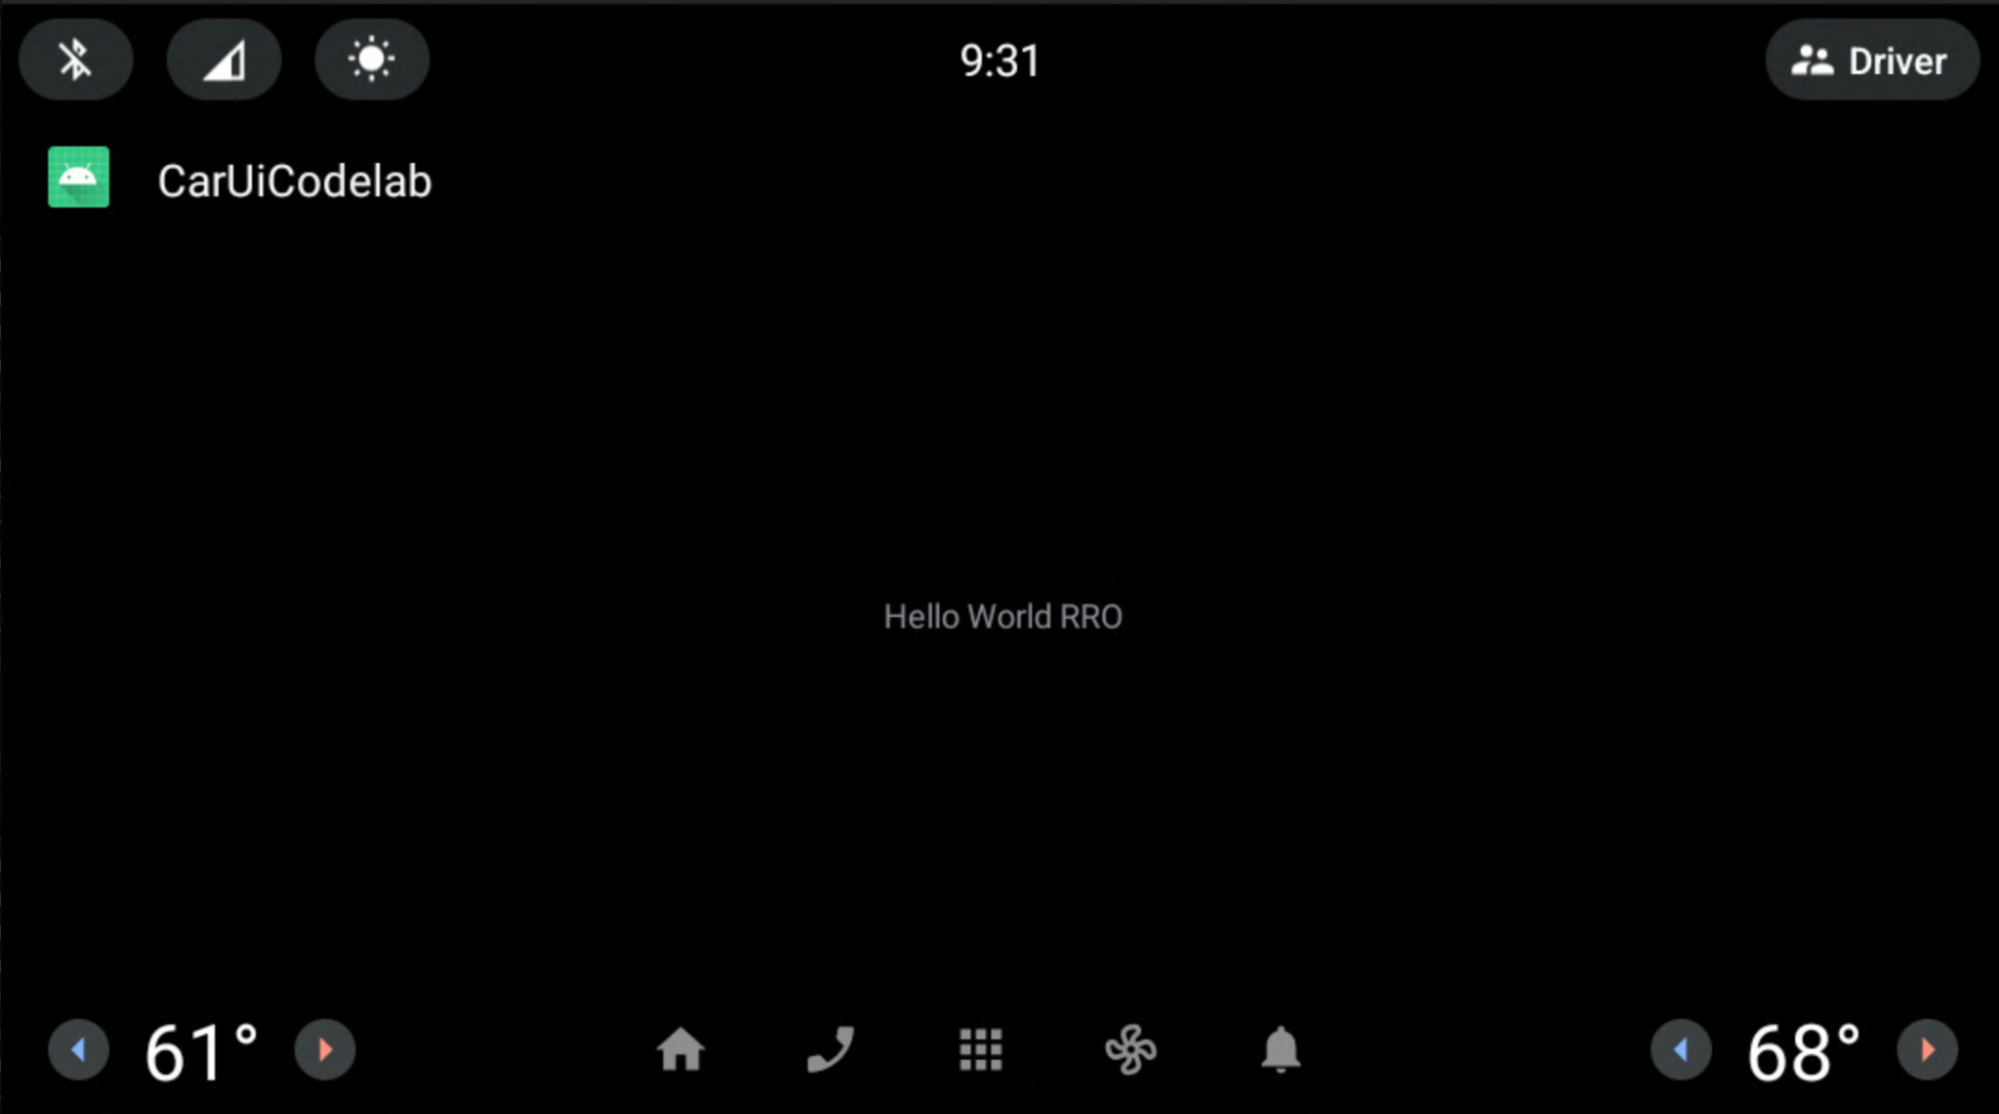
Das wars! Sie haben das Lab erfolgreich abgeschlossen. Sie haben Ihr erstes RRO erstellt.
Wenn Sie RROs verwenden, sollten Sie möglicherweise die AAPT2-Flags (Android Asset Packaging Tool) --no-resource-deduping und --no-resource-removal verwenden, die unter Link options beschrieben werden.
Es ist nicht erforderlich, die Flags in diesem Codelab hinzuzufügen. Wir empfehlen jedoch, sie in Ihren RROs zu verwenden, um das Entfernen von Ressourcen und damit verbundene Probleme zu vermeiden. Sie können sie so der Datei build.gradle Ihres RRO hinzufügen:
android {
    …
    aaptOptions {
        additionalParameters "--no-resource-deduping", "--no-resource-removal"
    }
}
Weitere Informationen zu diesen Flags finden Sie unter Paket erstellen und AAPT2.
car-ui-lib-Komponenten mit RROs in Ihrer Android-App ändern
Auf dieser Seite wird beschrieben, wie Sie mit einem Laufzeit-Ressourcen-Overlay (RRO) Komponenten aus der car-ui-lib-Bibliothek in Ihrer Android-App ändern können.
Hintergrundfarbe der Symbolleiste festlegen
Dauer:15 Minuten
So ändern Sie die Hintergrundfarbe der Symbolleiste:
Fügen Sie Ihrer RRO-App den folgenden Wert hinzu und legen Sie die Ressource auf Hellgrün (
#0F0) fest:<?xml version="1.0" encoding="utf-8"?> <resources> <drawable name="car_ui_toolbar_background">#0F0</drawable> </resources>Die
car-ui-lib-Bibliothek enthält eine Ressource mit dem Namencar_ui_toolbar_background. Wenn diese Ressource in der Konfiguration eines RRO enthalten ist, ändert sich die Symbolleiste nicht, da der falsche Wert als Ziel festgelegt ist.Aktualisieren Sie in der Datei
AndroidManifest.xmlfür Ihr RROtargetName, sodass sie aufcar-ui-libverweist:… android:targetName="car-ui-lib" …Sie MÜSSEN für jedes Zielpaket, das Sie mit RRO versehen möchten, ein neues RRO-Paket erstellen. Wenn Sie beispielsweise Overlays für zwei verschiedene Ziele erstellen, müssen Sie zwei Overlay-APKs erstellen.
Erstellen, prüfen, installieren und aktivieren Sie das RRO auf dieselbe Weise wie zuvor.
Ihre App wird so angezeigt:
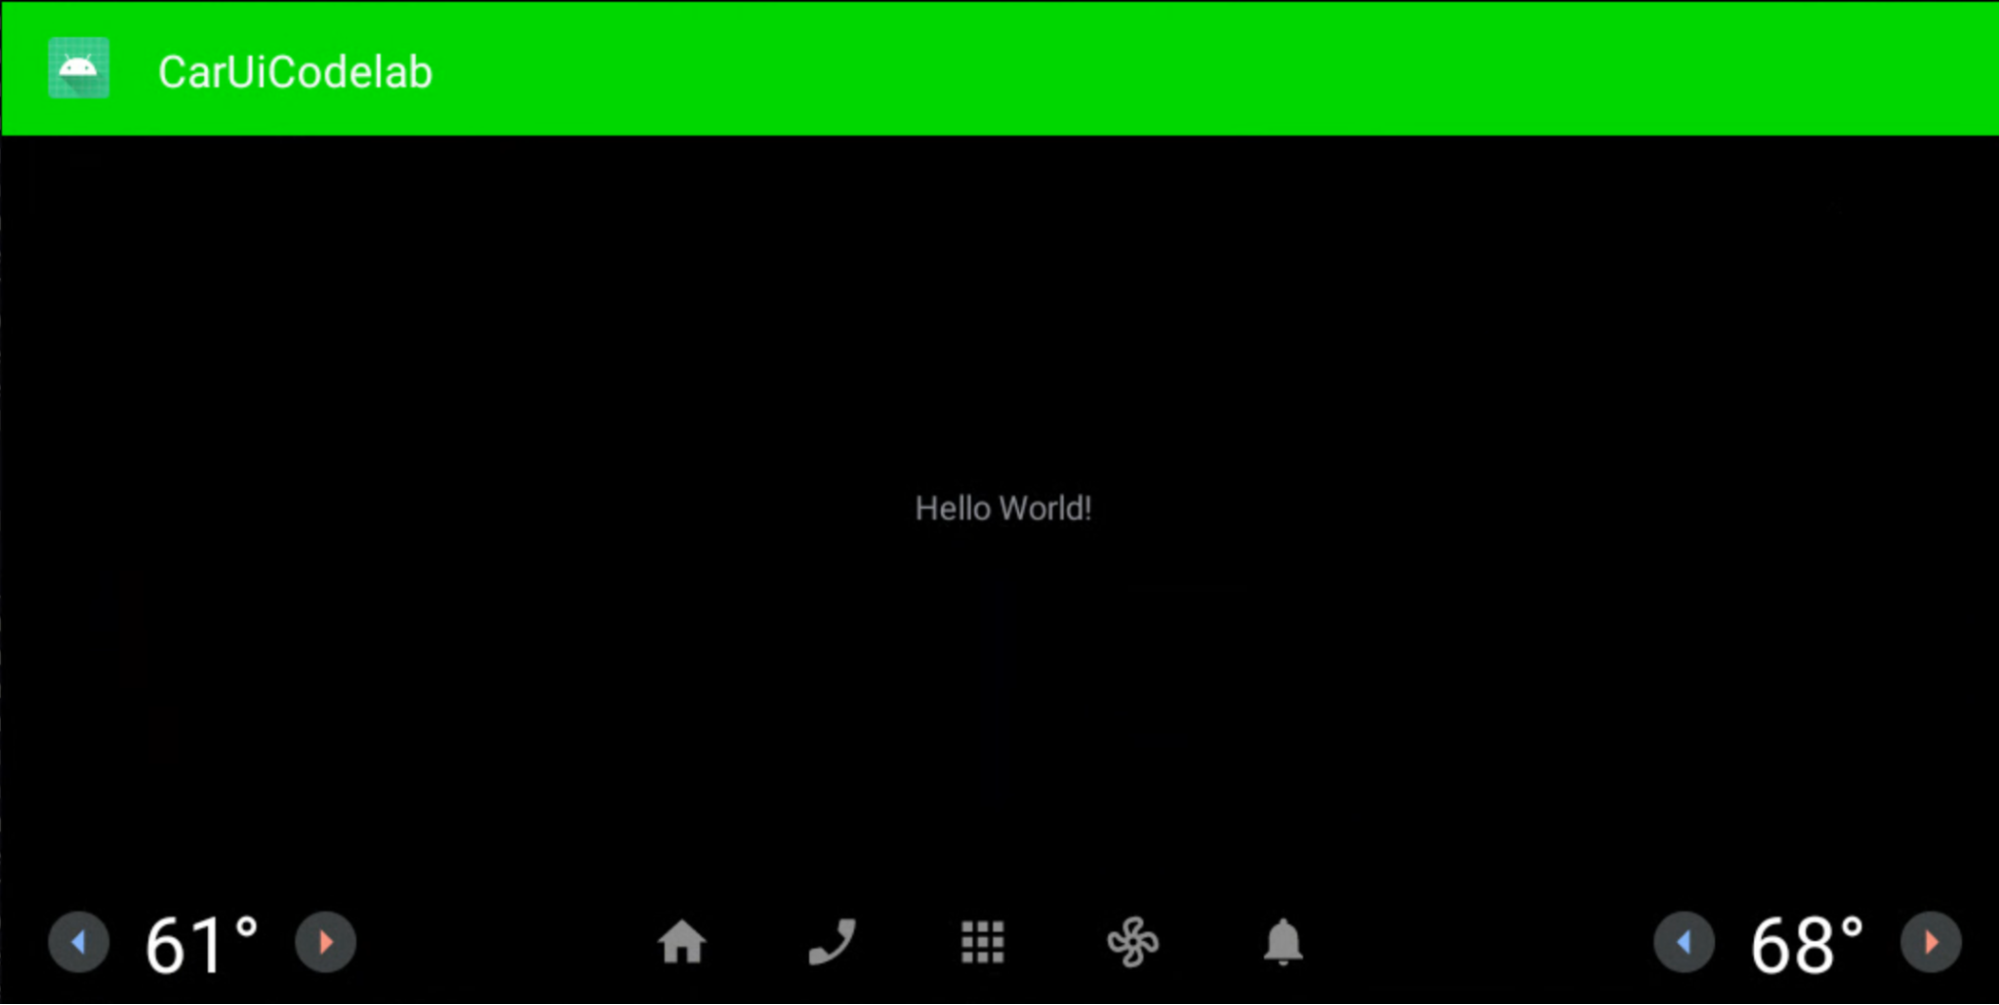
RRO-Layouts und ‑Stile
Dauer:15 Minuten
In dieser Übung erstellen Sie eine neue App, die der App ähnelt, die Sie zuvor erstellt haben. Mit dieser App kann das Layout überlagert werden. Führen Sie dieselben Schritte wie zuvor aus oder ändern Sie Ihre vorhandene App.
Fügen Sie
overlayable.xmldie folgenden Zeilen hinzu:<?xml version="1.0" encoding="utf-8"?> <resources> <overlayable name="CarUiCodelab"> <policy type="public"> <item type="string" name="sample_text"/> <item type="layout" name="activity_main"/> <item type="id" name="textView"/> </policy> </overlayable> </resources>activity_main.xmlsollte so aussehen:<?xml version="1.0" encoding="utf-8"?> <androidx.constraintlayout.widget.ConstraintLayout xmlns:android="http://schemas.android.com/apk/res/android" xmlns:app="http://schemas.android.com/apk/res-auto" xmlns:tools="http://schemas.android.com/tools" android:layout_width="match_parent" android:layout_height="match_parent" tools:context=".MainActivity"> <TextView android:id="@+id/textView" android:layout_width="wrap_content" android:layout_height="wrap_content" android:text="@string/sample_text" app:layout_constraintBottom_toBottomOf="parent" app:layout_constraintEnd_toEndOf="parent" app:layout_constraintStart_toStartOf="parent" app:layout_constraintTop_toTopOf="parent" /> </androidx.constraintlayout.widget.ConstraintLayout>Erstellen Sie in Ihrer RRO-App eine
res/layout/activity_main.xmlund fügen Sie Folgendes hinzu:<?xml version="1.0" encoding="utf-8"?> <FrameLayout xmlns:android="http://schemas.android.com/apk/res/android" android:layout_width="match_parent" android:layout_height="match_parent"> <TextView android:id="@+id/textView" android:layout_width="wrap_content" android:layout_height="wrap_content" android:text="@string/sample_text" android:textAppearance="@style/TextAppearance.CarUi" android:layout_gravity="center_vertical|center_horizontal"/> </FrameLayout>Aktualisieren Sie
res/values/styles.xml, um den Stil dem RRO hinzuzufügen:<?xml version="1.0" encoding="utf-8"?> <resources> <style name="TextAppearance.CarUi" parent="android:TextAppearance.DeviceDefault"> <item name="android:textColor">#0f0</item> <item name="android:textSize">100sp</item> </style> </resources>Ändern Sie
targetNameinAndroidManifest.xmlso, dass es auf den Namen Ihrer neuen App verweist:… android:targetName="CarUiCodelab" …Fügen Sie die Ressourcen der Datei
sample_overlay.xmlin Ihrem RRO hinzu:<?xml version="1.0" encoding="utf-8"?> <overlay> <item target="string/sample_text" value="@string/sample_text"/> <item target="id/textView" value="@id/textView"/> <item target="layout/activity_main" value="@layout/activity_main"/> </overlay>Erstellen und installieren Sie die App und das RRO auf dieselbe Weise wie zuvor (grüne Play-Schaltfläche). Achten Sie darauf, dass Ihr RRO aktiviert ist.
Die App und das RRO werden so gerendert: Der „Hello World“-RRO-Text ist grün und zentriert, wie im Layout-RRO angegeben.
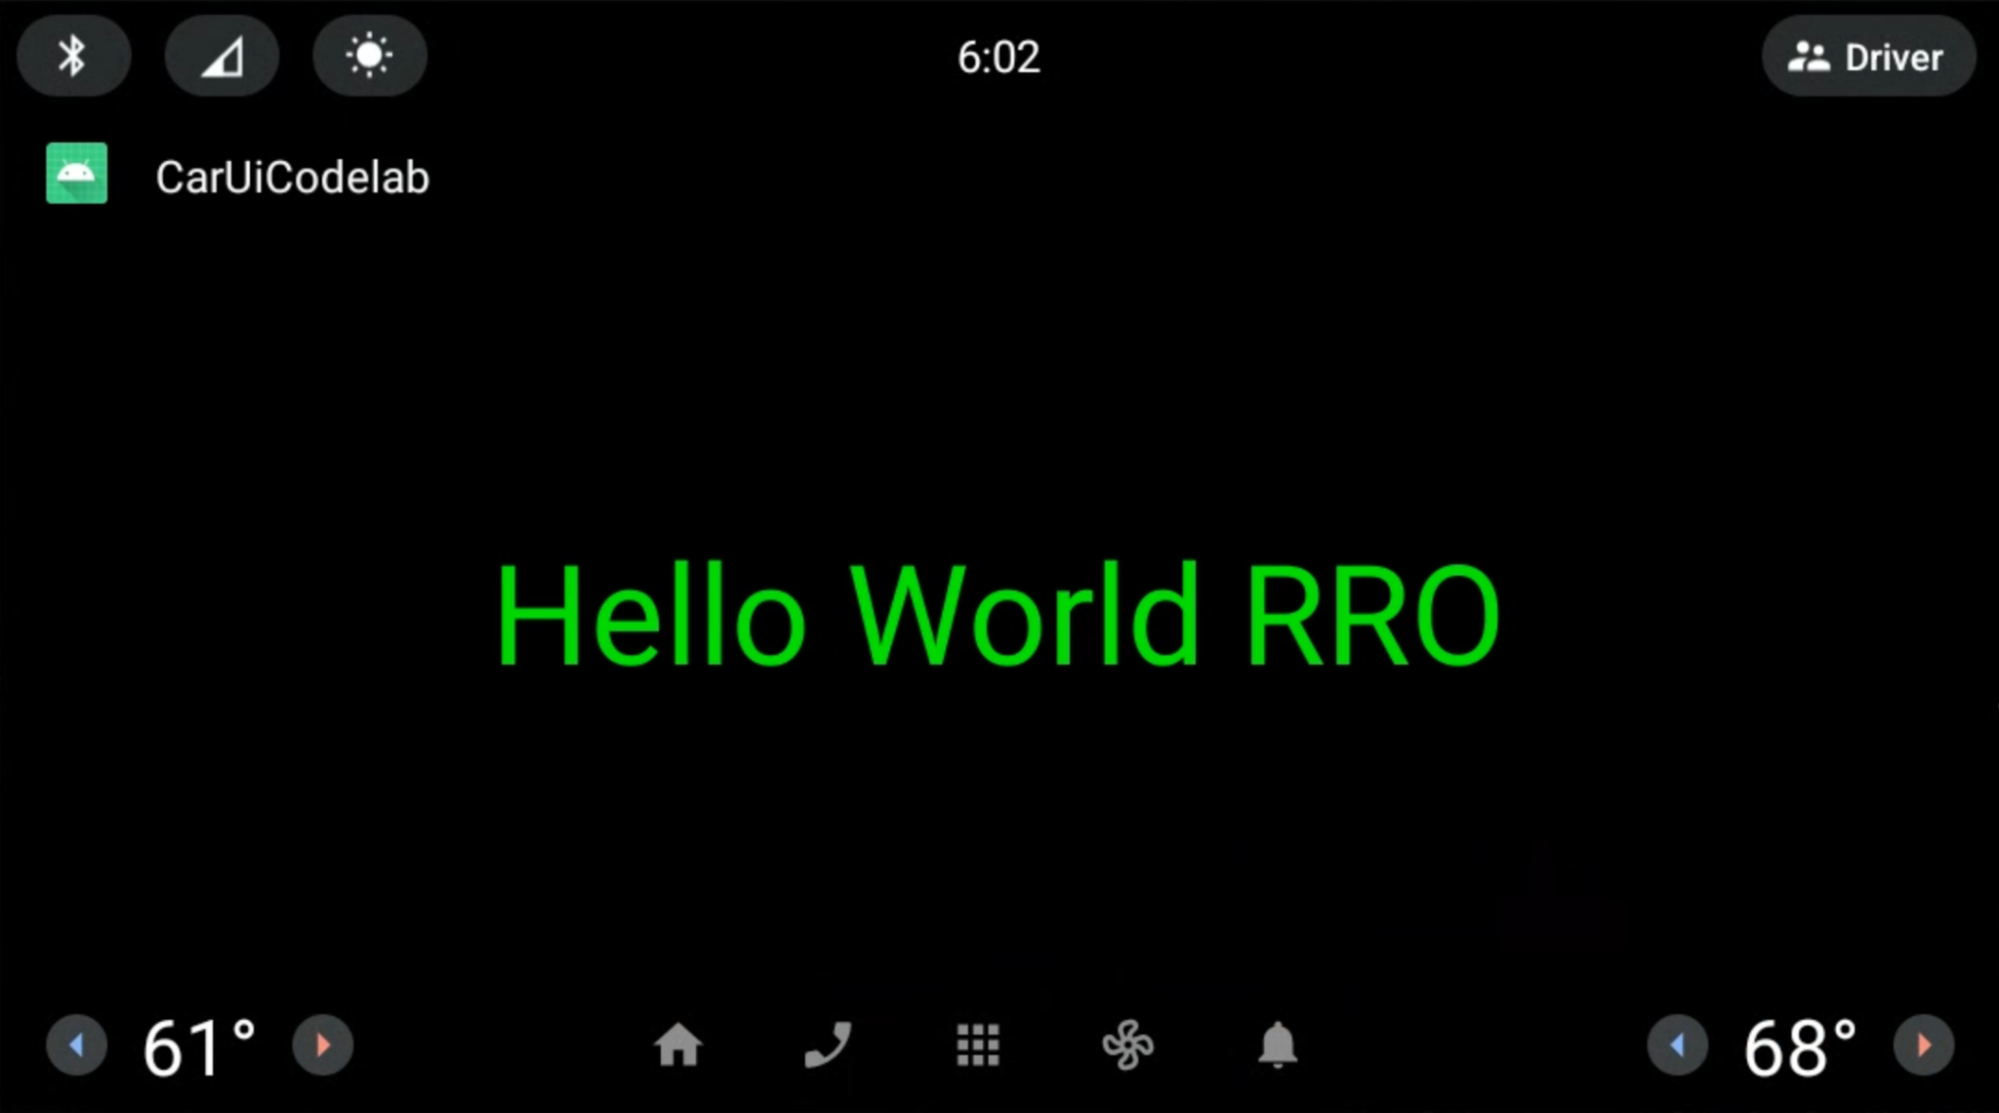
CarUiRecyclerView zur App hinzufügen
Dauer:15 Minuten
Die CarUiRecyclerView-Schnittstelle bietet APIs für den Zugriff auf eine RecyclerView, die über car-ui-lib-Ressourcen angepasst wird. Beispiel: CarUiRecyclerView prüft zur Laufzeit ein Flag, um festzustellen, ob die Scrollleiste aktiviert werden soll oder nicht, und wählt das entsprechende Layout aus.
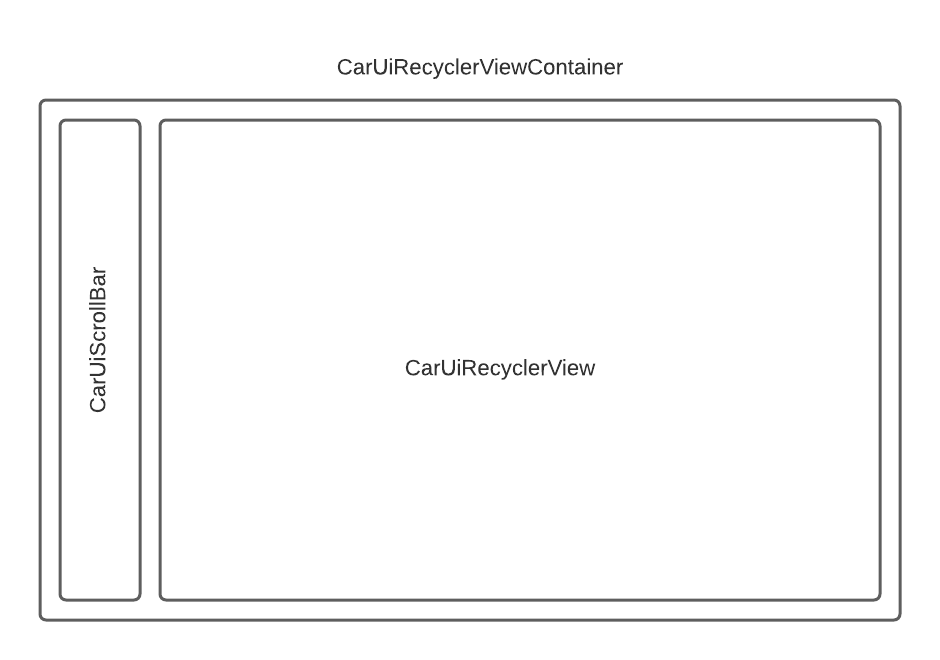
Wenn Sie eine
CarUiRecyclerViewhinzufügen möchten, fügen Sie sie den Dateienactivity_main.xmlundMainActivity.javahinzu. Sie können entweder eine neue App von Grund auf erstellen oder die vorhandene App ändern. Wenn Sie die vorhandene App ändern, müssen Sie nicht deklarierte Ressourcen ausoverlayable.xmlentfernen.activity_main.xml<?xml version="1.0" encoding="utf-8"?> <com.android.car.ui.recyclerview.CarUiRecyclerView android:id="@+id/list" android:layout_width="match_parent" android:layout_height="match_parent"/>Möglicherweise wird der folgende Fehler angezeigt, den Sie ignorieren können:
Cannot resolve class com.android.car.ui.recyclerview.CarUiRecyclerViewSolange der Klassenname richtig geschrieben ist und Sie
car-ui-libals Abhängigkeit hinzugefügt haben, können Sie Ihre APK erstellen und kompilieren. Um den Fehler zu beheben, wählen Sie File > Invalidate Caches (Datei > Caches ungültig machen) und klicken Sie dann auf Invalidate and Restart (Ungültig machen und neu starten).Fügen Sie
MainActivity.javaFolgendes hinzu:package com.example.caruicodelab; import android.app.Activity; import android.os.Bundle; import com.android.car.ui.core.CarUi; import com.android.car.ui.recyclerview.CarUiContentListItem; import com.android.car.ui.recyclerview.CarUiListItem; import com.android.car.ui.recyclerview.CarUiListItemAdapter; import com.android.car.ui.recyclerview.CarUiRecyclerView; import com.android.car.ui.toolbar.ToolbarController; import java.util.ArrayList; /** Activity with a simple car-ui layout. */ public class MainActivity extends Activity { private final ArrayList<CarUiListItem> mData = new ArrayList<>(); private CarUiListItemAdapter mAdapter; @Override protected void onCreate(Bundle savedInstanceState) { super.onCreate(savedInstanceState); setContentView(R.layout.activity_main); ToolbarController toolbar = CarUi.getToolbar(this); toolbar.setTitle(getTitle()); toolbar.setLogo(R.mipmap.ic_launcher_round); CarUiRecyclerView recyclerView = findViewById(R.id.list); mAdapter = new CarUiListItemAdapter(generateSampleData()); recyclerView.setAdapter(mAdapter); } private ArrayList<CarUiListItem> generateSampleData() { for (int i = 0; i < 20; i++) { CarUiContentListItem item = new CarUiContentListItem(CarUiContentListItem.Action.ICON); item.setTitle("Title " + i); item.setPrimaryIconType(CarUiContentListItem.IconType.CONTENT); item.setIcon(getDrawable(R.drawable.ic_launcher_foreground)); item.setBody("body " + i); mData.add(item); } return mData; }Erstellen und installieren Sie Ihre App wie bisher.
Sie sehen jetzt CarUiRecyclerView:
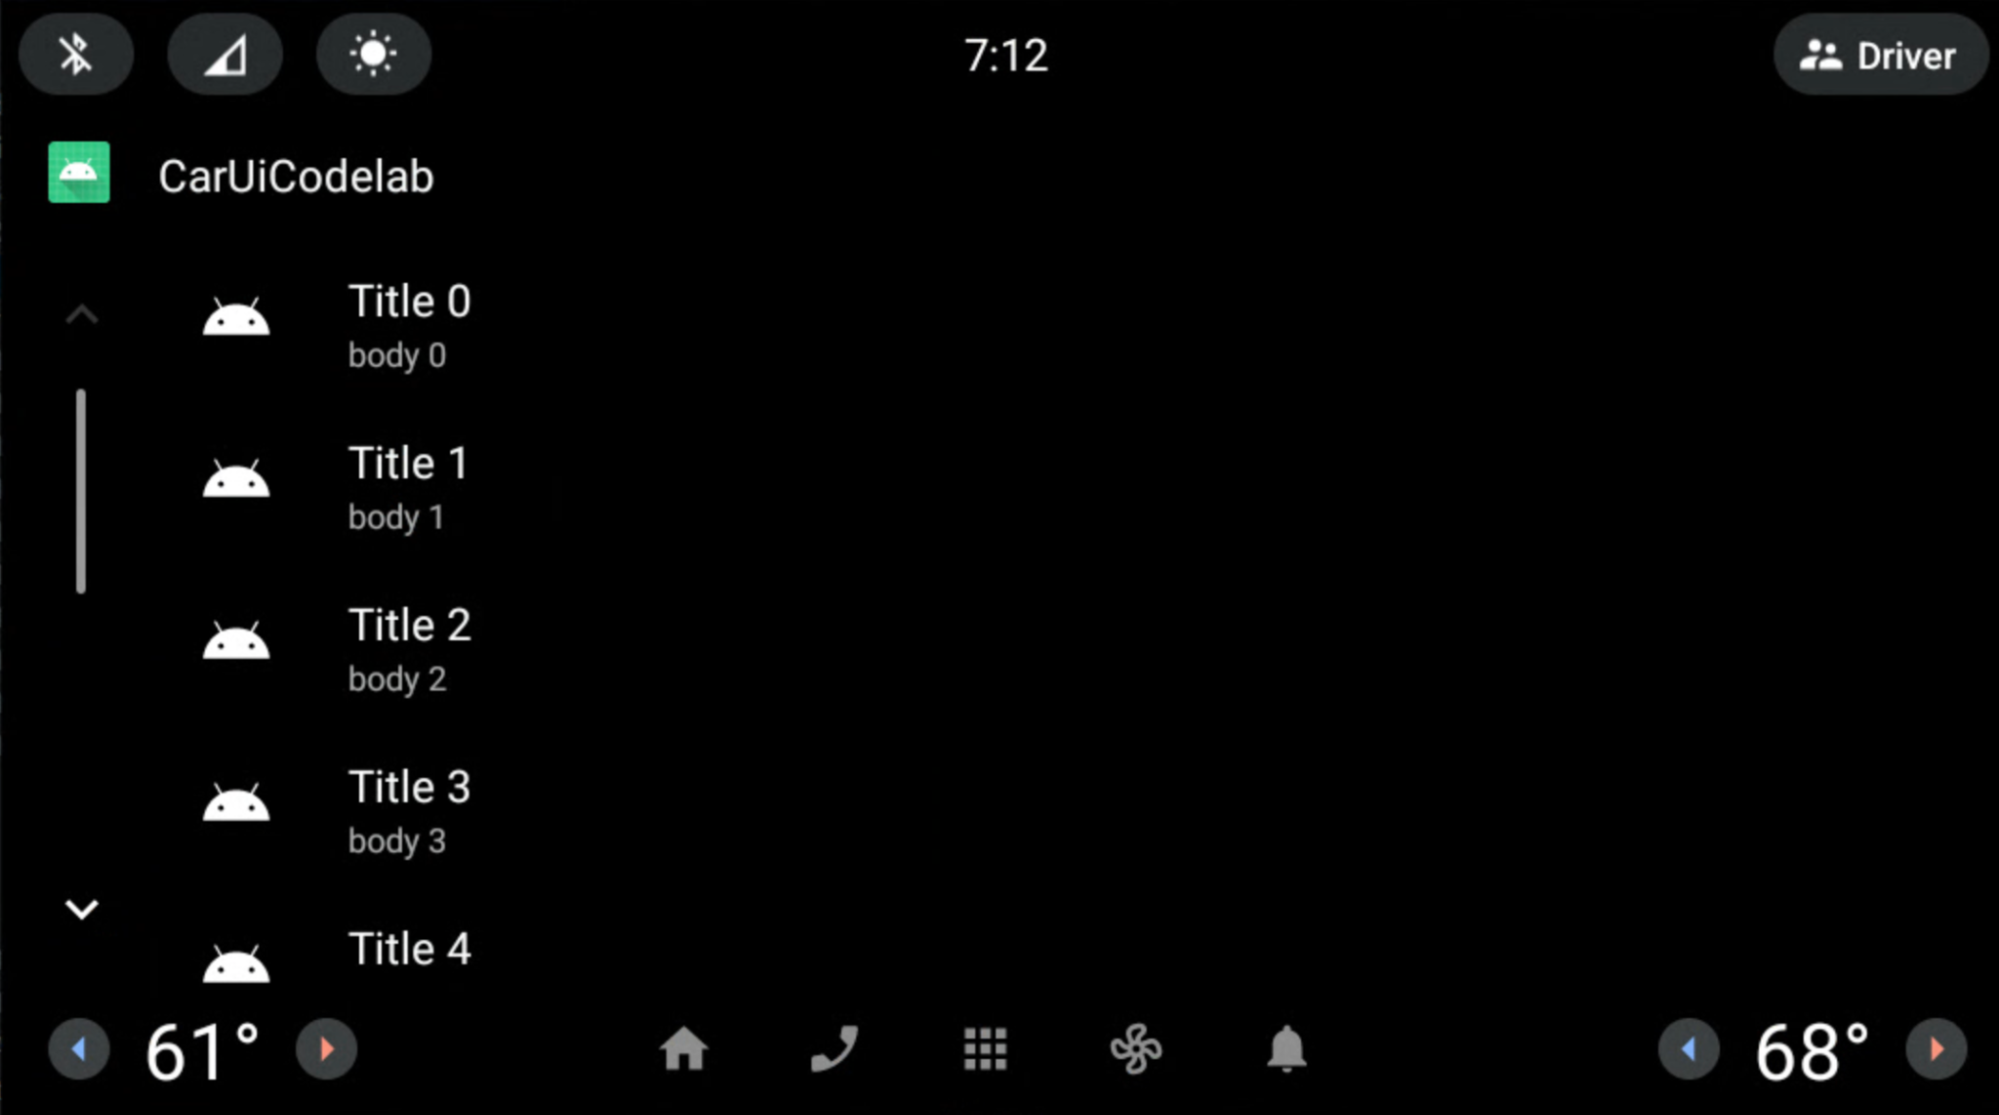
RRO zum Entfernen der Scrollleiste verwenden
Dauer:10 Minuten
In dieser Übung erfahren Sie, wie Sie mit einem RRO die Scrollleiste aus CarUiRecyclerView entfernen.
Fügen Sie in Ihrem RRO die folgenden Dateien hinzu und ändern Sie sie:
AndroidManifest.xml<?xml version="1.0" encoding="utf-8"?> <manifest xmlns:android="http://schemas.android.com/apk/res/android" package="com.example.caruirro"> <application android:hasCode="false" /> <uses-sdk android:minSdkVersion="29" android:targetSdkVersion="29"/> <overlay android:targetPackage="com.example.caruicodelab" android:targetName="car-ui-lib" android:isStatic="false" android:resourcesMap="@xml/sample_overlay" /> </manifest>res/values/bools.xml<?xml version="1.0" encoding="utf-8"?> <resources> <bool name="car_ui_scrollbar_enable">false</bool> </resources>Die Ressource
car_ui_scrollbar_enableist eine boolesche Ressource vom Typcar-ui-lib, mit der gesteuert wird, ob die für Autos optimierte Scrollleiste mit den Schaltflächen „Nach oben“ und „Nach unten“ inCarUiRecyclerViewvorhanden ist oder nicht. Wennfalsefestgelegt ist, verhält sichCarUiRecyclerViewwie ein AndroidX-RecyclerView.res/xml/sample_overlay.xml<?xml version="1.0" encoding="utf-8"?> <overlay> <item target="bool/car_ui_scrollbar_enable" value="@bool/car_ui_scrollbar_enable"/> </overlay>
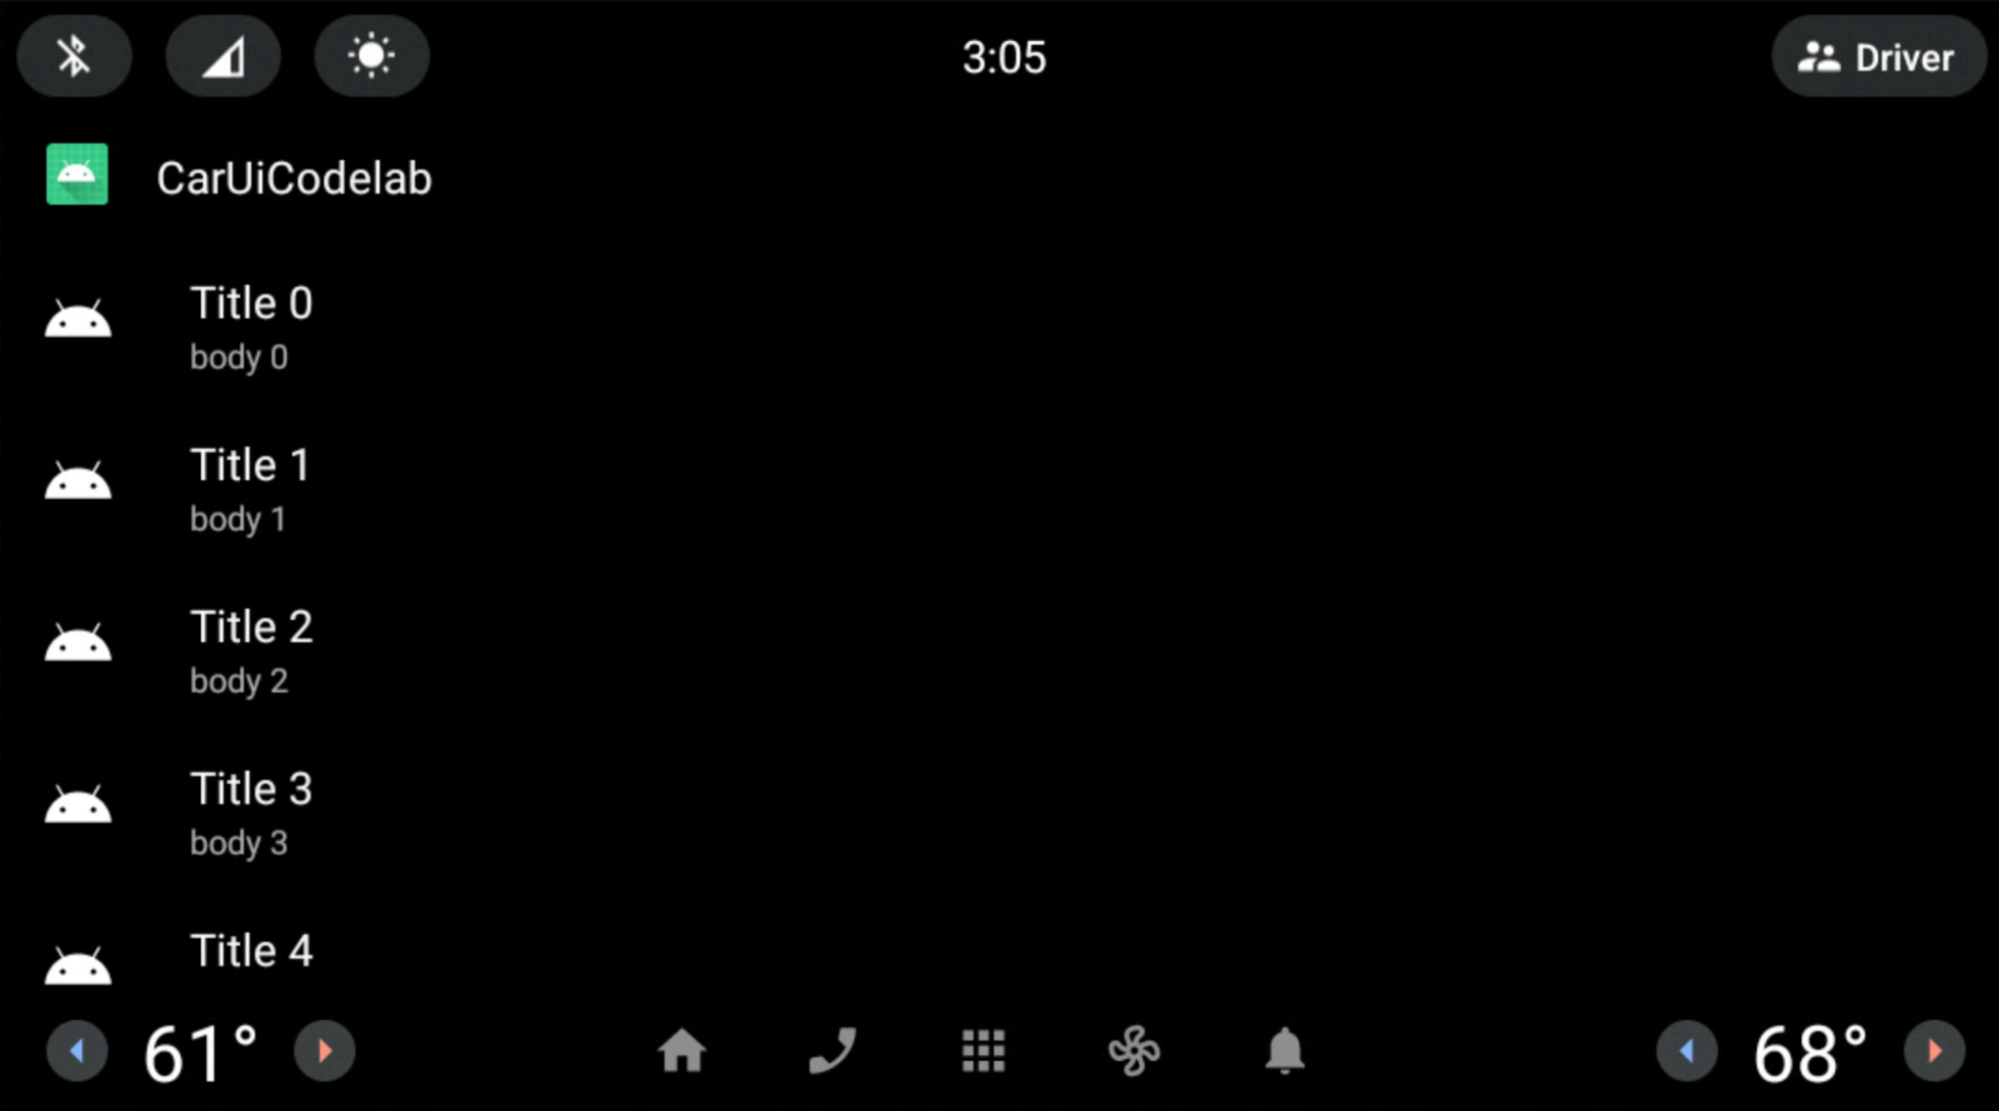
Erstellen und installieren Sie Ihre App wie bisher. Die Scrollleiste wurde aus CarUiRecyclerView entfernt:
Layout zum Überlagern der CarUiRecyclerView-Scrollleiste verwenden
Dauer:15 Minuten
In dieser Übung ändern Sie das Scrollbar-Layout von CarUiRecyclerView.
Fügen Sie die folgenden Dateien in Ihrer RRO-App hinzu und ändern Sie sie.
res/layout/car_ui_recycler_view_scrollbar.xml<?xml version="1.0" encoding="utf-8"?> <RelativeLayout xmlns:android="http://schemas.android.com/apk/res/android" android:layout_width="112dp" android:layout_height="match_parent" android:id="@+id/car_ui_scroll_bar"> <!-- View height is dynamically calculated during layout. --> <View android:id="@+id/car_ui_scrollbar_thumb" android:layout_width="6dp" android:layout_height="20dp" android:layout_alignParentTop="true" android:layout_centerHorizontal="true" android:background="@drawable/car_ui_recyclerview_scrollbar_thumb"/> <View android:id="@+id/car_ui_scrollbar_track" android:layout_width="10dp" android:layout_height="match_parent" android:layout_marginTop="10dp" android:layout_centerHorizontal="true" android:layout_above="@+id/car_ui_scrollbar_page_up"/> <View android:layout_width="2dp" android:layout_height="match_parent" android:layout_marginTop="10dp" android:background="#323232" android:layout_toLeftOf="@+id/car_ui_scrollbar_thumb" android:layout_above="@+id/car_ui_scrollbar_page_up" android:layout_marginRight="5dp"/> <View android:layout_width="2dp" android:layout_height="match_parent" android:layout_marginTop="10dp" android:background="#323232" android:layout_toRightOf="@+id/car_ui_scrollbar_thumb" android:layout_above="@+id/car_ui_scrollbar_page_up" android:layout_marginLeft="5dp"/> <ImageView android:id="@+id/car_ui_scrollbar_page_up" android:layout_width="75dp" android:layout_height="75dp" android:focusable="false" android:hapticFeedbackEnabled="false" android:src="@drawable/car_ui_recyclerview_ic_up" android:scaleType="centerInside" android:background="?android:attr/selectableItemBackgroundBorderless" android:layout_centerHorizontal="true" android:layout_above="@+id/car_ui_scrollbar_page_down"/> <ImageView android:id="@+id/car_ui_scrollbar_page_down" android:layout_width="75dp" android:layout_height="75dp" android:focusable="false" android:hapticFeedbackEnabled="false" android:src="@drawable/car_ui_recyclerview_ic_down" android:scaleType="centerInside" android:background="?android:attr/selectableItemBackgroundBorderless" android:layout_centerHorizontal="true" android:layout_alignParentBottom="true"/> </RelativeLayout>Wenn Sie eine Layoutdatei überlagern möchten, müssen Sie alle IDs und Namespace-Attribute zum
overlay.xmlIhres RRO hinzufügen. Siehe die Dateien unten.res/xml/sample_overlay.xml<?xml version="1.0" encoding="utf-8"?> <overlay> <item target="drawable/car_ui_recyclerview_ic_down" value="@drawable/car_ui_recyclerview_ic_down"/> <item target="drawable/car_ui_recyclerview_ic_up" value="@drawable/car_ui_recyclerview_ic_up"/> <item target="drawable/car_ui_recyclerview_scrollbar_thumb" value="@drawable/car_ui_recyclerview_scrollbar_thumb"/> <item target="id/car_ui_scroll_bar" value="@id/car_ui_scroll_bar"/> <item target="id/car_ui_scrollbar_thumb" value="@id/car_ui_scrollbar_thumb"/> <item target="id/car_ui_scrollbar_track" value="@id/car_ui_scrollbar_track"/> <item target="id/car_ui_scrollbar_page_up" value="@id/car_ui_scrollbar_page_up"/> <item target="id/car_ui_scrollbar_page_down" value="@id/car_ui_scrollbar_page_down"/> <item target="layout/car_ui_recyclerview_scrollbar" value="@layout/car_ui_recyclerview_scrollbar"/> </overlay>res/drawable/car_ui_recyclerview_ic_up.xml<?xml version="1.0" encoding="utf-8"?> <vector xmlns:android="http://schemas.android.com/apk/res/android" android:width="48dp" android:height="48dp" android:viewportWidth="48.0" android:viewportHeight="48.0"> <path android:pathData="M14.83,30.83L24,21.66l9.17,9.17L36,28 24,16 12,28z" android:fillColor="#0000FF"/> </vector>res/drawable/car_ui_recyclerview_ic_down.xml<?xml version="1.0" encoding="utf-8"?> <vector xmlns:android="http://schemas.android.com/apk/res/android" android:width="48dp" android:height="48dp" android:viewportWidth="48.0" android:viewportHeight="48.0"> <path android:pathData="M14.83,16.42L24,25.59l9.17,-9.17L36,19.25l-12,12 -12,-12z" android:fillColor="#0000FF"/> </vector>res/drawable/car_ui_recyclerview_scrollbar_thumb.xml<?xml version="1.0" encoding="utf-8"?> <shape xmlns:android="http://schemas.android.com/apk/res/android" android:shape="rectangle"> <solid android:color="#0000FF" /> <corners android:radius="100dp"/> </shape>Es wird empfohlen, die Interaktion dieser Dateien zu untersuchen.
Zur Vereinfachung sind Dimensionen und Farben fest codiert. Es empfiehlt sich jedoch, diese Werte in
dimens.xmlundcolors.xmlzu deklarieren oder sie sogar als Farbdateien im Ordnerres/color/zu kennzeichnen. Weitere Informationen finden Sie unter AOSP Java code style for contributors.Erstellen und installieren Sie Ihre App wie bisher. Du hast
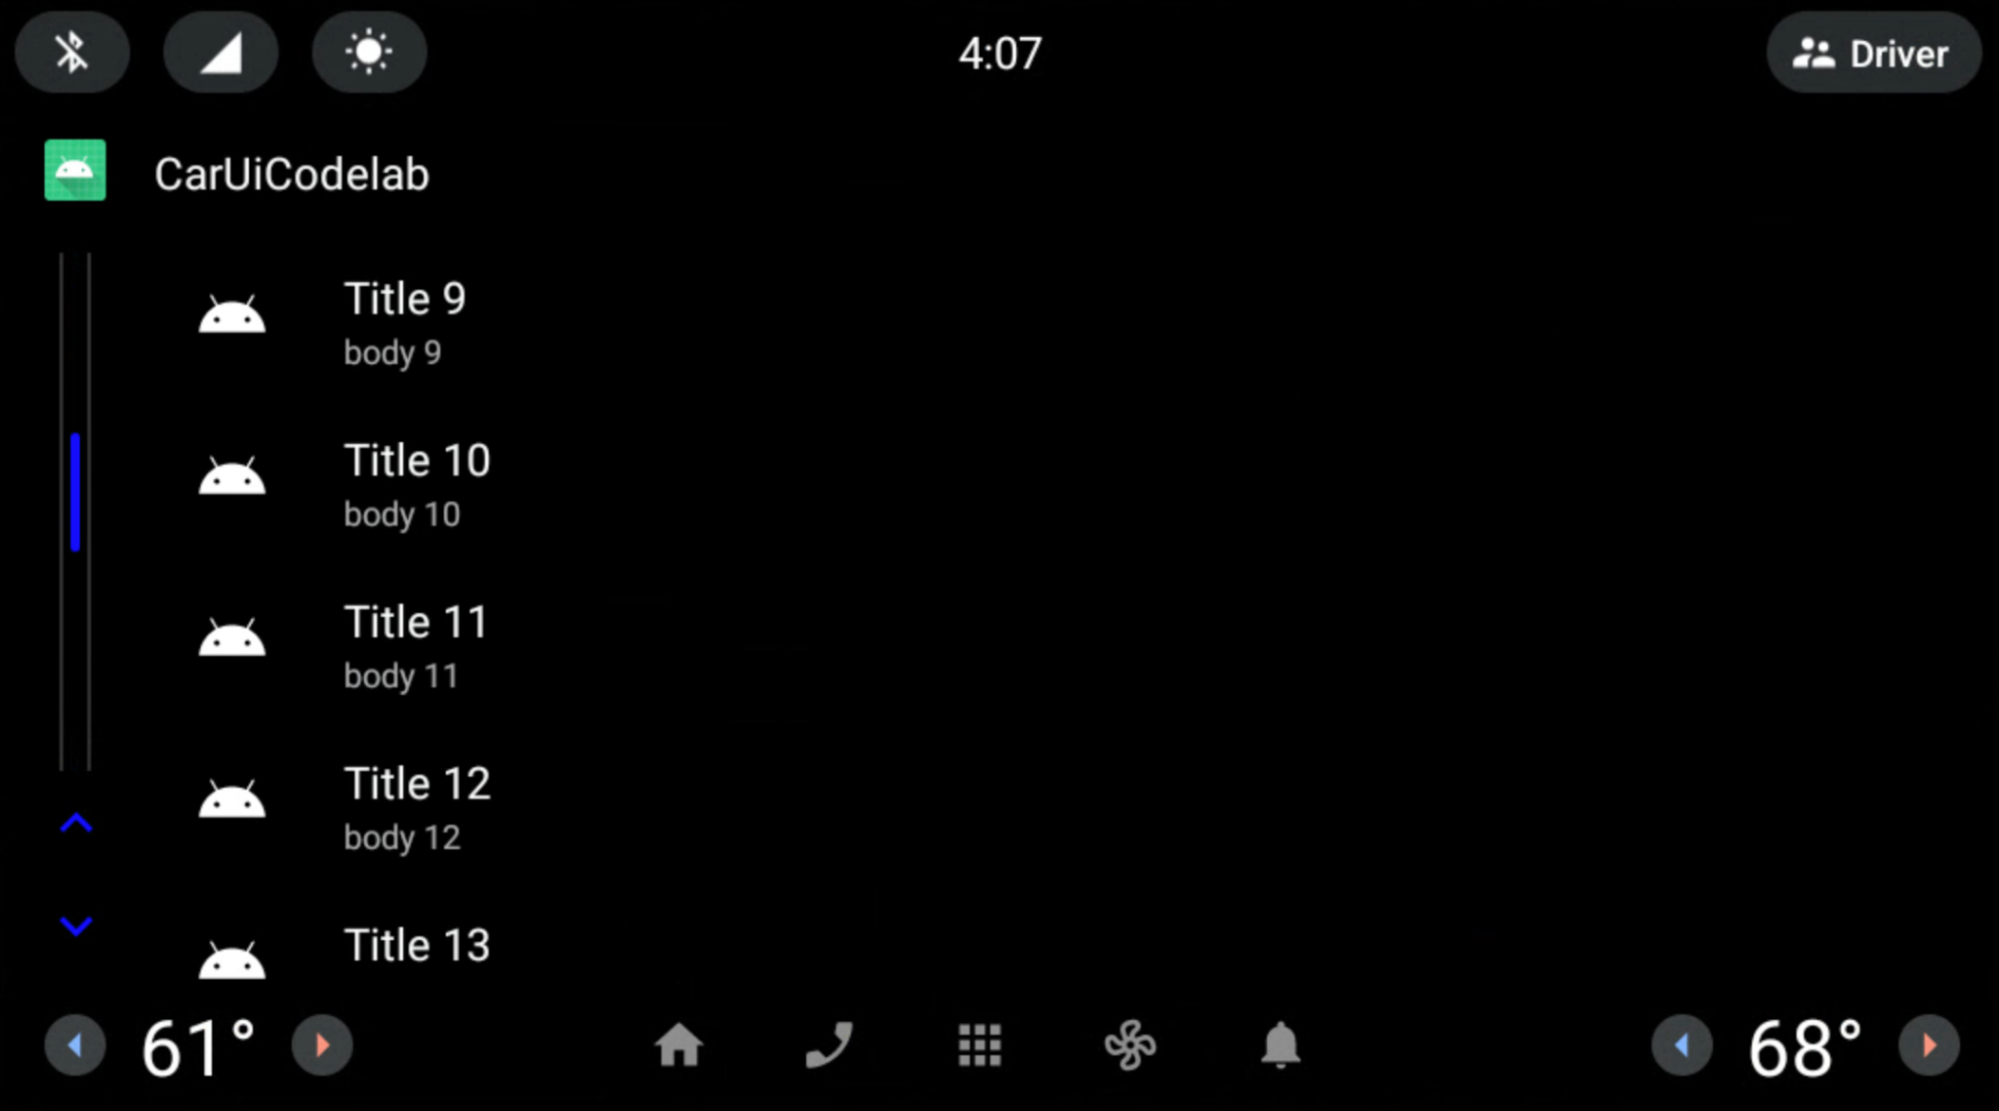
CarUiRecyclerViewmit einer blauen Scrollleiste und grauen Rändern erstellt.
Das wars! Sie haben das Lab erfolgreich abgeschlossen. Beide Pfeile werden unten in der Scrollleiste angezeigt. Sie haben erfolgreich ein RRO auf eine car-ui-lib-Layoutressourcendatei angewendet, indem Sie das Gradle-Buildsystem über Android Studio verwendet haben.
RRO-Listenelemente
Dauer:15 Minuten
Bisher haben Sie ein RRO auf car-ui-lib-Komponenten angewendet, indem Sie Framework-Komponenten (nicht AndroidX) verwendet haben. Wenn Sie AndroidX-Komponenten in einem RRO verwenden möchten, müssen Sie die Abhängigkeiten dieser Komponente sowohl der App als auch dem RRO build.gradle. hinzufügen. Außerdem müssen Sie das attrs dieser Komponente in overlayable.xml in Ihrer App sowie das sample_overlay.xml in Ihrem RRO hinzufügen.
In unserer Bibliothek (car-ui-lib) werden ConstraintLayout sowie andere AndroidX-Komponenten verwendet. Die overlayable.xml sieht daher möglicherweise so aus:
<?xml version='1.0' encoding='UTF-8'?>
<resources>
    <overlayable name="car-ui-lib">
        …
        <item type="attr" name="layout_constraintBottom_toBottomOf"/>
        <item type="attr" name="layout_constraintBottom_toTopOf"/>
        <item type="attr" name="layout_constraintCircle"/>
        <item type="attr" name="layout_constraintCircleAngle"/>
        <item type="attr" name="layout_constraintCircleRadius"/>
        <item type="attr" name="layout_constraintDimensionRatio"/>
        <item type="attr" name="layout_constraintEnd_toEndOf"/>
        <item type="attr" name="layout_constraintEnd_toStartOf"/>
        <item type="attr" name="layout_constraintGuide_begin"/>
        <item type="attr" name="layout_constraintGuide_end"/>
        <item type="attr" name="layout_constraintGuide_percent"/>
        <item type="attr" name="layout_constraintHeight_default"/>
        <item type="attr" name="layout_constraintHeight_max"/>
        <item type="attr" name="layout_constraintHeight_min"/>
        <item type="attr" name="layout_constraintHeight_percent"/>
        <item type="attr" name="layout_constraintHorizontal_bias"/>
        <item type="attr" name="layout_constraintHorizontal_chainStyle"/>
        <item type="attr" name="layout_constraintHorizontal_weight"/>
        <item type="attr" name="layout_constraintLeft_creator"/>
        <item type="attr" name="layout_constraintLeft_toLeftOf"/>
        <item type="attr" name="layout_constraintLeft_toRightOf"/>
        <item type="attr" name="layout_constraintRight_creator"/>
        <item type="attr" name="layout_constraintRight_toLeftOf"/>
        <item type="attr" name="layout_constraintRight_toRightOf"/>
        <item type="attr" name="layout_constraintStart_toEndOf"/>
        <item type="attr" name="layout_constraintStart_toStartOf"/>
        <item type="attr" name="layout_constraintTag"/>
        <item type="attr" name="layout_constraintTop_creator"/>
        <item type="attr" name="layout_constraintTop_toBottomOf"/>
        <item type="attr" name="layout_constraintTop_toTopOf"/>
        <item type="attr" name="layout_constraintVertical_bias"/>
        <item type="attr" name="layout_constraintVertical_chainStyle"/>
        …
    </overlayable>
</resources>
Ändere das Layout der Listenelemente in
CarUiRecyclerViewmitConstraintLayout. Fügen Sie Ihrem RRO die folgenden Dateien hinzu oder ändern Sie sie:res/xml/sample_overlay.xml<?xml version="1.0" encoding="utf-8"?> <overlay> <item target="id/car_ui_list_item_touch_interceptor" value="@id/car_ui_list_item_touch_interceptor"/> <item target="id/car_ui_list_item_reduced_touch_interceptor" value="@id/car_ui_list_item_reduced_touch_interceptor"/> <item target="id/car_ui_list_item_start_guideline" value="@id/car_ui_list_item_start_guideline"/> <item target="id/car_ui_list_item_icon_container" value="@id/car_ui_list_item_icon_container"/> <item target="id/car_ui_list_item_icon" value="@id/car_ui_list_item_icon"/> <item target="id/car_ui_list_item_content_icon" value="@id/car_ui_list_item_content_icon"/> <item target="id/car_ui_list_item_avatar_icon" value="@id/car_ui_list_item_avatar_icon"/> <item target="id/car_ui_list_item_title" value="@id/car_ui_list_item_title"/> <item target="id/car_ui_list_item_body" value="@id/car_ui_list_item_body"/> <item target="id/car_ui_list_item_action_container_touch_interceptor" value="@id/car_ui_list_item_action_container_touch_interceptor"/> <item target="id/car_ui_list_item_action_container" value="@id/car_ui_list_item_action_container"/> <item target="id/car_ui_list_item_action_divider" value="@id/car_ui_list_item_action_divider"/> <item target="id/car_ui_list_item_switch_widget" value="@id/car_ui_list_item_switch_widget"/> <item target="id/car_ui_list_item_checkbox_widget" value="@id/car_ui_list_item_checkbox_widget"/> <item target="id/car_ui_list_item_radio_button_widget" value="@id/car_ui_list_item_radio_button_widget"/> <item target="id/car_ui_list_item_supplemental_icon" value="@id/car_ui_list_item_supplemental_icon"/> <item target="id/car_ui_list_item_end_guideline" value="@id/car_ui_list_item_end_guideline"/> <item target="attr/layout_constraintBottom_toBottomOf" value="@attr/layout_constraintBottom_toBottomOf"/> <item target="attr/layout_constraintBottom_toTopOf" value="@attr/layout_constraintBottom_toTopOf"/> <item target="attr/layout_constraintEnd_toEndOf" value="@attr/layout_constraintEnd_toEndOf"/> <item target="attr/layout_constraintEnd_toStartOf" value="@attr/layout_constraintEnd_toStartOf"/> <item target="attr/layout_constraintGuide_begin" value="@attr/layout_constraintGuide_begin"/> <item target="attr/layout_constraintGuide_end" value="@attr/layout_constraintGuide_end"/> <item target="attr/layout_constraintHorizontal_bias" value="@attr/layout_constraintHorizontal_bias"/> <item target="attr/layout_constraintLeft_toLeftOf" value="@attr/layout_constraintLeft_toLeftOf"/> <item target="attr/layout_constraintLeft_toRightOf" value="@attr/layout_constraintLeft_toRightOf"/> <item target="attr/layout_constraintRight_toLeftOf" value="@attr/layout_constraintRight_toLeftOf"/> <item target="attr/layout_constraintRight_toRightOf" value="@attr/layout_constraintRight_toRightOf"/> <item target="attr/layout_constraintStart_toEndOf" value="@attr/layout_constraintStart_toEndOf"/> <item target="attr/layout_constraintStart_toStartOf" value="@attr/layout_constraintStart_toStartOf"/> <item target="attr/layout_constraintTop_toBottomOf" value="@attr/layout_constraintTop_toBottomOf"/> <item target="attr/layout_constraintTop_toTopOf" value="@attr/layout_constraintTop_toTopOf"/> <item target="attr/layout_goneMarginBottom" value="@attr/layout_goneMarginBottom"/> <item target="attr/layout_goneMarginEnd" value="@attr/layout_goneMarginEnd"/> <item target="attr/layout_goneMarginLeft" value="@attr/layout_goneMarginLeft"/> <item target="attr/layout_goneMarginRight" value="@attr/layout_goneMarginRight"/> <item target="attr/layout_goneMarginStart" value="@attr/layout_goneMarginStart"/> <item target="attr/layout_goneMarginTop" value="@attr/layout_goneMarginTop"/> <item target="attr/layout_constraintVertical_chainStyle" value="@attr/layout_constraintVertical_chainStyle"/> <item target="layout/car_ui_list_item" value="@layout/car_ui_list_item"/> </overlay>res/layout/car_ui_list_item.xml<?xml version="1.0" encoding="utf-8"?> <androidx.constraintlayout.widget.ConstraintLayout xmlns:android="http://schemas.android.com/apk/res/android" xmlns:app="http://schemas.android.com/apk/res-auto" android:layout_width="match_parent" android:layout_height="wrap_content" android:tag="carUiListItem" android:minHeight="@dimen/car_ui_list_item_height"> <!-- The following touch interceptor views are sized to encompass the specific sub-sections of the list item view to easily control the bounds of a background ripple effects. --> <com.android.car.ui.SecureView android:id="@+id/car_ui_list_item_touch_interceptor" android:layout_width="0dp" android:layout_height="0dp" android:background="@drawable/car_ui_list_item_background" app:layout_constraintBottom_toBottomOf="parent" app:layout_constraintEnd_toEndOf="parent" app:layout_constraintStart_toStartOf="parent" app:layout_constraintTop_toTopOf="parent" /> <!-- This touch interceptor does not include the action container --> <com.android.car.ui.SecureView android:id="@+id/car_ui_list_item_reduced_touch_interceptor" android:layout_width="0dp" android:layout_height="0dp" android:background="@drawable/car_ui_list_item_background" android:visibility="gone" app:layout_constraintBottom_toBottomOf="parent" app:layout_constraintEnd_toStartOf="@id/car_ui_list_item_action_container" app:layout_constraintStart_toStartOf="parent" app:layout_constraintTop_toTopOf="parent" /> <androidx.constraintlayout.widget.Guideline android:id="@+id/car_ui_list_item_start_guideline" android:layout_width="wrap_content" android:layout_height="wrap_content" android:orientation="vertical" app:layout_constraintGuide_begin="@dimen/car_ui_list_item_start_inset" /> <FrameLayout android:id="@+id/car_ui_list_item_icon_container" android:layout_width="@dimen/car_ui_list_item_icon_container_width" android:layout_height="0dp" app:layout_constraintBottom_toBottomOf="parent" app:layout_constraintStart_toStartOf="@+id/car_ui_list_item_start_guideline" app:layout_constraintTop_toTopOf="parent"> <ImageView android:id="@+id/car_ui_list_item_icon" android:layout_width="@dimen/car_ui_list_item_icon_size" android:layout_height="@dimen/car_ui_list_item_icon_size" android:layout_gravity="center" android:visibility="gone" android:scaleType="fitCenter" /> <ImageView android:id="@+id/car_ui_list_item_content_icon" android:layout_width="@dimen/car_ui_list_item_content_icon_width" android:layout_height="@dimen/car_ui_list_item_content_icon_height" android:layout_gravity="center" android:visibility="gone" android:scaleType="fitCenter" /> <ImageView android:id="@+id/car_ui_list_item_avatar_icon" android:background="@drawable/car_ui_list_item_avatar_icon_outline" android:layout_width="@dimen/car_ui_list_item_avatar_icon_width" android:layout_height="@dimen/car_ui_list_item_avatar_icon_height" android:layout_gravity="center" android:visibility="gone" android:scaleType="fitCenter" /> </FrameLayout> <CarUiTextView android:id="@+id/car_ui_list_item_title" android:layout_width="0dp" android:layout_height="wrap_content" android:layout_marginStart="@dimen/car_ui_list_item_text_start_margin" android:singleLine="@bool/car_ui_list_item_single_line_title" android:textAppearance="@style/TextAppearance.CarUi.ListItem" android:layout_gravity="right" android:gravity="right" android:textAlignment="viewEnd" app:layout_constraintBottom_toTopOf="@+id/car_ui_list_item_body" app:layout_constraintEnd_toStartOf="@+id/car_ui_list_item_action_container" app:layout_constraintStart_toEndOf="@+id/car_ui_list_item_icon_container" app:layout_constraintTop_toTopOf="parent" app:layout_constraintVertical_chainStyle="packed" app:layout_goneMarginStart="@dimen/car_ui_list_item_text_no_icon_start_margin" /> <CarUiTextView android:id="@+id/car_ui_list_item_body" android:layout_width="0dp" android:layout_height="wrap_content" android:layout_marginStart="@dimen/car_ui_list_item_text_start_margin" android:textAppearance="@style/TextAppearance.CarUi.ListItem.Body" android:layout_gravity="right" android:gravity="right" android:textAlignment="viewEnd" app:layout_constraintBottom_toBottomOf="parent" app:layout_constraintEnd_toStartOf="@+id/car_ui_list_item_action_container" app:layout_constraintStart_toEndOf="@+id/car_ui_list_item_icon_container" app:layout_constraintTop_toBottomOf="@+id/car_ui_list_item_title" app:layout_goneMarginStart="@dimen/car_ui_list_item_text_no_icon_start_margin" /> <!-- This touch interceptor is sized and positioned to encompass the action container --> <com.android.car.ui.SecureView android:id="@+id/car_ui_list_item_action_container_touch_interceptor" android:layout_width="0dp" android:layout_height="0dp" android:background="@drawable/car_ui_list_item_background" android:visibility="gone" app:layout_constraintBottom_toBottomOf="@id/car_ui_list_item_action_container" app:layout_constraintEnd_toEndOf="@id/car_ui_list_item_action_container" app:layout_constraintStart_toStartOf="@id/car_ui_list_item_action_container" app:layout_constraintTop_toTopOf="@id/car_ui_list_item_action_container" /> <FrameLayout android:id="@+id/car_ui_list_item_action_container" android:layout_width="wrap_content" android:minWidth="@dimen/car_ui_list_item_icon_container_width" android:layout_height="0dp" app:layout_constraintBottom_toBottomOf="parent" app:layout_constraintEnd_toEndOf="@+id/car_ui_list_item_end_guideline" app:layout_constraintTop_toTopOf="parent"> <View android:id="@+id/car_ui_list_item_action_divider" android:layout_width="@dimen/car_ui_list_item_action_divider_width" android:layout_height="@dimen/car_ui_list_item_action_divider_height" android:layout_gravity="start|center_vertical" android:background="@drawable/car_ui_list_item_divider" /> <Switch android:id="@+id/car_ui_list_item_switch_widget" android:layout_width="wrap_content" android:layout_height="wrap_content" android:layout_gravity="center" android:clickable="false" android:focusable="false" /> <CheckBox android:id="@+id/car_ui_list_item_checkbox_widget" android:layout_width="wrap_content" android:layout_height="wrap_content" android:layout_gravity="center" android:clickable="false" android:focusable="false" /> <RadioButton android:id="@+id/car_ui_list_item_radio_button_widget" android:layout_width="wrap_content" android:layout_height="wrap_content" android:layout_gravity="center" android:clickable="false" android:focusable="false" /> <ImageView android:id="@+id/car_ui_list_item_supplemental_icon" android:layout_width="@dimen/car_ui_list_item_supplemental_icon_size" android:layout_height="@dimen/car_ui_list_item_supplemental_icon_size" android:layout_gravity="center" android:scaleType="fitCenter" /> </FrameLayout> <androidx.constraintlayout.widget.Guideline android:id="@+id/car_ui_list_item_end_guideline" android:layout_width="wrap_content" android:layout_height="wrap_content" android:orientation="vertical" app:layout_constraintGuide_end="@dimen/car_ui_list_item_end_inset" /> </androidx.constraintlayout.widget.ConstraintLayout>car_ui_list_item.xmlverweist auf mehrere Komponenten/Ressourcen, die nicht als Abhängigkeiten der App enthalten sind. Das sindcar-ui-lib-Ressourcen. Sie können das Problem beheben, indem Siecar-ui-libals Abhängigkeit zu Ihrer RRO-App inapp/build.gradlehinzufügen:dependencies { implementation 'com.android.car.ui:car-ui-lib:2.0.0' implementation 'androidx.appcompat:appcompat:1.4.1' implementation 'com.google.android.material:material:1.4.0' }
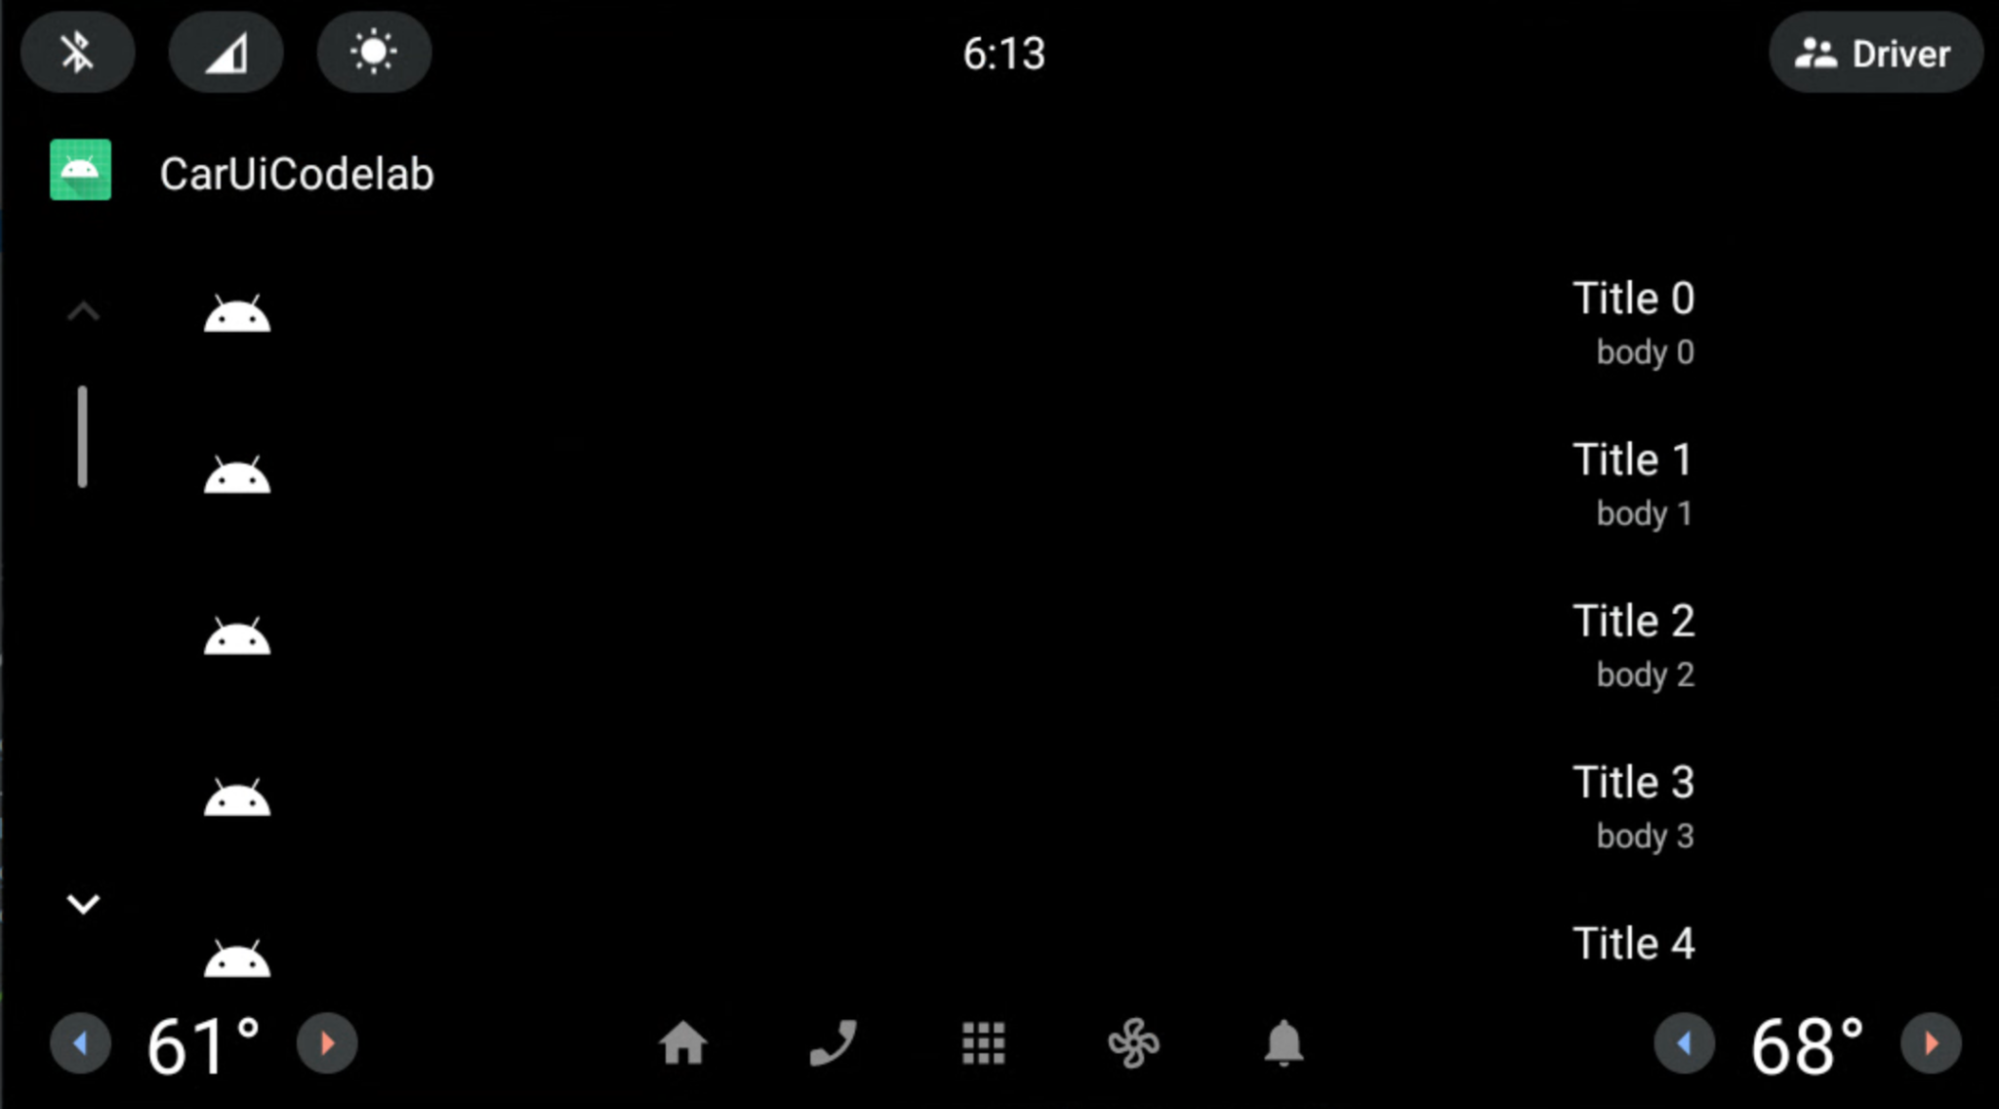
Titel und Text sind jetzt rechtsbündig statt linksbündig.
Wir haben nur ein RRO auf car-ui-lib mit AndroidX-Komponenten (ConstraintLayout) angewendet, wenn seine Attribute sowohl in der Datei car-ui-lib mit dem Namen overlayable.xml als auch im RRO sample_overlay.xml vorhanden waren. Sie können etwas Ähnliches in Ihrer eigenen App tun. Fügen Sie einfach alle entsprechenden attrs in die overlayable.xml Ihrer App ein, ähnlich wie bei car-ui-lib.
Es ist jedoch nicht möglich, eine App mit AndroidX-Komponenten per RRO zu überschreiben, wenn die App car-ui-lib als Abhängigkeit in ihrem build.gradle hat (wenn die App car-ui-lib-Komponenten verwendet). Da die Attributzuordnungen bereits in der overlayable.xml der car-ui-lib-Bibliothek definiert wurden, würde das Hinzufügen zu overlayable.xml Ihrer App mit car-ui-lib als Abhängigkeit einen mergeDebugResources-Fehler wie unten verursachen. Das liegt daran, dass diese Attribute in mehreren overlayable.xml-Dateien vorhanden sind:
org.gradle.api.tasks.TaskExecutionException: Execution failed for task ':app:mergeDebugResources'