
Para serem consideradas compatíveis com o Android, as implementações de dispositivos devem atender aos requisitos apresentados no Android Compatibility Definition Document (CDD) . O CDD do Android 10 avalia a segurança de uma implementação biométrica usando segurança arquitetônica e falsificação .
- Segurança arquitetônica : a resiliência de um pipeline biométrico contra o comprometimento do kernel ou da plataforma. Um pipeline é considerado seguro se os comprometimentos do kernel e da plataforma não conferirem a capacidade de ler dados biométricos brutos ou injetar dados sintéticos no pipeline para influenciar a decisão de autenticação.
- Desempenho de segurança biométrica : O desempenho de segurança biométrica é medido pela Taxa de Aceitação de Falsidade (SAR) , Taxa de Aceitação Falsa (FAR) e, quando aplicável, Taxa de Aceitação de Impostor (IAR) da biometria. SAR é uma métrica introduzida no Android 9 para medir a resiliência de uma biometria contra um ataque de apresentação física. Ao medir a biometria, você precisa seguir os protocolos descritos abaixo.
O Android usa três tipos de métricas para medir o desempenho da segurança biométrica.
- Taxa de aceitação de falsificação (SAR) : Define a métrica de A chance de um modelo biométrico aceitar uma amostra válida previamente registrada e conhecida. Por exemplo, com o desbloqueio por voz, isso mediria as chances de desbloquear o telefone de um usuário usando uma amostra gravada dele dizendo: "Ok, Google" Chamamos esses ataques de Spoof Attacks . Também conhecido como Impostor Attack Presentation Match Rate (IAPMR).
- Taxa de aceitação de impostor (IAR) : define a métrica da chance de um modelo biométrico aceitar entrada destinada a imitar uma amostra boa conhecida. Por exemplo, no mecanismo de voz confiável do Smart Lock (desbloqueio por voz), isso mediria a frequência com que alguém tentando imitar a voz de um usuário (usando tom e sotaque semelhantes) pode desbloquear seu dispositivo. Chamamos esses ataques de Ataques de Impostor .
- Taxa de aceitação falsa (FAR) : define as métricas de frequência com que um modelo aceita erroneamente uma entrada incorreta escolhida aleatoriamente. Embora seja uma medida útil, ela não fornece informações suficientes para avaliar como o modelo resiste a ataques direcionados.
Agentes de confiança
O Android 10 muda o comportamento dos agentes de confiança. Os agentes de confiança não podem desbloquear um dispositivo, eles só podem estender a duração do desbloqueio para um dispositivo que já está desbloqueado. O rosto confiável está obsoleto no Android 10.
Aulas biométricas
A segurança biométrica é classificada usando os resultados dos testes de segurança arquitetural e falsificação. Uma implementação biométrica pode ser classificada como Class 3 (anteriormente Strong) , Class 2 , (anteriormente Weak) ou Class 1 (anteriormente Convenience) . A tabela abaixo descreve cada classe para novos dispositivos Android 11.
| Classe biométrica | Métricas | Oleoduto biométrico | Restrições |
|---|---|---|---|
| Classe 3 (anteriormente forte) | SAR: 0-7% DISTANTE: 1/50k TRF: 10% | Seguro |
|
| Classe 2 (anteriormente fraco) | SAR: 7-20% DISTANTE: 1/50k TRF: 10% | Seguro |
|
| Classe 1 (anteriormente Conveniência) | SAR: >20% DISTANTE: 1/50k TRF: 10% | Inseguro/Seguro |
|
Modalidades de Classe 3 vs. Classe 2 vs. Classe 1
As classes de segurança biométrica são atribuídas com base na presença de um pipeline seguro e nas três taxas de aceitação - FAR, IAR e SAR. Nos casos em que não existe um ataque impostor, consideramos apenas o FAR e o SAR.
Consulte o Documento de Definição de Compatibilidade do Android (CDD) para as medidas a serem tomadas para todas as modalidades de desbloqueio.
Autenticação de rosto e íris
Processo de avaliação
O processo de avaliação é composto por duas fases. A fase de calibração determina o ataque de apresentação ideal para uma determinada solução de autenticação (que é a posição calibrada). A fase de teste usa a posição calibrada para realizar vários ataques e avalia o número de vezes que o ataque foi bem-sucedido. Os fabricantes de dispositivos Android e sistemas biométricos devem entrar em contato com o Android para obter as orientações de teste mais atualizadas enviando este formulário .
É importante primeiro determinar a posição calibrada porque o SAR só deve ser medido usando ataques contra o maior ponto de fraqueza do sistema.
Fase de calibração
Existem três parâmetros para autenticação de rosto e íris que precisam ser otimizados durante a fase de calibração para garantir valores ideais para a fase de teste: instrumento de ataque de apresentação (PAI), formato de apresentação e desempenho em toda a diversidade de assuntos.
ENFRENTAR
|
ÍRIS
|
Testando a diversidade
É possível que os modelos de rosto e íris tenham um desempenho diferente entre gêneros, faixas etárias e raças/etnias. Calibre os ataques de apresentação em uma variedade de faces para maximizar as chances de descobrir falhas no desempenho.
Fase de teste
A fase de teste é quando o desempenho de segurança biométrica é medido usando o ataque de apresentação otimizado da fase anterior.
Contando tentativas na fase de teste
Uma única tentativa é contada como a janela entre apresentar um rosto (real ou falsificado) e receber algum feedback do telefone (um evento de desbloqueio ou uma mensagem visível do usuário). Quaisquer tentativas em que o telefone não consiga obter dados suficientes para tentar uma correspondência não devem ser incluídas no número total de tentativas usadas para calcular o SAR.
Protocolo de avaliação
Inscrição
Antes de iniciar a fase de calibração para autenticação facial ou de íris, navegue até as configurações do dispositivo e remova todos os perfis biométricos existentes. Depois que todos os perfis existentes forem removidos, registre um novo perfil com a face ou íris alvo que será usada para calibração e teste. É importante estar em um ambiente bem iluminado ao adicionar uma nova face ou perfil de íris e que o dispositivo esteja corretamente posicionado diretamente na frente da face alvo a uma distância de 20 cm a 80 cm.
Fase de calibração
Execute a fase de calibração pelo menos duas vezes: pelo menos uma vez para espécies 2D PAI e pelo menos uma vez para espécies 3D PAI. Esta fase determina, no mínimo, a posição calibrada para espécies 2D PAI e a posição calibrada para espécies 3D PAI. A calibração para cada espécie é recomendada, embora não seja obrigatória. Preparar o PAI.
ENFRENTAR
|
ÍRIS
|
Conduzindo a fase de calibração
Posições de referência
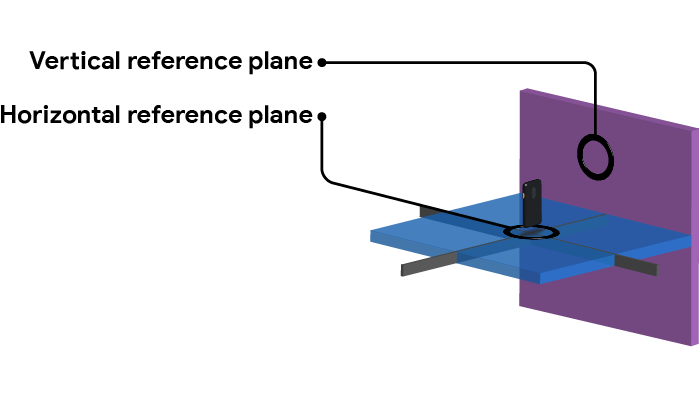
- Posição de referência : A posição de referência é determinada colocando o PAI a uma distância adequada (20-80 cm) na frente do dispositivo de forma que o PAI seja claramente visível na visão do dispositivo, mas qualquer outra coisa que esteja sendo usada (como um suporte para o PAI) não é visível.
- Plano de referência horizontal : Enquanto o PAI estiver na posição de referência, o plano horizontal entre o dispositivo e o PAI é o plano de referência horizontal.
- Plano de referência vertical : Enquanto o PAI estiver na posição de referência, o plano vertical entre o dispositivo e o PAI é o plano de referência vertical.
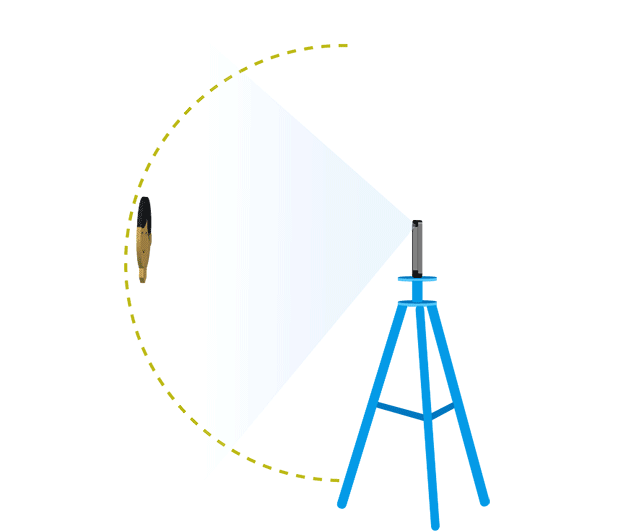
Arco vertical
Determine a posição de referência e teste o PAI em um arco vertical mantendo a mesma distância do dispositivo que a posição de referência. Eleve o PAI no mesmo plano vertical, criando um ângulo de 10 graus entre o dispositivo e o plano de referência horizontal e teste o desbloqueio facial.
Continue a aumentar e testar o PAI em incrementos de 10 graus até que o PAI não esteja mais visível no campo de visão do dispositivo. Registre todas as posições que desbloquearam com sucesso o dispositivo. Repita este processo, mas movendo o PAI em um arco descendente, abaixo do plano de referência horizontal. Veja a figura 3 abaixo para um exemplo dos testes de arco.
Arco horizontal
Retorne o PAI para a posição de referência e mova-o ao longo do plano horizontal para criar um ângulo de 10 graus com o plano de referência vertical. Realize o teste de arco vertical com o PAI nesta nova posição. Mova o PAI ao longo do plano horizontal em incrementos de 10 graus e execute o teste de arco vertical em cada nova posição.
Os testes de arco precisam ser repetidos em incrementos de 10 graus para o lado esquerdo e direito do dispositivo, bem como acima e abaixo do dispositivo.
A posição que produz os resultados de desbloqueio mais confiáveis é a posição calibrada para o tipo de espécie PAI (por exemplo, espécies PAI 2D ou 3D).
Fase de teste
No final da fase de calibração deve haver duas posições calibradas , uma para espécies 2D PAI e outra para espécies 3D PAI. Se uma posição calibrada não puder ser estabelecida, a posição de referência deve ser usada. A metodologia de teste é comum para testar espécies PAI 2D e 3D.
- Entre faces registradas, onde E>= 10 e inclui pelo menos 10 faces únicas.
- Inscrever face/íris
- Usando a posição calibrada da fase anterior, execute U tentativas de desbloqueio, contando as tentativas conforme descrito na seção anterior, e onde U >= 10. Registre o número de desbloqueios bem-sucedidos S .
- O SAR pode então ser medido como:
Onde:
- E = o número de inscrições
- U = o número de tentativas de desbloqueio por inscrição
- Si = o número de desbloqueios bem-sucedidos para inscrição i
Iterações necessárias para obter amostras estatisticamente válidas de taxas de erro: suposição de confiança de 95% para todos abaixo, N grande
| Margem de erro | Iterações de teste necessárias por assunto |
|---|---|
| 1% | 9595 |
| 2% | 2401 |
| 3% | 1067 |
| 5% | 385 |
| 10% | 97 |
Tempo necessário (30 segundos por tentativa, 10 sujeitos)
| Margem de erro | Tempo total |
|---|---|
| 1% | 799,6 horas |
| 2% | 200,1 horas |
| 3% | 88,9 horas |
| 5% | 32,1 horas |
| 10% | 8,1 horas |
Recomendamos direcionar uma margem de erro de 5%, o que fornece uma taxa de erro real na população de 2% a 12%.
Alcance
A fase de teste mede a resiliência da autenticação facial principalmente em relação aos fac-símiles do rosto do usuário alvo. Ele não aborda ataques não baseados em fac-símile, como o uso de LEDs ou padrões que atuam como impressões mestre. Embora ainda não tenham se mostrado eficazes contra sistemas de autenticação facial baseados em profundidade, não há nada que impeça conceitualmente que isso seja verdade. É possível e plausível que pesquisas futuras mostrem que esse é o caso. Neste ponto, este protocolo será revisado para incluir a medição da resiliência contra esses ataques.
Autenticação de impressão digital
No Android 9, a barra foi definida em uma resiliência mínima para PAIs, conforme medido por uma taxa de aceitação de falsificação (SAR) menor ou igual a 7%. Uma breve explicação de por que 7% especificamente pode ser encontrada nesta postagem do blog .
Processo de avaliação
O processo de avaliação é composto por duas fases. A fase de calibração determina o ataque de apresentação ideal para uma determinada solução de autenticação de impressão digital (ou seja, a posição calibrada). A fase de teste usa a posição calibrada para realizar vários ataques e avalia o número de vezes que o ataque foi bem-sucedido. Os fabricantes de dispositivos Android e sistemas biométricos devem entrar em contato com o Android para obter as orientações de teste mais atualizadas enviando este formulário .
Fase de calibração
Existem três parâmetros para autenticação de impressão digital que precisam ser otimizados para garantir valores ideais para a fase de teste: o instrumento de ataque de apresentação (PAI), formato de apresentação e desempenho em toda a diversidade de assuntos
- O PAI é a falsificação física, como impressões digitais ou uma réplica moldada são exemplos de mídia de apresentação. Os seguintes materiais falsos são fortemente recomendados
- Sensores ópticos de impressão digital (FPS)
- Papel de cópia/transparência com tinta não condutora
- Gelatina Knox
- Tinta látex
- Cola de Elmer Tudo
- FPS capacitivo
- Gelatina Knox
- Cola de madeira para interiores de carpinteiro de Elmer
- Cola de Elmer Tudo
- Tinta látex
- FPS ultrassônico
- Gelatina Knox
- Cola de madeira para interiores de carpinteiro de Elmer
- Cola de Elmer Tudo
- Tinta látex
- Sensores ópticos de impressão digital (FPS)
- O formato de apresentação refere-se à manipulação adicional do PAI ou do ambiente, de forma a auxiliar na falsificação. Por exemplo, retocar ou editar uma imagem de alta resolução de uma impressão digital antes de criar a réplica 3D.
- O desempenho na diversidade de assuntos é especialmente relevante para ajustar o algoritmo. Testar o fluxo de calibração entre os sexos, faixas etárias e raças/etnias dos sujeitos geralmente pode revelar um desempenho substancialmente pior para segmentos da população global e é um parâmetro importante para calibrar nesta fase.
Testando a diversidade
É possível que os leitores de impressões digitais tenham um desempenho diferente entre sexo, faixa etária e raças/etnias. Uma pequena porcentagem da população tem impressões digitais difíceis de reconhecer, portanto, uma variedade de impressões digitais deve ser usada para determinar os parâmetros ideais para reconhecimento e testes de falsificação.
Fase de teste
A fase de teste é quando o desempenho de segurança biométrica é medido. No mínimo, os testes devem ser feitos de maneira não cooperativa, o que significa que quaisquer impressões digitais coletadas são feitas levantando-as de outra superfície, em vez de ter o alvo participando ativamente da coleta de suas impressões digitais, como fazer um molde cooperativo do dedo do sujeito. Este último é permitido, mas não obrigatório.
Contando tentativas na fase de teste
Uma única tentativa é contada como a janela entre apresentar uma impressão digital (real ou falsificada) ao sensor e receber algum feedback do telefone (um evento de desbloqueio ou uma mensagem visível ao usuário).
Quaisquer tentativas em que o telefone não consiga obter dados suficientes para tentar uma correspondência não devem ser incluídas no número total de tentativas usadas para calcular o SAR.
Protocolo de avaliação
Inscrição
Antes de iniciar a fase de calibração para autenticação de impressão digital, navegue até as configurações do dispositivo e remova todos os perfis biométricos existentes. Depois que todos os perfis existentes forem removidos, registre um novo perfil com a impressão digital de destino que será usada para calibração e teste. Siga todas as instruções na tela até que o perfil seja registrado com sucesso.
Fase de calibração
FPS óptico
Isso é semelhante às fases de calibração do ultrassônico e capacitivo, mas com as espécies PAI 2D e 2.5D da impressão digital do usuário alvo.
- Levante uma cópia latente da impressão digital de uma superfície.
- Teste com espécies 2D PAI
- Coloque a impressão digital levantada no sensor
- Teste com espécies PAI 2.5D.
- Criar um PAI da impressão digital
- Coloque o PAI no sensor
FPS ultrassônico
A calibração para ultra-som envolve o levantamento de uma cópia latente da impressão digital alvo. Por exemplo, isso pode ser feito usando impressões digitais levantadas por meio de pó de impressão digital ou cópias impressas de uma impressão digital e pode incluir o retoque manual da imagem da impressão digital para obter uma falsificação melhor.
Após a obtenção da cópia latente da impressão digital alvo, é feito um PAI.
FPS capacitivo
A calibração para capacitiva envolve as mesmas etapas descritas acima para calibração ultrassônica.
Fase de teste
- Faça com que pelo menos 10 pessoas únicas se inscrevam usando os mesmos parâmetros usados ao calcular o FRR/FAR
- Crie PAIs para cada pessoa
- O SAR pode então ser medido como:
Iterações necessárias para obter amostras estatisticamente válidas de taxas de erro: suposição de confiança de 95% para todos abaixo, N grande
| Margem de erro | Iterações de teste necessárias por assunto |
|---|---|
| 1% | 9595 |
| 2% | 2401 |
| 3% | 1067 |
| 5% | 385 |
| 10% | 97 |
Tempo necessário (30 segundos por tentativa, 10 sujeitos)
| Margem de erro | Tempo total |
|---|---|
| 1% | 799,6 horas |
| 2% | 200,1 horas |
| 3% | 88,9 horas |
| 5% | 32,1 horas |
| 10% | 8,1 horas |
Recomendamos direcionar uma margem de erro de 5%, o que fornece uma taxa de erro real na população de 2% a 12%.
Alcance
Esse processo é configurado para testar a resiliência da autenticação de impressão digital principalmente em relação a fac-símiles da impressão digital do usuário de destino. A metodologia de teste é baseada nos custos atuais do material, disponibilidade e tecnologia. Este protocolo será revisado para incluir a medição da resiliência contra novos materiais e técnicas à medida que se tornarem práticos de executar.
Considerações comuns
Embora cada modalidade exija uma configuração de teste diferente, existem alguns aspectos comuns que se aplicam a todas elas.
Teste o hardware real
As métricas SAR/IAR coletadas podem ser imprecisas quando os modelos biométricos são testados em condições idealizadas e em hardware diferente do que realmente apareceria em um dispositivo móvel. Por exemplo, os modelos de desbloqueio por voz calibrados em uma câmara anecóica usando uma configuração de vários microfones se comportam de maneira muito diferente quando usados em um único dispositivo de microfone em um ambiente barulhento. Para capturar métricas precisas, os testes devem ser realizados em um dispositivo real com o hardware instalado e, caso contrário, com o hardware como ele apareceria no dispositivo.
Use ataques conhecidos
A maioria das modalidades biométricas em uso hoje foi falsificada com sucesso e existe documentação pública da metodologia de ataque. Abaixo, fornecemos uma breve visão geral de alto nível das configurações de teste para modalidades com ataques conhecidos. Recomendamos usar a configuração descrita aqui sempre que possível.
Antecipe novos ataques
Para modalidades em que novas melhorias significativas foram feitas, o documento de configuração de teste pode não conter uma configuração adequada e pode não existir nenhum ataque público conhecido. As modalidades existentes também podem precisar de sua configuração de teste ajustada após um ataque recém-descoberto. Em ambos os casos, você precisará criar uma configuração de teste razoável. Por favor, use o link Comentários do Site na parte inferior desta página para nos informar se você configurou um mecanismo razoável que pode ser adicionado.
Configurações para diferentes modalidades
Impressão digital
| IAR | Não é necessário. |
| SAR |
|
Rosto e íris
| IAR | O limite inferior será capturado pelo SAR, portanto, não é necessário medir separadamente. |
| SAR |
|
Voz
| IAR |
|
| SAR |
|