
Android 4.4 and higher supports Verified Boot through the optional device-mapper-verity (dm-verity) kernel feature, which provides transparent integrity checking of block devices. dm-verity helps prevent persistent rootkits that can hold onto root privileges and compromise devices. This feature helps Android users be sure when booting a device it is in the same state as when it was last used.
Potentially Harmful Applications (PHAs) with root privileges can hide from detection programs and otherwise mask themselves. The rooting software can do this because it is often more privileged than the detectors, enabling the software to "lie" to the detection programs.
The dm-verity feature lets you look at a block device, the underlying storage layer of the file system, and determine if it matches its expected configuration. It does this using a cryptographic hash tree. For every block (typically 4k), there is a SHA256 hash.
Because the hash values are stored in a tree of pages, only the top-level "root" hash must be trusted to verify the rest of the tree. The ability to modify any of the blocks would be equivalent to breaking the cryptographic hash. See the following diagram for a depiction of this structure.
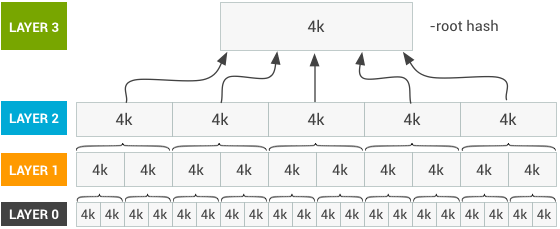
Figure 1. dm-verity hash table
A public key is included on the boot partition, which must be verified externally by the device manufacturer. That key is used to verify the signature for that hash and confirm the device's system partition is protected and unchanged.
Operation
dm-verity protection lives in the kernel. So if rooting software compromises the system before the kernel comes up, it retains that access. To mitigate this risk, most manufacturers verify the kernel using a key burned into the device. That key isn't changeable once the device leaves the factory.
Manufacturers use that key to verify the signature on the first-level bootloader, which in turn verifies the signature on subsequent levels, the app bootloader and eventually the kernel. Each manufacturer wishing to take advantage of verified boot should have a method for verifying the integrity of the kernel. Assuming the kernel has been verified, the kernel can look at a block device and verify it as it is mounted.
One way of verifying a block device is to directly hash its contents and compare them to a stored value. However, attempting to verify an entire block device can take an extended period and consume much of a device's power. Devices would take long periods to boot and then be significantly drained prior to use.
Instead, dm-verity verifies blocks individually and only when each one is accessed. When read into memory, the block is hashed in parallel. The hash is then verified up the tree. And since reading the block is such an expensive operation, the latency introduced by this block-level verification is comparatively nominal.
If verification fails, the device generates an I/O error indicating the block can't be read. It appears as if the filesystem has been corrupted, as is expected.
Apps may choose to proceed without the resulting data, such as when those results aren't required to the app's primary function. However, if the app can't continue without the data, it fails.
Forward error correction
Android 7.0 and higher improves dm-verity robustness with forward error correction (FEC). The AOSP implementation starts with the common Reed-Solomon error-correcting code and applies a technique called interleaving to reduce space overhead and increase the number of corrupted blocks that can be recovered. For more details on FEC, see Strictly Enforced Verified Boot with Error Correction.Implementation
Summary
- Generate an ext4 system image.
- Generate a hash tree for that image.
- Build a dm-verity table for that hash tree.
- Sign that dm-verity table to produce a table signature.
- Bundle the table signature and dm-verity table into verity metadata.
- Concatenate the system image, the verity metadata, and the hash tree.
See the The Chromium Projects - Verified Boot for a detailed description of the hash tree and dm-verity table.
Generate the hash tree
As described in the introduction, the hash tree is integral to dm-verity. The cryptsetup tool generates a hash tree for you. Alternatively, a compatible one is defined here:
<your block device name> <your block device name> <block size> <block size> <image size in blocks> <image size in blocks + 8> <root hash> <salt>
To form the hash, the system image is split at layer 0 into 4k blocks, each assigned a SHA256 hash. Layer 1 is formed by joining only those SHA256 hashes into 4k blocks, resulting in a much smaller image. Layer 2 is formed identically, with the SHA256 hashes of Layer 1.
This is done until the SHA256 hashes of the previous layer can fit in a single block. When get the SHA256 of that block, you have the root hash of the tree.
The size of the hash tree (and corresponding disk space usage) varies with the size of the verified partition. In practice, the size of hash trees tends to be small, often less than 30 MB.
If you have a block in a layer that isn't completely filled naturally by the hashes of the previous layer, you should pad it with zeroes to achieve the expected 4k. This allows you to know the hash tree hasn't been removed and is instead completed with blank data.
To generate the hash tree, concatenate the layer 2 hashes onto those for layer 1, the layer 3 the hashes onto those of layer 2, and so on. Write all of this out to disk. Note that this doesn't reference layer 0 of the root hash.
To recap, the general algorithm to construct the hash tree is as follows:
- Choose a random salt (hexadecimal encoding).
- Unsparse your system image into 4k blocks.
- For each block, get its (salted) SHA256 hash.
- Concatenate these hashes to form a level
- Pad the level with 0s to a 4k block boundary.
- Concatenate the level to your hash tree.
- Repeat steps 2-6 using the previous level as the source for the next until you have only a single hash.
The result of this is a single hash, which is your root hash. This and your salt are used during the construction of your dm-verity mapping table.
Build the dm-verity mapping table
Build the dm-verity mapping table, which identifies the block device (or target)
for the kernel and the location of the hash tree (which is the same value.) This
mapping is used for fstab generation and booting. The table also identifies
the size of the blocks and the hash_start, the start location of the hash tree
(specifically, its block number from the beginning of the image).
See cryptsetup for a detailed description of the verity target mapping table fields.
Sign the dm-verity table
Sign the dm-verity table to produce a table signature. When verifying a partition, the table signature is validated first. This is done against a key on your boot image in a fixed location. Keys are typically included in the manufacturers' build systems for automatic inclusion on devices in a fixed location.
To verify the partition with this signature and key combination:
- Add an RSA-2048 key in libmincrypt-compatible format to the
/bootpartition at/verity_key. Identify the location of the key used to verify the hash tree. - In the fstab for the relevant entry, add
verifyto thefs_mgrflags.
Bundle the table signature into metadata
Bundle the table signature and dm-verity table into verity metadata. The entire block of metadata is versioned so it may be extended, such as to add a second kind of signature or change some ordering.
As a sanity check, a magic number is associated with each set of table metadata that helps identify the table. Because the length is included in the ext4 system image header, this provides a way to search for the metadata without knowing the contents of the data itself.
This makes sure you haven't elected to verify an unverified partition. If so,
the absence of this magic number halts the verification process. This number resembles
0xb001b001.
The byte values in hex are:
- first byte = b0
- second byte = 01
- third byte = b0
- fourth byte = 01
The following diagram depicts the breakdown of the verity metadata:
<magic number>|<version>|<signature>|<table length>|<table>|<padding>
\-------------------------------------------------------------------/
\----------------------------------------------------------/   |
                            |                                  |
                            |                                 32K
                       block content
And this table describes those metadata fields.
Table 1. Verity metadata fields
| Field | Purpose | Size | Value |
|---|---|---|---|
| magic number | used by fs_mgr as a sanity check | 4 bytes | 0xb001b001 |
| version | used to version the metadata block | 4 bytes | currently 0 |
| signature | the signature of the table in PKCS1.5 padded form | 256 bytes | |
| table length | the length of the dm-verity table in bytes | 4 bytes | |
| table | the dm-verity table described earlier | table length bytes | |
| padding | this structure is 0-padded to 32k in length | 0 |
Optimize dm-verity
To get the best performance out of dm-verity, you should:
- In the kernel, turn on NEON SHA-2 for ARMv7 and the SHA-2 extensions for ARMv8.
- Experiment with different read-ahead and prefetch_cluster settings to find the best configuration for your device.