自 2025 年 3 月 27 日起,我們建議您使用 android-latest-release
而非 aosp-main
建構及貢獻 AOSP。詳情請參閱「Android 開放原始碼計畫變更」。
建構可辨識多用戶的應用程式
透過集合功能整理內容
你可以依據偏好儲存及分類內容。
如果裝置支援多位使用者,則其應用程式必須瞭解這些不同的使用者。
某些應用程式需要讓部分元件以單例模式執行,並可接受來自任何使用者的請求。目前只有系統應用程式可以使用這項功能。
這項設施:
- 節省資源
- 為多位使用者仲裁一或多個共用資源
- 使用單一伺服器連線可減少網路支出
請參閱下方圖表,瞭解多位使用者的權限流程。
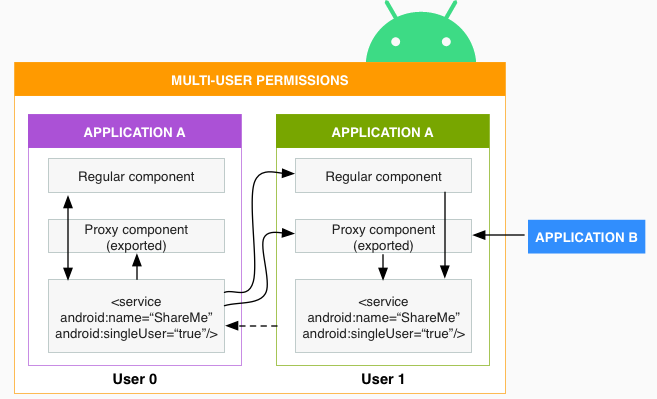
圖 1. 多位使用者權限
啟用單例元件
如要將應用程式視為單例,請在 Android 資訊清單中將 android:singleUser="true"
新增至服務、接收器或提供者。
系統只會在以使用者 0 身分執行的程序中,以例項化方式建立該元件。任何使用者提出的連線至該供應商或服務,或向該接收端廣播的請求,都會轉送至使用者 0 的程序。如果這是應用程式中唯一的元件,則只會執行一個應用程式執行個體。
套件中的活動仍會針對每位使用者在個別程序中啟動,且 UID 會位於該使用者的 UID 範圍內 (例如 1010034)。
與使用者互動
設定權限
必須具備下列權限:
INTERACT_ACROSS_USERS (signature|system)
INTERACT_ACROSS_USERS_FULL (signature)
使用 API
使用下列 API,讓應用程式瞭解多位使用者。
- 從傳入的 Binder 呼叫中擷取使用者句柄:
int userHandle = UserHandle.getCallingUserId()
- 使用新的受保護 API,針對特定使用者啟動服務、活動和廣播:
Context.startActivityAsUser(Intent, UserHandle)
Context.bindServiceAsUser(Intent, …, UserHandle)
Context.sendBroadcastAsUser(Intent, … , UserHandle)
Context.startServiceAsUser(Intent, …, UserHandle)
UserHandle
可以是明確的使用者,也可以是下列特殊句柄:UserHandle.CURRENT
或 UserHandle.ALL
。CURRENT
表示目前在前景的使用者。如要向所有使用者發送廣播訊息,請使用 ALL
。
- 與您應用程式中的元件通訊:
(INTERACT_ACROSS_USERS)
或與其他應用程式中的元件通訊:
(INTERACT_ACROSS_USERS_FULL)
- 您可能需要建立在使用者程序中執行的代理元件,然後存取使用者 0 中的
singleUser
元件。
- 使用新的
UserManager
系統服務查詢使用者和其句柄:
UserManager.getUsers()
UserManager.getUserInfo()
UserManager.supportsMultipleUsers()
UserManager.getUserSerialNumber(int userHandle)
:對應使用者帳號的未回收號碼。
UserManager.getUserHandle(int serialNumber)
UserManager.getUserProfiles()
- 傳回自有和受管理的設定檔集合 (如果有的話)。
- 註冊以便監聽特定或所有使用者,以及在 ContentObserver、PackageMonitor、BroadcastReceiver 上使用新 API 的回呼,這些 API 可提供哪些使用者導致回呼的相關資訊。
多位使用者或設定檔中的服務
並非所有服務都需要在其他使用者或工作資料夾中執行例項。如果系統服務只需要以使用者 0 的身份執行,請在以其他使用者身分執行時停用服務的元件,以利保留資源。以下範例說明如何在服務的進入點執行這項操作:
// Add on all entry points such as boot_completed or other manifest-listed receivers and providers
if (!UserManager.isSystemUser()) {
// Disable the service
ComponentName targetServiceName = new ComponentName(this, TargetService.class);
context.getPackageManager().setComponentEnabledSetting(
targetServiceName, COMPONENT_ENABLED_STATE_DISABLED, 0);
}
這個範例也可以使用 PackageManager.setApplicationEnabledSetting()
停用整個應用程式。
這個頁面中的內容和程式碼範例均受《內容授權》中的授權所規範。Java 與 OpenJDK 是 Oracle 和/或其關係企業的商標或註冊商標。
上次更新時間:2025-07-27 (世界標準時間)。
[[["容易理解","easyToUnderstand","thumb-up"],["確實解決了我的問題","solvedMyProblem","thumb-up"],["其他","otherUp","thumb-up"]],[["缺少我需要的資訊","missingTheInformationINeed","thumb-down"],["過於複雜/步驟過多","tooComplicatedTooManySteps","thumb-down"],["過時","outOfDate","thumb-down"],["翻譯問題","translationIssue","thumb-down"],["示例/程式碼問題","samplesCodeIssue","thumb-down"],["其他","otherDown","thumb-down"]],["上次更新時間:2025-07-27 (世界標準時間)。"],[],[],null,["# Build multiuser-aware apps\n\nWhen a device supports [multiple users](/docs/devices/admin/multi-user), its apps must be\nmade aware of these distinct users.\n\nCertain apps need to have some components run as singletons and can accept\nrequests from any user. Only system apps can currently use this feature.\n\nThis facility:\n\n- Conserves resources\n- Arbitrates one or more shared resources across users\n- Reduces network overhead by using a single server connection\n\nSee the diagram below for a depiction of permissions flow with multiple users.\n\n\n**Figure 1.** Multiple users permissions\n\nEnable a singleton component\n----------------------------\n\nTo identify an app as a singleton, add `android:singleUser=\"true\"` to your service,\nreceiver, or provider in the Android manifest.\n\nThe system instantiates that component in the process running as user 0\nonly. Any requests to connect to that provider or service, or to broadcast to that receiver, from\nany user is routed to the process in user 0. If this is the only component in your app,\nonly one instance of your app runs.\n\nActivities in your package are still launched in a separate process for\neach user, with the UID being in the UID range for that user (such as 1010034).\n\nInteract with users\n-------------------\n\n### Set permissions\n\nThese permissions are required: \n\n```\nINTERACT_ACROSS_USERS (signature|system)\nINTERACT_ACROSS_USERS_FULL (signature)\n```\n\n### Employ APIs\n\nUse the following APIs to make apps aware of multiple users.\n\n1. Extract the user handle from incoming Binder calls:\n - `int userHandle = UserHandle.getCallingUserId()`\n2. Use new, protected APIs to start services, activities, broadcasts on a specific user:\n - `Context.startActivityAsUser(Intent, UserHandle)`\n - `Context.bindServiceAsUser(Intent, ..., UserHandle)`\n - `Context.sendBroadcastAsUser(Intent, ... , UserHandle)`\n - `Context.startServiceAsUser(Intent, ..., UserHandle)`\n\n `UserHandle` can be an explicit user or one of the special handles: `UserHandle.CURRENT` or `UserHandle.ALL`. `CURRENT` indicates the user that is currently in the foreground. Use `ALL` when you want to send a broadcast to all users.\n3. Communicate with components in your own app: `(INTERACT_ACROSS_USERS)` Or with components in other apps: `(INTERACT_ACROSS_USERS_FULL)`\n4. You might need to create proxy components that run in the user's process that then access the `singleUser` component in user 0.\n5. Query users and their handles with the new `UserManager` system service:\n - `UserManager.getUsers()`\n - `UserManager.getUserInfo()`\n - `UserManager.supportsMultipleUsers()`\n - `UserManager.getUserSerialNumber(int userHandle)` - a nonrecycled number that corresponds to a user handle.\n - `UserManager.getUserHandle(int serialNumber)`\n - `UserManager.getUserProfiles()` - returns the collection of self and managed profiles, if any.\n6. Register to listen to specific or all users and the callbacks with new APIs on ContentObserver, PackageMonitor, BroadcastReceiver that provide additional information about which user has caused the callback.\n\n### Services in multiple users or profiles\n\nNot all services need to run an instance in another user or work profile. If your system service\nonly needs to run as user 0, disable the service's components when running under other users to\nhelp preserve resources. The following example shows how you might do this at your service's entry\npoints: \n\n```\n// Add on all entry points such as boot_completed or other manifest-listed receivers and providers\nif (!UserManager.isSystemUser()) {\n // Disable the service\n ComponentName targetServiceName = new ComponentName(this, TargetService.class);\n context.getPackageManager().setComponentEnabledSetting(\n targetServiceName, COMPONENT_ENABLED_STATE_DISABLED, 0);\n}\n```\n\nThe example could also use `PackageManager.setApplicationEnabledSetting()` to disable\nthe entire app."]]