
이 페이지에서는 Android에서 기기 제조업체가 할 수 있는 기기 관리에 관한 가이드라인을 설명합니다. 기기 관리를 지원하려면 기기에서 섹션 3.9 기기 관리(Android 호환성 정의 문서(CDD))에 정의된 소프트웨어 호환성 요구사항을 모두 충족해야 합니다. 여기서 제공하는 구현 가이드라인은 전체가 아니며 Android 기기 관리 구현을 위한 시작점일 뿐입니다.
기기 관리 사용 설정
Android에서 기기 관리를 사용 설정하려면 다음 기능을 사용 설정해야 합니다.
android.software.device_adminandroid.software.managed_users
기기에서 기기 관리를 지원하는지 확인하려면 기기에서 adb 명령어(adb shell pm
list features)를 실행하고 이러한 기능이 표시되는지 확인합니다.
설정 요구사항
기기 소유자 또는 프로필 소유자 프로비저닝을 구현하는 기기는 설정 시 (최초 환경설정 또는 직장 프로필 설정) 최종 사용자에게 적절한 정보 공개 문구를 표시해야 합니다. AOSP는 참조 구현을 제공합니다. 관리 프로비저닝은 Android 프레임워크 UI 흐름으로, 기기 사용자가 기기에서 기기 소유자 또는 관리 프로필 설정의 의미를 적절히 알 수 있도록 완전 관리형 기기 설정 또는 직장 프로필의 설정 시 호출됩니다. 관리 프로비저닝은 프로비저닝을 진행하는 중에 다음 활동을 실행하거나 기기 정책 관리 역할 보유자에게 활동을 위임합니다.
- 기기를 암호화합니다(암호화가 사용 설정된 경우).
- 관리 사용자를 설정합니다.
- 선택사항인 앱을 사용 중지합니다.
- 엔터프라이즈 모바일 관리(EMM) 기기 정책 컨트롤러(DPC) 앱을 기기 소유자 또는 프로필 소유자로 설정합니다.
이후 DPC 앱은 다음 활동을 실행합니다.
- 사용자 계정을 추가합니다.
- 기기 정책을 준수합니다.
- 추가 시스템 앱을 사용 설정합니다.
프로비저닝이 완료되면 DPC 앱의 ADMIN_POLICY_COMPLIANCE 인텐트 핸들러가 완전 관리형 기기 사용자(기기 소유자 프로비저닝용) 또는 직장 프로필 사용자(프로필 소유자 프로비저닝용)에서 실행됩니다.
그런 다음 DPC 앱은 계정을 추가하고 정책을 시행합니다.
런처 요구사항
기기 관리를 지원하려면 런처에서 직장 아이콘 배지(관리 애플리케이션을 나타내기 위해 AOSP에서 제공함)가 포함된 배지 지정 앱을 지원해야 합니다. 관리 기기 또는 프로필의 다른 사용자 인터페이스 요소(예: 알림)는 직장 배지 애셋을 사용해야 합니다. AOSP의 Launcher3은 이미 이러한 배지 기능을 지원하고 있습니다.
기본 직장 앱
기본적으로 관리 기기 또는 직장 프로필이 올바르게 작동하는 데 필요한 애플리케이션만 Android Enterprise 프로비저닝의 일부로 사용 설정됩니다. 기기 제조업체는 다음의 XML 파일을 사용하여 기본 앱 목록을 명시할 수 있습니다.
vendor_required_apps_managed_profile.xmlvendor_required_apps_managed_device.xmlvendor_required_apps_managed_user.xml
기기 프로비저닝 후에는 IT 관리자가 EMM 콘솔이나 관리 Google Play를 사용하여 조직에서 필요하다고 생각되는 앱을 추가로 푸시할 수 있습니다.
기기 소유자(완전 관리형 기기)와 프로필 소유자(직장 프로필) 모드 모두에서 앱은 다음과 같이 작동합니다.
- 런처 아이콘이 없는 앱은 필수 시스템 구성요소로 간주되어 Android에서 자동으로 사용 설정합니다.
- 런처 아이콘이 있는 앱은 기본적으로 기기 프로비저닝 동안
vendor_required_apps_managed_[device|profile|user].xml files에 패키지 이름을 허용 목록에 추가하여 사용 설정할 수 있습니다. - 다른 앱은 모두 기기 프로비저닝 동안 자동으로 사용 중지됩니다.
헤드리스 시스템 사용자로 구성된 기기에서 기기 소유자 구현
Android 14(API 수준 34)에는 시스템 사용자가 백그라운드 사용자이고 포그라운드 사용자가 보조 사용자인 헤드리스 시스템 사용자 모드 구성이 도입되었습니다. 기본적으로 기기 소유자 기능은 포그라운드에도 있는 시스템 사용자를 사용하므로 헤드리스 시스템 사용자 구성은 완전 관리형 기기(기기 소유자 프로비저닝)에 고유한 특정 문제를 일으킵니다.
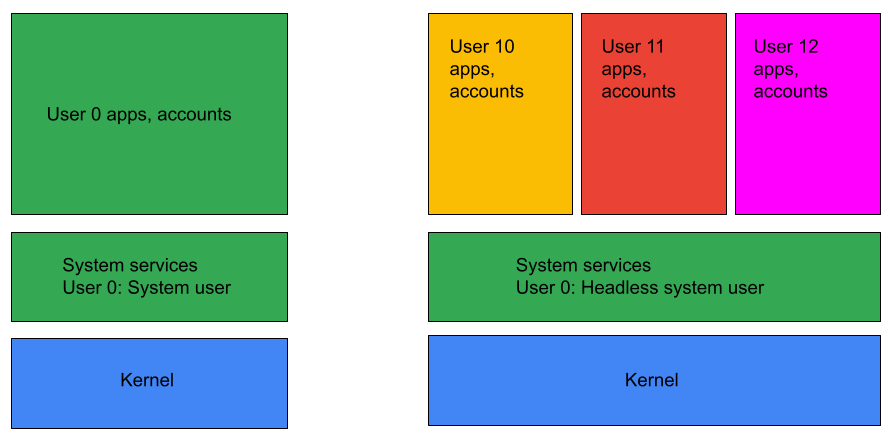
그림 1. 헤드리스 시스템 사용자 모드
헤드리스 시스템 사용자 모드 기기에서 기기 정책 컨트롤러(DPC) 애플리케이션은 제휴 모드(HEADLESS_DEVICE_OWNER_MODE_AFFILIATED)를 지원하는 경우에만 기기 소유자로 설정될 수 있습니다. 시스템은 getHeadlessDeviceOwnerMode()를 호출하여 제휴 모드가 지원되는지 확인합니다.
기기 프로비저닝은 DPC 애플리케이션이 제휴 모드 프로비저닝을 지원하는지에 따라 처리됩니다.