You can use Android Emulator to create emulations of Android devices that run your own custom Android system images. In addition, you can add multi-display support to Android Emulator emulations.
Android Emulator architecture
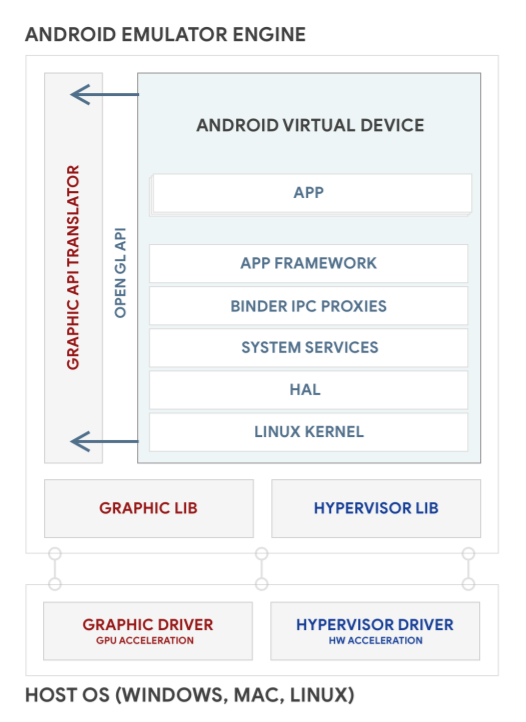
Android Emulator runs the Android operating system in a virtual machine called an Android Virtual Device (AVD). Each AVD contains the full Android software stack, and it runs as if it were on a physical device. Figure 1 illustrates Android Emulator's high-level architecture. For more information about the emulator, see Run apps on the Android Emulator.

Figure 1. Android Emulator architecture.
Build AVD images
Each AVD includes an Android system image, which runs in that AVD. The AVD Manager includes some system images. And you can build custom AVD system images from your source code and create device emulations to run them.
To build and run an AVD system image:
Download the Android source:
mkdir aosp-android-latest-release; cd aosp-android-latest-releaserepo init -urepo sync -j24
If you want to build other Android versions, you can find their branch names in the public Android repository. They map to Android Codenames, Tags, and Build Numbers.
Build an AVD system image. This is the same process as building an Android device system image. For example, to build a x86 64-bit AVD:
source ./build/envsetup.shlunch sdk_phone_x86_64make -j32Run the AVD system image in the Android Emulator:
emulator
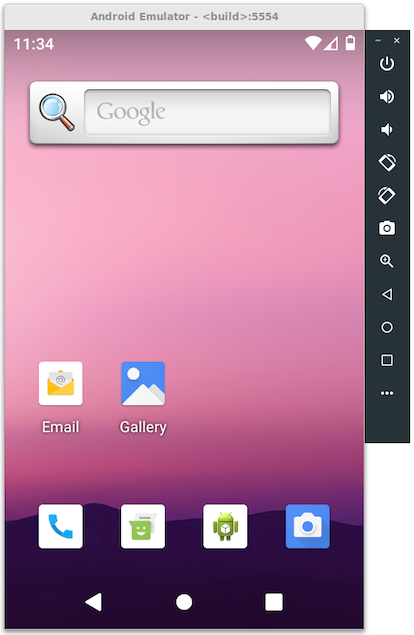
See Command-line startup options for more details about running the emulator. Figure 2 shows an example of the Android Emulator running an AVD:

Figure 2. Android Emulator running an AVD.
Share AVD system images for others to use with Android Studio
Follow these instructions to share your AVD system images with others. They can use your AVD system images with Android Studio to develop and test apps.
Make additional
sdkandsdk_repopackages:For Android 13 and higher, use the
emu_img_zipcommand:$ make emu_img_zipThis generates an
sdk-repo-linux-system-images-eng.[username]].zipfile.For Android 12 and lower, use the
sdk_repocommand:$ make -j32 sdk sdk_repoThe
make sdk sdk_repocommand creates two files underaosp-android-latest-release/out/host/linux-x86/sdk/sdk_phone_x86:sdk-repo-linux-system-images-eng.[username].ziprepo-sys-img.xml
Host the file
sdk-repo-linux-system-images-eng.[username].zipsomewhere accessible to your users, and get its URL to use as the AVD System Image URL.For Android 12 and lower, edit
repo-sys-img.xmlaccordingly:- Update
<sdk:url>to your AVD System Image URL. - See sdk-sys-img-03.xsd to learn about other updates to the file.
- Host
repo-sys-img.xmlsomewhere accessible to your users, and get its URL to use as the Custom Update Site URL.
- Update
To use a custom AVD image, do the following in the SDK Manager:
Add the Custom Update Site URL as an SDK Update Site.
This adds your custom AVD system image to the System Images page.
Create an AVD by downloading and selecting the custom AVD system image.
Add multi-display support
Android 10 enhances multi-display to better support more use cases, such as auto and desktop mode. Android Emulator also supports multi-display emulation. So you can create a specific multi-display environment without setting up the real hardware.
You can add multi-display support to an AVD by making the following changes, or by cherry picking from these CLs.
Add the multi-display provider to the build by adding these lines to file
build/target/product/sdk_phone_x86.mk:PRODUCT_ARTIFACT_PATH_REQUIREMENT_WHITELIST := \ system/lib/libemulator_multidisplay_jni.so \ system/lib64/libemulator_multidisplay_jni.so \ system/priv-app/MultiDisplayProvider/MultiDisplayProvider.apk \ PRODUCT_PACKAGES += MultiDisplayProviderEnable the Multi-Display feature flag by adding this line to file
device/generic/goldfish/data/etc/advancedFeatures.ini:MultiDisplay = on
You can find the latest emulator features and release information from the following sources:
