

軟體定義車輛 (SDV) 平台上的設定與校準服務 (ConCal) 可根據車輛規格、國家/地區法規和客戶訂購的功能,設定 SDV 服務。這項服務是 SDV 平台的基本建構區塊,可讓 OEM 透過設定多個來源 (例如工廠、服務中心、雲端) 的重新設定功能,在多部車輛之間重複使用相同的服務程式碼。
SDV 平台提供面向服務的 API,用於設定及校正特定車輛上的服務套裝組合。OEM 可以透過這個介面實作 OEM 專屬的設定和校正邏輯。
設定和校正服務包含下列程序:
設定:定義車輛的基本屬性和行為,可能取決於多項因素,例如車輛位置、使用者訂購的選項或國家/地區法規。這項架構會建立元件的互動方式,並決定影響車輛整體功能的軟體設定,例如軟體變體、網路連線和初始作業參數。
校準:在預先設定的範圍內微調系統參數。舉例來說,校準可調整感應器和致動器的準確度、針對排放控制最佳化引擎效能,以及改善可駕駛性和安全系統回應。設定會為車輛運作方式建立基本架構,校準則會根據該架構最佳化車輛行為。兩者對於確保車輛符合排放法規、發揮最大效能、提升安全性,以及補償長期磨損至關重要。
我們提供標準的 SDV 全面 ConCal API,簡化 SDV 服務套件的實作程序,避免重新實作設定和校準功能,以便在不同 OEM 的不同車輛上執行。
建築
每個服務套裝組合可擁有一或多個設定構件。
設定構件
設定構件 (設定) 包含一或多個設定參數及其值。設定是服務專屬的 protobuf 訊息,欄位可包含巢狀 protobuf 訊息 (struct)、對應、陣列、int、float、bool、位元組或字串參數。
// Example of a configuration message.
message SampleServiceBundleConfig
{
 bool bool_parameter = 1;
 int64 int_parameter = 2;
 float float_parameter = 3;
 string str_parameter = 4;
 repeated string list_parameter = 5;
 map<string, int32> map_parameter = 6;
 SomeNestedMessage nested_parameter = 7;
 SomeComplexMessage complex_parameter = 8;
 some.nested.package.SomeNestedMessage nested_package = 9;
 bytes bytes_parameter = 10;
}
設定 ID
每項設定都有專屬 ID。這個 ID 包含服務套件擁有者的完整執行個體名稱和設定名稱。設定名稱必須容易辨識,且每個服務套裝組合不得重複,並遵循「服務套裝組合命名慣例」中定義的命名標準,例如 shared、private、diagnostics 和 calibration。
限制:
- 執行個體名稱開頭必須為英文字母。
- 所有字元都必須是小寫英數字元或連字號。
- 名稱中的連字號不得連續出現超過一次。
- 設定名稱結尾不得為連字號。
- 設定名稱長度不得超過 48 個字元。
- 在同一部 VM 上,相同服務套件的設定名稱不得重複。
在 26Q2 之前,設定 ID 的定義如下:
// Unique identifier for the config.
message ConfigId {
  // The FQIN of the service bundle that owns the configuration.
  com.sdv.google.sd_common.ServiceFqin service_fqin = 1;

  // The name of the config.
  string config_name = 2;
}
啟動時,設定擁有者只知道設定的結構定義和預設值。如要根據目前的車輛自訂服務套件行為,擁有服務套件必須註冊預設設定和架構。
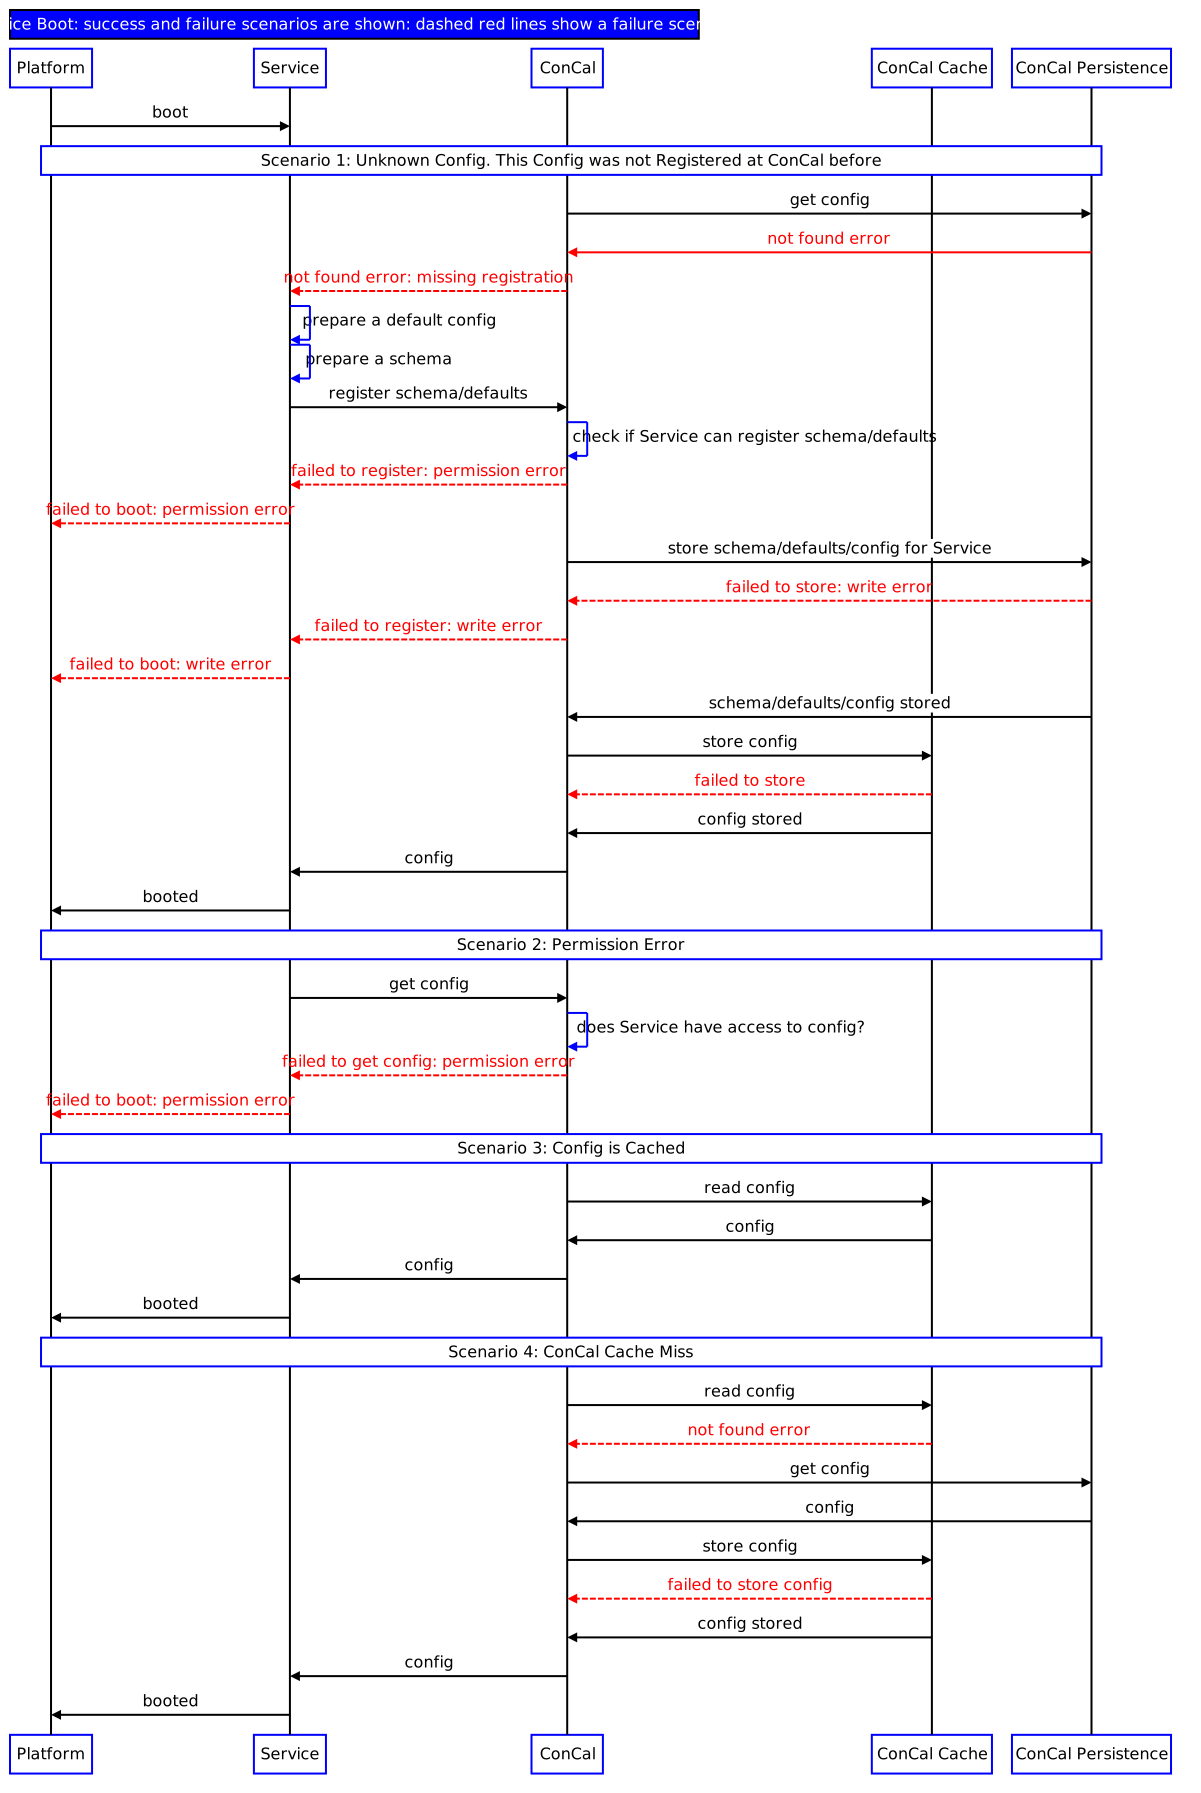
圖 1. 註冊預設設定,以及擷取自訂設定。
這樣一來,原始設備製造商就能實作一次服務套裝組合,並在多部車輛上執行。
部署作業
ConCal 可以在 SDV 平台上維護一或多個伺服器執行個體。服務套件應探索並使用最接近的 ConCal 伺服器。舉例來說,如果每個 ECU 部署一個 ConCal,服務套件應可存取在相同 ECU 上執行的 ConCal 執行個體。這可讓服務套件及時擷取設定。如果 ConCal 執行個體沒有要求設定 (因為屬於其他 ConCal 的責任範圍),則聯絡的 ConCal 伺服器會向擁有 ConCal 執行個體要求設定,並將其重新導向至服務套件。
自訂設定
能夠在不同車輛重複使用相同軟體,是 SDV 的主要優勢之一。軟體開發完成後,即可重複用於多部車輛,且我們可根據車輛規格調整軟體行為。這就是 ConCal 的主要用途,可根據車輛屬性並透過設定覆寫,計算服務設定。
ConfigOverride 是 protobuf 訊息,說明如何針對特定車輛調整設定。其中包含覆寫 ID (由提供覆寫的實體唯一定義)、設定 ID 和 ConfigOverrideKeyValuePair 清單。ConfigOverride 只能在更新程序期間提供,且只能由 OEM 允許的服務提供。以下提供這兩種結構的 protobuf 定義。
// Key-value pair to update configuration.
message ConfigOverrideKeyValue {
  string key = 1;

  oneof value {
    string value_txtproto = 2;
    .google.protobuf.Any value_any = 3;
  }
}

// A collection of changes for a specific configuration which should be atomically applied.
message ConfigOverride {
  string override_id = 1;

  ConfigId config_id = 2;

  repeated ConfigOverrideKeyValue pairs = 3;
}
ConfigOverride 支援下列作業:
指派新值:最後一個值已淘汰,且參數會指派新值,例如為簡單欄位 (int、string、float、bool、bytes) 指派新值,或重新編寫複雜欄位,例如對應、清單、結構體或完整設定。
移除或清除值:這項作業適用於所有類型,包括訊息、重複欄位、對應、單一欄位和設定本身。這項作業可對完整欄位或訊息執行,也就是說,系統不支援從對應中移除特定鍵,也不支援從重複欄位中移除個別元素。
在地圖中新增值。
在對應中重新編寫現有鍵的值 (如果鍵不存在,這項作業也可以視為在對應中新增值)。
使用 ConCal 設定服務組合
本章說明如何開發服務套件,在執行階段擷取設定。從可設定的組合角度來看,無論擷取的設定是預設出廠設定,還是後續使用 ConCal 覆寫和校準程序進行的修改,都是完全不透明的。
您可以在 system/software_defined_vehicle/samples/concal/src/concal_client 找到說明文件所依據的範例。
詳情請參閱「服務套件開發」。
宣告服務套件擁有的設定類型
服務套件擁有其擷取的設定類型。這樣一來,可設定的套件就能獨立更新,不必依賴持續性設定資料。
編寫 protobuf 檔案 (副檔名為
.proto),宣告設定類型:syntax = "proto3"; package android.sdv.demo.config; message RearViewCamera { string model = 1; uint64 horizontal_resolution = 2; uint64 vertical_resolution = 3; float x_axis_field_of_view = 4; float y_axis_field_of_view = 5; bool is_rgb = 6; }建立建構目標,產生可讓您擷取設定類型的執行階段程式庫。在
Android.bp檔案中:rust_protobuf { name: "libsdvtestconcal_proto_rust", crate_name: "sdvtestconcal_proto_rust", protos: [ "rear_view_camera.proto", ], proto_flags: [ "-I external/protobuf/src", "-I .", ], source_stem: "sdvtestconcal_proto_rust", vendor_available: true, product_available: true, min_sdk_version: "35", }
為套件產生 ConCal RPC 中介軟體程式碼
在服務套件中新增 VSIDL 宣告:
package: "com.sdv.oem.sample.concal"

service_bundle {
  name: "SampleOemConCalClientServiceBundle"
  client {
    service: "com.sdv.google.concal.ConCalRegistrationService"
  }
}
這會宣告該套件是 ConCal 設定註冊和擷取服務的用戶端。如要瞭解如何使用 VSIDLC 為套件產生 RPC 用戶端繫結,請參閱 VSIDL 和中介軟體總覽。
初始化中介軟體,以擷取 RPC 設定
在執行階段,初始化 ConCal RPC 呼叫所需的 Middleware 元件。 在本範例中,我們會在啟動套件時非同步初始化。
pub struct ExampleConcalBundle {
    context: ContextRef,
    runtime: Option<Runtime>,
}

sdv::lifecycle::register_service_bundle!(ExampleConcalBundle);

impl ServiceBundle for ExampleConcalBundle {
    fn new(context: ContextRef) -> ExampleConcalBundle {
        info!("Creating {}.", context.get_self_fqin());

        ExampleConcalBundle { context, runtime: None }
    }

    fn on_start(&mut self) {
        let fqin = self.context.get_self_fqin();
        info!("Starting {}.", fqin);

        let runtime = Builder::new_multi_thread()
            .worker_threads(4)
            .thread_name("tokio-pool")
            .enable_all()
            .build()
            .unwrap();
        let context = self.context;
        runtime.spawn(async move {
            let registration_client = setup_register_config_rpc(context).await;
            /* main SB logic here */
        });
        self.runtime = Some(runtime);
    }

async fn setup_register_config_rpc(context: ContextRef) -> RegistrationClient {
    let sdv_comms = SdvComms { context };
    let sd = ServiceDiscoveryManager::new(context);
    let unit_name_args = UnitNameDiscoveryArgs::new_builder()
        .set_sdv_package_name("com.sdv.oem.sample.concal")
        .set_service_bundle_name("SampleOemConCalServiceBundle")
        .set_service_unit_name(RegistrationClient::DEFAULT_UNIT_NAME)
        .build()
        .unwrap();

    let mut unit_name_stream =
        sd.subscribe_service_unit_change_by_name(&unit_name_args).await.unwrap();

    // wait until RPC servers are registered, if server is not a custom agent
    while let Some(event) = unit_name_stream.next().await {
        if let ServiceUnitChangeEvent::Registered(sud) = event {
            let service_identity = sud.get_service_bundle_identity();
            let fqin = service_identity.get_fqin();
            if fqin.get_sdv_package_name() == "com.sdv.oem.sample.concal"
                && fqin.get_service_bundle_name() == "SampleOemConCalServiceBundle"
                && fqin.get_service_instance_name() == "default"
            {
                break;
            }
        }
    }

    let service_bundle =
        SampleOemConCalClientServiceBundle::new(Arc::new(sdv_comms)).await.unwrap();
    service_bundle
        .create_rpc_client::<RegistrationClient>(
            UnitName::builder()
                .package_name("com.sdv.oem.sample.concal")
                .bundle_name("SampleOemConCalServiceBundle")
                .service_unit_name(RegistrationClient::DEFAULT_UNIT_NAME)
                .build()
                .unwrap(),
            ClientOptions::default(),
        )
        .await
        .expect("Failed to create an RPC client")
}
其中:
- 在
on_start中,我們會建立 tokio 執行階段,並產生 tokio 工作。工作會先呼叫setup_register_rpc,再繼續執行套件的主要邏輯。 setup_register_rpc會設定中介軟體 RPC 繫結。請注意,這個範例並未假設代理程式會實作 ConCal 功能:伺服器可能要等到套件啟動後才會可用。因此,範例程式碼會等待 RPC 伺服器使用 Service Discovery API 註冊。
初始化設定
向 ConCal 伺服器提供 ID、設定結構定義,以及預設和出廠設定值,以註冊設定構件。
如果這是第一次呼叫註冊,系統會保留預設值。如果在後續的套件啟動時呼叫註冊,系統會擷取套用 ConCal 覆寫 (如有) 的持續性預設值。
無論構件是否已註冊,ConCal 註冊設定呼叫一律不會失敗。
impl ServiceBundle for ExampleConcalBundle{
/* ... */
fn on_start(&mut self) {
/* ... */
runtime.spawn(async move {
let registration_client = setup_register_config_rpc(context).await;
sample_concal_main(fqin, registration_client).await
});
self.runtime = Some(runtime);
}
}
async fn sample_concal_main(
fqin: ServiceFqin,
registration_client: RegistrationClient,
) -> sdv::status::SdvResult<()> {
let config = get_rear_view_camera_factory_config();
let config_id = get_config_id(&fqin);
register_config(®istration_client, &config_id, &config).await;
/* ... */
}
fn get_rear_view_camera_factory_config() -> RearViewCamera {
RearViewCamera {
model: String::from("model 1"),
horizontal_resolution: 720,
vertical_resolution: 720,
x_axis_field_of_view: 70.0,
y_axis_field_of_view: 70.0,
is_rgb: false,
..Default::default()
}
}
fn get_config_id(fqin: &ServiceFqin) -> ConfigId {
ConfigId {
config_name: "config".to_string(),
service_fqin: MessageField::some(ProtoFqin {
vm_name: fqin.get_sdv_vm_name().to_string(),
package_name: fqin.get_sdv_package_name().to_string(),
service_name: fqin.get_service_bundle_name().to_string(),
instance_name: fqin.get_service_instance_name().to_string(),
..Default::default()
}),
..Default::default()
}
}
async fn register_config(
client: &RegistrationClient,
config_id: &ConfigId,
config: &RearViewCamera,
) {
let config_fd = FileDescriptorSet {
file: vec![RearViewCamera::descriptor().file_descriptor_proto().clone()],
..Default::default()
};
let config = Any::pack(config).expect("Failed to pack config");
let config_metadata = ConfigMetadata {
descriptor_set: MessageField::some(config_fd),
default_config: MessageField::some(config.clone()),
..Default::default()
};
client
.RegisterConfigMetadata(&RegisterConfigMetadataRequest {
config_id: MessageField::some(config_id.clone()),
metadata: MessageField::some(config_metadata),
config_version: String::from("1.0"),
..Default::default()
})
.await
.expect(
"RegisterConfigMetadata should not fail, even if configuration was registered before",
);
}
其中:
- 在
on_start中產生的工作會先擷取 RPC 繫結,然後繼續執行商業邏輯,並呼叫sample_concal_main。 sample_concal_main會先註冊設定構件。邏輯包含在register_config中。- 如要註冊設定,套件必須指定其 protobuf 型別、ID 和預設值。
config_fd是設定類型。擁有設定類型的套件可確保系統一律會擷取套件預期的結構定義,包括 APEX 更新後。- 這個 ID 會做為 ConCal 伺服器內部持續性邏輯中的 ID。
- 預設值是在
get_rear_view_camera_factory_config中建構。 如果先前未保留任何值,則預設值為 ConCal 伺服器保留的值。這是系統指定原廠設定的方式之一。您也可以使用其他設定。
擷取設定
註冊後,請擷取設定。由於先前已註冊設定,因此這次呼叫保證會成功。
async fn sample_concal_main(
fqin: ServiceFqin,
registration_client: RegistrationClient,
update_client: UpdateClient,
) -> sdv::status::SdvResult<()> {
let config = get_rear_view_camera_factory_config();
let config_id = get_config_id(&fqin);
register_config(®istration_client, &config_id, &config).await;
let config = get_config(®istration_client, &config_id).await;
info!("Retrieved configuration:\n{config:#?}");
// Onwards, use configuration in bundle's main business logic
/* ... */
}
async fn get_config(client: &RegistrationClient, config_id: &ConfigId) -> RearViewCamera {
let bytes = client
.GetConfig(&GetConfigRequest {
config_id: MessageField::some(config_id.clone()),
..Default::default()
})
.await
.expect("Get config does not fail, as config was registered before")
.config;
RearViewCamera::parse_from_bytes(&bytes).expect("parse_from_bytes failed")
}
其中:
由於設定是由同一個套件預先註冊,因此對
GetConfigRequest的呼叫保證會成功。設定可讓服務套件不透明地處理工廠設定和覆寫設定這兩種情況:服務套件的業務邏輯維持不變。呼叫
GetConfigRequest會傳回原始位元組。函式get_config會繼續將這些值剖析為預期的設定類型。