
Use the Instrument Cluster API (an Android API) to display navigation apps,
including Google Maps, on a secondary display in a car, such as behind the
steering wheel on the instrument panel. This page describes how to create a
service to control that secondary display and to integrate the service with
CarService so that navigation apps can display a
user interface.
Terminology
The following terms are used on this page.
CarManager that enables external apps to launch an activity on
the Instrument Cluster and receive callbacks when the Instrument Cluster is ready to display
activities.android:singleUser attribute. At
any given time, at most one instance of the service runs on the Android system.Prerequisites
Before you continue, be sure to have these elements:
- Android development environment. To set up the Android development environment, see Build requirements.
- Download the Android source code. Get the latest version of the Android source code from the pi-car-release branch (or later) at https://android.googlesource.com.
- Head unit (HU). An Android device capable of running Android 9 (or later). This device must have its own display and be capable of flashing the display with new builds of Android.
- Instrument Cluster is one of the following:
- Physical secondary display attached to the HU. If the device hardware and kernel support the management of multiple displays.
- Independent unit. Any computational unit connected to the HU via a network connection, capable of receiving and displaying a video stream on its own display.
- Emulated display. During development, you can use one of
these emulated environments:
- Simulated secondary displays. To enable a simulated secondary display on any AOSP Android distribution, go to the Developer Options settings in the Settings system app and then select Simulate secondary displays This configuration is equivalent to attaching a physical secondary display, with the limitation that this display is superimposed over the primary display.
- Emulated instrument cluster. The Android emulator included with AAOS provides an option to display an instrument cluster with ClusterRenderingService.
Integration architecture
Integration components
Any integration of the Instrument Cluster API consists of these three components:
CarService- Navigation apps
- OEM Instrument Cluster Service
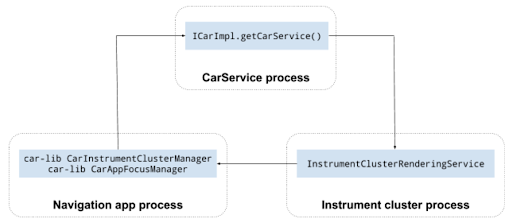
CarService
CarService mediates between navigation apps and the car, ensuring that only
one navigation app is active at any given time and only apps with the
android.car.permission.CAR_INSTRUMENT_CLUSTER_CONTROL permission can send data
to the car.
CarService bootstraps all car-specific services and provides access to
these services through a series of managers. To interact with the services,
apps running in the car can access these managers.
For instrument cluster implementation, automotive OEMs must create a custom implementation of InstrumentClusterRendererService and update the ClusterRenderingService.
When rendering an Instrument Cluster, during the boot process the
CarService reads the InstrumentClusterRendererService key of the
ClusterRenderingService
to locate an implementation of InstrumentClusterService. In AOSP, this entry
points to the Navigation State API sample cluster implementation render service:
<string name="instrumentClusterRendererService">
android.car.cluster/.ClusterRenderingService
</string>
The service referred to in this entry is initialized and bound to
CarService. When navigation apps, like Google Maps, request a
CarInstrumentClusterManager, CarService provides a manager that
updates the Instrument Cluster state from the bound InstrumentClusterRenderingService.
(In this case, bound refers to
Android
Services.)
Instrument Cluster service
OEMs must create an Android Package (APK) that contains a subclass of ClusterRenderingService.
This class serves two purposes:
- Provides an interface Android and the Instrument Cluster rendering device (the purpose of this page).
- Receives and renders navigation state updates, such as turn-by-turn navigation guidance.
For the first purpose, OEM implementations of InstrumentClusterRendererService
must initialize the secondary display used to render information on screens in the car cabin and
communicate this information to CarService by calling to the
InstrumentClusterRendererService.setClusterActivityOptions() and
InstrumentClusterRendererService.setClusterActivityState() methods.
For the second function, the Instrument Cluster service must provide an
implementation of the
ClusterRenderingService
interface that receives navigation status update events, which are encoded as an
eventType and event data encoded in a bundle.
Integration sequence
The following diagram illustrates the implementation of a navigation state that renders updates:

In this illustration, colors denote the following:
- Yellow.
CarServiceandCarNavigationStatusManagerprovided by the Android platform. To learn more, see Car and CAR_NAVIGATION_SERVICE. - Cyan.
InstrumentClusterRendererServiceimplemented by the OEM. - Purple. The Navigation app implemented by Google and third-party developers.
- Green.
CarAppFocusManager. To learn more, see Using the CarAppFocusManager API below and CarAppFocusManager.
The Navigation State information flow follows this sequence:
CarServiceinitializes theInstrumentClusterRenderingService.- During initialization, the
InstrumentClusterRenderingServiceupdatesCarServicewith:- Instrument Cluster display properties, such as unobscure boundaries (see more details about unobscure boundaries later).
- Activity options needed to launch activities inside the Instrument Cluster display. To learn more, see ActivityOptions.
- A navigation app (such as Google Maps for Android Automotive or any maps app
with the required permissions):
- Obtains a
CarAppFocusManagerusing the Car class from car-lib. - Before turn-by-turn directions start, calls to
CarAppFocusManager.requestFocus()to passCarAppFocusManager.APP_FOCUS_TYPE_NAVIGATIONas theappTypeparameter.
- Obtains a
CarAppFocusManagercommunicates this request toCarService. If granted,CarServiceinspects the navigation app package and locates an activity marked with categoryandroid.car.cluster.NAVIGATION.- If found, the navigation app uses the
ActivityOptionsreported by theInstrumentClusterRenderingServiceto launch the activity and includes the Instrument Cluster display properties as extras in the intent.
Integrate the API
The InstrumentClusterRenderingService implementation must:
- Be designated as a singleton service by adding the following value to
the AndroidManifest.xml. This is necessary to ensure that a single copy of the
Instrument Cluster service runs, even during initialization and user switching:
android:singleUser="true" - Hold the
BIND_INSTRUMENT_CLUSTER_RENDERER_SERVICEsystem permission. This guarantees that only the Instrument Cluster rendering service included as part of the Android system image is ever bound by theCarService:<uses-permission android:name="android.car.permission.BIND_INSTRUMENT_CLUSTER_RENDERER_SERVICE"/>
Implement InstrumentClusterRenderingService
To build the service:
- Write a class that extends from
ClusterRenderingService
and then add a corresponding entry to your
AndroidManifest.xmlfile. This class controls the Instrument Cluster display and can (optionally) render Navigation State API data. - During
onCreate(), use this service to initialize the communication with the rendering hardware. Options include:- Determine the secondary display to be used for the Instrument Cluster.
- Create a virtual display so that the Instrument Cluster app renders and transmits the rendered image to an external unit (using a video streaming format, such as H.264).
- When the display indicated above is ready, this service must call
InstrumentClusterRenderingService#setClusterActivityLaunchOptions()to define the exactActivityOptionsthat must be used to display an Activity on the Instrument Cluster. Use these parameters:category.ClusterRenderingService.ActivityOptions.AnActivityOptionsinstance that can be used to launch an Activity in the Instrument Cluster. For example, from the sample Instrument Cluster implementation on AOSP:getService().setClusterActivityLaunchOptions( CATEGORY_NAVIGATION, ActivityOptions.makeBasic() .setLaunchDisplayId(displayId));
- When the Instrument Cluster is ready to display activities, this service must invoke
InstrumentClusterRenderingService#setClusterActivityState(). Use these parameters:categoryClusterRenderingService.stateBundle generated with ClusterRenderingService. Be sure to provide this data:visibleSpecifies the Instrument Cluster as visible and ready to display content.unobscuredBoundsA rectangle that defines the area within the Instrument Cluster display in which it's safe to display content. For example, areas covered by dials and gauges.
- Override the
Service#dump()method and report status information useful for debugging (see dumpsys for more information).
Sample InstrumentClusterRenderingService implementation
The following example outlines an InstrumentClusterRenderingService
implementation, which creates a VirtualDisplay to present the Instrument
Cluster content on a remote physical display.
Alternatively, this code could pass the displayId of a physical secondary
display connected to the HU, if one is known to be available.
/**
* Sample {@link InstrumentClusterRenderingService} implementation
*/
public class SampleClusterServiceImpl extends InstrumentClusterRenderingService {
   // Used to retrieve or create displays
   private final DisplayManager mDisplayManager;
   // Unique identifier for the display to be used for instrument
   // cluster
   private final String mUniqueId = UUID.randomUUID().toString();
   // Format of the instrument cluster display
   private static final int DISPLAY_WIDTH = 1280;
   private static final int DISPLAY_HEIGHT = 720;
   private static final int DISPLAY_DPI = 320;
   // Area not covered by instruments
   private static final int DISPLAY_UNOBSCURED_LEFT = 40;
   private static final int DISPLAY_UNOBSCURED_TOP = 0;
   private static final int DISPLAY_UNOBSCURED_RIGHT = 1200;
   private static final int DISPLAY_UNOBSCURED_BOTTOM = 680;
   @Override
   public void onCreate() {
      super.onCreate();
      // Create a virtual display to render instrument cluster activities on
      mDisplayManager = getSystemService(DisplayManager.class);
      VirtualDisplay display = mDisplayManager.createVirtualDisplay(
          mUniqueId, DISPLAY_WIDTH, DISPLAY_HEIGHT, DISPLAY_DPI, null,
          0 /* flags */, null, null);
      // Do any additional initialization (e.g.: start a video stream
      // based on this virtual display to present activities on a remote
      // display).
      onDisplayReady(display.getDisplay());
}
private void onDisplayReady(Display display) {
    // Report activity options that should be used to launch activities on
    // the instrument cluster.
    String category = CarInstrumentClusterManager.CATEGORY_NAVIGATION;
    ActionOptions options = ActivityOptions.makeBasic()
        .setLaunchDisplayId(display.getDisplayId());
    setClusterActivityOptions(category, options);
    // Report instrument cluster state.
    Rect unobscuredBounds = new Rect(DISPLAY_UNOBSCURED_LEFT,
        DISPLAY_UNOBSCURED_TOP, DISPLAY_UNOBSCURED_RIGHT,
        DISPLAY_UNOBSCURED_BOTTOM);
    boolean visible = true;
    ClusterActivityState state = ClusterActivityState.create(visible,
       unobscuredBounds);
    setClusterActivityState(category, options);
  }
}
Use the CarAppFocusManager API
The CarAppFocusManager API provides a method named getAppTypeOwner(), which allows
the cluster service written by OEMs to know which navigation app has navigation focus at any given
time. OEMs can use the existing CarAppFocusManager#addFocusListener() method, and
then use getAppTypeOwner() to learn which app has focus. With this information,
OEMs can:
- Switch the activity shown in the cluster to the cluster activity provided by the navigation app holding focus.
- Can detect if the focused navigation app has a cluster activity or not. If the focused navigation app doesn't have a cluster activity (or if such activity is disabled), OEMs can send this signal to the car DIM so the navigation facet of the cluster is skipped altogether.
Use CarAppFocusManager to set and listen for the current app focus, such as
active navigation or a voice command. Usually only one instance of such an app is actively
running (or focused) in the system.
Use the CarAppFocusManager#addFocusListener(..) method to listen for app focus
changes:
import android.car.CarAppFocusManager;

...

Car car = Car.createCar(this);
mAppFocusManager = (CarAppFocusManager)car.getCarManager(Car.APP_FOCUS_SERVICE);
mAppFocusManager.addFocusListener(this, CarAppFocusManager.APP_FOCUS_TYPE_NAVIGATION);

...

public void onAppFocusChanged(int appType, boolean active) {
    // Use the CarAppFocusManager#getAppTypeOwner(appType) method call
    // to retrieve a list of active package names
}
Use the CarAppFocusManager#getAppTypeOwner(..) method to retrieve the package
names of the current owner of a given app type that is in focus. This method may return
more than one package name if the current owner uses the android:sharedUserId feature.
import android.car.CarAppFocusManager;

...

Car car = Car.createCar(this);
mAppFocusManager = (CarAppFocusManager)car.getCarManager(Car.APP_FOCUS_SERVICE);
List<String> focusOwnerPackageNames = mAppFocusManager.getAppTypeOwner(
              CarAppFocusManager.APP_FOCUS_TYPE_NAVIGATION);

if (focusOwnerPackageNames == null || focusOwnerPackageNames.isEmpty()) {
        // No Navigation app has focus
        // OEM may choose to show their default cluster view
} else {
       // focusOwnerPackageNames
       // Use the PackageManager to retrieve the cluster activity for the package(s)
       // returned in focusOwnerPackageNames
}

...
Identify template apps
For template-based navigation apps that use the Car App library,
CarAppFocusManager#getAppTypeOwner() returns the host's package name
(for example, com.google.android.apps.automotive.templates.host)
because the host holds the system focus on behalf of the client app.
To identify the navigating client app, OEMs can
extract the package name from the navigation state bundle sent with
CarNavigationStatusManager. The package name is stored under the
key active_app_package_name in the bundle received by
NavigationRenderer#onNavigationStateChanged(Bundle):
// In your NavigationRenderer implementation
@Override
public void onNavigationStateChanged(Bundle bundle) {
    if (bundle.containsKey("active_app_package_name")) {
        String activeAppPackage = bundle.getString("active_app_package_name");
        // Use the package name to identify the navigating app (e.g., com.waze)
    }
}
Appendix: Use the sample app
AOSP provides a sample app that implements the Navigation State API.
To run this sample app:
- Build and flash Android Auto on a supported HU. Use the Android building and flashing instructions specific to your device. For instructions, see Using Reference Boards.
- Connect a physical secondary display to the HU (if supported) or turn on the virtual
secondary HU:
- Select Developer Mode in the Settings app.
- Go to Settings > System > Advanced > Developer options > Simulate secondary displays.
- Reboot the HU
- To launch the KitchenSink app:
- Open the drawer.
- Go to Inst. Cluster.
- Click START METADATA.
KitchenSink requests NAVIGATION focus, which instructs the DirectRenderingCluster
service to display a mocked-up user interface on the Instrument Cluster.