
Android Camera Image Test Suite (ITS) is part of Android Compatibility Test Suite (CTS) Verifier and includes tests that verify image content. CTS Verifier supports ITS test automation with Camera ITS-in-a-box; support for manual tests covers all Android device form factors.
ITS-in-a-box includes the following benefits:
- Automation. No human intervention is needed during the test.
- Easy troubleshooting. Consistency of test environment leads to fewer setup errors and increases reproducibility.
- Efficiency. Ability to retry for individual camera/scene improves test execution efficiency.
Rig selection
ITS-in-a-box consists of a plastic box that is laser cut from computer-aided design (CAD) drawings, a chart tablet, and a device under test (DUT). The following table describes the features and specifications for the different ITS-in-a-box rigs that are available. To select the appropriate rig, consider the specific field of view and minimum focus distance of the DUT. For camera systems with a 60 to 110 degree field of view and a 22 to 31 cm minimum focus distance, we recommend a modular base rig for its adaptability. If the camera system includes a telephoto lens with a minimum focus distance between 31 cm and 110 cm, we recommend a modular base rig with a tele extension that closely matches the lens's focus distance. Tele extensions are available in lengths from 50 cm to 90 cm.
| Rig | Chart distance | DUT camera FoV range (approx) | Features |
|---|---|---|---|
| Modular base rig | 22 cm | 60° - 120° |
|
| Modular base rig and tele extension rig | 22 cm - 110 cm* | 10° - 120° | 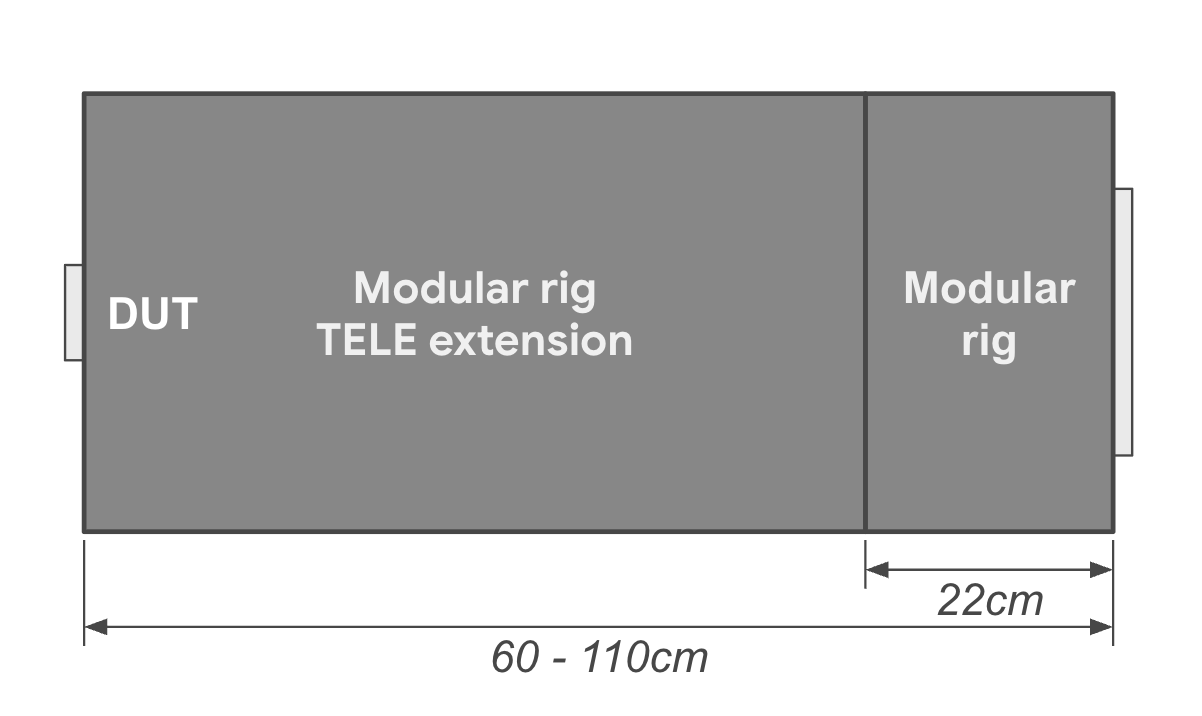
|
| WFoV ITS-in-a-box | 22 cm | 60° - 120° |
|
| RFoV ITS-in-a-box | 31 cm | 60° - 90° |
|
| Gen2 ITS-in-a-box | 31 cm | 60° - 90° |
|
| Chart distance | Scene scaling percentage | Image |
|---|---|---|
| 31 cm | 33% |
|
| 50 cm | 50% |

|
| 80 cm | 100% |

|
To get started with the Camera ITS-in-a-box:
- Purchase or build a modular, WFoV, or RFoV and sensor Fusion ITS-in-a-box.
- Configure a tablet with Camera ITS software.
- Run tests.
- Get results from the DUT.
Configure the tablet
This section provides step-by-step instructions for setting up a
tablet for use with the
Camera ITS tests located in the
CameraITS directory. These instructions use a Pixel C as
an example tablet. For information on tablet
requirements and recommendations, see Tablet
requirements.
Note: The Camera ITS Python scripts
automatically set the following options on the tablet for you:
Settings > Display > Sleep > After 30 minutes of inactivity
Adaptive brightness > OFF
- Charge the tablet and power it on. If prompted to set up an account, skip it (Camera ITS does not require any account paired with the tablet).
- Update the tablet to Android 7.0 or higher. Android 6.x and lower versions do not support Camera ITS.
- Enable developer mode.
- Return to Settings and select Developer options.
Enable options - On
- Stay awake
- USB debugging (This allows the host to run the tablet in debug mode. When you connect the tablet to the host for the first time, the tablet prompts Allow USB debugging? If the tablet doesn't display the debug prompt, disconnect then reconnect the tablet.)
Disable options - Automatic system updates
- Verify apps over USB
- Determine DUT and chart IDs by running
$ adb devicesto list available devices. To determinedevice_idandchart_id, plug and unplug devices and observe the devices that connect and disconnect. - Perform three test runs to suppress hints and user prompts that can obscure
charts on the tablet screen.
- Position the tablet face up on a table (don't attach the tablet to the back panel of the box).
- Run the following command:
python tools/run_all_tests.py device=$device_id camera=0 chart=$chart_id scenes=2,3
- Run the command again. The tablet prompts Keep a copy of this file? and suggests Google Drive. Clear this prompt (and prevent future prompts) by pressing the Drive icon then Cancel for upload to drive.
- Finally, run
tools/run_all_tests.pyand confirm that scenes change automatically as the script cycles through different scenes. While most tests fail (as the camera isn't pointed at the chart), you can verify that the tablet correctly cycles through the scenes without displaying any prompts or other popups on the screen.
Run tests
Before running the ITS-in-a-box, ensure that your test setup includes the following hardware and software:
- One (1) ITS-in-a-box
- One (1) high resolution 10" tablet for displaying scenes, S/N: 5811000011
- One (1) DUT that has the CTS Verifier
7.0_8+ app installed. Example DUT:
- One (1) Pixel NOF26W for the back camera(0) testing, S/N: FA6BM0305016. To
install the CTS Verifier app, unzip
android-cts-verifier.zipthen runadb -s FA6BM0305016 install -r -g android-cts-verifier/CtsVerifier.apk
- One (1) Pixel NOF26W for the back camera(0) testing, S/N: FA6BM0305016. To
install the CTS Verifier app, unzip
Run tablet-based scenes
To run scenes 0 to 4, 6, and scene_change on the back camera:
cd android-cts-verifier/CameraITS. build/envsetup.shpython tools/run_all_tests.py camera=0
Example:
Retry scenes
You can retry scenes for a single camera:
- To retry scenes on a single camera:
python tools/run_all_tests.py device=FA6BM0305016 camera=0 scenes=3,4
Run scene 5
Scene 5 requires special setup with specific lighting (for details, refer to
CameraITS.pdf in CTS Verifier, which you can download at
Compatibility Test Suite Downloads).
You must run scene 5 separately
(outside of the box) and with the
TEST_BED_MANUAL testbed.
To run scene 5 for front and back cameras on a single device:
python tools/run_all_tests.py device=FA6BM0305016 camera=0 scenes=5python tools/run_all_tests.py device=FA6BM0305016 camera=1 scenes=5
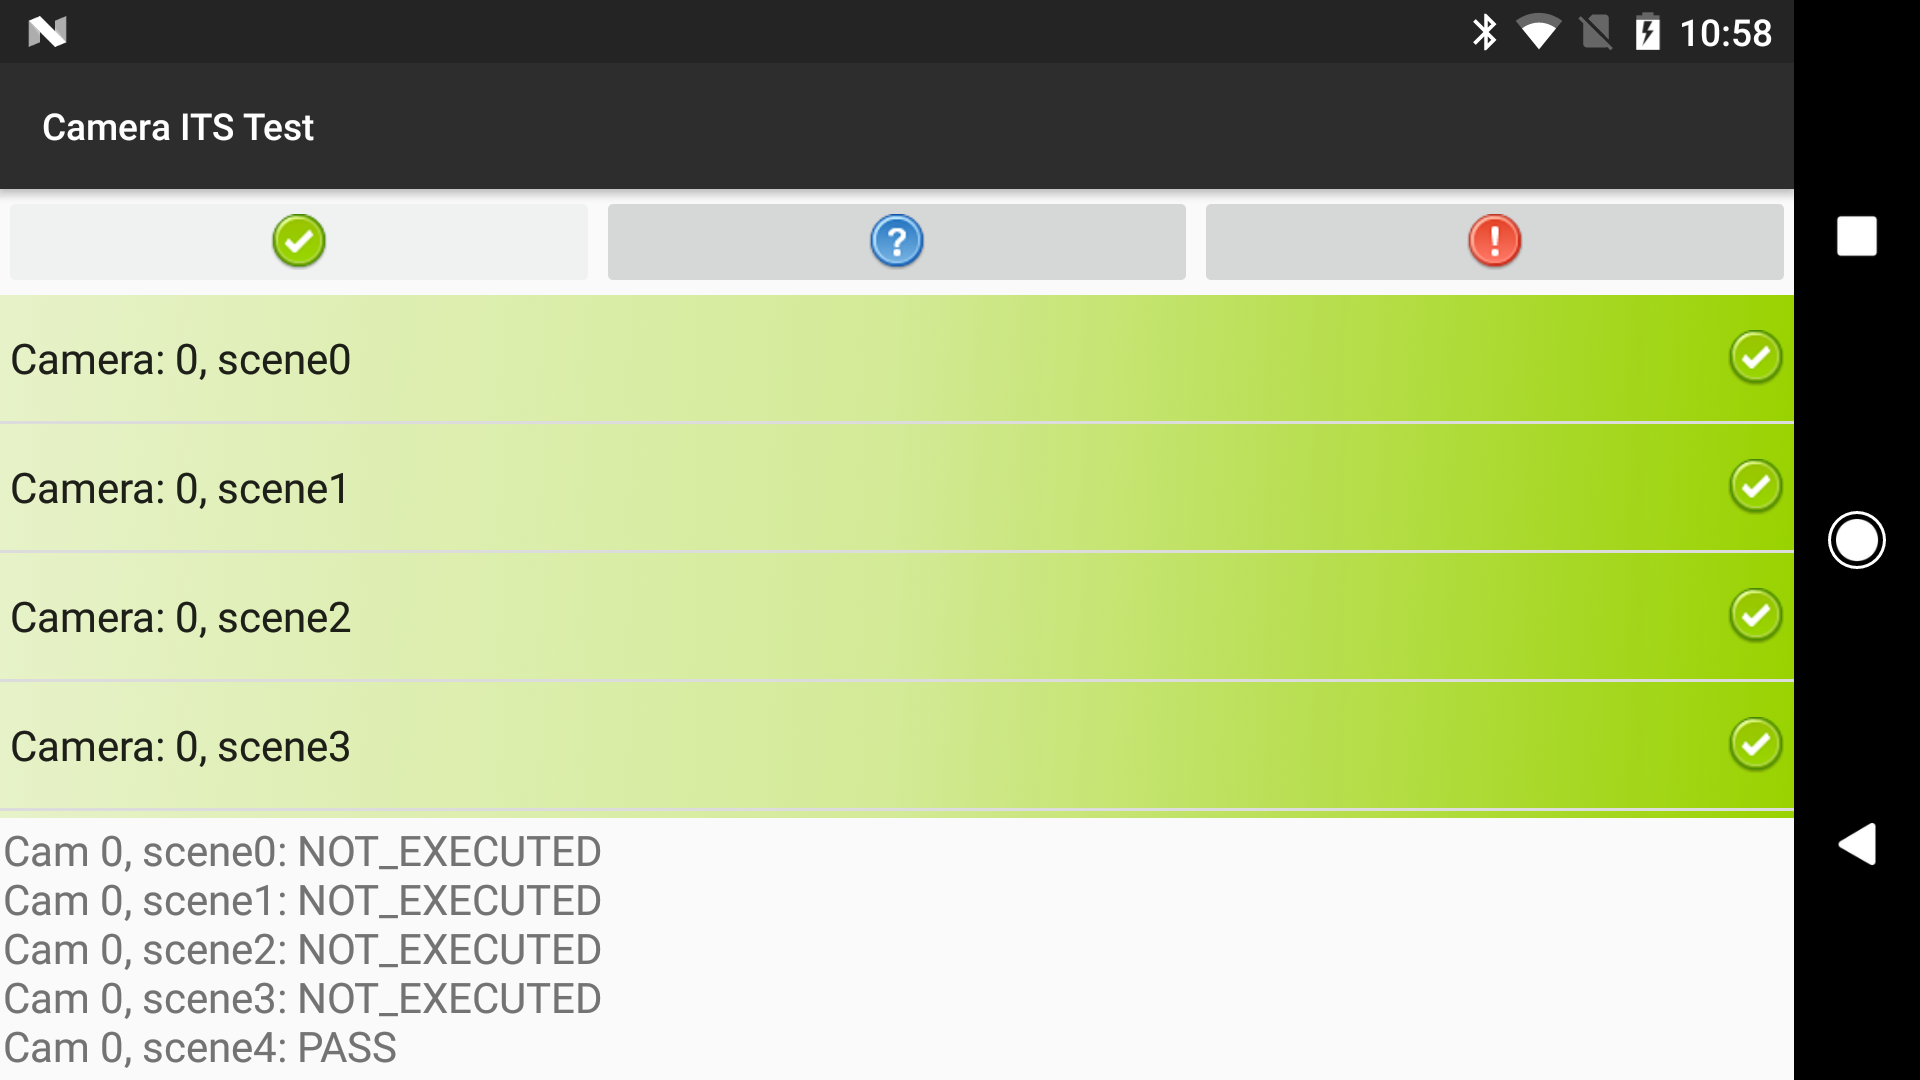
Get results
You can view results during testing and save the completed results as a report.
- View results. To save Camera ITS results as a report:
- Press Pass and save the report.
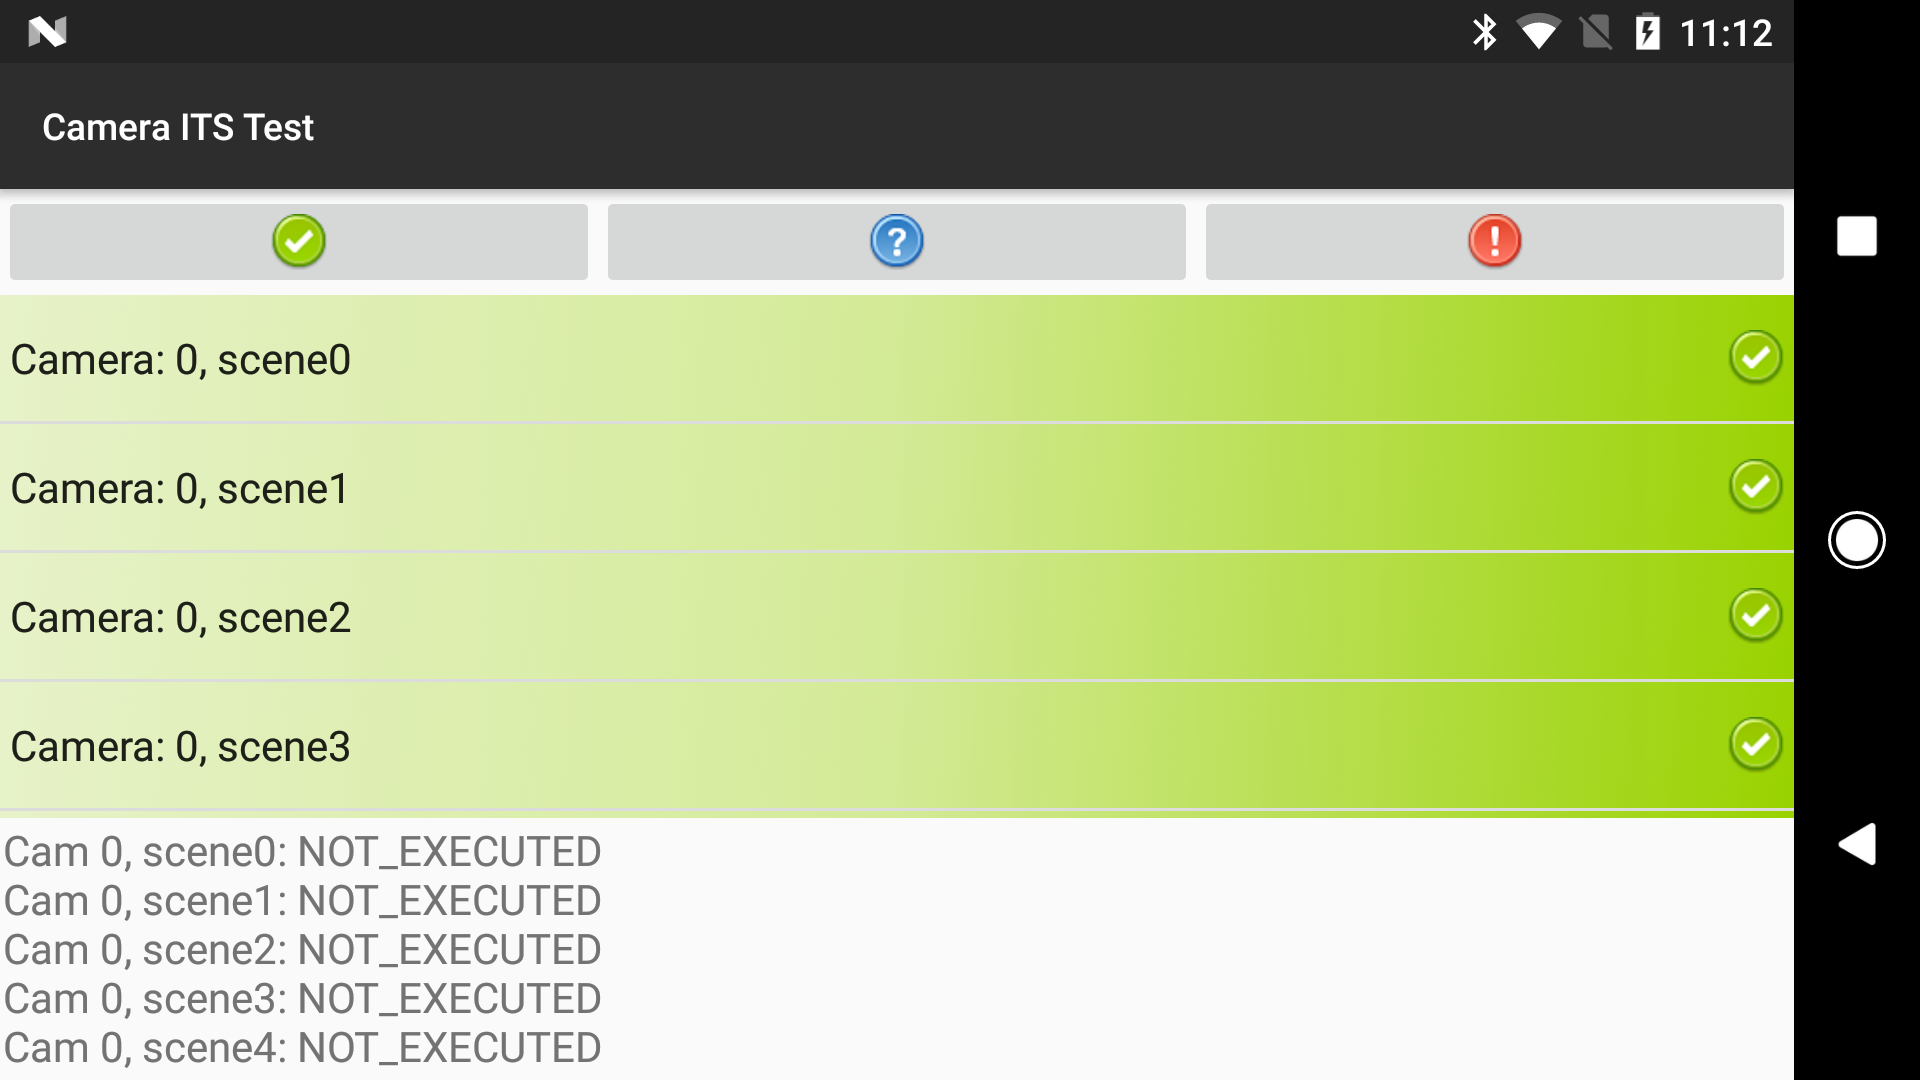
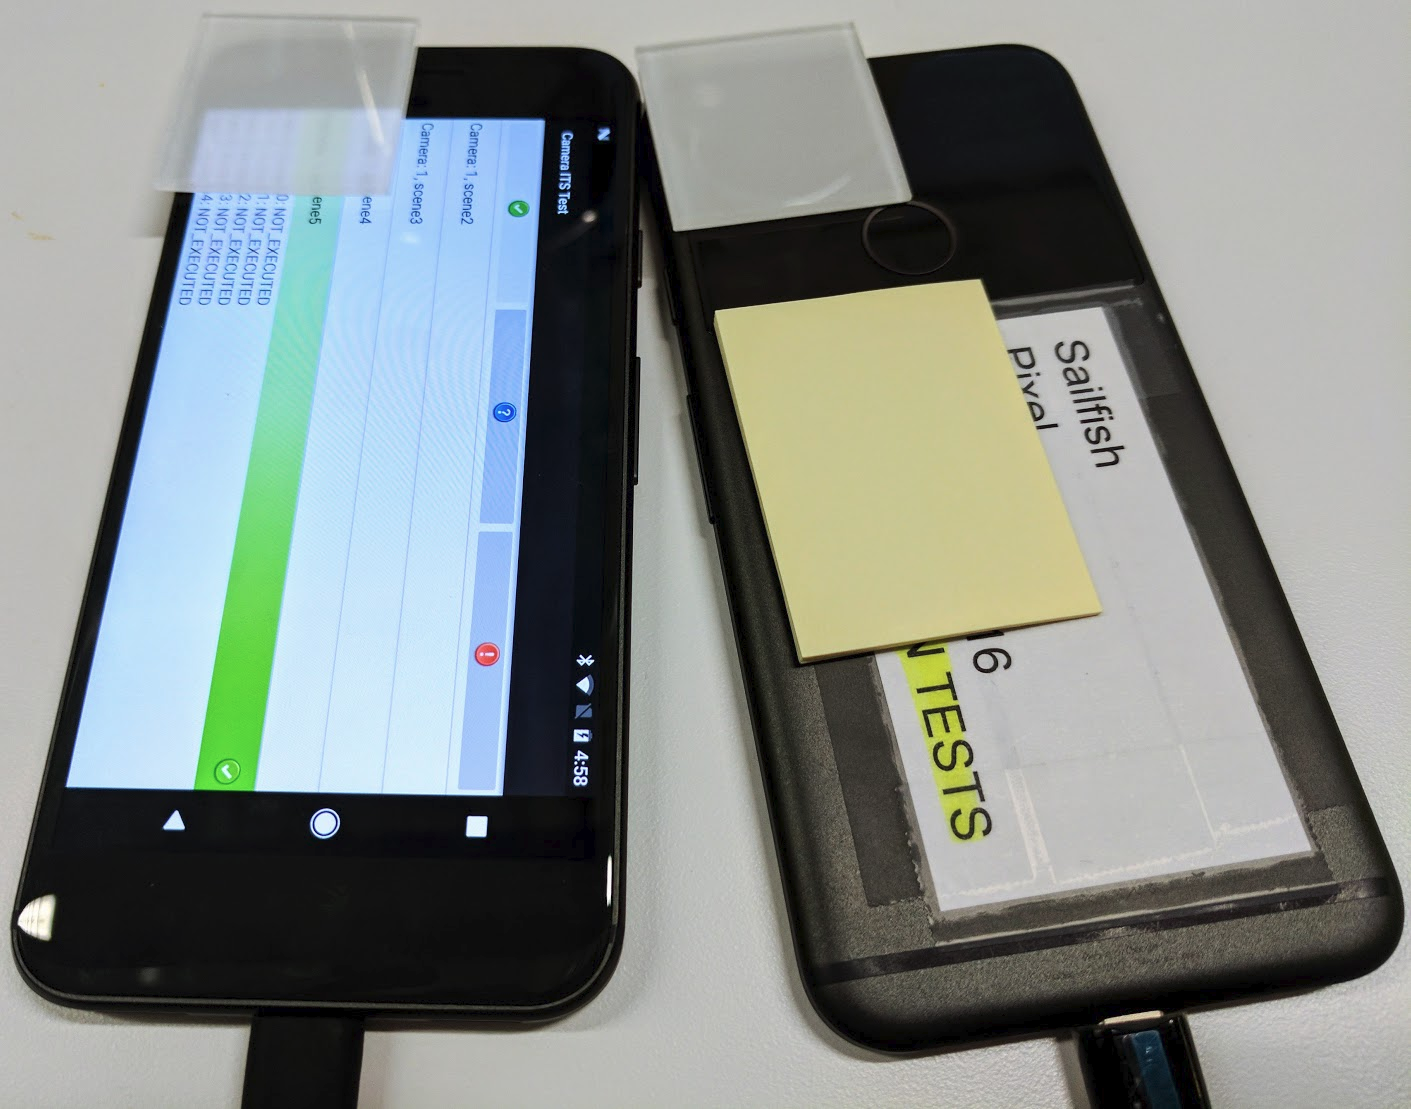
Figure 3. Camera ITS report - Pull reports from the device:
adb -s FA6BM0305016 pull /sdcard/verifierReports
- Unzip the report file and view
test_result.xml.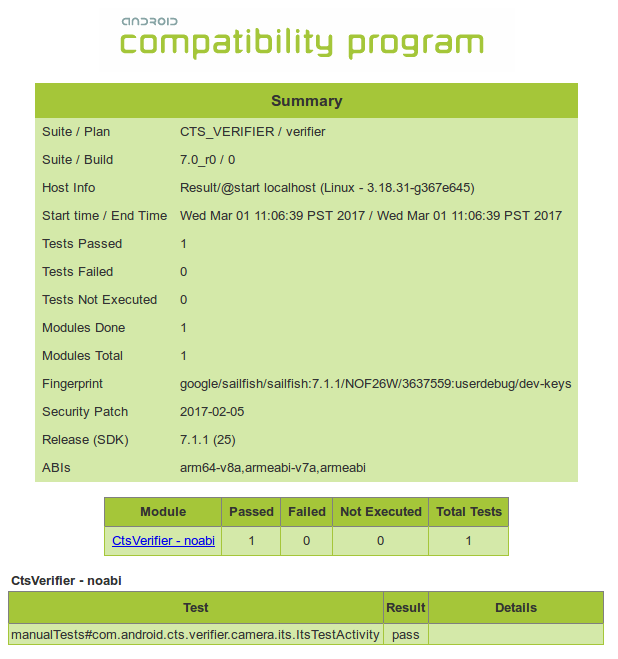
Figure 4. Camera ITS reports
- Press Pass and save the report.
Tablet requirements
For Android 15 and higher, tablets used as the ITS chart display must be on the following tablet allowlist. For a list of tablets that support testing for low-light scenes, see Supported tablets for low-light scene. For Android 14 or lower, see Tablet requirements for Android 14 and lower.
The tablets in the allowlist are chosen based on the following criteria:
- Display size of around 10 inches with a screen resolution greater than 1920 x 1200 pixels.
- Must not have any measured flickering caused by pulse-width modulation (PWM) controlled screen dimming.
- Capable of excecuting adb commands sent by ITS tests and displaying chart images with instructed screen brightness.
The brightness value must be set in config.yml according to the tablet
model. To determine whether your tablet model corresponds to a device name on the
allowlist, print out the ro.product.device value by running the
adb shell getprop | grep 'ro.product.device' adb command.
| Device | Display size (inches) |
Display size (pixels) |
Tablet dimensions (inches) |
Display brightness |
Device name (ro.product .device) |
Tablet OS Version |
|---|---|---|---|---|---|---|
| Google Pixel C |
10.2 | 2560 x 1800 | 9.53 x 7.05 x 0.28 | 96 | dragon | Android 6+ |
| Honor Pad 8 |
11 | 2000 x 1200 | 10.18 x 6.76 x 0.29 | 192 | HNHEY-Q | Android 12 |
| Honor Pad 20 |
12.1 | 3000 x 1872 | 10.91 x 7.06 x 0.25 | 96 | HNHEY4-Q, HNHEY4-Q1 | Android 16 |
| Honor Pad V9 |
11.5 | 2800 x 1840 | 10.2 x 6.93 x 0.24 | 192 | HNROL-M, HNROL-M1 | Android 15 |
| Huawei MediaPad m5 |
10.8 | 2560 x 1600 | 10.18 x 6.76 x 0.29 | 192 | HWCMR09 | Android 8+ |
| Lenovo Tab M10 Plus |
10.3 | 1920 x 1200 | 9.61 x 6.03 x 0.32 | 192 | X606F | Android 9+ |
| Lenovo Tab P11 |
11 | 2000 x 1200 | 10.17 x 6.42 x 0.30 | 192 | J606F | Android 11+ |
| Lenovo Tab P11 Gen2 |
11.5 | 2000 x 1200 | 10.59 x 6.67 x 0.29 | 192 | TB350FU | Android 13+ |
| Nokia T21 |
10.4 | 2000 x 1200 | 9.74 x 6.19 x 0.30 | 192 | AGTA | Android 12+ |
| Samsung Galaxy Tab A7 |
10.4 | 2000 x 1200 | 9.75 x 6.2 x 0.28 | 192 | gta4lwifi | Android 10+ |
| Samsung Galaxy Tab A8 |
10.5 | 1920 x 1200 | 9.72 x 6.73 x 0.27 | 192 | gta8wifi | Android 11+ |
| Samsung Galaxy Tab A9+ |
11 | 1920 x 1200 | 10.12 x 6.64 x 0.27 | 192 | gta9pwifi | Android 13+ |
| Samsung Galaxy Tab S10 FE |
11 | 2304 x 1440 | 10.01 x 6.53 x 0.24 | 192 | gts10fewifi | Android 15+ |
| Vivo Pad2 |
12.1 | 2800 x 1968 | 10.47 x 7.54 x 0.26 | 192 | DPD2221 | Android 13+ |
| Xiaomi Pad 5 |
11 | 2560 x 1600 | 10.18 x 6.76 x 0.29 | 192 | nabu | Android 13+ |
| Xiaomi Redmi Pad |
10.61 | 2000 x 1200 | 9.86 x 6.22 x 0.28 | 192 | yunluo | Android 14+ |
| Xiaomi Redmi Pad SE |
11 | 2560 x 1600 | 10.06 x 6.58 x 0.29 | 192 | xun | Android 13+ |
Supported tablets for low-light scenes
The following table lists tablets that support testing for low-light scenes. These tablets can reach the brightness level needed for low-light scenes, allowing the DUT to correctly expose the chart.| Device | Device name (ro.product.device) | Tablet OS Version |
|---|---|---|
| Honor Pad V9 |
HNROL-M1 | Android 15+ |
| Huawei MediaPad m5 |
HWCMR09 | Android 8+ |
| Samsung Galaxy Tab A8 | gta8wifi | Android 11+ |
| Samsung Galaxy Tab A9+ | gta9pwifi | Android 13+ |
| Xiaomi Pad 5 | nabu | Android 13+ |
| Xiaomi Redmi Pad SE |
xun | Android 13+ |
Tablet requirements for Android 14 and lower
Tablets must have a display size of around 10 inches with a screen resolution
greater than 1920 x 1200 pixels. The tablet must not use pulse width modulation (PWM) to set
the brightness level. The brightness value must be set in
config.yml according to the tablet model.
The table below lists the recommended tablets for ITS testing along with the Android release
versions for the DUT the tablets work with.
| Device | Display size (inches) |
Display size (pixels) |
Tablet dimensions (inches) |
Display brightness |
Display bits |
Supported DUT OS |
Supported tablet OS |
|---|---|---|---|---|---|---|---|
| Samsung Galaxy Tab A8 |
10.5 | 1920 x 1200 | 9.72 x 6.37 x 0.27 | 192 | 8 | Android 13+ | Android 11+ |
| Xiaomi Pad 5 |
11 | 2560 x 1600 | 10.03 x 6.55 x 0.27 | 1024 | 11 | Android 12+ | Only Android 11 |
| Lenovo Tab M10 Plus |
10.3 | 1920 x 1200 | 9.61 x 6.03 x 0.32 | 192 | 8 | Android 12+ | Android 9+ |
| Samsung Galaxy Tab A7 |
10.4 | 2000 x 1200 | 9.75 x 6.2 x 0.28 | 192 | 8 | Android 12+ | Android 10+ |
| Chuwi Hi9 Air 10.1 |
10.1 | 2560 x 1600 | 9.52 x 6.77 x 0.31 | 192 | 8 | Android 7+ | Android 8+ |
| Asus ZenPad 3 |
9.7 | 2048 x 1536 | 9.47 x 6.44 x 0.28 | 192 | 8 | Android 7+ | Android 6+ |
| Huawei MediaPad m5 |
10.8 | 2560 x 1600 | 10.18 x 6.76 x 0.29 | 192 | 8 | Android 7+ | Android 8+ |
| Google Pixel C |
10.2 | 2560 x 1800 | 9.53 x 7.05 x 0.28 | 96 | 8 | Android 7+ | Android 6+ |
| Sony Xperia Z4 |
10.1 | 2560 x 1600 | 10 x 6.57 x 0.24 | 192 | 8 | Android 7+ | Android 5+ |
Frequently asked questions
Q1: How do I determine which test rigs I need for my device?
The
RFoV ITS-in-a-box revision 1 tests RFoV cameras for tablet scenes tests in the
CameraITS/tests directory. RFoV is defined as
60° < FoV < 90°.
For larger FoV cameras, the lights might appear in the images or the charts
might cover too small an area in the FoV, affecting test results.
The WFoV ITS-in-a-box
revision 2 tests WFoV cameras for tablet scenes tests in the
CameraITS/tests directory. WFoV is defined as
FoV >= 90°.
The revision 2 test rig is functionally identical to revision 1, but larger. The revision 2 test rig
can test both RFoV and WFoV cameras in Android 9 and higher. Given the larger footprint, revision 2
is ideal if DUT is a tablet
The modular base rig
tests WFoV cameras for tablet scenes tests in the
CameraITS/tests directory. WFoV is defined as
FoV >= 90°.
The modular base rig can test both RFoV and WFoV cameras for devices running Android 9 and higher.
It also supports the tele extension rig that can be attached to test tele cameras with a longer
minimum focus distance. The modular base rig is functionally identical to the WFoV ITS-in-a-box
but is smaller.
The
sensor fusion box tests the camera/gyroscope timing
offset and multi-camera systems frame sync with tests in
scenes=sensor_fusion. A camera/gyroscope timing offset of less
than 1 ms is required for the REALTIME feature flag.
Multi-camera devices can be tested with a single rig for static ITS tests
and a sensor fusion rig if the camera has the REALTIME feature
flag.
A set of example configurations is provided in the table below.
| Minimum Focus Distance | Camera FoVs | REALTIME? | Recommended rigs | Notes |
|---|---|---|---|---|
| 31 cm - 22 cm | 75° | No | Modular base, WFoV, or RFoV | Android 7.0 or higher |
| 31 cm - 22 cm | 75° | Yes | Modular base, WFoV, or RFoV and sensor fusion | Android 9 or higher |
| 22 cm or below | 75° + 95° | Yes | Modular base or WFoV and sensor fusion | Android 9 or higher |
| 110 cm - 22 cm | 75° + 95° + 20° | Yes | Modular base and tele extension and sensor fusion | Android 9 or higher |
| 110 cm - 22 cm | 75° + 95° + 20° | Yes | Modular base and tele extension and sensor fusion and gen2 rig | |
| 22 cm or below | 75° + 95° Tablet | No | WFoV | Android 9 or higher |
Q2: How do I designate which test rig is in use?
To designate the correct test rig, ensure that the chart distance parameter is correct. The rev1 test rig (RFoV) has chart distance of 31 cm, and the rev2 rig (WFoV) has chart distance of 22 cm. By default the chart distance is set to 31 cm.
Android 10 to Android 11
To identify the correct test rig in Android 10 through 11 add thedist flag at the command line. The default
value for dist is 31. Run the following
command to change the chart_distance parameter.
python tools/run_all_tests.py ... chart=# dist=22
Android 12 and higher
To identify the correct test rig in Android 12 and higher you can edit the config.yml file to change thechart_distance parameter.
edit config.yml
chart_distance: 31.0 → chart_distance: 22.0
Q3: How do I control the tablet brightness?
By default, the tablet brightness is set to 96.
To change the brightness on tablets running Android 7.0 through Android 9, run:
edit tools/wake_up_screen.py
DISPLAY_LEVEL=96 → DISPLAY_LEVEL=192
To change the brightness on tablets running Android 10 through
11, the
value can be changed at the command line by adding the brightness flag:
python tools/run_all_tests.py device=# camera=# chart=# brightness=192
To change the brightness on tablets running Android 12 and higher, run:
edit config.yml
brightness: 96 → brightness: 192
Q4: How do I debug a single test?
Tests can be run individually for debugging purposes, but the results aren't
reported to CtsVerifier.apk unless the entire scene is run.
To run an individual scene in Android 12 and higher:
-
Edit the
config.ymlfile.edit config.yml camera: <camera-id> → camera: 0 scene: <scene-name> → scene: scene4
-
Run the individual test.
python tests/scene4/test_aspect_ratio_and_crop.py -c config.yml --test_bed TEST_BED_TABLET_SCENES
Results are printed in the /tmp/logs/mobly/TEST_BED_TABLET_SCENES/ directory sorted
by run time.
To run an individual scene in Android 11 and lower:
- Load a scene by adding the
scenesflag intools/run_all_tests.py:python tools/run_all_tests.py device=# camera=# chart=# scenes=#
-
Press Control+C to halt tests after the scene is logged as loaded to
stdout.If the correct scene is already on the screen, wake up the screen:
python tools/wake_up_screen.py screen=#
-
Run an individual test.
python tests/scene#/test_*.py device=# camera=#
Plots are then generated in the local directory and
stdoutandstderrare printed to the screen.To get more information for debugging, add
printstatements to the script. To increase the test output for debugging, add thedebug=Trueflag.python tests/scene#/test_*.py device=# camera=# debug=True
Results are printed to the local screen and images are saved in the local directory
instead of the generated /tmp/tmp### directory when
running tools/run_all_tests.py.
Q5: Why do I need to run failing tests as an entire scene instead of rerunning tests individually?
Tests can be run individually for debugging purposes, but the results are not
reported to CtsVerifier.apk unless the entire scene is run.
Camera ITS ensures that third-party apps have a compatible camera interface. Similar to a unit test, each test stresses a single specification in the camera. To catch unreliable behavior, these tests are expected to pass as a group for an entire scene. For example, although a single unreliable test may pass a rerun of an entire scene, it's difficult for multiple unreliable tests to pass.
As an extreme example, consider the case where there are 10 tests in a scene
that each has a 50% probability of returning PASS. By running each
test individually, there's a high chance that an operator can get the camera to
pass Camera ITS. However, if the tests are run in the aggregate as a scene,
there's only a 0.1% chance that the scene will pass.
Q6: How do I run a single scene or reorder the run scenes?
By default, the script tools/run_all_tests.py runs all scenes
in order. However, scenes can be run individually or in a specified order and
be reported to CtsVerifier.apk.
To run an individual scene (for example, scene 2) or run more than one scene in a specific order in Android 11 or lower:
python tools/run_all_tests.py device=# camera=# chart=# scenes=2
python tools/run_all_tests.py device=# camera=# chart=# scenes=3,2
To run an individual scene or run more than one scene in a specific order in Android 12 and higher:
python tools/run_all_tests.py scenes=2
python tools/run_all_tests.py scenes=3,2
The additional parameters are set in the config.yml file.
Q7: A number of scene 1 tests fail with the tablet setup but pass with a paper chart. What's wrong?
Ensure that the tablet and test environment meet the following specifications.
Tablet specifications
Make sure that the tablet meets the following specifications:
- Display size (inches): 10 inches
- Display size (pixels): greater than 1920 x 1200 pixels
For more details, see Tablet requirements.
Tablet brightness
Tests may not obtain correct results if the tablet display brightness is too low.
For more details, see How do I control the tablet brightness?
Box lighting level (requires lux meter)
Make sure that the target lux value at tablet opening is between 100 and 300.
If the lux level is too high, scene1/test_param_flash_mode.py
returns FAIL. If the lux level is too low, multiple tests fail.
Q8: How do I debug sensor fusion tests?
Ensure that you're in a
dialoutgroup.groups | egrep ‘dialout'
Ensure that the sensor fusion controller is connected by determining if Microchip Technology is connected to the USB port.
lsusb
…
Bus 003 Device 004: ID 04d8:fc73 Microchip Technology, Inc.
…
Run the test multiple times to get a distribution of test attempts with the following commands.
In Android 11 or lower:
python tools/run_sensor_fusion_box.py device=A camera=0 num_runs=10 rotator=default
In Android 12 and higher:
python tools/run_sensor_fusion_box.py num_runs=10
The additional parameters are set in the
config.ymlfile.Run outputs are in the
/tmp/tmp###folder created under thesensor_fusion_#folders, where#is the run number. Common reasons for failure are:- The phone isn't centered properly.
- Not enough features are found in the image (often a FoV or lighting issue).
- The returned
FAILis valid, and the timing offset between the camera and the gyroscope must be corrected.
Q9: What information should I include when reporting a testing bug?
When reporting a testing bug, include the generated files and images for the test.
- If you ran the test through
tools/run_all_tests.py, attach a zipped/tmp/directory to the bug. - If you ran the test by itself, attach all of the screen outputs and generated images to the bug.
Also include a bug report. After the test in question fails, use the following command to generate a bug report and attach the generated zip file to the bug.
adb -s device_id bugreport
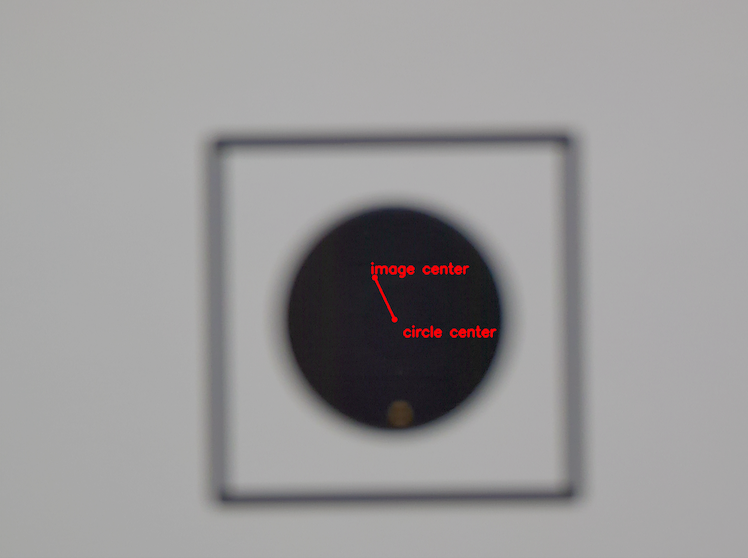
Q10: How do I run a sensor_fusion test scene with a camera that has a minimum focus distance that creates blurry images at 25 cm chart distance?
If your camera can't focus at a distance of 25 cm, remove the chart-mounting panel of the
sensor fusion box. Place the chart at a distance where the DUT can focus and change
chart_distance in config.yml to the measured distance between the DUT and
the chart. Figure 5 shows an example of how to measure the chart distance in this situation.
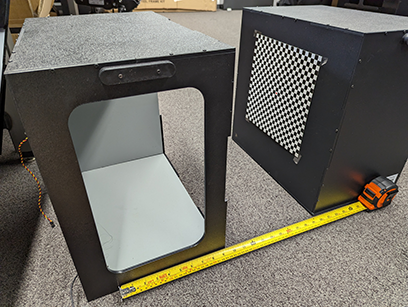
  edit config.yml
chart_distance: 25 → chart_distance: DISTANCE_BETWEEN_DUT_AND_CHART
Q11: How do I run tablet test scenes for a camera with a minimum focus distance that creates blurry images at 31 cm chart distance?
If your camera can't produce sharp enough images testing at 31 cm (the
depth of the RFoV test rig), mount your camera in front of the rig at a distance to allow the
chart scene to fill approximately 60% of the camera field of view (FoV) with
sharper images. This distance can be less than the minimum focus
distance of the camera. Leave the chart_distance in config.yml at
31 cm. The chart scaling on the tablet is determined by the camera
FoV as shown in the following table:
| Camera FoV | Chart scaling factor |
|---|---|
| 60 > FoV > 40 | 0.67x |
| 40 > FoV > 25 | 0.5x |
| FoV < 25 | 0.33x |
Q12: With the logical multi-camera API, which tests are run on which cameras?
If your camera uses
REQUEST_AVAILABLE_CAPABILITIES_LOGICAL_MULTI_CAMERA, all supported ITS tests
are run on the top-level logical camera. A subset of the ITS tests are run on the physical
sub-cameras, and these tests are listed in tools/run_all_tests.py
under the SUB_CAMERA_TESTS constant.