
이 페이지에는 Android 16 QPR2 이상에서 더 나은 호환성 CTS 인증 도구 (CTS-V) 테스트를 사용하는 방법이 설명되어 있습니다.
호스트 측 멀티 디바이스 테스트 설정
이 섹션에서는 멀티 디바이스 테스트를 설정하는 방법을 설명합니다.
- 데스크톱 컴퓨터가 CTS의 운영체제 요구사항을 충족하는지 확인합니다.
데스크톱 소프트웨어 설치의 2단계와 5단계에 따라 adb, AAPT2, Python이 데스크톱에 올바르게 설치되어 있는지 확인합니다.
- Python 버전은 3.11 이상이어야 합니다. Python 버전을 확인하려면
python3 --version을 실행합니다. 버전이 3.11보다 낮은 경우 최신 공식 Python 출시 버전을 설치합니다. 자세한 내용은python.org다운로드 섹션을 참고하세요. - 특정 테스트에서는 호스트에 Python
venv모듈이 있어야 합니다. Debian 및 Ubuntu 시스템에서는 이 모듈이 기본적으로 설치되지 않을 수 있습니다. Python 버전에venv모듈이 있는지 확인하려면python3 -m venv venv를 실행합니다. 이 명령어가 실패하면 오류 메시지가 표시됩니다. 프롬프트에 따라python3.x-venv패키지를 설치합니다.
- Python 버전은 3.11 이상이어야 합니다. Python 버전을 확인하려면
CTS-V가 설정된 일치하는 테스트 대상 기기 (DUT) 두 대를 준비합니다.
테스트 유형의 설정 섹션으로 이동합니다.
- NFC 테스트의 경우 NFC 테스트 설정을 참고하세요.
- Wi-Fi AP 연결 테스트의 경우 Wi-Fi AP 연결 테스트 설정으로 이동하세요.
- CDM 모듈을 테스트하려면 표준 2기기 테스트 설정으로 이동한 후 CDM 테스트 설정으로 이동하세요.
테스트가 이 목록에 없으면 표준 2기기 테스트 설정으로 진행하세요.
NFC 테스트 설정
NFC 테스트에서는 하나의 DUT와 하나의 PN532 NFC 칩을 사용합니다.
NFC 테스트를 설정하려면 다음 단계를 따르세요.
- PN532 NFC 칩을 구매합니다. All-In-One PN532가 권장됩니다.
DUT에서 설정 앱으로 이동합니다.
NFC를 사용 설정합니다.
NFC 칩을 배치합니다.
휴대전화의 경우 그림 1과 같이 DUT의 NFC 리더를 배치합니다.
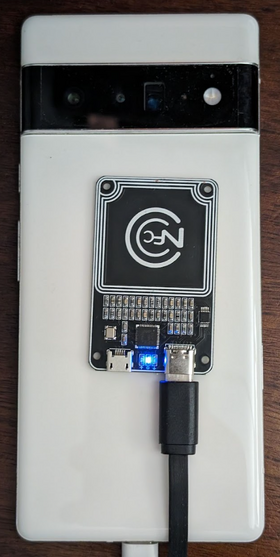
그림 1. NFC 칩 배치
다른 기기 유형의 경우 칩을 기기의 NFC 안테나 옆에 배치합니다.
USB 케이블을 사용하여 PN532 NFC 칩을 테스트 워크스테이션에 연결합니다.
선택사항: Wi-Fi AP 연결 테스트 설정
Wi-Fi 액세스 포인트 (AP) 연결 테스트 (CtsWifiConnectionTests)는 DUT와 AP 간의 연결을 테스트합니다. 이러한 테스트를 실행하는 것이 좋지만 CTS-V Android 16 16 QPR2에서는 필수가 아닙니다.
이러한 테스트에는 DUT와 OpenWrt Banana Pi R3 AP가 필요합니다.
Wi-Fi AP 연결 테스트를 설정하려면 다음 단계를 따르세요.
Banana Pi R3 AP를 구매하고 설정합니다. 자세한 내용은 Banana Pi BPI-R3 AP 설정을 참고하세요.
선택사항: 차폐 상자가 없는 경우 JTP-SR101 차폐 상자를 사용하는 것이 좋습니다. 다음 정보를 사용하여 이 상자를 구매하세요.
Dong Guan Zheng Sheng Electronics Technology Co., LTD
Bohui Industrial Park, Panlong Road, Liaobu Town, Dongguan City, Guangdong Province, China
담당자: Forest Pan
이메일: forest.pan@jtpmak.cn
전화번호 (중국): +86 18676993556DUT와 AP를 호스트에 연결하고 RF 차폐 상자에 넣습니다. DUT와 AP는 10cm 이상 떨어져 있어야 합니다. 그림 2는 이 구성을 보여줍니다.

그림 2. 실드 상자에 있는 DUT 및 AP
SSH를 사용하여 호스트에서 AP에 액세스할 수 있는지 확인합니다.
표준 2개 기기 테스트 설정
기본 2대 기기 설정의 경우:
- 일치하는 Android DUT 두 개를 약 20cm 간격으로 배치합니다.
클린 환경을 설정하려면 두 기기를 모두 차폐 상자에 넣습니다.
선택사항: Wi-Fi 디버깅을 위해 OTA 스니퍼를 설정합니다.
CDM 테스트 설정
test_permissions_sync() 테스트 사례는 테스트가 실행되는 기기의 빌드 유형에 따라 동작이 다릅니다. 디버깅 가능 (userdebug 또는 eng) 빌드와 디버깅 불가능 (user) 빌드를 모두 OEM이 테스트하고 두 빌드 모두 테스트를 통과해야 합니다.
면제
권한 동기화 API 구현에 관한 CDD 조항에서는 보안 채널을 통해 기기 간에 데이터를 성공적으로 전송할 수 있기만 하면 됩니다. 보안 채널 구현은 CDD 규정 준수 요구사항이 아니므로 이 테스트는 디버깅할 수 없는 (사용자) 빌드에서 건너뛸 수 있지만 CDM 권한 동기화 기능 지원을 선택 해제하려는 경우에만 가능합니다.
테스트는 디버그 가능 빌드에서 예외 없이 통과해야 합니다.
디버그 불가능한 빌드에서 테스트하기 위한 기본 요건
이전 면제 조항에 따라 면제되지 않는 경우 다음 기본 요건을 충족하는지 확인하세요.
보안 채널은 AVF (AttestationVerificationFramework)를 사용하여 하드웨어의 신뢰성을 확인합니다. 양쪽에서 생성된 증명에는 시스템에서 무단 변경이 없었음을 확인하기 위한 자체에 관한 여러 정보가 포함됩니다. AVF는 확인 프로세스 중에 다음 상태를 확인합니다.
- 기기가 인터넷에 액세스할 수 있음
- 기기에서 자체 검사 부팅을 사용하고 빌드는 dev-key가 아닌 release-key로 서명해야 합니다.
- 기기가 부트로더로 잠겨 있습니다. 자세한 내용은 부트로더 잠금을 참고하세요.
- OS, 키 부팅, 키 공급업체 패치 수준이 12개월 이내입니다. 1년이 지난 빌드는 사용하지 마세요.
기기 증명은 공급업체 승인 루트 인증서 중 하나로 지원됩니다.
vendor_required_attestation_certificates.xml리소스 오버레이에서 신뢰할 수 있는 루트 인증서를 지정합니다.
호스트 측 멀티 디바이스 테스트 실행 (AOSP 16 이상)
CTS 인증 도구 16에서는 호스트 측 다중 기기 테스트 지원이 도입되었습니다. 이러한 테스트는 기기에서 수동 테스트 작업을 수행하는 대신 호스트에서 자동화된 스크립트를 사용하여 실행할 수 있습니다. 각 테스트가 완료되면 결과가 DUT에 자동으로 업로드되고 CTS 인증 도구 앱에 표시됩니다.
이 섹션에서는 호스트 측 멀티 디바이스 테스트를 실행하는 방법을 설명합니다.
멀티 디바이스 테스트 실행
멀티 디바이스 테스트를 실행하려면 다음 단계를 따르세요.
테스트 워크스테이션에서 CTS-V zip 패키지가 압축 해제된 디렉터리에서
cts-v-host콘솔을 실행합니다../android-cts-verifier/android-cts-v-host/tools/cts-v-host-tradefedDUT의 CTS 인증 도구 앱에서 호스트 측 테스트를 클릭합니다. 그림 3은 CTS 인증 도구 앱의 호스트 측 테스트를 보여줍니다.
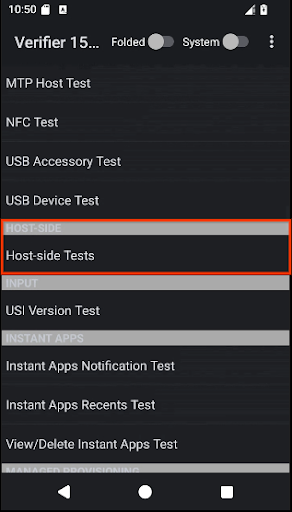
그림 3. CTS 인증 도구 앱의 호스트 측 멀티 디바이스 테스트
테스트 호스트 측 멀티스크린 테스트 모듈 목록이 표시됩니다.
실행하려는 테스트 모듈의 이름을 식별합니다. 예를 들어 CompanionDeviceManager 모듈은 CtsCompanionDeviceManagerMultiDeviceTestCases로 나열됩니다.
cts-v-host 콘솔에서 다음 명령어를 실행합니다.
run cts-v-host -m test_module_name예를 들면 다음과 같습니다.
run cts-v-host -m CtsCompanionDeviceManagerMultiDeviceTestCasesxTS 콘솔에서 테스트 실행이 완료되면 결과가 CTS 인증 도구 앱에 표시됩니다. 녹색으로 표시된 테스트는 통과한 것입니다. 빨간색으로 표시된 테스트가 실패했습니다. 그림 4는 CtsCompanionDeviceManager 테스트의 결과 예를 보여줍니다.
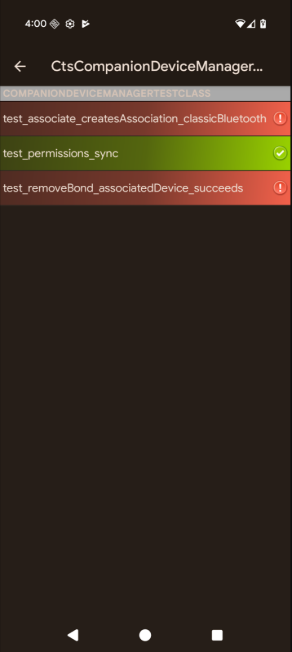
그림 4. CTS 인증 도구 앱의 호스트 측 멀티 디바이스 테스트 결과
선택사항: Wi-Fi AP 연결 테스트 실행
Wi-Fi AP 연결 테스트를 실행하려면 다음 단계를 따르세요.
테스트베드 구성 파일 (
WifiConnectionTestbed.yaml)을 수정합니다. 이 파일은 CTS-Verifier가 압축 해제된 디렉터리에 있습니다../android-cts-verifier/android-cts-v-host/testcases/CtsWifiConnectionTests/x86_64/connection/WifiConnectionTestbed.yaml로컬 SSH 설정에 따라
hostname필드 값을 AP의 IP 주소로 변경합니다. IP 주소를 확인하려면 AP의 IP 주소 찾기를 참고하세요.다음 예시는
WifiConnectionTestbed.yaml파일에서hostname필드의 위치를 보여줍니다.TestBeds: - Name: WifiConnectionTestbed Controllers: # Specify settings for the AP. OpenWrtDevice: - hostname: AP-IP skip_init_reboot: Truects-v-host 콘솔에서 다음 명령어를 실행합니다.
run everything -m CtsWifiConnectionTests
멀티 디바이스 테스트 문제 해결
이 섹션에서는 발생 가능한 문제에 대한 문제 해결 도움말을 제공합니다.
NFC 테스트 중 GetFirmwareVersion에 대한 응답 없음 수정
멀티 디바이스 테스트를 실행하는 동안 verify_firmware_version RuntimeError: No response
for GetFirmwareVersion 메시지가 표시되면 테스트에서 PN532 NFC 보드에 액세스할 수 없습니다.
이 문제를 해결하려면 호스트에서 PN532 NFC 보드가 사용하는 직렬 경로(예: dev/ttyUSB1)를 식별한 다음 콘솔에서 --module-arg 인수를 사용하여 수동으로 지정하세요.
run cts-v-host -m CtsNfcHceMultiDeviceTestCases --module-arg CtsNfcHceMultiDeviceTestCases:pn532_serial_path:/dev/ttyUSB1
NFC 테스트 중 거래 실패 오류 메시지 수정
모든 NFC 테스트 사례에 대해 Transaction failed, check device logs for more
information. 메시지가 표시되면 DUT의 NFC 칩이 PN532를 감지할 수 없기 때문일 수 있습니다.
호스트에 연결된 기기가 여러 대이고 일부 기기에는 PN532가 상단에 배치되어 있지 않은 경우 잘못된 DUT가 선택되었을 수 있습니다. 자세한 내용은 NFC 테스트 설정을 참고하세요.
이 문제를 해결하려면 다음 중 한 가지를 따르세요.
-s플래그를 사용하여 호스트 측 테스트 명령어에서 올바른 DUT의 시리얼을 설정합니다.호스트에서 DUT가 아닌 모든 기기를 연결 해제합니다.
CDM 테스트 사례 test_permissions_sync가 무시됨
디버깅할 수 없는 기기에서 테스트를 실행하는 경우 제외되었는지 확인하세요. 그렇지 않은 경우 두 기기가 모두 기본 요건을 충족하는지 확인합니다.