
本頁說明如何使用 Better Together CTS 驗證器 (CTS-V) 測試,適用於 Android 16 QPR2 以上版本。
設定主機端多裝置測試
本節說明如何設定多裝置測試。
- 確認桌機符合 CTS 的作業系統需求。
請按照「安裝電腦軟體」的步驟 2 和 5 操作,安裝並確認 adb、AAPT2 和 Python 已正確安裝在電腦上。
- Python 版本必須為 3.11 以上。如要判斷 Python 版本,請執行
python3 --version。如果版本低於 3.11,請安裝最新的 Python 正式版本。詳情請參閱python.org的「下載」一節。 - 某些測試需要主機具備 Python
venv模組。 在 Debian 和 Ubuntu 系統上,這個模組可能不會預設安裝。 如要判斷 Python 版本是否含有venv模組,請執行python3 -m venv venv。如果這個指令失敗,系統會顯示錯誤訊息。 按照提示安裝python3.x-venv套件。
- Python 版本必須為 3.11 以上。如要判斷 Python 版本,請執行
準備兩部相符的受測裝置 (DUT),並在每部裝置上設定 CTS-V。
前往測試類型的設定章節:
- 如要進行 NFC 測試,請參閱「設定 NFC 測試」。
- 如要進行 Wi-Fi AP 連線測試,請參閱「設定 Wi-Fi AP 連線測試」。
- 如要測試 CDM 模組,請參閱「設定標準雙裝置測試」和「設定 CDM 測試」。
如果測試不在清單中,請繼續進行「設定標準雙裝置測試」
設定 NFC 測試
NFC 測試會使用一個 DUT 和一個 PN532 NFC 晶片。
如何設定 NFC 測試:
- 購買 PN532 NFC 晶片。建議使用多合一 PN532。
在 DUT 上前往「設定」應用程式。
啟用「NFC」。
放置 NFC 晶片:
如果是手機,請如圖 1 所示放置 DUT 的 NFC 讀取器:
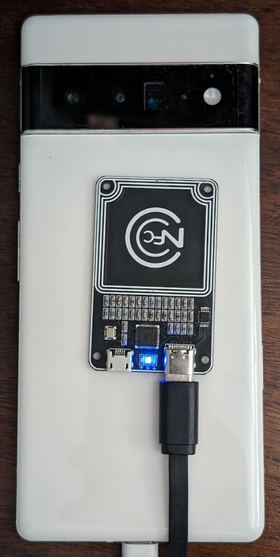
圖 1. NFC 晶片位置。
如果是其他裝置類型,請將晶片放在裝置的 NFC 天線旁。
使用 USB 傳輸線將 PN532 NFC 晶片連接至測試工作站。
選用步驟:設定 Wi-Fi AP 連線測試
Wi-Fi 存取點 (AP) 連線測試 (CtsWifiConnectionTests) 會測試 DUT 與 AP 之間的連線。強烈建議您執行這些測試,但 CTS-V Android 16 16 QPR2 並未強制要求。
這些測試需要 DUT 和 OpenWrt Banana Pi R3 AP。
如要設定 Wi-Fi AP 連線測試,請按照下列步驟操作:
購買並設定 Banana Pi R3 AP。詳情請參閱「設定 Banana Pi BPI-R3 AP」。
選用:如果沒有遮蔽盒,建議使用 JTP-SR101 遮蔽盒。請使用下列資訊購買這款盒子:
東莞正盛電子科技股份LTD
中國廣東省東莞市寮步鎮蟠龍路博匯工業園
聯絡人:Forest Pan
電子郵件地址:forest.pan@jtpmak.cn
電話 (中國):+86 18676993556將 DUT 和 AP 連接至主機,然後放入 RF 遮蔽盒。DUT 和 AP 之間應間隔至少 10 公分。圖 2 顯示這種設定:

圖 2. 防護盒中的 DUT 和 AP。
使用 SSH 確認主機可以存取 AP。
設定標準雙裝置測試
預設的雙裝置設定:
- 將兩個相符的 Android DUT 放在相距約 20 公分的位置。
如要設定乾淨的環境,請將兩部裝置都放在遮蔽盒中。
選用:設定 OTA 封包嗅探器,進行 Wi-Fi 除錯。
設定 CDM 測試
test_permissions_sync() 測試案例的行為會因執行測試的裝置建構類型而異。原始設備製造商必須測試可偵錯 (userdebug 或 eng) 和不可偵錯 (user) 的建構版本,且兩者都必須通過測試。
豁免
權限同步 API 實作的 CDD 條款僅要求能夠透過安全管道在裝置之間順利傳輸資料。由於安全管道實作並非 CDD 相容性規定,因此您可以在無法偵錯 (使用者) 的建構版本中略過這項測試,但前提是您想選擇不支援 CDM 權限同步功能。
測試必須在可偵錯的建構版本中通過,不得有例外狀況。
在無法偵錯的建構版本上測試的必要條件
如果您不符合先前的豁免條款,請確認您符合下列先決條件。
安全管道會使用 AVF (AttestationVerificationFramework) 驗證硬體的可靠性。雙方產生的認證包含多項自身資訊,可驗證系統是否遭到未經授權的變更。AVF 會在驗證程序中檢查下列狀態:
- 裝置可連上網際網路
- 裝置使用已驗證的啟動程序,且建構版本必須以發布金鑰簽署,而非開發人員金鑰
- 裝置已鎖定系統啟動載入程式。如需詳細操作說明,請參閱鎖定系統啟動載入程式。
- OS、主要啟動和主要供應商修補程式層級在 12 個月內。請勿使用超過一年的舊版
裝置認證是由供應商核准的根憑證之一所支援。在
vendor_required_attestation_certificates.xml資源疊加層中指定信任的根憑證。
執行主機端多裝置測試 (Android 開放原始碼計畫 16 以上版本)
CTS Verifier 16 支援主機端多裝置測試。這些測試可在主機上使用自動化指令碼執行,不必在裝置上進行手動測試作業。每項測試完成後,結果會自動上傳至 DUT,並顯示在 CTS Verifier 應用程式中。
本節說明如何執行主機端多裝置測試。
執行多裝置測試
如要執行多裝置測試,請按照下列步驟操作:
在測試工作站上,從解壓縮 CTS-V zip 封裝的目錄啟動
cts-v-host控制台:./android-cts-verifier/android-cts-v-host/tools/cts-v-host-tradefed在 DUT 上的 CTS Verifier 應用程式中,按一下「Host-side Tests」。 圖 3 顯示 CTS 驗證器應用程式中的主機端測試:
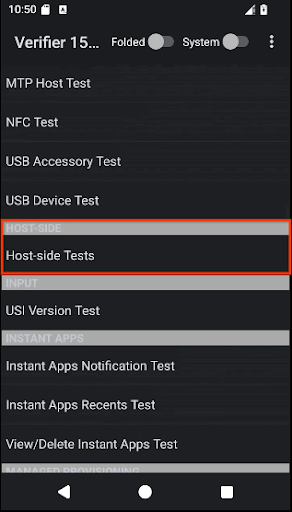
圖 3. 在 CTS 驗證器應用程式中進行主機端多裝置測試。
畫面上會顯示測試主機端多裝置測試模組清單。
找出要執行的測試模組名稱。舉例來說,CompanionDeviceManager 模組會列為 CtsCompanionDeviceManagerMultiDeviceTestCases。
在 cts-v-host 控制台中,執行下列指令:
run cts-v-host -m test_module_name例如:
run cts-v-host -m CtsCompanionDeviceManagerMultiDeviceTestCasesxTS 控制台完成測試後,結果會顯示在 CTS 驗證器應用程式中。標示為綠色的測試表示已通過。標示為紅色的測試已失敗。圖 4 顯示 CtsCompanionDeviceManager 測試的結果範例:
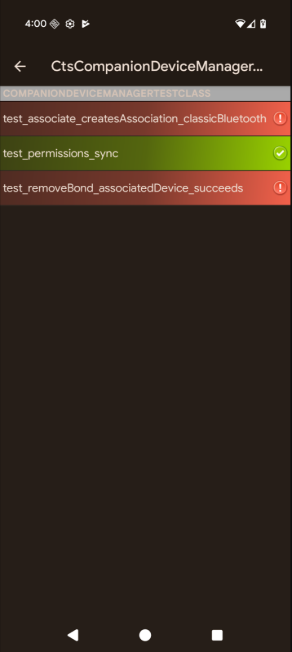
圖 4. 主機端多裝置測試結果會顯示在 CTS 驗證器應用程式中。
選用步驟:執行 Wi-Fi AP 連線測試
如要執行 Wi-Fi AP 連線測試,請按照下列步驟操作:
編輯測試平台設定檔 (
WifiConnectionTestbed.yaml)。這個檔案位於 CTS-Verifier 解壓縮的目錄中:./android-cts-verifier/android-cts-v-host/testcases/CtsWifiConnectionTests/x86_64/connection/WifiConnectionTestbed.yaml根據本機 SSH 設定,將
hostname欄位的值變更為 AP 的 IP 位址。如要找出 IP 位址,請參閱「找出存取點的 IP 位址」。以下範例顯示
WifiConnectionTestbed.yaml檔案中hostname欄位的位置:TestBeds: - Name: WifiConnectionTestbed Controllers: # Specify settings for the AP. OpenWrtDevice: - hostname: AP-IP skip_init_reboot: True在 cts-v-host 控制台中,執行下列指令:
run everything -m CtsWifiConnectionTests
排解多裝置測試問題
本節提供可能問題的疑難排解說明。
修正 NFC 測試期間「GetFirmwareVersion」沒有回應的問題
如果在執行多重裝置測試時收到 verify_firmware_version RuntimeError: No response
for GetFirmwareVersion 訊息,表示測試無法存取 PN532 NFC 板。
如要修正這個問題,請找出主機上 PN532 NFC 板使用的序列路徑 (例如 dev/ttyUSB1),然後在控制台中使用 --module-arg 引數手動指定該路徑:
run cts-v-host -m CtsNfcHceMultiDeviceTestCases --module-arg CtsNfcHceMultiDeviceTestCases:pn532_serial_path:/dev/ttyUSB1
修正 NFC 測試期間顯示的「交易失敗」錯誤訊息
如果所有 NFC 測試案例都收到 Transaction failed, check device logs for more
information. 訊息,可能是因為 DUT 的 NFC 晶片無法偵測到 PN532。
如果有多部裝置連線至主機,且部分裝置未放置 PN532,系統可能選取了錯誤的 DUT。詳情請參閱「設定 NFC 測試」。
如要修正這個問題,請採取下列任一做法:
使用
-s標記,在主機端測試指令中設定正確的 DUT 序號。從主機中斷所有非 DUT 裝置的連線。