
The following material is for app developers.
To make your app support rotary, you MUST:
- Place a
FocusParkingViewin the respective activity layout. - Ensure the views that are (or aren't) focusable.
- Use
FocusAreas to wrap around all your focusable views, except theFocusParkingView.
Each of these tasks is detailed below, after you are set up your environment to develop rotary-enabled apps.
Set up a rotary controller
Before you can start developing rotary-enabled apps, you need either a rotary controller or a stand-in. You have the options described below.
Emulator
source build/envsetup.sh && lunch car_x86_64-userdebug
m -j
emulator -wipe-data -no-snapshot -writable-system
You can also use aosp_car_x86_64-userdebug.
To access the emulated rotary controller:
- Tap on the three dots at the bottom of the toolbar:
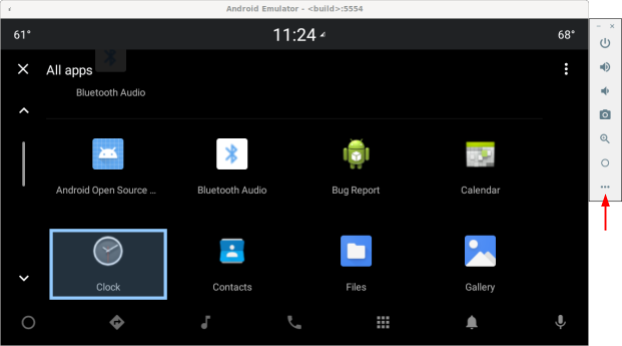
Figure 1. Access emulated rotary controller - Select Car rotary in the extended controls window:
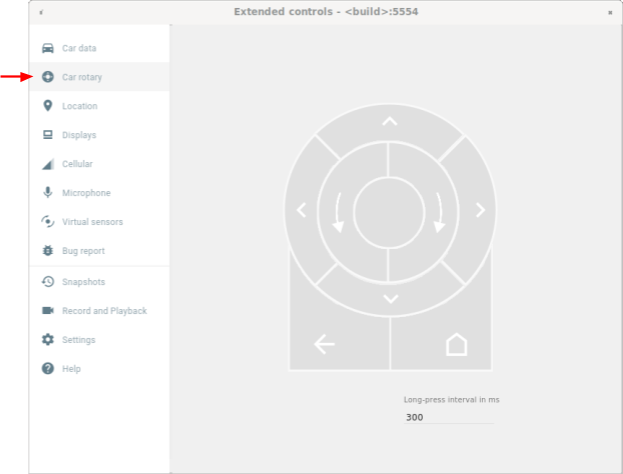
Figure 2. Select Car rotary
USB keyboard
- Plug a USB keyboard into your device that runs Android Automotive OS (AAOS), In some cases, this prevents the on-screen keyboard from appearing.
- Use a
userdebugorengbuild. - Enable key event filtering:
adb shell settings put secure android.car.ROTARY_KEY_EVENT_FILTER 1
- See the table below to find the corresponding key for each action:
Key Rotary action Q Rotate counterclockwise E Rotate clockwise A Nudge left D Nudge right W Nudge up S Nudge down F or Comma Center button R or Esc Back button
ADB commands
You can use car_service commands to inject rotary input events. These commands
can be run on devices that run Android Automotive OS (AAOS) or on an emulator.
| car_service commands | Rotary input |
|---|---|
adb shell cmd car_service inject-rotary |
Rotate counterclockwise |
adb shell cmd car_service inject-rotary -c true |
Rotate clockwise |
adb shell cmd car_service inject-rotary -dt 100 50 |
Rotate counterclockwise multiple times (100 ms ago and 50 ms ago) |
adb shell cmd car_service inject-key 282 |
Nudge left |
adb shell cmd car_service inject-key 283 |
Nudge right |
adb shell cmd car_service inject-key 280 |
Nudge up |
adb shell cmd car_service inject-key 281 |
Nudge down |
adb shell cmd car_service inject-key 23 |
Center button click |
adb shell input keyevent inject-key 4 |
Back button click |
OEM rotary controller
When your rotary controller hardware is up and running, this is the most realistic option. It's particularly useful for testing fast rotation.
FocusParkingView
FocusParkingView is a transparent view in the
Car UI Library (car-ui-library).
RotaryService uses it to support rotary controller navigation.
FocusParkingView must be the first focusable view
in the layout. It must be placed outside of all FocusAreas. Each window must have one
FocusParkingView. If you're already using the car-ui-library base layout,
which contains a FocusParkingView, you don't need to add another
FocusParkingView. Shown below is an example of FocusParkingView in
RotaryPlayground.
<FrameLayout
   xmlns:android="http://schemas.android.com/apk/res/android"
   android:layout_width="match_parent"
   android:layout_height="match_parent">
   <com.android.car.ui.FocusParkingView
       android:layout_width="wrap_content"
       android:layout_height="wrap_content"/>
   <FrameLayout
       android:layout_width="match_parent"
       android:layout_height="match_parent"/>
</FrameLayout>
Here are the reasons you need a FocusParkingView:
- Android doesn't clear focus automatically when focus is set in another window. If you
try to clear focus in the previous window, Android refocuses a view in that window, which
results in two windows being focused on simultaneously. Adding a
FocusParkingViewto each window can fix this problem. This view is transparent and its default focus highlight is disabled, so that it's invisible to the user no matter whether focused or not. It can take focus so thatRotaryServicecan park the focus on it to remove the focus highlight. - If there is only one
FocusAreain the current window, rotating the controller in theFocusAreacausesRotaryServiceto move the focus from the view on the right to the view on the left (and vice versa). Adding this view to each window can fix the issue. WhenRotaryServicedetermines the focus target is aFocusParkingView, it can determine a wrap-around is about to occur at which point it avoids the wrap-around by not moving focus. - When the rotary control launches an app, Android focuses the first focusable view,
which is always the
FocusParkingView. TheFocusParkingViewdetermines the optimal view to focus on and then applies focus.
Focusable views
RotaryService builds upon the Android framework's
existing
concept of view focus, dating back to when phones had physical keyboards and D-pads.
The existing android:nextFocusForward attribute is repurposed for rotary
(see FocusArea customization), but
android:nextFocusLeft, android:nextFocusRight,
android:nextFocusUp, and android:nextFocusDown are not.
RotaryService only focuses on views that are focusable. Some views,
such as Buttons,
are usually focusable. Others, such as TextViews and ViewGroups,
usually aren't. Clickable views are automatically focusable and views are automatically
clickable when they have a click listener. If this automatic logic results in the desired
focusability, you needn't explicitly set the view's focusability. If automatic logic doesn't
result in the desired focusability, set the android:focusable attribute to
true or false, or programmatically set the view's focusability with
View.setFocusable(boolean). For RotaryService to focus on it, a view MUST
meet the following requirements:
- Focusable
- Enabled
- Visible
- Have non-zero values for width and height
If a view doesn't meet all these requirements, for example a focusable but disabled button,
the user can't use the rotary control to focus on it. If you want focus on disabled views,
consider using a custom state rather than android:state_enabled to control how
the view appears without indicating that Android should consider it disabled. Your app can inform
the user why the view is disabled when tapped. The next section explains how to do this.
Custom state
To add a custom state:
- To add a custom attribute
to your view. For example, to add a
state_rotary_enabledcustom state to theCustomViewview class, use:<declare-styleable name="CustomView"> <attr name="state_rotary_enabled" format="boolean" /> </declare-styleable> - To track this state, add an instance variable to your view along with accessor methods:
private boolean mRotaryEnabled; public boolean getRotaryEnabled() { return mRotaryEnabled; } public void setRotaryEnabled(boolean rotaryEnabled) { mRotaryEnabled = rotaryEnabled; } - To read the value of your attribute when your view is created:
TypedArray a = context.obtainStyledAttributes(attrs, R.styleable.CustomView);
mRotaryEnabled = a.getBoolean(R.styleable.CustomView_state_rotary_enabled);
- In your view class, override the
onCreateDrawableState()method and then add the custom state, when appropriate. For example:@Override protected int[] onCreateDrawableState(int extraSpace) { if (mRotaryEnabled) extraSpace++; int[] drawableState = super.onCreateDrawableState(extraSpace); if (mRotaryEnabled) { mergeDrawableStates(drawableState, { R.attr.state_rotary_enabled }); } return drawableState; } - Make your view's click handler perform differently depending on its state. For example, the
click handler might do nothing or it might pop up a toast when
mRotaryEnabledisfalse. - To make the button appear disabled, in your view's background drawable, use
app:state_rotary_enabledinstead ofandroid:state_enabled. If you don't already have it, you'll need to add:xmlns:app="http://schemas.android.com/apk/res-auto"
- If your view is disabled in any layouts, replace
android:enabled="false"withapp:state_rotary_enabled="false"and then add theappnamespace, as above. - If your view is programmatically disabled, replace calls to
setEnabled()with calls tosetRotaryEnabled().
FocusArea
Use FocusAreas to partition the focusable views into blocks to make navigation
easier and to be consistent with other apps. For example, if your app has a toolbar, the toolbar
should be in a separate FocusArea from the rest of your app. Tab bars and
other navigation elements should also be separated from the rest of the app. Large lists
should generally have their own FocusArea. If not, users must rotate through
the entire list to access some views.
FocusArea is a subclass of LinearLayout in the car-ui-library.
When this feature is enabled, FocusArea draws a highlight when one of its
descendants is focused. To learn more, see
Focus highlight customization.
When creating a navigation block in the layout file, if you intend to use a
LinearLayout as a container for that block, use FocusArea instead.
Otherwise, wrap the block in a FocusArea.
Do NOT nest a FocusArea in another FocusArea.
Doing so leads to undefined navigation behavior. Ensure that all focusable views are
nested within a FocusArea.
An example of a FocusArea in
RotaryPlayground is shown below:
<com.android.car.ui.FocusArea
       android:layout_margin="16dp"
       android:layout_width="match_parent"
       android:layout_height="wrap_content"
       android:orientation="vertical">
       <EditText
           android:layout_width="match_parent"
           android:layout_height="wrap_content"
           android:singleLine="true">
       </EditText>
   </com.android.car.ui.FocusArea>
FocusArea works as follows:
- When handling rotate and nudge actions,
RotaryServicelooks for instances ofFocusAreain the view hierarchy. - When receiving a rotation event,
RotaryServicemoves focus to another View that can take focus in the sameFocusArea. - When receiving a nudge event,
RotaryServicemove focus to another view that can take focus in another (typically adjacent)FocusArea.
If you don't include any FocusAreas in your layout, the root view is treated
as an implicit focus area. The user can't nudge to navigate in the app. Instead, they'll
rotate through all focusable views, which might be adequate for dialogs.
FocusArea customization
Two standard View attributes can be used to customize rotary navigation:
android:nextFocusForwardallows app developers to specify the rotation order in a focus area. This is the same attribute used to control the Tab order for keyboard navigation. Do NOT use this attribute to create a loop. Instead, useapp:wrapAround(see below) to create a loop.android:focusedByDefaultallows app developers to specify the default focus view in the window. Do NOT use this attribute andapp:defaultFocus(see below) in the sameFocusArea.
FocusArea also defines some attributes to customize rotary navigation.
Implicit focus areas can't be customized with these attributes.
- (Android 11 QPR3, Android 11 Car,
Android 12)
app:defaultFocuscan be used to specify the ID of a focusable descendant view, which should be focused on when the user nudges to thisFocusArea. - (Android 11 QPR3, Android 11 Car,
Android 12)
app:defaultFocusOverridesHistorycan be set totrueto make the view specified above take focus even if with history to indicate another view in thisFocusAreahad been focused on. - (Android 12)
Useapp:nudgeLeftShortcut,app:nudgeRightShortcut,app:nudgeUpShortcut, andapp:nudgeDownShortcutto specify the ID of a focusable descendant view, which should be focused on when the user nudges in a given direction. To learn more, see the content for nudge shortcuts below.(Android 11 QPR3, Android 11 Car, deprecated in Android 12)
app:nudgeShortcutandapp:nudgeShortcutDirectionsupported only one nudge shortcut. - (Android 11 QPR3, Android 11 Car,
Android 12)
To enable rotation to wrap around in thisFocusArea,app:wrapAroundcan be set totrue. This is most typically used when views are arranged in a circle or oval. - (Android 11 QPR3, Android 11 Car,
Android 12)
To adjust the padding of the highlight in thisFocusArea, useapp:highlightPaddingStart,app:highlightPaddingEnd,app:highlightPaddingTop,app:highlightPaddingBottom,app:highlightPaddingHorizontal, andapp:highlightPaddingVertical. - (Android 11 QPR3, Android 11 Car,
Android 12)
To adjust the perceived bounds of thisFocusAreato find a nudge target, useapp:startBoundOffset,app:endBoundOffset,app:topBoundOffset,app:bottomBoundOffset,app:horizontalBoundOffset, andapp:verticalBoundOffset. - (Android 11 QPR3, Android 11 Car,
Android 12)
To explicitly specify the ID of an adjacentFocusArea(or areas) in the given directions, useapp:nudgeLeft,app:nudgeRight,app:nudgeUp, andapp:nudgeDown. Use this when the geometric search used by default doesn't find the desired target.
Nudging usually navigates between FocusAreas. But with nudge shortcuts,
nudging sometimes first navigates within a FocusArea so that the user might need
to nudge twice to navigate to the next FocusArea. Nudge shortcuts are useful
when a FocusArea contains a long list followed by a
Floating Action Button,
as in the example below:
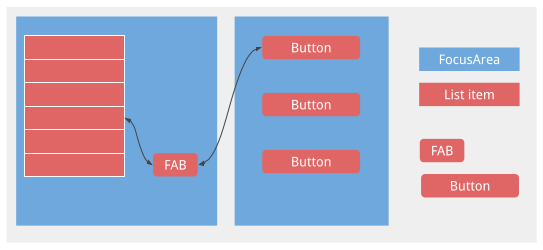
Without the nudge shortcut, the user would have to rotate through the entire list to reach the FAB.
Focus highlight customization
As noted above, RotaryService builds upon the Android framework's existing concept of
view focus. When the user rotates and nudges, RotaryService moves the focus around,
focusing one view and unfocusing another. In Android, when a view is focused, if the view:
- Has specified its own focus highlight, Android draws the view's focus highlight.
- Doesn't specify a focus highlight, and the default focus highlight isn't disabled, Android draws the default focus highlight for the view.
Apps designed for touch usually don't specify the appropriate focus highlights.
The default focus highlight is provided by the Android framework and can be overridden
by the OEM. App developers receive it when the theme they're using is derived from
Theme.DeviceDefault.
For a consistent user experience, rely on the default focus highlight whenever possible.
If you need a custom-shaped (for example, round or pill-shaped) focus highlight, or if you're
using a theme not derived from Theme.DeviceDefault, use the car-ui-library
resources to specify your own focus highlight for each view.
To specify a custom focus highlight for a view, change the background or foreground drawable of the view to a drawable that differs when the view is focused on. Typically, you'd change the background. The following drawable, if used as the background for a square view, produces a round focus highlight:
<selector xmlns:android="http://schemas.android.com/apk/res/android">
   <item android:state_focused="true" android:state_pressed="true">
      <shape android:shape="oval">
         <solid android:color="@color/car_ui_rotary_focus_pressed_fill_color"/>
         <stroke
            android:width="@dimen/car_ui_rotary_focus_pressed_stroke_width"
            android:color="@color/car_ui_rotary_focus_pressed_stroke_color"/>
      </shape>
   </item>
   <item android:state_focused="true">
      <shape android:shape="oval">
         <solid android:color="@color/car_ui_rotary_focus_fill_color"/>
         <stroke
            android:width="@dimen/car_ui_rotary_focus_stroke_width"
            android:color="@color/car_ui_rotary_focus_stroke_color"/>
      </shape>
   </item>
   <item>
      <ripple...>
         ...
      </ripple>
   </item>
</selector>
(Android 11 QPR3, Android 11 Car, Android 12) Bold resource references in the sample above identify resources defined by the car-ui-library. The OEM overrides these to be consistent with the default focus highlight they specify. This ensures that the focus highlight color, stroke width, and so on don't change when the user navigates between a view with a custom focus highlight and a view with the default focus highlight. The last item is a ripple used for touch. Default values used for the bold resources appear as follows:
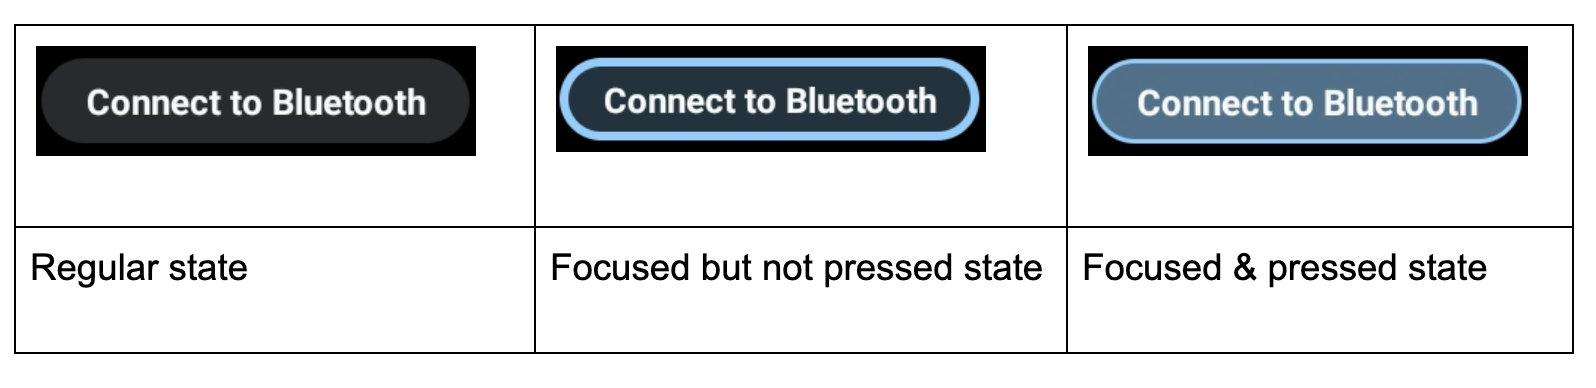
In addition, a custom focus highlight is called for when a button is given a solid background color to bring it to the user's attention, as in the example below. This can make the focus highlight difficult to see. In this situation, specify a custom focus highlight using secondary colors:
 |
- (Android 11 QPR3, Android 11 Car,
Android 12)
car_ui_rotary_focus_fill_secondary_color
car_ui_rotary_focus_stroke_secondary_color - (Android 12)
car_ui_rotary_focus_pressed_fill_secondary_color
car_ui_rotary_focus_pressed_stroke_secondary_color
For example:
 |
 |
|
| Focused, not pressed | Focused, pressed |
Rotary scrolling
If your app uses RecyclerViews, you SHOULD use
CarUiRecyclerViews instead. This ensures that your UI is consistent with
others because an OEM's customization applies to all CarUiRecyclerViews.
If the elements in your list are all focusable, you needn't do anything else. Rotary navigation moves the focus through the elements in the list and the list scrolls to make the newly focused element visible.
(Android 11 QPR3, Android 11 Car,
Android 12)
If there is a mix of focusable and unfocusable
elements, or if all the elements are unfocusable, you can enable rotary scrolling, which allows
the user to use the rotary controller to gradually scroll through the list without skipping
unfocusable items. To enable rotary scrolling, set the app:rotaryScrollEnabled
attribute to true.
(Android 11 QPR3, Android 11 Car,
Android 12)
You can enable rotary scrolling in any
scrollable view, including avCarUiRecyclerView, with the
setRotaryScrollEnabled() method in CarUiUtils. If you do so,
you need to:
- Make the scrollable view focusable so that it can be focused on when none of its focusable descendant views are visible,
- Disable the default focus highlight on the scrollable view by calling
setDefaultFocusHighlightEnabled(false)so that the scrollable view doesn't appear to be focused, - Ensure that the scrollable view is focused on before its descendants by calling
setDescendantFocusability(ViewGroup.FOCUS_BEFORE_DESCENDANTS). - Listen for MotionEvents with
SOURCE_ROTARY_ENCODERand eitherAXIS_VSCROLLorAXIS_HSCROLLto indicate the distance to scroll and the direction (through the sign).
When rotary scrolling is enabled on a CarUiRecyclerView and the user rotates
to an area where no focusable views are present, the scrollbar changes from gray to blue, as if
to indicate the scrollbar is focused. You can implement a similar effect if you like.
The MotionEvents are the same as those generated by a scroll wheel on a mouse, except for the source.
Direct manipulation mode
Normally, nudges and rotation navigate through the user interface, while Center button presses take action, though this isn't always the case. For example, if a user wants to adjust the alarm volume, they might use the rotary controller to navigate to the volume slider, press the Center button, rotate the controller to adjust the alarm volume, and then press the Back button to return to navigation. This is referred to as direct manipulation (DM) mode. In this mode, the rotary controller is used to interact with the view directly rather than to navigate.
Implement DM in one of two ways. If you only need to handle rotation and the view you want
to manipulate responds to ACTION_SCROLL_FORWARD and
ACTION_SCROLL_BACKWARD AccessibilityEvents appropriately, use the
simple mechanism. Otherwise, use the advanced mechanism.
The simple mechanism is the only option in system windows; apps can use either mechanism.
Simple mechanism
(Android 11 QPR3, Android 11 Car,
Android 12)
Your app should call
DirectManipulationHelper.setSupportsRotateDirectly(View view, boolean enable).
RotaryService recognizes when the user is in DM mode and enters DM mode when the user
presses the Center button while a view is focused. When in DM mode, rotations perform
ACTION_SCROLL_FORWARD or ACTION_SCROLL_BACKWARD and exits DM mode
when the user presses the Back button. The simple mechanism toggles the selected state of
the view when entering and exiting DM mode.
To provide a visual cue that the user is in DM mode, make your view appear different
when selected. For example, change the background when
android:state_selected is true.
Advanced mechanism
The app determines when RotaryService enters and exits DM mode. For a consistent
user experience, pressing the Center button with a DM view focused should enter DM mode
and the Back button should exit DM mode. If the Center button and/or nudge aren't used,
they can be alternative ways to exit DM mode. For apps such as Maps, a button to represent
DM can be used to enter DM mode.
To support advanced DM mode, a view:
- (Android 11 QPR3, Android 11 Car,
Android 12) MUST listen for a
KEYCODE_DPAD_CENTERevent to enter DM mode and listen for aKEYCODE_BACKevent to exit DM mode, callingDirectManipulationHelper.enableDirectManipulationMode()in each case. To listen for these events, do one of the following:- Register an
OnKeyListener.
or,
- Extend the view and then override its
dispatchKeyEvent()method.
- Register an
- SHOULD listen for nudge events (
KEYCODE_DPAD_UP,KEYCODE_DPAD_DOWN,KEYCODE_DPAD_LEFT, orKEYCODE_DPAD_RIGHT) if the view should handle nudges. - SHOULD listen to
MotionEvents and get rotation count inAXIS_SCROLLif the view wants to handle rotation. There are several ways to do this:- Register an
OnGenericMotionListener. - Extend the view and override its
dispatchTouchEvent()method.
- Register an
- To avoid being stuck in DM mode, MUST exit DM mode when the Fragment or Activity the view belongs to is not interactive.
- SHOULD provide a visual cue to indicate that the view is in DM mode.
A sample of a custom view that uses DM mode to pan and zoom a map is provided below:
/** Whether this view is in DM mode. */
private boolean mInDirectManipulationMode;


/** Initializes the view. Called by the constructors. */
private void init() {
   setOnKeyListener((view, keyCode, keyEvent) -> {
      boolean isActionUp = keyEvent.getAction() == KeyEvent.ACTION_UP;
      switch (keyCode) {
         // Always consume KEYCODE_DPAD_CENTER and KEYCODE_BACK events.
         case KeyEvent.KEYCODE_DPAD_CENTER:
            if (!mInDirectManipulationMode && isActionUp) {
               mInDirectManipulationMode = true;
               DirectManipulationHelper.enableDirectManipulationMode(this, true);
               setSelected(true); // visually indicate DM mode
            }
            return true;
         case KeyEvent.KEYCODE_BACK:
            if (mInDirectManipulationMode && isActionUp) {
               mInDirectManipulationMode = false;
               DirectManipulationHelper.enableDirectManipulationMode(this, false);
               setSelected(false);
            }
            return true;
        // Consume controller nudge events only when in DM mode.
        // When in DM mode, nudges pan the map.
        case KeyEvent.KEYCODE_DPAD_UP:
           if (!mInDirectManipulationMode) return false;
           if (isActionUp) pan(0f, -10f);
           return true;
        case KeyEvent.KEYCODE_DPAD_DOWN:
           if (!mInDirectManipulationMode) return false;
           if (isActionUp) pan(0f, 10f);
           return true;
        case KeyEvent.KEYCODE_DPAD_LEFT:
           if (!mInDirectManipulationMode) return false;
           if (isActionUp) pan(-10f, 0f);
           return true;
        case KeyEvent.KEYCODE_DPAD_RIGHT:
           if (!mInDirectManipulationMode) return false;
           if (isActionUp) pan(10f, 0f);
           return true;
        // Don't consume other key events.
        default:
           return false;
      }
   });


   // When in DM mode, rotation zooms the map.
   setOnGenericMotionListener(((view, motionEvent) -> {
      if (!mInDirectManipulationMode) return false;
      float scroll = motionEvent.getAxisValue(MotionEvent.AXIS_SCROLL);
      zoom(10 * scroll);
      return true;
   }));
}


@Override
public void onPause() {
   if (mInDirectManipulationMode) {
      // To ensure that the user doesn't get stuck in DM mode, disable DM mode
      // when the fragment is not interactive (e.g., a dialog shows up).
      mInDirectManipulationMode = false;
      DirectManipulationHelper.enableDirectManipulationMode(this, false);
   }
   super.onPause();
}
More examples can be found in the
RotaryPlayground project.
ActivityView
When using an ActivityView:
- The
ActivityViewshouldn't be focusable. - (Android 11 QPR3, Android 11 Car,
deprecated in Android 11)
The contents of theActivityViewMUST contain aFocusParkingViewas the first focusable view, and itsapp:shouldRestoreFocusattribute MUST befalse. - The contents of the
ActivityViewshould have noandroid:focusByDefaultviews.
For the user, ActivityViews should have no effect on navigation except that focus
areas can't span ActivityViews. In other words, you can't have a single focus area that
has content inside and outside an ActivityView. If you don't add
any FocusAreas to your ActivityView, the root of the view hierarchy in the
ActivityView is considered an implicit focus area.
Buttons that operate when held down
Most buttons cause some action when clicked. Some buttons operate when held down instead.
For example, the Fast Forward and Rewind buttons typically operate when held down. To make such
buttons support rotary, listen for KEYCODE_DPAD_CENTER KeyEvents
as follows:
mButton.setOnKeyListener((v, keyCode, event) ->
{
    if (keyCode != KEYCODE_DPAD_CENTER) {
        return false;
    }
    if (event.getAction() == ACTION_DOWN) {
        mButton.setPressed(true);
        mHandler.post(mRunnable);
    } else {
        mButton.setPressed(false);
        mHandler.removeCallbacks(mRunnable);
    }
    return true;
});
In which mRunnable takes an action (such as rewinding) and schedules itself to
be run after a delay.
Touch mode
Users can use a rotary controller to interact with the head unit in a car in two ways, either by using the rotary controller or by touching the screen. When using the rotary controller, one of the focusable views is highlighted. When touching the screen, no focus highlight appears. The user can switch between these input modes at any time:
- Rotary → touch. When the user touches the screen, the focus highlight disappears.
- Touch → rotary. When the user nudges, rotates, or presses the Center button, the focus highlight appears.
The Back and Home buttons have no effect on the input mode.
Rotary piggybacks on Android's existing concept of
touch mode.
You can use
View.isInTouchMode()
to determine which input mode the user is using. You can use
OnTouchModeChangeListener
to listen for changes. While this can be used to customize your user interface for the current
input mode, avoid any major changes as they can be disconcerting.
Troubleshooting
In an app designed for touch, it's common to have nested focusable views.
For example, there might be a FrameLayout around an ImageButton,
both of which are focusable. This does no harm for touch but it can result in a poor
user experience for rotary because the user must rotate the controller twice to move to
the next interactive view. For a good user experience, Google recommends you make either
the outer view or the inner view focusable, but not both.
If a button or switch loses focus when pressed through the rotary controller, one of these conditions might apply:
- The button or switch is being disabled (briefly or indefinitely) due to the
button being pressed. In either case, there are two ways to address this:
- Leave the
android:enabledstate astrueand use a custom state to gray out the button or switch as described in Custom State. - Use a container to surround the button or switch and make the container focusable instead of the button or switch. (The click listener must be on the container.)
- Leave the
- The button or switch is being replaced. For example, the action taken when the button
is pressed or the switch is toggled might trigger a refresh of the available actions
causing new buttons to replace existing buttons. There are two ways to address this:
- Instead of creating a new button or switch, set the icon and/or text of the existing button or switch.
- As above, add a focusable container around the button or switch.
RotaryPlayground
RotaryPlayground is a reference app for rotary. Use it to learn how to integrate
rotary features into your apps. RotaryPlayground is included in emulator builds and in
builds for devices that run Android Automotive OS (AAOS).
RotaryPlaygroundrepository:packages/apps/Car/tests/RotaryPlayground/- Versions: Android 11 QPR3, Android 11 Car, and Android 12
The RotaryPlayground app shows the following tabs on the left:
- Cards. Test navigating around focus areas, skipping unfocusable elements and text input.
- Direct Manipulation. Test widgets that support simple and advanced direct manipulation mode. This tab is specifically for direct manipulation within the app window.
- Sys UI Manipulation. Test widgets that support direct manipulation in system windows where only simple direct manipulation mode is supported.
- Grid. Test z-pattern rotary navigation with scrolling.
- Notification. Test nudging in and out of heads-up notifications.
- Scroll. Test scrolling through a mix of focusable and unfocusable content.
- WebView. Test navigating through links in a
WebView. - Custom
FocusArea. TestFocusAreacustomization:- Wrap-around.
android:focusedByDefaultandapp:defaultFocus.
- Explicit nudge targets.
- Nudge shortcuts.
FocusAreawith no focusable views.