
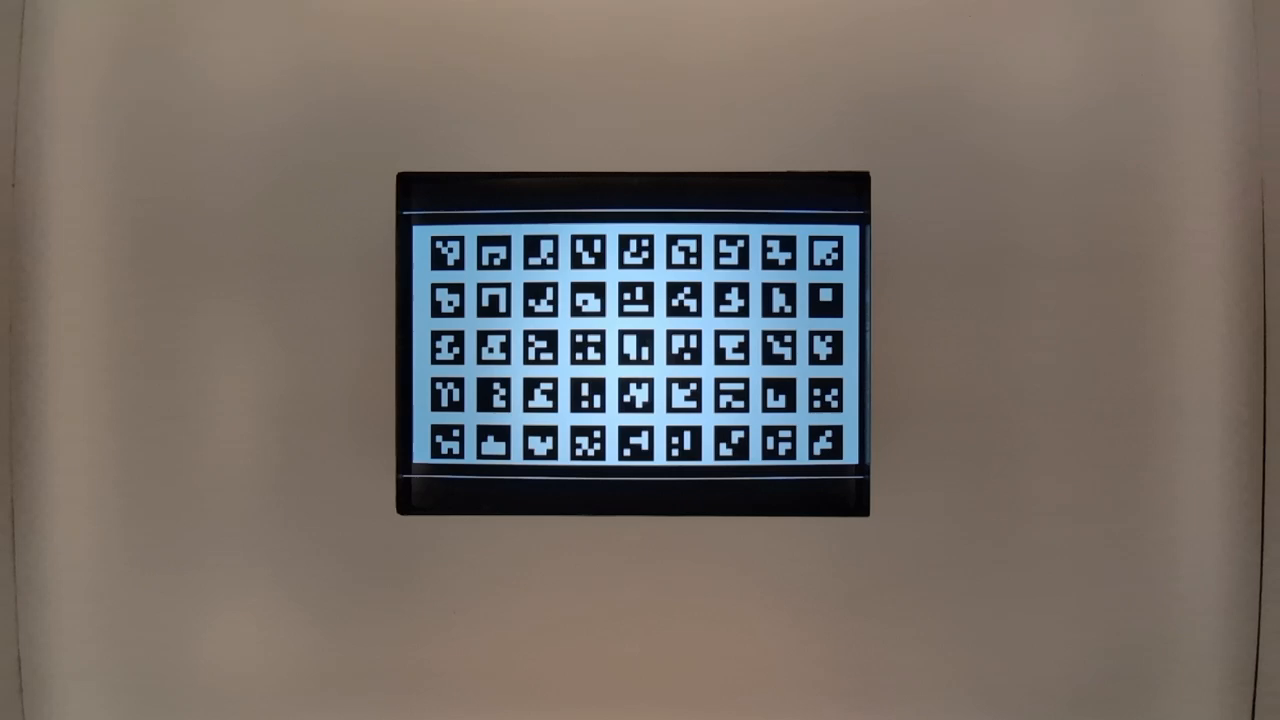
หน้านี้แสดงรายการการทดสอบทั้งหมดในชุดเครื่องมือทดสอบรูปภาพของกล้อง (ITS) ซึ่งเป็นส่วนหนึ่งของโปรแกรมตรวจสอบชุดเครื่องมือทดสอบความเข้ากันได้ของ Android (CTS) การทดสอบ ITS เป็นการทดสอบการทำงาน ซึ่งหมายความว่าไม่ได้วัดคุณภาพของรูปภาพ แต่เป็นการทดสอบว่าฟังก์ชันกล้องทั้งหมดที่โฆษณาทำงานได้ตามที่คาดไว้ เอกสารนี้ช่วยให้นักพัฒนาแอปและผู้ทดสอบเข้าใจว่าการทดสอบแต่ละรายการทำอะไรบ้างและวิธีแก้ไขข้อบกพร่องของการทดสอบที่ไม่สำเร็จ
ใน Android 17 ขึ้นไป การทดสอบ ITS ของกล้องจะแยกออกเป็น 2 กิจกรรมใน CTS Verifier เพื่อให้ดำเนินการแบบขนานได้และลดเวลาในการทดสอบ โดยกิจกรรมหนึ่งจะใช้สำหรับการทดสอบ feature_combination และ sensor_fusion ส่วนอีกกิจกรรมจะใช้สำหรับการทดสอบอื่นๆ ทั้งหมด
ITS ของกล้องจะควบคุมการทดสอบตามพร็อพเพอร์ตี้ของกล้องที่จำเป็น ระดับ API และ
ระดับ Media Performance Class (MPC) สำหรับระดับ API นั้น ITS ใช้
ro.product.first_api_level เพื่อควบคุมการทดสอบที่เพิ่มในระดับ API ที่เฉพาะเจาะจง ซึ่ง
ทดสอบประสบการณ์ของผู้ใช้ในเชิงลบสำหรับฟังก์ชันการทำงานในระดับ API ที่ต่ำกว่า ITS
ใช้ ro.vendor.api_level เพื่อควบคุมการทดสอบฟีเจอร์ที่เพิ่มใน API
ระดับหนึ่งๆ ซึ่งต้องใช้ความสามารถของฮาร์ดแวร์ใหม่ หากกำหนด
ro.odm.build.media_performance_class สำหรับ
อุปกรณ์ ITS จะกำหนดให้เรียกใช้การทดสอบที่เฉพาะเจาะจงตามระดับ MPC
การทดสอบจะจัดกลุ่มตามฉากดังนี้
scene0: จับข้อมูลเมตา Jitter เครื่องวัดการหมุน การสั่นscene1: การเปิดรับแสง ความไว การชดเชยค่าการเปิดรับแสง (EV), YUV เทียบกับ JPEG และ RAWscene2: การตรวจจับใบหน้า การทดสอบที่ต้องใช้ฉากสีscene3: การเพิ่มประสิทธิภาพขอบ การเคลื่อนที่ของเลนส์scene4: สัดส่วนภาพ การครอบตัด มุมมองscene5: การไล่ระดับสีของเลนส์scene6: ซูมscene7: สวิตช์กล้องหลายตัวscene8: การรับแสงอัตโนมัติ (AE) และสมดุลสีขาวอัตโนมัติ (AWB) การวัดแสงในภูมิภาคscene9: การบีบอัด JPEGscene_extensions: ส่วนขยายกล้องscene_tele: การสลับเลนส์เทเลโฟโต้scene_flash: แฟลชอัตโนมัติ อัตราเฟรมขั้นต่ำscene_video: เฟรมหลุดscene_gen2_chart: การทดสอบโดยใช้ชาร์ตกระดาษรุ่นที่ 2scene_wide_gamut: โปรไฟล์และช่วงสีที่มีขอบเขตกว้างsensor_fusion: ออฟเซ็ตเวลาของกล้องและเครื่องวัดการหมุนfeature_combination: การรวมฟีเจอร์scene_ip: ความเท่าเทียมของรูปภาพระหว่างแอปกล้องเริ่มต้นกับ แอป Jetpack Camera (JCA)
ดูคำอธิบายของแต่ละฉากได้ในส่วนต่างๆ
scene0
การทดสอบไม่จำเป็นต้องมีข้อมูลฉากที่เฉพาะเจาะจง อย่างไรก็ตาม โทรศัพท์ต้อง อยู่กับที่สำหรับการทดสอบเครื่องวัดการหมุนและการสั่น
test_jitter
วัดความกระตุกในแสตมป์เวลาของกล้อง
API ที่ทดสอบ:
android.hardware.camera2.CaptureResult#SENSOR_TIMESTAMPandroid.hardware.camera2.CaptureRequest#CONTROL_AE_TARGET_FPS_RANGE
ผ่าน: มีเดลต้าอย่างน้อย 30 มิลลิวินาทีระหว่างเฟรม
ในรูปต่อไปนี้ โปรดสังเกตช่วงแกน y ขนาดเล็ก จริงๆ แล้วความกระวนกระวายมีน้อย ในพล็อตนี้
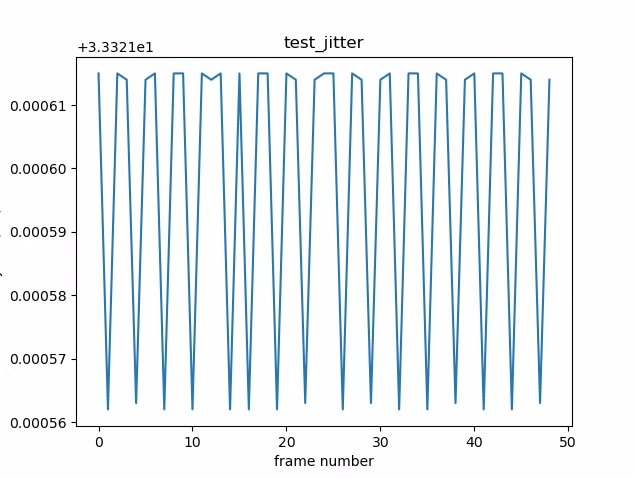
รูปที่ 1 พล็อต test_jitter
test_metadata
ทดสอบความถูกต้องของรายการข้อมูลเมตา โดยดูผลการจับภาพและออบเจ็กต์ลักษณะกล้อง การทดสอบนี้ใช้ค่า
auto_capture_requestการเปิดรับแสงและค่าเกนเนื่องจากเนื้อหาของรูปภาพไม่สำคัญ
API ที่ทดสอบ:
android.hardware.camera2.CameraCharacteristics#INFO_SUPPORTED_HARDWARE_LEVELandroid.hardware.camera2.CameraCharacteristics#SCALER_CROPPING_TYPEandroid.hardware.camera2.CameraCharacteristics#SENSOR_BLACK_LEVEL_PATTERNandroid.hardware.camera2.CameraCharacteristics#SENSOR_INFO_TIMESTAMP_SOURCEandroid.hardware.camera2.CaptureRequest#SENSOR_FRAME_DURATIONandroid.hardware.camera2.CaptureResult#SENSOR_ROLLING_SHUTTER_SKEW
ผ่าน: แท็กระดับฮาร์ดแวร์ rollingShutterSkew, frameDuration
timestampSource, croppingType, blackLevelPattern, pixel_pitch
ขอบเขตการมองเห็น (FoV) และระยะชัดลึกมีอยู่และมีค่าที่ถูกต้อง
test_request_capture_match
การทดสอบที่อุปกรณ์เขียนค่าการรับแสงและค่าเกนที่ถูกต้องโดยการอ่านข้อมูลเมตาของการจับภาพ
API ที่ทดสอบ:
android.hardware.camera2.CameraCharacteristics#SENSOR_INFO_EXPOSURE_TIME_RANGEandroid.hardware.camera2.CameraCharacteristics#SENSOR_INFO_SENSITIVITY_RANGEandroid.hardware.camera2.CaptureRequest#SENSOR_EXPOSURE_TIMEandroid.hardware.camera2.CaptureRequest#SENSOR_SENSITIVITYandroid.hardware.camera2.CaptureResult#SENSOR_EXPOSURE_TIMEandroid.hardware.camera2.CaptureResult#SENSOR_SENSITIVITY
ผ่าน: คำขอและค่าข้อมูลเมตาที่บันทึกไว้ตรงกันในทุกช็อต
test_sensor_events
สำหรับอุปกรณ์ที่โฆษณารองรับการรวมเซ็นเซอร์ การทดสอบนี้จะตรวจสอบว่า อุปกรณ์ค้นหาและพิมพ์เหตุการณ์เซ็นเซอร์หรือไม่ เซ็นเซอร์ที่คาดไว้คือ ตัวตรวจวัดความเร่ง เครื่องวัดการหมุน และเครื่องวัดค่าความเข้มข้นของสนามแม่เหล็ก การทดสอบนี้จะทำงานได้ก็ต่อเมื่อหน้าจอเปิดอยู่ ซึ่งหมายความว่าอุปกรณ์ไม่ได้อยู่ในโหมดสแตนด์บาย
API ที่ทดสอบ:
ผ่าน: ได้รับเหตุการณ์สำหรับเซ็นเซอร์แต่ละตัว
test_solid_color_test_pattern
การทดสอบว่ารูปแบบการทดสอบสีทึบสร้างขึ้นอย่างถูกต้องสำหรับการปิดเสียงกล้อง หากรองรับการปิดเสียงกล้อง จะต้องรองรับรูปแบบการทดสอบสีทึบ หากไม่รองรับการปิดเสียงกล้อง ระบบจะทดสอบรูปแบบการทดสอบสีทึบเฉพาะในกรณีที่มีการโฆษณาความสามารถนี้
หากระบบรองรับรูปภาพดิบ เราจะทดสอบการกำหนดสีด้วย สีที่ทดสอบคือดำ ขาว แดง น้ำเงิน และเขียว สำหรับกล้องที่ไม่รองรับ รูปภาพ RAW ระบบจะทดสอบเฉพาะสีดำ
API ที่ทดสอบ:
android.hardware.camera2.CameraCharacteristic#SENSOR_AVAILABLE_TEST_PATTERN_MODESandroid.hardware.camera2.CaptureResult#SENSOR_TEST_PATTERN_DATAandroid.hardware.camera2.CaptureResult#SENSOR_TEST_PATTERN_MODE
ผ่าน: รูปแบบการทดสอบสีทึบที่รองรับมีสีที่ถูกต้องและมีความแปรปรวนต่ำในรูปภาพ
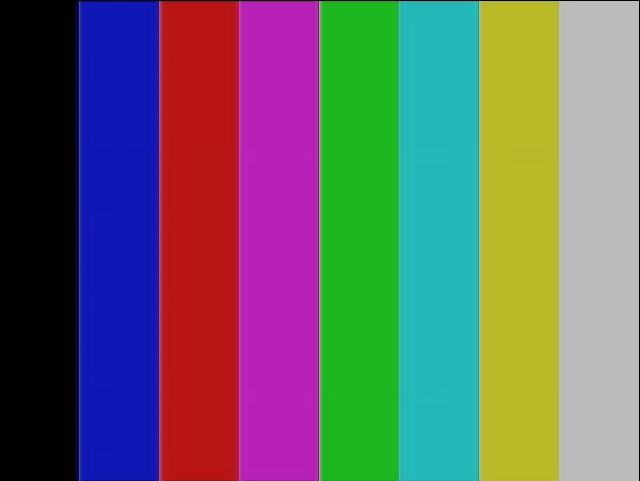
test_test_pattern
ทดสอบพารามิเตอร์ android.sensor.testPatternMode เพื่อ
บันทึกเฟรมสำหรับรูปแบบการทดสอบที่ถูกต้องแต่ละรูปแบบ และตรวจสอบว่าระบบ
สร้างเฟรมอย่างถูกต้องสำหรับสีทึบและแถบสี การทดสอบนี้มีขั้นตอนต่อไปนี้
- บันทึกรูปภาพสำหรับรูปแบบการทดสอบที่รองรับทั้งหมด
- ตรวจสอบความถูกต้องของรูปแบบการทดสอบสีเดียวและแถบสี
API ที่ทดสอบ:
android.hardware.camera2.CameraCharacteristic#SENSOR_AVAILABLE_TEST_PATTERN_MODESandroid.hardware.camera2.CaptureResult#SENSOR_TEST_PATTERN_MODE
ผ่าน: สร้างรูปแบบการทดสอบที่รองรับได้อย่างถูกต้อง
รูปที่ 2 ตัวอย่าง test_test_patterns
test_tonemap_curve
ทดสอบการแปลงรูปแบบการทดสอบจาก RAW เป็น YUV ด้วยการแมปโทนเชิงเส้น การทดสอบนี้
ต้องใช้ android.sensor.testPatternMode = 2 (COLOR_BARS) เพื่อสร้าง
รูปแบบรูปภาพที่สมบูรณ์แบบสำหรับการแปลงโทนแมป ตรวจสอบว่าไปป์ไลน์มี
เอาต์พุตสีที่เหมาะสมพร้อมการแมปโทนเชิงเส้นและอินพุตรูปภาพที่เหมาะสม (ขึ้นอยู่กับ
test_test_patterns)
API ที่ทดสอบ:
android.hardware.camera2.CaptureRequest#DISTORTION_CORRECTION_MODEandroid.hardware.camera2.CaptureRequest#SENSOR_TEST_PATTERN_MODEandroid.hardware.camera2.CaptureRequest#TONEMAP_CURVEandroid.hardware.camera2.CaptureRequest#TONEMAP_MODE
ผ่าน: YUV และ RAW ดูคล้ายกัน

รูปที่ 3 ตัวอย่างดิบของ test_tonemap_curve
รูปที่ 4 ตัวอย่าง YUV ของ test_tonemap_curve
test_unified_timestamp
ทดสอบว่าเหตุการณ์เซ็นเซอร์ตรวจจับภาพและเซ็นเซอร์ตรวจจับความเคลื่อนไหวอยู่ในโดเมนเวลาเดียวกันหรือไม่
API ที่ทดสอบ:
android.hardware.camera2.CaptureResult#SENSOR_TIMESTAMPandroid.hardware.Sensorandroid.hardware.SensorEventandroid.hardware.Sensor#TYPE_ACCELEROMETERandroid.hardware.Sensor#TYPE_GYROSCOPE
ผ่าน: การประทับเวลาการเคลื่อนไหวอยู่ระหว่างการประทับเวลารูปภาพ 2 รายการ
test_vibration_restriction
ทดสอบว่าการสั่นของอุปกรณ์ทำงานตามที่คาดไว้หรือไม่
API ที่ทดสอบ:
android.hardware.Sensorandroid.hardware.SensorEventandroid.hardware.Sensor#TYPE_ACCELEROMETERandroid.os.Vibratorandroid.hardware.camera2.CameraDevice#setCameraAudioRestriction
ผ่าน: อุปกรณ์ไม่สั่นเมื่อปิดเสียงโดย API การจำกัดเสียงของกล้อง
scene1_1
scene1 เป็นแผนภูมิสีเทา ชาร์ตสีเทาต้องครอบคลุม 30% ตรงกลางของ FoV ของกล้อง
คาดว่าชาร์ตสีเทาจะท้าทาย 3A (AE,
AWB และ AF) ในระดับปานกลางเนื่องจากภูมิภาคตรงกลางไม่มีฟีเจอร์
อย่างไรก็ตาม คำขอจับภาพจะระบุฉากทั้งหมด ซึ่งรวมถึง
ฟีเจอร์ที่เพียงพอสำหรับ 3A ในการรวมกัน
คุณทดสอบกล้อง RFoV ได้ในแท่นทดสอบ WFoV หรือ RFoV หากทดสอบกล้อง RFoV ในแท่นทดสอบ WFoV ระบบจะปรับขนาดแผนภูมิเป็น 2/3 เพื่อระบุขอบเขตบางอย่างสำหรับแผนภูมิสีเทาใน FoV เพื่อช่วยให้ 3A ทำงานร่วมกันได้ ดูคำอธิบายโดยละเอียดเพิ่มเติมเกี่ยวกับแท่นทดสอบกล้องได้ที่ ITS ของกล้องในกล่อง

รูปที่ 5 แผนภูมิฉากที่ 1 ขนาดเต็ม (ซ้าย), แผนภูมิที่ปรับขนาด 2/3 (ขวา)
test_ae_precapture_trigger
ทดสอบเครื่องสถานะ AE เมื่อใช้ทริกเกอร์ก่อนการจับภาพ บันทึกคำขอที่ดำเนินการด้วยตนเอง 5 รายการโดยปิดใช้ AE คำขอสุดท้ายมีทริกเกอร์การจับภาพล่วงหน้าของ AE ซึ่งควรละเว้นเนื่องจากปิดใช้ AE
API ที่ทดสอบ:
android.hardware.camera2.CaptureRequest#CONTROL_AE_MODEandroid.hardware.camera2.CaptureRequest#CONTROL_AE_PRECAPTURE_TRIGGERandroid.hardware.camera2.CaptureResult#CONTROL_AE_STATE
ผ่าน: AE บรรจบกัน
test_auto_vs_manual
การทดสอบที่บันทึกภาพอัตโนมัติและภาพที่ถ่ายด้วยตนเองจะมีลักษณะเหมือนกัน
API ที่ทดสอบ:
android.hardware.camera2.CaptureRequest#COLOR_CORRECTION_GAINSandroid.hardware.camera2.CaptureRequest#COLOR_CORRECTION_TRANSFORMandroid.hardware.camera2.CaptureResult#TONEMAP_CURVEandroid.hardware.camera2.CaptureResult#TONEMAP_MODE
ผ่าน: การปรับสมดุลสีขาวด้วยตนเองที่ได้รับและแปลงแล้วซึ่งรายงานในผลลัพธ์การจับภาพแต่ละรายการ
ตรงกับการปรับสมดุลสีขาวอัตโนมัติ estimate จากอัลกอริทึม 3A ของกล้อง
รูปที่ 6. ตัวอย่างการทดสอบอัตโนมัติเทียบกับแคมเปญอัตโนมัติที่สร้างขึ้นเอง
รูปที่ 7 ตัวอย่างไวท์บาลานซ์ทดสอบอัตโนมัติเทียบกับแมนนวล
รูปที่ 8. ตัวอย่างการแปลงการปรับสมดุลแสงขาวด้วยตนเอง test_auto_vs_manual
test_black_white
การทดสอบที่อุปกรณ์สร้างรูปภาพขาวดำเต็มรูปแบบ ถ่ายภาพ 2 ครั้ง ครั้งแรกใช้ค่าเกนต่ำมากและค่าแสงสั้น ซึ่งจะทำให้ได้ภาพสีดำ และครั้งที่ 2 ใช้ค่าเกนสูงมากและค่าแสงยาว ซึ่งจะทำให้ได้ภาพสีขาว
API ที่ทดสอบ:
android.hardware.camera2.CaptureRequest#SENSOR_EXPOSURE_TIMEandroid.hardware.camera2.CaptureRequest#SENSOR_SENSITIVITY
ผ่าน: สร้างรูปภาพขาวดำ ช่องที่อิ่มตัวของรูปภาพสีขาวมีค่า RGB เป็น [255, 255, 255] โดยมีส่วนต่างของข้อผิดพลาดน้อยกว่า 1%

รูปที่ 9 test_black_white, ตัวอย่างสีดำ

รูปที่ 10 test_black_white, ตัวอย่างสีขาว
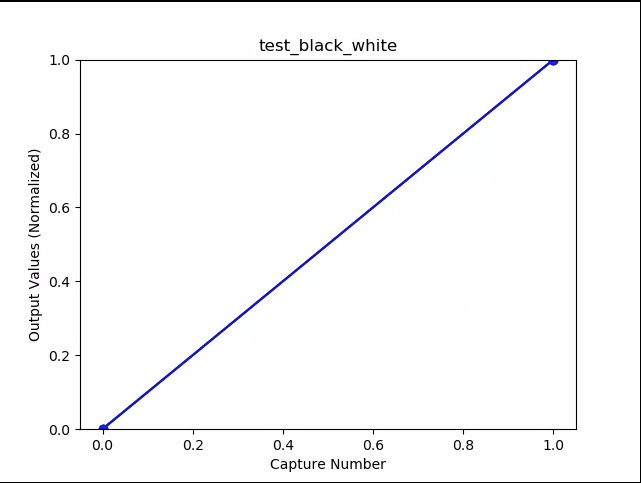
รูปที่ 11 test_black_white, plot means example
test_burst_capture
ยืนยันว่าไปป์ไลน์การจับภาพทั้งหมดสามารถรองรับความเร็วของ การจับภาพขนาดเต็มและเวลา CPU ได้
API ที่ทดสอบ:
ผ่าน: จับภาพต่อเนื่องขนาดเต็ม ตรวจสอบการหลุดของเฟรมและความสว่างของรูปภาพ
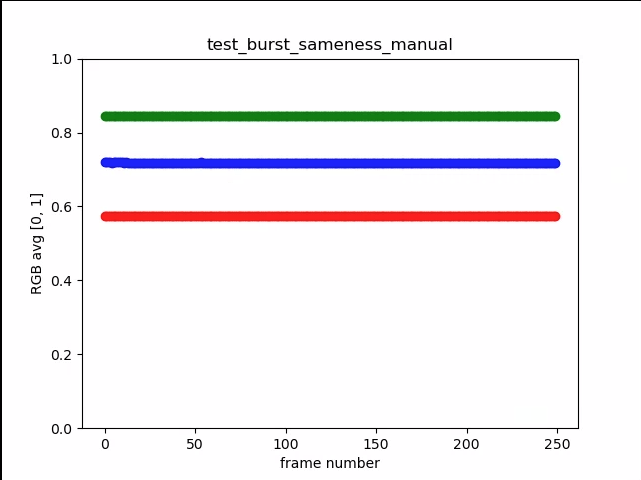
test_burst_sameness_manual
ถ่ายภาพต่อเนื่อง 5 ชุด ชุดละ 50 ภาพด้วยการตั้งค่าการจับภาพด้วยตนเอง และตรวจสอบว่าภาพทั้งหมดเหมือนกัน ใช้การทดสอบนี้เพื่อระบุว่ามีเฟรมเป็นระยะๆ ที่ประมวลผลแตกต่างกันหรือมีอาร์ติแฟกต์หรือไม่
API ที่ทดสอบ:
android.hardware.camera2.CameraMetadata#REQUEST_AVAILABLE_CAPABILITIES_MANUAL_SENSORandroid.hardware.camera2.CameraMetadata#SYNC_MAX_LATENCY_PER_FRAME_CONTROL
ผ่าน: รูปภาพเหมือนกันทั้งในด้านภาพและค่า RGB
ไม่ผ่าน: แสดงจุดสูงสุดหรือจุดต่ำสุดของแผนภูมิค่าเฉลี่ย RGB ที่จุดเริ่มต้นของ แต่ละการถ่ายภาพต่อเนื่อง
- ความคลาดเคลื่อนคือ 3% สำหรับ
first_API_level< 30 - ความคลาดเคลื่อนคือ 2% สำหรับ
first_API_level>= 30

รูปที่ 12. ตัวอย่างค่าเฉลี่ยของ test_burst_sameness_manual
รูปที่ 13 test_burst_sameness_manual_plot_means
test_crop_region_raw
ทดสอบว่าสตรีม RAW ครอบตัดไม่ได้
API ที่ทดสอบ:
android.hardware.camera2.CameraCharacteristics#SENSOR_INFO_ACTIVE_ARRAY_SIZEandroid.hardware.camera2.CaptureResult#SCALER_CROP_REGIONandroid.hardware.camera2.CaptureRequest#SCALER_CROP_REGION
ผ่าน: รูปภาพ YUV จะได้รับการครอบตัดตรงกลาง แต่รูปภาพ RAW จะไม่ได้รับการครอบตัด

รูปที่ 14 ตัวอย่างการครอบตัดดิบของ test_crop_region_raw comp
รูปที่ 15. ตัวอย่างแบบเต็มของ test_crop_region_raw comp raw

รูปที่ 16 ตัวอย่างการครอบตัด YUV ของการเปรียบเทียบ test_crop_region_raw
รูปที่ 17 ตัวอย่างแบบเต็มของ test_crop_region_raw YUV
test_crop_regions
ทดสอบว่าการครอบตัดภูมิภาคใช้งานได้ รับรูปภาพเต็มและสร้างแพตช์ของ 5 ภูมิภาคที่แตกต่างกัน (มุมและตรงกลาง) ถ่ายภาพโดยตั้งค่าการครอบตัดสำหรับทั้ง 5 ภูมิภาค เปรียบเทียบค่าของแพตช์และรูปภาพที่ครอบตัด
API ที่ทดสอบ:
android.hardware.camera2.CameraCharacteristics#SENSOR_INFO_ACTIVE_ARRAY_SIZEandroid.hardware.camera2.CaptureRequest#SCALER_CROP_REGION
ผ่าน: รูปภาพของภูมิภาคที่ครอบตัดตรงกับแพตช์ที่สอดคล้องกับ รูปภาพที่ครอบตัด
test_ev_compensation
ทดสอบว่ามีการชดเชยค่าการรับแสง (EV) หรือไม่ การทดสอบประกอบด้วย ส่วนพื้นฐานและส่วนขั้นสูง
ส่วนพื้นฐานจะทดสอบว่ามีการชดเชย EV โดยใช้ช่วง
ที่สร้างด้วย CONTROL_AE_COMPENSATION_STEP ระบบจะบันทึก 8 เฟรมที่ค่า
การชดเชยแต่ละค่า
ส่วนขั้นสูงจะเพิ่มการเปิดรับแสงใน 8 ขั้นตอน และตรวจสอบความสว่างที่วัดได้ เทียบกับความสว่างที่คาดไว้ ระบบจะคำนวณค่าที่คาดไว้จาก ความสว่างของรูปภาพที่ไม่มีการชดเชย EV และ ค่าที่คาดไว้จะอิ่มตัวหากค่าที่คำนวณเกินช่วงค่าของรูปภาพจริง การทดสอบจะล้มเหลวหากค่าที่คาดไว้และค่าที่วัดได้ไม่ตรงกัน หรือหากรูปภาพสว่างเกินไปภายใน 5 ขั้นตอน
API ที่ทดสอบ:
android.hardware.camera2.CameraCharacteristics#CONTROL_AE_COMPENSATION_STEPandroid.hardware.camera2.CaptureRequest#CONTROL_AE_EXPOSURE_COMPENSATIONandroid.hardware.camera2.CaptureRequest#CONTROL_AE_LOCKandroid.hardware.camera2.CaptureResult#CONTROL_AE_STATEandroid.hardware.camera2.CaptureRequest#CONTROL_AWB_LOCKandroid.hardware.camera2.CaptureResult#TONEMAP_CURVEandroid.hardware.camera2.CaptureResult#TONEMAP_MODE
การผ่านส่วนพื้นฐาน: รูปภาพแสดงการเปิดรับแสงที่เพิ่มขึ้นโดยไม่เปิดรับแสงมากเกินไป ภายใน 5 ขั้นตอน
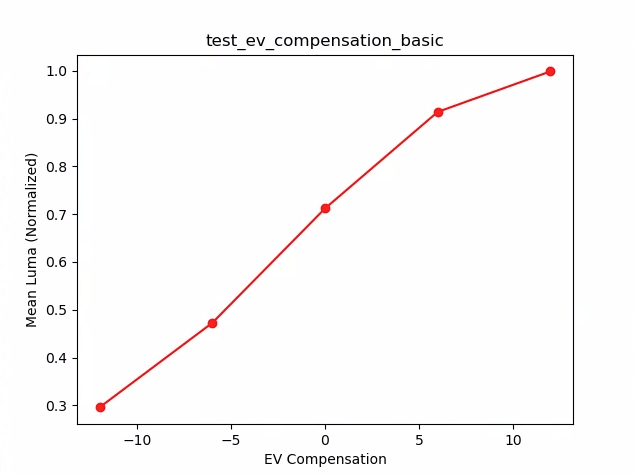
รูปที่ 18 test_ev_compensation_basic
การผ่านส่วนขั้นสูง: จับภาพการเพิ่มขึ้นของลูมาเมื่อการตั้งค่าการชดเชย EV เพิ่มขึ้น เฟรมทั้ง 8 เฟรมที่บันทึกไว้สำหรับการตั้งค่าการชดเชย EV แต่ละรายการมีค่าความสว่างที่คงที่
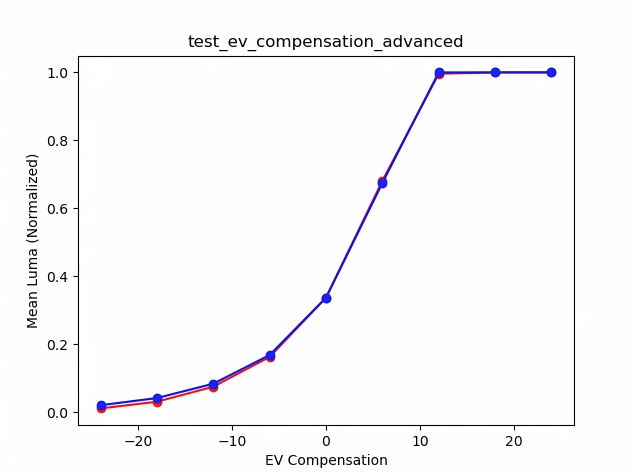
รูปที่ 19 test_ev_compensation_advanced_plot_means
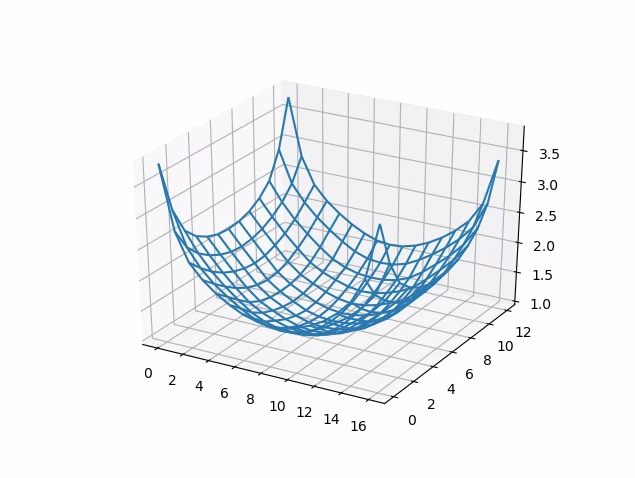
test_exposure_x_iso
การทดสอบที่แสดงให้เห็นว่าการเปิดรับแสงคงที่เกิดขึ้นเมื่อ ISO และเวลาเปิดรับแสงแตกต่างกัน ถ่าย
ภาพต่อเนื่องโดยเลือก ISO และเวลาเปิดรับแสงให้สมดุลกัน
ผลลัพธ์ควรมีความสว่างเท่ากัน แต่เมื่อเวลาผ่านไป รูปภาพควร
มีสัญญาณรบกวนมากขึ้น ยืนยันว่าค่าเฉลี่ยของพิกเซลตัวอย่างอยู่ใกล้กัน ตรวจสอบว่ารูปภาพไม่ได้ถูกจำกัดไว้ที่ 0 หรือ 1 (ซึ่งจะทำให้ดูเหมือนเส้นตรง) นอกจากนี้ คุณยังเรียกใช้การทดสอบกับรูปภาพ RAW ได้โดยตั้งค่าแฟล็ก debug ใน
ไฟล์การกำหนดค่า
API ที่ทดสอบ:
android.hardware.camera2.CaptureRequest#SENSOR_EXPOSURE_TIMEandroid.hardware.camera2.CaptureRequest#SENSOR_SENSITIVITY
ผ่าน: รูปภาพมีความสว่างเท่ากัน แต่มีสัญญาณรบกวนมากขึ้นเมื่อ ISO สูงขึ้น ระนาบ RGB จะแบนเมื่อค่าของ ISO*exposure คงที่ในพื้นที่เกนที่ทดสอบ
กลไกการล้มเหลว: ในรูปต่อไปนี้ เมื่อค่าตัวคูณเกน (แกน x) เพิ่มขึ้น ค่าเฉลี่ยของระนาบ RGB ที่ปรับให้เป็นมาตรฐาน (แกน y) จะเริ่ม เบี่ยงเบนจากค่าตัวคูณเกนต่ำ
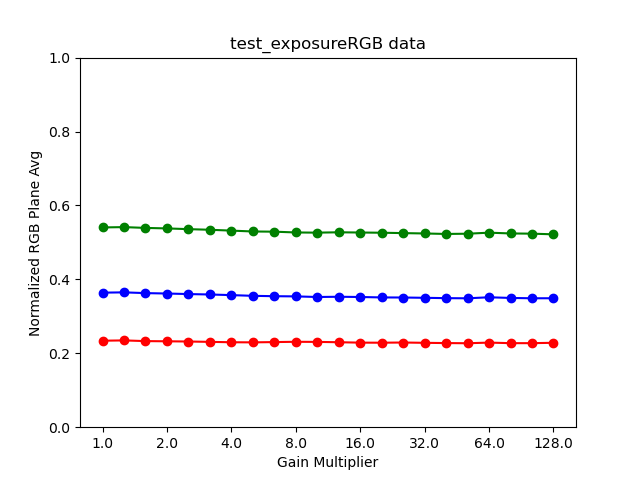
รูปที่ 20 test_exposure_plot_means
รูปที่ 21 test_exposure_mult=1.00
รูปที่ 22 test_exposure_mult=64.00
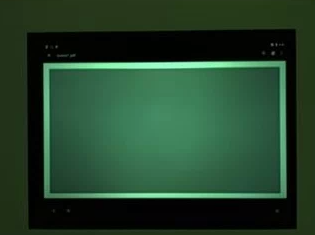
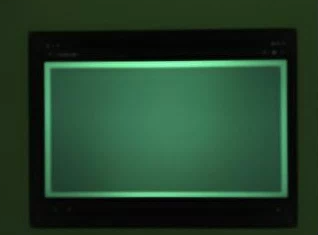
test_latching
การทดสอบการตั้งค่า (การรับแสงและอัตราขยาย) จะยึดเฟรมขวาสำหรับกล้อง FULL และ
LEVEL_3 ถ่ายภาพต่อเนื่องโดยใช้คำขอแบบต่อเนื่อง
และเปลี่ยนพารามิเตอร์คำขอจับภาพระหว่างช็อต ตรวจสอบว่ารูปภาพมีพร็อพเพอร์ตี้ที่คาดไว้
API ที่ทดสอบ:
ผ่าน: รูปภาพ [2, 3, 6, 8, 10, 12, 13] มี ISO หรือการเปิดรับแสงเพิ่มขึ้นและ แสดงค่าเฉลี่ย RGB ที่สูงขึ้นในพล็อตในรูปต่อไปนี้
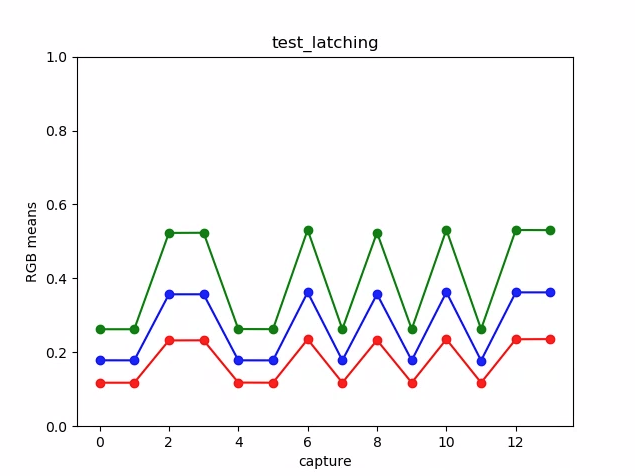
รูปที่ 23 พล็อต test_latching หมายถึงตัวอย่าง
รูปที่ 24 test_latching i=00
รูปที่ 25 test_latching i=01
รูปที่ 26 test_latching i=02
รูปที่ 27. test_latching i=03
รูปที่ 28. test_latching i=04
รูปที่ 29 test_latching i=05
รูปที่ 30 test_latching i=06
รูปที่ 31 test_latching i=07
รูปที่ 32. test_latching i=08
รูปที่ 33 test_latching i=09
รูปที่ 34 test_latching i=10
รูปที่ 35 test_latching i=11
รูปที่ 36 test_latching i=12
test_linearity
การทดสอบที่สามารถกลับการประมวลผลของอุปกรณ์เป็นพิกเซลเชิงเส้นได้ บันทึก ลำดับภาพโดยหันอุปกรณ์ไปยังเป้าหมายที่สม่ำเสมอ
API ที่ทดสอบ:
android.hardware.camera2.CameraCharacteristics#SENSOR_INFO_SENSITIVITY_RANGEandroid.hardware.camera2.CaptureRequest#BLACK_LEVEL_LOCKandroid.hardware.camera2.CaptureRequest#SENSOR_SENSITIVITYandroid.hardware.camera2.CaptureRequest#TONEMAP_CURVEandroid.hardware.camera2.CaptureRequest#TONEMAP_MODE
ผ่าน: ค่า R, G, B ต้องเพิ่มขึ้นเป็นเส้นตรงตามความไวที่เพิ่มขึ้น

รูปที่ 37 พล็อต test_linearity หมายถึงตัวอย่าง
test_locked_burst
ทดสอบการล็อก 3A และการถ่ายภาพต่อเนื่อง YUV (ใช้การตั้งค่าอัตโนมัติ) การทดสอบนี้ออกแบบมาให้ผ่าน
แม้ในอุปกรณ์ที่มีข้อจำกัดซึ่งไม่มี MANUAL_SENSOR หรือ PER_FRAME_CONTROLS
การทดสอบจะตรวจสอบความสอดคล้องของรูปภาพ YUV ขณะที่การตรวจสอบอัตราเฟรมอยู่ใน CTS
API ที่ทดสอบ:
android.hardware.camera2.CaptureRequest#CONTROL_AE_LOCKandroid.hardware.camera2.CaptureRequest#CONTROL_AWB_LOCK
ผ่าน: ภาพที่บันทึกดูสอดคล้องกัน

รูปที่ 38. ตัวอย่างเฟรม 0 ของ test_locked_burst

รูปที่ 39 ตัวอย่างเฟรม 1 ของ test_locked_burst
รูปที่ 40 ตัวอย่างเฟรม test_locked_burst2
scene1_2
scene 1_2 เป็นสำเนาที่ทำงานเหมือนกับ scene 1_1 ทุกประการ โดยใช้โครงสร้างฉากย่อยเพื่อลดระยะเวลาที่ยาวนานของ scene 1
test_param_color_correction
การทดสอบที่ใช้พารามิเตอร์ android.colorCorrection.* เมื่อตั้งค่า
ถ่ายภาพโดยใช้ค่าการแปลงและค่าเกนที่แตกต่างกัน และทดสอบว่าภาพที่ได้ดูแตกต่างกันตามค่าที่ใช้ ระบบจะเลือกการแปลงและค่าที่ได้เพื่อให้เอาต์พุต
มีสีแดงหรือสีน้ำเงินมากขึ้น ใช้การแมปโทนแบบเชิงเส้น
การแมปโทนสีเป็นเทคนิคที่ใช้ในการประมวลผลรูปภาพเพื่อแมปชุดสีหนึ่งไปยังอีกชุดหนึ่งเพื่อประมาณลักษณะของรูปภาพที่มีช่วงไดนามิกสูงในสื่อที่มีช่วงไดนามิกจำกัดกว่า
API ที่ทดสอบ:
android.hardware.camera2.CaptureRequest#COLOR_CORRECTION_GAINSandroid.hardware.camera2.CaptureRequest#COLOR_CORRECTION_MODEandroid.hardware.camera2.CaptureRequest#COLOR_CORRECTION_TRANSFORM
ผ่าน: ค่า R และ B จะเพิ่มขึ้นตามการเปลี่ยนรูป
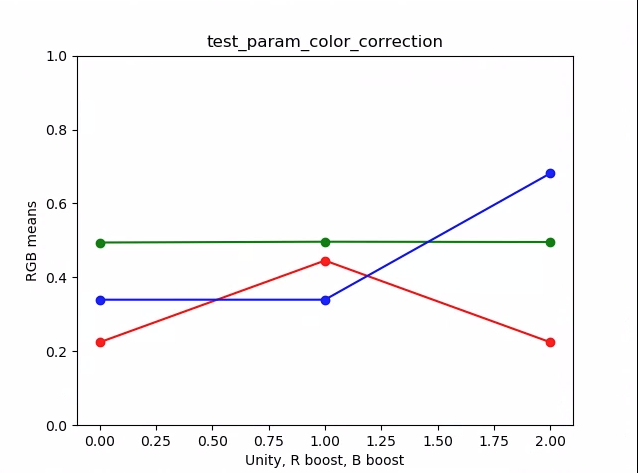
รูปที่ 41 พล็อต test_param_color_correction หมายถึงตัวอย่าง
ในรูปต่อไปนี้ แกน x คือคำขอการจับภาพ: 0 = เอกภาพ, 1 = การเพิ่มสีแดง และ 2 = การเพิ่มสีน้ำเงิน
รูปที่ 42. test_param_color_correction req=0 ตัวอย่าง Unity
รูปที่ 43. test_param_color_correctness req=1 ตัวอย่างการเพิ่มสีแดง
รูปที่ 44. test_param_color_correction req=2 ตัวอย่างการเพิ่มสีน้ำเงิน
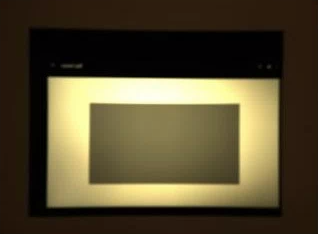
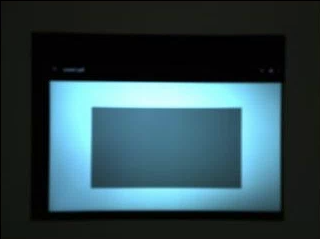
test_param_flash_mode
การทดสอบที่ใช้พารามิเตอร์ android.flash.mode ตั้งค่า
การเปิดรับแสงด้วยตนเองให้เป็นด้านมืด เพื่อให้เห็นได้ชัดว่าแฟลชทำงานหรือไม่
และใช้การแมปโทนแบบเชิงเส้น ตรวจสอบกึ่งกลางด้วยรูปภาพไทล์เพื่อดู
ว่ามีไล่ระดับสีขนาดใหญ่ที่สร้างขึ้นเพื่อยืนยันว่าแฟลชทำงานหรือไม่
API ที่ทดสอบ:
ผ่าน: ตรงกลางของรูปภาพไทล์มีไล่ระดับสีขนาดใหญ่ ซึ่งหมายความว่า แฟลชทำงาน
รูปที่ 45 ตัวอย่าง test_param_flash_mode 1

รูปที่ 46. ตัวอย่างไทล์เดียวของ test_param_flash_mode

รูปที่ 47 ตัวอย่าง test_param_flash_mode 2

รูปที่ 48 ตัวอย่างไทล์ 2 รายการของ test_param_flash_mode
test_param_noise_reduction
ทดสอบว่ามีการใช้พารามิเตอร์ android.noiseReduction.mode อย่างถูกต้อง
เมื่อตั้งค่า ถ่ายภาพด้วยกล้องในที่แสงน้อย ใช้เกนแอนะล็อกสูงเพื่อ
ช่วยให้มั่นใจว่ารูปภาพที่ถ่ายมีสัญญาณรบกวน ถ่ายภาพ 3 ภาพสำหรับปิด NR, เร็ว
และคุณภาพสูง นอกจากนี้ ยังจับภาพที่มีค่าเกนต่ำและปิด NR ไว้ แล้วใช้
ความแปรปรวนของภาพนี้เป็นพื้นฐาน ยิ่งอัตราส่วนสัญญาณต่อสัญญาณรบกวน (SNR) สูงขึ้น คุณภาพของภาพก็จะยิ่งดีขึ้น
API ที่ทดสอบ:
ผ่าน: SNR จะแตกต่างกันไปตามโหมดการลดเสียงรบกวนต่างๆ และมีลักษณะคล้ายกับกราฟต่อไปนี้
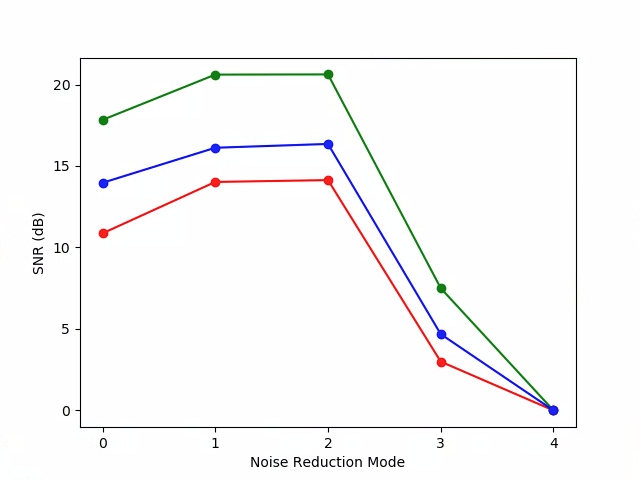
รูปที่ 49 กราฟ test_param_noise_reduction แสดงตัวอย่าง SNR
0: ปิด, 1: เร็ว, 2: คุณภาพสูง, 3: ต่ำสุด , 4: ZSL
รูปที่ 50 ตัวอย่าง test_param_noise_reduction high gain nr=0
รูปที่ 51 ตัวอย่าง test_param_noise_reduction high gain nr=1
รูปที่ 52. ตัวอย่าง test_param_noise_reduction high gain nr=2
รูปที่ 53 ตัวอย่าง test_param_noise_reduction high gain nr=3
รูปที่ 54 ตัวอย่างการลดเสียงรบกวนของ test_param_noise_reduction ที่มีอัตราขยายต่ำ
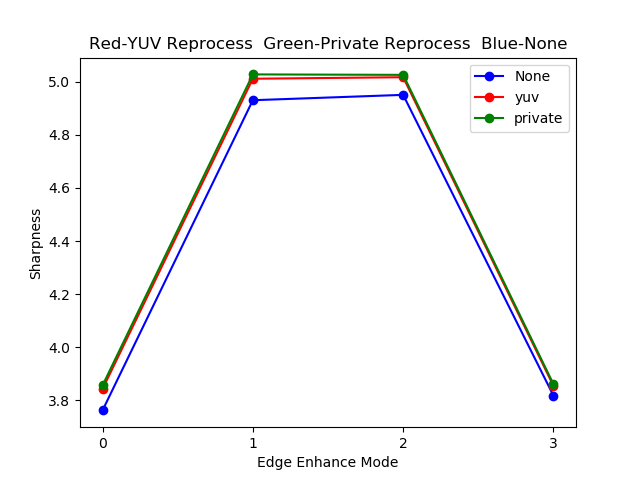
test_param_shading_mode
การทดสอบที่ใช้พารามิเตอร์ android.shading.mode
API ที่ทดสอบ:
android.hardware.camera2.CaptureRequest#SHADING_MODEandroid.hardware.camera2.CaptureRequest#STATISTICS_LENS_SHADING_MAP_MODEandroid.hardware.camera2.CaptureResult#STATISTICS_LENS_SHADING_CORRECTION_MAP
ผ่าน: ระบบจะสลับโหมดการแรเงาและแก้ไขแผนที่การแรเงาเลนส์ตามที่คาดไว้
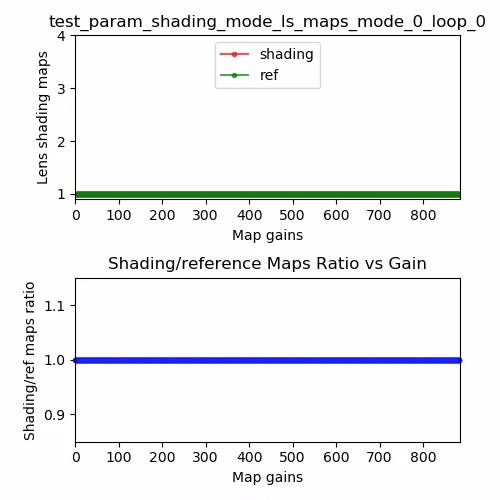
รูปที่ 55. แผนที่การแรเงาเลนส์ test_param_shading_mode, ตัวอย่างลูป 0 โหมด 0
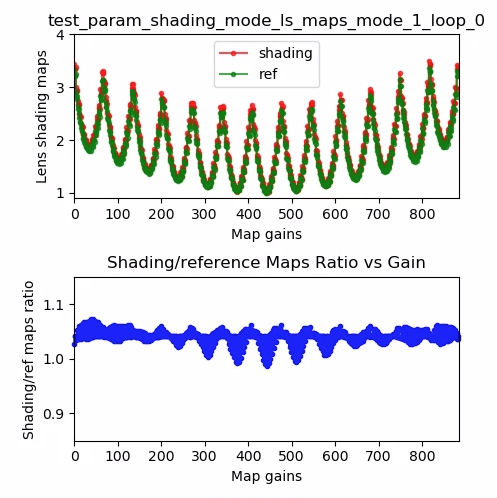
รูปที่ 56. แผนที่การแรเงาเลนส์ test_param_shading_mode ตัวอย่างลูป 0 โหมด 1
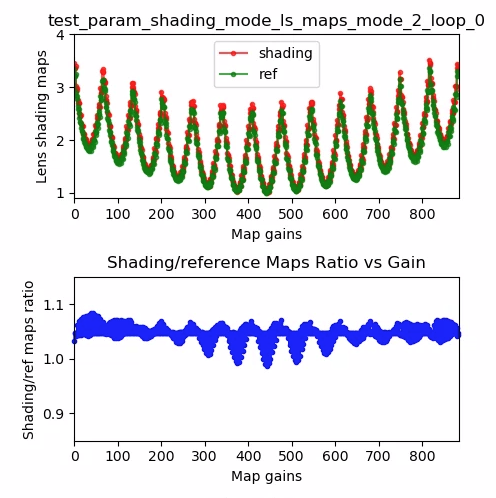
รูปที่ 57. แผนที่การแรเงาเลนส์ test_param_shading_mode ตัวอย่างโหมด 2 ลูป 0
test_param_tonemap_mode
การทดสอบที่ใช้พารามิเตอร์ android.tonemap.mode ใช้เส้นโค้งการแมปโทนที่แตกต่างกันกับช่อง R, G, B แต่ละช่อง และตรวจสอบว่ารูปภาพเอาต์พุตได้รับการแก้ไขตามที่คาดไว้ การทดสอบนี้ประกอบด้วยการทดสอบ 2 รายการ ได้แก่ test1 และ test2
API ที่ทดสอบ:
android.hardware.camera2.CameraMetadata#TONEMAP_MODE_CONTRAST_MODEandroid.hardware.camera2.CameraMetadata#TONEMAP_MODE_FASTandroid.hardware.camera2.CaptureRequest#TONEMAP_CURVEandroid.hardware.camera2.CaptureRequest#TONEMAP_MODE
บัตร:
test1: รูปภาพทั้ง 2 มีการแมปโทนแบบเส้นตรง แต่n=1มีการไล่ระดับสีที่ชันกว่า แชแนล G (สีเขียว) จะสว่างกว่าสำหรับn=1รูปภาพtest2: ใช้การแมปโทนเดียวกัน แต่มีความยาวต่างกัน รูปภาพเหมือนกัน
รูปที่ 58. test_param_tonemap_mode ที่มี n=0

รูปที่ 59 test_param_tonemap_mode ที่มี n=1
test_post_raw_sensitivity_boost
ตรวจสอบการเพิ่มความไวของโพสต์ดิบ บันทึกชุดรูปภาพ RAW และ YUV ที่มีความไวต่างกัน โพสต์การผสมผสานการเพิ่มความไวของ RAW และตรวจสอบว่าค่าเฉลี่ยของพิกเซลเอาต์พุตตรงกับการตั้งค่าคำขอหรือไม่
API ที่ทดสอบ:
android.hardware.camera2.CameraCharacteristics#CONTROL_POST_RAW_SENSITIVITY_BOOST_RANGEandroid.hardware.camera2.CameraMetadata#REQUEST_AVAILABLE_CAPABILITIES_RAWandroid.hardware.camera2.CaptureRequest#CONTROL_POST_RAW_SENSITIVITY_BOOSTandroid.hardware.camera2.CaptureRequest#SENSOR_SENSITIVITY
ผ่าน: รูปภาพ RAW จะมืดลงเมื่อเพิ่มการบูสต์ ในขณะที่ความสว่างของรูปภาพ YUV จะคงที่
รูปที่ 60. test_post_raw_sensitivity_boost raw s=3583 boost=0100 example

รูปที่ 61. test_post_raw_sensitivity_boost raw s=1792 boost=0200 example

รูปที่ 62. ตัวอย่าง test_post_raw_sensitivity_boost raw s=0896 boost=0400

รูปที่ 63. test_post_raw_sensitivity_boost raw s=0448 boost=0800 example

รูปที่ 64. ตัวอย่าง test_post_raw_sensitivity_boost raw s=0224 boost=1600

รูปที่ 65 ตัวอย่าง test_post_raw_sensitivity_boost raw s=0112 boost=3199

รูปที่ 66 test_post_raw_sensitivity_boost raw plot means example

รูปที่ 67 ตัวอย่าง test_post_raw_sensitivity_boost YUV s=0112 boost=3199

รูปที่ 68. test_post_raw_sensitivity_boost YUV s=0448 boost=0800 example

รูปที่ 69. test_post_raw_sensitivity_boost YUV s=0896 boost=0400 example

รูปที่ 70. test_post_raw_sensitivity_boost YUV s=1792 boost=0200 example

รูปที่ 71. ตัวอย่าง test_post_raw_sensitivity_boost YUV s=3585 boost=0100
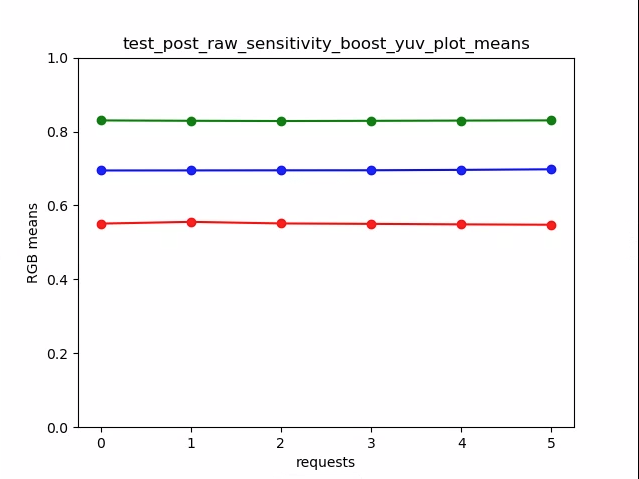
รูปที่ 72 test_post_raw_sensitivity_boost_yuv_plot_means
test_raw_exposure
จับภาพชุดรูปภาพ RAW โดยเพิ่มเวลาเปิดรับแสงและวัดค่าพิกเซล
API ที่ทดสอบ:
android.hardware.camera2.CameraMetadata#REQUEST_AVAILABLE_CAPABILITIES_RAWandroid.hardware.camera2.CaptureRequest#SENSOR_EXPOSURE_TIME
ผ่าน: การเพิ่ม ISO (เกน) จะทำให้พิกเซลมีความไวต่อแสงมากขึ้น จึงทำให้พล็อตเคลื่อนไปทางซ้าย
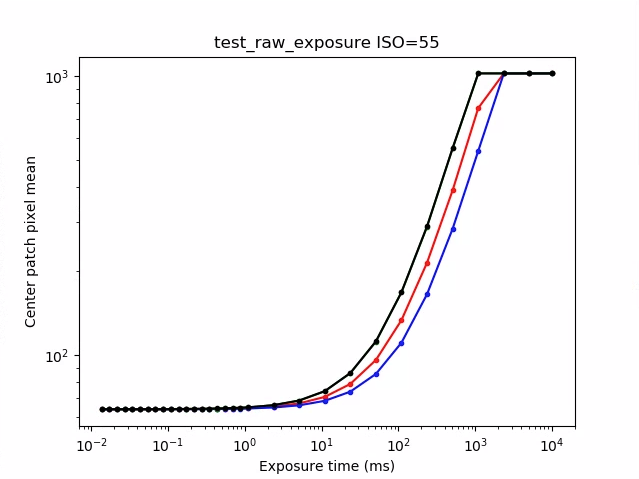
รูปที่ 73 ตัวอย่าง ISO=55 ของ test_raw_exposure
10⁰ คือ 1 มิลลิวินาที, 10¹ คือ 10 มิลลิวินาที และ 10⁻¹ คือ 0.1 มิลลิวินาที
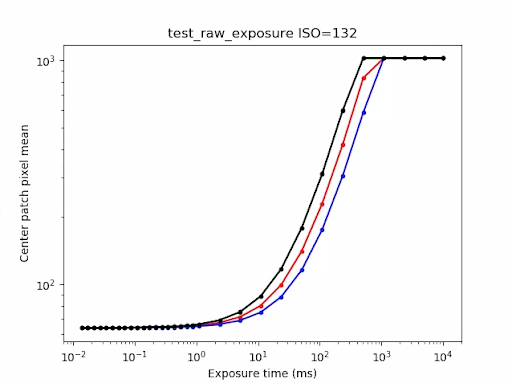
รูปที่ 74. ตัวอย่าง test_raw_exposure ISO=132
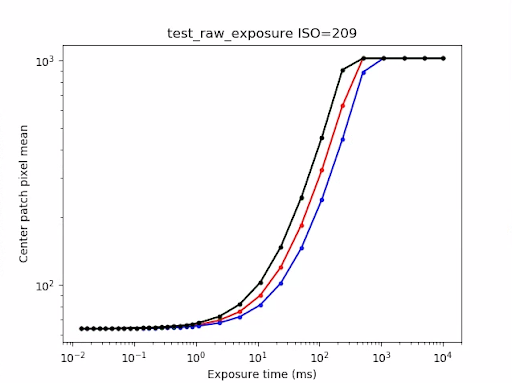
รูปที่ 75 ตัวอย่าง test_raw_exposure ISO=209
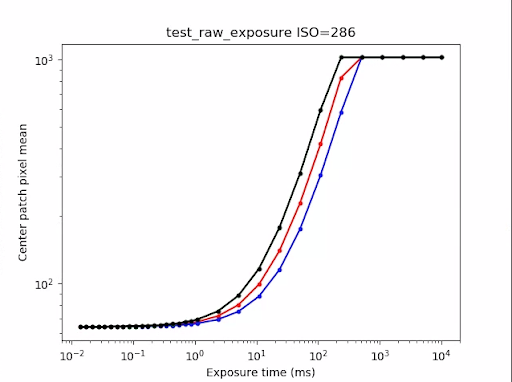
รูปที่ 76 ตัวอย่าง ISO ของ test_raw_exposure=286
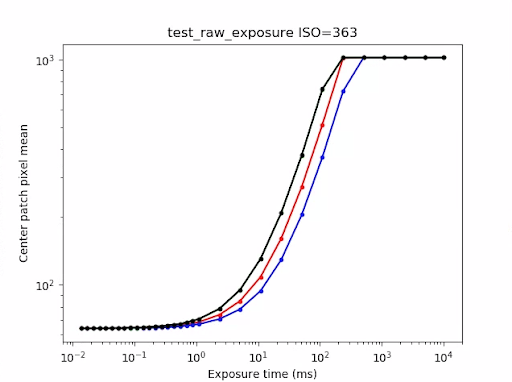
รูปที่ 77. ตัวอย่าง ISO=363 ของ test_raw_exposure
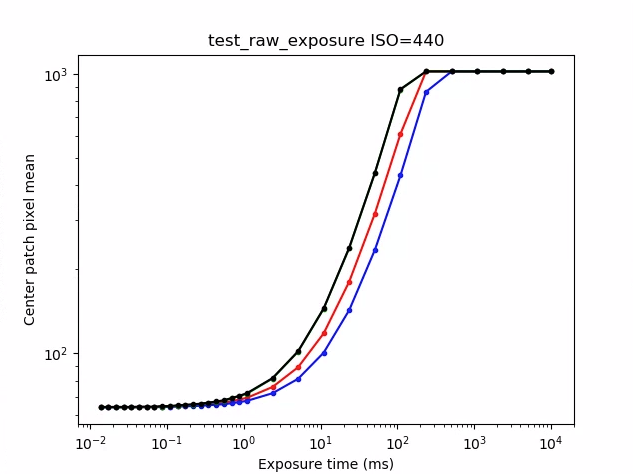
รูปที่ 78. ตัวอย่าง test_raw_exposure ISO=440
test_reprocess_noise_reduction
การทดสอบที่ใช้กับคำขอประมวลผลซ้ำandroid.noiseReduction.mode
จับภาพที่ประมวลผลซ้ำด้วยกล้องที่มีแสงสลัว ใช้เกนแอนะล็อกสูง
เพื่อยืนยันว่ารูปภาพที่จับภาพมีสัญญาณรบกวน บันทึกรูปภาพที่ประมวลผลซ้ำ 3 รูป
สำหรับปิด NR, คุณภาพสูง และรวดเร็ว บันทึกรูปภาพที่ประมวลผลซ้ำโดยมีเกนต่ำ
และปิด NR แล้วใช้ความแปรปรวนของรูปภาพนี้เป็นพื้นฐาน
API ที่ทดสอบ:
ผ่าน: FAST >= OFF, HQ >= FAST และ HQ >> OFF
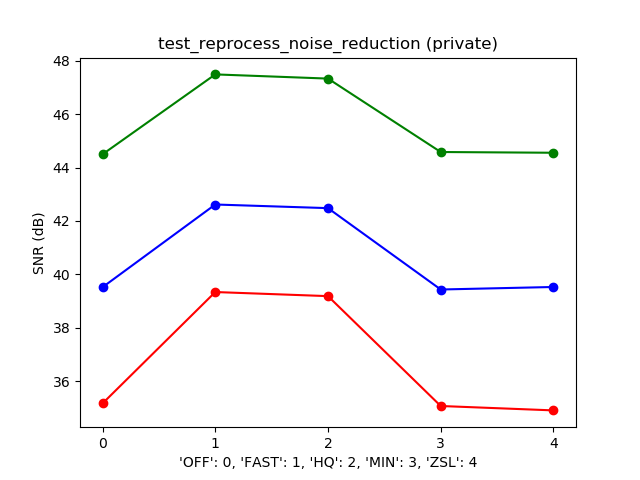
รูปที่ 79 ตัวอย่างพล็อต SNR ทั่วไปเทียบกับโหมด NR
test_tonemap_sequence
ทดสอบลำดับช็อตด้วยเส้นโค้งการแมปโทนที่แตกต่างกัน ถ่ายภาพด้วยการตั้งค่าด้วยตนเอง 3 ภาพ พร้อมการแมปโทนแบบเชิงเส้น ถ่ายภาพด้วยตนเอง 3 ภาพโดยใช้การจับคู่โทนสีเริ่มต้น คำนวณ เดลต้าระหว่างคู่เฟรมที่ต่อเนื่องกัน
API ที่ทดสอบ:
ผ่าน: มีเฟรมที่เหมือนกัน 3 เฟรมตามด้วยเฟรมที่เหมือนกันอีก 3 เฟรม
รูปที่ 80 ตัวอย่าง test_tonemap_sequence i=0
รูปที่ 81. ตัวอย่าง test_tonemap_sequence i=1

รูปที่ 82. ตัวอย่าง test_tonemap_sequence i=2
รูปที่ 83 ตัวอย่าง test_tonemap_sequence i=3
รูปที่ 84 ตัวอย่าง test_tonemap_sequence i=4
รูปที่ 85 ตัวอย่าง test_tonemap_sequence i=5
test_yuv_jpeg_all
การทดสอบที่รายงานขนาดและรูปแบบทั้งหมดสำหรับการจับภาพทำงาน ใช้คำขอที่กำหนดเอง
พร้อมการแมปโทนแบบเชิงเส้นเพื่อให้ YUV และ JPEG มีลักษณะเหมือนกันเมื่อ
แปลงโดยโมดูล image_processing_utils ระบบจะไม่บันทึกรูปภาพโดยค่าเริ่มต้น แต่คุณบันทึกได้โดยการเปิดใช้debug_mode
API ที่ทดสอบ:
android.hardware.camera2.CaptureRequest#TONEMAP_CURVEandroid.hardware.camera2.CaptureRequest#TONEMAP_MODEandroid.graphics.ImageFormat#JPEG
ผ่าน: จุดกึ่งกลางของรูปภาพทั้งหมดมีค่าความแตกต่างของค่าเฉลี่ยความคลาดเคลื่อนกำลังสอง (RMS) สูงสุด (ค่าของสัญญาณ) ในรูปภาพ RGB ที่แปลงแล้ว โดยมีรูปภาพ YUV ที่มีความละเอียดสูงสุด 3%
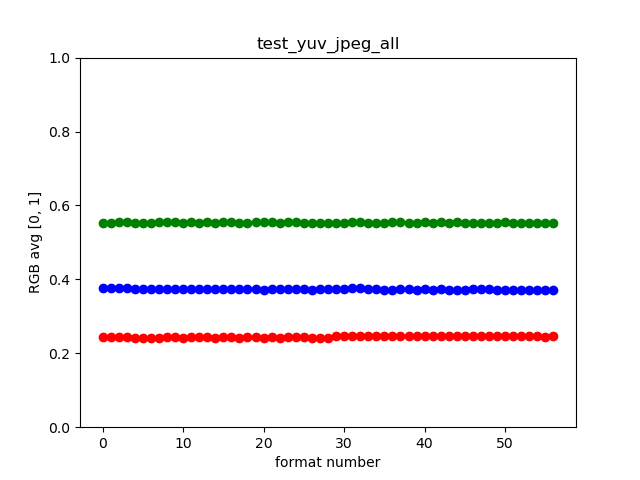
รูปที่ 86 ตัวอย่าง test_yuv_jpeg_all
test_yuv_plus_dng
การทดสอบว่าขนาดและรูปแบบที่รายงานสำหรับการจับภาพทำงานได้
API ที่ทดสอบ:
ผ่าน: การทดสอบเสร็จสมบูรณ์และแสดงรูปภาพที่ขอ
รูปที่ 87. ตัวอย่าง test_yuv_plus_dng
scene1_3
scene 1_3 เป็นสำเนาที่ทำงานเหมือนกับ scene 1_1 ทุกประการ โดยใช้โครงสร้างฉากย่อยเพื่อลดระยะเวลาที่ยาวนานของ scene 1
test_capture_result
การทดสอบที่ส่งคืนข้อมูลที่ถูกต้องในออบเจ็กต์ CaptureResult การทดสอบ
ประกอบด้วยการจับภาพอัตโนมัติ การจับภาพด้วยตนเอง และการจับภาพอัตโนมัติครั้งที่ 2
API ที่ทดสอบ:
android.hardware.camera2.CaptureRequest#CONTROL_AE_MODEandroid.hardware.camera2.CaptureRequest#CONTROL_AE_REGIONSandroid.hardware.camera2.CaptureRequest#CONTROL_AF_MODEandroid.hardware.camera2.CaptureRequest#CONTROL_AF_REGIONSandroid.hardware.camera2.CaptureRequest#CONTROL_AWB_MODEandroid.hardware.camera2.CaptureRequest#CONTROL_AWB_REGIONSandroid.hardware.camera2.CaptureRequest#CONTROL_MODEandroid.hardware.camera2.CaptureRequest#COLOR_CORRECTION_GAINSandroid.hardware.camera2.CaptureRequest#COLOR_CORRECTION_TRANSFORMandroid.hardware.camera2.CaptureRequest#COLOR_CORRECTION_MODEandroid.hardware.camera2.CaptureRequest#SENSOR_EXPOSURE_TIMEandroid.hardware.camera2.CaptureRequest#SENSOR_SENSITIVITYandroid.hardware.camera2.CaptureResult#STATISTICS_LENS_SHADING_CORRECTION_MAPandroid.hardware.camera2.CaptureRequest#STATISTICS_LENS_SHADING_MAP_MODEandroid.hardware.camera2.CaptureRequest#TONEMAP_CURVEandroid.hardware.camera2.CaptureRequest#TONEMAP_MODE
ผ่าน: ข้อมูลเมตาใช้ได้กับการจับภาพทั้งหมด และการตั้งค่าด้วยตนเองจะไม่รั่วไหล ไปยังการจับภาพอัตโนมัติครั้งที่ 2 กำหนดการแก้ไขการแรเงาของเลนส์สำหรับการ จับภาพ
รูปที่ 88. test_capture_result_plot_lsc_auto_ch0
test_dng_noise_model
ตรวจสอบว่าพารามิเตอร์โมเดล RAW ของ DNG ถูกต้อง พล็อตแสดงความแปรปรวนที่วัดได้ของแพตช์ตรงกลางของการ์ดสีเทาในภาพดิบที่ถ่ายในช่วงความไวต่างๆ และเปรียบเทียบค่าเหล่านี้กับความแปรปรวนที่คาดไว้ที่ความไวแต่ละระดับโดยโมเดลสัญญาณรบกวน DNG ใน HAL ของกล้อง (อิงตามพารามิเตอร์ O,S ที่แสดงในออบเจ็กต์ผลลัพธ์การจับภาพ) ดูรายละเอียดเพิ่มเติม เกี่ยวกับโมเดลสัญญาณรบกวน DNG ได้โดยดาวน์โหลดเอกสารต่อไปนี้เกี่ยวกับ โมเดลสัญญาณรบกวน DNG
API ที่ทดสอบ:
android.hardware.camera2.CameraCharacteristics#SENSOR_INFO_SENSITIVITY_RANGEandroid.hardware.camera2.CameraCharacteristics#SENSOR_INFO_WHITE_LEVELandroid.hardware.camera2.CameraCharacteristics#SENSOR_MAX_ANALOG_SENSITIVITYandroid.hardware.camera2.CaptureResult#SENSOR_NOISE_PROFILEandroid.hardware.camera2.CaptureRequest#SENSOR_SENSITIVITY
ผ่าน: พารามิเตอร์โมเดล RAW ของ DNG ถูกต้อง ค่า RGB ที่คาดไว้ตรงกับค่า RGB จริงที่วัดได้
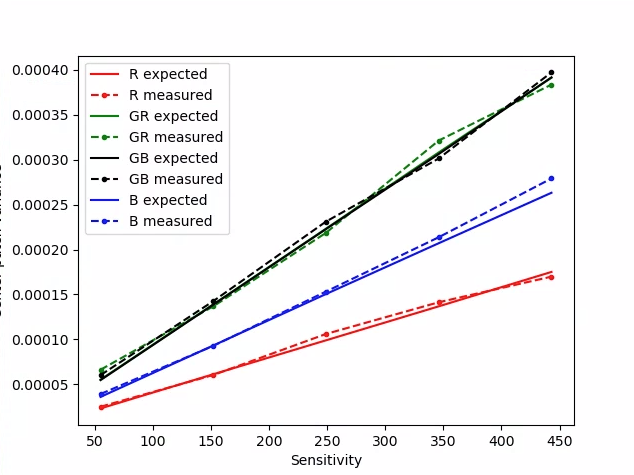
รูปที่ 89. test_dng_noise_model_plog
test_jpeg
การทดสอบที่แปลงรูปภาพ YUV และรูปภาพ JPEG ของอุปกรณ์จะมีลักษณะเหมือนกัน การทดสอบจะใช้ ส่วนกลาง 10% ของรูปภาพและคำนวณค่า RGB แล้วตรวจสอบว่าค่าเหล่านั้น ตรงกัน
API ที่ทดสอบ:
ผ่าน: ความแตกต่างของ RGB โดยเฉลี่ยระหว่างแต่ละรูปภาพน้อยกว่า 3%
รูปที่ 90 test_jpeg_fmt=jpg.jpg
รูปที่ 91. test_jpeg=fmt=yuv.jpg
test_raw_burst_sensitivity
บันทึกชุดรูปภาพ RAW ที่มีค่าเกนเพิ่มขึ้นและวัดสัญญาณรบกวน จับภาพเฉพาะไฟล์ RAW ในโหมดถ่ายภาพต่อเนื่อง
API ที่ทดสอบ:
android.hardware.camera2.CameraCharacteristics#SENSOR_INFO_ACTIVE_ARRAY_SIZEandroid.hardware.camera2.CameraCharacteristics#SENSOR_INFO_SENSITIVITY_RANGEandroid.hardware.camera2.CameraCharacteristics#SENSOR_INFO_WHITE_LEVELandroid.hardware.camera2.CameraCharacteristics#SENSOR_MAX_ANALOG_SENSITIVITYandroid.hardware.camera2.CameraMetadata#REQUEST_AVAILABLE_CAPABILITIES_RAW
ผ่าน: ภาพแต่ละภาพมีสัญญาณรบกวนมากกว่าภาพก่อนหน้า เนื่องจากมีการเพิ่มค่าเกน
ใช้ความแปรปรวนของเซลล์ตารางสถิติส่วนกลาง
รูปที่ 92. test_raw_burst_sensitivity_variance
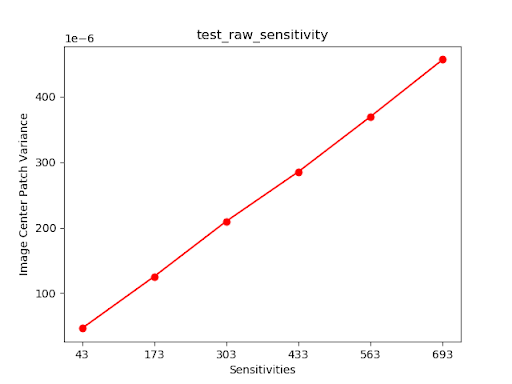
test_raw_sensitivity
บันทึกชุดรูปภาพ RAW ที่มีความไวเพิ่มขึ้นและวัด สัญญาณรบกวน (ความแปรปรวน) ในส่วนกลาง 10% ของรูปภาพ การทดสอบที่แต่ละช็อตมีสัญญาณรบกวนมากกว่าช็อตก่อนหน้า
API ที่ทดสอบ:
android.hardware.camera2.CameraCharacteristics#SENSOR_INFO_PRE_CORRECTION_ACTIVE_ARRAY_SIZEandroid.hardware.camera2.CameraCharacteristics#SENSOR_INFO_SENSITIVITY_RANGEandroid.hardware.camera2.CameraCharacteristics#SENSOR_INFO_WHITE_LEVELandroid.hardware.camera2.CameraCharacteristics#SENSOR_MAX_ANALOG_SENSITIVITYandroid.hardware.camera2.CameraMetadata#REQUEST_AVAILABLE_CAPABILITIES_RAW
ผ่าน: ความแปรปรวนจะเพิ่มขึ้นตามการยิงแต่ละครั้ง
รูปที่ 93. test_raw_sensitivity_variance
test_yuv_plus_jpeg
ทดสอบการจับภาพเฟรมเดียวเป็นเอาต์พุตทั้ง YUV และ JPEG ใช้คำขอที่กำหนดเอง
พร้อมการแมปโทนแบบเชิงเส้นเพื่อให้ YUV และ JPEG มีลักษณะเหมือนกันเมื่อ
แปลงโดยโมดูล image_processing_utils
API ที่ทดสอบ:
android.hardware.camera2.CaptureRequest#TONEMAP_CURVEandroid.hardware.camera2.CaptureRequest#TONEMAP_MODEandroid.graphics.ImageFormat#JPEG
ผ่าน: รูปภาพ YUV และ JPEG มีความคล้ายคลึงกันและมีความแตกต่างของ RMS (ค่าของสัญญาณ) น้อยกว่า 1%

รูปที่ 94. test_yuv_plus_jpeg ในรูปแบบ JPEG
รูปที่ 95. test_yuv_plus_jpeg ที่มีรูปแบบ YUV
test_yuv_plus_raw
ทดสอบการจับภาพเฟรมเดียวเป็นทั้งเอาต์พุต RAW (RAW 10 บิตและ 12 บิต) และ YUV หากรองรับ
ใช้คำขอที่สร้างขึ้นด้วยตนเองที่มีการแมปโทนเชิงเส้น ดังนั้นจึงคาดว่ารูปแบบ Raw และ
YUV จะเหมือนกัน เปรียบเทียบค่า RGB 10% ตรงกลางของรูปภาพที่แปลงเป็น RGB
บันทึกandroid.shading.mode
API ที่ทดสอบ:
android.hardware.camera2.CameraMetadata#REQUEST_AVAILABLE_CAPABILITIES_RAWandroid.hardware.camera2.CaptureResult#STATISTICS_LENS_SHADING_CORRECTION_MAPandroid.hardware.camera2.CaptureRequest#COLOR_CORRECTION_MODEandroid.hardware.camera2.CaptureRequest#COLOR_CORRECTION_GAINSandroid.hardware.camera2.CaptureRequest#COLOR_CORRECTION_TRANSFORMandroid.hardware.camera2.CaptureRequest#CONTROL_AWB_MODEandroid.hardware.camera2.CaptureRequest#CONTROL_MODEandroid.hardware.camera2.CaptureRequest#SHADING_MODEandroid.hardware.camera2.CaptureRequest#TONEMAP_CURVEandroid.hardware.camera2.CaptureRequest#TONEMAP_MODEandroid.hardware.graphics.ImageFormat#RAW10android.hardware.graphics.ImageFormat#RAW12
ผ่าน: รูปภาพ YUV และรูปภาพดิบมีความคล้ายกันและมีค่า RMS (ค่ารูทมีนสแควร์ของสัญญาณ) แตกต่างกันน้อยกว่า 3.5%
รูปที่ 96. test_yuv_plus_raw_shading=1_raw.jpg
รูปที่ 97. test_yuv_plus_raw_shading=1_yuv.jpg
test_sensitivity_priority
ทดสอบ CONTROL_AE_PRIORITY_MODE_SENSOR_SENSITIVITY_PRIORITY
ในการตั้งค่า ISO ต่างๆ เพื่อยืนยันความสัมพันธ์ระหว่าง ISO ที่สูงขึ้นกับ
ระดับสัญญาณรบกวนที่เพิ่มขึ้น
API ที่ทดสอบ:
android.hardware.camera2.CameraMetadata#CONTROL_AE_PRIORITY_MODE_SENSOR_SENSITIVITY_PRIORITYandroid.hardware.camera2.CaptureRequest#SENSOR_SENSITIVITYandroid.hardware.camera2.CaptureResult#SENSOR_SENSITIVITYandroid.hardware.camera2.CaptureRequest#CONTROL_AE_PRIORITY_MODEandroid.hardware.camera2.CaptureResult#CONTROL_AE_PRIORITY_MODEandroid.hardware.camera2.CameraCharacteristics#SENSOR_INFO_SENSITIVITY_RANGEandroid.hardware.camera2.CaptureRequest#CONTROL_AE_MODEandroid.hardware.camera2.CaptureResult#CONTROL_AE_MODEandroid.hardware.camera2.CameraMetadata#CONTROL_AE_MODE_ONandroid.hardware.camera2.CameraCharacteristics#CONTROL_AE_AVAILABLE_PRIORITY_MODES
ผ่าน: ISO ที่สูงขึ้นจะทำให้ระดับสัญญาณรบกวนเพิ่มขึ้น
เกณฑ์การข้ามการทดสอบ
ระบบจะข้ามการทดสอบ test_sensitivity_priority.py หากเป็นไปตามเกณฑ์ต่อไปนี้
- อุปกรณ์มีระดับ API แรก (
first_api_level) เป็น 35 หรือต่ำกว่า - อุปกรณ์ไม่โฆษณา
CONTROL_AE_PRIORITY_MODE_SENSOR_SENSITIVITY_PRIORITYในCONTROL_AE_AVAILABLE_PRIORITY_MODES
test_exposure_time_priority
ทดสอบ CONTROL_AE_PRIORITY_MODE_SENSOR_EXPOSURE_TIME_PRIORITY
ในเวลาเปิดรับแสงต่างๆ เพื่อตรวจสอบความสว่างที่คงที่ในช่วง
ที่ ISO สามารถชดเชยได้
API ที่ทดสอบ:
android.hardware.camera2.CameraMetadata#CONTROL_AE_PRIORITY_MODE_SENSOR_EXPOSURE_TIME_PRIORITYandroid.hardware.camera2.CaptureRequest#SENSOR_EXPOSURE_TIMEandroid.hardware.camera2.CaptureResult#SENSOR_EXPOSURE_TIMEandroid.hardware.camera2.CaptureRequest#CONTROL_AE_PRIORITY_MODEandroid.hardware.camera2.CaptureResult#CONTROL_AE_PRIORITY_MODEandroid.hardware.camera2.CameraCharacteristics#SENSOR_INFO_SENSITIVITY_RANGEandroid.hardware.camera2.CaptureResult#SENSOR_SENSITIVITYandroid.hardware.camera2.CaptureRequest#CONTROL_AE_MODEandroid.hardware.camera2.CaptureResult#CONTROL_AE_MODEandroid.hardware.camera2.CameraMetadata#CONTROL_AE_MODE_ONandroid.hardware.camera2.CameraCharacteristics#CONTROL_AE_AVAILABLE_PRIORITY_MODES
ผ่าน: ความสว่างคงที่ (อยู่ในค่าความคลาดเคลื่อน) ในช่วงเวลาเปิดรับแสงต่างๆ หาก ISO อยู่ในช่วงการชดเชย
เกณฑ์การข้ามการทดสอบ
ระบบจะข้ามการทดสอบ test_exposure_time_priority หากเป็นไปตามเกณฑ์ต่อไปนี้
- อุปกรณ์มีระดับ API แรก (
first_api_level) เป็น 35 หรือต่ำกว่า - อุปกรณ์ไม่โฆษณา
CONTROL_AE_PRIORITY_MODE_SENSOR_EXPOSURE_TIME_PRIORITYในCONTROL_AE_AVAILABLE_PRIORITY_MODES
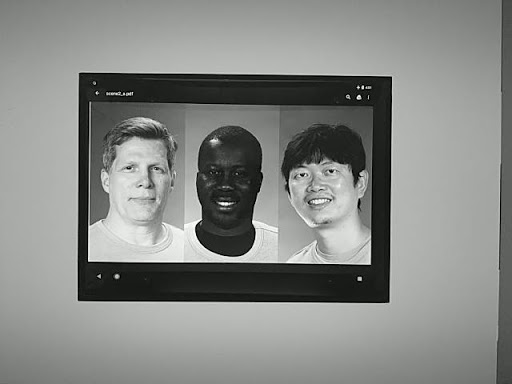
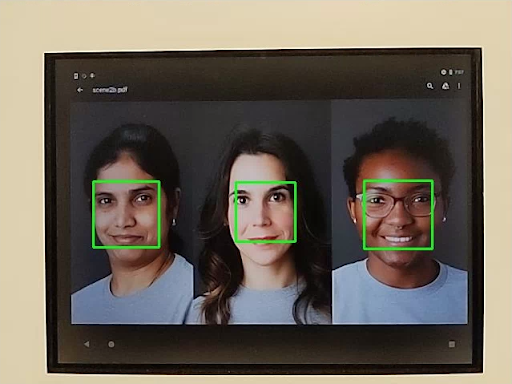
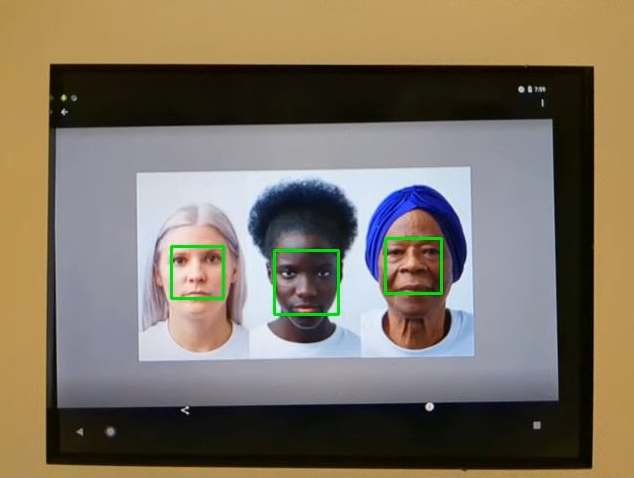
scene2_a
scene2_a มี 3 หน้าพร้อมพื้นหลังสีเทาและเสื้อผ้าสีกลาง โดยเราเลือกใบหน้าที่มีสีผิวหลากหลาย แผนภูมิจะต้องมี
การวางแนวที่ถูกต้องเพื่อให้การตรวจจับใบหน้าทำงานได้อย่างเหมาะสมที่สุด
รูปที่ 98. ตัวอย่าง scene2_a
test_autoframing
ทดสอบลักษณะการทำงานของการจัดเฟรมอัตโนมัติของอุปกรณ์กล้อง ซูมภาพให้ใหญ่จนมองไม่เห็นใบหน้าใดๆ ในฉาก เปิดใช้โหมดการจัดเฟรมอัตโนมัติโดยตั้งค่า AUTOFRAMING ใน CaptureRequest เป็น True และตรวจสอบว่าระบบตรวจจับใบหน้าทั้งหมดในฉากต้นฉบับได้หรือไม่เมื่อสถานะบรรจบกัน (กล่าวคือ เมื่อตั้งค่า AUTOFRAMING_STATE ใน CaptureResult เป็น AUTOFRAMING_STATE_CONVERGED)
API ที่ทดสอบ:
android.hardware.camera2.CameraCharacteristics#CONTROL_AUTOFRAMING_AVAILABLEandroid.hardware.camera2.CaptureRequest#CONTROL_AUTOFRAMINGandroid.hardware.camera2.CaptureResult#CONTROL_AUTOFRAMINGandroid.hardware.camera2.CaptureResult#CONTROL_AUTOFRAMING_STATE
ผ่าน: ตรวจพบใบหน้าทั้ง 3
test_display_p3
การทดสอบ
Display P3
บันทึกในรูปแบบ JPEG โดยใช้ ColorSpaceProfiles API ทดสอบว่า JPEG ที่แคปเจอร์มี
โปรไฟล์ ICC ที่เหมาะสม
ในส่วนหัว และรูปภาพมีสีที่อยู่นอกขอบเขตสี sRGB
API ที่ทดสอบ:
android.hardware.camera2.params.ColorSpaceProfilesandroid.hardware.camera2.params.SessionConfiguration#setColorSpace
ผ่าน: JPEG มีโปรไฟล์ ICC ของ Display P3 และสีที่อยู่นอกช่วงสี sRGB
test_effects
จับภาพเฟรมสำหรับเอฟเฟกต์กล้องที่รองรับและตรวจสอบว่าระบบสร้างเอฟเฟกต์อย่างถูกต้องหรือไม่
การทดสอบจะตรวจสอบเฉพาะเอฟเฟกต์ OFF และ MONO แต่จะบันทึกรูปภาพสำหรับ
เอฟเฟกต์ที่รองรับทั้งหมด
API ที่ทดสอบ:
android.hardware.camera2.CameraCharacteristics#CONTROL_AVAILABLE_EFFECTSandroid.hardware.camera2.CaptureRequest#CONTROL_EFFECT_MODE
ผ่าน: จับภาพฉากพร้อมเอฟเฟกต์ OFF และภาพขาวดำ
พร้อมเอฟเฟกต์ที่ตั้งค่าเป็น MONO
รูปที่ 99. test_effects_MONO
test_exposure_keys_consistent
การทดสอบนี้จะเปรียบเทียบความสว่างเฉลี่ยของการจับภาพที่เปิดใช้ AE กับการจับภาพที่ปิดใช้ AE ซึ่งใช้พารามิเตอร์การรับแสง (ความไว
เวลาในการรับแสง ระยะเวลาของเฟรม การเพิ่มความไวหลังการประมวลผล RAW) ที่ได้รับใน
CaptureResult
ของการจับภาพที่เปิดใช้ AE
API ที่ทดสอบ:
android.hardware.camera2.CaptureRequest#SENSOR_SENSITIVITYandroid.hardware.camera2.CaptureRequest#SENSOR_EXPOSURE_TIMEandroid.hardware.camera2.CaptureRequest#SENSOR_FRAME_DURATIONandroid.hardware.camera2.CaptureRequest#CONTROL_POST_RAW_SENSITIVITY_BOOSTandroid.hardware.camera2.CaptureResult#SENSOR_SENSITIVITYandroid.hardware.camera2.CaptureResult#SENSOR_EXPOSURE_TIMEandroid.hardware.camera2.CaptureResult#SENSOR_FRAME_DURATIONandroid.hardware.camera2.CaptureResult#CONTROL_POST_RAW_SENSITIVITY_BOOST
ผ่าน: ความแตกต่างสัมพัทธ์ของความสว่างระหว่างการจับภาพ 2 ครั้งน้อยกว่า 4 เปอร์เซ็นต์
test_format_combos
ทดสอบการผสมผสานรูปแบบเอาต์พุตต่างๆ
API ที่ทดสอบ:
android.hardware.camera2.CameraCharacteristics#SCALER_STREAM_CONFIGURATION_MAPandroid.hardware.camera2.params.StreamConfigurationMap#getOutputSizes()android.hardware.camera2.CameraCaptureSession#captureBurst()
ผ่าน: บันทึกการผสมทั้งหมดเรียบร้อยแล้ว
test_num_faces
ทดสอบการตรวจจับใบหน้า
API ที่ทดสอบ:
android.hardware.camera2.CaptureResult#STATISTICS_FACESandroid.hardware.camera2.CaptureResult#STATISTICS_FACE_DETECT_MODE
ผ่าน: ค้นหาใบหน้า 3 ใบ
รูปที่ 100. ตัวอย่างโหมดการตรวจจับใบหน้า test_num_faces 1
test_reprocess_uv_swap
การทดสอบที่การประมวลผล YUV ซ้ำไม่ได้สลับระนาบ U และ V ระบบจะตรวจจับความแตกต่างนี้โดยการคำนวณผลรวมของความแตกต่างสัมบูรณ์ (SAD) ระหว่างรูปภาพที่ประมวลผลซ้ำกับภาพที่จับภาพโดยไม่ได้ประมวลผลซ้ำ หากการสลับระนาบ U และ V ของเอาต์พุตในผลลัพธ์การจับภาพที่ประมวลผลซ้ำทำให้ SAD เพิ่มขึ้น ระบบจะถือว่าเอาต์พุตมีระนาบ U และ V ที่ถูกต้อง
API ที่ทดสอบ:
android.hardware.camera2.CameraDevice#createCaptureSessionandroid.hardware.camera2.CameraMetadata#REQUEST_AVAILABLE_CAPABILITIES_YUV_REPROCESSINGandroid.hardware.camera2.CaptureRequest#EDGE_MODEandroid.hardware.camera2.CaptureResult#NOISE_REDUCTION_MODE
ผ่าน: ไม่ได้สลับระนาบ U และ V
รูปที่ 101. ตัวอย่าง test_reprocess_uv_swap
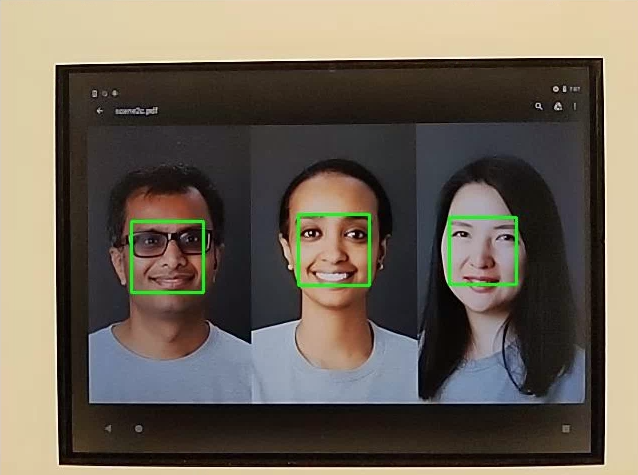
scene2_b
scene2_b มี 3 หน้าพร้อมพื้นหลังสีเทาและเสื้อผ้าสีกลาง โดยเราเลือกใบหน้าที่มีสีผิวหลากหลาย แผนภูมิจะต้องมี
การวางแนวที่ถูกต้องเพื่อให้การตรวจจับใบหน้าทำงานได้อย่างเหมาะสมที่สุด
test_preview_num_faces
ทดสอบการตรวจหาใบหน้าในตัวอย่างโดยเพิ่มความหลากหลายของสีผิวในฉากที่มีใบหน้า
API ที่ทดสอบ:
android.hardware.camera2.CaptureResult#STATISTICS_FACESandroid.hardware.camera2.CaptureResult#STATISTICS_FACE_DETECT_MODE
ผ่าน: ค้นหาใบหน้า 3 ใบหน้าที่มีจุดสังเกตใบหน้าในกรอบล้อมรอบใบหน้า
รูปที่ 102. ตัวอย่างโหมดการตรวจจับใบหน้า test_num_faces 1
test_yuv_jpeg_capture_sameness
ถ่ายภาพ 2 ภาพโดยใช้รูปแบบ YUV และ JPEG ทั่วไปที่ใหญ่ที่สุดซึ่งมี
สัดส่วนภาพเดียวกันกับรูปแบบ JPEG ที่ใหญ่ที่สุดซึ่งมีความละเอียดไม่เกิน 1920x1440
ตั้งค่า jpeg.quality เป็น 100 และบันทึกคำขอแบบ 2 พื้นผิว แปลงทั้ง 2 รูปภาพเป็นอาร์เรย์ RGB และคำนวณความแตกต่างของค่าเฉลี่ยรากที่สอง (RMS) แบบ 3 มิติ
ระหว่างรูปภาพ 2 รูป
นอกจากนี้ การทดสอบนี้ยังยืนยันว่าเอาต์พุต YUV สำหรับ Use Case ของสตรีมที่รองรับทั้งหมด
มีความคล้ายคลึงกับ YUV ที่มี Use Case STILL_CAPTURE อย่างสมเหตุสมผล
API ที่ทดสอบ:
android.hardware.camera2.CameraCharacteristics#SCALER_AVAILABLE_STREAM_USE_CASESandroid.hardware.camera2.CaptureRequest#JPEG_QUALITYandroid.graphics.ImageFormat#JPEG
ผ่าน: รูปภาพ YUV และ JPEG สำหรับกรณีการใช้งาน STILL_CAPTURE มีความแตกต่างของ RMS (ค่ารูทมีนสแควร์ของสัญญาณ) น้อยกว่า 3% รูปภาพ YUV สำหรับกรณีการใช้งานที่รองรับทั้งหมดมีความแตกต่างของ CIELAB น้อยกว่า 4% จากรูปภาพ YUV ที่มีกรณีการใช้งาน STILL_CAPTURE
scene2_c
test_num_faces
ทดสอบการตรวจจับใบหน้าด้วยความหลากหลายของสีผิวที่เพิ่มขึ้นในฉากที่มีใบหน้า
API ที่ทดสอบ:
android.hardware.camera2.CaptureResult#STATISTICS_FACESandroid.hardware.camera2.CaptureResult#STATISTICS_FACE_DETECT_MODE
ผ่าน: ค้นหาใบหน้า 3 ใบ
รูปที่ 103 ตัวอย่างโหมดการตรวจจับใบหน้า test_num_faces
test_jpeg_capture_perf_class
ทดสอบเวลาในการตอบสนองของการจับภาพ JPEG สำหรับคลาสประสิทธิภาพ S ตามที่ระบุไว้ใน ส่วน 2.2.7.2 กล้อง ใน CDD
ผ่าน: ต้องมีเวลาในการตอบสนองการจับภาพ JPEG ของ camera2 น้อยกว่า 1,000 มิลลิวินาทีสำหรับความละเอียด 1080p ตามที่วัดโดย Camera PerformanceTest ของ CTS ภายใต้สภาพแสง ITS (3000K) สำหรับกล้องหลักทั้ง 2 ตัว
test_camera_launch_perf_class
ทดสอบเวลาในการตอบสนองของการเปิดกล้องสำหรับคลาสประสิทธิภาพ S ตามที่ระบุไว้ใน ส่วน 2.2.7.2 กล้อง ใน CDD
ผ่าน: ต้องมีเวลาในการตอบสนองเมื่อเริ่มต้น camera2 (เปิดกล้องไปยังเฟรมตัวอย่างแรก) น้อยกว่า 600 มิลลิวินาทีตามที่วัดโดย CTS camera PerformanceTest ภายใต้สภาพแสง ITS (3000K) สำหรับกล้องหลักทั้ง 2 ตัว
test_default_camera_hdr
ทดสอบว่าการจับภาพของกล้องเริ่มต้นเป็น Ultra HDR สำหรับประสิทธิภาพ คลาส 15 ตามที่ระบุไว้ใน ส่วน 2.2.7.2 กล้อง ของ CDD
ผ่าน: การจับภาพแพ็กเกจกล้องเริ่มต้นต้องเป็น Ultra HDR สำหรับอุปกรณ์ประสิทธิภาพ คลาส 15
scene2_d
test_preview_num_faces
ทดสอบการตรวจหาใบหน้าในตัวอย่างโดยเพิ่มความหลากหลายของสีผิวในฉากที่มีใบหน้า
API ที่ทดสอบ:
android.hardware.camera2.CaptureResult#STATISTICS_FACESandroid.hardware.camera2.CaptureResult#STATISTICS_FACE_DETECT_MODE
ผ่าน: ค้นหาใบหน้า 3 ใบหน้าที่มีจุดสังเกตใบหน้าในกรอบล้อมรอบใบหน้า
scene2_e
test_continuous_picture
ระบบจะจับภาพเฟรมความละเอียด VGA 50 เฟรมโดยใช้การตั้งค่าคำขอการจับภาพครั้งแรก
android.control.afMode = 4 (CONTINUOUS_PICTURE).
API ที่ทดสอบ:
android.hardware.camera2.CaptureRequest#CONTROL_AF_MODEandroid.hardware.camera2.CaptureResult#CONTROL_AE_STATEandroid.hardware.camera2.CaptureResult#CONTROL_AF_STATEandroid.hardware.camera2.CaptureResult#CONTROL_AWB_STATE
ผ่าน: ระบบ 3A จะปรับค่าภายในสิ้นสุดการจับภาพ 50 เฟรม
test_num_faces
ทดสอบการตรวจจับใบหน้าด้วยความหลากหลายของสีผิวที่เพิ่มขึ้นในฉากที่มีใบหน้า
API ที่ทดสอบ:
android.hardware.camera2.CaptureResult#STATISTICS_FACESandroid.hardware.camera2.CaptureResult#STATISTICS_FACE_DETECT_MODE
ผ่าน: พบใบหน้า 3 ใบ
scene2_f
scene2_f มี 3 หน้าโดยมีพื้นหลังสีขาวและเสื้อผ้าสีขาว ใบหน้า
มีโทนสีผิวที่หลากหลายและมีคอนทราสต์สูงกับพื้นหลัง
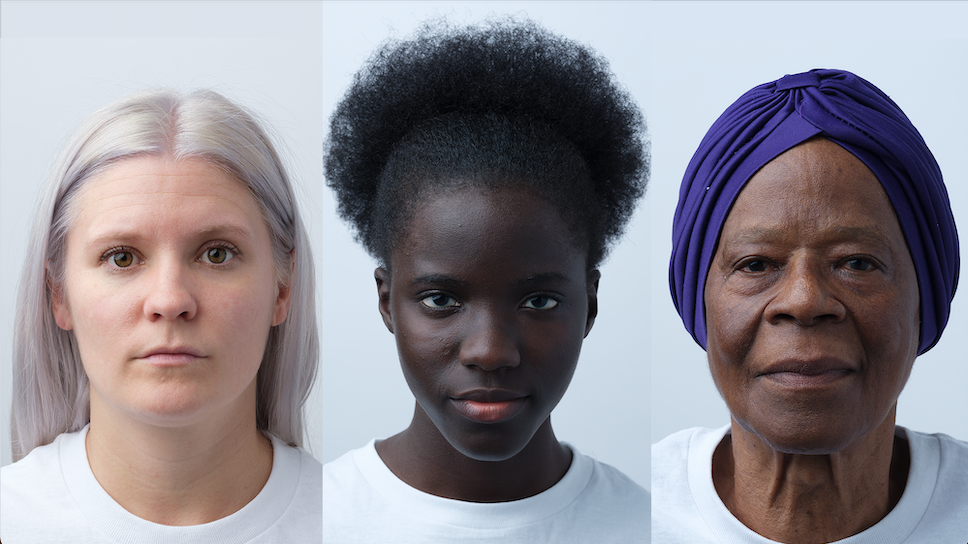
รูปที่ 104. ตัวอย่าง scene2_f
test_preview_num_faces
ทดสอบการตรวจจับใบหน้าด้วยความหลากหลายของสีผิวที่เพิ่มขึ้นในฉากที่มีใบหน้า
API ที่ทดสอบ:
android.hardware.camera2.CaptureResult#STATISTICS_FACESandroid.hardware.camera2.CaptureResult#STATISTICS_FACE_DETECT_MODE
ผ่าน: ค้นหาใบหน้า 3 ใบหน้าที่มีจุดสังเกตใบหน้าในกรอบล้อมรอบใบหน้า
รูปที่ 105 ตัวอย่าง test_num_faces_fd_mode_1
scene2_g
scene2_g มีภาพโปรไฟล์ 3 ภาพที่มีพื้นหลังสีขาวและสวมเสื้อผ้าสีขาว
ใบหน้ามีโทนสีผิวที่หลากหลายและมีคอนทราสต์สูงกับพื้นหลัง
รูปที่ 106. ตัวอย่าง scene2_g
test_preview_num_faces
ทดสอบการตรวจจับใบหน้าด้วยความหลากหลายของสีผิวที่เพิ่มขึ้นในฉากที่มีใบหน้า
API ที่ทดสอบ:
android.hardware.camera2.CaptureResult#STATISTICS_FACESandroid.hardware.camera2.CaptureResult#STATISTICS_FACE_DETECT_MODE
ผ่าน: ค้นหาใบหน้า 3 ใบหน้าที่มีจุดสังเกตใบหน้าในกรอบล้อมรอบใบหน้า

รูปที่ 107 ตัวอย่าง test_preview_num_faces
ฉากที่ 3
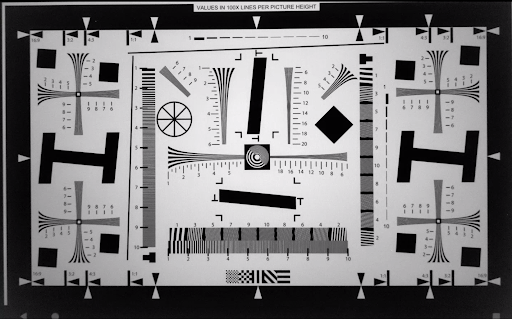
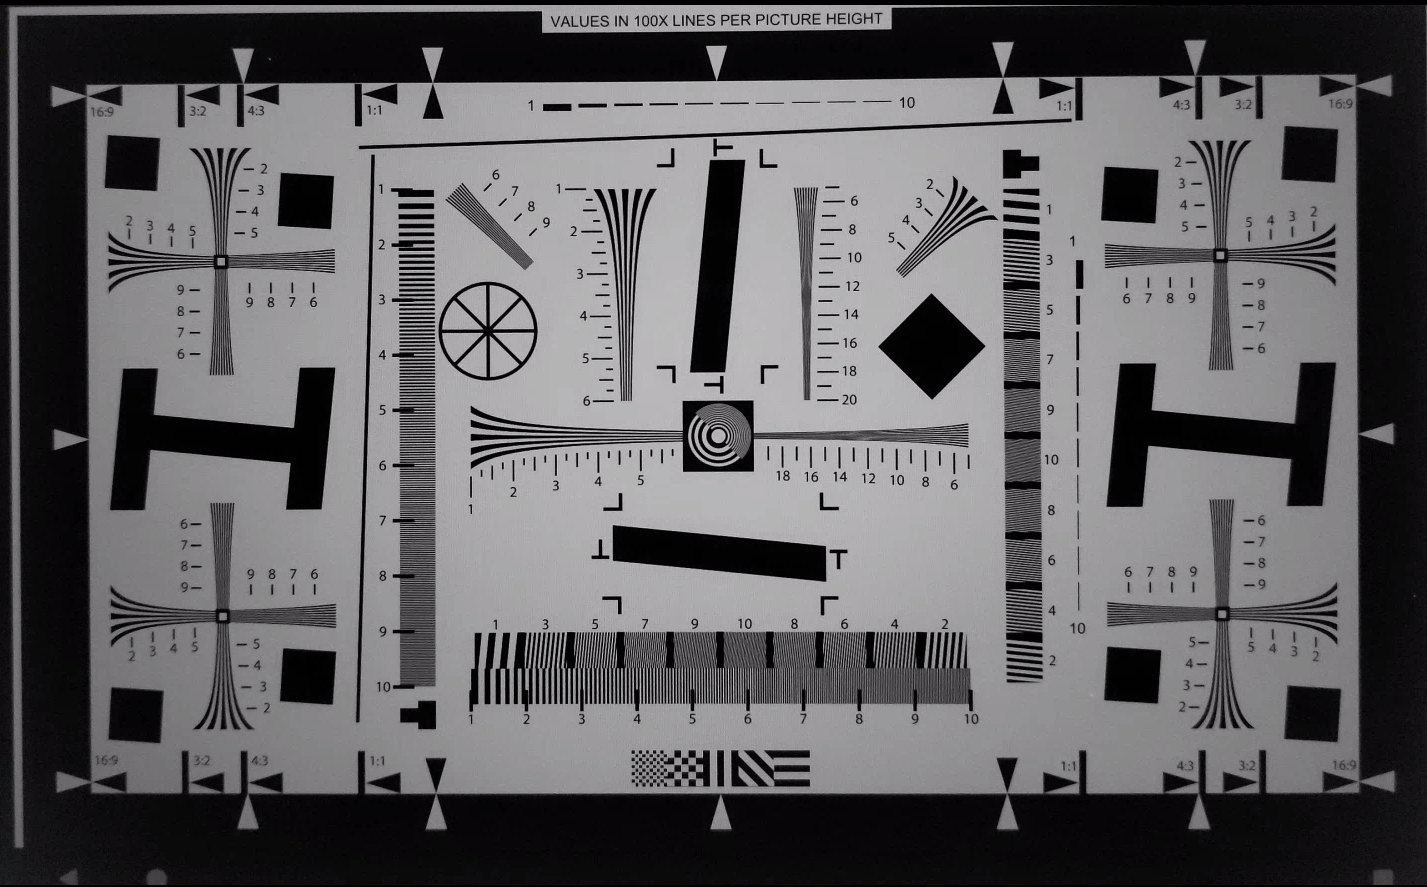
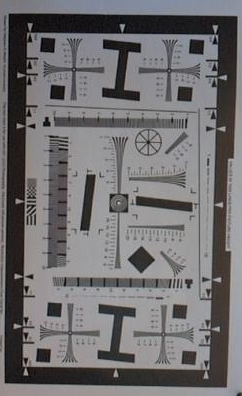
scene3 ใช้ชาร์ต ISO12233 และการทดสอบส่วนใหญ่ใช้วิธีการแยกชาร์ตเพื่อ
ค้นหาชาร์ตในฉาก ด้วยเหตุนี้ รูปภาพที่บันทึกไว้ส่วนใหญ่จึงไม่มี
ขอบเหมือนรูปภาพสำหรับฉากที่ 1, 2 หรือ 4 แต่มีเพียงแผนภูมิเท่านั้น
แผนภูมิต้องอยู่ในแนวนอนที่ถูกต้องเพื่อให้เครื่องมือค้นหาแผนภูมิทำงานได้อย่างมีประสิทธิภาพสูงสุด
ใน Android 17 ขึ้นไป scene3 จะใช้เครื่องหมาย ArUco
สำหรับการตรวจจับแผนภูมิ

รูปที่ 108 แผนภูมิ scene3
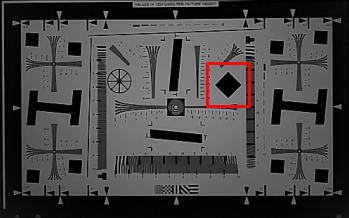
test_edge_enhancement
ทดสอบว่าใช้พารามิเตอร์ android.edge.mode อย่างถูกต้อง จับภาพ
รูปภาพที่ไม่ได้ประมวลผลซ้ำสำหรับโหมดขอบแต่ละโหมด และแสดงความคมชัดของรูปภาพเอาต์พุต
และข้อมูลเมตาของผลลัพธ์การจับภาพ ประมวลผลคำขอการจับภาพด้วยโหมดขอบ ความไว เวลาเปิดรับแสง ระยะโฟกัส และพารามิเตอร์พื้นผิวเอาต์พุตที่ระบุ ใน Android 17 ขึ้นไป จะใช้เครื่องหมาย ArUco
เพื่อกำหนดพื้นที่แผนภูมิที่มีขอบคมที่จำเป็น
ผ่าน: โหมด HQ (2) คมชัดกว่าโหมด OFF (0) FAST โหมด (1) คมชัดกว่าOFF โหมด HQ โหมดคมชัดกว่าหรือเท่ากับ FAST โหมด
API ที่ทดสอบ:
พารามิเตอร์ของกล้องที่ได้รับผลกระทบ
EDGE_MODE
รูปที่ 109. ตัวอย่าง test_edge_enhancement edge=0

รูปที่ 110. ตัวอย่าง test_edge_enhancement edge=1 (โหมดเร็ว)
รูปที่ 111. ตัวอย่าง test_edge_enhancement edge=2 (โหมดคุณภาพสูง)
test_flip_mirror
ทดสอบว่ารูปภาพวางแนวอย่างถูกต้องตาม 7.5.2 กล้องหน้าใน CDD ใน Android 17 ขึ้นไป จะใช้เครื่องหมาย ArUco เพื่อ ตรวจสอบทั้งการแสดงผลและการวางแนวของแผนภูมิ รูปภาพที่กลับด้าน พลิก หรือหมุนจะระบุได้ด้วยฟีเจอร์สี่เหลี่ยมข้าวหลามตัด ใกล้กับกึ่งกลาง
ผ่าน: ตรวจพบเครื่องหมายทั้งหมดและจัดแนวอย่างถูกต้อง รูปภาพไม่ได้พลิก กลับด้าน หรือหมุน
รูปที่ 112. ตัวอย่างแพตช์ฉาก test_flip_mirror
test_imu_drift
ทดสอบว่าหน่วยวัดความเฉื่อย (IMU) มีเอาต์พุตที่เสถียรเป็นเวลา 30 วินาทีหรือไม่ ขณะที่อุปกรณ์อยู่กับที่และบันทึกตัวอย่างความละเอียดสูง
API ที่ทดสอบ:
android.hardware.Sensorandroid.hardware.SensorEventandroid.hardware.Sensor#TYPE_GYROSCOPEandroid.hardware.Sensor#TYPE_ROTATION_VECTOR
บัตร:
- ดริฟต์ของไจโรสโคปน้อยกว่า 0.01 เรเดียนในช่วงเวลาทดสอบ
- ความแปรปรวนของการอ่านค่าไจโรสโคปน้อยกว่า 1E-7 rad2/s2/Hz ในช่วงเวลาทดสอบ
- การดริฟต์ของเวกเตอร์การหมุนน้อยกว่า 0.01 เรเดียนในช่วงเวลาทดสอบ
- (ยังไม่มีข้อกำหนด) การดริฟต์ของไจโรสโคปน้อยกว่า 1 องศา ต่อวินาที
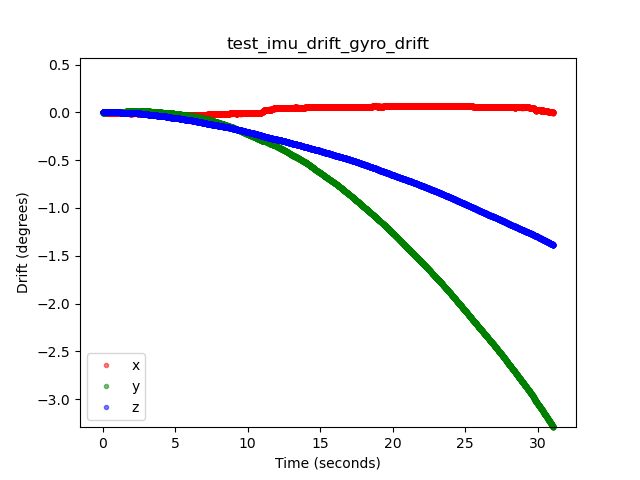
รูปที่ 113 ตัวอย่างการดริฟท์ของไจโรสโคป test_imu_drift

รูปที่ 114. ตัวอย่างการดริฟต์เวกเตอร์การหมุนของ test_imu_drift
test_landscape_to_portrait
ทดสอบว่าการลบล้างจากแนวนอนเป็นแนวตั้งทำงานอย่างถูกต้องสำหรับ เซ็นเซอร์ที่วางในแนวนอนหรือไม่
API ที่ทดสอบ:
android.hardware.camera2.CameraCharacteristics#SCALER_AVAILABLE_ROTATE_AND_CROP_MODESandroid.hardware.camera2.CameraCharacteristics#SENSOR_ORIENTATIONandroid.hardware.camera2.CameraCharacteristics#getCameraCharacteristics
ผ่าน: การทดสอบจะค้นหาแผนภูมิที่มีการหมุนตามที่คาดไว้ (0 องศา เมื่อปิดใช้การลบล้างจากแนวนอนเป็นแนวตั้ง และ 90 องศาเมื่อ เปิดใช้)
รูปที่ 115 ตัวอย่าง test_landscape_to_portrait
test_lens_movement_reporting
ทดสอบว่ามีการรายงานแฟล็กการเคลื่อนที่ของเลนส์อย่างถูกต้องหรือไม่ จับภาพต่อเนื่อง 24 ภาพ โดย 12 เฟรมแรกจะอยู่ที่ระยะโฟกัสที่เหมาะสมที่สุด (ตามที่ 3A พบ) และ 12 เฟรมสุดท้ายจะอยู่ที่ระยะโฟกัสต่ำสุด ที่เฟรมประมาณ 12 เลนส์ เคลื่อนที่ทำให้ความคมชัดลดลง ความคมชัดจะคงที่ในที่สุดเมื่อ เลนส์เคลื่อนไปยังตำแหน่งสุดท้าย
ควรยืนยันค่าสถานะการเคลื่อนที่ของเลนส์ในทุกเฟรมที่ความคมชัด อยู่ระหว่างความคมชัดใน 2-3 เฟรมแรกที่เลนส์อยู่กับที่ ในระยะโฟกัสที่เหมาะสม และ 2-3 เฟรมสุดท้ายที่เลนส์อยู่กับที่ ในระยะโฟกัสขั้นต่ำ เฟรมที่เลนส์เคลื่อนที่นั้นไม่สำคัญ สิ่งที่สำคัญคือต้องมีการยืนยันแฟล็กการเคลื่อนที่เมื่อเลนส์เคลื่อนที่
ใน Android 17 ขึ้นไป การทดสอบนี้จะใช้เครื่องหมาย ArUco เพื่อกำหนดพื้นที่แผนภูมิที่มีขอบคมที่จำเป็น วิธีนี้ ช่วยให้ตรวจจับกล้องได้อย่างเสถียรตั้งแต่กล้องมุมกว้างพิเศษ (UW) ไปจนถึงกล้องเทเล
API ที่ทดสอบ:
android.hardware.camera2.CameraCharacteristics#LENS_INFO_MINIMUM_FOCUS_DISTANCEandroid.hardware.camera2.CaptureResult#LENS_STATEandroid.hardware.camera2.CaptureResult#LENS_FOCUS_DISTANCEandroid.hardware.camera2.CaptureResult#SENSOR_TIMESTAMPandroid.hardware.camera2.CaptureRequest#LENS_FOCUS_DISTANCE
ผ่าน: แฟล็กการเคลื่อนไหวของเลนส์คือ True ในเฟรมที่มีการเปลี่ยนแปลงความคมชัด
กลไกการทำงานที่ล้มเหลว
lens_moving: True(android.hardware.camera2.CaptureResult#LENS_STATE= 1) ในtest_log.DEBUGจะได้รับการยืนยันในเฟรมที่ความคมชัดไม่เปลี่ยนแปลงเท่านั้น- เฟรมที่มี
lens_moving: False(android.hardware.camera2.CaptureResult#LENS_STATE= 0) ในtest_log.DEBUGมีความคมชัดแตกต่างจาก 2-3 เฟรมแรก ที่ระยะโฟกัสที่เหมาะสมหรือ 2-3 เฟรมสุดท้ายที่ระยะโฟกัสต่ำสุด
test_reprocess_edge_enhancement
ทดสอบว่าวิธีการประมวลผลซ้ำที่รองรับสำหรับการเพิ่มประสิทธิภาพที่ขอบทำงานได้อย่างถูกต้องหรือไม่ ประมวลผลคำขอการจับภาพด้วยโหมด Edge การประมวลผลซ้ำที่ระบุและเปรียบเทียบ โหมดต่างๆ กับการจับภาพโดยปิดใช้โหมด Edge การประมวลผลซ้ำ
API ที่ทดสอบ:
android.hardware.camera2.CaptureRequest#EDGE_MODEandroid.hardware.camera2.CaptureRequest#REPROCESS_EFFECTIVE_EXPOSURE_FACTOR
ผ่าน: ความคมชัดสำหรับโหมดขอบต่างๆ ถูกต้อง HQ (โหมด 2) คมชัดกว่า OFF (โหมด 0) และการปรับปรุงระหว่างโหมดต่างๆ ก็คล้ายกัน
รูปที่ 116. ตัวอย่างพล็อต test_reprocess_edge_enhancement
ฉากที่ 4
scene4 ประกอบด้วยวงกลมสีดำบนพื้นหลังสีขาวภายในสี่เหลี่ยมจัตุรัส
การทดสอบใน scene4 อาจมีความไวต่อการจัดแนว ดังนั้นตั้งแต่ Android
15 เป็นต้นไป คุณจะใช้ check_alignment.py ใน
ไดเรกทอรีเครื่องมือเพื่อเปิดใช้การตรวจสอบการจัดแนว DUT และแผนภูมิได้
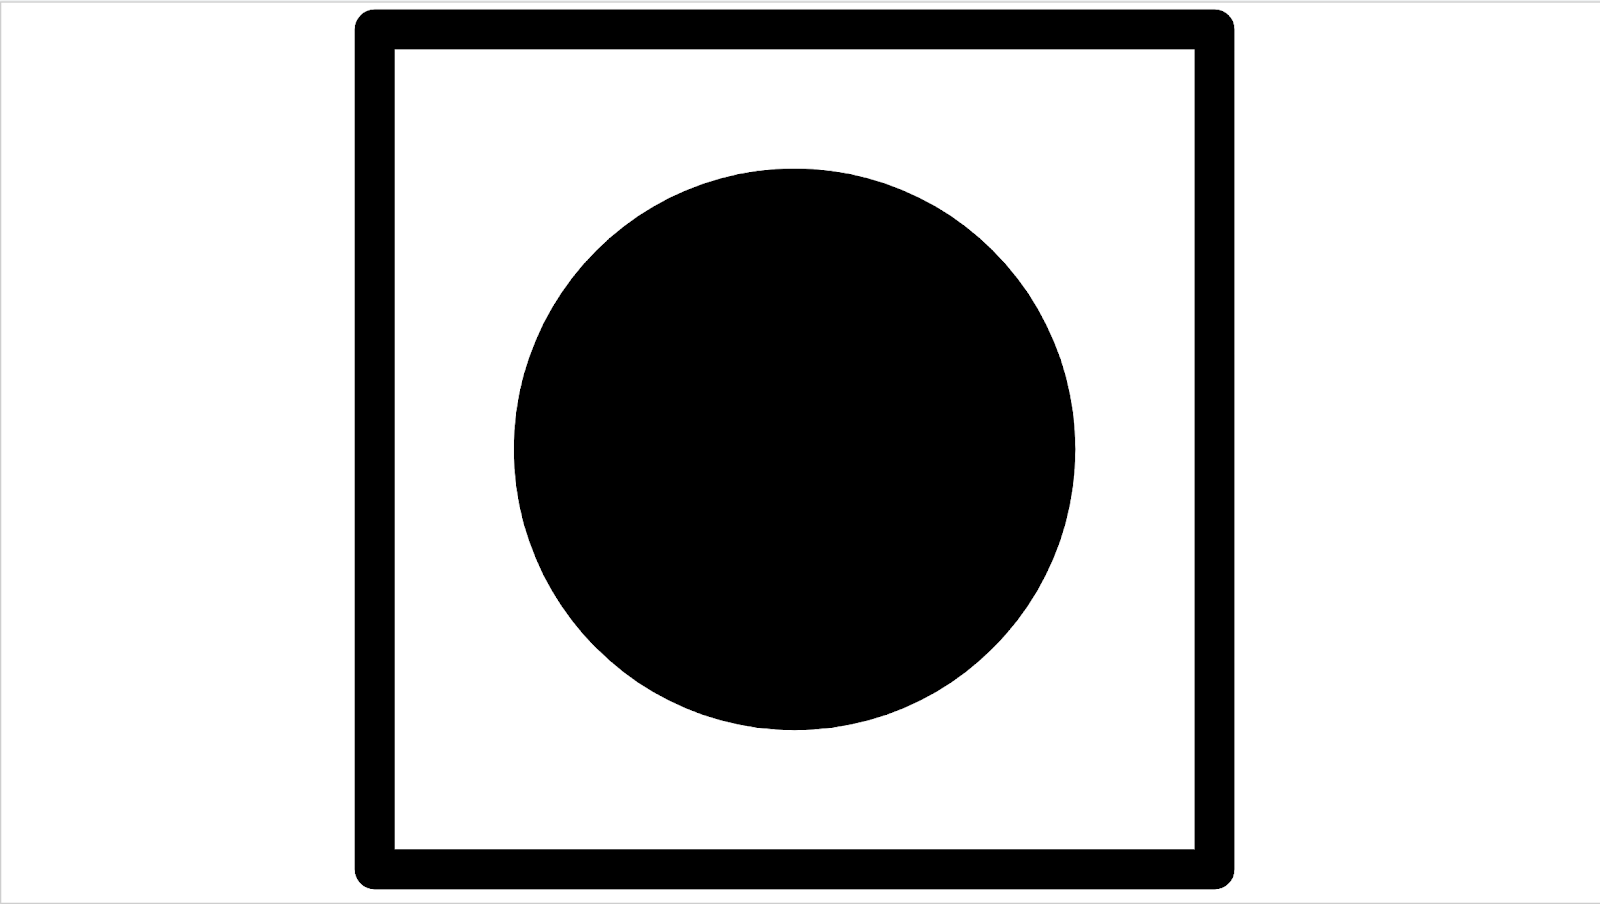
รูปที่ 117 ตัวอย่าง scene4
test_30_60fps_preview_fov_match
ทดสอบว่าวิดีโอตัวอย่าง 30 FPS และ 60 FPS มี FoV เดียวกัน การทดสอบจะบันทึกวิดีโอ 2 รายการ โดยรายการหนึ่งมี 30 FPS และอีกรายการมี 60 FPS ระบบจะเลือกเฟรมตัวแทนจากวิดีโอแต่ละรายการและวิเคราะห์เพื่อยืนยัน ว่าการเปลี่ยนแปลง FoV ในวิดีโอทั้ง 2 รายการเป็นไปตามข้อกำหนด การทดสอบที่อัตราส่วนภาพของวงกลมยังคงที่ จุดศูนย์กลางของวงกลมยังคง เสถียร และรัศมีของวงกลมยังคงที่
API ที่ทดสอบ:
android.hardware.camera2.CaptureRequest#CONTROL_AE_TARGET_FPS_RANGEandroid.hardware.camera2.CaptureRequest#SENSOR_FRAME_DURATIONandroid.hardware.camera2.CaptureRequest#SENSOR_EXPOSURE_TIMEandroid.hardware.camera2.CaptureResult#LENS_DISTORTIONandroid.hardware.camera2.CaptureResult#LENS_FOCAL_LENGTHandroid.hardware.camera2.CaptureResult#LENS_INTRINSIC_CALIBRATION
ผ่าน: รูปภาพไม่ยืดออก จุดกึ่งกลางของรูปภาพไม่แตกต่างกันเกิน 3% และการเปลี่ยนแปลงสัดส่วนภาพสูงสุดระหว่างวิดีโอ 30 FPS กับ 60 FPS ไม่เกิน 7.5%
กลไกการทำงานที่ล้มเหลว
- วงกลมจากวิดีโอ 30 FPS มีขนาดแตกต่างจากวิดีโอ 60 FPS อย่างเห็นได้ชัด
- วงกลมในรูปภาพที่จับได้จะบิดเบี้ยวเนื่องจากไปป์ไลน์การประมวลผล
- วงกลมในรูปภาพที่จับภาพจะถูกครอบตัดเนื่องจากคำขอจับภาพที่มีสัดส่วนภาพไม่ปกติ ซึ่งจะลดความสูงหรือความกว้างของรูปภาพ
- วงกลมในรูปภาพที่ถ่ายมีแสงสะท้อนตรงกลางและดูเหมือนว่าไม่ได้เติมสีจนเต็ม
test_aspect_ratio_and_crop
ทดสอบว่ารูปภาพบิดเบี้ยวหรือถูกครอบตัดโดยไม่คาดคิดในไปป์ไลน์รูปภาพหรือไม่ ถ่ายภาพวงกลมในทุกรูปแบบ ตรวจสอบว่าวงกลมไม่บิดเบี้ยว วงกลมไม่เคลื่อนที่จากกึ่งกลางของรูปภาพ และวงกลมไม่เปลี่ยนขนาดอย่างไม่ถูกต้องเมื่อใช้สัดส่วนภาพหรือความละเอียดที่แตกต่างกัน
API ที่ทดสอบ:
android.hardware.camera2.CaptureResult#LENS_DISTORTIONandroid.hardware.camera2.CaptureResult#LENS_FOCAL_LENGTHandroid.hardware.camera2.CaptureResult#LENS_INTRINSIC_CALIBRATION
ผ่าน: รูปภาพไม่ยืดออก จุดกึ่งกลางของรูปภาพไม่แตกต่างกันเกิน 3% และรักษา FoV ที่เป็นไปได้สูงสุดไว้
กลไกการทำงานที่ล้มเหลว
- กล้องไม่ได้อยู่ในแนวเดียวกับวงกลมที่แสดงบน แท็บเล็ตตรงกลางฉากที่จับภาพ
- วงกลมในรูปภาพที่จับได้จะบิดเบี้ยวเนื่องจากไปป์ไลน์การประมวลผล
- รูปภาพความละเอียดต่ำจะได้รับการครอบตัดเป็น 2 เท่าในไปป์ไลน์รูปภาพ ซึ่งจะทำให้เกิด FoV ที่แตกต่างกันระหว่างรูปภาพความละเอียดสูงและต่ำ
- วงกลมในรูปภาพที่จับภาพจะถูกครอบตัดเนื่องจากคำขอจับภาพที่มีสัดส่วนภาพไม่ปกติ ซึ่งจะลดความสูงหรือความกว้างของรูปภาพ
- วงกลมในรูปภาพที่ถ่ายมีแสงสะท้อนตรงกลางและดูเหมือนว่าไม่ได้เติมสีจนเต็ม
test_multi_camera_alignment
ทดสอบพารามิเตอร์การปรับเทียบกล้องที่เกี่ยวข้องกับการวางตำแหน่งกล้องสำหรับ ระบบกล้องหลายตัว ใช้กล้องย่อยจริงแบบหลายกล้องเพื่อถ่าย รูปด้วยกล้องจริงตัวใดตัวหนึ่ง ค้นหาจุดศูนย์กลางของวงกลม โปรเจ็กต์ จุดศูนย์กลางของวงกลมไปยังพิกัดโลกสำหรับกล้องแต่ละตัว เปรียบเทียบความแตกต่าง ระหว่างจุดศูนย์กลางของวงกลมของกล้องในพิกัดโลก ฉายพิกัดโลกกลับไปเป็นพิกัดพิกเซลและเปรียบเทียบกับต้นฉบับเพื่อตรวจสอบความถูกต้อง เปรียบเทียบขนาดวงกลมโดยตรวจสอบว่าความยาวโฟกัสของ กล้องแตกต่างกันหรือไม่
API ที่ทดสอบ:
android.hardware.camera2.CameraCharacteristics#getPhysicalCameraIds()android.hardware.camera2.CameraCharacteristics#LENS_DISTORTIONandroid.hardware.camera2.CameraCharacteristics#LENS_INFO_AVAILABLE_FOCAL_LENGTHSandroid.hardware.camera2.CameraCharacteristics#LENS_INTRINSIC_CALIBRATIONandroid.hardware.camera2.CameraCharacteristics#LENS_POSE_ROTATIONandroid.hardware.camera2.CameraCharacteristics#LENS_POSE_TRANSLATIONandroid.hardware.camera2.CameraMetadata#REQUEST_AVAILABLE_CAPABILITIES_LOGICAL_MULTI_CAMERAandroid.hardware.camera2.CaptureRequest#SCALER_CROP_REGIONandroid.hardware.camera2.CaptureRequest#DISTORTION_CORRECTION_MODE
ผ่าน: วงกลมมีจุดศูนย์กลางและขนาดตามที่คาดไว้ในรูปภาพที่ฉาย เมื่อเทียบกับรูปภาพที่ถ่ายโดยใช้ข้อมูลการปรับเทียบกล้องและความยาวโฟกัส
กลไกการทำงานที่ล้มเหลว
LENS_INTRINSIC_CALIBRATION,LENS_POSE_TRANSLATIONและLENS_POSE_ROTATIONเป็นค่าการออกแบบ ไม่ใช่ข้อมูลการปรับเทียบจริง- ระบบกล้องไม่เหมาะกับการตั้งค่าการทดสอบ เช่น การทดสอบระบบกล้องไวด์และอัลตร้าไวด์ด้วยแท่นทดสอบ RFoV ดูข้อมูลเพิ่มเติมได้ที่ คำถามที่พบบ่อยเกี่ยวกับ ITS-in-a-box ของกล้อง Q1
test_preview_aspect_ratio_and_crop
คล้ายกับการทดสอบtest_aspect_ratio_and_crop
สำหรับการจับภาพนิ่ง การทดสอบนี้จะตรวจสอบรูปแบบตัวอย่างที่รองรับเพื่อยืนยันว่า
เฟรมตัวอย่างไม่ได้ยืดหรือครอบตัดอย่างไม่เหมาะสม ตรวจสอบว่า
สัดส่วนของวงกลมไม่เปลี่ยนแปลง รูปภาพที่ครอบตัดจะคงวงกลมไว้ที่
กึ่งกลางของเฟรม และขนาดวงกลมจะไม่เปลี่ยนแปลงสำหรับรูปแบบคงที่หรือ
ความละเอียดที่แตกต่างกัน (การตรวจสอบ FoV)
API ที่ทดสอบ:
android.hardware.camera2.CaptureResult#LENS_DISTORTIONandroid.hardware.camera2.CaptureResult#LENS_FOCAL_LENGTHandroid.hardware.camera2.CaptureResult#LENS_INTRINSIC_CALIBRATIONandroid.hardware.camera2.CameraCharacteristics#SCALAR_AVAILABLE_CAPABILITIES_STREAM_USE_CASESandroid.media.MediaRecorderandroid.media.CamcorderProfile
ผ่าน: รูปภาพไม่ยืดออก จุดกึ่งกลางของรูปภาพไม่แตกต่างกันเกิน 3% และรักษา FoV ที่เป็นไปได้สูงสุดไว้
test_preview_stabilization_fov
ตรวจสอบขนาดตัวอย่างที่รองรับเพื่อให้มั่นใจว่าระบบจะครอบตัด FoV
อย่างเหมาะสม การทดสอบจะบันทึกวิดีโอ 2 รายการ รายการหนึ่งมีระบบกันภาพสั่นขณะแสดงตัวอย่าง
ON และอีกรายการหนึ่งมีระบบกันภาพสั่นขณะแสดงตัวอย่างOFF ระบบจะเลือกเฟรมที่เป็นตัวแทนจากวิดีโอแต่ละรายการและวิเคราะห์เพื่อยืนยันว่าการเปลี่ยนแปลง FoV ในวิดีโอทั้ง 2 รายการเป็นไปตามข้อกำหนด
API ที่ทดสอบ:
android.hardware.camera2.CameraCharacteristics#SCALAR_AVAILABLE_CAPABILITIES_STREAM_USE_CASESandroid.media.MediaRecorderandroid.media.CamcorderProfile
ผ่าน: สัดส่วนภาพของวงกลมยังคงเกือบคงที่ ตำแหน่งกึ่งกลางของ วงกลมยังคงเสถียร และขนาดของวงกลมเปลี่ยนแปลงไม่เกิน 20%
test_video_aspect_ratio_and_crop
ถ่ายวิดีโอวงกลมภายในสี่เหลี่ยมจัตุรัสในรูปแบบวิดีโอทั้งหมด แยก เฟรมหลัก และตรวจสอบว่าอัตราส่วนของวงกลมไม่เปลี่ยนแปลง รูปภาพที่ครอบตัดจะคงวงกลมไว้ตรงกลาง และขนาดของวงกลมจะไม่ เปลี่ยนแปลงสำหรับรูปแบบคงที่หรือความละเอียดที่แตกต่างกัน (การตรวจสอบ FoV)
API ที่ทดสอบ:
android.hardware.camera2.CameraCharacteristics#SCALAR_AVAILABLE_CAPABILITIES_STREAM_USE_CASESandroid.hardware.camera2.CaptureResult#LENS_DISTORTIONandroid.hardware.camera2.CaptureResult#LENS_FOCAL_LENGTHandroid.hardware.camera2.CaptureResult#LENS_INTRINSIC_CALIBRATIONandroid.media.MediaRecorderandroid.media.CamcorderProfile
ผ่าน: เฟรมวิดีโอไม่ยืดออก จุดกึ่งกลางของเฟรมไม่แตกต่างกันเกิน 3% และรักษา FoV ที่เป็นไปได้สูงสุดไว้
ฉากที่ 5
scene5 ต้องใช้ฉากสีเทาที่มีแสงสว่างสม่ำเสมอ โดยใช้แผ่นกระจายแสง
วางไว้เหนือเลนส์กล้อง เราขอแนะนำให้ใช้ตัวกระจายแสงต่อไปนี้
www.edmundoptics.com/optics/window-diffusers/optical-diffusers/opal-diffusing-glass/46168
หากต้องการเตรียมฉาก ให้ติดตัวกระจายแสงไว้หน้ากล้องและเล็งกล้องไปยังแหล่งกำเนิดแสงที่มีความสว่างประมาณ 2, 000 ลักซ์ รูปภาพที่ถ่ายสำหรับ
scene5 ต้องมีแสงแบบกระจายโดยไม่มีฟีเจอร์ที่ชัดเจน ต่อไปนี้คือ
รูปภาพตัวอย่าง
รูปที่ 118 ตัวอย่างการจับภาพ scene5
เนื่องจากไม่จำเป็นต้องใช้แท็บเล็ตหรือตัวควบคุมสำหรับฉากนี้ การทดสอบจึงใช้TEST_BED_MANUAL Testbed ดูตัวอย่างได้ที่
ไฟล์ config.yml สำหรับการทดสอบด้วยตนเอง
ไฟล์ config.yml เริ่มต้นไม่มี TEST_BED_MANUAL แต่คุณสามารถ
แก้ไขไฟล์ให้มีได้
test_lens_shading_and_color_uniformity
ทดสอบว่ามีการใช้การแก้ไขการแรเงาของเลนส์อย่างเหมาะสม และ สีของฉากที่มีสีเดียวสม่ำเสมอมีการกระจายอย่างเท่าเทียมกัน ทำการทดสอบนี้ใน เฟรม YUV ที่มี 3A อัตโนมัติ การไล่ระดับสีของเลนส์จะได้รับการประเมินตามช่อง y วัดค่า y เฉลี่ยสำหรับแต่ละบล็อกตัวอย่างที่ระบุ และกำหนด ผ่านหรือไม่ผ่านโดยการเปรียบเทียบกับค่า y ตรงกลาง การทดสอบความสม่ำเสมอของสีจะ ได้รับการประเมินในพื้นที่สีแดง-เขียวและสีน้ำเงิน-เขียว
API ที่ทดสอบ:
android.hardware.camera2.CaptureRequest#CONTROL_AE_MODEandroid.hardware.camera2.CaptureRequest#CONTROL_AWB_MODE
ผ่าน: ที่รัศมีที่ระบุของรูปภาพ ความแปรปรวนของค่าแดง-เขียวและ น้ำเงิน-เขียวต้องน้อยกว่า 20% จึงจะผ่านการทดสอบ
กลไกการทำงานที่ล้มเหลว
- ขอบมืดมากเกินไปในรูปภาพ
- อาร์ติแฟกต์ขอบสีดำในรูปภาพ

รูปที่ 119. test_lens_shading_and_color_uniformity_y_plane

รูปที่ 120 test_lens_shading_and_color_uniformity_color_uniformity

รูปที่ 121. test_lens_shading_and_color_uniformity_lens_shading_result
ฉากที่ 6
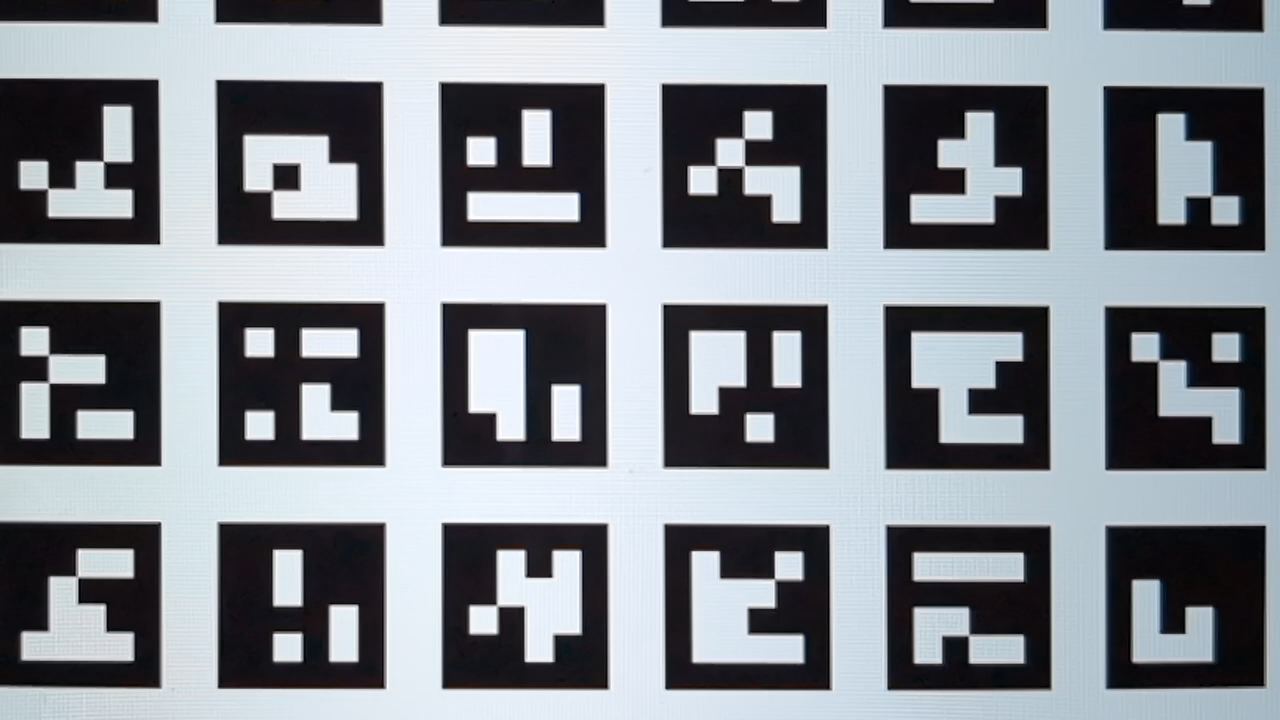
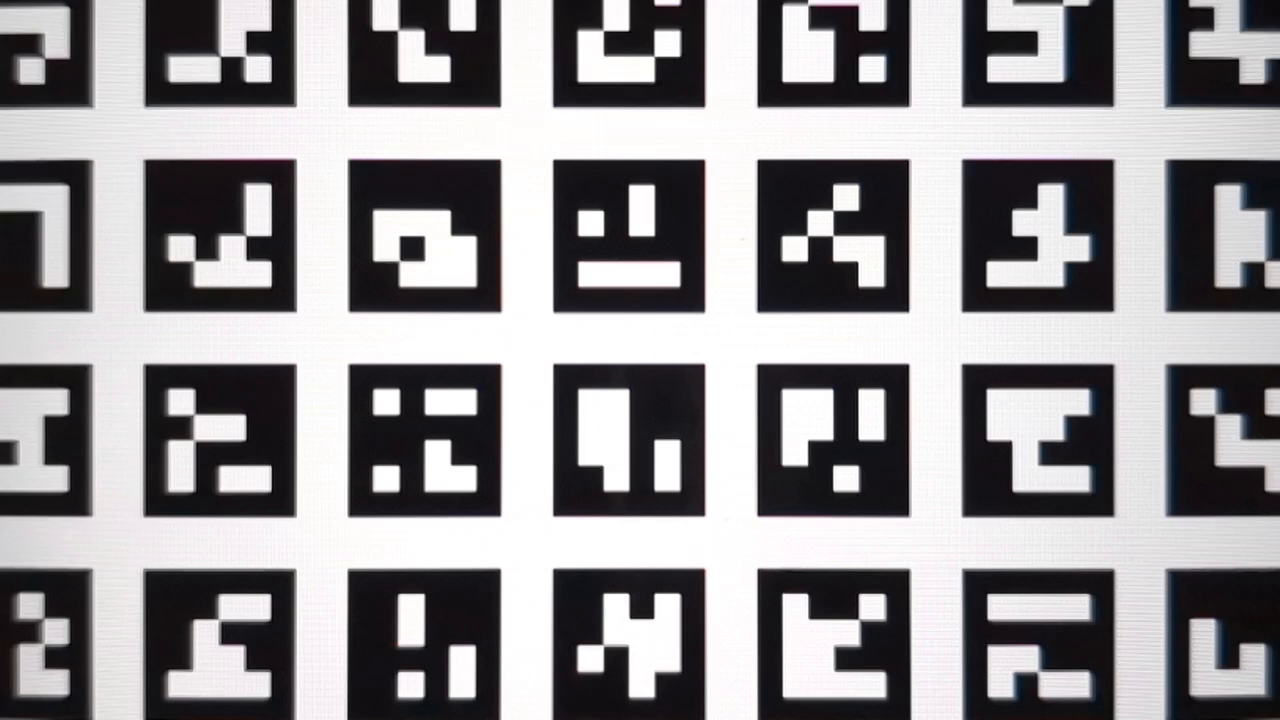
scene6 คือตารางเครื่องหมาย ArUco ที่ระบุได้ไม่ซ้ำกัน
การทดสอบใน scene6 อาจไวต่อการจัดแนว ดังนั้นตั้งแต่วันที่ 15 เป็นต้นไป คุณจะใช้ check_alignment.py ในไดเรกทอรีเครื่องมือเพื่อเปิดใช้การตรวจสอบการจัดแนว DUT และแผนภูมิได้
รูปที่ 122 ตัวอย่างฉากที่ 6
test_in_sensor_zoom
ทดสอบลักษณะการทำงานของฟีเจอร์ซูมในเซ็นเซอร์ของกล้อง ซึ่งจะสร้าง รูปภาพ RAW ที่ครอบตัดแล้ว
เมื่อตั้งค่ากรณีการใช้งานสตรีมเป็น
CROPPED_RAW
การทดสอบจะจับภาพ 2 ครั้งในช่วงการซูม ซึ่งก็คือภาพดิบแบบ FoV เต็ม
และภาพดิบที่ครอบตัด การทดสอบจะแปลงรูปภาพเป็นอาร์เรย์ RGB
ลดขนาดรูปภาพ RAW ที่ครอบตัดขนาดเต็มให้เป็นขนาดที่รายงานโดย
SCALER_RAW_CROP_REGION และคำนวณความแตกต่างของ RMS 3 มิติ
ระหว่างรูปภาพ 2 รูป
API ที่ทดสอบ:
android.hardware.camera2.CameraCharacteristics#CONTROL_ZOOM_RATIO_RANGEandroid.hardware.camera2.CameraCharacteristics#SCALAR_AVAILABLE_CAPABILITIES_STREAM_USE_CASESandroid.hardware.camera2.CameraMetadata#SCALER_AVAILABLE_STREAM_USE_CASES_CROPPED_RAWandroid.hardware.camera2.CaptureRequest#CONTROL_ZOOM_RATIOandroid.hardware.camera2.CaptureResult#SCALER_RAW_CROP_REGION
ผ่าน: ความแตกต่างของ RMS แบบ 3 มิติระหว่างรูปภาพ RAW ที่ครอบตัดและลดขนาด กับรูปภาพ RAW แบบ FoV เต็มน้อยกว่าเกณฑ์ที่ตั้งไว้ในการทดสอบ
test_zoom
ทดสอบลักษณะการซูมของกล้องจากเลนส์มุมกว้างพิเศษไปยังเลนส์มุมกว้าง ถ่ายภาพ ในช่วงการซูมและตรวจสอบว่าเครื่องหมาย ArUco มีขนาดใหญ่ขึ้นเมื่อ กล้องซูมเข้าหรือไม่ การทดสอบยังตรวจสอบว่าตำแหน่งของเครื่องหมายกึ่งกลางเปลี่ยนแปลง อย่างคาดการณ์ได้ในแต่ละการจับภาพหรือไม่ ระยะห่างจากกึ่งกลางของเครื่องหมายกึ่งกลางถึง กึ่งกลางของรูปภาพอาจเปลี่ยนแปลงในอัตราคงที่เมื่อเทียบกับอัตราส่วนการซูม จนกว่าจะมีการสลับกล้องจริง หรืออาจเปลี่ยนแปลงแบบโมโนโทนไปยัง ตำแหน่งของเครื่องหมายเดียวกันหลังจากสลับกล้องจริง ต้องติดตั้ง Jetpack Camera App (JCA) ในอุปกรณ์ก่อนทำการทดสอบ
API ที่ทดสอบ:
android.hardware.camera2.CameraCharacteristics#CONTROL_ZOOM_RATIO_RANGEandroid.hardware.camera2.CameraCharacteristics#LENS_INFO_AVAILABLE_FOCAL_LENGTHSandroid.hardware.camera2.CaptureRequest#CONTROL_ZOOM_RATIOandroid.hardware.camera2.CaptureResult#LENS_FOCAL_LENGTH
ผ่าน: ขนาดสัมพัทธ์ของเครื่องหมาย ArUco ที่จับได้ถูกต้องตามอัตราส่วนการซูมที่ขอเพื่อยืนยันว่ากล้องซูมได้อย่างถูกต้อง และระยะห่างของเครื่องหมายจากกึ่งกลางของรูปภาพเปลี่ยนแปลงตามเกณฑ์ที่ระบุไว้ในคำอธิบายการทดสอบ

รูปที่ 123. test_zoom เพื่อค้นหาเส้นชั้นความสูงของเครื่องหมาย ArUco ที่ใกล้กับกึ่งกลางมากที่สุด
test_low_latency_zoom
ทดสอบลักษณะการทำงานของการซูมที่มีเวลาในการตอบสนองที่รวดเร็วของกล้อง ถ่ายภาพในช่วงการซูม
ด้วย android.control.settingsOverride = 1 (SETTINGS_OVERRIDE_ZOOM) และตรวจสอบ
ว่าเครื่องหมายในรูปภาพเอาต์พุตตรงกับอัตราส่วนการซูมในข้อมูลเมตา
ของการจับภาพหรือไม่ ระบบจะใช้เซสชันการจับภาพจากกล้องเดียวกันเพื่อรวม 3A และ
ถ่ายภาพ
API ที่ทดสอบ:
android.hardware.camera2.CameraCharacteristics#CONTROL_AVAILABLE_SETTINGS_OVERRIDESandroid.hardware.camera2.CameraCharacteristics#CONTROL_ZOOM_RATIO_RANGEandroid.hardware.camera2.CaptureRequest#CONTROL_SETTINGS_OVERRIDEandroid.hardware.camera2.CaptureRequest#CONTROL_ZOOM_RATIOandroid.hardware.camera2.CaptureResult#CONTROL_SETTINGS_OVERRIDE
ผ่าน: ขนาดสัมพัทธ์ของเครื่องหมายที่จับได้ถูกต้องเมื่อเทียบกับอัตราส่วนการซูม ข้อมูลเมตาของผลลัพธ์
test_preview_video_zoom_match
การทดสอบขณะบันทึกและซูม แสดงตัวอย่างวิดีโอและเอาต์พุตวิดีโอ และบันทึกเอาต์พุตเดียวกัน คำนวณขนาดของตัวทำเครื่องหมายที่ใกล้กับ กึ่งกลางมากที่สุดที่อัตราส่วนการซูมต่างๆ และตรวจสอบว่าขนาดของตัวทำเครื่องหมาย เพิ่มขึ้นเมื่ออัตราส่วนการซูมเพิ่มขึ้นหรือไม่
API ที่ทดสอบ:
android.hardware.camera2.CameraCharacteristics#CONTROL_ZOOM_RATIO_RANGEandroid.hardware.camera2.CameraCharacteristics#LENS_INFO_AVAILABLE_FOCAL_LENGTHSandroid.hardware.camera2.CaptureRequest#CONTROL_ZOOM_RATIOandroid.hardware.camera2.CaptureResult#LENS_FOCAL_LENGTH
ผ่าน: ขนาดสัมพัทธ์ของเครื่องหมายที่จับภาพถูกต้องเมื่อเทียบกับอัตราส่วนการซูมที่ขอในวิดีโอและตัวอย่าง
รูปที่ 124 HD_1280x720_key_frame.png (ก่อนซูม)
รูปที่ 125. preview_1280x720_key_frame.png (ก่อนซูม)
รูปที่ 126 HD_1280x720_key_frame.png (หลังซูม)
รูปที่ 127. preview_1280x720_key_frame.png (หลังซูม)
test_preview_zoom
การทดสอบว่าอัตราส่วนการซูมของเฟรมตัวอย่างแต่ละเฟรมตรงกับข้อมูลเมตาของการจับภาพที่เกี่ยวข้องจากเลนส์มุมกว้างพิเศษไปยังเลนส์ไวด์ การทดสอบจะใช้ เฟรมตัวอย่างในช่วงการซูมและค้นหาเครื่องหมาย ArUco ที่อยู่ใกล้กับ กึ่งกลางมากที่สุด จากนั้นการทดสอบจะตรวจสอบว่าตำแหน่งของเครื่องหมายกึ่งกลางเปลี่ยนแปลง อย่างคาดการณ์ได้ในแต่ละการจับภาพหรือไม่ ระยะห่างจากกึ่งกลางของเครื่องหมายกึ่งกลางถึง กึ่งกลางของรูปภาพอาจเปลี่ยนแปลงในอัตราคงที่เมื่อเทียบกับอัตราส่วนการซูม จนกว่าจะมีการสลับกล้องจริง หรืออาจเปลี่ยนแปลงแบบโมโนโทนไปยัง ตำแหน่งของเครื่องหมายเดียวกันหลังจากสลับกล้องจริง
API ที่ทดสอบ:
android.hardware.camera2.CameraCharacteristics#CONTROL_ZOOM_RATIO_RANGEandroid.hardware.camera2.CameraCharacteristics#LENS_INFO_AVAILABLE_FOCAL_LENGTHSandroid.hardware.camera2.CaptureRequest#CONTROL_ZOOM_RATIOandroid.hardware.camera2.CaptureResult#LENS_FOCAL_LENGTH
ผ่าน: ขนาดสัมพัทธ์ของเครื่องหมาย ArUco ที่เลือกถูกต้องสำหรับ อัตราส่วนการซูมที่รายงานของผลลัพธ์การจับภาพที่เกี่ยวข้องสำหรับเฟรมตัวอย่างทั้งหมด ระยะทางสัมพัทธ์ของเครื่องหมายที่เลือกจากกึ่งกลางของ รูปภาพจะถูกต้องสำหรับอัตราส่วนการซูมที่รายงานของผลการจับภาพที่เกี่ยวข้อง ของเฟรมตัวอย่างทั้งหมด
รูปที่ 128. รูปภาพ test_preview_zoom ที่แสดงเครื่องหมายที่เลือกซึ่งอยู่ใกล้กึ่งกลางมากที่สุด
test_session_characteristics_zoom
ทดสอบช่วงอัตราส่วนการซูมสําหรับการกําหนดค่าเซสชันที่รองรับทั้งหมดซึ่งแสดงอยู่ใน
CameraCharacteristics#INFO_SESSION_CONFIGURATION_QUERY_VERSION
สำหรับการกำหนดค่าแต่ละรายการ หาก
CameraDeviceSetup#isSessionConfigurationSupported
แสดงผลเป็น true การทดสอบจะยืนยันว่าช่วงอัตราส่วนการซูมที่แสดงผลใน
CameraDeviceSetup#getSessionCharacteristics
สามารถเข้าถึงได้
API ที่ทดสอบ:
android.hardware.camera2.CameraCharacteristics#INFO_SESSION_CONFIGURATION_QUERY_VERSIONandroid.hardware.camera2.CameraDevice.CameraDeviceSetup#isSessionConfigurationSupportedandroid.hardware.camera2.CameraDevice.CameraDeviceSetup#getSessionCharacteristics
ผ่าน: สามารถเข้าถึงอัตราส่วนการซูมทั้งขั้นต่ำและสูงสุดสำหรับSessionConfigurationที่รองรับแต่ละรายการซึ่งระบุไว้ในCameraCharacteristics#INFO_SESSION_CONFIGURATION_QUERY_VERSION
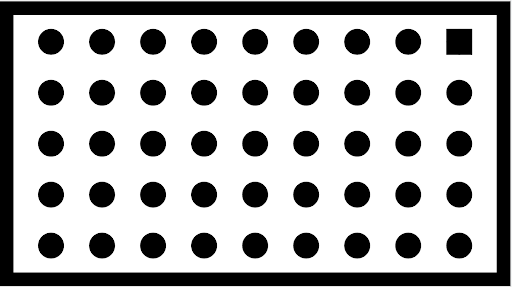
scene7
scene7 คือกรอบสี่เหลี่ยมผืนผ้าที่แบ่งออกเป็น 4 ส่วนเท่าๆ กัน โดยแต่ละส่วนจะเติม
ด้วยสีที่แตกต่างกัน ตรงกลางสี่เหลี่ยมผืนผ้าคือชาร์ตขอบเอียง
สำหรับการตรวจสอบความคมชัด เครื่องหมาย ArUco 4 อันจะจัดแนวให้ตรงกับมุมด้านนอกทั้ง 4 มุม
ของสี่เหลี่ยมผืนผ้าเพื่อช่วยในการรับพิกัดที่ถูกต้องของกรอบ
สี่เหลี่ยมผืนผ้าหลักที่อัตราส่วนการซูมต่างๆ

รูปที่ 129 scene7
test_multi_camera_switch
การทดสอบนี้จะยืนยันว่าในระหว่างการบันทึกตัวอย่างที่อัตราส่วนการซูมต่างๆ การสลับระหว่างเลนส์อัลตร้าไวด์ (UW) กับเลนส์ไวด์ (W) จะส่งผลให้ค่า RGB คล้ายกัน
การทดสอบจะใช้อัตราส่วนการซูมที่แตกต่างกันภายในช่วงที่กำหนดไว้ล่วงหน้าเพื่อทำการ บันทึกตัวอย่างแบบไดนามิกและระบุจุดที่กล้องจริง เปลี่ยน จุดนี้เป็นจุดที่เปลี่ยนจากเลนส์ UW เป็นเลนส์ W
ระบบจะวิเคราะห์เฟรมที่จับภาพ ณ จุดครอสโอเวอร์และก่อนหน้านั้นเพื่อหา การเปิดรับแสงอัตโนมัติ (AE), สมดุลสีขาวอัตโนมัติ (AWB) และโฟกัสอัตโนมัติ (AF)
การตรวจสอบ AE จะยืนยันว่าการเปลี่ยนแปลงความสว่างอยู่ในช่วงที่คาดไว้สำหรับ ทั้งรูปภาพเลนส์ UW และ W การตรวจสอบ AWB จะยืนยันว่าอัตราส่วนของสีแดง-เขียว และสีน้ำเงิน-เขียวอยู่ภายในค่าเกณฑ์สำหรับทั้งรูปภาพเลนส์ UW และ W การตรวจสอบ AF จะประเมินค่าการประมาณความคมชัดตามขนาดการไล่ระดับสีเฉลี่ยระหว่างรูปภาพเลนส์ UW และ W
ขณะทำการทดสอบนี้ หากเอฟเฟกต์มัวเรส่งผลต่อผลลัพธ์ ให้ใช้แท็บเล็ตที่มีความละเอียดสูงกว่าจากรายการรายการแท็บเล็ตที่ผ่านการรับรอง ITS ของกล้อง
API ที่ทดสอบ:
android.hardware.camera2.CameraCharacteristics#CONTROL_ZOOM_RATIO_RANGEandroid.hardware.camera2.CaptureRequest#CONTROL_ZOOM_RATIOandroid.media.CamcorderProfileandroid.media.MediaRecorder
ผ่าน: การทดสอบจะผ่านได้ก็ต่อเมื่อการตรวจสอบ AE และ AWB ผ่าน ผลการตรวจสอบ AF จะใช้เพื่อวัตถุประสงค์ในการบันทึกเท่านั้น เกณฑ์สำหรับการตรวจสอบแต่ละรายการมีดังนี้
- การตรวจสอบ AE: การเปลี่ยนแปลงความสว่าง (ค่า Y) ระหว่างรูปภาพเลนส์ UW และ W ต้องน้อยกว่า 4% สำหรับแพตช์สีทั้งหมด หากอุปกรณ์รองรับทั้ง
ae_regionsและawb_regionsหากรองรับเฉพาะae_regionsค่าแพตช์สีเทาเท่านั้นที่ต้องเป็นไปตามเกณฑ์ - การตรวจสอบ AWB: ความแตกต่างระหว่างค่าสีแดง-เขียวและสีน้ำเงิน-เขียวสำหรับ
รูปภาพเลนส์ UW และ W ต้องน้อยกว่า 3% สำหรับแพตช์สีเทาและ
ต้องน้อยกว่า 10% สำหรับแพตช์สีอื่นๆ หากอุปกรณ์รองรับทั้ง
ae_regionsและawb_regions - การตรวจสอบ AF: ความคมชัดของรูปภาพที่ถ่ายด้วยเลนส์ W ต้องสูงกว่าความคมชัดที่ถ่ายด้วย UW
รูปที่ 130 แพตช์สีเทาที่ถ่ายด้วยเลนส์ UW
รูปที่ 131 แพตช์สีเทาที่ถ่ายด้วยเลนส์ W
scene8
scene8 เป็นกรอบสี่เหลี่ยมผืนผ้าที่แบ่งออกเป็น 4 ส่วนเท่าๆ กัน โดยแต่ละส่วนมี
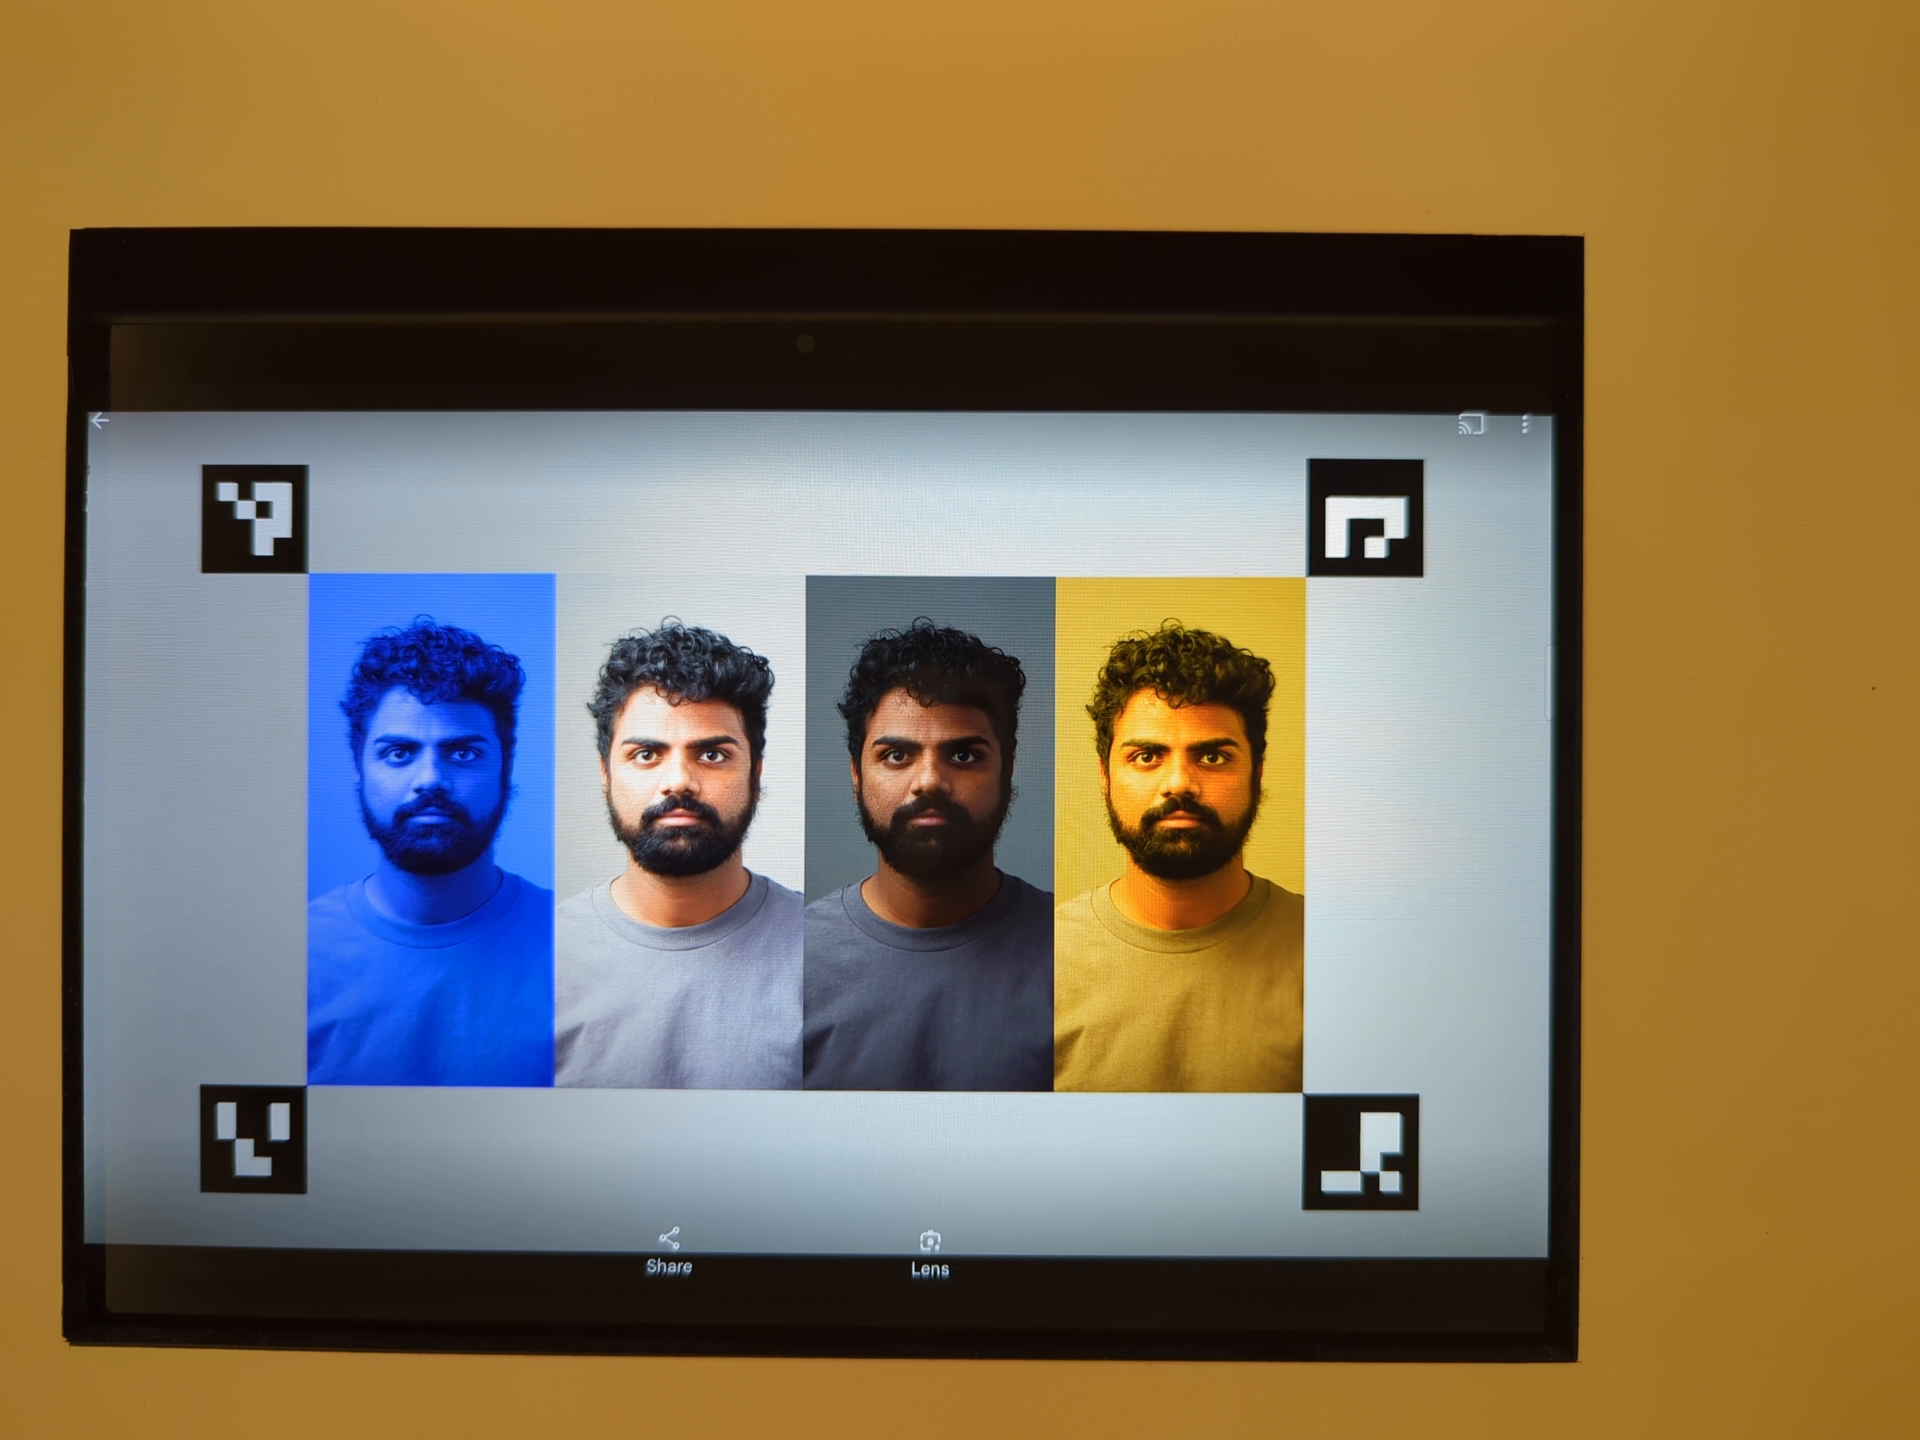
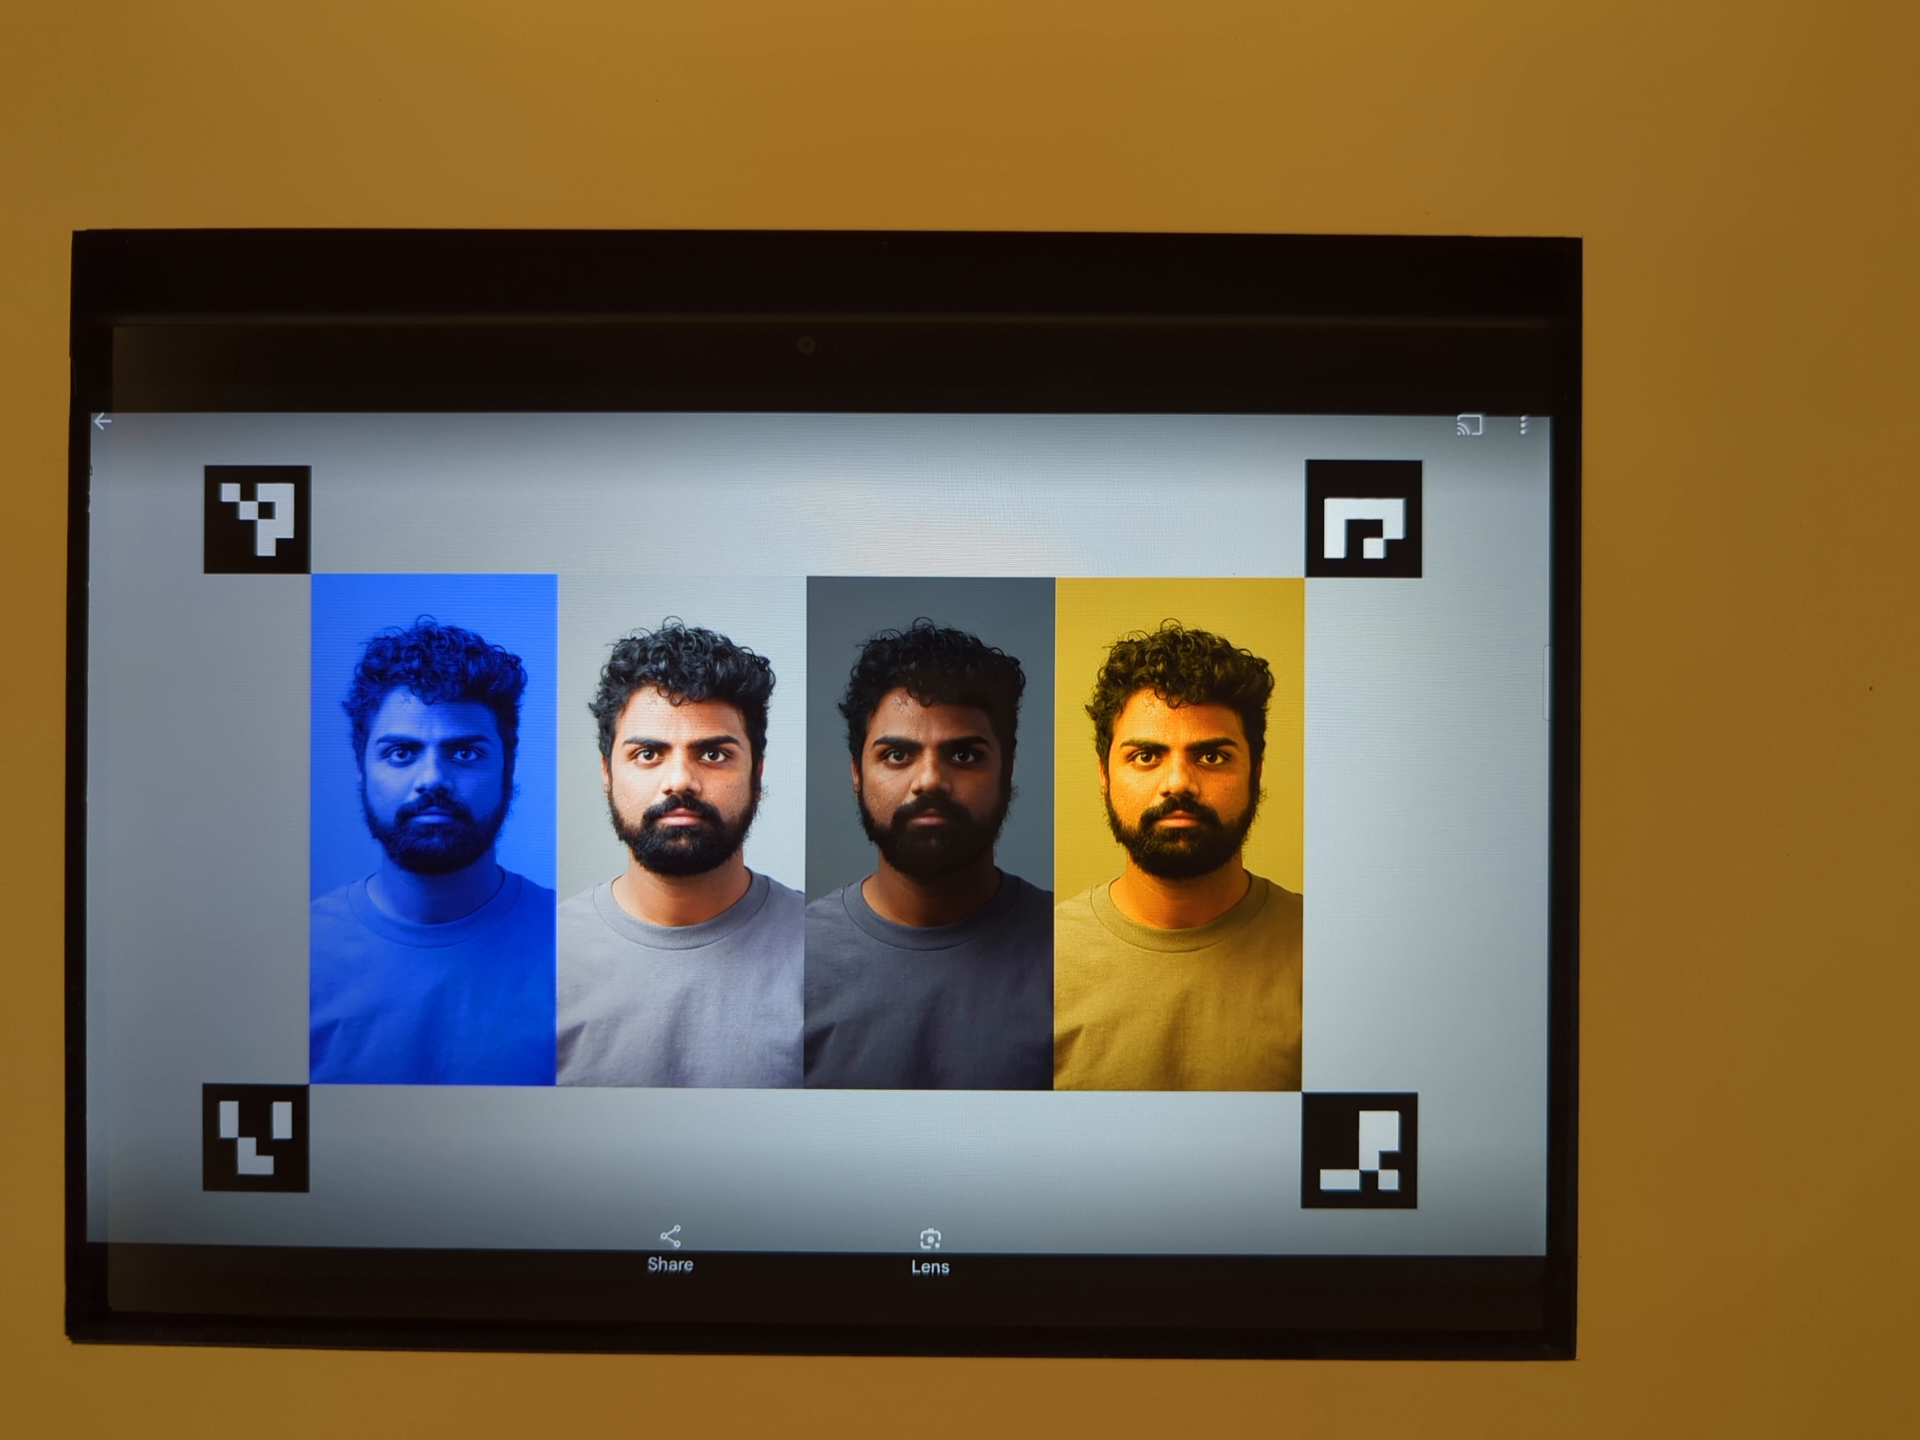
ภาพบุคคลที่ถ่ายด้วยค่าแสงที่แตกต่างกันหรือซ้อนทับด้วยเฉดสีที่แตกต่างกัน (เฉดสีน้ำเงิน ค่าแสงเพิ่มขึ้น ค่าแสงลดลง เฉดสีเหลือง)
เครื่องหมาย ArUco 4 อันจะอยู่ในแนวเดียวกับมุมด้านนอกทั้ง 4 ของสี่เหลี่ยมผืนผ้า
เพื่อให้ได้พิกัดที่ถูกต้องของกรอบสี่เหลี่ยมผืนผ้าหลัก

รูปที่ 132. ตัวอย่างฉากที่ 8
test_ae_awb_regions
การทดสอบที่ค่า RGB และค่าความสว่างแตกต่างกันเมื่อดูตัวอย่างการบันทึกในภูมิภาค AE และ AWB ที่แตกต่างกัน
การทดสอบจะบันทึกตัวอย่างการบันทึก 8 วินาที โดยจะทำการวัดแสง AE และ AWB ในแต่ละจตุภาคเป็นเวลา 2 วินาที จากนั้นการทดสอบจะดึงเฟรมจากวิดีโอตัวอย่างที่บันทึกไว้ของแต่ละภูมิภาค และใช้เฟรมที่ดึงมาเพื่อตรวจสอบ AE และ AWB ดังต่อไปนี้
- การตรวจสอบ AE: ตรวจสอบว่าเฟรมที่วัดแสงในภูมิภาคที่มีการลด ค่าแสงมีค่าความสว่างเพิ่มขึ้นมากกว่า 1% เมื่อเทียบกับเฟรม ที่วัดแสงในภูมิภาคที่มีการเพิ่มค่าแสง ซึ่งจะยืนยันว่าระบบจะ เพิ่มความสว่างให้รูปภาพเมื่อวัดแสงในพื้นที่มืด
- การตรวจสอบ AWB: ตรวจสอบว่าอัตราส่วนของสีแดงต่อสีน้ำเงิน (ค่า RGB เฉลี่ยของรูปภาพ) ในเฟรมที่มีพื้นที่วัดแสงสีน้ำเงินสูงกว่าเฟรมที่มีพื้นที่วัดแสงสีเหลืองมากกว่า 2% ซึ่งจะยืนยันว่า รูปภาพมีค่า RGB ที่สมดุลเมื่อวัดแสงในพื้นที่สีเหลือง (โทนอุ่น) หรือสีน้ำเงิน (โทนเย็น)
API ที่ทดสอบ:
android.hardware.camera2.CaptureRequest#CONTROL_AWB_REGIONSandroid.hardware.camera2.CaptureRequest#CONTROL_AE_REGIONSandroid.hardware.camera2.CameraCharacteristics#CONTROL_MAX_REGIONS_AEandroid.hardware.camera2.CameraCharacteristics#CONTROL_MAX_REGIONS_AWB
ผ่าน: การตรวจสอบ AE และ AWB ผ่านทั้ง 2 รายการ
รูปที่ 133 การวัดแสงแบบเฟรมในพื้นที่มืดที่มีการเพิ่มการรับแสง
รูปที่ 134 การวัดแสงตามเฟรมในบริเวณที่สว่างขึ้นพร้อมการเปิดรับแสงที่ลดลง
กลไกการทำงานที่ล้มเหลว
การตรวจจับเครื่องหมาย ArUco ทั้ง 4 อย่างได้อย่างแม่นยำเป็นสิ่งสำคัญสำหรับการทดสอบนี้ หากการตรวจจับครั้งแรกไม่สำเร็จ ระบบจะพยายามตรวจจับครั้งที่ 2 โดยใช้รูปภาพเวอร์ชันขาวดำ รูปภาพระดับสีเทาต่อไปนี้ แสดงขั้นตอนการประมวลผลรอง
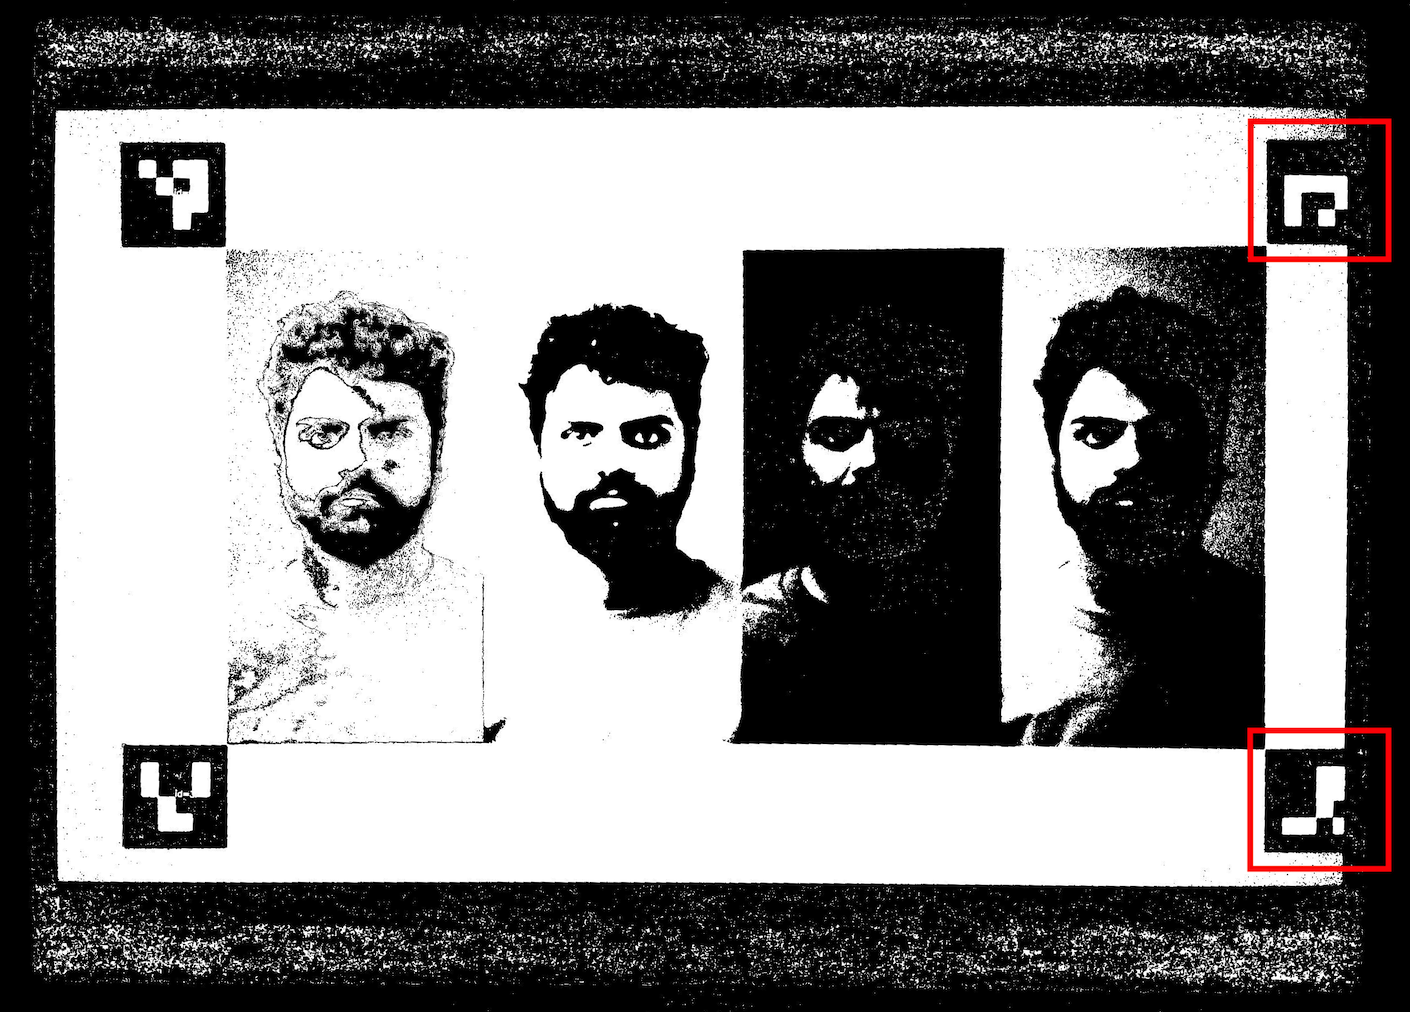
รูปที่ 135 เครื่องหมาย ArUco ไม่ตรงกัน
test_color_correction_mode_cct
ทดสอบ COLOR_CORRECTION_MODE
ในอุณหภูมิสีและเฉดสีต่างๆ โดยตรวจสอบการเปลี่ยนแปลงในอัตราส่วน RGB
เทียบกับฉากที่บันทึก scene8
API ที่ทดสอบ:
android.hardware.camera2.CaptureRequest#COLOR_CORRECTION_MODEandroid.hardware.camera2.CaptureResult#COLOR_CORRECTION_MODEandroid.hardware.camera2.CaptureRequest#COLOR_CORRECTION_COLOR_TEMPERATUREandroid.hardware.camera2.CaptureResult#COLOR_CORRECTION_COLOR_TEMPERATUREandroid.hardware.camera2.CaptureRequest#COLOR_CORRECTION_COLOR_TINTandroid.hardware.camera2.CaptureResult#COLOR_CORRECTION_COLOR_TINTandroid.hardware.camera2.CameraCharacteristics#COLOR_CORRECTION_COLOR_TEMPERATURE_RANGEandroid.hardware.camera2.CameraMetadata#COLOR_CORRECTION_MODE_CCTandroid.hardware.camera2.CameraCharacteristics#COLOR_CORRECTION_AVAILABLE_ABERRATION_MODES
ผ่าน: อัตราส่วน RGB แสดงการเพิ่มขึ้นหรือลดลงตามที่คาดการณ์ไว้เมื่อเทียบกับ อุณหภูมิสีและเฉดสีที่เลือก
เกณฑ์การข้ามการทดสอบ
ระบบจะข้ามการทดสอบ test_color_correction_mode_cct หากเป็นไปตามเกณฑ์ต่อไปนี้
- อุปกรณ์มีระดับ API แรก (
first_api_level) เป็น 35 หรือต่ำกว่า - อุปกรณ์ไม่โฆษณา
COLOR_CORRECTION_MODE_CCTในCOLOR_CORRECTION_AVAILABLE_ABERRATION_MODES
scene9
scene9 ประกอบด้วยวงกลมหลายพันวงที่มีขนาดและสีแบบสุ่มเพื่อสร้างฉากที่มีความซ้ำซ้อนต่ำมากเพื่อทดสอบอัลกอริทึมการบีบอัด JPEG

รูปที่ 136 ตัวอย่าง scene9
test_jpeg_high_entropy
การทดสอบที่การบีบอัด JPEG ของกล้องทำงานบน scene9 ที่มีเอนโทรปีสูงและ
ตั้งค่าปัจจัยคุณภาพ JPEG เป็น 100% เพิ่มปัจจัยการซูมเพื่อยืนยันว่า
ฉากที่แสดงบนแท็บเล็ตจะเติมเต็ม FoV ของกล้อง
API ที่ทดสอบ:
ผ่าน: บีบอัดไฟล์ JPEG อย่างถูกต้อง เขียน และอ่านจากดิสก์
test_jpeg_quality
ทดสอบคุณภาพการบีบอัด JPEG ของกล้อง Step JPEG qualities through
android.jpeg.quality and verifies that the quantization tables change
correctly.
API ที่ทดสอบ:
ผ่าน: เมทริกซ์การหาปริมาณจะลดลงเมื่อคุณภาพเพิ่มขึ้น (เมทริกซ์ แสดงถึงปัจจัยการหาร)
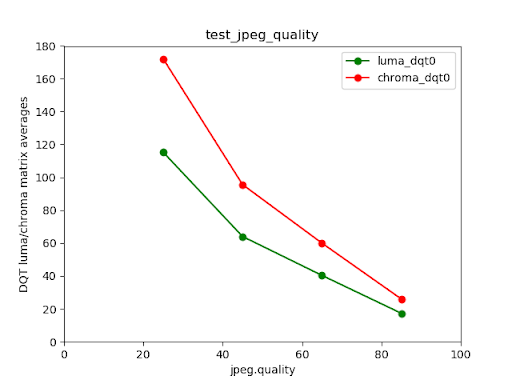
รูปที่ 137 ค่าเฉลี่ยเมทริกซ์ DQT ของความสว่างและสีของกล้องหลัง Pixel 4 เทียบกับคุณภาพ JPEG
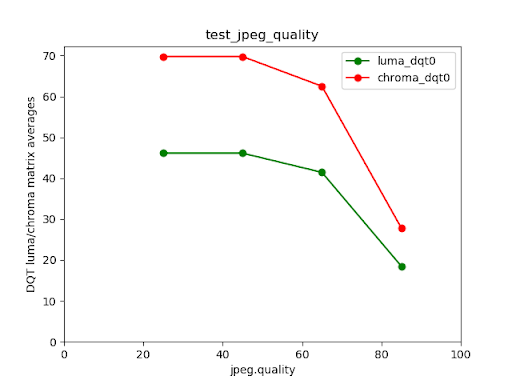
รูปที่ 138 ตัวอย่างการทดสอบที่ไม่สำเร็จ
scene_video
scene_video เป็นฉากวิดีโอที่ประกอบด้วยวงกลมสีต่างๆ 4 วง
เคลื่อนที่ไปมาด้วยอัตราเฟรมที่แตกต่างกันบนพื้นหลังสีขาว
รูปที่ 139 ตัวอย่าง scene_video
test_preview_frame_drop
ทดสอบว่าอัตราเฟรมตัวอย่างที่ขอจะยังคงอยู่กับฉากแบบไดนามิก การทดสอบนี้จะทำงานในกล้องทั้งหมดที่แอปของบุคคลที่สามเข้าถึงได้
API ที่ทดสอบ:
android.hardware.camera2.CameraCharacteristics#CONTROL_AE_AVAILABLE_TARGET_FPS_RANGESandroid.hardware.camera2.CameraCharacteristics#SCALAR_AVAILABLE_CAPABILITIES_STREAM_USE_CASESandroid.hardware.camera2.CaptureResult#CONTROL_AE_TARGET_FPS_RANGEandroid.media.CamcorderProfileandroid.media.MediaRecorder
ผ่าน: อัตราเฟรมของตัวอย่างอยู่ที่อัตราเฟรมสูงสุดของช่วงอัตราเฟรมที่ขอ และความผันผวนเฉลี่ยระหว่างเฟรมที่ต่อเนื่องกันน้อยกว่าค่าความคลาดเคลื่อนสัมพัทธ์ที่ตั้งไว้ในการทดสอบ
scene_extensions
การทดสอบ scene_extensions มีไว้สำหรับส่วนขยายของกล้องและต้องใช้ Camera ITS-in-a-Box
เนื่องจากต้องมีการควบคุมสภาพแวดล้อมการทดสอบอย่างแม่นยำ นอกจากนี้
ต้องควบคุมการรั่วไหลของแสงทั้งหมด ซึ่งอาจต้องคลุมแท่นทดสอบ
DUT และแท็บเล็ตด้วยผ้าคลุม รวมถึงป้องกันไม่ให้แสงรั่วจาก
หน้าจอด้านหน้าของ DUT
scene_hdr
ฉาก scene_hdr ประกอบด้วยภาพบุคคลทางด้านซ้ายและคิวอาร์โค้ดที่มีคอนทราสต์ต่ำ
ทางด้านขวา
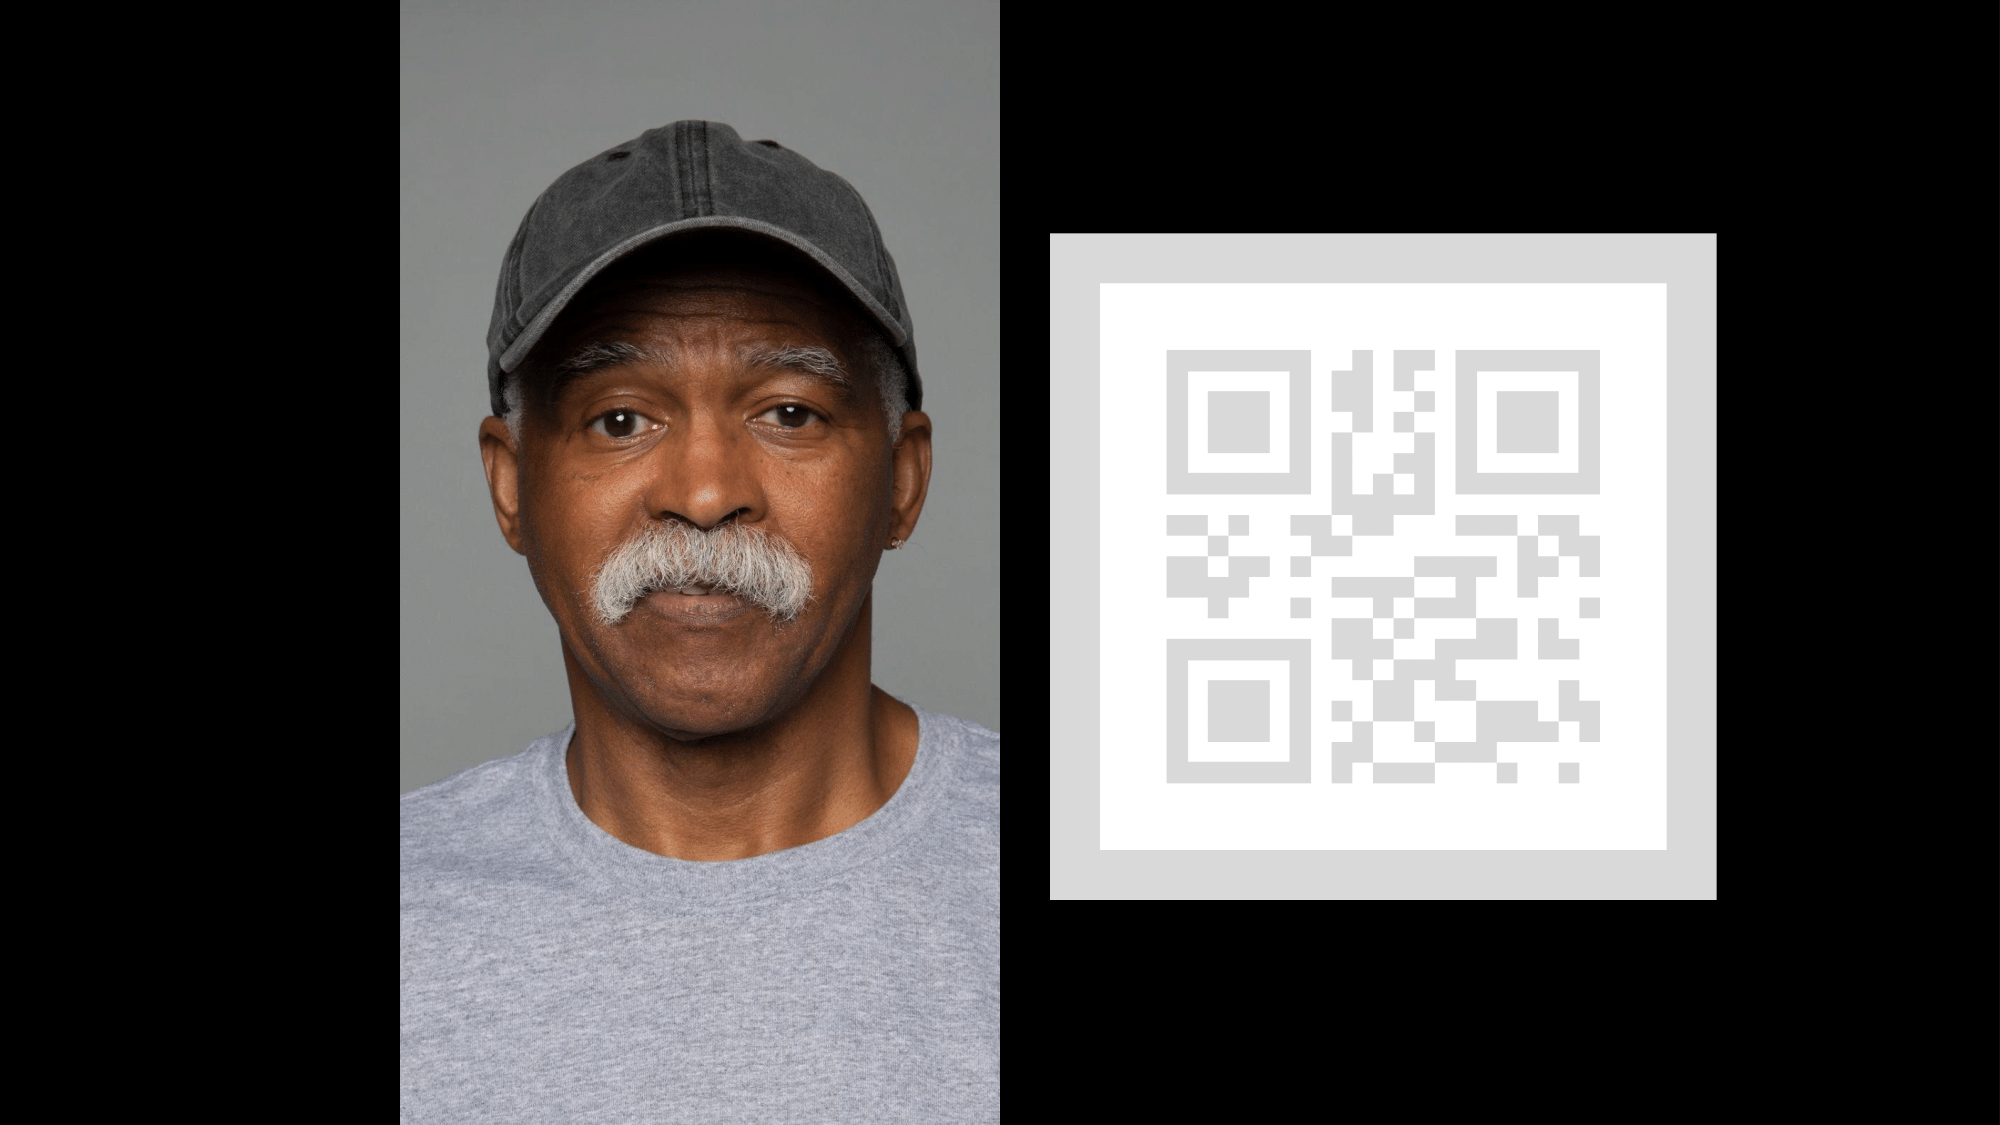
รูปที่ 140 ตัวอย่าง scene_hdr
test_hdr_extension
ทดสอบส่วนขยาย HDR ถ่ายภาพโดยเปิดและปิดใช้ส่วนขยาย แล้วตรวจสอบว่าส่วนขยายช่วยให้ตรวจหาคิวอาร์โค้ดได้ง่ายขึ้นหรือไม่
API ที่ทดสอบ:
android.hardware.camera2.CameraExtensionCharacteristics#getSupportedExtensionsandroid.hardware.camera2.CameraExtensionSession#capture
ผ่าน: ส่วนขยาย HDR จะลดจำนวนการเปลี่ยนแปลงคอนทราสต์ที่จำเป็นต่อการ ตรวจหาคิวอาร์โค้ดหรือลดการไล่ระดับสีในคิวอาร์โค้ด
scene_low_light
ฉาก scene_low_light ประกอบด้วยตารางสี่เหลี่ยมจัตุรัสที่มีเฉดสีเทาแตกต่างกัน
บนพื้นหลังสีดำ และตารางสี่เหลี่ยมจัตุรัสมีเส้นขอบสีแดง
โดยสี่เหลี่ยมจัตุรัสจะจัดเรียงตามเส้นโค้งฮิลเบิร์ต

รูปที่ 141 ตัวอย่าง scene_low_light
test_night_extension
ทดสอบส่วนขยาย กลางคืน ถ่ายภาพโดยเปิดใช้ส่วนขยาย แล้วดำเนินการต่อไปนี้
- ตรวจจับการมีอยู่ของสี่เหลี่ยม 20 รูป
- คำนวณความสว่างที่ล้อมรอบด้วยแต่ละสี่เหลี่ยม
- คำนวณค่าความสว่างเฉลี่ยของสี่เหลี่ยมจัตุรัส 6 ช่องแรกตาม การวางแนวตารางเส้นโค้งฮิลเบิร์ต
- คำนวณความแตกต่างของค่าความสว่างของสี่เหลี่ยมจัตุรัสที่อยู่ติดกัน (เช่น square2 - square1) จนถึงสี่เหลี่ยมจัตุรัสที่ 5 และ 6 (square6 - square5) และหา ค่าเฉลี่ยของความแตกต่างที่คำนวณได้ 5 ค่า
สำหรับอุปกรณ์ที่ใช้ Android 16 ขึ้นไป คำขอจับภาพ จะมีภูมิภาคที่วัดการใช้งานซึ่งสอดคล้องกับสี่เหลี่ยมผืนผ้าที่ล้อมรอบ ตารางสี่เหลี่ยม การเพิ่มนี้จะเปลี่ยนเกณฑ์การผ่านเกณฑ์
API ที่ทดสอบ:
android.hardware.camera2.CameraExtensionCharacteristics#getSupportedExtensionsandroid.hardware.camera2.CameraExtensionSession#capture
บัตร:
- สำหรับอุปกรณ์ที่ใช้ Android 16 ขึ้นไป ค่าความสว่างเฉลี่ยของสี่เหลี่ยมจัตุรัส 6 ช่องแรกต้องมีค่าอย่างน้อย 80 และความแตกต่างเฉลี่ยของค่าความสว่างของสี่เหลี่ยมจัตุรัสที่อยู่ติดกันจนถึงสี่เหลี่ยมจัตุรัสที่ 5 และ 6 ต้องมีค่าอย่างน้อย 18.75
- สำหรับอุปกรณ์ที่ใช้ Android 15 และต่ำกว่า ค่าความสว่างเฉลี่ยของสี่เหลี่ยมจัตุรัส 6 ช่องแรกต้องมีค่าอย่างน้อย 85 และความแตกต่างเฉลี่ยของค่าความสว่างของสี่เหลี่ยมจัตุรัสที่อยู่ติดกันจนถึงสี่เหลี่ยมจัตุรัสช่องที่ 5 และ 6 ต้องมีค่าอย่างน้อย 17
แปลงความสว่างต่อไปนี้แสดงลักษณะของผลการทดสอบที่ผ่าน
รูปที่ 142 ตัวอย่างการผ่านการทดสอบฉากกลางคืนที่มีแสงน้อย
test_low_light_boost_extension
ทดสอบ โหมด AE การเพิ่มแสงในสภาวะแสงน้อย หาก Camera2 รองรับโหมด AE ที่เพิ่มประสิทธิภาพในที่แสงน้อย ระบบจะทำการทดสอบนี้สำหรับ Camera2 หากส่วนขยายกล้องโหมดกลางคืนรองรับและส่วนขยายรองรับโหมด AE ที่เพิ่มประสิทธิภาพในสภาวะแสงน้อย ระบบจะทำการทดสอบนี้กับส่วนขยายกล้องโหมดกลางคืนด้วย การทดสอบนี้จะตั้งค่าโหมด AE เป็นการเพิ่มแสงน้อย ถ่ายเฟรมจากตัวอย่าง และดำเนินการต่อไปนี้
- ตรวจหาการมีอยู่ของกล่อง 20 กล่อง
- คำนวณความสว่างที่ล้อมรอบด้วยแต่ละช่อง
- คำนวณค่าความสว่างเฉลี่ยของสี่เหลี่ยมจัตุรัส 6 ช่องแรกตาม การวางแนวตารางเส้นโค้งฮิลเบิร์ต
- คำนวณความแตกต่างของค่าความสว่างของสี่เหลี่ยมจัตุรัสที่อยู่ติดกัน (เช่น square2 - square1) จนถึงสี่เหลี่ยมจัตุรัสที่ 5 และ 6 (square6 - square5) และหา ค่าเฉลี่ยของความแตกต่างที่คำนวณได้ 5 ค่า
สำหรับอุปกรณ์ที่ใช้ Android 16 ขึ้นไป คำขอจับภาพ จะมีภูมิภาคที่วัดการใช้งานซึ่งสอดคล้องกับสี่เหลี่ยมผืนผ้าที่ล้อมรอบ ตารางสี่เหลี่ยม การเพิ่มนี้จะเปลี่ยนเกณฑ์การผ่านเกณฑ์
API ที่ทดสอบ:
android.hardware.camera2.CameraCharacteristics.CONTROL_AE_AVAILABLE_MODESandroid.hardware.camera2.CameraMetadata#CONTROL_AE_MODE_ON_LOW_LIGHT_BOOST_BRIGHTNESS_PRIORITYandroid.hardware.camera2.CameraExtensionCharacteristics#getSupportedExtensions
บัตร:
สำหรับอุปกรณ์ที่ใช้ Android 16 ขึ้นไป ค่าความสว่างเฉลี่ยของสี่เหลี่ยมจัตุรัส 6 ช่องแรกต้องมีค่าอย่างน้อย 54 และความแตกต่างเฉลี่ยของค่าความสว่างของสี่เหลี่ยมจัตุรัสที่อยู่ติดกันจนถึงสี่เหลี่ยมจัตุรัสที่ 5 และ 6 ต้องมีค่าอย่างน้อย 17
สำหรับอุปกรณ์ที่ใช้ Android 15 และต่ำกว่า ค่าความสว่างเฉลี่ยของสี่เหลี่ยมจัตุรัส 6 ช่องแรกต้องมีค่าอย่างน้อย 70 และความแตกต่างเฉลี่ยของค่าความสว่างของสี่เหลี่ยมจัตุรัสที่อยู่ติดกันจนถึงสี่เหลี่ยมจัตุรัสช่องที่ 5 และ 6 ต้องมีค่าอย่างน้อย 18
scene_tele
ข้อกำหนดที่สำคัญสำหรับการทดสอบ scene_tele คือระยะห่างของชาร์ตต้องเป็นระยะโฟกัสต่ำสุดของเลนส์เทเลโฟโต้เป็นอย่างน้อย
เนื่องจากระยะโฟกัสต่ำสุดนี้อาจแตกต่างกันไปในแต่ละอุปกรณ์ คุณจึงต้องกำหนดค่าการตั้งค่าให้เหมาะกับกล้องเทเลโฟโต้เฉพาะ

รูปที่ 143 การตั้งค่า scene_tele ตามระยะโฟกัสของกล้องมุมกว้างและกล้องเทเล
ดูข้อมูลเพิ่มเติมเกี่ยวกับการตั้งค่าฮาร์ดแวร์ทดสอบได้ที่ การตั้งค่าอุปกรณ์เสริมสำหรับ Tele
scene6_tele
ฉาก scene6_tele ประกอบด้วยตารางเครื่องหมาย ArUco บนพื้นหลังสีขาว
หากscene6_teleจับภาพที่ดูสว่างเกินไปในริกแบบโมดูลาร์ ให้นำแผ่นด้านหน้าของริกแบบโมดูลาร์ออก
ถอดแท่นทดสอบ WFoV ออกจากส่วนขยายและถอดที่ยึดโทรศัพท์ออก
รูปที่ 144 ถอดแท่นทดสอบ WFoV ออกจากส่วนขยายและถอดที่ยึดโทรศัพท์ออก
รูปที่ 145 ถอดเพลตด้านหน้าออก
test_zoom_tele
ทดสอบลักษณะการซูมของกล้องจากเลนส์มุมกว้างไปยังเลนส์เทเลโฟโต้ การทดสอบนี้เหมือนกับ test_zoom แต่จะทดสอบลักษณะการทำงานของการซูมกล้อง
จากเลนส์มุมกว้างไปยังเลนส์เทเลโฟโต้
API ที่ทดสอบ:
android.hardware.camera2.CameraCharacteristics#CONTROL_ZOOM_RATIO_RANGEandroid.hardware.camera2.CameraCharacteristics#LENS_INFO_AVAILABLE_FOCAL_LENGTHSandroid.hardware.camera2.CaptureRequest#CONTROL_ZOOM_RATIOandroid.hardware.camera2.CaptureResult#LENS_FOCAL_LENGTH
ผ่าน: ขนาดสัมพัทธ์ของเครื่องหมาย ArUco ที่จับได้ถูกต้องตามอัตราส่วนการซูมที่ขอ
เพื่อยืนยันว่ากล้องซูมได้อย่างถูกต้อง และระยะห่างของเครื่องหมาย
จากกึ่งกลางของรูปภาพเปลี่ยนแปลงตามเกณฑ์ที่ระบุไว้ใน
test_zoom
test_preview_zoom_tele
ทดสอบลักษณะการซูมของกล้องสำหรับเฟรมตัวอย่างจากเลนส์มุมกว้างไปยัง
เลนส์เทเลโฟโต้ การทดสอบนี้เหมือนกับ
test_preview_zoom แต่จะทดสอบการซูมกล้อง
สำหรับเฟรมตัวอย่างจากเลนส์ไวด์ไปยังเลนส์เทเลโฟโต้
API ที่ทดสอบ:
android.hardware.camera2.CameraCharacteristics#CONTROL_ZOOM_RATIO_RANGEandroid.hardware.camera2.CameraCharacteristics#LENS_INFO_AVAILABLE_FOCAL_LENGTHSandroid.hardware.camera2.CaptureRequest#CONTROL_ZOOM_RATIOandroid.hardware.camera2.CaptureResult#LENS_FOCAL_LENGTH
ผ่าน: ขนาดสัมพัทธ์ของเครื่องหมาย ArUco ที่จับภาพถูกต้องตามอัตราส่วนการซูมที่ขอ เพื่อยืนยันว่ากล้องซูมได้อย่างถูกต้อง และระยะห่างของเครื่องหมาย จากกึ่งกลางของภาพเปลี่ยนแปลงตามเกณฑ์ที่ระบุไว้ใน test_preview_zoom
scene7_tele
scene7_tele เหมือนกับ scene7 ทุกประการ แต่ตั้งค่าสำหรับการทดสอบเลนส์เทเลโฟโต้
โดยเป็นกรอบสี่เหลี่ยมผืนผ้าที่แบ่งออกเป็น 4 ส่วนเท่าๆ กัน ซึ่งแต่ละส่วนจะเติม
ด้วยสีที่แตกต่างกัน ตรงกลางสี่เหลี่ยมผืนผ้าคือชาร์ตขอบเอียง
สำหรับการตรวจสอบความคมชัด เครื่องหมาย ArUco 4 อันจะจัดแนวให้ตรงกับมุมด้านนอกทั้ง 4 มุม
ของสี่เหลี่ยมผืนผ้าเพื่อช่วยในการรับพิกัดที่ถูกต้องของกรอบ
สี่เหลี่ยมผืนผ้าหลักที่อัตราส่วนการซูมต่างๆ
test_multi_camera_switch_tele
การทดสอบนี้จะยืนยันว่าในระหว่างการบันทึกตัวอย่างที่อัตราส่วนการซูมต่างๆ การสลับระหว่างเลนส์ไวด์ (W) และเลนส์เทเลโฟโต้ (tele) จะส่งผลให้มีค่า RGB ที่คล้ายกัน
การทดสอบจะใช้อัตราส่วนการซูมที่แตกต่างกันภายในช่วงที่กำหนดไว้ล่วงหน้าเพื่อทำการ บันทึกตัวอย่างแบบไดนามิกและระบุจุดที่กล้องจริง เปลี่ยน จุดนี้เป็นจุดที่เปลี่ยนจากเลนส์ W ไปเป็นเลนส์เทเล
เฟรมที่จับภาพ ณ จุดครอสโอเวอร์และก่อนหน้านั้นจะได้รับการวิเคราะห์เพื่อหา AE, AWB และ AF
การตรวจสอบ AE จะยืนยันว่าการเปลี่ยนแปลงความสว่างอยู่ในช่วงที่คาดไว้สำหรับ ทั้งรูปภาพเลนส์ W และเลนส์เทเล การตรวจสอบ AWB จะยืนยันว่าอัตราส่วนของสีแดง-เขียว และสีน้ำเงิน-เขียวอยู่ในค่าเกณฑ์สำหรับทั้งภาพเลนส์ W และเลนส์เทเล การตรวจสอบ AF จะประเมินค่าการประมาณความคมชัดตามขนาดการไล่ระดับสีเฉลี่ยระหว่างภาพเลนส์ W และเลนส์เทเล
API ที่ทดสอบ:
android.hardware.camera2.CameraCharacteristics#CONTROL_ZOOM_RATIO_RANGEandroid.hardware.camera2.CaptureRequest#CONTROL_ZOOM_RATIOandroid.media.CamcorderProfileandroid.media.MediaRecorder
ผ่าน: การทดสอบจะผ่านได้ก็ต่อเมื่อการตรวจสอบ AE, AWB และ AF ผ่านทั้งหมด เกณฑ์สำหรับการตรวจสอบแต่ละรายการมีดังนี้
- การตรวจสอบ AE: การเปลี่ยนแปลงความสว่างระหว่างรูปภาพเลนส์ W และเลนส์เทเลต้องน้อยกว่า 4%
- การตรวจสอบ AWB: ในพื้นที่สี LAB ค่าเดลต้า C ระหว่างสีแดง-เขียวและ สีน้ำเงิน-เขียวสำหรับเลนส์ไวด์และเทเลโฟโต้ต้องไม่เกิน 10
- การตรวจสอบ AF: ความคมชัดของภาพจากเลนส์เทเลต้องสูงกว่าเลนส์ W
scene_flash
scene_flash การทดสอบต้องใช้ฉากมืดในกล่องฟิวชันเซ็นเซอร์
ใน Android 17 ขึ้นไป คุณสามารถscene_flashทดสอบ
โดยใช้อุปกรณ์ทดสอบ Gen2
test_auto_flash
การทดสอบที่ทริกเกอร์แฟลชอัตโนมัติในฉากมืดสำหรับกล้องหลังและ กล้องหน้า สำหรับกล้องหน้า แฟลชอัตโนมัติจะใช้หน้าจอเพื่อ ส่องสว่างฉาก ไม่ใช่หน่วยแฟลชจริง การทดสอบจะยืนยันว่า เปิดใช้แฟลชอัตโนมัติโดยตรวจสอบว่ากึ่งกลางของรูปภาพไทล์ สว่างขึ้นเมื่อเปิดใช้แฟลชอัตโนมัติ หากต้องการทริกเกอร์แฟลชอัตโนมัติ คุณต้องปิดไฟใน แท่นทดสอบ และปิดไฟได้โดยอัตโนมัติด้วย ตัวควบคุม Arduino ฉากต้องมืดสนิทเพื่อให้การทดสอบทำงานได้อย่างถูกต้อง ต้องติดตั้ง Jetpack Camera App (JCA) ในอุปกรณ์ก่อนทำการทดสอบ แฟลชอัตโนมัติสำหรับกล้องหลังจะอาศัยสถานะ AE ในการทริกเกอร์ แต่แฟลชอัตโนมัติสำหรับกล้องหน้าจะไม่ขึ้นอยู่กับ AE และจะทริกเกอร์เสมอ
ใน Android 17 ขึ้นไป ให้ทดสอบระดับการซูมที่ไม่ใช่ 1 เท่าเพื่อ ยืนยันฟังก์ชันการทำงานที่ถูกต้องในทุกช่วงการซูมที่รองรับ
API ที่ทดสอบ:
android.hardware.camera2.CameraCharacteristics#FLASH_INFO_AVAILABLEandroid.hardware.camera2.CaptureRequest#CONTROL_AE_MODEandroid.hardware.camera2.CaptureRequest#CONTROL_AE_PRECAPTURE_TRIGGERandroid.hardware.camera2.CaptureResult#CONTROL_AE_STATEandroid.hardware.camera2.CaptureRequest#FLASH_MODE
ผ่าน: กึ่งกลางของรูปภาพไทล์ที่เปิดใช้แฟลชอัตโนมัติจะสว่างกว่า รูปภาพฉากต้นฉบับสำหรับกล้องทุกรุ่น
test_flash_strength
ทดสอบว่ามีการควบคุมความแรงของแฟลชในโหมด
SINGLE
อย่างถูกต้อง
ตรวจสอบว่าหากอุปกรณ์รองรับการควบคุมความแรงของแฟลชขณะใช้กล้องในโหมด SINGLE ความแรงของแฟลชจะเปลี่ยนไปตามระดับความแรงที่ขอ
ยืนยันว่าการควบคุมความแรงของแฟลชทำงานร่วมกับ
AE_MODESต่างๆ ได้
เช่น หากโหมดการรับแสงอัตโนมัติเป็น ON หรือ OFF ระดับความแรงของแฟลช
จะมีผลต่อความสว่าง และหากโหมดเป็น ON_AUTO_FLASH ระดับความแรงของแฟลช
จะไม่มีผลต่อความสว่าง
หากต้องการทำการทดสอบ ต้องปิดไฟในแท่นทดสอบ คุณสามารถปิดไฟโดยอัตโนมัติได้ด้วยตัวควบคุม Arduino ฉากต้องมืดสนิทเพื่อให้การทดสอบทำงานได้อย่างถูกต้อง
API ที่ทดสอบ:
android.hardware.camera2.CameraCharacteristics#FLASH_INFO_STRENGTH_DEFAULT_LEVELandroid.hardware.camera2.CameraCharacteristics#FLASH_INFO_STRENGTH_MAXIMUM_LEVELandroid.hardware.camera2.CameraCharacteristics#FLASH_SINGLE_STRENGTH_DEFAULT_LEVELandroid.hardware.camera2.CameraCharacteristics#FLASH_SINGLE_STRENGTH_MAX_LEVEL
บัตร:
เมื่อโหมดการรับแสงอัตโนมัติเป็น ON หรือ OFF ความสว่างของแพตช์รูปภาพ
จะเพิ่มขึ้นเมื่อระดับความแรงของแฟลชเพิ่มขึ้นจากไม่มีแฟลชเป็น
FLASH_SINGLE_STRENGTH_MAX_LEVEL
เมื่อโหมดการชดเชยแสงอัตโนมัติเป็น ON_AUTO_FLASH ความแตกต่างของความสว่างของ
แพตช์รูปภาพจะอยู่ภายในค่าความคลาดเคลื่อนเมื่อระดับความแรงของแฟลชเพิ่มขึ้นจาก
ไม่มีแฟลชเป็น FLASH_SINGLE_STRENGTH_MAX_LEVEL
test_led_snapshot
การทดสอบว่าสแนปชอต LED ไม่ทำให้รูปภาพอิ่มตัวหรือมีสี
การทดสอบนี้จะเพิ่มตัวควบคุมแสงลงใน Sensor Fusion Box เพื่อ
ควบคุมไฟ เมื่อตั้งค่าไฟเป็น OFF การทดสอบจะถ่ายภาพโดยตั้งค่าโหมด AUTO_FLASH เป็น ON ในระหว่างการจับภาพนี้ การทดสอบจะเรียกใช้ลำดับก่อนการจับภาพโดยมีทริกเกอร์ aePrecapture ตั้งค่าเป็น START และตั้งค่า
เจตนาในการจับภาพเป็น Preview เพื่อจับภาพด้วยแฟลช
เนื่องจากการจับภาพมีฮอตสปอตที่โดดเด่นเนื่องจากแฟลช การทดสอบจึงคำนวณค่าเฉลี่ยของรูปภาพแฟลชของการจับภาพทั้งหมดและตรวจสอบว่าค่าอยู่ในช่วง (68, 102) หรือไม่ หากต้องการตรวจสอบว่ารูปภาพมีการปรับสมดุลสีขาวอย่างสมเหตุสมผลหรือไม่ การทดสอบจะคำนวณอัตราส่วนสีแดงต่อสีเขียวและสีน้ำเงินต่อสีเขียว และตรวจสอบว่าอัตราส่วนอยู่ระหว่าง 0.95 ถึง 1.05 หรือไม่
API ที่ทดสอบ:
android.hardware.camera2.CameraCharacteristics#FLASH_INFO_AVAILABLEandroid.hardware.camera2.CaptureRequest#CONTROL_AE_MODEandroid.hardware.camera2.CaptureRequest#FLASH_MODE
ผ่าน: อัตราส่วนแดง-เขียวและน้ำเงิน-เขียวอยู่ระหว่าง 0.95 ถึง 1.05 ค่าเฉลี่ยของรูปภาพแฟลชอยู่ภายในช่วง (68, 102)
test_night_mode_indicator
ทดสอบฟังก์ชันการทำงานของตัวบ่งชี้โหมดกลางคืน ซึ่งเป็นฟีเจอร์ที่ระบุว่ากล้องทำงานในสภาพแสงน้อยหรือไม่ และจะได้รับประโยชน์จากการถ่ายภาพนิ่งด้วยส่วนขยายกล้องโหมดกลางคืนหรือไม่ ฟีเจอร์นี้ใช้ได้เฉพาะใน อุปกรณ์ที่รองรับส่วนขยายกล้องโหมดกลางคืน
การทดสอบนี้จะตรวจสอบว่าตัวบ่งชี้โหมดกลางคืน แสดงถึงสภาพแสงอย่างถูกต้องในระหว่างการแสดงตัวอย่างกล้อง การทดสอบ จะทำตามขั้นตอนต่อไปนี้
- การเริ่มต้น: การทดสอบจะเริ่มต้น
ItsSessionและดึงข้อมูล พร็อพเพอร์ตี้ของกล้อง และยังสร้างการเชื่อมต่อกับตัวควบคุมแสงสว่างด้วย - เงื่อนไขการข้าม: ระบบจะข้ามการทดสอบหากอุปกรณ์ไม่รองรับ ระดับ API ที่จำเป็นหรือฟีเจอร์ตัวบ่งชี้โหมดกลางคืน
- เซสชัน Camera2:
- การทดสอบจะเริ่มเซสชันการจับภาพตัวอย่างโดยใช้
Camera2เซสชัน - ไฟจะเปิดขึ้นและระบบจะจับภาพเฟรมตัวอย่าง
- การทดสอบจะยืนยันว่าตัวบ่งชี้โหมดกลางคืนอยู่ในสถานะ
OFF - ระบบจะปิดไฟและจับภาพเฟรมตัวอย่าง
- การทดสอบจะยืนยันว่าตัวบ่งชี้โหมดกลางคืนอยู่ในสถานะ
ON
- การทดสอบจะเริ่มเซสชันการจับภาพตัวอย่างโดยใช้
- เซสชันส่วนขยายกล้อง:
- การทดสอบจะทำตามขั้นตอนเดียวกับเซสชัน
Camera2แต่ ใช้เซสชันCameraExtensionที่มีส่วนขยายEXTENSION_NIGHT
- การทดสอบจะทำตามขั้นตอนเดียวกับเซสชัน
- การล้างข้อมูล: การทดสอบจะปิด
ItsSessionและปล่อยตัวควบคุมแสง
API ที่ทดสอบ:
บัตร:
- เมื่อไฟเปิดอยู่ ตัวบ่งชี้โหมดกลางคืนควรอยู่ในสถานะ
OFF - เมื่อไฟปิดอยู่ ตัวบ่งชี้โหมดกลางคืนควรอยู่ในสถานะ
ON - มีผลกับทั้งเซสชัน
Camera2และCameraExtension
test_preview_min_frame_rate
การทดสอบที่อัตราเฟรมตัวอย่างลดลงอย่างถูกต้องในฉากมืด หากต้องการให้การทดสอบนี้ทำงานได้อย่างถูกต้อง ผู้ควบคุมหรือผู้ปฏิบัติงานทดสอบต้องปิดไฟในแท่นทดสอบด้วยตนเอง
API ที่ทดสอบ:
android.hardware.camera2.CameraCharacteristics#CONTROL_AE_AVAILABLE_TARGET_FPS_RANGESandroid.hardware.camera2.CameraCharacteristics#SCALAR_AVAILABLE_CAPABILITIES_STREAM_USE_CASESandroid.hardware.camera2.CaptureResult#CONTROL_AE_TARGET_FPS_RANGEandroid.media.CamcorderProfileandroid.media.MediaRecorder
ผ่าน: อัตราเฟรมของตัวอย่างอยู่ที่อัตราเฟรมขั้นต่ำของช่วงอัตราเฟรมที่ขอ และความแตกต่างระหว่างเฟรมน้อยกว่าค่าความคลาดเคลื่อนสัมบูรณ์ที่ตั้งไว้ในการทดสอบ
test_torch_strength
ทดสอบว่ามีการควบคุมความแรงของแฟลชในโหมด
TORCH
อย่างถูกต้อง
ตรวจสอบว่าหากอุปกรณ์รองรับการควบคุมความแรงของแฟลชขณะใช้กล้องในโหมด TORCH ความแรงของไฟฉายจะเปลี่ยนไปตามระดับความแรงที่ขอ
ยืนยันว่าการควบคุมความแรงของแฟลชทำงานร่วมกับ
AE_MODESต่างๆ ได้
เช่น หากโหมดการรับแสงอัตโนมัติเป็น ON หรือ OFF ระดับความแรงของแฟลช
จะมีผลต่อความสว่าง และหากโหมดเป็น ON_AUTO_FLASH ระดับความแรงของแฟลช
จะไม่มีผลต่อความสว่าง
ยืนยันว่าความแรงของไฟฉายยังคงเท่าเดิมตลอดระยะเวลาของ
การถ่ายภาพต่อเนื่อง ซึ่งจำลองเซสชันการจับภาพวิดีโอ หากต้องการทำการทดสอบ ต้องปิดไฟใน
แท่นทดสอบ โดยสามารถปิดไฟได้โดยอัตโนมัติด้วย
ตัวควบคุม Arduino ฉากต้องมืดสนิทเพื่อให้การทดสอบทำงานได้อย่างถูกต้อง
API ที่ทดสอบ:
android.hardware.camera2.CameraCharacteristics#FLASH_INFO_STRENGTH_DEFAULT_LEVELandroid.hardware.camera2.CameraCharacteristics#FLASH_INFO_STRENGTH_MAXIMUM_LEVELandroid.hardware.camera2.CameraCharacteristics#FLASH_TORCH_STRENGTH_DEFAULT_LEVELandroid.hardware.camera2.CameraCharacteristics#FLASH_TORCH_STRENGTH_MAX_LEVEL
บัตร:
เมื่อโหมดการรับแสงอัตโนมัติเป็น ON หรือ OFF ความสว่างของแพตช์การถ่ายภาพต่อเนื่อง
จะเพิ่มขึ้นเมื่อระดับความแรงของแฟลชเพิ่มขึ้นจากไม่มีแฟลช
เป็น
FLASH_TORCH_STRENGTH_MAX_LEVEL
เมื่อโหมดการรับแสงอัตโนมัติเป็น ON_AUTO_FLASH ความแตกต่างของ
ความสว่างของแพตช์ภาพถ่ายต่อเนื่องจะอยู่ในค่าความคลาดเคลื่อน
เมื่อระดับความแรงของแฟลชเพิ่มขึ้นจากไม่มีแฟลชเป็น
FLASH_TORCH_STRENGTH_MAX_LEVEL
scene_gen2_chart
ใน Android 17 ขึ้นไป scene_gen2_chart จะใช้
แผนภูมิกระดาษ Gen2
แผนภูมิทดสอบนี้ประกอบด้วยตัวอย่างใบหน้า คิวอาร์โค้ด แถบสีเทา ดาวซีเมนส์ แผนภูมิสี และสี่เหลี่ยมจัตุรัสเอียง
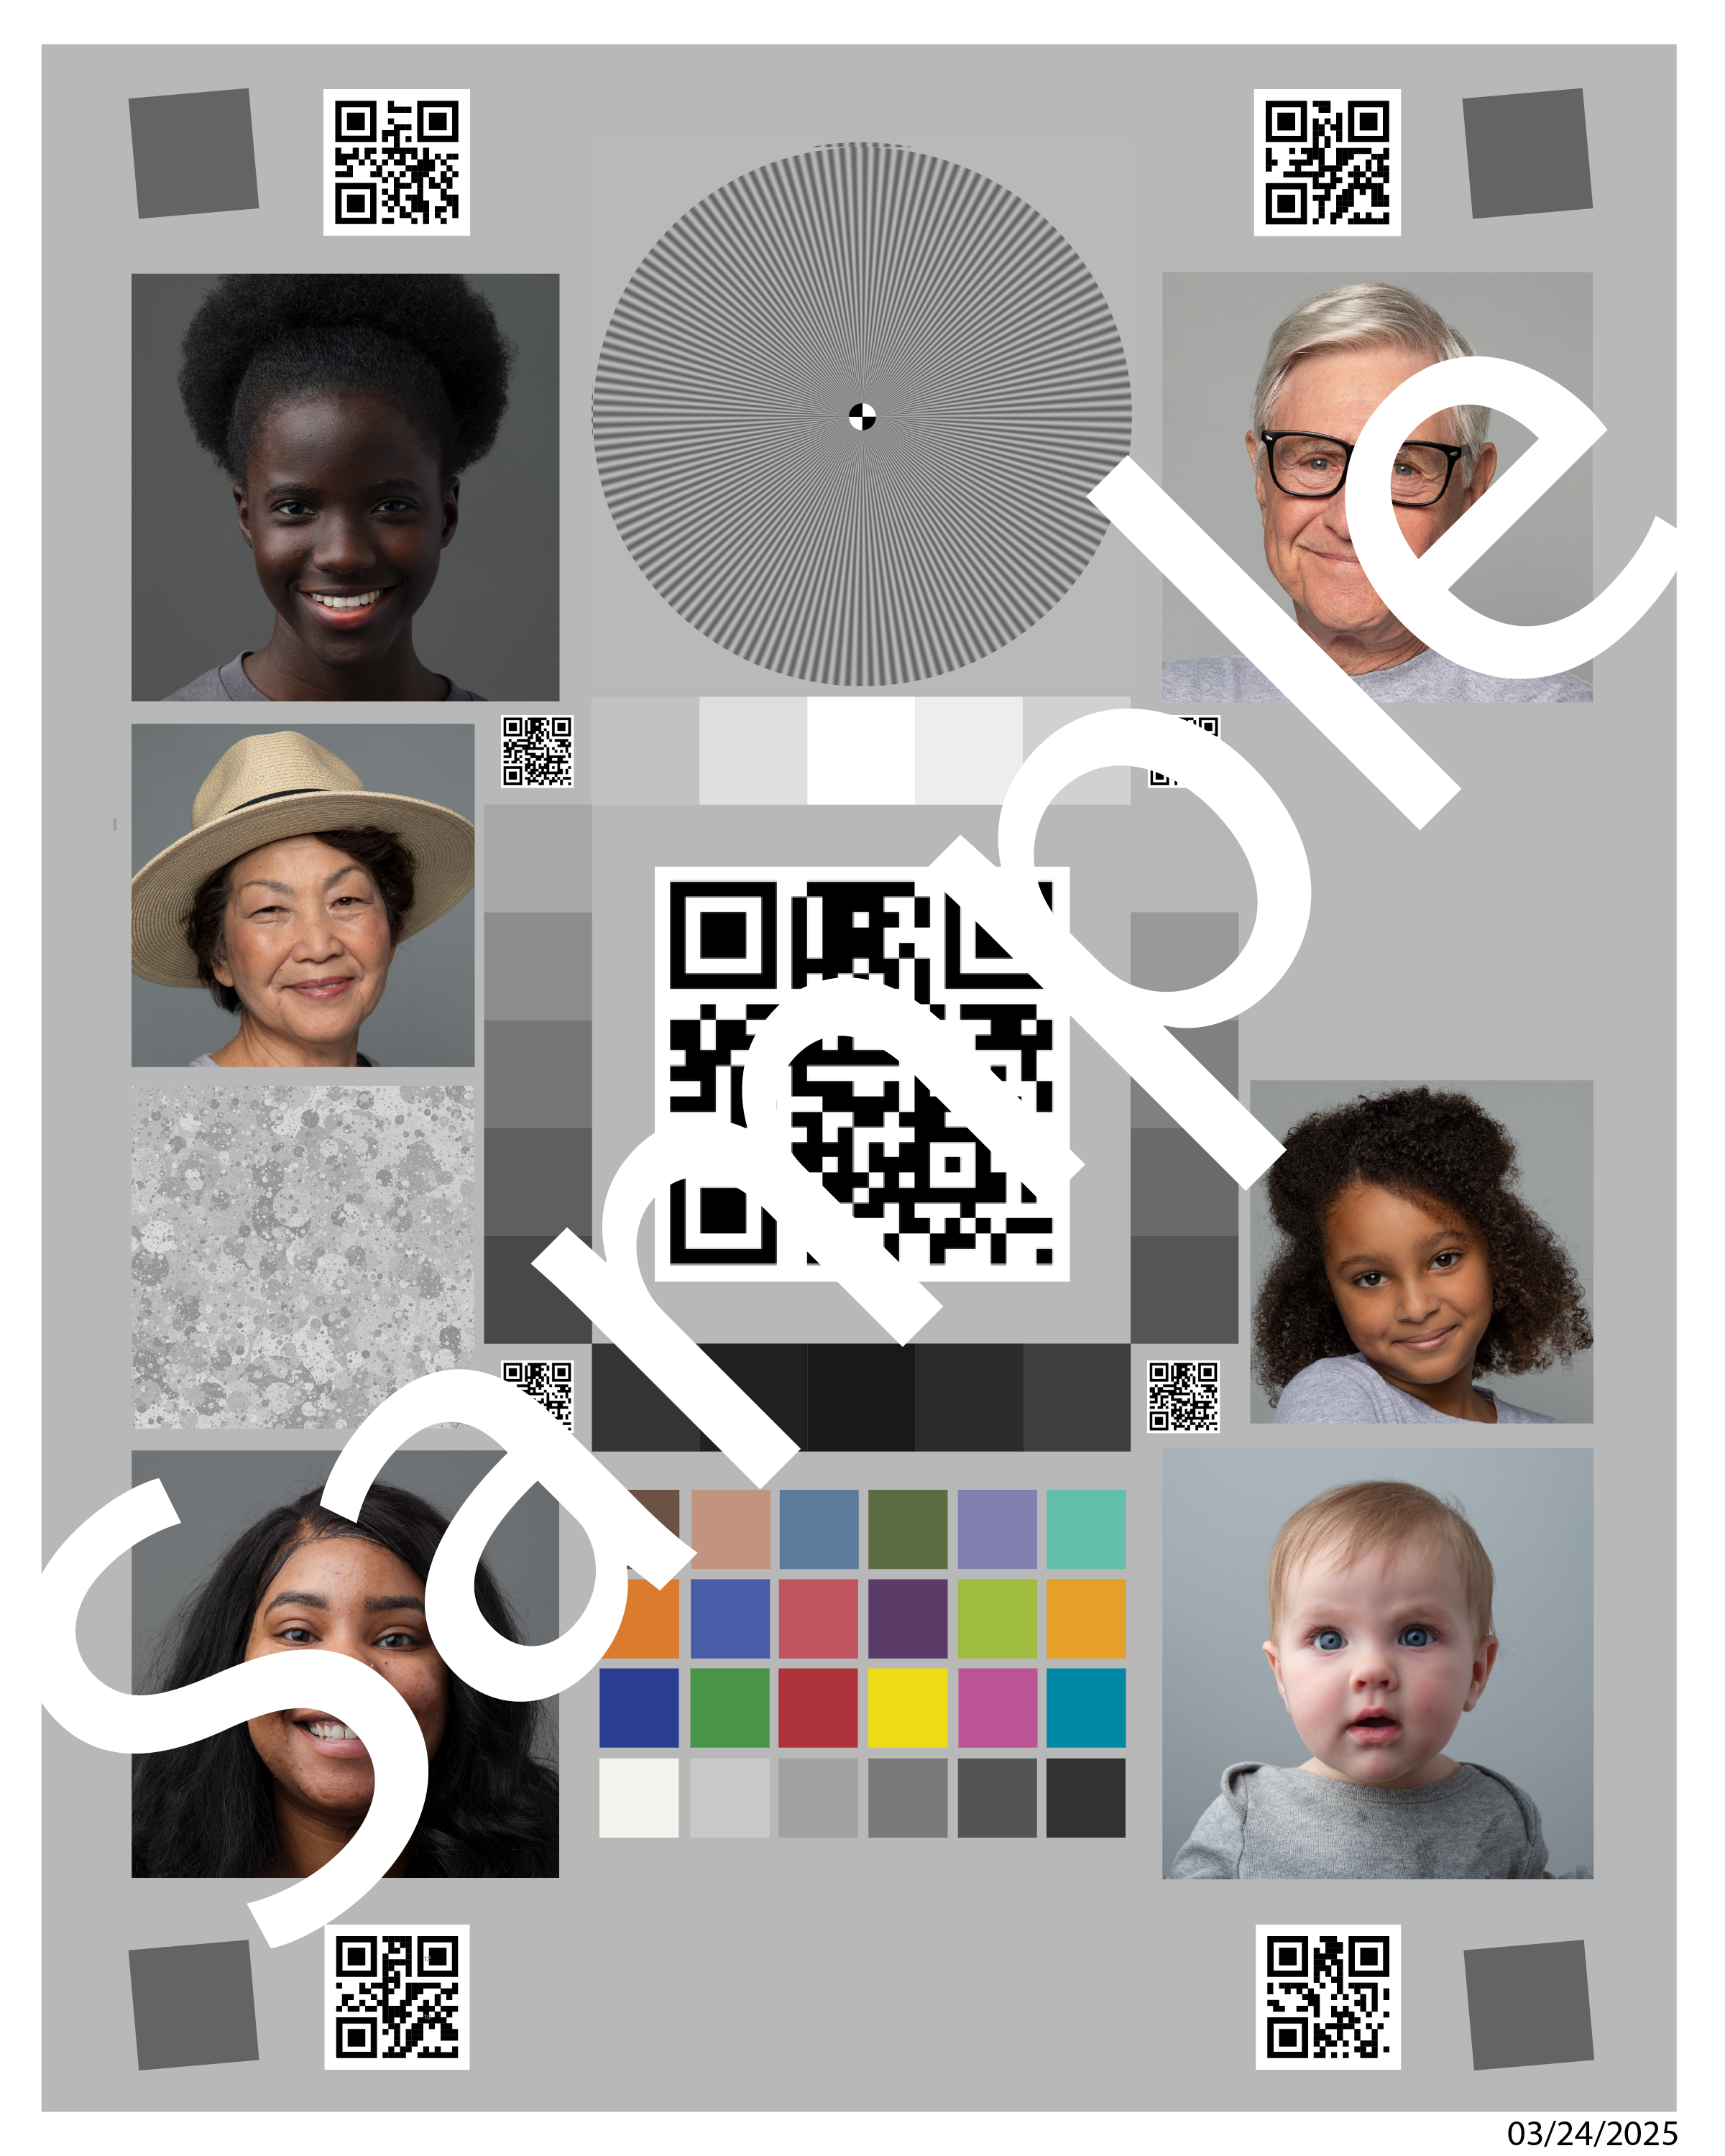
รูปที่ 146 ตัวอย่างแผนภูมิ Gen2
test_tonemap_sequence
การทดสอบนี้จะประเมินเส้นโค้งการแมปโทนเริ่มต้นของอุปกรณ์เทียบกับ เส้นโค้งเชิงเส้นและเส้นโค้งเอกซ์โพเนนเชียล 2 เส้น (เส้นหนึ่งมีจุดสม่ำเสมอ และอีกเส้นหนึ่งมีจุดไม่สม่ำเสมอ) หากต้องการให้ผลลัพธ์ผ่าน ความสว่างของ เส้นโค้งเริ่มต้นต้องมากกว่าความสว่างของเส้นโค้งเชิงเส้นและ เส้นโค้งเอกซ์โพเนนเชียล นอกจากนี้ เส้นโค้งเชิงเส้นต้องสว่างกว่า เส้นโค้งเอกซ์โพเนนเชียล และเส้นโค้งเอกซ์โพเนนเชียลทั้ง 2 เส้นควร มีความสว่างในระดับที่คล้ายกัน
การทดสอบยังยืนยันความแม่นยำของเส้นโค้งเริ่มต้นของอุปกรณ์ด้วย โดยการดึงเส้นโค้งเริ่มต้น ป้อนอีกครั้ง และ จากนั้นเปรียบเทียบความสว่างของรูปภาพที่ได้กับรูปภาพของเส้นโค้งเริ่มต้น เดิม
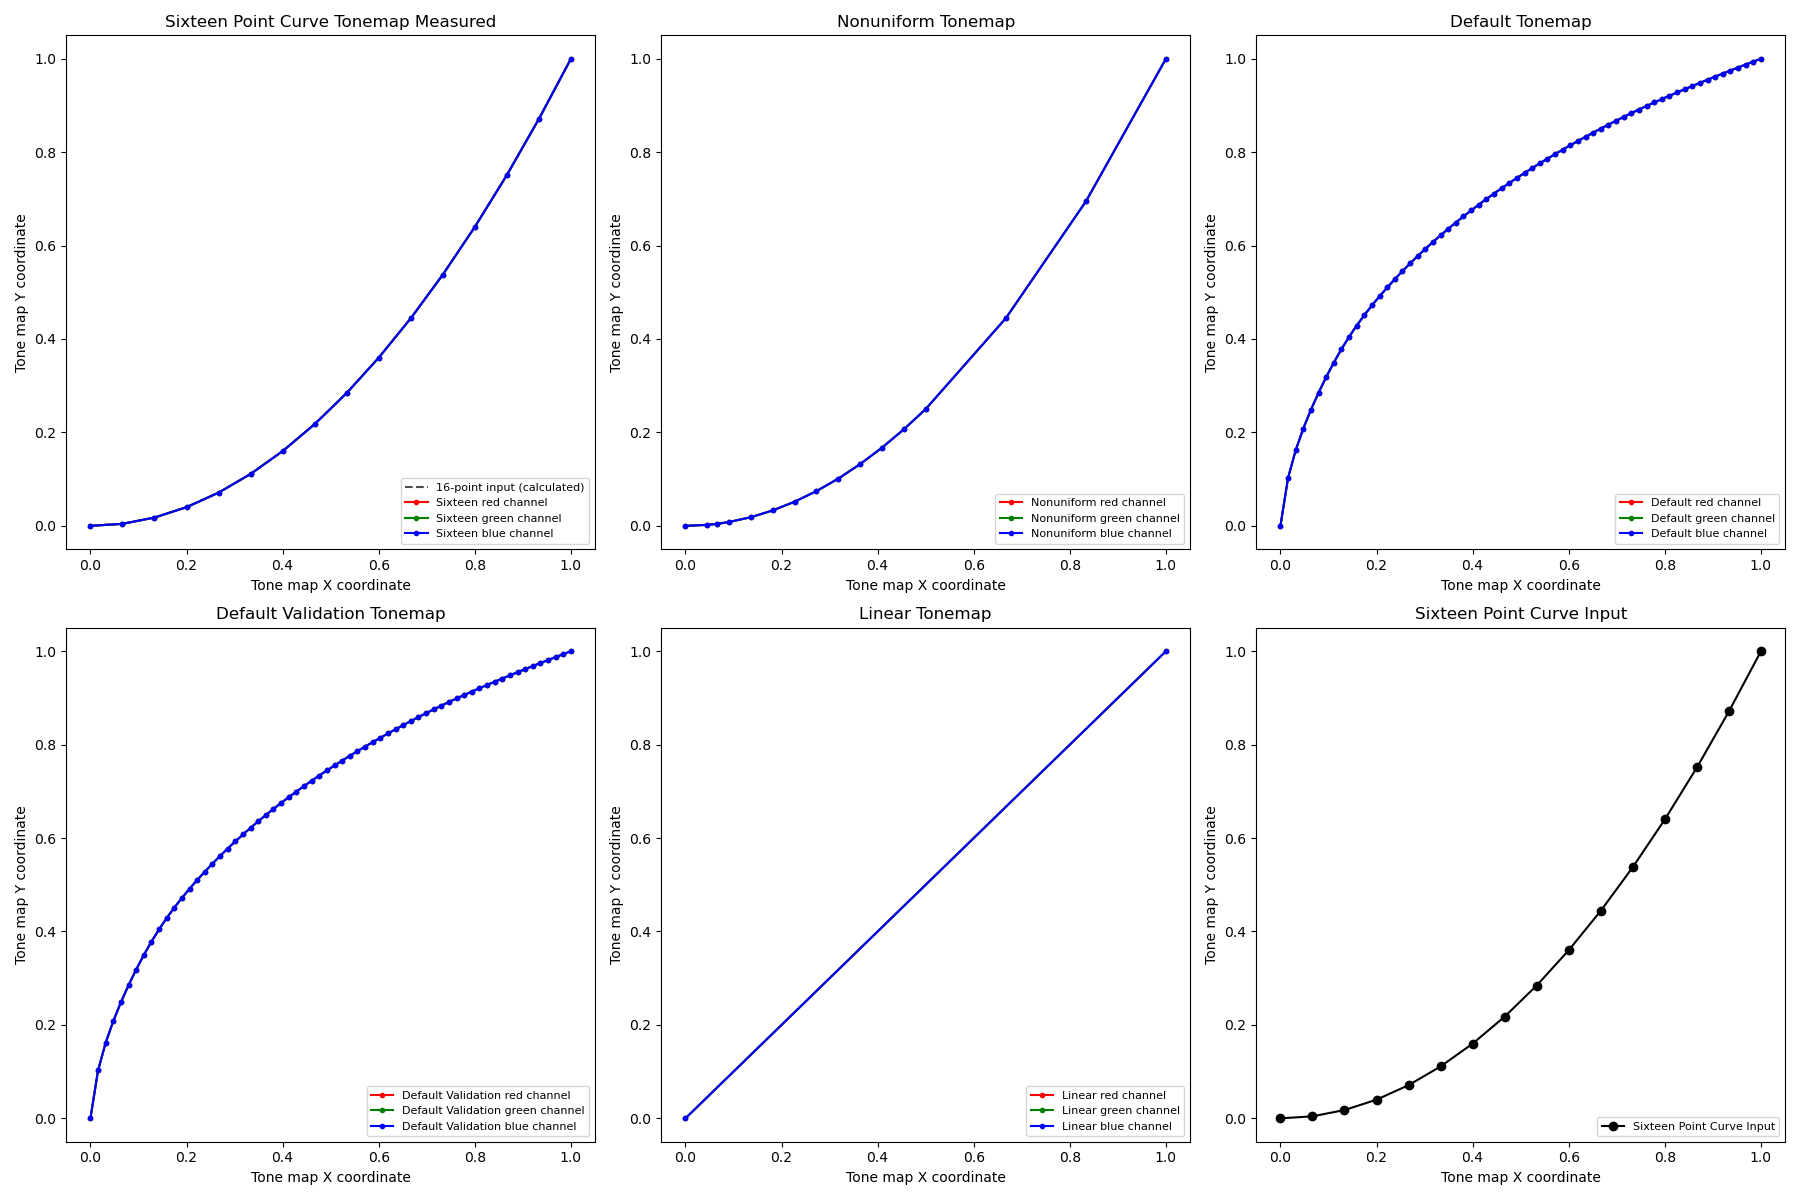
รูปที่ 147 ทดสอบพล็อตลำดับการแมปโทน
API ที่ทดสอบ:
android.hardware.camera2.CameraMetadata#TONEMAP_MODE_CONTRAST_MODEandroid.hardware.camera2.CameraMetadata#TONEMAP_MODE_FASTandroid.hardware.camera2.CaptureRequest#TONEMAP_CURVEandroid.hardware.camera2.CaptureRequest#TONEMAP_MODE
ผ่าน: ความแตกต่างของความสว่างระหว่าง เส้นโค้งเริ่มต้นและเส้นโค้งเชิงเส้นมากกว่า 15% ในขณะที่ความแตกต่างระหว่าง เส้นโค้งเอกซ์โพเนนเชียล 2 เส้นน้อยกว่า 8%
test_multi_camera_switch
การทดสอบนี้จะยืนยันความสอดคล้องของสีและการเปิดรับแสงระหว่างการเปลี่ยนฉากแบบซูมไดนามิก โดยจะยืนยันว่าการสลับระหว่างเลนส์อัลตร้าไวด์ (UW) กับเลนส์ไวด์ (W) ในระหว่างการบันทึกตัวอย่างจะยังคงค่า CIELAB ที่เกือบจะเหมือนกัน เพื่อป้องกันการเปลี่ยนแปลงที่มองเห็นได้ในประสบการณ์ของผู้ใช้
การทดสอบจะบันทึกตัวอย่างแบบไดนามิกในช่วงการซูมที่กำหนดไว้ล่วงหน้าเพื่อ ทริกเกอร์จุด "ครอสโอเวอร์" ของกล้องจริง ซึ่งเลนส์อัลตราไวด์ จะเปลี่ยนเป็นเลนส์ไวด์ การทดสอบจะระบุเฟรมที่แน่นอนซึ่งมีการ สลับเลนส์ ระบบจะบันทึกและวิเคราะห์เฟรมก่อนหน้าและถัดจากจุดครอสโอเวอร์นี้ทันทีเพื่อดูความเสถียรในการเปิดรับแสงอัตโนมัติ (AE) และสมดุลแสงขาวอัตโนมัติ (AWB)
การตรวจสอบ AE จะยืนยันว่าความผันผวนของ Luma ยังคงอยู่ในช่วงที่ยอมรับได้ ในระหว่างการเปลี่ยนเลนส์ การตรวจสอบ AWB จะยืนยันว่าอัตราส่วนสีแดง-เขียวและสีน้ำเงิน-เขียว ยังคงอยู่ภายในเกณฑ์ที่กำหนดของความเป็นกลางของสี
API ที่ทดสอบ:
android.hardware.camera2.CameraCharacteristics#CONTROL_ZOOM_RATIO_RANGEandroid.hardware.camera2.CaptureRequest#CONTROL_ZOOM_RATIOandroid.media.CamcorderProfileandroid.media.MediaRecorder
ผ่าน: การทดสอบจะผ่านได้ก็ต่อเมื่อการตรวจสอบ AE และ AWB ต่อไปนี้ผ่าน
- การตรวจสอบ AE: การเปลี่ยนแปลงความสว่าง (ค่า Y) ระหว่างรูปภาพเลนส์ UW และ W ต้องน้อยกว่า 4% สำหรับแพตช์สีทั้งหมด หากอุปกรณ์รองรับทั้ง
ae_regionsและawb_regionsหากรองรับเฉพาะae_regionsค่าแพตช์สีเทาเท่านั้นที่ต้องเป็นไปตามเกณฑ์ - การตรวจสอบ AWB: ความแตกต่างระหว่างค่าสีแดง-เขียวและสีน้ำเงิน-เขียวสำหรับ
รูปภาพเลนส์ UW และ W ต้องน้อยกว่า 3% สำหรับแพตช์สีเทาและ
ต้องน้อยกว่า 10% สำหรับแพตช์สีอื่นๆ หากอุปกรณ์รองรับทั้ง
ae_regionsและawb_regions

รูปที่ 148 แพตช์สีเทาที่ถ่ายด้วยเลนส์ UW

รูปที่ 149 แพตช์สีเทาที่ถ่ายด้วยเลนส์ W
scene_wide_gamut
scene_wide_gamut คือกรอบสี่เหลี่ยมผืนผ้าที่แบ่งออกเป็น 4 ส่วนเท่าๆ กัน
แต่ละส่วนมีสีต่างกัน ซึ่งต้องใช้แท็บเล็ตเพื่อแสดง
แผนภูมิในขอบเขตสีกว้าง และ DUT ต้องถ่ายภาพขอบเขตสีกว้างของ
หน้าจอ
การทดสอบเหล่านี้จะยืนยันว่ารูปภาพที่ถ่ายเป็นไปตามโปรไฟล์สีและช่วงสีที่ถูกต้อง
test_display_p3
ทดสอบการจับภาพ Display P3 ในรูปแบบ JPEG โดยใช้ ColorSpaceProfiles API ทดสอบ
ว่า JPEG ที่จับภาพมีโปรไฟล์ ICC ที่เหมาะสมในส่วนหัว และ
ว่ารูปภาพมีเปอร์เซ็นไทล์ของสีบางอย่างที่อยู่นอกขอบเขตสี sRGB
API ที่ทดสอบ:
android.hardware.camera2.params.ColorSpaceProfilesandroid.hardware.camera2.params.SessionConfiguration#setColorSpace
ผ่าน: JPEG มีโปรไฟล์ ICC ของ Display P3 และมีสีมากกว่า 1% ที่อยู่นอกขอบเขตสี sRGB

รูปที่ 150. ตัวอย่าง test_display_p3
sensor_fusion
การทดสอบการรวมเซ็นเซอร์ต้องมีการเคลื่อนไหวโทรศัพท์ที่เฉพาะเจาะจงด้านหน้า
รูปแบบตารางหมากรุกและเครื่องหมาย ArUco โปรดตรวจสอบว่าชาร์ตทดสอบติดตั้งราบเพื่อให้ได้ผลลัพธ์ที่ดีที่สุด แผนภูมิที่ไม่คงที่ส่งผลต่อการคำนวณการหมุนเวียนสำหรับการทดสอบหลายรายการ
โดยแผนภูมิต้องเต็มด้านหลังของกล่องฟิวชันเซ็นเซอร์ด้วยการพิมพ์
ที่ขนาด 17x17 นิ้ว (43x43 ซม.) sensor_fusion สามารถทดสอบโดยอัตโนมัติ
ด้วยกล่อง Sensor Fusion

รูปที่ 151 แผนภูมิการผสานเซ็นเซอร์

รูปที่ 152 แผนภูมิการรวมเซ็นเซอร์ที่เติมด้านหลังของกล่องการรวมเซ็นเซอร์
test_lens_intrinsic_calibration
การทดสอบที่ศูนย์กลางออปติคัลของการเปลี่ยนแปลงโดยธรรมชาติของเลนส์เมื่อเลนส์เคลื่อนที่ เนื่องจากระบบกันภาพสั่นแบบออปติคัล (OIS) หากระบบรองรับตัวอย่างพารามิเตอร์ภายในของเลนส์ ระบบจะทดสอบว่าศูนย์กลางออปติคัลของตัวอย่างพารามิเตอร์ภายในของเลนส์มีการเปลี่ยนแปลงเมื่อเลนส์เคลื่อนที่เนื่องจาก OIS หรือไม่
API ที่ทดสอบ:
android.hardware.camera2.CameraCharacteristics#LENS_INTRINSIC_CALIBRATIONandroid.media.MediaRecorderandroid.media.CamcorderProfile
ผ่าน: ศูนย์กลางออปติคอลของเลนส์มีการเปลี่ยนแปลงโดยธรรมชาติ 1 พิกเซลขึ้นไป หากระบบรองรับตัวอย่างพารามิเตอร์ภายในของเลนส์ ศูนย์กลางทางแสงของตัวอย่างพารามิเตอร์ภายในของเลนส์จะเปลี่ยนไป 1 พิกเซลขึ้นไป
รูปต่อไปนี้เป็นตัวอย่างtest_lens_intrinsic_calibrationกราฟ
ที่แสดงการเปลี่ยนแปลงของจุดหลักในหน่วยพิกเซลสำหรับแต่ละเฟรม
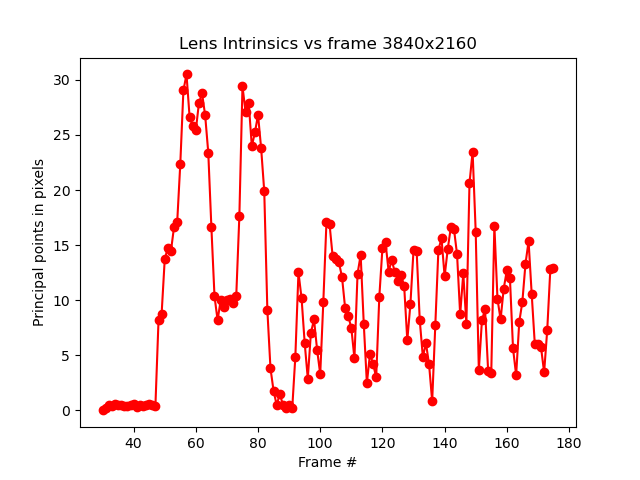
รูปที่ 153 ตัวอย่างของพล็อต test_lens_intrinsic_calibration ที่แสดงการเปลี่ยนแปลงของจุดหลัก เป็นพิกเซลสำหรับแต่ละเฟรม
test_multi_camera_frame_sync
การทดสอบที่จัดเฟรมการประทับเวลาที่กล้องเชิงตรรกะบันทึกไว้จะอยู่ภายใน 10 มิลลิวินาทีโดย การคำนวณมุมของสี่เหลี่ยมภายในกระดานหมากรุกเพื่อกำหนดการประทับเวลา
API ที่ทดสอบ:
android.hardware.camera2.CameraCharacteristics#LOGICAL_MULTI_CAMERA_SENSOR_SYNC_TYPEandroid.hardware.camera2.CameraCharacteristics#getPhysicalCameraIds()android.hardware.camera2.CameraMetadata#REQUEST_AVAILABLE_CAPABILITIES_LOGICAL_MULTI_CAMERAandroid.hardware.camera2.params.OutputConfiguration#setPhysicalCameraId()
ผ่าน: มุมระหว่างรูปภาพจากกล้องแต่ละตัวไม่เปลี่ยนแปลงอย่างเห็นได้ชัด เมื่อหมุนโทรศัพท์
test_preview_distortion
การทดสอบว่ามีการแก้ไขการบิดเบือนตลอดทั้งเฟรมตัวอย่างแต่ละเฟรมที่ถ่ายในระดับการซูมต่างๆ สำหรับการแสดงตัวอย่างแต่ละเฟรม การทดสอบจะคำนวณจุดที่เหมาะสม โดยอิงตามพารามิเตอร์ภายในและภายนอกของกล้อง
ในรูปภาพตัวอย่าง จุดที่เหมาะสมจะแสดงเป็นสีเขียว ส่วนจุดจริงจะแสดงเป็นสีแดง ข้อผิดพลาดจากการบิดเบี้ยวจะคำนวณตามระยะทางพิกเซล RMS ระหว่างจุดจริงกับจุดในอุดมคติ ไฮไลต์สีเขียวและสีแดงใน รูปภาพใช้เพื่อตรวจหาพื้นที่ที่มีข้อผิดพลาดจากการบิดเบือนด้วยสายตา
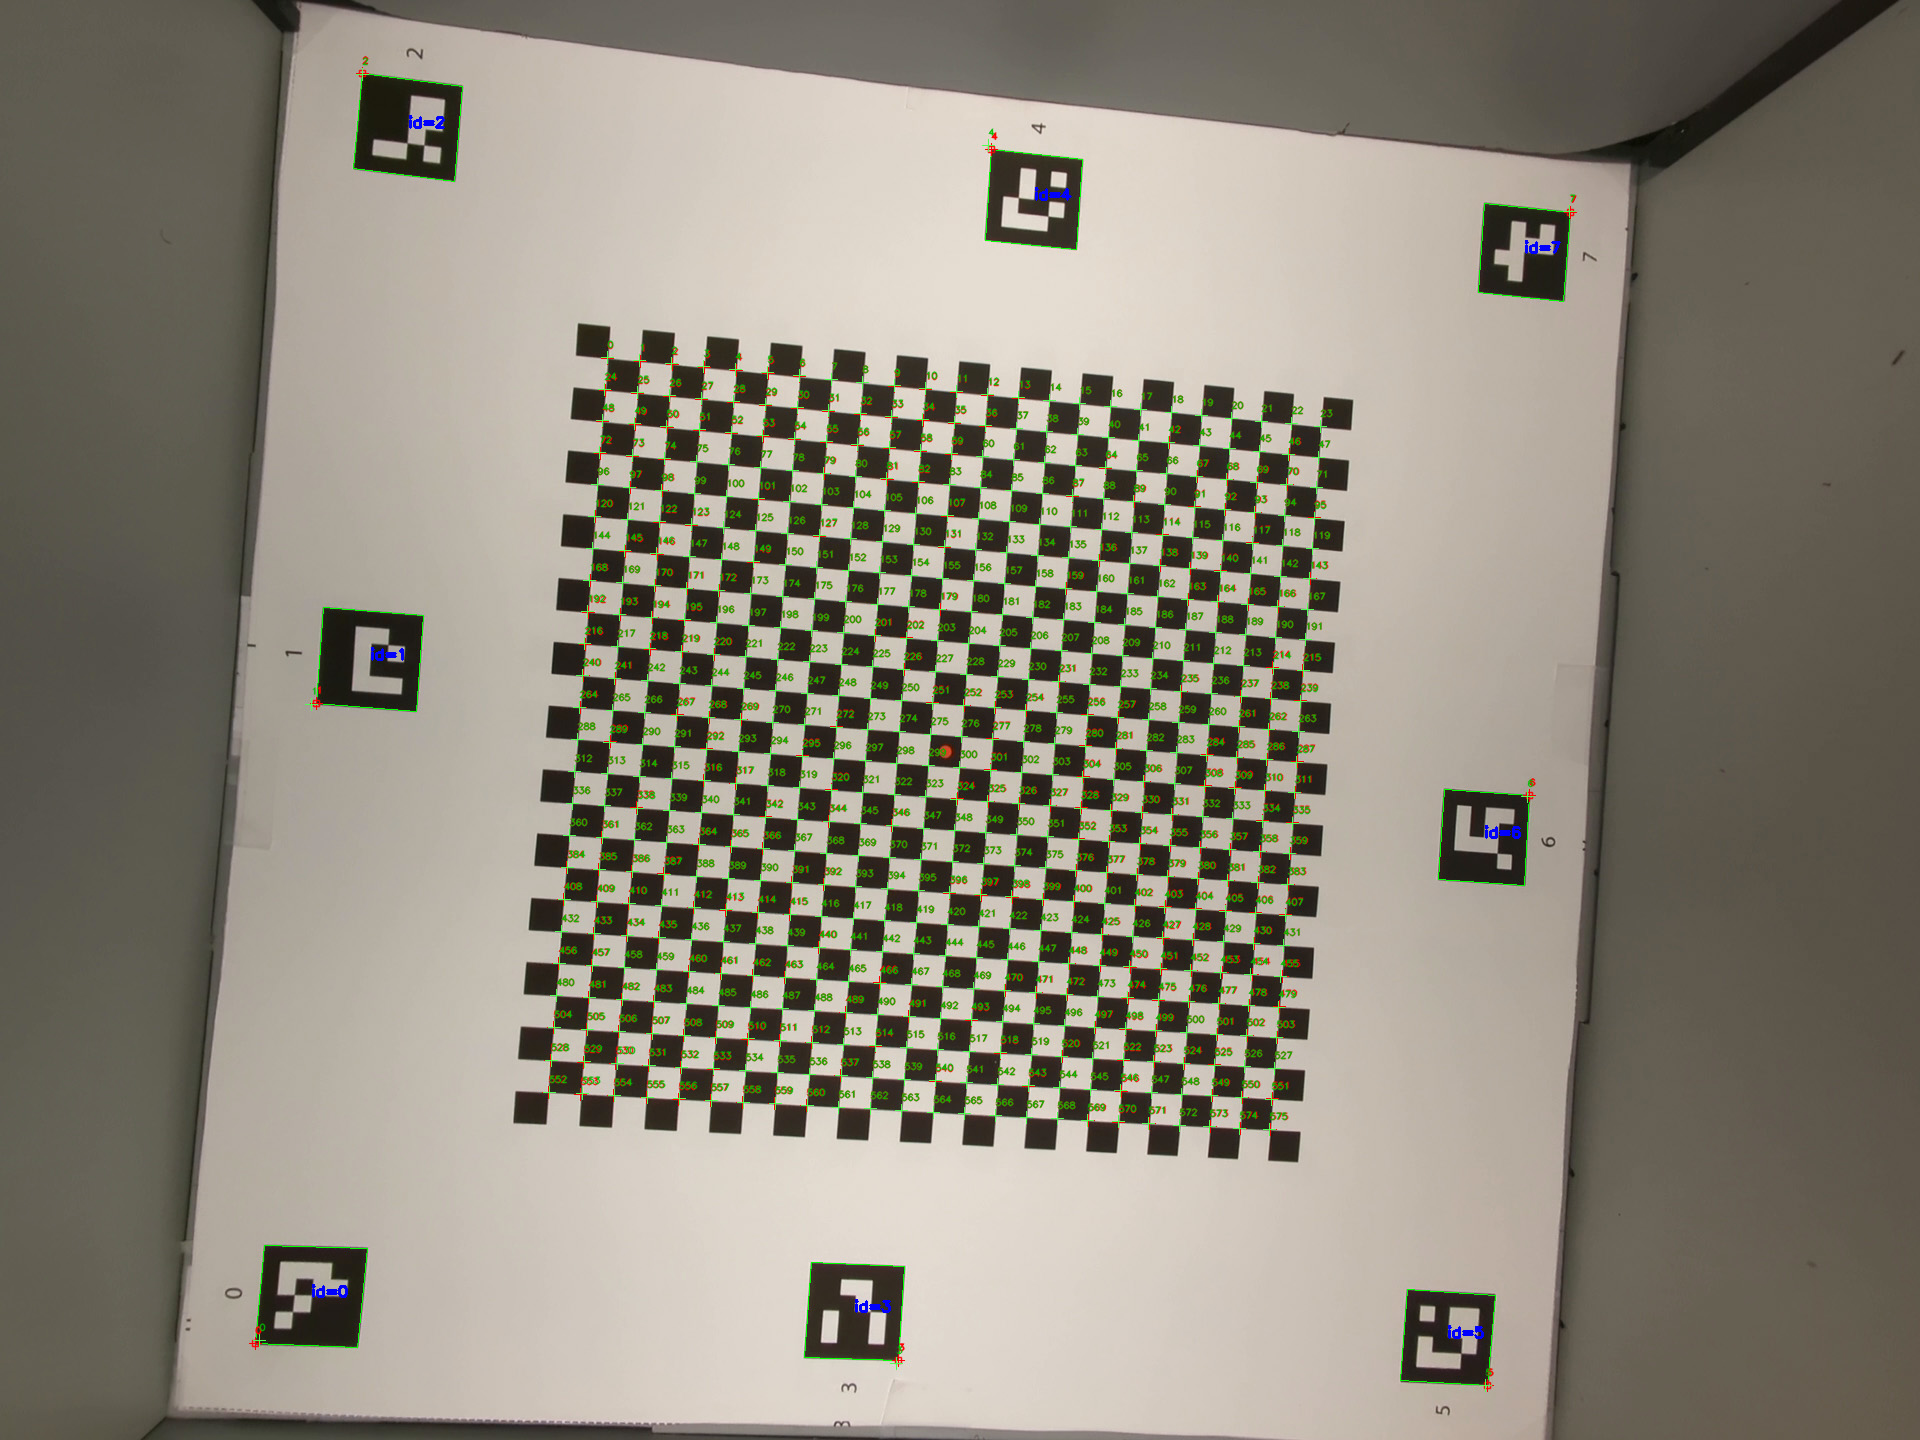
รูปที่ 154 รูปภาพกระดานหมากรุกที่มีจุดที่เหมาะสมเป็นสีเขียวและจุดจริงเป็นสีแดง
API ที่ทดสอบ:
android.hardware.camera2.CameraCharacteristics#CONTROL_ZOOM_RATIO_RANGEandroid.hardware.camera2.CaptureRequest#CONTROL_ZOOM_RATIOandroid.hardware.camera2.CameraCharacteristics#getPhysicalCameraIds()android.media.CamcorderProfileandroid.media.MediaRecorder
ผ่าน: ข้อผิดพลาดความผิดเพี้ยนที่ปรับให้เป็นมาตรฐานของเฟรมตัวอย่างแต่ละเฟรมน้อยกว่า เกณฑ์ที่ตั้งไว้ในการทดสอบ
test_preview_stabilization
การทดสอบที่ทำให้วิดีโอตัวอย่างคงที่หมุนน้อยกว่าไจโรสโคป
API ที่ทดสอบ:
android.hardware.camera2.CameraCharacteristics#SCALAR_AVAILABLE_CAPABILITIES_STREAM_USE_CASESandroid.media.MediaRecorderandroid.media.CamcorderProfile
ผ่าน: การหมุนมุมสูงสุดในเฟรมน้อยกว่า 70% ของการหมุน ไจโรสโคป
วิดีโอตัวอย่างที่มีและไม่มีการกันภาพสั่นมีดังนี้
รูปที่ 155 วิดีโอตัวอย่างที่มีการป้องกันภาพสั่นไหว
รูปที่ 156 วิดีโอตัวอย่างที่ไม่มีการป้องกันภาพสั่นไหว
test_sensor_fusion
ทดสอบความแตกต่างของการประทับเวลาของกล้องและเครื่องวัดการหมุนสำหรับแอปพลิเคชัน AR และ VR หมุนโทรศัพท์ 90 องศา 10 ครั้งหน้า
รูปแบบตารางหมากรุก การเคลื่อนไหวจะใช้เวลาประมาณ 2 วินาทีไป-กลับ ระบบจะข้ามการทดสอบนี้หากไม่มีไจโรสโคปหรือไม่ได้เปิดใช้พารามิเตอร์แหล่งที่มาของการประทับเวลา
REALTIME
test_sensor_fusion การทดสอบจะสร้างพล็อตจำนวนหนึ่ง พล็อตที่สำคัญที่สุด 2 รายการสำหรับการแก้ไขข้อบกพร่องคือ
test_sensor_fusion_gyro_events: แสดงเหตุการณ์เครื่องวัดการหมุนของโทรศัพท์ ระหว่างการทดสอบ การเคลื่อนที่ในทิศทาง x และ y แสดงว่าโทรศัพท์ไม่ได้ ติดตั้งบนเพลตยึดอย่างแน่นหนา ซึ่งจะลดโอกาสที่การทดสอบจะ ผ่าน จำนวนรอบในพล็อตขึ้นอยู่กับความเร็วในการเขียน สำหรับการบันทึกเฟรม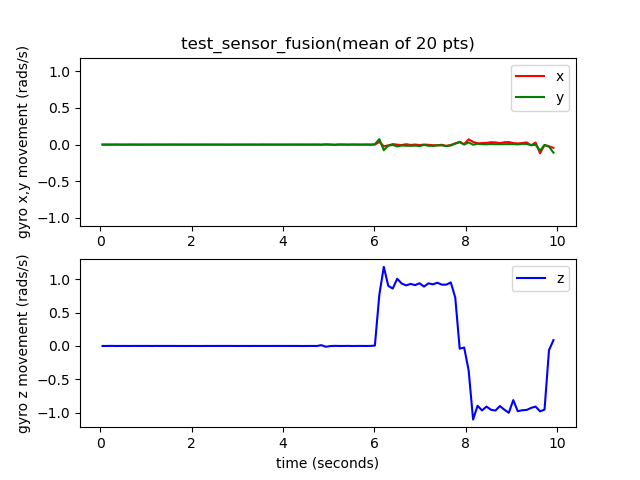
รูปที่ 157. ตัวอย่างเหตุการณ์ไจโรสโคป test_sensor_fusion
test_sensor_fusion_plot_rotations: แสดงการจัดแนวของเครื่องวัดการหมุน และเหตุการณ์จากกล้อง พล็อตนี้ต้องแสดงการเคลื่อนไหวที่ตรงกันระหว่างกล้องกับ ไจโรสโคปที่ +/-1 มิลลิวินาที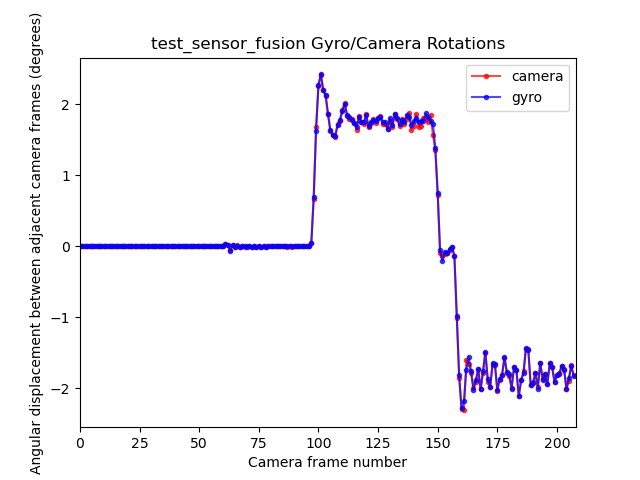
รูปที่ 158. ตัวอย่างการหมุนแปลงพล็อต test_sensor_fusion
API ที่ทดสอบ:
android.hardware.camera2.CameraCharacteristics#LENS_FACINGandroid.hardware.camera2.CameraCharacteristics#SENSOR_INFO_TIMESTAMP_SOURCEandroid.hardware.camera2.CameraMetadata#SENSOR_INFO_TIMESTAMP_SOURCE_REALTIMEandroid.hardware.camera2.CaptureRequest#CONTROL_AE_TARGET_FPS_RANGEandroid.hardware.camera2.CaptureRequest#SENSOR_FRAME_DURATIONandroid.hardware.camera2.CaptureRequest#SENSOR_TIMESTAMPandroid.hardware.camera2.CaptureResult#SENSOR_ROLLING_SHUTTER_SKEW
ผ่าน: ออฟเซ็ตของกล้องและเครื่องวัดการหมุนมีคําประทับเวลาน้อยกว่า 1 มิลลิวินาทีตาม 7.3.9 High Fidelity Sensors ใน CDD
กลไกการทำงานที่ล้มเหลว
- ข้อผิดพลาดในการชดเชย: การชดเชยไจโรสโคปของกล้องไม่ได้รับการปรับเทียบอย่างถูกต้อง ภายใน +/-1 มิลลิวินาที
- เฟรมหลุด: ไปป์ไลน์ไม่เร็วพอที่จะจับภาพ 200 เฟรม ติดต่อกัน
- ข้อผิดพลาดเกี่ยวกับซ็อกเก็ต:
adbเชื่อมต่อกับ DUT ไม่ได้นานพอที่จะ เรียกใช้การทดสอบ - ชาร์ตไม่ได้ติดเรียบ พล็อต
test_sensor_fusion_plot_rotationsมีเฟรมที่ไจโรสโคปและการหมุนของกล้องแตกต่างกันอย่างมากเนื่องจาก กล้องหมุนผ่านส่วนของแผนภูมิที่ไม่แบน - กล้องไม่ได้ติดตั้งในแนวราบ พล็อต
test_sensor_fusion_gyro_eventsแสดงการเคลื่อนไหวในระนาบ X และ Y ความล้มเหลวนี้มักเกิดขึ้นในกล้องหน้ามากกว่า เนื่องจากกล้องหลังมัก มีส่วนที่นูนขึ้นจากส่วนอื่นๆ ของตัวโทรศัพท์ ทำให้เกิดการเอียงเมื่อ ติดด้านหลังของโทรศัพท์เข้ากับเพลตยึด
test_video_stabilization
เลิกใช้แล้ว: การทดสอบนี้เลิกใช้แล้วตั้งแต่ Android 17 สำหรับ Android 17 ขึ้นไป การทดสอบนี้จะแทนที่ด้วย test_video_stabilization_jca
การทดสอบที่วิดีโอที่ปรับไม่ให้สั่นหมุนน้อยกว่าไจโรสโคป
API ที่ทดสอบ:
android.hardware.camera2.CameraCharacteristics#SCALAR_AVAILABLE_CAPABILITIES_STREAM_USE_CASESandroid.media.MediaRecorderandroid.media.CamcorderProfile
ผ่าน: การหมุนมุมสูงสุดในเฟรมจะน้อยกว่า 60% ของการหมุน ไจโรสโคป
วิดีโอตัวอย่างที่มีและไม่มีการป้องกันภาพสั่นไหวมีดังนี้
รูปที่ 159 วิดีโอตัวอย่างที่มีการป้องกันภาพสั่นไหว
รูปที่ 160 วิดีโอตัวอย่างที่ไม่มีการป้องกันภาพสั่นไหว
test_video_stabilization_jca
การทดสอบที่ทำให้วิดีโอที่บันทึกโดยใช้ JCA หมุนน้อยกว่าเครื่องวัดการหมุน ต้องติดตั้ง JCA ใน อุปกรณ์ก่อนทำการทดสอบ
API ที่ทดสอบ:
android.hardware.camera2.CameraCharacteristics#SCALAR_AVAILABLE_CAPABILITIES_STREAM_USE_CASESandroid.media.CamcorderProfileandroid.media.MediaRecorder
ผ่าน: การหมุนมุมสูงสุดในเฟรมที่ดึงมาจากวิดีโอที่บันทึกโดยใช้ JCA น้อยกว่า 70% ของการหมุนไจโรสโคป
feature_combination
feature_combination การทดสอบจะยืนยันว่าฟีเจอร์ทำงานได้อย่างถูกต้องเมื่อ
เปิดใช้ฟีเจอร์กล้องหลายรายการพร้อมกัน การทดสอบเหล่านี้ใช้ภาพตารางหมากรุกเดียวกันกับที่ใช้ในฉากการรวมเซ็นเซอร์
test_feature_combination
ทดสอบการผสมผสานทั้งหมดของการผสมผสานสตรีมที่แตกต่างกัน โหมดการป้องกันภาพสั่นไหวของวิดีโอ ช่วง FPS เป้าหมาย วิดีโอ HDR 10 บิต และ Ultra HDR ที่อุปกรณ์กล้องรองรับ
สำหรับ Android 16 ขึ้นไป การทดสอบจะเรียกใช้ฟีเจอร์ที่รองรับทั้งหมด
และบันทึกผลลัพธ์ลงในไฟล์ Proto การยืนยันความล้มเหลว
จะเรียกใช้เฉพาะชุดค่าผสมของฟีเจอร์ที่
isSessionConfigurationSupported แสดงผล True
API ที่ทดสอบ:
android.hardware.camera2.CameraDevice.CameraDeviceSetup#isSessionConfigurationSupportedandroid.hardware.camera2.CameraDevice.CameraDeviceSetup#createCaptureRequest
ผ่าน: สำหรับชุดค่าผสมของฟีเจอร์ที่รองรับแต่ละชุด
- ระบบจะปรับสตรีมตัวอย่างให้เสถียรหากเปิดการปรับตัวอย่างให้เสถียร
- อัตราเฟรมของตัวอย่างอยู่ใน
AE_TARGET_FPS_RANGEที่กำหนดค่าไว้ - พื้นที่สีของสตรีมตัวอย่างที่บันทึกไว้จะตรงกับที่ตั้งค่าไว้
- การจับภาพ Ultra HDR มีแผนที่การเพิ่มที่ถูกต้อง
scene_ip
ใน Android 16 ขึ้นไป ฉาก scene_ip จะเปิดใช้การตรวจสอบความเท่าเทียมของรูปภาพระหว่าง
แอปกล้องเริ่มต้นกับแอปกล้อง Jetpack (JCA) เพื่อระบุความแตกต่างที่สำคัญ
ระหว่างรูปภาพที่ถ่าย JCA จะจำลองการจับภาพจากแอปโซเชียลมีเดีย
และให้รูปภาพพื้นฐานซึ่งแอปโซเชียลมีเดียจะนำไปประมวลผลและ
ปรับแต่ง
ข้อกำหนดในการตั้งค่าฮาร์ดแวร์
ต้องตั้งค่าฮาร์ดแวร์ต่อไปนี้สำหรับการทดสอบ scene_ip
- การทดสอบจะดำเนินการใน ITS-in-a-box ของกล้อง Gen2
- ระบบจะใช้ตัวควบคุมแสงและเซอร์โวที่เป็นส่วนหนึ่งของอุปกรณ์ Gen2 เพื่อ ควบคุมสภาพแวดล้อมการทดสอบ
- วางแผนภูมิฟีเจอร์ทดสอบไว้ภายในแท่นขุดเจาะ Gen2

รูปที่ 161 ตัวอย่าง Gen2chart_sample
เกณฑ์การข้ามการทดสอบ
ระบบจะข้ามscene_ipการทดสอบหากเป็นไปตามเกณฑ์ต่อไปนี้
- อุปกรณ์มีระดับ API แรก (
first_api_level) เป็น 35 หรือต่ำกว่า - อุปกรณ์ไม่ใช่โทรศัพท์ที่มีกล้องหลักด้านหน้าและด้านหลัง (เช่น แท็บเล็ตหรือทีวี)
test_default_jca_ip
ถ่ายภาพชาร์ตฟีเจอร์ทดสอบภายใต้สภาพแสงที่ควบคุม โดยใช้แอปกล้องเริ่มต้นและ JCA แล้วทำการตรวจสอบต่อไปนี้
FoV: ตรวจสอบว่าแอปกล้องเริ่มต้นและภาพที่ JCA จับมี FoV เดียวกัน การตรวจสอบนี้ใช้ฟีเจอร์คิวอาร์โค้ดตรงกลางที่ดึงมาจากภาพชาร์ต การจับภาพ
ความสว่าง: ตรวจสอบว่าความแตกต่างของความสว่างที่วัดระหว่าง แอปกล้องเริ่มต้นกับ JCA ไม่เกิน 10 การตรวจสอบนี้ใช้แพตช์ช่วง ไดนามิกสำหรับการวัดความสว่าง
สมดุลสีขาว: ตรวจสอบว่าความแตกต่างของสมดุลสีขาวระหว่างแอปกล้องเริ่มต้นกับ JCA ไม่เกิน 4 การตรวจสอบนี้ใช้แพตช์ช่วง ไดนามิกสำหรับการวัดความสว่าง
การแสดงสี: ตรวจสอบว่าความแตกต่างของการแสดงสีระหว่าง แอปกล้องเริ่มต้นกับ JCA ไม่เกิน 6
ผ่าน: การทดสอบผ่านการตรวจสอบ FoV, ความสว่าง และสมดุลสีขาว ใน Android
16 ไม่มีการบังคับให้ทำการทดสอบนี้ (NOT_YET_MANDATED) สำหรับ Android
17 ขึ้นไป จะมีการบังคับให้ตรวจสอบความเท่าเทียมกันของ FoV, ความสว่าง และไวต์บาลานซ์ การตรวจสอบการแสดงสีไม่บังคับ
(NOT_YET_MANDATED) ใน Android 17
test_jca_jpegr_ip
ยืนยันว่าความแตกต่างของไวต์บาลานซ์ระหว่างตัวอย่าง JPEG_R JCA สแนปชอตกับรูปภาพที่ถ่ายไม่เกิน 4
API ที่ทดสอบ:
ผ่าน: ความแตกต่างของไวต์บาลานซ์ระหว่างสแนปชอตตัวอย่าง JCA กับรูปภาพ JPEG_R ที่ จับภาพได้อยู่ภายในเกณฑ์ (ค่าเริ่มต้นคือ 4)