
This pages describes the setup process for the BananaPi-R3 access point (AP) BPi-R3, which is used in Wi-Fi AP connection testing for Android 16 QPR2 and higher.
Purchase a BananaPi-R3 access point
To purchase a BananaPi-R3 access point:
Purchase the Banana Pi R3 AP and accessories listed in this table:
Item Quantity BPi-R3 board, similar to the Banana Pi BPI-R3 Router Board with MediaTek MT7986 chip design support Wi-Fi 6 ,2G DDR RAM ,8G eMMC flash onboard 1 BPi-R3 aluminum case, similar to the BPI-R3 Iron case 1 BPi-R3 aluminum heatsink (cooling fan), similar to the BPI-R3 aluminum heatsink with fan 1 2 and 5 GHz antenna with cable, similar to the 5DB antenna in the BPI shop 8 Power adapter, similar to the 12V/2A DC power supply 1 To finalize your purchase, see the Easy to buy section of the Banana Pi BPI-R3 page.
Set up hardware
To set up the hardware:
Install the cooling fan onto the BPi-R3 board:
Apply 2 thermal pads to the chips. Figure 1 shows placement of the thermal pads:

Figure 1. Placement of thermal pads on the BPi-R3 board.
Mount the fan and secure it with four screws from the underside of the RPi-R3 board. Figure 2 shows the location of fan mounting holes on the underside of the BPi-R3 board:
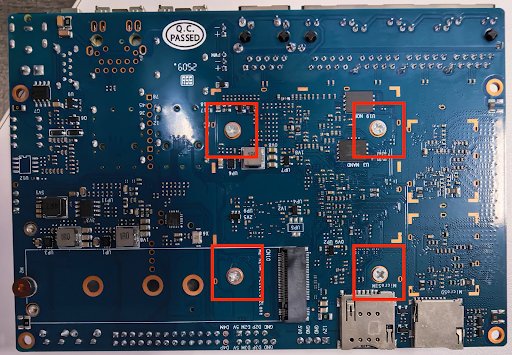
Figure 2. Fan mounting holes on underside of the BPi-R3 board.
Connect the fan to the power source at the location labeled FAN. Figure 3 shows the fan power connector on the BPi-R3 board:
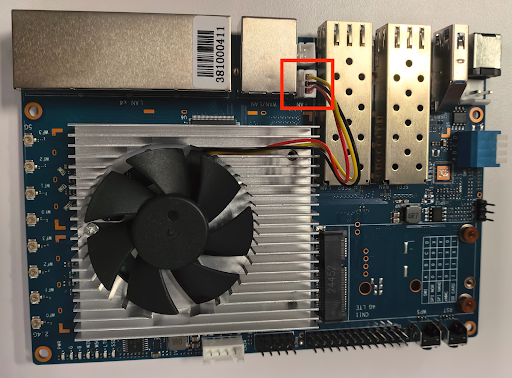
Figure 3. Fan power connector.
Screw the BPi-R3 board onto the case at the four corners. Figure 4 shows the location for the four corner screws in the case:
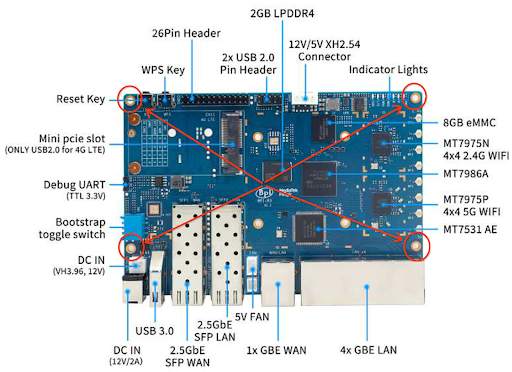
Figure 4. Corner screws in the case.
There are two sets of four U.FL connectors, one set for 2.4 GHz and one set for 5 GHz, located on the right side of the board. The 2.4 GHz connectors are positioned above the 5 GHz connectors. Figure 5 shows the location of the U.FL connectors.
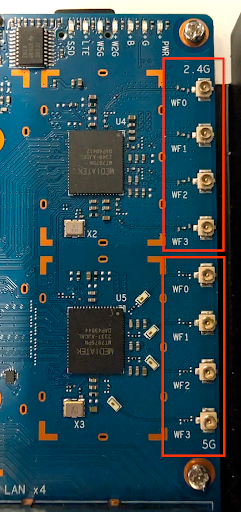
Figure 5. U.FL connectors.
Connect the eight RF cables to the U.FL connectors: Put four 2.4 G ports on one side and four 5 G ports on the other. Figure 6 shows the location of the U.FL connectors.
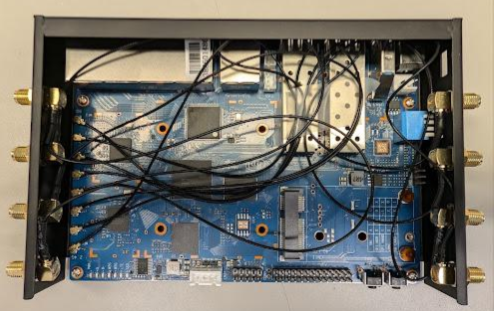
Figure 6. RF cable connections.
Connect eight antennas to the board. Verify that the antennas are screwed tightly. Figure 7 shows connected antennas.
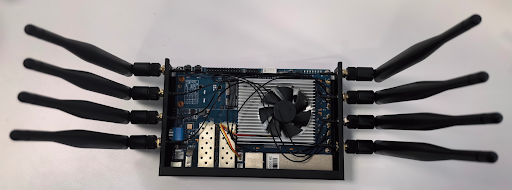
Figure 7. Antenna connections.
Install the top panel of the case. Figure 8 shows the BPi-R3 case with the top panel installed.
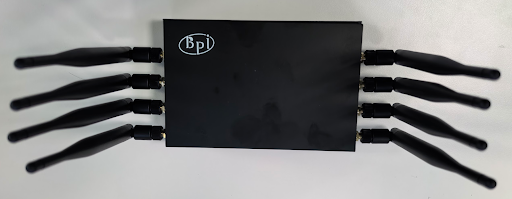
Figure 8. The BPi-R3 case with the top panel installed.
Connect the power and Ethernet cable to the AP. Connect the Ethernet cable to the WAN port on the AP. Figure 9 shows the locations of the power and Ethernet ports.
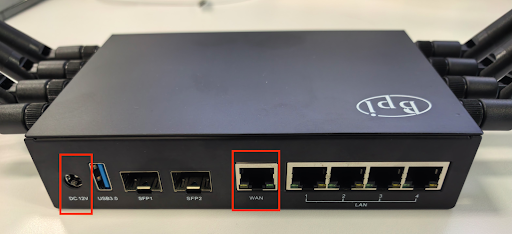
Figure 9. Power and Ethernet ports.
Flash OpenWrt image
Flashing the device is a two-stage process:
- Load the OpenWrt image onto an SD card.
- Flash the OpenWrt image from the SD card to the AP's on-device storage.
Load the OpenWrt image onto an SD card
This section explains how to load the OpenWrt image onto an SD card.
Prerequisites
To load the OpenWrt image onto an SD card, you need:
- An internet-accessible subnet.
- A Linux computer on this subnet. Use this computer to prepare the SD card and to connect to AP using SSH.
Load OpenWrt image onto an SD card
To flash the OpenWrt image to an SD card, do the following:
- Download the OpenWrt image.
- Plug your SD card in to the Linux machine.
Wipe all existing partition tables and file system identifiers with this command:
sudo wipefs -a /dev/sd#Burn the SD card:
sudo dd if=openwrt-23.05.5-cros-1.4.0-standard-1.0.2-mediatek-filogic-bananapi_bpi-r3-sdcard.img of=/dev/sd# bs=1000M && sync && sync && syncWait for 3 seconds and unplug the SD card.
Verify that all the bootstrap jumpers of the AP are set to high. This jumper setting is required to boot the AP from the SD card. Figure 10 shows the location of the bootstrap jumpers.
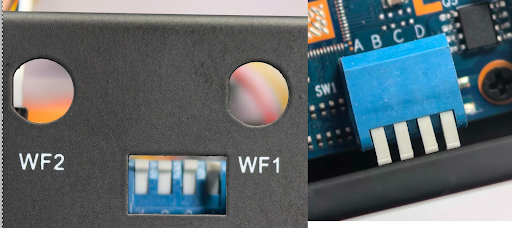
Figure 10. Location of bootstrap jumpers.
Verify that an Ethernet cable is connected to the WAN port of the AP.
Insert the SD card in to the AP.
Connect the power cable to the AP. A second LED indicator flashes green; wait until it stops flashing. Figure 11 shows the LED indicators:
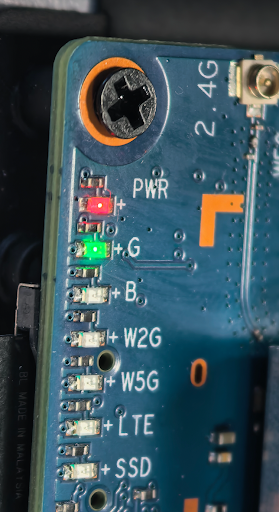
Figure 11. LED indicators.
Verify the SD card image version
After you have loaded the OpenWrt image onto an SD card, verify the version of the image by doing the following:
Identify the IP address for the AP. To identify the IP address, see Appendix A: Find the IP address of the AP.
Download the SSH identity testing_rsa file to a Linux computer on the same subnet as the AP.
Grant the required permissions:
chmod 600 path-to-testing_rsa-fileUse SSH to connect to the AP from the host computer:
ssh -i path-to-testing_rsa-file root@IPA screen similar to the following appears:
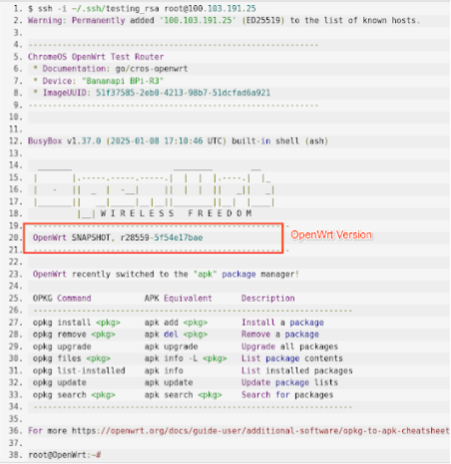
Figure 12. Use SSH to connect to the AP.
Verify that the version number on the AP matches the version number highlighted on Figure 12.
Flash OpenWrt image from SD card to BPi-R3 AP
Due to hardware design, flashing the OpenWrt image from SD card to the AP's eMMC is a two-stage process:
- Flash image from SD card to NAND storage.
- Flash OpenWrt from NAND to eMMC.
Flash image from SD card to NAND storage
To flash the OpenWrt image from the SD card to NAND storage:
Insert the SD card in to the AP.
Power on the AP and wait until boot completes. Verify that the second LED indicator marked G shows a steady green light. Figure 13 shows the LED indicators:
Figure 13. LED indicators.
Sign in to the AP using SSH.
Run the following command to configure the next reboot to install image from SD card to the NAND flash:
fw_setenv bootcmd "env default bootcmd ; saveenv ; run ubi_init ; bootmenu 0"This command configures the next reboot to install image from SD card to the NAND flash.
Reboot the AP:
rebootWait until boot completes by verifying that the second LED indicator shows a steady green light.
Verify that you can sign in to the AP using SSH.
Unplug the AP's power cable.
Set the bootstrap jumpers to boot from NAND. Figure 14 shows the new boot stramp jumper settings:
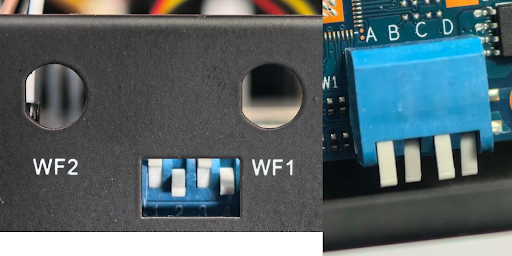
Figure 14. New bootstrap jumper settings.
Power on the AP and wait until the AP boot completes.
Identify the IP address for the AP. To identify the IP address, see Appendix A: Find the IP address of the AP.
Sign in to the AP with the new IP address.
Run the following command to verify you're running an OpenWrt system installed on NAND:
df -hThe output should show a disk file system with
/dev/ubi0_6. Figure 15 shows the output: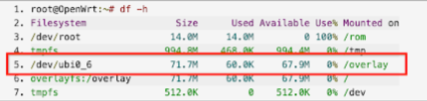
Figure 15. Output of df -h command.
Flash OpenWrt from NAND to eMMC
To flash OpenWrt from NAND to eMMC:
In the SSH session, run the following command:
fw_setenv bootcmd "env default bootcmd ; saveenv ; saveenv ; run emmc_init ; bootmenu 0"This command configures the next reboot to install image from NAND to eMMC.
Reboot the AP:
rebootWait until boot completes by verifying that the second LED indicator shows a steady green light.
Unplug the AP's power cable.
Unplug the SD card from the AP.
Set the bootstrap jumpers to boot from eMMC. Figure 16 shows the new boot stramp jumper settings:
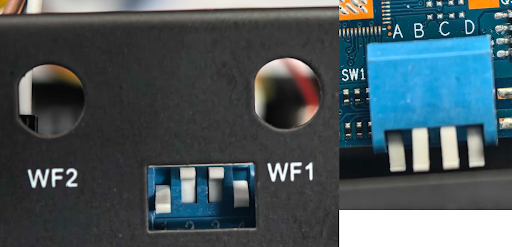
Figure 16. New bootstrap jumper settings.
Power on the AP and wait until the AP boot completes.
Identify the IP address for the AP. To identify the IP address, see Appendix: Find the IP address of the AP.
Sign in to the AP using the new IP address.
Run the following command to verify you're running an OpenWrt system installed on NAND:
df -hThe output should show a disk file system with
/dev/fitrw. Figure 17 shows the output: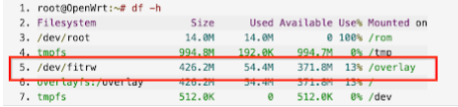
Figure 17. Output of df -h command.
Run the following command:
cat /sys/block/mmcblk0/device/typeThe output should show MMC instead of SD.
The AP setup process is complete.
Appendix A: Find the IP address of the AP
To find the IP address of the AP, follow the instructions in this section.
Run the following command:
ifconfigThe output looks similar to the following:
docker0: flags=4099<UP,BROADCAST,MULTICAST>  mtu 1500
      inet 172.17.0.1  netmask 255.255.0.0  broadcast 172.17.255.255
      ether 02:42:67:38:a9:d8  txqueuelen 0  (Ethernet)
      RX packets 0  bytes 0 (0.0 B)
      RX errors 0  dropped 0  overruns 0  frame 0
      TX packets 0  bytes 0 (0.0 B)
      TX errors 0  dropped 0 overruns 0  carrier 0  collisions 0

eno1: flags=4163<UP,BROADCAST,RUNNING,MULTICAST>  mtu 1500
      inet 100.103.191.133  netmask 255.255.255.0  broadcast 100.103.191.255
      inet6 2401:fa00:44:800:f64d:30ff:fe6d:bc3f  prefixlen 64  scopeid 0x0<global>
      inet6 fe80::f64d:30ff:fe6d:bc3f  prefixlen 64  scopeid 0x20<link>
      ether f4:4d:30:6d:bc:3f  txqueuelen 1000  (Ethernet)
      RX packets 31360658  bytes 39343143744 (39.3 GB)
      RX errors 0  dropped 0  overruns 0  frame 0
      TX packets 11023616  bytes 1258521174 (1.2 GB)
      TX errors 0  dropped 0 overruns 0  carrier 0  collisions 0
      device interrupt 16  memory 0xdc200000-dc220000

lo: flags=73<UP,LOOPBACK,RUNNING>  mtu 65536
      inet 127.0.0.1  netmask 255.0.0.0
      inet6 ::1  prefixlen 128  scopeid 0x10<host>
      loop  txqueuelen 1000  (Local Loopback)
      RX packets 19825978  bytes 1265586518 (1.2 GB)
      RX errors 0  dropped 0  overruns 0  frame 0
      TX packets 19825978  bytes 1265586518 (1.2 GB)
      TX errors 0  dropped 0 overruns 0  carrier 0  collisions 0

wlp58s0: flags=4099<UP,BROADCAST,MULTICAST>  mtu 1500
      ether f8:63:3f:2e:63:e6  txqueuelen 1000  (Ethernet)
      RX packets 0  bytes 0 (0.0 B)
      RX errors 0  dropped 0  overruns 0  frame 0
      TX packets 0  bytes 0 (0.0 B)
      TX errors 0  dropped 0 overruns 0  carrier 0  collisions
Identify the IP address of the AP. The IP address is the value of the
inetfield of theeno1interface (100.103.191.133).Identify the netmask of the
eno1interface (255.255.255.0).Use the following table to obtain the network prefix length from the netmask:
Netmask Network prefix length 255.255.255.252 30 255.255.255.248 29 255.255.255.240 28 255.255.255.0 24 255.255.252.0 22 255.255.248.0 21 255.255.0.0 16 Disconnect the AP from the host's LAN interface.
Run the following command to obtain the host LAN IP addresses of devices connected to the host:
sudo nmap -sP IP/network-prefix-lengthConnect the AP to the host.
Perform step 6 again. A new IP address, the IP address of the AP, appears.