हमारा सुझाव है कि 27 मार्च, 2025 से AOSP को बनाने और उसमें योगदान देने के लिए, aosp-main
के बजाय android-latest-release
का इस्तेमाल करें. ज़्यादा जानकारी के लिए, AOSP में हुए बदलाव लेख पढ़ें.
रोटेशन वेक्टर सीवी की क्रॉसचेक
संग्रह की मदद से व्यवस्थित रहें
अपनी प्राथमिकताओं के आधार पर, कॉन्टेंट को सेव करें और कैटगरी में बांटें.
पहली इमेज. टेस्ट पैटर्न का थंबनेल. ऊपर दिए गए लिंक से, फ़ुल रिज़ॉल्यूशन वाली इमेज डाउनलोड करें.
इस पेज पर, रोटेशन वेक्टर सेंसर को लागू करने के साथ काम करने की जांच करने का तरीका बताया गया है. यह टेस्ट तब चलाया जाना चाहिए, जब डिवाइस में TYPE_ROTATION_VECTOR कंपोजिट सेंसर की सुविधा मौजूद हो.
टेस्ट
- जिस Android डिवाइस की जांच की जा रही है उस पर OpenCV Manager इंस्टॉल करें.
OpenCV-3.0.0-android-sdk.zip
पैकेज को
SourceForge.net से डाउनलोड करें.
- डाउनलोड किए गए संग्रह में
apk
फ़ोल्डर से APK ढूंढें. --bypass-low-target-sdk-block
विकल्प के साथ adb install
कमांड का इस्तेमाल करके, कंप्यूटर से डिवाइस पर APK लोड करें. Android 13 या इससे पहले के वर्शन वाले डिवाइसों के लिए,
यह --bypass-low-target-sdk-block
विकल्प ज़रूरी नहीं है. ज़्यादा जानकारी के लिए, ऐप्लिकेशन इंस्टॉल करना लेख पढ़ें.
अगर Google Play में कोई चालू खाता लॉग इन है, तो Google Play में OpenCV Manager ढूंढें
और संदर्भ मेन्यू ("..." बटन से पॉप-अप मेन्यू) में जाकर, अपने-आप अपडेट होने की सुविधा बंद करें.
दूसरी इमेज. Google Play में अपने-आप अपडेट होने की सुविधा बंद करना.
- लिंक किए गए टेस्ट पैटर्न को प्रिंट करें. प्रिंट करते समय, स्केलिंग के सभी विकल्प बंद करें. पैटर्न, लैंडस्केप में अमेरिकन लेटर पेपर या उससे बड़े पेपर पर फ़िट होना चाहिए.
ध्यान दें: ऊपर दी गई इनलाइन इमेज का रिज़ॉल्यूशन कम है और इसे सिर्फ़ उदाहरण के तौर पर दिखाया गया है. कृपया इसे सीधे अपने पैटर्न के तौर पर न प्रिंट करें.
- पैटर्न को हॉरिज़ॉन्टल सतह पर रखें.
- CTS Verifier ऐप्लिकेशन में, रोटेशन वेक्टर सीवी क्रॉसचेक शुरू करें. अगर ये बदलाव नहीं किए गए हैं, तो हवाई जहाज़ मोड चालू करने, स्क्रीन के अपने-आप दिशा बदलने (ऑटो-रोटेट) की सुविधा बंद करने, और अडैप्टिव ब्राइटनेस और जगह की जानकारी में बदलाव करने के लिए, गाइड का पालन करें.
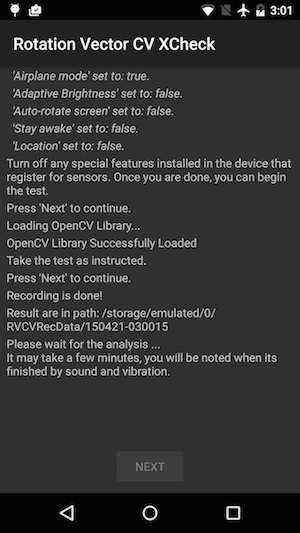
तीसरी इमेज. जांच शुरू की जा रही है.
- वीडियो की झलक दिखने पर, फ़ोन को पैटर्न से तीन फ़ीट (या एक मीटर) ऊपर रखें, ताकि मुख्य कैमरे का सामने वाला हिस्सा, स्क्रीन पर पीले रंग के मार्कर वाले पैटर्न की ओर हो और पैटर्न पर मौजूद पीले रंग का मार्कर, उसी कोने में अलाइन हो.
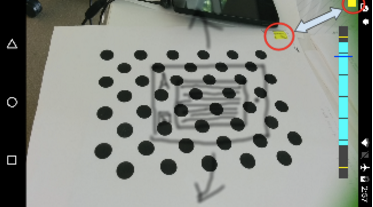
चौथी इमेज. टेस्ट पैटर्न डालना.
- पैटर्न को कैमरे के व्यू में रखते हुए, जांच के दायरे में मौजूद Android डिवाइस (DUT) को पैटर्न के चारों ओर तीन अलग-अलग दिशाओं में घुमाएं. घुमाने के लिए, घुमाव की सीमा के इंडिकेटर के निर्देशों का पालन करें. यहां दी गई इमेज में, 1, 2, और फिर 3 के क्रम में यह तरीका दिखाया गया है. बेहतर नतीजे पाने के लिए, कैमरे को धीरे-धीरे और एक ही दिशा में घुमाएं.
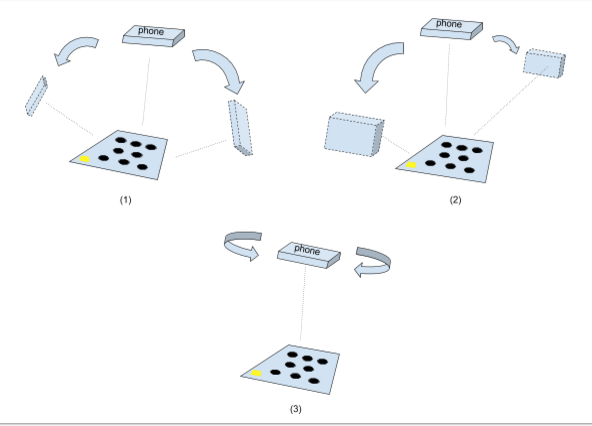
पांचवीं इमेज. टेस्ट के लिए उपलब्ध डिवाइस में बदलाव करना.
- फ़ोटो कैप्चर करने के बाद, कैमरे की झलक हट जाएगी और विश्लेषण की प्रोसेस शुरू हो जाएगी. विश्लेषण पूरा होने का इंतज़ार करें. आम तौर पर, फ़ोन की परफ़ॉर्मेंस के हिसाब से, इसमें एक से पांच मिनट लगते हैं. विश्लेषण पूरा होने पर, फ़ोन बजने और वाइब्रेट करने लगेगा. अगर विश्लेषण पूरा हो जाता है, तो स्क्रीन पर संख्याओं वाला नतीजा दिखेगा.
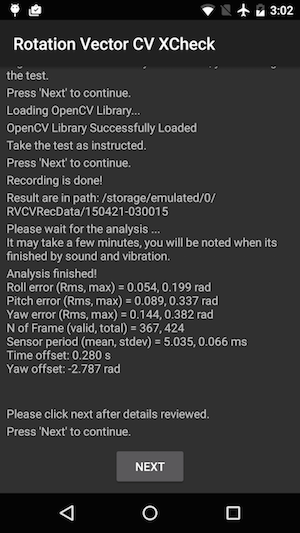
छठी इमेज. जांच पूरी हो गई है.
- पास/फ़ेल स्क्रीन पर जाने और नतीजे की समीक्षा करने के लिए, आगे बढ़ें पर क्लिक करें.
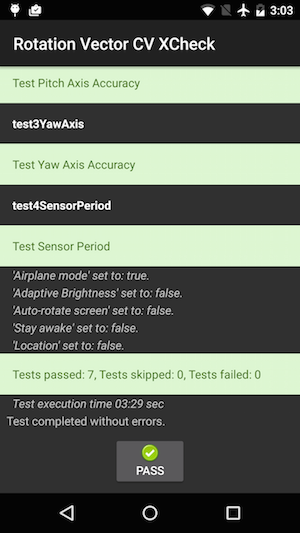
सातवीं इमेज. टेस्ट पास करना.
- बेहतर नतीजे पाने के लिए, ये सलाह अपनाएं:
- यह मैन्युअल टेस्ट है और इसमें कुछ मुश्किलियां आ सकती हैं. इसलिए, बेहतर नतीजे पाने के लिए, इसे कुछ समय बाद फिर से आज़माएं.
- बेहतर नतीजे पाने के लिए, जांच करने से पहले ऐक्सेलेरोमीटर, जायरोस्कोप, और मैग्नेटोमीटर को कैलिब्रेट करना चाहिए.
समस्या हल करें
- समस्या का लक्षण: टेस्ट केस शुरू करते समय या वीडियो रिकॉर्डिंग खत्म होने के तुरंत बाद, टेस्ट क्रैश हो गया.
कारण: ऐसा हो सकता है कि OpenCV Manager के साथ काम करने में कोई समस्या हो. पुष्टि करने के लिए,
logcat
पर सही का निशान लगाएं. पुष्टि होने के बाद, इंस्टॉल किए गए OpenCV Manager का वर्शन और आर्क देखें.
- समस्या का लक्षण: "बहुत ज़्यादा अमान्य फ़्रेम" गड़बड़ियों की वजह से, जांच बार-बार फ़ेल होती है.
वजह: ऐसा वीडियो की क्वालिटी की वजह से हो सकता है. इन शर्तों की पुष्टि करें:
- टेस्ट के लिए, रोशनी काफ़ी हो. आम तौर पर, प्राकृतिक रोशनी में खींचने पर सबसे अच्छा नतीजा मिलता है. हालांकि, अगर यह सुविधा उपलब्ध नहीं है, तो एक से ज़्यादा ऐंगल से मिलने वाली ज़्यादा रोशनी भी काम करती है. हालांकि, यह ज़रूरी है कि इस रोशनी से साफ़-साफ़ परछाई न दिखे.
चमक को कम करने के लिए, कम ऐंगल वाली लाइटिंग का इस्तेमाल न करें.
- वीडियो रिकॉर्ड करने के दौरान, कैमरे की गति स्थिर हो. अचानक होने वाली हलचल की वजह से, वीडियो में धुंधलापन दिखता है और कंप्यूटर विज़न सॉफ़्टवेयर को गलत जानकारी मिलती है.
- पैटर्न हमेशा वीडियो की झलक वाले फ़्रेम में होना चाहिए और
बीच में होना चाहिए. पैटर्न का साइज़, वीडियो की झलक दिखाने वाली विंडो के साइज़ का 1/4 ~ 1/2 होना चाहिए. अगर पैटर्न बहुत छोटा है, तो नतीजे कम सटीक होते हैं.
अगर पैटर्न बहुत बड़ा है, तो लेंस में डिस्टॉर्शन ज़्यादा दिखता है. साथ ही, पैटर्न को हमेशा वीडियो रिकॉर्डिंग फ़्रेम में रखना मुश्किल होता है.
- कैमरा अच्छी तरह से फ़ोकस कर पा रहा हो. कुछ डिवाइसों में, वीडियो रिकॉर्डिंग के दौरान फ़ोकस करने में समस्या आती है. आम तौर पर, ऐसा तब होता है, जब सीन में बहुत कम वैरिएशन हों. उदाहरण के लिए, एक ही रंग का चिकना फ़्लोर. आम तौर पर, टेस्ट पैटर्न को टेक्स्चर वाली सतह पर ले जाने या टेस्ट पैटर्न के आस-पास ऑब्जेक्ट जोड़ने से मदद मिलती है.
- कैमरा हिलने पर साफ़ फ़ोटो खींचने की सुविधा बंद हो.
- समस्या: पिच और रोल टेस्ट ठीक से काम करता है, लेकिन याव टेस्ट में अक्सर गड़बड़ी होती है.
इसकी वजह: सबसे पहले, पक्का करें कि मैग्नेटिक फ़ील्ड सेंसर को सही तरीके से कैलिब्रेट किया गया हो.
अगर मैग्नेटिक फ़ील्ड सेंसर को कैलिब्रेट नहीं किया गया है, तो रोटेशन वेक्टर ठीक से काम नहीं करता.
ऐसा भी हो सकता है कि वीडियो रिकॉर्ड करने की वजह से, याव ऐक्सिस काम न करे. डिवाइस को स्थिर रखें और जांच के याव सेक्शन के लिए, टेस्ट पैटर्न के आस-पास पैदल चलें/घूमें. डिवाइस को हाथ में घुमाते समय, वीडियो की क्वालिटी को बनाए रखना मुश्किल होता है.
फ़ीडबैक रिपोर्ट करें
अगर ऊपर दिया गया तरीका काम नहीं करता है, तो अपनी समस्या की शिकायत करने के लिए, कृपया नीचे दिए गए सुझाव, शिकायत या राय देने के तरीके का पालन करें.
गड़बड़ी की शिकायत करते समय, कृपया यह जानकारी इकट्ठा करें:
- Android की गड़बड़ी की रिपोर्ट
- अगर स्क्रीन पर गड़बड़ी का कोई मैसेज दिखता है, तो उसका स्क्रीनशॉट लें.
/sdcard/RVCVRecData/
का कॉन्टेंट. इस फ़ोल्डर में
वीडियो फ़ाइलें होती हैं. इसलिए, अगर टेस्ट पहले से ही कई बार किया जा चुका है, तो यह फ़ोल्डर काफ़ी बड़ा हो सकता है. फ़ोल्डर को खाली करके, फिर से जांच करने से साइज़ कम करने में मदद मिलेगी. रिकॉर्डिंग में मौजूद समस्याओं का पता लगाने के लिए, वीडियो फ़ाइलों की जांच करें.
- OpenCV Manager ऐप्लिकेशन का स्क्रीनशॉट.
इस पेज पर मौजूद कॉन्टेंट और कोड सैंपल कॉन्टेंट के लाइसेंस में बताए गए लाइसेंस के हिसाब से हैं. Java और OpenJDK, Oracle और/या इससे जुड़ी हुई कंपनियों के ट्रेडमार्क या रजिस्टर किए हुए ट्रेडमार्क हैं.
आखिरी बार 2025-07-27 (UTC) को अपडेट किया गया.
[[["समझने में आसान है","easyToUnderstand","thumb-up"],["मेरी समस्या हल हो गई","solvedMyProblem","thumb-up"],["अन्य","otherUp","thumb-up"]],[["वह जानकारी मौजूद नहीं है जो मुझे चाहिए","missingTheInformationINeed","thumb-down"],["बहुत मुश्किल है / बहुत सारे चरण हैं","tooComplicatedTooManySteps","thumb-down"],["पुराना","outOfDate","thumb-down"],["अनुवाद से जुड़ी समस्या","translationIssue","thumb-down"],["सैंपल / कोड से जुड़ी समस्या","samplesCodeIssue","thumb-down"],["अन्य","otherDown","thumb-down"]],["आखिरी बार 2025-07-27 (UTC) को अपडेट किया गया."],[],[],null,["# Rotation vector CV crosscheck\n\n**Figure 1.** Thumbnail of test pattern. Download the\nfull-resolution image linked above.\n\nThis page provides the steps to properly test the compatibility of your [rotation vector\nsensor](/docs/core/interaction/sensors/sensor-types#rotation_vector) implementation. This test should be run when the device declares the\nTYPE_ROTATION_VECTOR composite sensor feature.\n\nTest\n----\n\n1. Install OpenCV Manager on the Android device being tested.\n2. Download the `OpenCV-3.0.0-android-sdk.zip` package from [SourceForge.net](https://sourceforge.net/projects/opencvlibrary/files/opencv-android/3.0.0).\n3. Find the APK from the `apk` folder inside the downloaded archive. Load the APK on the device from a computer using the `adb install` command with the `--bypass-low-target-sdk-block` option. For devices running Android 13 or lower, this `--bypass-low-target-sdk-block` option isn't necessary. For more information, see [Install an app](http://developer.android.com/tools/help/adb#move).\n4. If there is an active account logged into Google Play, locate OpenCV Manager in Google Play\n and disable *Auto-update* in the context menu (the popup menu from the \"...\" button).\n\n\n **Figure 2.** Disabling Auto-update in Google Play.\n5. Print out the linked [test pattern](/static/docs/compatibility/cts/images/acircles_pattern.pdf), disabling any scaling options when printing. The pattern should fit US Letter paper in landscape or anything bigger.\n\n **Note:** The inline picture above is low\n resolution and just for illustration. Please do not directly print it as your\n pattern.\n6. Place the pattern on a horizontal surface.\n7. Start the **Rotation Vector CV Crosscheck** in the CTS Verifier app. Follow the guide to turn on airplane mode, turn off auto rotate, and adjust adaptive brightness and location if these changes have not been made. \n\n\n **Figure 3.** Initiating the test.\n8. When the video preview appears, place the phone three feet (or one meter) over the pattern so the main camera is facing the pattern with yellow marker on the screen and yellow marker on the pattern aligned at the same corner. \n\n\n **Figure 4.** Placing the test pattern.\n9. While keeping the pattern entirely in the camera view, rotate the Android device under test (DUT) around the pattern in three different directions, one by one (1, 2 and then 3 illustrated in picture below) as prompted by the rotation range indicator. Keep movement smooth and steady for the best result. \n\n\n **Figure 5.** Manipulating the device under test.\n10. After the capture, the camera preview will disappear and the analysis process will start. Wait patiently for analysis to finish; it usually takes one to five minutes depending on the phone performance. The phone will sound and vibrate at analysis completion. A numerical result will be presented on screen if the analysis is successful. \n\n\n **Figure 6.** Finishing the test.\n11. Click **next** to proceed to the pass/fail screen and review the result. \n\n\n **Figure 7.** Passing the test.\n12. Follow these tips for best results:\n 1. Since this is a manual test with complexity, you may want to try it a few times for the best results.\n 2. Accelerometer, gyroscope, and magnetometer should be calibrated before testing for good results.\n\nTroubleshoot\n------------\n\n1. Symptom: Test crashed when starting test case or immediately after finishing video recording. \n Cause: Likely an OpenCV Manager compatibility issue. Check `logcat` to confirm. If confirmed, check version and arch of the installed OpenCV Manager.\n2. Symptom: Test fails frequently due to \"Too many invalid frame\" errors. \n Cause: Likely due to video quality. Confirm the following conditions:\n 1. There is enough ambient lighting for the test. Natural light usually gives the best result. However, when it is not available, abundant light from multiple angles that does not form obvious shadows works, as well. Avoid low angle lighting to reduce glare.\n 2. The motion during video taking is smooth. Jerky movement causes blur and confuses the computer vision software.\n 3. The pattern should always be entirely in video preview frame and located around the center. The pattern should be 1/4 \\~ 1/2 the size of the video preview window. If the pattern is too small, the accuracy is reduced. If the pattern is too big, lens distortion is more obvious, and it is more difficult to keep the pattern always inside video recording frame.\n 4. The camera is able to focus well. Some devices have trouble in focusing during video recording. This is usually due to there is too few variations in the scene, e.g. solid color smooth floor surface. Moving test pattern to a place with textured surface or introducing objects around the test pattern usually helps.\n 5. Image stabilization is turned off.\n3. Symptom: The pitch and roll test works fine, but the yaw test regularly fails. \n Cause: First, make sure the magnetic field sensor is well calibrated. Rotation vector does not function well if magnetic field sensor is not calibrated. \n It is also possible that yaw axis fails due to video taking. Hold the device steady and walk/move around the test pattern for the yaw section of test. It is hard to maintain the quality of video while rotating device in hand.\n\nReport feedback\n---------------\n\nIf the steps above do not help, please make sure to follow the feedback steps below to report your issue.\n\nPlease gather the following information when reporting a bug:\n\n1. Android bugreport\n2. Screenshot if there is any error message on screen.\n3. Contents of `/sdcard/RVCVRecData/`. This folder contains video files and thus can be quite large if the test has already been taken multiple times. Clearing the folder and performing the test again will help reduce size. Inspect video files inside to find obvious issues in recording.\n4. Screenshot of the OpenCV Manager app."]]