ตั้งแต่วันที่ 27 มีนาคม 2025 เป็นต้นไป เราขอแนะนำให้ใช้ android-latest-release
แทน aosp-main
เพื่อสร้างและมีส่วนร่วมใน AOSP โปรดดูข้อมูลเพิ่มเติมที่หัวข้อการเปลี่ยนแปลงใน AOSP
การตรวจสอบครอสเช็ก CV ของเวกเตอร์การหมุน
จัดทุกอย่างให้เป็นระเบียบอยู่เสมอด้วยคอลเล็กชัน
บันทึกและจัดหมวดหมู่เนื้อหาตามค่ากำหนดของคุณ
รูปที่ 1 ภาพปกของรูปแบบทดสอบ ดาวน์โหลดรูปภาพความละเอียดสูงที่ลิงก์ไว้ด้านบน
หน้านี้แสดงขั้นตอนในการทดสอบความเข้ากันได้ของการติดตั้งใช้งานเซ็นเซอร์เวกเตอร์การหมุนอย่างถูกต้อง การทดสอบนี้ควรทําเมื่ออุปกรณ์ประกาศฟีเจอร์เซ็นเซอร์คอมโพสิต TYPE_ROTATION_VECTOR
ทดสอบ
- ติดตั้ง OpenCV Manager ในอุปกรณ์ Android ที่จะทดสอบ
- ดาวน์โหลดแพ็กเกจ
OpenCV-3.0.0-android-sdk.zip
จาก
SourceForge.net
- ค้นหา APK จากโฟลเดอร์
apk
ภายในไฟล์ที่เก็บข้อมูลที่ดาวน์โหลด โหลด APK ในอุปกรณ์จากคอมพิวเตอร์โดยใช้คำสั่ง adb install
พร้อมตัวเลือก --bypass-low-target-sdk-block
สำหรับอุปกรณ์ที่ใช้ Android 13 หรือต่ำกว่า คุณไม่จำเป็นต้องเลือกตัวเลือก --bypass-low-target-sdk-block
ดูข้อมูลเพิ่มเติมได้ที่ติดตั้งแอป
หากมีบัญชีที่ใช้งานอยู่ซึ่งเข้าสู่ระบบ Google Play ให้ค้นหา OpenCV Manager ใน Google Play และปิดใช้การอัปเดตอัตโนมัติในเมนูบริบท (เมนูป๊อปอัปจากปุ่ม "...")
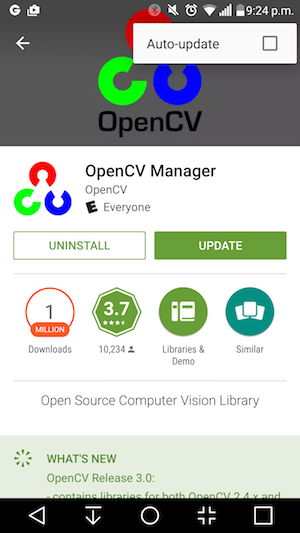
รูปที่ 2 การปิดใช้การอัปเดตอัตโนมัติใน Google Play
- พิมพ์รูปแบบทดสอบที่ลิงก์ไว้ โดยปิดใช้ตัวเลือกการปรับขนาดเมื่อพิมพ์ ลายควรพอดีกับกระดาษจดหมายขนาด US แบบแนวนอนหรือขนาดที่ใหญ่กว่า
หมายเหตุ: รูปภาพในบรรทัดด้านบนมีความละเอียดต่ำและเป็นเพียงภาพประกอบเท่านั้น โปรดอย่าพิมพ์เป็นลายของคุณโดยตรง
- วางลายบนพื้นผิวแนวนอน
- เริ่มการตรวจสอบครอสเช็ก CV ของเวกเตอร์การหมุนในแอป CTS Verifier โดยทำตามคำแนะนำเพื่อเปิดโหมดบนเครื่องบิน ปิดการหมุนอัตโนมัติ และปรับความสว่างและตำแหน่งแบบปรับตามสภาพหากยังไม่ได้ทำการเปลี่ยนแปลงเหล่านี้
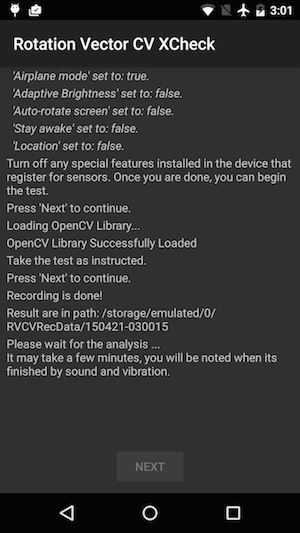
รูปที่ 3 กำลังเริ่มการทดสอบ
- เมื่อตัวอย่างวิดีโอปรากฏขึ้น ให้วางโทรศัพท์เหนือลวดลาย 3 ฟุต (หรือ 1 เมตร) เพื่อให้กล้องหลักหันเข้าหาลวดลายโดยมีเครื่องหมายสีเหลืองบนหน้าจอและเครื่องหมายสีเหลืองบนลวดลายอยู่ในมุมเดียวกัน
รูปที่ 4 การวางรูปแบบทดสอบ
- ขณะที่ทำให้ลายอยู่ในมุมมองกล้องทั้งหมด ให้หมุนอุปกรณ์ Android ภายใต้การทดสอบ (DUT) รอบๆ ลายใน 3 ทิศทางที่แตกต่างกันทีละทิศทาง (1, 2 และ 3 ที่แสดงในรูปภาพด้านล่าง) ตามข้อความแจ้งจากตัวบ่งชี้ช่วงการหมุน เคลื่อนไหวอย่างราบรื่นและมั่นคงเพื่อให้ได้ผลลัพธ์ที่ดีที่สุด
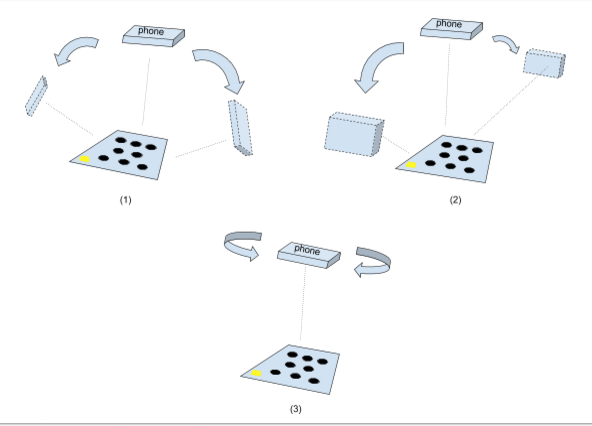
รูปที่ 5 การจัดการอุปกรณ์ทดสอบ
- หลังจากจับภาพแล้ว การแสดงตัวอย่างจากกล้องจะหายไปและกระบวนการวิเคราะห์จะเริ่มขึ้น โปรดรอให้การวิเคราะห์เสร็จสิ้น ซึ่งโดยปกติจะใช้เวลา 1-5 นาที ทั้งนี้ขึ้นอยู่กับประสิทธิภาพของโทรศัพท์ โทรศัพท์จะส่งเสียงและสั่นเมื่อการวิเคราะห์เสร็จสมบูรณ์ ผลลัพธ์ที่เป็นตัวเลขจะแสดงบนหน้าจอหากการวิเคราะห์สําเร็จ
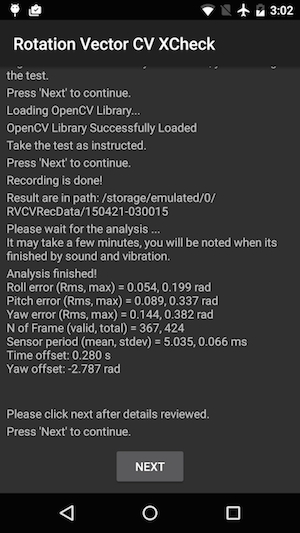
รูปที่ 6 กำลังทำการทดสอบ
- คลิกถัดไปเพื่อไปยังหน้าจอผ่าน/ไม่ผ่านและตรวจสอบผล
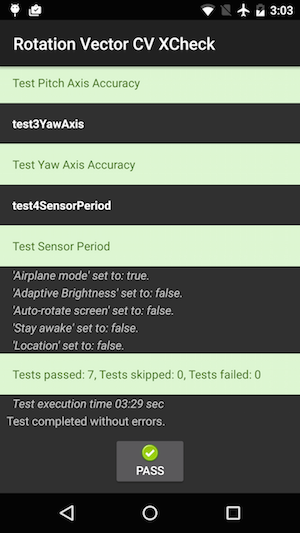
รูปที่ 7 ผ่านการทดสอบ
- ทําตามเคล็ดลับต่อไปนี้เพื่อให้ได้ผลลัพธ์ที่ดีที่สุด
- เนื่องจากเป็นการทดสอบด้วยตนเองที่มีความซับซ้อน คุณจึงอาจต้องลองทำ 2-3 ครั้งเพื่อให้ได้ผลลัพธ์ที่ดีที่สุด
- คุณควรปรับเทียบเครื่องวัดความเร่ง อุปกรณ์วัดการหมุน และมาตรแม่เหล็กก่อนการทดสอบเพื่อให้ได้ผลลัพธ์ที่ดี
แก้ปัญหา
- อาการ: การทดสอบขัดข้องเมื่อเริ่ม Test Case หรือทันทีหลังจากบันทึกวิดีโอเสร็จ
สาเหตุ: อาจเป็นปัญหาความเข้ากันได้ของ OpenCV Manager เลือก logcat
เพื่อยืนยัน หากยืนยันแล้ว ให้ตรวจสอบเวอร์ชันและสถาปัตยกรรมของ OpenCV Manager ที่ติดตั้ง
- อาการ: การทดสอบล้มเหลวบ่อยครั้งเนื่องจากข้อผิดพลาด "เฟรมที่ไม่ถูกต้องมากเกินไป"
สาเหตุ: อาจเกิดจากคุณภาพของวิดีโอ ตรวจสอบเงื่อนไขต่อไปนี้
- มีแสงแวดล้อมเพียงพอสำหรับการทดสอบ โดยทั่วไปแล้ว แสงธรรมชาติจะให้ผลลัพธ์ที่ดีที่สุด อย่างไรก็ตาม หากไม่มีแสงธรรมชาติ การใช้แสงจากหลายมุมที่สว่างเพียงพอและไม่ทำให้เกิดเงาที่เห็นได้ชัดก็ช่วยได้เช่นกัน
หลีกเลี่ยงแสงจากมุมต่ำเพื่อลดแสงสะท้อน
- การเคลื่อนไหวระหว่างถ่ายวิดีโอเป็นไปอย่างราบรื่น การเคลื่อนไหวที่กระตุกทำให้ซอฟต์แวร์การมองเห็นด้วยคอมพิวเตอร์เกิดความสับสนและภาพเบลอ
- ลายควรอยู่ในเฟรมตัวอย่างวิดีโอทั้งหมดและอยู่ตรงกลางเสมอ ลายควรมีขนาด 1/4 ~ 1/2 ของหน้าต่างแสดงตัวอย่างวิดีโอ หากลายเล็กเกินไป ความแม่นยำจะลดลง
หากลายมีขนาดใหญ่เกินไป ความผิดเพี้ยนของเลนส์จะชัดเจนขึ้นและทำให้วางลายให้อยู่ในเฟรมวิดีโอขณะบันทึกได้ยากขึ้น
- กล้องโฟกัสได้ดี อุปกรณ์บางเครื่องมีปัญหาในการโฟกัสระหว่างบันทึกวิดีโอ ปัญหานี้มักเกิดจากการมีฉากที่มีสีสันน้อยเกินไป เช่น พื้นเรียบสีพื้น โดยทั่วไปแล้ว การนำรูปแบบทดสอบไปยังที่ที่มีพื้นผิวขรุขระหรือวางวัตถุไว้รอบๆ รูปแบบทดสอบมักจะช่วยได้
- ระบบกันภาพสั่นปิดอยู่
- อาการ: การทดสอบการเอียงขึ้นและลงทํางานได้ดี แต่การทดสอบการหมุนตามแนวราบทํางานไม่สําเร็จเป็นประจำ
สาเหตุ: ก่อนอื่น ให้ตรวจสอบว่าเซ็นเซอร์สนามแม่เหล็กได้รับการปรับเทียบอย่างถูกต้อง
เวกเตอร์การหมุนทำงานได้ไม่ดีหากไม่ได้ปรับเทียบเซ็นเซอร์สนามแม่เหล็ก
นอกจากนี้ แกนหมุนตามแนวราบอาจไม่ทำงานเนื่องจากมีการถ่ายวิดีโอ ถืออุปกรณ์ให้นิ่งและเดิน/เคลื่อนไหวไปรอบๆ รูปแบบการทดสอบในส่วนการทดสอบการหมุน การรักษาคุณภาพของวิดีโอขณะหมุนอุปกรณ์ในมือทำได้ยาก
รายงานความคิดเห็น
หากขั้นตอนข้างต้นไม่ได้ผล โปรดทำตามขั้นตอนการส่งความคิดเห็นด้านล่างเพื่อรายงานปัญหา
โปรดรวบรวมข้อมูลต่อไปนี้เมื่อรายงานข้อบกพร่อง
- Android bugreport
- ภาพหน้าจอหากมีข้อความแสดงข้อผิดพลาดบนหน้าจอ
- เนื้อหาของ
/sdcard/RVCVRecData/
โฟลเดอร์นี้มีไฟล์วิดีโอ จึงอาจมีขนาดใหญ่หากทำแบบทดสอบหลายครั้งแล้ว การล้างโฟลเดอร์และทำการทดสอบอีกครั้งจะช่วยลดความจุได้ ตรวจสอบไฟล์วิดีโอภายในเพื่อหาปัญหาที่เห็นได้ชัดในการบันทึก
- ภาพหน้าจอของแอป OpenCV Manager
ตัวอย่างเนื้อหาและโค้ดในหน้าเว็บนี้ขึ้นอยู่กับใบอนุญาตที่อธิบายไว้ในใบอนุญาตการใช้เนื้อหา Java และ OpenJDK เป็นเครื่องหมายการค้าหรือเครื่องหมายการค้าจดทะเบียนของ Oracle และ/หรือบริษัทในเครือ
อัปเดตล่าสุด 2025-07-27 UTC
[[["เข้าใจง่าย","easyToUnderstand","thumb-up"],["แก้ปัญหาของฉันได้","solvedMyProblem","thumb-up"],["อื่นๆ","otherUp","thumb-up"]],[["ไม่มีข้อมูลที่ฉันต้องการ","missingTheInformationINeed","thumb-down"],["ซับซ้อนเกินไป/มีหลายขั้นตอนมากเกินไป","tooComplicatedTooManySteps","thumb-down"],["ล้าสมัย","outOfDate","thumb-down"],["ปัญหาเกี่ยวกับการแปล","translationIssue","thumb-down"],["ตัวอย่าง/ปัญหาเกี่ยวกับโค้ด","samplesCodeIssue","thumb-down"],["อื่นๆ","otherDown","thumb-down"]],["อัปเดตล่าสุด 2025-07-27 UTC"],[],[],null,["# Rotation vector CV crosscheck\n\n**Figure 1.** Thumbnail of test pattern. Download the\nfull-resolution image linked above.\n\nThis page provides the steps to properly test the compatibility of your [rotation vector\nsensor](/docs/core/interaction/sensors/sensor-types#rotation_vector) implementation. This test should be run when the device declares the\nTYPE_ROTATION_VECTOR composite sensor feature.\n\nTest\n----\n\n1. Install OpenCV Manager on the Android device being tested.\n2. Download the `OpenCV-3.0.0-android-sdk.zip` package from [SourceForge.net](https://sourceforge.net/projects/opencvlibrary/files/opencv-android/3.0.0).\n3. Find the APK from the `apk` folder inside the downloaded archive. Load the APK on the device from a computer using the `adb install` command with the `--bypass-low-target-sdk-block` option. For devices running Android 13 or lower, this `--bypass-low-target-sdk-block` option isn't necessary. For more information, see [Install an app](http://developer.android.com/tools/help/adb#move).\n4. If there is an active account logged into Google Play, locate OpenCV Manager in Google Play\n and disable *Auto-update* in the context menu (the popup menu from the \"...\" button).\n\n\n **Figure 2.** Disabling Auto-update in Google Play.\n5. Print out the linked [test pattern](/static/docs/compatibility/cts/images/acircles_pattern.pdf), disabling any scaling options when printing. The pattern should fit US Letter paper in landscape or anything bigger.\n\n **Note:** The inline picture above is low\n resolution and just for illustration. Please do not directly print it as your\n pattern.\n6. Place the pattern on a horizontal surface.\n7. Start the **Rotation Vector CV Crosscheck** in the CTS Verifier app. Follow the guide to turn on airplane mode, turn off auto rotate, and adjust adaptive brightness and location if these changes have not been made. \n\n\n **Figure 3.** Initiating the test.\n8. When the video preview appears, place the phone three feet (or one meter) over the pattern so the main camera is facing the pattern with yellow marker on the screen and yellow marker on the pattern aligned at the same corner. \n\n\n **Figure 4.** Placing the test pattern.\n9. While keeping the pattern entirely in the camera view, rotate the Android device under test (DUT) around the pattern in three different directions, one by one (1, 2 and then 3 illustrated in picture below) as prompted by the rotation range indicator. Keep movement smooth and steady for the best result. \n\n\n **Figure 5.** Manipulating the device under test.\n10. After the capture, the camera preview will disappear and the analysis process will start. Wait patiently for analysis to finish; it usually takes one to five minutes depending on the phone performance. The phone will sound and vibrate at analysis completion. A numerical result will be presented on screen if the analysis is successful. \n\n\n **Figure 6.** Finishing the test.\n11. Click **next** to proceed to the pass/fail screen and review the result. \n\n\n **Figure 7.** Passing the test.\n12. Follow these tips for best results:\n 1. Since this is a manual test with complexity, you may want to try it a few times for the best results.\n 2. Accelerometer, gyroscope, and magnetometer should be calibrated before testing for good results.\n\nTroubleshoot\n------------\n\n1. Symptom: Test crashed when starting test case or immediately after finishing video recording. \n Cause: Likely an OpenCV Manager compatibility issue. Check `logcat` to confirm. If confirmed, check version and arch of the installed OpenCV Manager.\n2. Symptom: Test fails frequently due to \"Too many invalid frame\" errors. \n Cause: Likely due to video quality. Confirm the following conditions:\n 1. There is enough ambient lighting for the test. Natural light usually gives the best result. However, when it is not available, abundant light from multiple angles that does not form obvious shadows works, as well. Avoid low angle lighting to reduce glare.\n 2. The motion during video taking is smooth. Jerky movement causes blur and confuses the computer vision software.\n 3. The pattern should always be entirely in video preview frame and located around the center. The pattern should be 1/4 \\~ 1/2 the size of the video preview window. If the pattern is too small, the accuracy is reduced. If the pattern is too big, lens distortion is more obvious, and it is more difficult to keep the pattern always inside video recording frame.\n 4. The camera is able to focus well. Some devices have trouble in focusing during video recording. This is usually due to there is too few variations in the scene, e.g. solid color smooth floor surface. Moving test pattern to a place with textured surface or introducing objects around the test pattern usually helps.\n 5. Image stabilization is turned off.\n3. Symptom: The pitch and roll test works fine, but the yaw test regularly fails. \n Cause: First, make sure the magnetic field sensor is well calibrated. Rotation vector does not function well if magnetic field sensor is not calibrated. \n It is also possible that yaw axis fails due to video taking. Hold the device steady and walk/move around the test pattern for the yaw section of test. It is hard to maintain the quality of video while rotating device in hand.\n\nReport feedback\n---------------\n\nIf the steps above do not help, please make sure to follow the feedback steps below to report your issue.\n\nPlease gather the following information when reporting a bug:\n\n1. Android bugreport\n2. Screenshot if there is any error message on screen.\n3. Contents of `/sdcard/RVCVRecData/`. This folder contains video files and thus can be quite large if the test has already been taken multiple times. Clearing the folder and performing the test again will help reduce size. Inspect video files inside to find obvious issues in recording.\n4. Screenshot of the OpenCV Manager app."]]