自 2025 年 3 月 27 日起,我們建議您使用 android-latest-release
而非 aosp-main
建構及貢獻 AOSP。詳情請參閱「Android 開放原始碼計畫變更」。
旋轉向量 CV 交叉檢查
透過集合功能整理內容
你可以依據偏好儲存及分類內容。
圖 1. 測試圖案的縮圖。下載上述連結的完整解析度圖片。
本頁提供旋轉向量感應器導入作業的正確測試相容性步驟。裝置宣告 TYPE_ROTATION_VECTOR 複合感應器功能時,應執行此測試。
測試
- 在測試的 Android 裝置上安裝 OpenCV Manager。
- 請從
SourceForge.net 下載
OpenCV-3.0.0-android-sdk.zip
套件。
- 在下載的封存檔內的
apk
資料夾中找出 APK。使用搭配 --bypass-low-target-sdk-block
選項的 adb install
指令,從電腦上載入裝置上的 APK。如果裝置搭載 Android 13 以下版本,則不需要使用這個 --bypass-low-target-sdk-block
選項。詳情請參閱「安裝應用程式」。
如果有登入 Google Play 的有效帳戶,請在 Google Play 中找出 OpenCV Manager,然後在內容選單 (「...」按鈕的彈出式選單) 中停用「Auto-update」。
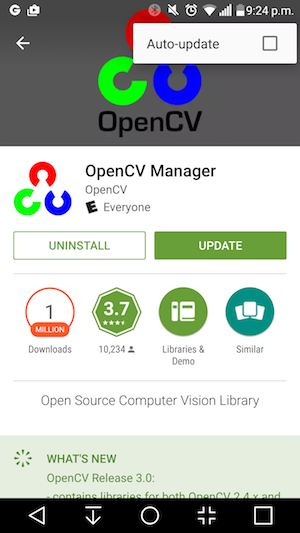
圖 2. 在 Google Play 中停用自動更新功能。
- 列印連結的測試圖案,並在列印時停用所有縮放選項。圖案應適合橫向的美國 Letter 紙張或更大的紙張。
注意:上方的內嵌圖片解析度較低,僅供說明。請勿直接將其列印為圖案。
- 將圖案放在水平表面上。
- 在 CTS Verifier 應用程式中啟動旋轉向量 CV 交叉比對。如果尚未進行這些變更,請按照指南開啟飛航模式、關閉自動旋轉功能,並調整自動亮度和位置。
圖 3. 開始測試。
- 當影片預覽畫面顯示時,請將手機放在圖案上方約 1 公尺 (或 1 公尺) 處,讓主相機朝向圖案,螢幕上的黃色標記和圖案上的黃色標記對齊於同一角落。
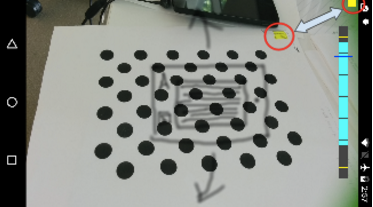
圖 4. 放置測試圖案。
- 請在圖案完全位於相機畫面內時,依照旋轉範圍指標的提示,以三個不同方向旋轉測試中的 Android 裝置 (DUT),每個方向各旋轉一次 (如下圖所示,依序為 1、2 和 3)。請保持平穩移動,以取得最佳結果。
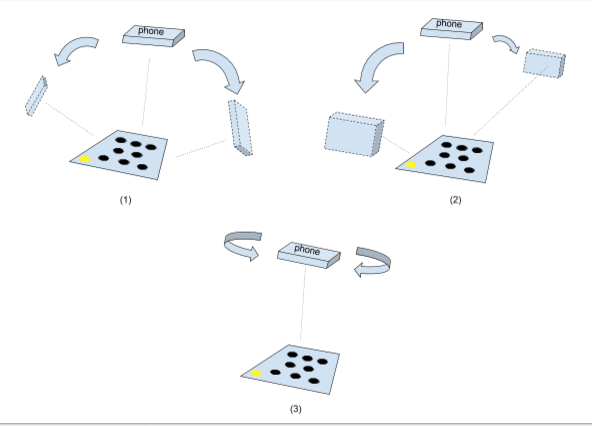
圖 5. 操控測試中的裝置。
- 擷取後,相機預覽畫面會消失,並開始分析程序。請耐心等待分析完成,這通常需要一到五分鐘的時間,視手機效能而定。分析完成後,手機會發出聲響並震動。如果分析成功,畫面上會顯示數值結果。
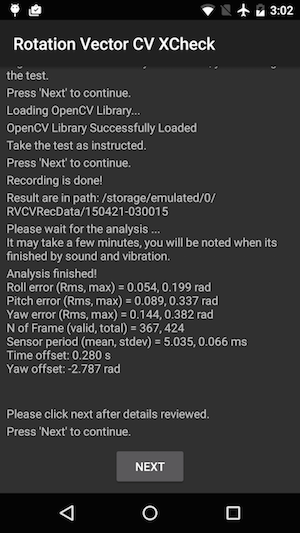
圖 6. 完成測試。
- 點選「下一步」,前往通過/不通過畫面查看結果。
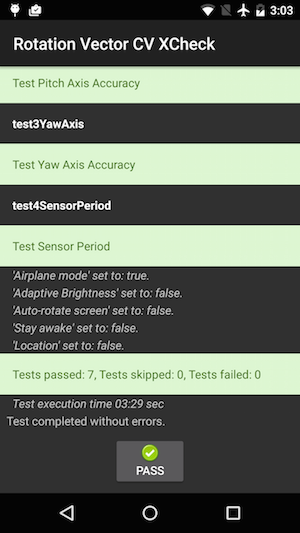
圖 7. 通過測試。
- 如要獲得最佳成效,請參考下列提示:
- 由於這是一項複雜的手動測試,建議您嘗試幾次,以獲得最佳結果。
- 為了取得良好的測試結果,請先校正加速計、陀螺儀和磁力計。
疑難排解
- 症狀:開始測試案例或在完成錄影後立即測試時,測試就會異常終止。
原因:可能是 OpenCV Manager 的相容性問題。請勾選 logcat
確認。如果確認是這個問題,請檢查已安裝的 OpenCV Manager 的版本和架構。 - 症狀:由於「無效影格過多」錯誤,測試經常失敗。
原因:可能是影片畫質不佳。確認下列條件:
- 有足夠的環境光線進行測試。自然光通常能提供最佳效果。不過,如果沒有這種光源,從多個角度照射的充足光線,只要不會形成明顯陰影,也能達到相同效果。避免使用低角度光源,以減少眩光。
- 拍攝影片時,畫面流暢不晃動。動作生硬會導致模糊,並讓電腦視覺軟體產生混淆。
- 圖案應一律位於影片預覽畫面內,並位於中心附近。圖案大小應為影片預覽視窗的 1/4 至 1/2。如果模式太小,準確度就會降低。如果圖案太大,鏡頭失真的情況就會更明顯,而且更難讓圖案一律位於錄影畫面內。
- 相機能正常對焦。部分裝置在錄製影片時無法聚焦。這通常是因為場景中的變化太少,例如單色平滑地板表面。將測試圖案移至具有紋理表面的位置,或在測試圖案周圍放置物件,通常有助於改善測試結果。
- 影像穩定功能已關閉。
- 症狀:俯仰和橫滾測試正常運作,但偏航測試經常失敗。
原因:請先確認磁場感應器已正確校正。
如果磁場感應器未校正,旋轉向量就無法正常運作。
拍攝影片也可能會導致偏航軸失效。請拿穩裝置,並在測試的偏航部分周圍走動/移動,以便進行測試。在手持裝置時旋轉裝置,很難維持影片品質。
提供意見
如果上述步驟無法解決問題,請務必按照下方的意見回饋步驟回報問題。
回報錯誤時,請收集下列資訊:
- Android bugreport
- 如果畫面上有任何錯誤訊息,請提供螢幕截圖。
/sdcard/RVCVRecData/
的內容。這個資料夾包含影片檔案,因此如果您已多次進行測試,檔案可能會相當大。清除資料夾並再次執行測試,有助於縮減大小。檢查內部的影片檔案,找出錄製過程中的明顯問題。- OpenCV Manager 應用程式的螢幕截圖。
這個頁面中的內容和程式碼範例均受《內容授權》中的授權所規範。Java 與 OpenJDK 是 Oracle 和/或其關係企業的商標或註冊商標。
上次更新時間:2025-07-27 (世界標準時間)。
[[["容易理解","easyToUnderstand","thumb-up"],["確實解決了我的問題","solvedMyProblem","thumb-up"],["其他","otherUp","thumb-up"]],[["缺少我需要的資訊","missingTheInformationINeed","thumb-down"],["過於複雜/步驟過多","tooComplicatedTooManySteps","thumb-down"],["過時","outOfDate","thumb-down"],["翻譯問題","translationIssue","thumb-down"],["示例/程式碼問題","samplesCodeIssue","thumb-down"],["其他","otherDown","thumb-down"]],["上次更新時間:2025-07-27 (世界標準時間)。"],[],[],null,["# Rotation vector CV crosscheck\n\n**Figure 1.** Thumbnail of test pattern. Download the\nfull-resolution image linked above.\n\nThis page provides the steps to properly test the compatibility of your [rotation vector\nsensor](/docs/core/interaction/sensors/sensor-types#rotation_vector) implementation. This test should be run when the device declares the\nTYPE_ROTATION_VECTOR composite sensor feature.\n\nTest\n----\n\n1. Install OpenCV Manager on the Android device being tested.\n2. Download the `OpenCV-3.0.0-android-sdk.zip` package from [SourceForge.net](https://sourceforge.net/projects/opencvlibrary/files/opencv-android/3.0.0).\n3. Find the APK from the `apk` folder inside the downloaded archive. Load the APK on the device from a computer using the `adb install` command with the `--bypass-low-target-sdk-block` option. For devices running Android 13 or lower, this `--bypass-low-target-sdk-block` option isn't necessary. For more information, see [Install an app](http://developer.android.com/tools/help/adb#move).\n4. If there is an active account logged into Google Play, locate OpenCV Manager in Google Play\n and disable *Auto-update* in the context menu (the popup menu from the \"...\" button).\n\n\n **Figure 2.** Disabling Auto-update in Google Play.\n5. Print out the linked [test pattern](/static/docs/compatibility/cts/images/acircles_pattern.pdf), disabling any scaling options when printing. The pattern should fit US Letter paper in landscape or anything bigger.\n\n **Note:** The inline picture above is low\n resolution and just for illustration. Please do not directly print it as your\n pattern.\n6. Place the pattern on a horizontal surface.\n7. Start the **Rotation Vector CV Crosscheck** in the CTS Verifier app. Follow the guide to turn on airplane mode, turn off auto rotate, and adjust adaptive brightness and location if these changes have not been made. \n\n\n **Figure 3.** Initiating the test.\n8. When the video preview appears, place the phone three feet (or one meter) over the pattern so the main camera is facing the pattern with yellow marker on the screen and yellow marker on the pattern aligned at the same corner. \n\n\n **Figure 4.** Placing the test pattern.\n9. While keeping the pattern entirely in the camera view, rotate the Android device under test (DUT) around the pattern in three different directions, one by one (1, 2 and then 3 illustrated in picture below) as prompted by the rotation range indicator. Keep movement smooth and steady for the best result. \n\n\n **Figure 5.** Manipulating the device under test.\n10. After the capture, the camera preview will disappear and the analysis process will start. Wait patiently for analysis to finish; it usually takes one to five minutes depending on the phone performance. The phone will sound and vibrate at analysis completion. A numerical result will be presented on screen if the analysis is successful. \n\n\n **Figure 6.** Finishing the test.\n11. Click **next** to proceed to the pass/fail screen and review the result. \n\n\n **Figure 7.** Passing the test.\n12. Follow these tips for best results:\n 1. Since this is a manual test with complexity, you may want to try it a few times for the best results.\n 2. Accelerometer, gyroscope, and magnetometer should be calibrated before testing for good results.\n\nTroubleshoot\n------------\n\n1. Symptom: Test crashed when starting test case or immediately after finishing video recording. \n Cause: Likely an OpenCV Manager compatibility issue. Check `logcat` to confirm. If confirmed, check version and arch of the installed OpenCV Manager.\n2. Symptom: Test fails frequently due to \"Too many invalid frame\" errors. \n Cause: Likely due to video quality. Confirm the following conditions:\n 1. There is enough ambient lighting for the test. Natural light usually gives the best result. However, when it is not available, abundant light from multiple angles that does not form obvious shadows works, as well. Avoid low angle lighting to reduce glare.\n 2. The motion during video taking is smooth. Jerky movement causes blur and confuses the computer vision software.\n 3. The pattern should always be entirely in video preview frame and located around the center. The pattern should be 1/4 \\~ 1/2 the size of the video preview window. If the pattern is too small, the accuracy is reduced. If the pattern is too big, lens distortion is more obvious, and it is more difficult to keep the pattern always inside video recording frame.\n 4. The camera is able to focus well. Some devices have trouble in focusing during video recording. This is usually due to there is too few variations in the scene, e.g. solid color smooth floor surface. Moving test pattern to a place with textured surface or introducing objects around the test pattern usually helps.\n 5. Image stabilization is turned off.\n3. Symptom: The pitch and roll test works fine, but the yaw test regularly fails. \n Cause: First, make sure the magnetic field sensor is well calibrated. Rotation vector does not function well if magnetic field sensor is not calibrated. \n It is also possible that yaw axis fails due to video taking. Hold the device steady and walk/move around the test pattern for the yaw section of test. It is hard to maintain the quality of video while rotating device in hand.\n\nReport feedback\n---------------\n\nIf the steps above do not help, please make sure to follow the feedback steps below to report your issue.\n\nPlease gather the following information when reporting a bug:\n\n1. Android bugreport\n2. Screenshot if there is any error message on screen.\n3. Contents of `/sdcard/RVCVRecData/`. This folder contains video files and thus can be quite large if the test has already been taken multiple times. Clearing the folder and performing the test again will help reduce size. Inspect video files inside to find obvious issues in recording.\n4. Screenshot of the OpenCV Manager app."]]