Mulai 27 Maret 2025, sebaiknya gunakan android-latest-release
, bukan aosp-main
, untuk mem-build dan berkontribusi pada AOSP. Untuk mengetahui informasi selengkapnya, lihat Perubahan pada AOSP.
Pemeriksaan silang CV vektor rotasi
Tetap teratur dengan koleksi
Simpan dan kategorikan konten berdasarkan preferensi Anda.
Gambar 1. Thumbnail pola pengujian. Download
gambar beresolusi penuh yang ditautkan di atas.
Halaman ini memberikan langkah-langkah untuk menguji kompatibilitas penerapan sensor vektor
rotasi dengan benar. Pengujian ini harus dijalankan saat perangkat mendeklarasikan
fitur sensor komposit TYPE_ROTATION_VECTOR.
Tes
- Instal OpenCV Manager di perangkat Android yang sedang diuji.
- Download paket
OpenCV-3.0.0-android-sdk.zip
dari
SourceForge.net.
- Temukan APK dari folder
apk
di dalam arsip yang didownload. Muat APK
di perangkat dari komputer menggunakan perintah adb install
dengan
opsi --bypass-low-target-sdk-block
. Untuk perangkat yang menjalankan Android 13 atau yang lebih lama,
opsi --bypass-low-target-sdk-block
ini tidak diperlukan. Untuk mengetahui informasi selengkapnya, lihat
Menginstal aplikasi.
Jika ada akun aktif yang login ke Google Play, cari OpenCV Manager di Google Play
dan nonaktifkan Update otomatis di menu konteks (menu pop-up dari tombol "...").
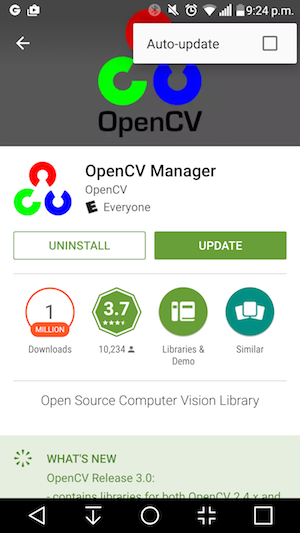
Gambar 2. Menonaktifkan Update otomatis di Google Play.
- Cetak pola pengujian yang ditautkan,
yang menonaktifkan opsi penskalaan saat mencetak. Pola harus sesuai dengan kertas
US Letter dalam lanskap atau yang lebih besar.
Catatan: Gambar inline di atas memiliki resolusi rendah dan hanya untuk ilustrasi. Jangan langsung mencetaknya sebagai
pola Anda.
- Letakkan pola di permukaan horizontal.
- Mulai Rotation Vector CV Crosscheck di aplikasi CTS Verifier. Ikuti panduan untuk mengaktifkan mode pesawat, menonaktifkan putar otomatis, dan menyesuaikan kecerahan dan lokasi adaptif jika perubahan ini belum dilakukan.
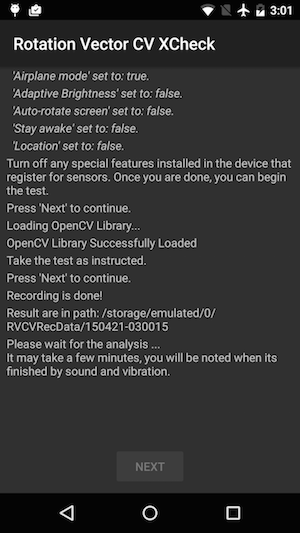
Gambar 3. Memulai pengujian.
- Saat pratinjau video muncul, tempatkan ponsel sejauh satu meter di atas
pola sehingga kamera utama menghadap pola dengan penanda kuning di
layar dan penanda kuning pada pola yang sejajar di sudut yang sama.
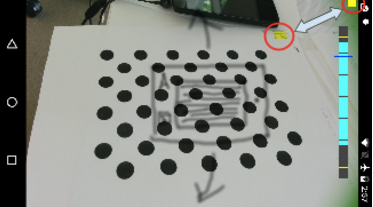
Gambar 4. Menempatkan pola pengujian.
- Sambil mempertahankan pola sepenuhnya dalam tampilan kamera, putar perangkat Android
yang sedang diuji (DUT) di sekitar pola dalam tiga arah yang berbeda, satu
per satu (1, 2, lalu 3 yang diilustrasikan dalam gambar di bawah) seperti yang diminta oleh
indikator rentang rotasi. Pastikan gerakan tetap lancar dan stabil untuk mendapatkan hasil terbaik.
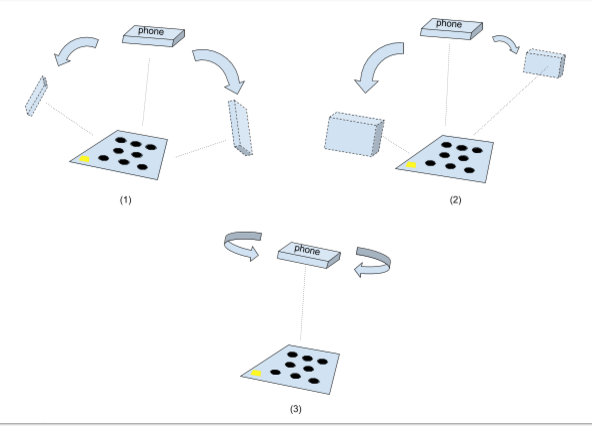
Gambar 5. Melakukan manipulasi pada perangkat yang sedang diuji.
- Setelah pengambilan gambar, pratinjau kamera akan hilang dan proses analisis
akan dimulai. Tunggu dengan sabar hingga analisis selesai; biasanya perlu waktu satu hingga lima
menit, bergantung pada performa ponsel. Ponsel akan berbunyi dan bergetar saat
analisis selesai. Hasil numerik akan ditampilkan di layar jika
analisis berhasil.
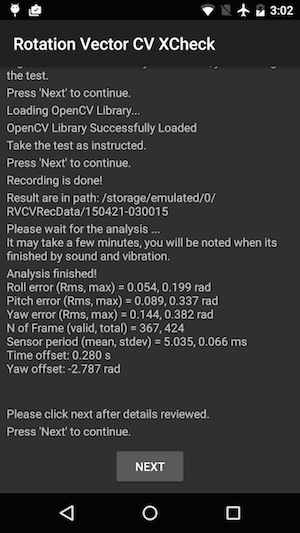
Gambar 6. Menyelesaikan pengujian.
- Klik berikutnya untuk melanjutkan ke layar lulus/gagal dan meninjau hasilnya.
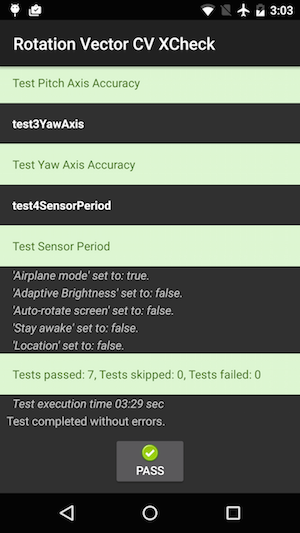
Gambar 7. Lulus pengujian.
- Ikuti tips berikut untuk mendapatkan hasil terbaik:
- Karena ini adalah pengujian manual dengan kompleksitas, sebaiknya coba beberapa kali untuk mendapatkan hasil terbaik.
- Akselerometer, giroskop, dan magnetometer harus dikalibrasi sebelum pengujian
untuk mendapatkan hasil yang baik.
Memecahkan masalah
- Gejala: Pengujian error saat memulai kasus pengujian atau segera setelah menyelesaikan perekaman video.
Penyebab: Kemungkinan masalah kompatibilitas OpenCV Manager. Centang
logcat
untuk mengonfirmasi. Jika dikonfirmasi, periksa versi dan arsitektur
OpenCV Manager yang diinstal.
- Gejala: Pengujian sering gagal karena error "Terlalu banyak frame yang tidak valid".
Penyebab: Kemungkinan karena kualitas video. Konfirmasi kondisi berikut:
- Ada cukup pencahayaan sekitar untuk pengujian. Cahaya alami
biasanya memberikan hasil terbaik. Namun, jika tidak tersedia, cahaya yang berlimpah
dari beberapa sudut yang tidak membentuk bayangan yang jelas juga dapat digunakan.
Hindari pencahayaan dengan sudut rendah untuk mengurangi silau.
- Gerakan selama perekaman video halus. Gerakan yang tidak stabil menyebabkan
buram dan membingungkan software computer vision.
- Pola harus selalu berada sepenuhnya dalam bingkai pratinjau video dan
terletak di sekitar bagian tengah. Pola harus berukuran 1/4 ~ 1/2 dari
jendela pratinjau video. Jika pola terlalu kecil, akurasi akan berkurang.
Jika pola terlalu besar, distorsi lensa akan lebih jelas, dan lebih
sulit untuk menjaga pola agar selalu berada di dalam frame perekaman video.
- Kamera dapat fokus dengan baik. Beberapa perangkat mengalami masalah fokus
selama perekaman video. Hal ini biasanya disebabkan oleh terlalu sedikit
variabel dalam tampilan, misalnya permukaan lantai halus berwarna solid. Memindahkan pola
pengujian ke tempat dengan permukaan bertekstur atau memasukkan objek di sekitar pola
pengujian biasanya akan membantu.
- Stabilisasi gambar dinonaktifkan.
- Gejala: Pengujian pitch dan roll berfungsi dengan baik, tetapi pengujian yaw sering gagal.
Penyebab: Pertama, pastikan sensor medan magnet dikalibrasi dengan baik.
Vektor rotasi tidak berfungsi dengan baik jika sensor medan magnet tidak
dikalibrasi.
Sumbu yaw juga dapat gagal karena pengambilan video. Pegang
perangkat dengan stabil dan berjalan/bergerak di sekitar pola pengujian untuk bagian pengujian
yaw. Sulit untuk mempertahankan kualitas video saat memutar perangkat di tangan.
Beri masukan
Jika langkah-langkah di atas tidak membantu, pastikan untuk mengikuti langkah-langkah masukan di bawah untuk melaporkan masalah Anda.
Kumpulkan informasi berikut saat melaporkan bug:
- Bugreport Android
- Screenshot jika ada pesan error di layar.
- Konten
/sdcard/RVCVRecData/
. Folder ini berisi
file video sehingga dapat berukuran cukup besar jika pengujian telah dilakukan
beberapa kali. Menghapus folder dan melakukan pengujian lagi akan
membantu mengurangi ukuran. Periksa file video di dalamnya untuk menemukan masalah yang jelas dalam
perekaman.
- Screenshot aplikasi OpenCV Manager.
Konten dan contoh kode di halaman ini tunduk kepada lisensi yang dijelaskan dalam Lisensi Konten. Java dan OpenJDK adalah merek dagang atau merek dagang terdaftar dari Oracle dan/atau afiliasinya.
Terakhir diperbarui pada 2025-07-27 UTC.
[[["Mudah dipahami","easyToUnderstand","thumb-up"],["Memecahkan masalah saya","solvedMyProblem","thumb-up"],["Lainnya","otherUp","thumb-up"]],[["Informasi yang saya butuhkan tidak ada","missingTheInformationINeed","thumb-down"],["Terlalu rumit/langkahnya terlalu banyak","tooComplicatedTooManySteps","thumb-down"],["Sudah usang","outOfDate","thumb-down"],["Masalah terjemahan","translationIssue","thumb-down"],["Masalah kode / contoh","samplesCodeIssue","thumb-down"],["Lainnya","otherDown","thumb-down"]],["Terakhir diperbarui pada 2025-07-27 UTC."],[],[],null,["# Rotation vector CV crosscheck\n\n**Figure 1.** Thumbnail of test pattern. Download the\nfull-resolution image linked above.\n\nThis page provides the steps to properly test the compatibility of your [rotation vector\nsensor](/docs/core/interaction/sensors/sensor-types#rotation_vector) implementation. This test should be run when the device declares the\nTYPE_ROTATION_VECTOR composite sensor feature.\n\nTest\n----\n\n1. Install OpenCV Manager on the Android device being tested.\n2. Download the `OpenCV-3.0.0-android-sdk.zip` package from [SourceForge.net](https://sourceforge.net/projects/opencvlibrary/files/opencv-android/3.0.0).\n3. Find the APK from the `apk` folder inside the downloaded archive. Load the APK on the device from a computer using the `adb install` command with the `--bypass-low-target-sdk-block` option. For devices running Android 13 or lower, this `--bypass-low-target-sdk-block` option isn't necessary. For more information, see [Install an app](http://developer.android.com/tools/help/adb#move).\n4. If there is an active account logged into Google Play, locate OpenCV Manager in Google Play\n and disable *Auto-update* in the context menu (the popup menu from the \"...\" button).\n\n\n **Figure 2.** Disabling Auto-update in Google Play.\n5. Print out the linked [test pattern](/static/docs/compatibility/cts/images/acircles_pattern.pdf), disabling any scaling options when printing. The pattern should fit US Letter paper in landscape or anything bigger.\n\n **Note:** The inline picture above is low\n resolution and just for illustration. Please do not directly print it as your\n pattern.\n6. Place the pattern on a horizontal surface.\n7. Start the **Rotation Vector CV Crosscheck** in the CTS Verifier app. Follow the guide to turn on airplane mode, turn off auto rotate, and adjust adaptive brightness and location if these changes have not been made. \n\n\n **Figure 3.** Initiating the test.\n8. When the video preview appears, place the phone three feet (or one meter) over the pattern so the main camera is facing the pattern with yellow marker on the screen and yellow marker on the pattern aligned at the same corner. \n\n\n **Figure 4.** Placing the test pattern.\n9. While keeping the pattern entirely in the camera view, rotate the Android device under test (DUT) around the pattern in three different directions, one by one (1, 2 and then 3 illustrated in picture below) as prompted by the rotation range indicator. Keep movement smooth and steady for the best result. \n\n\n **Figure 5.** Manipulating the device under test.\n10. After the capture, the camera preview will disappear and the analysis process will start. Wait patiently for analysis to finish; it usually takes one to five minutes depending on the phone performance. The phone will sound and vibrate at analysis completion. A numerical result will be presented on screen if the analysis is successful. \n\n\n **Figure 6.** Finishing the test.\n11. Click **next** to proceed to the pass/fail screen and review the result. \n\n\n **Figure 7.** Passing the test.\n12. Follow these tips for best results:\n 1. Since this is a manual test with complexity, you may want to try it a few times for the best results.\n 2. Accelerometer, gyroscope, and magnetometer should be calibrated before testing for good results.\n\nTroubleshoot\n------------\n\n1. Symptom: Test crashed when starting test case or immediately after finishing video recording. \n Cause: Likely an OpenCV Manager compatibility issue. Check `logcat` to confirm. If confirmed, check version and arch of the installed OpenCV Manager.\n2. Symptom: Test fails frequently due to \"Too many invalid frame\" errors. \n Cause: Likely due to video quality. Confirm the following conditions:\n 1. There is enough ambient lighting for the test. Natural light usually gives the best result. However, when it is not available, abundant light from multiple angles that does not form obvious shadows works, as well. Avoid low angle lighting to reduce glare.\n 2. The motion during video taking is smooth. Jerky movement causes blur and confuses the computer vision software.\n 3. The pattern should always be entirely in video preview frame and located around the center. The pattern should be 1/4 \\~ 1/2 the size of the video preview window. If the pattern is too small, the accuracy is reduced. If the pattern is too big, lens distortion is more obvious, and it is more difficult to keep the pattern always inside video recording frame.\n 4. The camera is able to focus well. Some devices have trouble in focusing during video recording. This is usually due to there is too few variations in the scene, e.g. solid color smooth floor surface. Moving test pattern to a place with textured surface or introducing objects around the test pattern usually helps.\n 5. Image stabilization is turned off.\n3. Symptom: The pitch and roll test works fine, but the yaw test regularly fails. \n Cause: First, make sure the magnetic field sensor is well calibrated. Rotation vector does not function well if magnetic field sensor is not calibrated. \n It is also possible that yaw axis fails due to video taking. Hold the device steady and walk/move around the test pattern for the yaw section of test. It is hard to maintain the quality of video while rotating device in hand.\n\nReport feedback\n---------------\n\nIf the steps above do not help, please make sure to follow the feedback steps below to report your issue.\n\nPlease gather the following information when reporting a bug:\n\n1. Android bugreport\n2. Screenshot if there is any error message on screen.\n3. Contents of `/sdcard/RVCVRecData/`. This folder contains video files and thus can be quite large if the test has already been taken multiple times. Clearing the folder and performing the test again will help reduce size. Inspect video files inside to find obvious issues in recording.\n4. Screenshot of the OpenCV Manager app."]]