
از 27 مارس 2025، توصیه می کنیم از android-latest-release
به جای aosp-main
برای ساختن و کمک به AOSP استفاده کنید. برای اطلاعات بیشتر، به تغییرات AOSP مراجعه کنید.
بردار چرخش بررسی متقاطع CV
با مجموعهها، منظم بمانید
ذخیره و طبقهبندی محتوا براساس اولویتهای شما.

شکل 1. تصویر بند انگشتی از الگوی آزمایشی. دانلود تصویر با وضوح کامل لینک بالا.
این صفحه مراحلی را برای آزمایش صحیح سازگاری اجرای سنسور بردار چرخشی ارائه می دهد. این آزمایش باید زمانی اجرا شود که دستگاه ویژگی سنسور ترکیبی TYPE_ROTATION_VECTOR را اعلام کند.
تست کنید
- OpenCV Manager را روی دستگاه اندرویدی در حال آزمایش نصب کنید.
- بسته
OpenCV-3.0.0-android-sdk.zip
از SourceForge.net دانلود کنید. - APK را از پوشه
apk
داخل بایگانی دانلود شده پیدا کنید. APK را با استفاده از دستور adb install
با گزینه --bypass-low-target-sdk-block
از رایانه روی دستگاه بارگیری کنید. برای دستگاههایی که اندروید 13 یا پایینتر دارند، این گزینه --bypass-low-target-sdk-block
ضروری نیست. برای اطلاعات بیشتر، به نصب برنامه مراجعه کنید. اگر یک حساب فعال وارد Google Play شده است، مدیر OpenCV را در Google Play پیدا کنید و به روز رسانی خودکار را در منوی زمینه (منوی بازشو از دکمه "...") غیرفعال کنید.
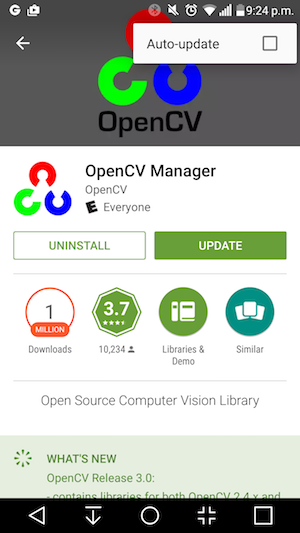
شکل 2. غیرفعال کردن بهروزرسانی خودکار در Google Play.
- الگوی آزمایشی پیوند داده شده را چاپ کنید، هر گونه گزینه مقیاس بندی را هنگام چاپ غیرفعال کنید. این الگو باید با کاغذ US Letter در منظره یا هر چیز بزرگتر مطابقت داشته باشد.
توجه: تصویر درون خطی بالا وضوح پایینی دارد و فقط برای تصویر است. لطفاً آن را مستقیماً به عنوان الگوی خود چاپ نکنید.
- الگو را روی سطح افقی قرار دهید.
- بررسی متقاطع CV Vector را در برنامه CTS Verifier شروع کنید. برای روشن کردن حالت هواپیما، خاموش کردن چرخش خودکار، و تنظیم روشنایی و مکان تطبیقی در صورتی که این تغییرات انجام نشده اند، راهنمای را دنبال کنید.
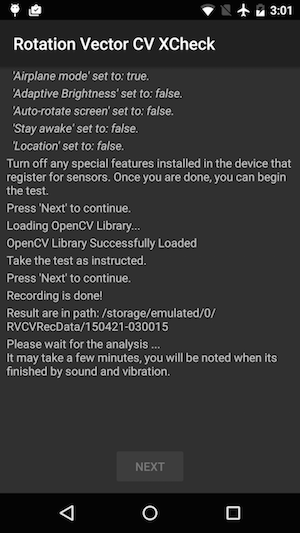
شکل 3. شروع آزمون.
- هنگامی که پیشنمایش ویدیو ظاهر شد، تلفن را در سه فوت (یا یک متر) روی الگو قرار دهید تا دوربین اصلی با نشانگر زرد روی صفحه و نشانگر زرد روی الگوی تراز شده در همان گوشه رو به الگو باشد.
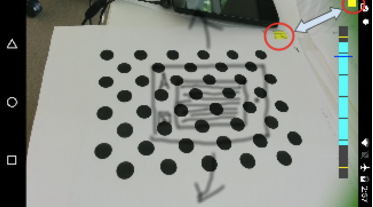
شکل 4. قرار دادن الگوی تست.
- در حالی که الگو را کاملاً در نمای دوربین نگه می دارید، دستگاه Android تحت آزمایش (DUT) را در سه جهت مختلف به دور الگو بچرخانید، همانطور که توسط نشانگر محدوده چرخش نشان داده شده است (1، 2 و سپس 3 نشان داده شده در تصویر زیر). برای بهترین نتیجه حرکت را صاف و ثابت نگه دارید.
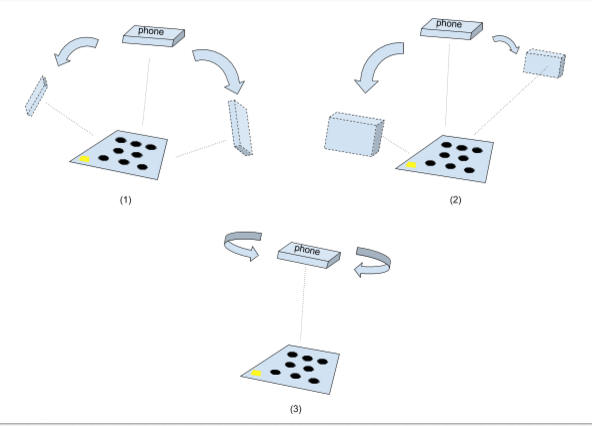
شکل 5. دستکاری دستگاه تحت آزمایش.
- پس از ضبط، پیش نمایش دوربین ناپدید می شود و فرآیند تحلیل شروع می شود. صبر کنید تا تجزیه و تحلیل به پایان برسد. بسته به عملکرد گوشی معمولا یک تا پنج دقیقه طول می کشد. تلفن در پایان تجزیه و تحلیل صدا و لرزش خواهد داشت. در صورت موفقیت آمیز بودن تجزیه و تحلیل، یک نتیجه عددی روی صفحه نمایش داده می شود.
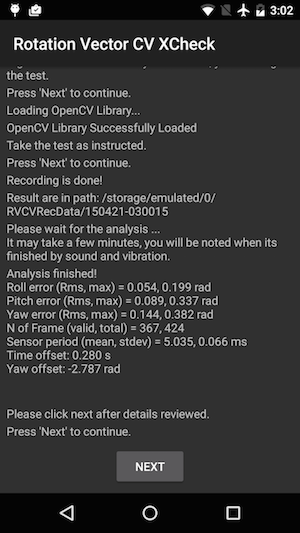
شکل 6. اتمام آزمون.
- روی next کلیک کنید تا به صفحه گذر/شکست بروید و نتیجه را بررسی کنید.
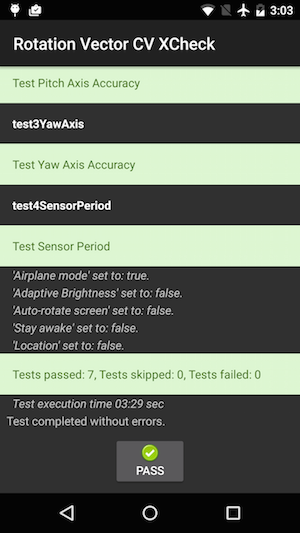
شکل 7. قبولی در آزمون.
- برای بهترین نتایج این نکات را دنبال کنید:
- از آنجایی که این یک تست دستی با پیچیدگی است، ممکن است بخواهید آن را چند بار امتحان کنید تا بهترین نتیجه را بگیرید.
- شتاب سنج، ژیروسکوپ و مغناطیس سنج باید قبل از آزمایش برای نتایج خوب کالیبره شوند.
عیب یابی
- علامت: تست هنگام شروع آزمایش یا بلافاصله پس از اتمام ضبط ویدیو از کار افتاد.
علت: احتمالاً مشکل سازگاری OpenCV Manager وجود دارد. برای تایید logcat
بررسی کنید. در صورت تایید، نسخه و قوس مدیر OpenCV نصب شده را بررسی کنید. - علامت: تست اغلب به دلیل خطاهای "قاب نامعتبر زیاد" ناموفق است.
علت: احتمالاً به دلیل کیفیت فیلم است. شرایط زیر را تایید کنید:- نور محیطی کافی برای تست وجود دارد. نور طبیعی معمولا بهترین نتیجه را می دهد. با این حال، زمانی که در دسترس نیست، نور فراوان از زوایای متعدد که سایههای واضحی ایجاد نمیکند نیز کار میکند. از نورپردازی با زاویه کم برای کاهش تابش خیره کننده اجتناب کنید.
- حرکت در حین فیلمبرداری روان است. حرکت ناگهانی باعث تاری و سردرگمی نرم افزار بینایی کامپیوتر می شود.
- الگو همیشه باید کاملاً در قاب پیشنمایش ویدیو باشد و در اطراف مرکز قرار گیرد. الگو باید 1/4 ~ 1/2 اندازه پنجره پیش نمایش ویدیو باشد. اگر الگو خیلی کوچک باشد، دقت کاهش می یابد. اگر الگوی بیش از حد بزرگ باشد، اعوجاج لنز آشکارتر است و نگه داشتن الگو همیشه در قاب ضبط ویدیو دشوارتر است.
- دوربین قادر است به خوبی فوکوس کند. برخی از دستگاه ها در فوکوس در حین ضبط ویدیو مشکل دارند. این معمولاً به این دلیل است که تغییرات بسیار کمی در صحنه وجود دارد، به عنوان مثال سطح کف صاف رنگ ثابت. انتقال الگوی آزمایشی به مکانی با سطح بافت یا وارد کردن اشیاء در اطراف الگوی آزمایشی معمولا کمک می کند.
- تثبیت کننده تصویر خاموش است.
- علامت: تست پیچ و رول به خوبی کار می کند، اما تست انحراف به طور منظم با شکست مواجه می شود.
علت: ابتدا مطمئن شوید که حسگر میدان مغناطیسی به خوبی کالیبره شده است. اگر سنسور میدان مغناطیسی کالیبره نشده باشد، بردار چرخش به خوبی عمل نمی کند.
همچنین ممکن است محور انحراف به دلیل فیلم برداری از کار بیفتد. دستگاه را ثابت نگه دارید و روی الگوی آزمایشی بخش انحراف تست راه بروید/حرکت کنید. حفظ کیفیت ویدیو در حین چرخاندن دستگاه در دست دشوار است.
گزارش بازخورد
اگر مراحل بالا کمکی نکرد، لطفاً مراحل بازخورد زیر را برای گزارش مشکل خود دنبال کنید.
لطفاً هنگام گزارش یک اشکال، اطلاعات زیر را جمع آوری کنید:
- گزارش اشکال اندروید
- اسکرین شات در صورت وجود هرگونه پیام خطایی روی صفحه.
- محتویات
/sdcard/RVCVRecData/
. این پوشه حاوی فایلهای ویدیویی است و بنابراین اگر آزمایش قبلاً چندین بار انجام شده باشد، میتواند بسیار بزرگ باشد. پاک کردن پوشه و انجام مجدد تست به کاهش اندازه کمک می کند. فایل های ویدیویی داخل آن را بررسی کنید تا مشکلات واضحی در ضبط پیدا کنید. - تصویری از برنامه OpenCV Manager.
محتوا و نمونه کدها در این صفحه مشمول پروانههای توصیفشده در پروانه محتوا هستند. جاوا و OpenJDK علامتهای تجاری یا علامتهای تجاری ثبتشده Oracle و/یا وابستههای آن هستند.
تاریخ آخرین بهروزرسانی 2025-07-29 بهوقت ساعت هماهنگ جهانی.
[[["درک آسان","easyToUnderstand","thumb-up"],["مشکلم را برطرف کرد","solvedMyProblem","thumb-up"],["غیره","otherUp","thumb-up"]],[["اطلاعاتی که نیاز دارم وجود ندارد","missingTheInformationINeed","thumb-down"],["بیشازحد پیچیده/ مراحل بسیار زیاد","tooComplicatedTooManySteps","thumb-down"],["قدیمی","outOfDate","thumb-down"],["مشکل ترجمه","translationIssue","thumb-down"],["مشکل کد / نمونهها","samplesCodeIssue","thumb-down"],["غیره","otherDown","thumb-down"]],["تاریخ آخرین بهروزرسانی 2025-07-29 بهوقت ساعت هماهنگ جهانی."],[],[],null,["# Rotation vector CV crosscheck\n\n**Figure 1.** Thumbnail of test pattern. Download the\nfull-resolution image linked above.\n\nThis page provides the steps to properly test the compatibility of your [rotation vector\nsensor](/docs/core/interaction/sensors/sensor-types#rotation_vector) implementation. This test should be run when the device declares the\nTYPE_ROTATION_VECTOR composite sensor feature.\n\nTest\n----\n\n1. Install OpenCV Manager on the Android device being tested.\n2. Download the `OpenCV-3.0.0-android-sdk.zip` package from [SourceForge.net](https://sourceforge.net/projects/opencvlibrary/files/opencv-android/3.0.0).\n3. Find the APK from the `apk` folder inside the downloaded archive. Load the APK on the device from a computer using the `adb install` command with the `--bypass-low-target-sdk-block` option. For devices running Android 13 or lower, this `--bypass-low-target-sdk-block` option isn't necessary. For more information, see [Install an app](http://developer.android.com/tools/help/adb#move).\n4. If there is an active account logged into Google Play, locate OpenCV Manager in Google Play\n and disable *Auto-update* in the context menu (the popup menu from the \"...\" button).\n\n\n **Figure 2.** Disabling Auto-update in Google Play.\n5. Print out the linked [test pattern](/static/docs/compatibility/cts/images/acircles_pattern.pdf), disabling any scaling options when printing. The pattern should fit US Letter paper in landscape or anything bigger.\n\n **Note:** The inline picture above is low\n resolution and just for illustration. Please do not directly print it as your\n pattern.\n6. Place the pattern on a horizontal surface.\n7. Start the **Rotation Vector CV Crosscheck** in the CTS Verifier app. Follow the guide to turn on airplane mode, turn off auto rotate, and adjust adaptive brightness and location if these changes have not been made. \n\n\n **Figure 3.** Initiating the test.\n8. When the video preview appears, place the phone three feet (or one meter) over the pattern so the main camera is facing the pattern with yellow marker on the screen and yellow marker on the pattern aligned at the same corner. \n\n\n **Figure 4.** Placing the test pattern.\n9. While keeping the pattern entirely in the camera view, rotate the Android device under test (DUT) around the pattern in three different directions, one by one (1, 2 and then 3 illustrated in picture below) as prompted by the rotation range indicator. Keep movement smooth and steady for the best result. \n\n\n **Figure 5.** Manipulating the device under test.\n10. After the capture, the camera preview will disappear and the analysis process will start. Wait patiently for analysis to finish; it usually takes one to five minutes depending on the phone performance. The phone will sound and vibrate at analysis completion. A numerical result will be presented on screen if the analysis is successful. \n\n\n **Figure 6.** Finishing the test.\n11. Click **next** to proceed to the pass/fail screen and review the result. \n\n\n **Figure 7.** Passing the test.\n12. Follow these tips for best results:\n 1. Since this is a manual test with complexity, you may want to try it a few times for the best results.\n 2. Accelerometer, gyroscope, and magnetometer should be calibrated before testing for good results.\n\nTroubleshoot\n------------\n\n1. Symptom: Test crashed when starting test case or immediately after finishing video recording. \n Cause: Likely an OpenCV Manager compatibility issue. Check `logcat` to confirm. If confirmed, check version and arch of the installed OpenCV Manager.\n2. Symptom: Test fails frequently due to \"Too many invalid frame\" errors. \n Cause: Likely due to video quality. Confirm the following conditions:\n 1. There is enough ambient lighting for the test. Natural light usually gives the best result. However, when it is not available, abundant light from multiple angles that does not form obvious shadows works, as well. Avoid low angle lighting to reduce glare.\n 2. The motion during video taking is smooth. Jerky movement causes blur and confuses the computer vision software.\n 3. The pattern should always be entirely in video preview frame and located around the center. The pattern should be 1/4 \\~ 1/2 the size of the video preview window. If the pattern is too small, the accuracy is reduced. If the pattern is too big, lens distortion is more obvious, and it is more difficult to keep the pattern always inside video recording frame.\n 4. The camera is able to focus well. Some devices have trouble in focusing during video recording. This is usually due to there is too few variations in the scene, e.g. solid color smooth floor surface. Moving test pattern to a place with textured surface or introducing objects around the test pattern usually helps.\n 5. Image stabilization is turned off.\n3. Symptom: The pitch and roll test works fine, but the yaw test regularly fails. \n Cause: First, make sure the magnetic field sensor is well calibrated. Rotation vector does not function well if magnetic field sensor is not calibrated. \n It is also possible that yaw axis fails due to video taking. Hold the device steady and walk/move around the test pattern for the yaw section of test. It is hard to maintain the quality of video while rotating device in hand.\n\nReport feedback\n---------------\n\nIf the steps above do not help, please make sure to follow the feedback steps below to report your issue.\n\nPlease gather the following information when reporting a bug:\n\n1. Android bugreport\n2. Screenshot if there is any error message on screen.\n3. Contents of `/sdcard/RVCVRecData/`. This folder contains video files and thus can be quite large if the test has already been taken multiple times. Clearing the folder and performing the test again will help reduce size. Inspect video files inside to find obvious issues in recording.\n4. Screenshot of the OpenCV Manager app."]]