از 27 مارس 2025، توصیه می کنیم از android-latest-release به جای aosp-main برای ساختن و کمک به AOSP استفاده کنید. برای اطلاعات بیشتر، به تغییرات AOSP مراجعه کنید.
با مجموعهها، منظم بمانید
ذخیره و طبقهبندی محتوا براساس اولویتهای شما.
تست همجوشی حسگر، دقت مهر زمانی سنسورها را برای دستگاههای اندرویدی، بهویژه سنسورهای تصویر دوربین و ژیروسکوپها اندازهگیری میکند. این صفحه دستورالعمل های گام به گام نحوه راه اندازی تست Sensor Fusion و Sensor Fusion Box را برای اولین بار ارائه می دهد.
آموزش تصویری
این یک آموزش تصویری در مورد نحوه تنظیم جعبه فیوژن سنسور است.
ابزار مورد نیاز
قبل از شروع، مطمئن شوید که اجزای زیر را دارید:
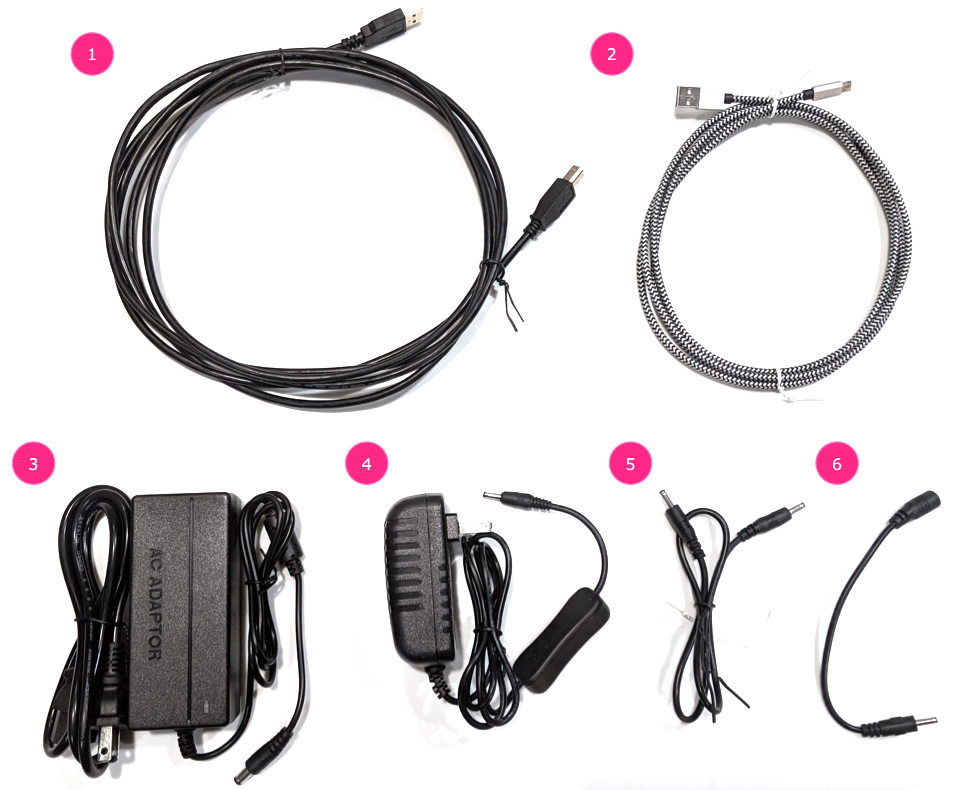
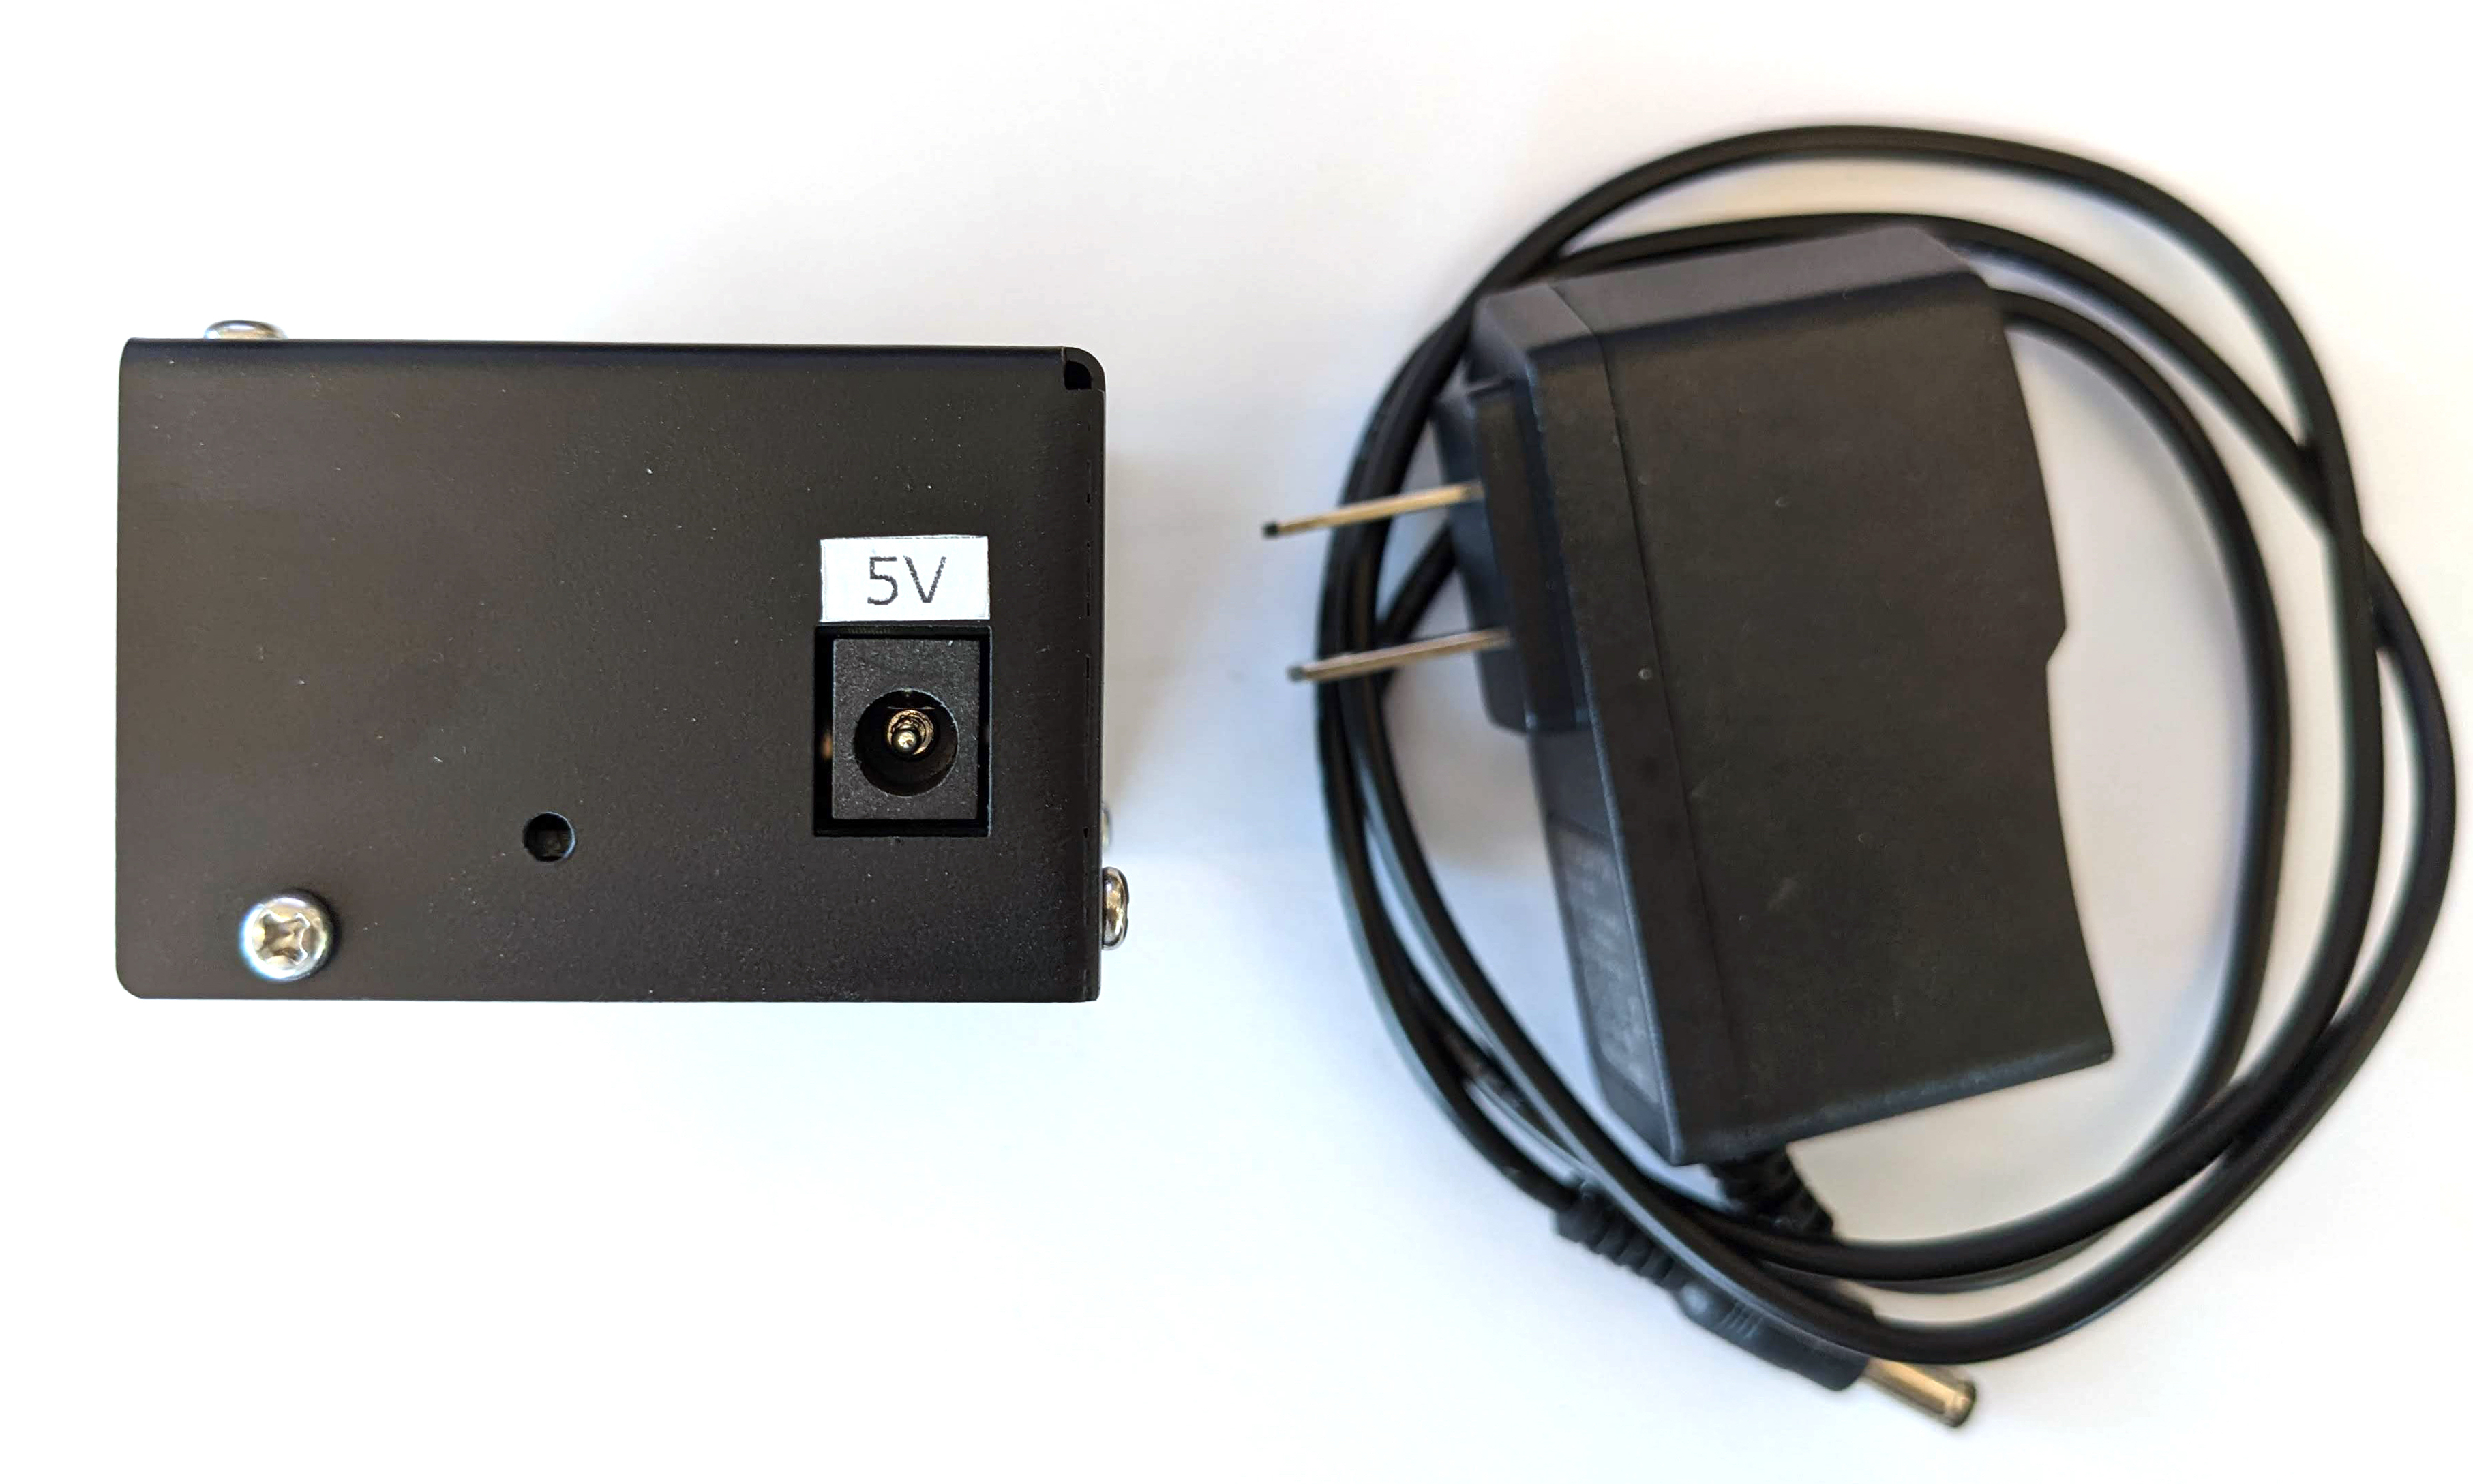
شکل 1. اجزای مورد نیاز برای تست همجوشی سنسور
کابل USB A به B
کابل USB A به C (برای تلفن آزمایشی)
سیم برق 12 ولت 2 آمپر (برای جعبه کنترل سروو)
سیم برق 12 ولت (برای روشنایی، دارای سوئیچ)
کابل اتصال نر-نر 5 ولت (برای روشنایی)
کابل تبدیل زن به زن 5 ولت (برای روشنایی)
مرحله 1: چراغ ها را وصل کنید
برای اتصال چراغ ها:
همانطور که در شکل 2 نشان داده شده است، از کابل نر-نر برای اتصال دو چراغ در انتهای پایین چراغ ها استفاده کنید. کابل را به پایین جعبه محکم کنید تا کابل در کار اختلال ایجاد نکند.
انتهای چراغ را نزدیکتر به سوراخ خروجی کابل نور به کابل تبدیل وصل کنید شکل 2. اتصال چراغ ها به یکدیگر و یک چراغ به کابل تبدیل
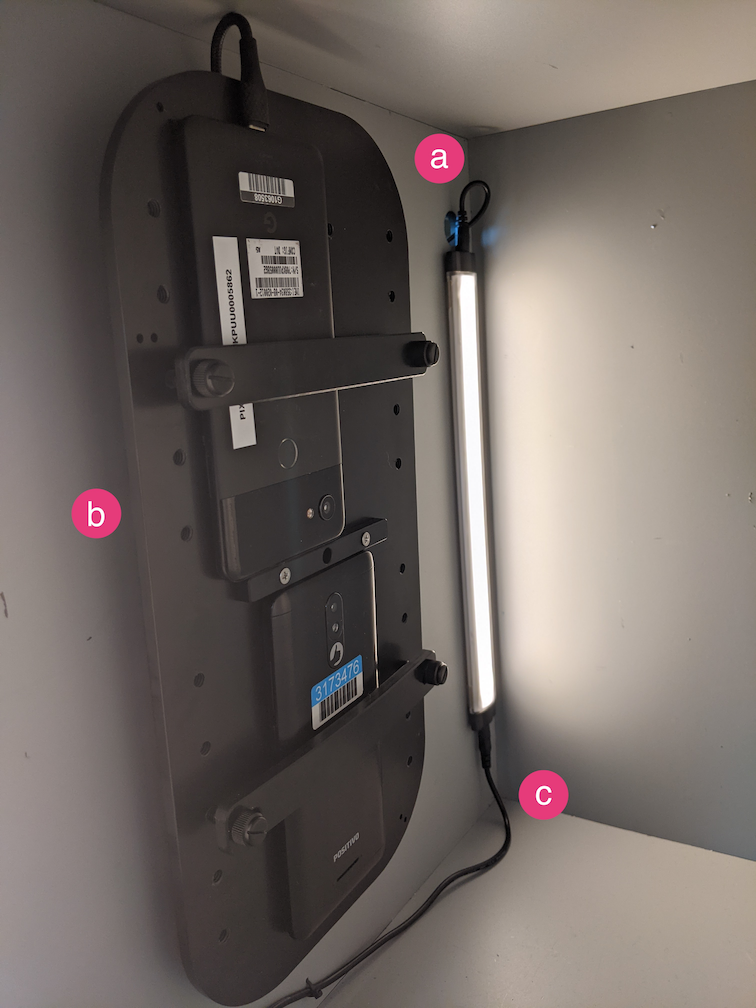
سوراخ خروجی کابل نور
سوراخ خروجی کابل USB
کابل تبدیل نر به نر 5 ولت
انتهای غیر متصل کابل تبدیل را از سوراخ گردی که از جعبه خارج می شود عبور دهید، سپس آن را برای روشنایی به کابل برق وصل کنید. شکل 3. کابل تبدیل روشنایی خروجی از جعبه و اتصال به کابل برق
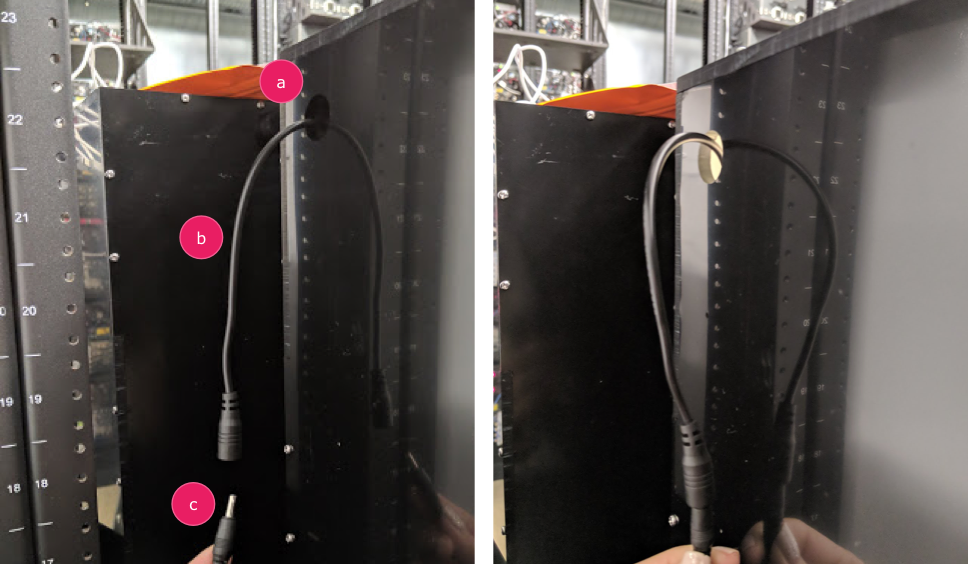
سوراخ خروجی
کابل تبدیل
کابل برق
مرحله 2: سروو را وصل کنید
برای اتصال سروو:
کانکتور سروو را به کنترل سروو وصل کنید. مطمئن شوید که کانکتور را با رنگ های مربوطه مطابق با برچسب (Y = زرد، R = قرمز، B = سیاه) وارد کنید، زیرا تغییر ترتیب ممکن است به موتور آسیب برساند. اگر سیم خیلی کوتاه است، از کابل توسعه سروو استفاده کنید. شکل 4. اتصال سروو به جعبه کنترل سروو
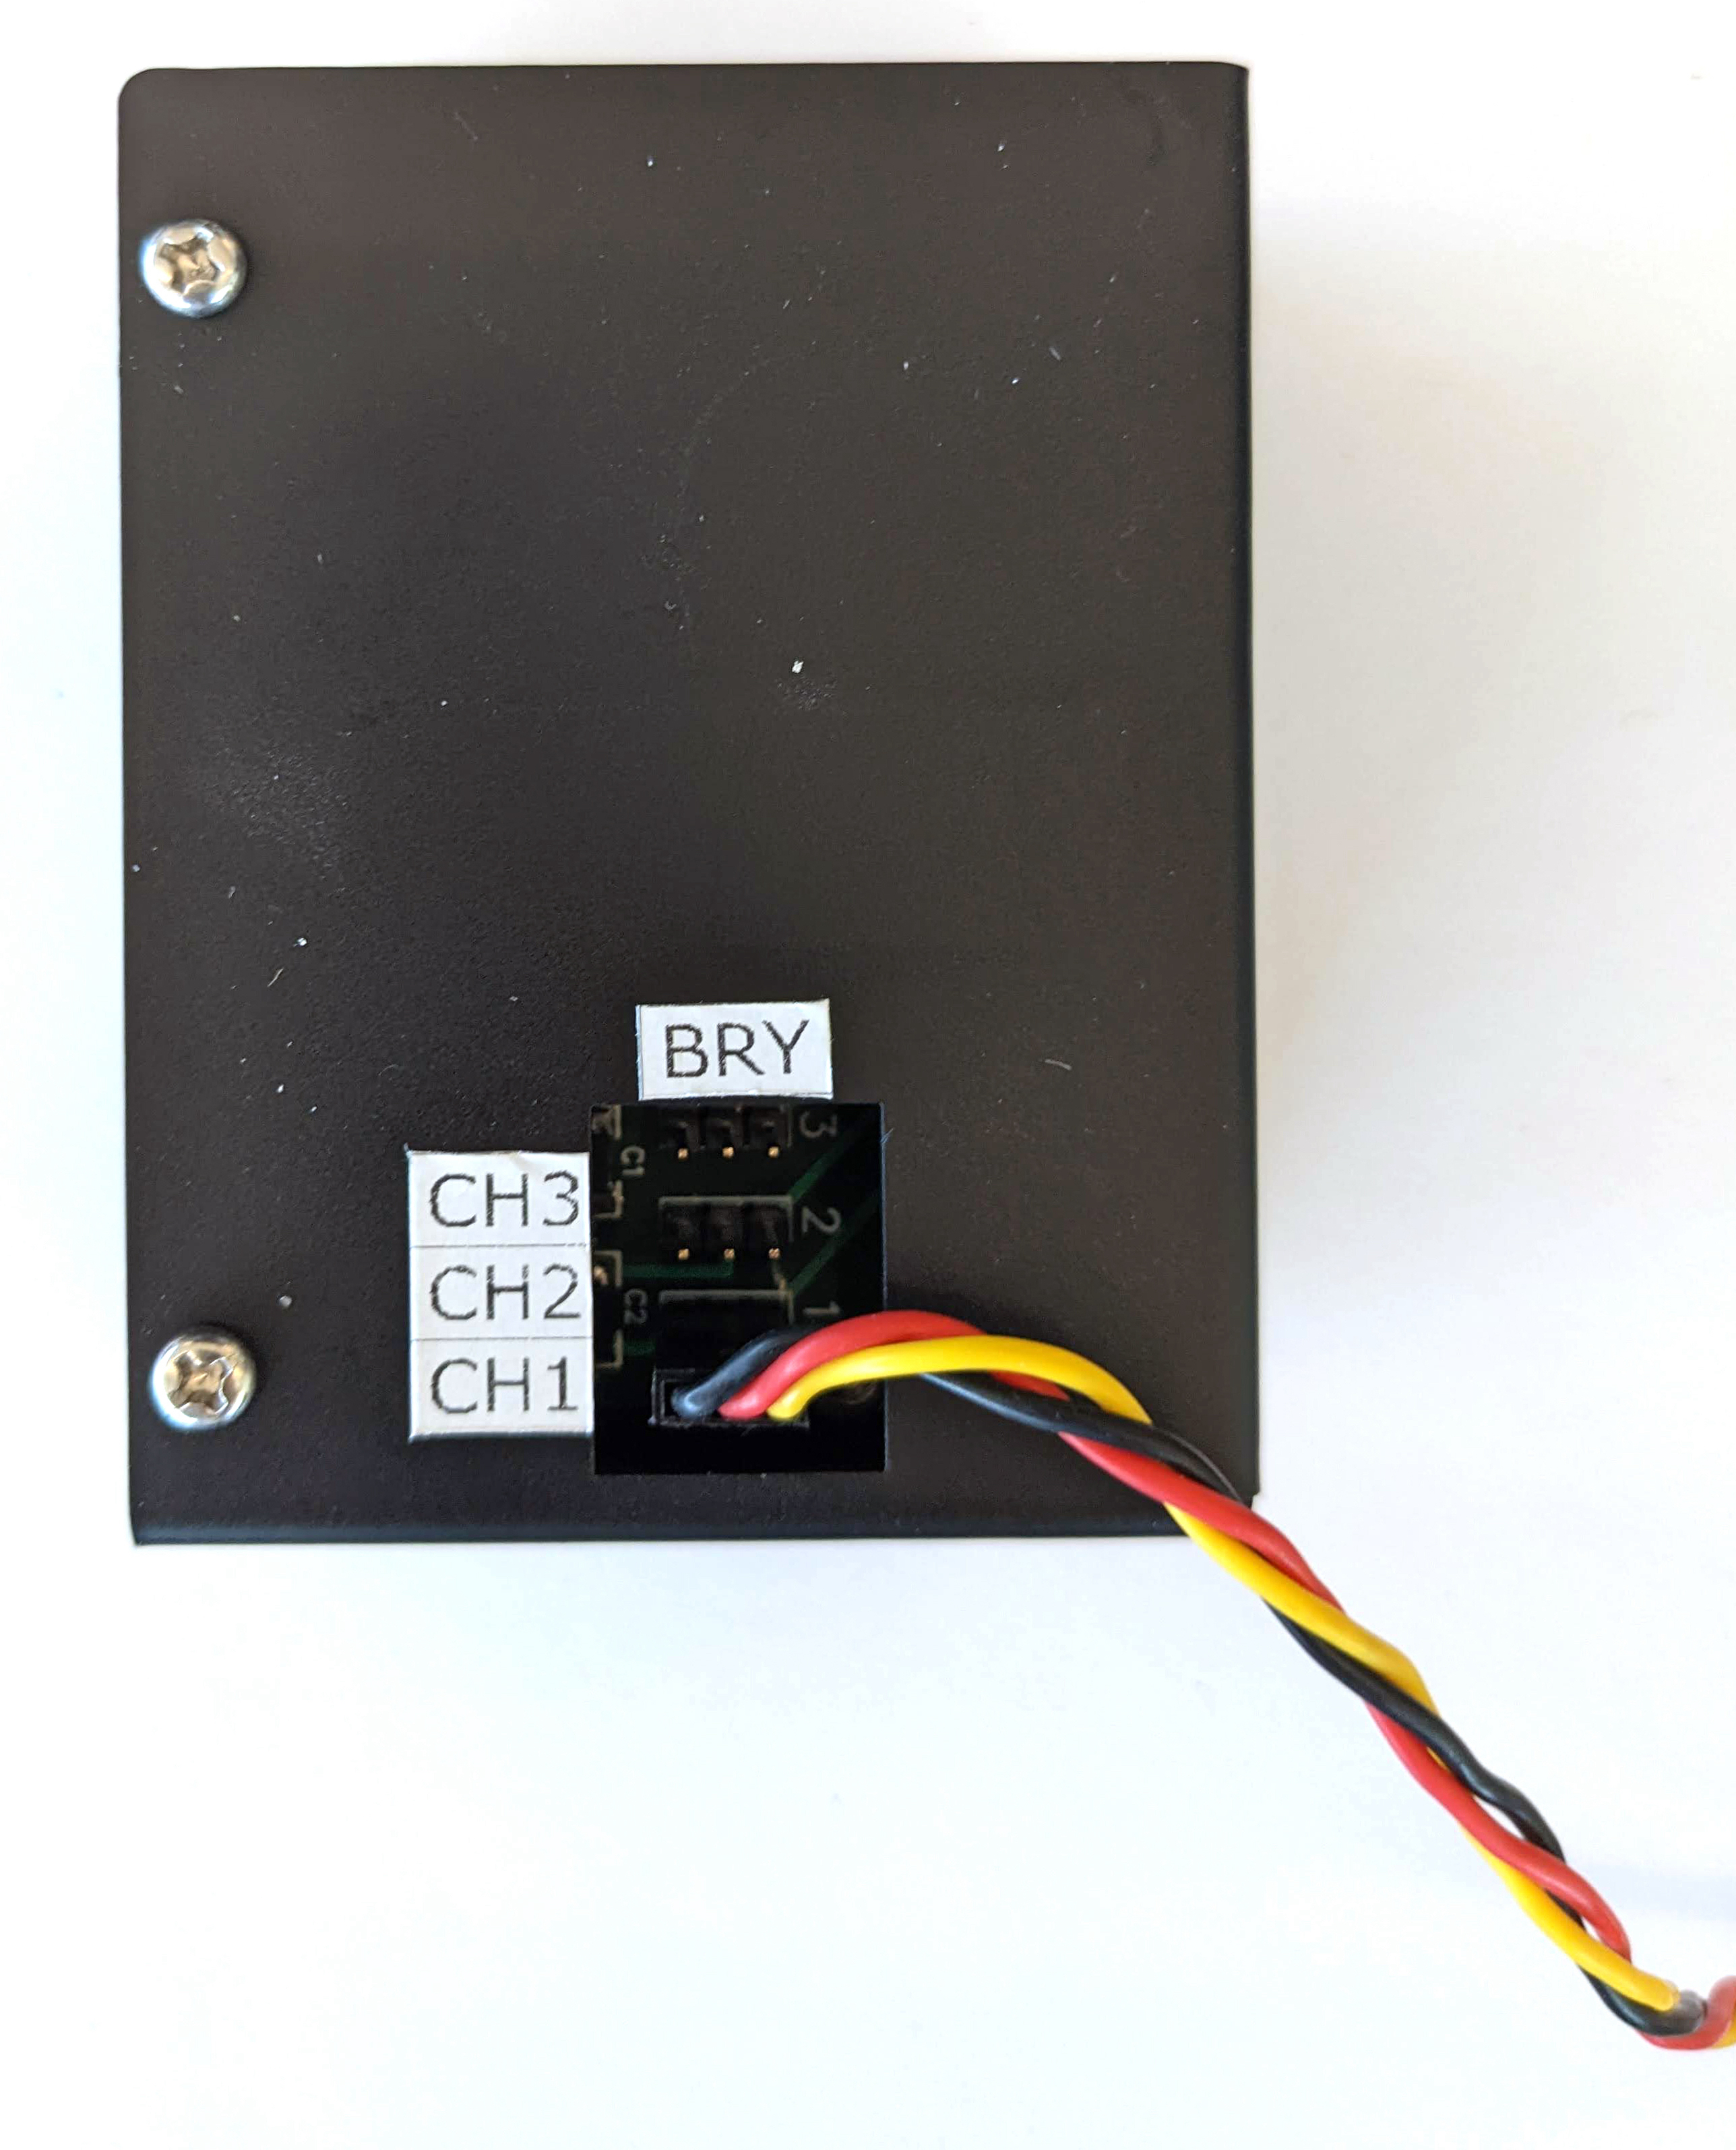
سروو کنترل را با سیم برق آن وصل کنید (روشنایی و کنترل سروو دارای منابع تغذیه مستقل و اختصاصی هستند). شکل 5. اتصال سروو کنترل به سیم برق اختصاصی آن
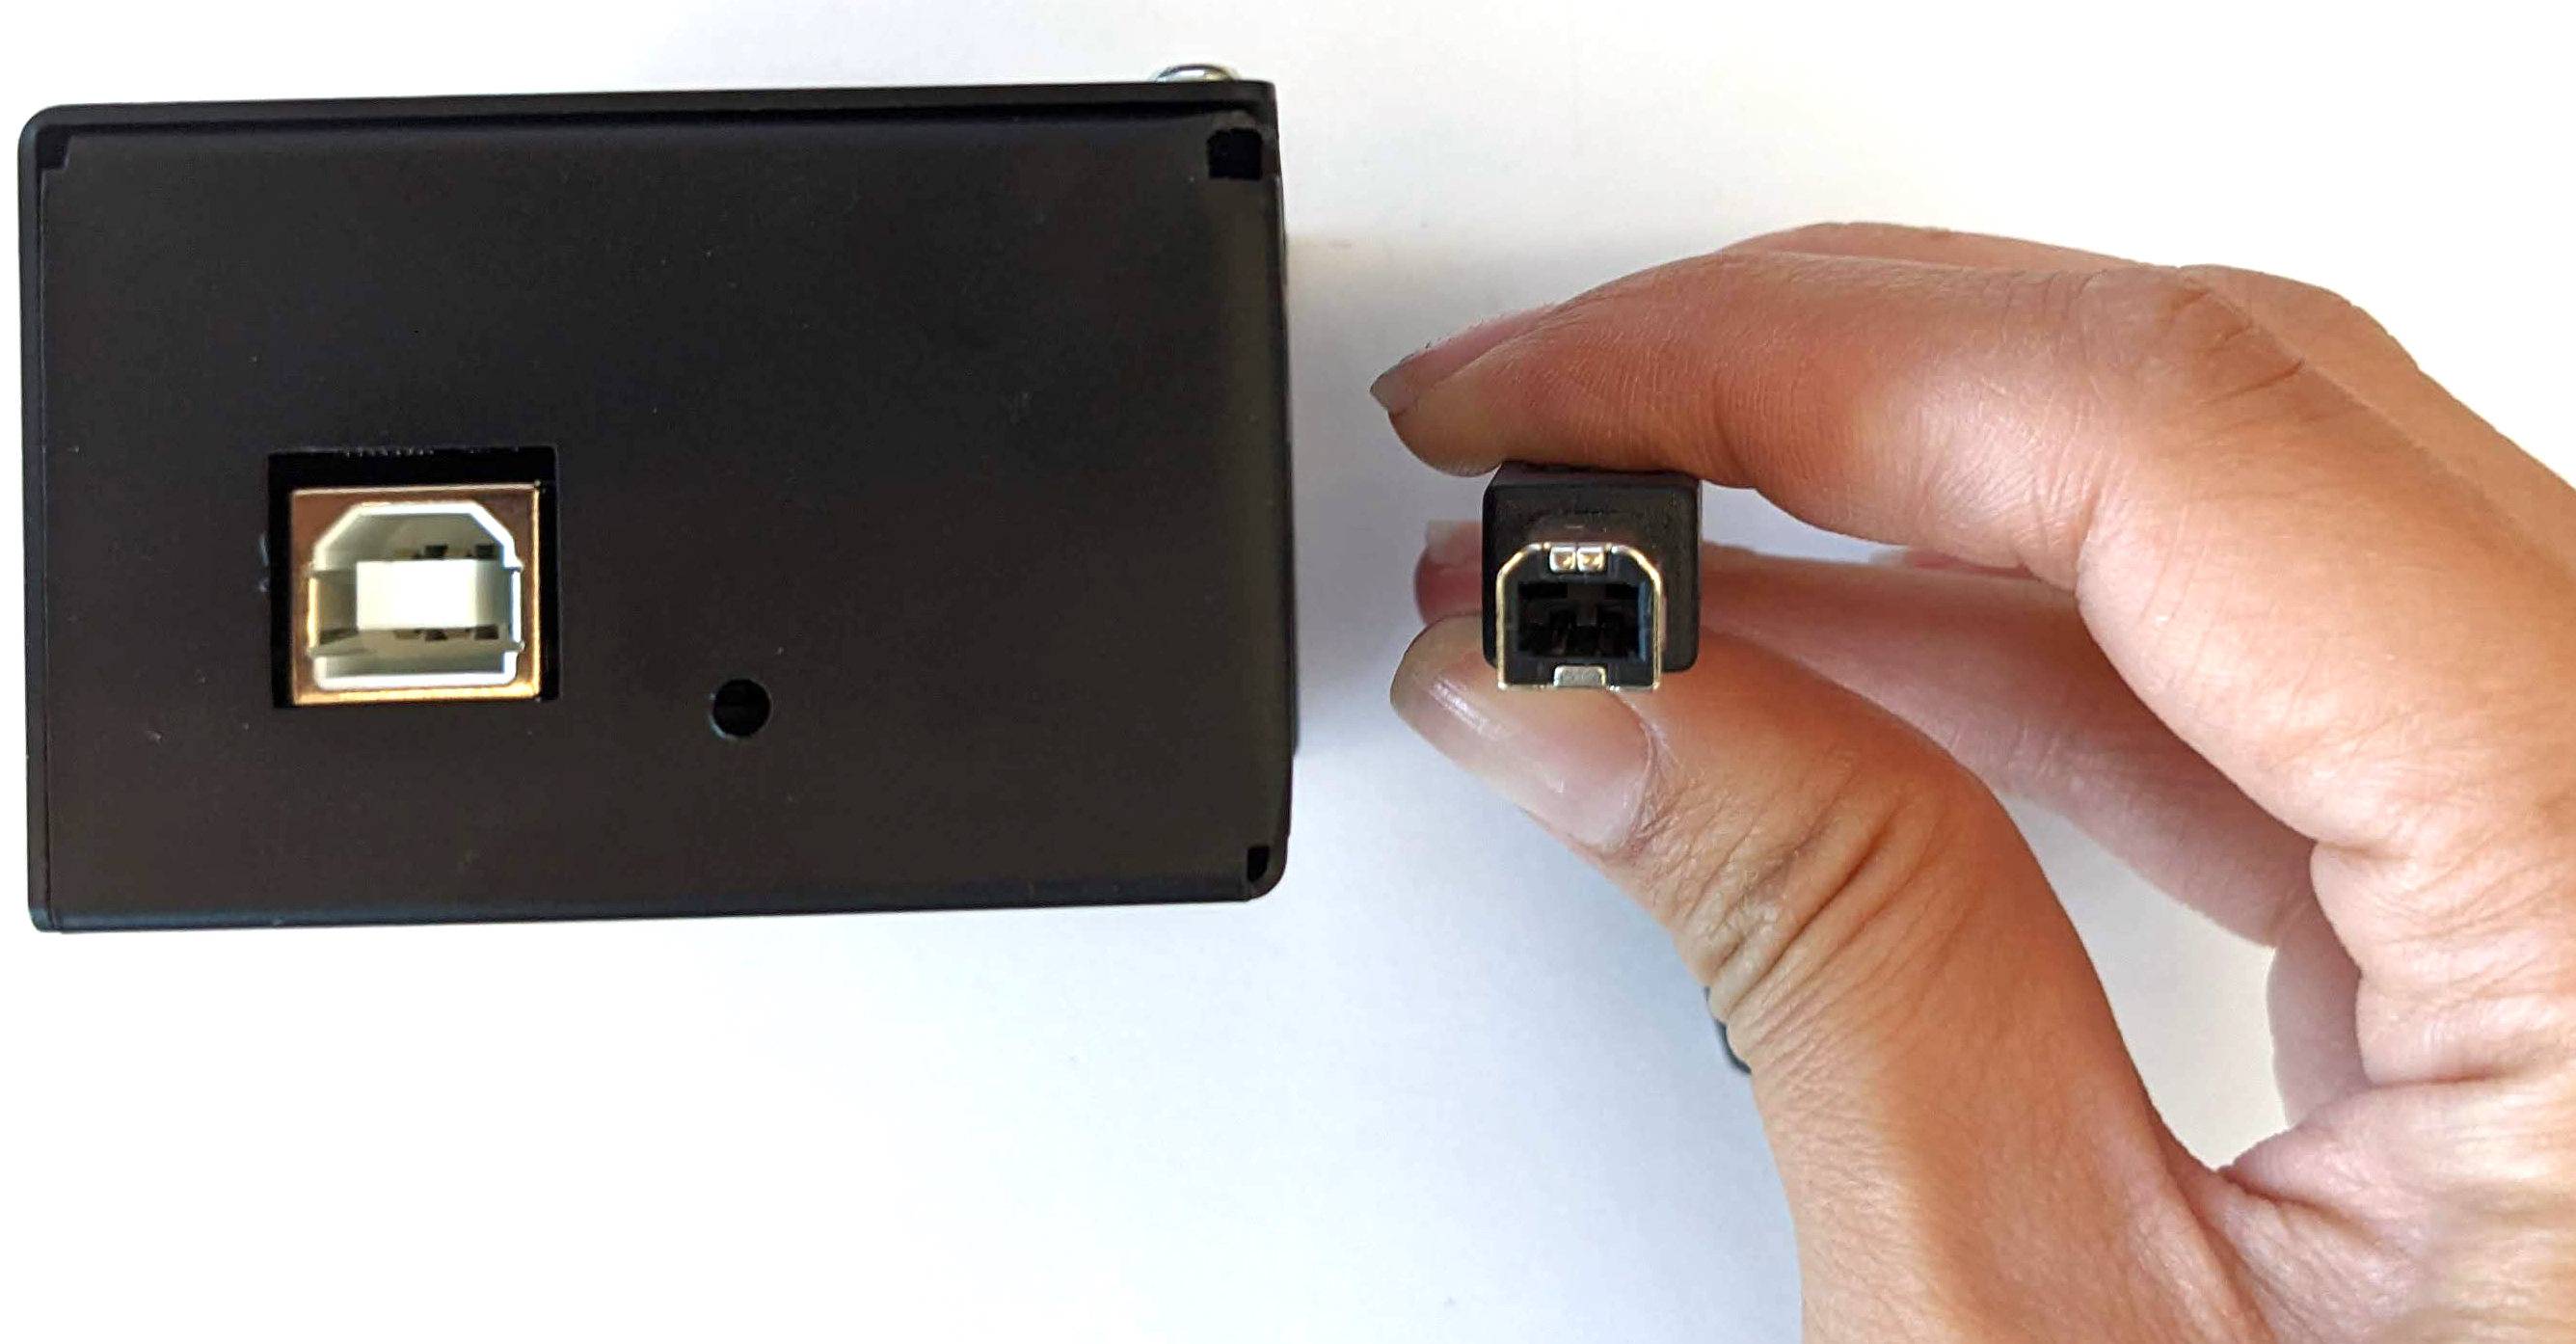
از کابل USB A به B برای اتصال جعبه کنترل سروو به میزبان (دستگاهی که آزمایش را انجام می دهد) استفاده کنید. شکل 6. اتصال جعبه کنترل سروو به دستگاه میزبان
مرحله 3: تلفن را وصل کنید
گوشی را روی فیکسچر قرار دهید و آن را محکم کنید. با چرخاندن پیچ نایلونی به سمت راست سفت کنید. شکل 7. قرار دادن و بستن گوشی روی فیکسچر
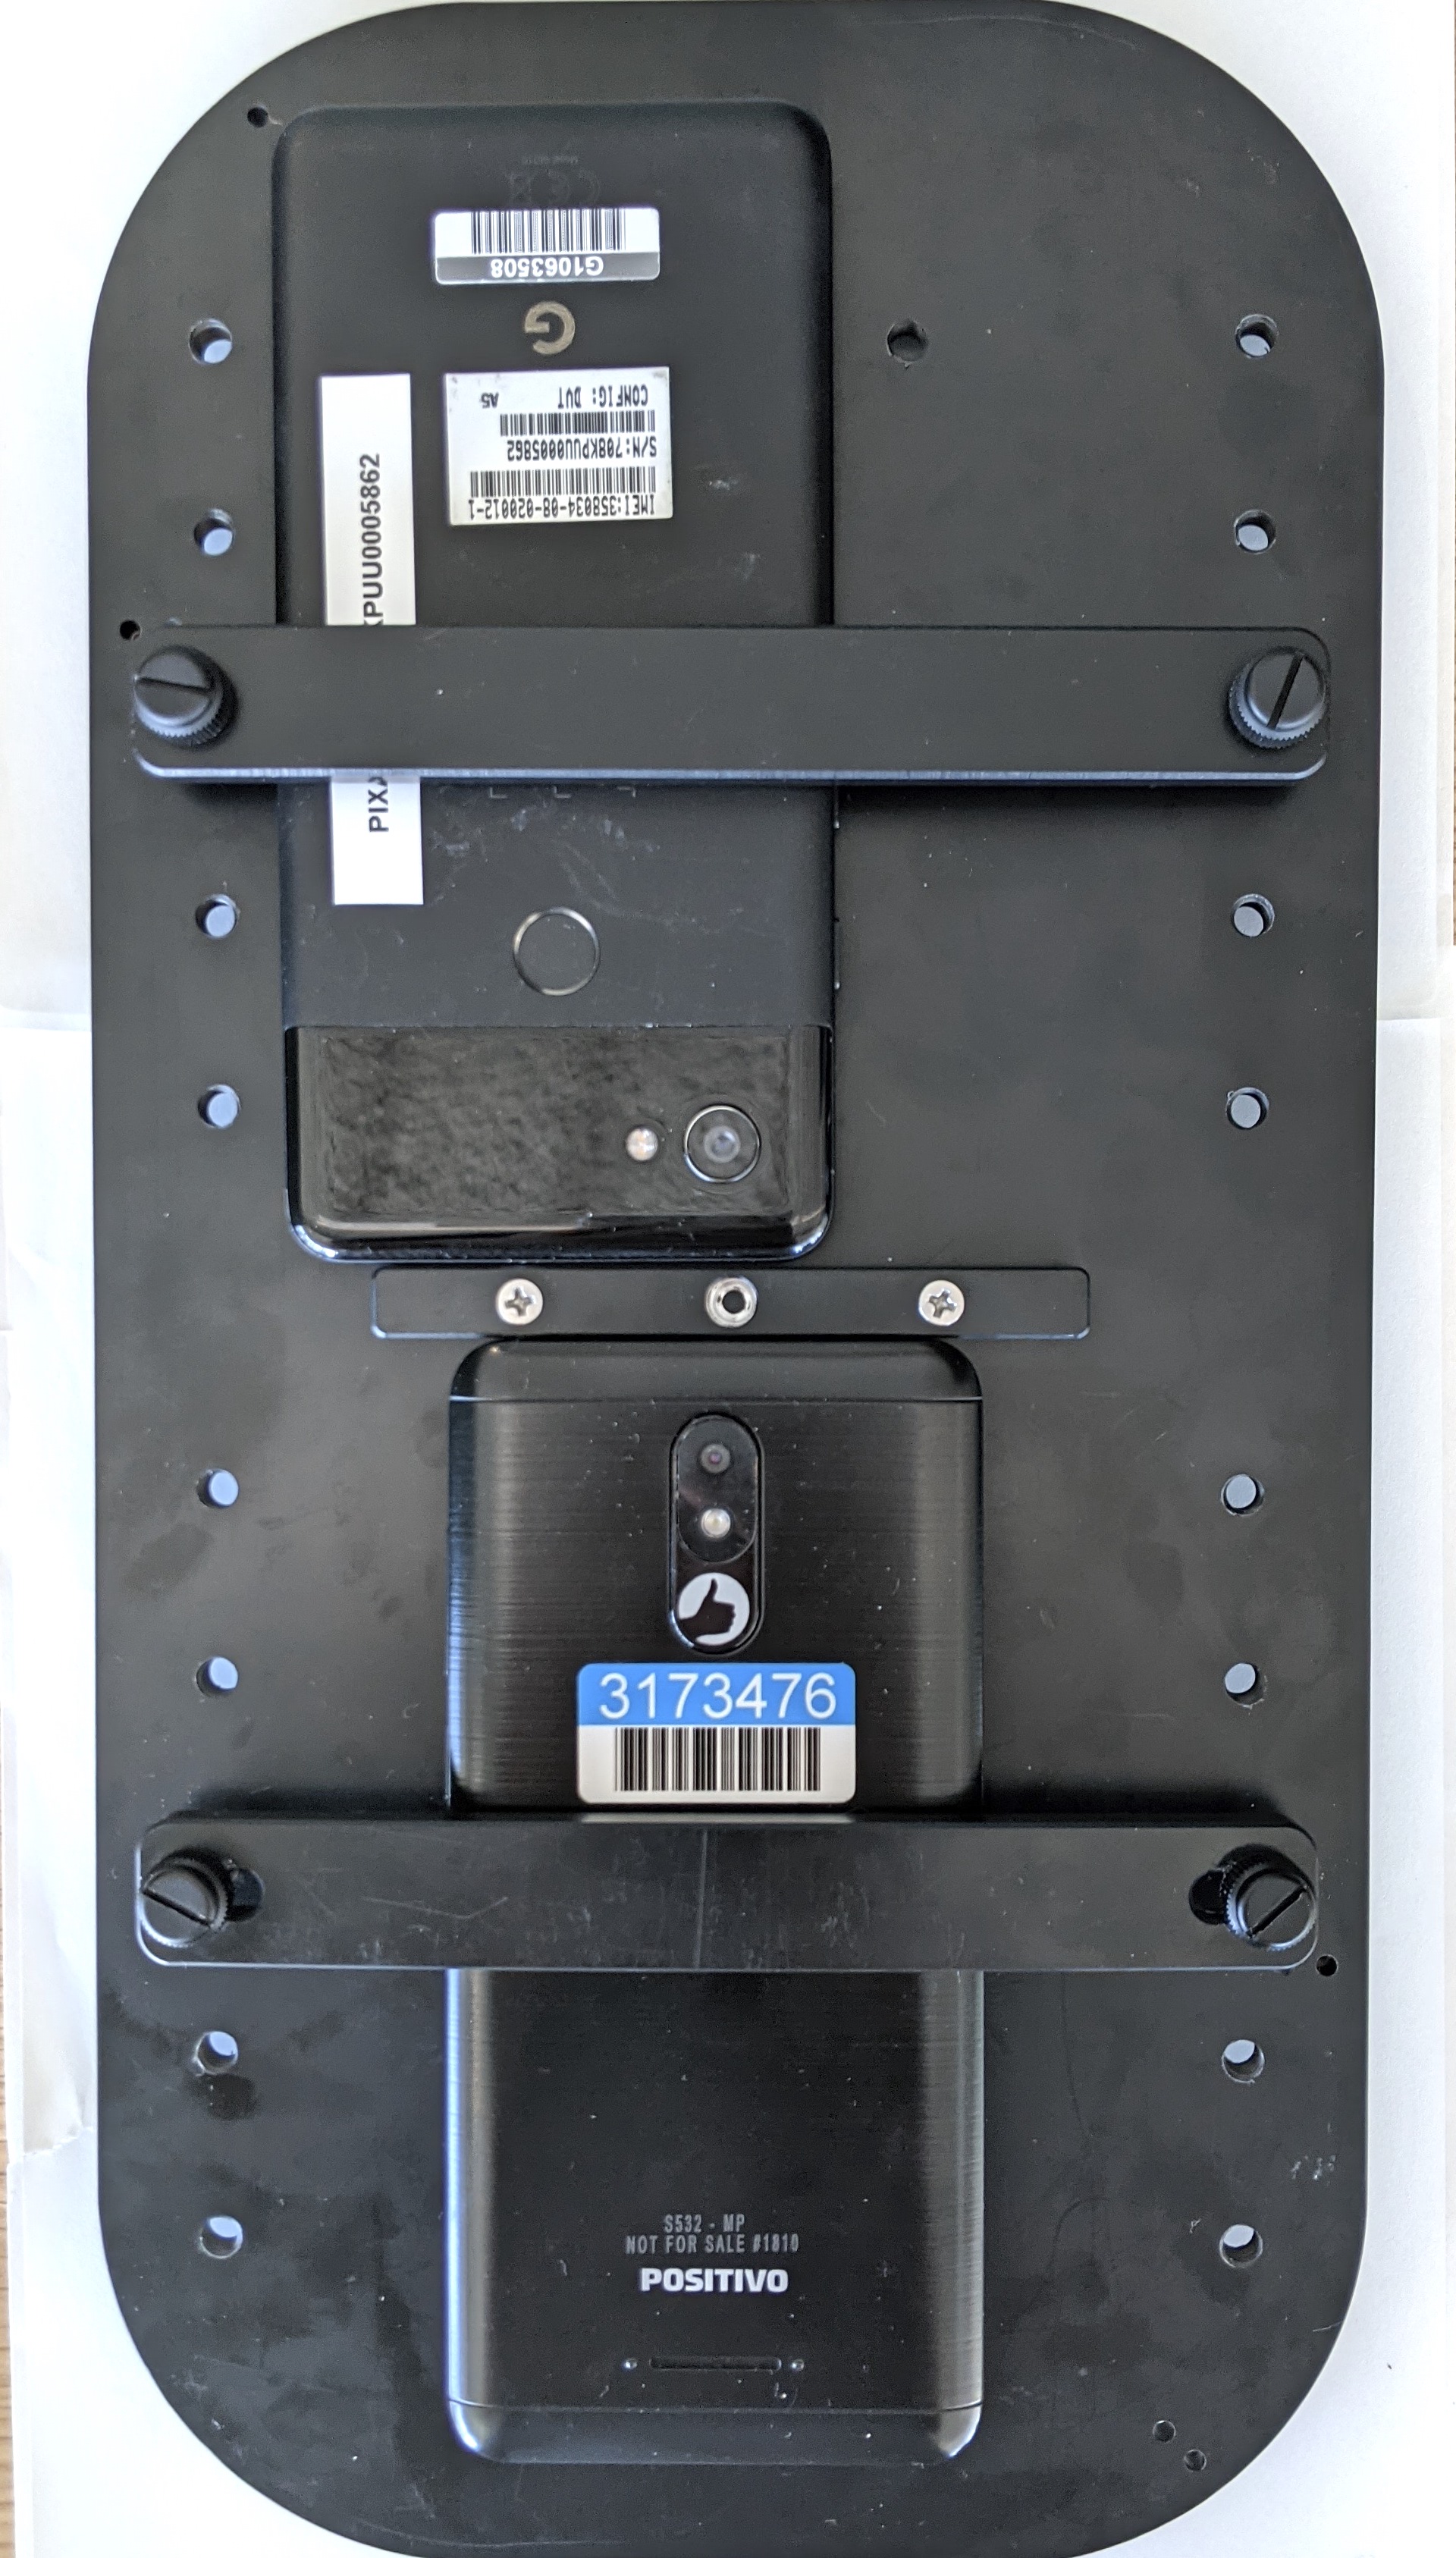
تلفنها باید به گونهای قرار بگیرند که کابلهای USB در حاشیه پایه تلفن و دوربینها نزدیک مرکز پایه قرار گیرند.
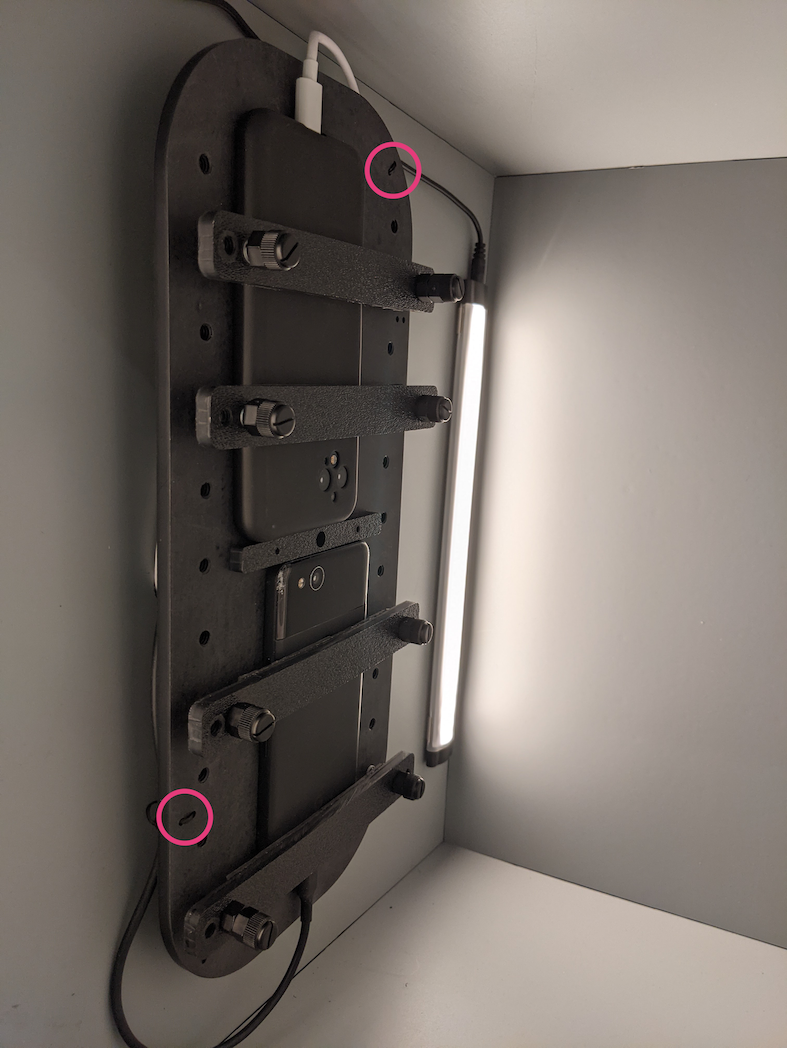
از یک زیپ برای نگه داشتن سیم USB تلفن روی صفحه ثابت استفاده کنید و آن را به بیرون از جعبه از سوراخ خروج هدایت کنید. سر دیگر سیم را به میزبانی که آزمایش را انجام می دهد وصل کنید. شکل 8. سیم USB تلفن با زیپ متصل شده است
می توانید با استفاده از این دستور، آدرس روتاتور واقعی را مشخص کنید:
rot_rig=VID:PID:CH
برای تعیین شناسه فروشنده (VID) و شناسه محصول (PID)، از دستور Linux lsusb استفاده کنید.
به طور پیش فرض، VID و PID روی 04d8 و fc73 با کانال "1" تنظیم شده اند.
اجراهای متعدد، فرمت های مختلف
برای اجرای چندین اجرا با فرمتهای مختلف، میتوانید از یک اسکریپت متفاوت استفاده کنید (با این حال، نتایج در CtsVerifier.apk آپلود نمیشوند). نمونه اسکریپت تست:
برای حل مشکلات مجوز مربوط به کنترل موتور از طریق درگاه USB:
با استفاده از: نام کاربری اپراتور را به گروه dialout اضافه کنید:
sudo adduser USERNAME dialout
از اپراتور خارج شوید.
وارد اپراتور شوید
محتوا و نمونه کدها در این صفحه مشمول پروانههای توصیفشده در پروانه محتوا هستند. جاوا و OpenJDK علامتهای تجاری یا علامتهای تجاری ثبتشده Oracle و/یا وابستههای آن هستند.
تاریخ آخرین بهروزرسانی 2025-07-30 بهوقت ساعت هماهنگ جهانی.
[[["درک آسان","easyToUnderstand","thumb-up"],["مشکلم را برطرف کرد","solvedMyProblem","thumb-up"],["غیره","otherUp","thumb-up"]],[["اطلاعاتی که نیاز دارم وجود ندارد","missingTheInformationINeed","thumb-down"],["بیشازحد پیچیده/ مراحل بسیار زیاد","tooComplicatedTooManySteps","thumb-down"],["قدیمی","outOfDate","thumb-down"],["مشکل ترجمه","translationIssue","thumb-down"],["مشکل کد / نمونهها","samplesCodeIssue","thumb-down"],["غیره","otherDown","thumb-down"]],["تاریخ آخرین بهروزرسانی 2025-07-30 بهوقت ساعت هماهنگ جهانی."],[],[],null,["# Test sensor fusion\n\nThe sensor fusion test measures timestamp accuracy of sensors for\nAndroid devices, specifically camera image sensors and gyroscopes. This\npage provides step-by-step directions on\nhow to setup the Sensor Fusion test and Sensor Fusion Box for the first\ntime.\n\nVideo tutorial\n--------------\n\n\nThis is a video tuturial on how to set up the sensor fusion box. \n\nRequired tools\n--------------\n\n\nBefore getting started, ensure you have the following components:\n**Figure 1.** Components required for the sensor fusion test\n\n1. USB A to B cable\n2. USB A to C cable (for test phone)\n3. 12V 2A power cord (for servo control box)\n4. 12V power cord (for lighting, with switch)\n5. 5V male-male connection cable (for lighting)\n6. 5V male-female conversion cable (for lighting)\n\nStep 1: Connect lights\n----------------------\n\n\nTo connect the lights:\n\n1. Use the male-male cable to connect the two lights on the bottom ends of the lights as shown in figure 2. Secure the cable to the bottom of the box to keep the cable from interfering with the operation.\n2. Connect the end of the light closer to the light cable exit hole to the conversion cable **Figure 2.** Connecting the lights to each other and one light to the conversion cable\n 1. Light cable exit hole\n 2. USB cable exit hole\n 3. 5V male-male conversion cable\n3. Thread the unconnected end of the conversion cable through the round hole that exits the box, then connect it to the power cable for lighting. **Figure 3.** Lighting conversion cable exiting the box and connecting to power cable\n 1. Exit hole\n 2. Conversion cable\n 3. Power cable\n\nStep 2: Attach servo\n--------------------\n\n\nTo attach the servo:\n\n1. Plug the servo connector into the servo control. Be sure to insert the connector oriented to the corresponding colors as labeled (Y = Yellow, R = Red, B = Black), as reversing the order could damage the motor. If the cord is too short, use a [servo extension cable](https://www.adafruit.com/product/972). **Figure 4.** Servo connecting to the servo control box\n2. Connect the servo control with its power cord (the lighting and servo control have independent, dedicated power supplies). **Figure 5.** Connecting the servo control to its dedicated power cord\n3. Use the USB A to B cable to connect the servo control box to the host (machine that is running the test). **Figure 6.** Connecting the servo control box to the host machine\n\nStep 3: Attach phone\n--------------------\n\n1. Set the phone on the fixture and clamp it down. Tighten by turning the nylon screw right. \n **Figure 7.** Placing and clamping the phone on the fixture\n\n Phones should be placed in a manner where the USB cords are located at\n the periphery of the phone mount and the cameras are near the center of\n the mount.\n2. Use a zip tie to hold the phone USB cord to the fixture plate and lead it outside the box through the exit hole. Plug the other end of the cord to the host running the test. **Figure 8.** Phone USB cord held to fixture with zip ties\n\nStep 4: Run test script\n-----------------------\n\n\nThe main python executable for the test script is: \n\n python tools/run_all_tests.py device=ID camera=0 scenes=sensor_fusion rot_rig=default\n \nYou can modify the command to specify the actual rotator address by using: \n\n```scdoc\nrot_rig=VID:PID:CH\n \n```\n\n- To determine the Vendor ID (VID) and Product ID (PID), use the Linux command `lsusb`.\n- By default, the VID and PID are set to `04d8` and `fc73` with channel \"1\".\n\n### Multiple runs, different formats\n\nTo perform multiple runs with different formats, you can use a\ndifferent script (however, the results will not be uploaded to\n`CtsVerifier.apk`). Sample test script: \n\n python tools/run_sensor_fusion_box.py device=FA7831A00278 camera=0 rotator=default img_size=640,360 fps=30 test_length=7\n\n### Permission issues\n\nTo resolve permission issues related to controlling the motor through the\nUSB port:\n\n1. Add the operator username to the `dialout` group using: \n\n sudo adduser \u003cvar translate=\"no\"\u003eUSERNAME\u003c/var\u003e dialout\n \n2. Log out the operator.\n3. Log in the operator."]]