اعتبارًا من 27 آذار (مارس) 2025، ننصحك باستخدام android-latest-release
بدلاً من aosp-main
لإنشاء AOSP والمساهمة فيه. لمزيد من المعلومات، يُرجى الاطّلاع على التغييرات في AOSP.
التحقّق من صحة قيمة متغيّر CV الخاص باتجاه التدوير
تنظيم صفحاتك في مجموعات
يمكنك حفظ المحتوى وتصنيفه حسب إعداداتك المفضّلة.
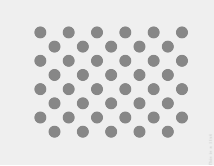
الشكل 1: صورة مصغّرة لنمط الاختبار نزِّل
الصورة العالية الدقة المرتبطة أعلاه.
تقدّم هذه الصفحة خطوات اختبار التوافق بشكلٍ سليم لتطبيق مستشعر اتجاه الدوران. يجب إجراء هذا الاختبار عندما يعلن الجهاز عن ميزة أداة الاستشعار المركبة
TYPE_ROTATION_VECTOR.
الاختبار
- ثبِّت OpenCV Manager على جهاز Android الذي يتم اختباره.
- نزِّل حزمة
OpenCV-3.0.0-android-sdk.zip
من
SourceForge.net.
- ابحث عن حزمة APK من مجلد
apk
داخل الأرشيف الذي تم تنزيله. حمِّل حزمة APK
على الجهاز من جهاز كمبيوتر باستخدام الأمر adb install
مع الخيار
--bypass-low-target-sdk-block
. بالنسبة إلى الأجهزة التي تعمل بالإصدار 13 من نظام التشغيل Android أو الإصدارات الأقدم،
ليس من الضروري تحديد هذا الخيار --bypass-low-target-sdk-block
. لمزيد من المعلومات، يُرجى الاطّلاع على
تثبيت تطبيق.
إذا كان هناك حساب نشط تم تسجيل الدخول إليه على Google Play، ابحث عن OpenCV Manager في Google Play
وأوقِف ميزة التحديث التلقائي في قائمة السياق (القائمة المنبثقة من الزر "...").
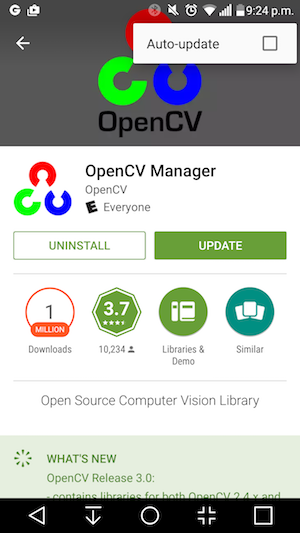
الشكل 2: إيقاف ميزة "التحديث التلقائي" في Google Play
- اطبع نمط الاختبار المرتبط،
وأوقِف أي خيارات لتغيير الحجم عند الطباعة. يجب أن يكون النمط مناسبًا لورق مراسلات US
بوضع أفقي أو أي حجم أكبر.
ملاحظة: الصورة المضمّنة أعلاه منخفضة
درجة الدقة وهي معروضة لأغراض توضيحية فقط. يُرجى عدم طباعته مباشرةً كأحد
أنماطك.
- ضَع النمط على سطح أفقي.
- ابدأ التحقّق من صحة ترميز الفيديو باستخدام تقنية تحليل التعرّف على الوجه (CV) لقياس سرعة دوران الجسم في تطبيق CTS Verifier. اتّبِع الدليل لتفعيل وضع الطيران وإيقاف ميزة التدوير التلقائي وتعديل السطوع التكيُّفي والموقع الجغرافي إذا لم يتم إجراء هذه التغييرات.
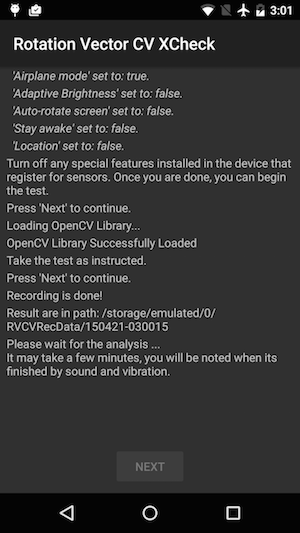
الشكل 3: جارٍ بدء الاختبار.
- عندما تظهر معاينة الفيديو، ضَع الهاتف على بعد متر واحد (أو ثلاثة أقدام) فوق
النمط بحيث تكون الكاميرا الرئيسية مواجهة للنمط مع وضع العلامة الصفراء على
الشاشة والعلامة الصفراء على النمط في الزاوية نفسها.
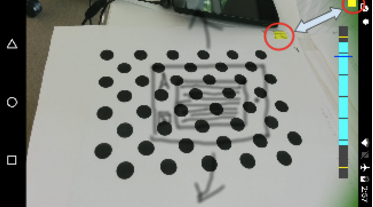
الشكل 4: وضع النمط التجريبي
- مع إبقاء النمط بالكامل في نطاق رؤية الكاميرا، يُرجى تدوير جهاز Android
قيد الاختبار (DUT) حول النمط في ثلاثة اتجاهات مختلفة، واحدًا يلي الآخر (1 و2 ثم 3 كما هو موضّح في الصورة أدناه) وفقًا للتوجيهات التي يعرضها مؤشر
نطاق الدوران. يجب أن تكون الحركات سلسة وثابتة للحصول على أفضل النتائج.
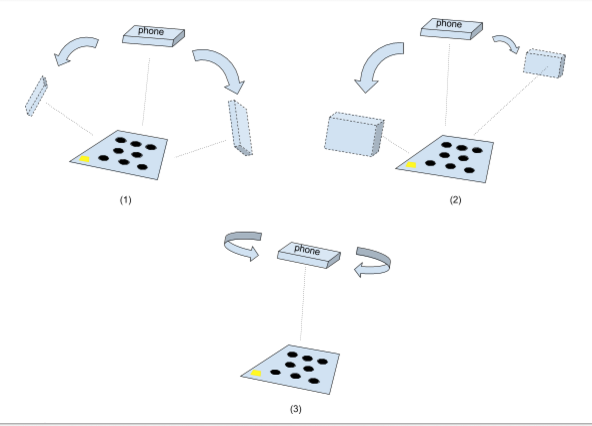
الشكل 5: التلاعب بالجهاز الذي يتم اختباره
- بعد التقاط الصورة، ستختفي معاينة الكاميرا وستبدأ عملية التحليل. انتظِر بصبر حتى تكتمل عملية التحليل، والتي تستغرق عادةً من دقيقة إلى خمس دقائق، وذلك استنادًا إلى أداء الهاتف. سيصدر الهاتف صوتًا ويهتزه عند اكتمال التحليل. ستظهر نتيجة رقمية على الشاشة إذا كان التحليل ناجحاً.
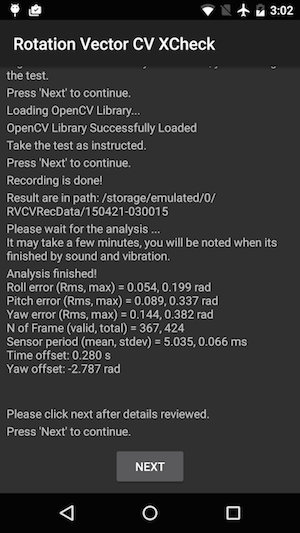
الشكل 6: جارٍ إنهاء الاختبار.
- انقر على التالي للانتقال إلى شاشة "اجتياز/تعذُّر الإجراء" ومراجعة النتيجة.
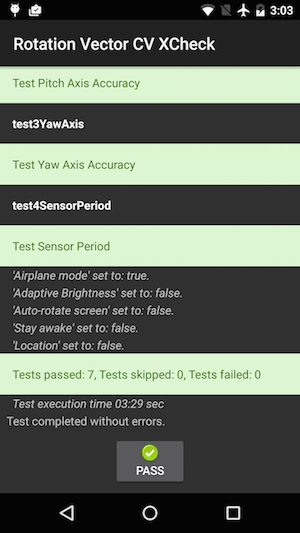
الشكل 7: اجتياز الاختبار
- اتّبِع النصائح التالية للحصول على أفضل النتائج:
- بما أنّ هذا الاختبار يدوي ومعقد، ننصحك بتجربته عدة مرات
للحصول على أفضل النتائج.
- يجب معايرة مقياس التسارع والجيروسكوب والمقياس المغناطيسي قبل الاختبار للحصول على نتائج جيدة.
تحديد المشاكل وحلّها
- العرض: تعطّل الاختبار عند بدء حالة الاختبار أو بعد الانتهاء من تسجيل الفيديو مباشرةً.
السبب: من المحتمل أن تكون هناك مشكلة في توافق OpenCV Manager. ضَع علامة في المربّع بجانب
logcat
للتأكيد. في حال تأكيد ذلك، تحقَّق من إصدار وبنية
أداة OpenCV Manager المثبَّتة.
- العرض: يتعذّر إكمال الاختبار بشكل متكرّر بسبب أخطاء "عدد كبير جدًا من اللقطات غير الصالحة".
السبب: يرجع ذلك على الأرجح إلى جودة الفيديو. تأكَّد من استيفاء الشروط التالية:
- تتوفر إضاءة محيطة كافية لإجراء الاختبار. تؤدي الإضاءة الطبيعية
عادةً إلى تحقيق أفضل نتيجة. وفي حال عدم توفّر ضوء الشمس، يمكنك استخدام ضوء كثيف
من زوايا متعدّدة لا يشكّل ظلالًا واضحة.
تجنَّب الإضاءة منخفضة الزاوية لتقليل الوهج.
- تكون الحركة أثناء تصوير الفيديو سلسة. تؤدي الحركة المتقطعة إلى
تشويش الصورة وزيادة صعوبة معالجة برنامج الرؤية الحاسوبية لها.
- يجب أن يظهر النمط دائمًا بالكامل في إطار معاينة الفيديو ويمثّل
الجزء الأوسط منه. يجب أن يكون حجم النمط بين ربع ونصف حجم
نافذة معاينة الفيديو. إذا كان النمط صغيرًا جدًا، تقل الدقة.
إذا كان النمط كبيرًا جدًا، سيكون تشويه العدسة أكثر وضوحًا، وسيكون من الصعوبة
الحفاظ على النمط دائمًا داخل إطار تسجيل الفيديو.
- يمكن للكاميرا التركيز بشكل جيد. تواجه بعض الأجهزة صعوبة في
التركيز أثناء تسجيل الفيديو. ويعود ذلك عادةً إلى قلّة
التفاوتات في المشهد، مثل سطح أرضية أملس بلون واحد. يساعد عادةً نقل نمط الاختبار
إلى مكان يضم سطحًا مزخرفًا أو إدخال عناصر حول نمط الاختبار.
- ميزة "تثبيت الصورة" غير مفعَّلة.
- العرض: يعمل اختبار الانحراف والانحناء بشكل جيد، ولكن يتعذّر إجراء اختبار الانحراف بشكل منتظم.
السبب: تأكَّد أولاً من معايرة أداة استشعار الحقل المغناطيسي بشكلٍ جيد.
لا يعمل متجه الدوران بشكل جيد في حال عدم
معايرة أداة استشعار الحقل المغناطيسي.
من الممكن أيضًا أن يتعذّر ضبط محور الانحراف بسبب التقاط الفيديو. احمل
الجهاز بثبات وتحرَّك حول نمط الاختبار الخاص بقسم الانحراف في
الاختبار. من الصعب الحفاظ على جودة الفيديو أثناء تدوير الجهاز في
اليد.
إعداد تقرير بالتعليقات
إذا لم تساعدك الخطوات أعلاه، يُرجى التأكّد من اتّباع خطوات الملاحظات أدناه للإبلاغ عن مشكلتك.
يُرجى جمع المعلومات التالية عند الإبلاغ عن خطأ:
- تقرير أخطاء Android
- لقطة شاشة إذا كانت هناك أي رسالة خطأ على الشاشة
- محتوى
/sdcard/RVCVRecData/
يحتوي هذا المجلد على
ملفات فيديو، وبالتالي يمكن أن يكون كبيرًا جدًا إذا سبق أن تم إجراء الاختبار
عدة مرات. سيؤدي محو المجلد وإجراء الاختبار مرة أخرى إلى
تقليل الحجم. راجِع ملفات الفيديو للعثور على مشاكل واضحة في
التسجيل.
- لقطة شاشة لتطبيق OpenCV Manager
يخضع كل من المحتوى وعيّنات التعليمات البرمجية في هذه الصفحة للتراخيص الموضحّة في ترخيص استخدام المحتوى. إنّ Java وOpenJDK هما علامتان تجاريتان مسجَّلتان لشركة Oracle و/أو الشركات التابعة لها.
تاريخ التعديل الأخير: 2025-07-27 (حسب التوقيت العالمي المتفَّق عليه)
[[["يسهُل فهم المحتوى.","easyToUnderstand","thumb-up"],["ساعَدني المحتوى في حلّ مشكلتي.","solvedMyProblem","thumb-up"],["غير ذلك","otherUp","thumb-up"]],[["لا يحتوي على المعلومات التي أحتاج إليها.","missingTheInformationINeed","thumb-down"],["الخطوات معقدة للغاية / كثيرة جدًا.","tooComplicatedTooManySteps","thumb-down"],["المحتوى قديم.","outOfDate","thumb-down"],["ثمة مشكلة في الترجمة.","translationIssue","thumb-down"],["مشكلة في العيّنات / التعليمات البرمجية","samplesCodeIssue","thumb-down"],["غير ذلك","otherDown","thumb-down"]],["تاريخ التعديل الأخير: 2025-07-27 (حسب التوقيت العالمي المتفَّق عليه)"],[],[],null,["# Rotation vector CV crosscheck\n\n**Figure 1.** Thumbnail of test pattern. Download the\nfull-resolution image linked above.\n\nThis page provides the steps to properly test the compatibility of your [rotation vector\nsensor](/docs/core/interaction/sensors/sensor-types#rotation_vector) implementation. This test should be run when the device declares the\nTYPE_ROTATION_VECTOR composite sensor feature.\n\nTest\n----\n\n1. Install OpenCV Manager on the Android device being tested.\n2. Download the `OpenCV-3.0.0-android-sdk.zip` package from [SourceForge.net](https://sourceforge.net/projects/opencvlibrary/files/opencv-android/3.0.0).\n3. Find the APK from the `apk` folder inside the downloaded archive. Load the APK on the device from a computer using the `adb install` command with the `--bypass-low-target-sdk-block` option. For devices running Android 13 or lower, this `--bypass-low-target-sdk-block` option isn't necessary. For more information, see [Install an app](http://developer.android.com/tools/help/adb#move).\n4. If there is an active account logged into Google Play, locate OpenCV Manager in Google Play\n and disable *Auto-update* in the context menu (the popup menu from the \"...\" button).\n\n\n **Figure 2.** Disabling Auto-update in Google Play.\n5. Print out the linked [test pattern](/static/docs/compatibility/cts/images/acircles_pattern.pdf), disabling any scaling options when printing. The pattern should fit US Letter paper in landscape or anything bigger.\n\n **Note:** The inline picture above is low\n resolution and just for illustration. Please do not directly print it as your\n pattern.\n6. Place the pattern on a horizontal surface.\n7. Start the **Rotation Vector CV Crosscheck** in the CTS Verifier app. Follow the guide to turn on airplane mode, turn off auto rotate, and adjust adaptive brightness and location if these changes have not been made. \n\n\n **Figure 3.** Initiating the test.\n8. When the video preview appears, place the phone three feet (or one meter) over the pattern so the main camera is facing the pattern with yellow marker on the screen and yellow marker on the pattern aligned at the same corner. \n\n\n **Figure 4.** Placing the test pattern.\n9. While keeping the pattern entirely in the camera view, rotate the Android device under test (DUT) around the pattern in three different directions, one by one (1, 2 and then 3 illustrated in picture below) as prompted by the rotation range indicator. Keep movement smooth and steady for the best result. \n\n\n **Figure 5.** Manipulating the device under test.\n10. After the capture, the camera preview will disappear and the analysis process will start. Wait patiently for analysis to finish; it usually takes one to five minutes depending on the phone performance. The phone will sound and vibrate at analysis completion. A numerical result will be presented on screen if the analysis is successful. \n\n\n **Figure 6.** Finishing the test.\n11. Click **next** to proceed to the pass/fail screen and review the result. \n\n\n **Figure 7.** Passing the test.\n12. Follow these tips for best results:\n 1. Since this is a manual test with complexity, you may want to try it a few times for the best results.\n 2. Accelerometer, gyroscope, and magnetometer should be calibrated before testing for good results.\n\nTroubleshoot\n------------\n\n1. Symptom: Test crashed when starting test case or immediately after finishing video recording. \n Cause: Likely an OpenCV Manager compatibility issue. Check `logcat` to confirm. If confirmed, check version and arch of the installed OpenCV Manager.\n2. Symptom: Test fails frequently due to \"Too many invalid frame\" errors. \n Cause: Likely due to video quality. Confirm the following conditions:\n 1. There is enough ambient lighting for the test. Natural light usually gives the best result. However, when it is not available, abundant light from multiple angles that does not form obvious shadows works, as well. Avoid low angle lighting to reduce glare.\n 2. The motion during video taking is smooth. Jerky movement causes blur and confuses the computer vision software.\n 3. The pattern should always be entirely in video preview frame and located around the center. The pattern should be 1/4 \\~ 1/2 the size of the video preview window. If the pattern is too small, the accuracy is reduced. If the pattern is too big, lens distortion is more obvious, and it is more difficult to keep the pattern always inside video recording frame.\n 4. The camera is able to focus well. Some devices have trouble in focusing during video recording. This is usually due to there is too few variations in the scene, e.g. solid color smooth floor surface. Moving test pattern to a place with textured surface or introducing objects around the test pattern usually helps.\n 5. Image stabilization is turned off.\n3. Symptom: The pitch and roll test works fine, but the yaw test regularly fails. \n Cause: First, make sure the magnetic field sensor is well calibrated. Rotation vector does not function well if magnetic field sensor is not calibrated. \n It is also possible that yaw axis fails due to video taking. Hold the device steady and walk/move around the test pattern for the yaw section of test. It is hard to maintain the quality of video while rotating device in hand.\n\nReport feedback\n---------------\n\nIf the steps above do not help, please make sure to follow the feedback steps below to report your issue.\n\nPlease gather the following information when reporting a bug:\n\n1. Android bugreport\n2. Screenshot if there is any error message on screen.\n3. Contents of `/sdcard/RVCVRecData/`. This folder contains video files and thus can be quite large if the test has already been taken multiple times. Clearing the folder and performing the test again will help reduce size. Inspect video files inside to find obvious issues in recording.\n4. Screenshot of the OpenCV Manager app."]]