
החל מ-27 במרץ 2025, מומלץ להשתמש ב-android-latest-release
במקום ב-aosp-main
כדי ליצור תרומות ל-AOSP. מידע נוסף זמין במאמר שינויים ב-AOSP.
בדיקת נקודות הצלב של וקטור הסיבוב
קל לארגן דפים בעזרת אוספים
אפשר לשמור ולסווג תוכן על סמך ההעדפות שלך.
איור 1. תמונה ממוזערת של דפוס הבדיקה. מורידים את התמונה ברזולוציה מלאה שמופיעה בקישור שלמעלה.
בדף הזה מוסבר איך לבדוק בצורה נכונה את התאימות של הטמעת חיישן וקטור הסיבוב. צריך להריץ את הבדיקה הזו כשהמכשיר מצהיר על התכונה של חיישן מורכב מסוג TYPE_ROTATION_VECTOR.
בדיקה
- מתקינים את OpenCV Manager במכשיר Android שנבדק.
- מורידים את החבילה
OpenCV-3.0.0-android-sdk.zip
מ-
SourceForge.net.
- מאתרים את קובץ ה-APK בתיקייה
apk
שבתוך הארכיון שהורדתם. מעבירים את קובץ ה-APK למכשיר מהמחשב באמצעות הפקודה adb install
עם האפשרות --bypass-low-target-sdk-block
. במכשירים עם Android מגרסה 13 ומטה, אפשרות --bypass-low-target-sdk-block
לא נדרשת. מידע נוסף זמין במאמר התקנת אפליקציה.
אם יש חשבון פעיל שמחובר ל-Google Play, מחפשים את OpenCV Manager ב-Google Play ומשביטים את האפשרות עדכון אוטומטי בתפריט ההקשר (תפריט הקופץ שמופיע מהלחצן '...').
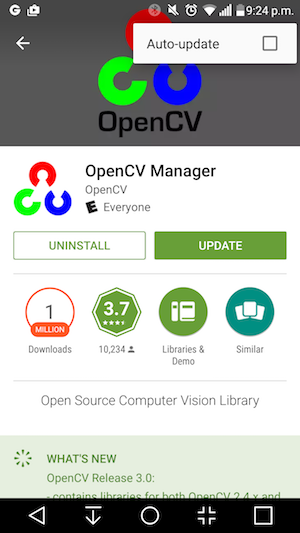
איור 2. השבתת העדכון האוטומטי ב-Google Play.
- מדפיסים את תבנית הבדיקה המקושרת, בלי להפעיל אפשרויות שינוי קנה מידה במהלך ההדפסה. התבנית צריכה להתאים לדף בגודל Letter בארה"ב בפריסה לרוחב או לדף בגודל גדול יותר.
הערה: התמונה שבהמשך היא ברזולוציה נמוכה ומשמשת רק להמחשה. אין להדפיס אותו ישירות בתור התבנית.
- מניחים את התבנית על משטח אופקי.
- מפעילים את הבדיקה Rotation Vector CV Crosscheck באפליקציית CTS Verifier. פועלים לפי ההוראות כדי להפעיל את מצב הטיסה, להשבית את הסיבוב האוטומטי ולשנות את הבהירות והמיקום ההתאמה, אם השינויים האלה לא בוצעו.
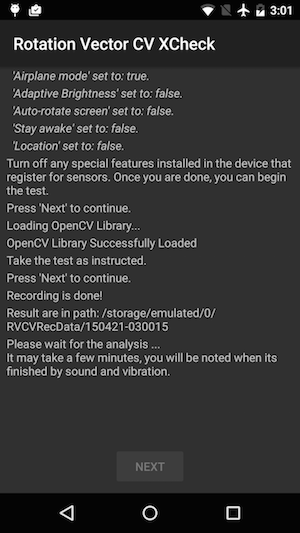
איור 3. התחלת הבדיקה.
- כשתצוגת הווידאו המקדימה מופיעה, מניחים את הטלפון במרחק של מטר אחד מעל התבנית כך שהמצלמה הראשית תהיה מול התבנית, והסמן הצהוב במסך והסמן הצהוב בתבנית יהיו באותו כיוון.
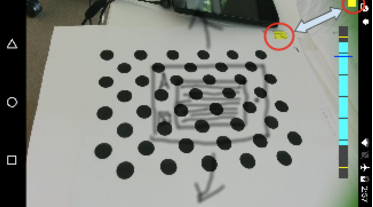
איור 4. מיקום דפוס הבדיקה.
- תוך שמירה על התבנית במלואה בשדה הראייה של המצלמה, מסובבים את מכשיר Android שנבדק (DUT) סביב התבנית בשלושה כיוונים שונים, אחד אחרי השני (1, 2 ואז 3 כפי שמוצג בתמונה למטה) לפי ההנחיה של אינדיקטור טווח הסיבוב. כדי לקבל את התוצאה הטובה ביותר, חשוב שהתנועה תהיה חלקה ויציבה.
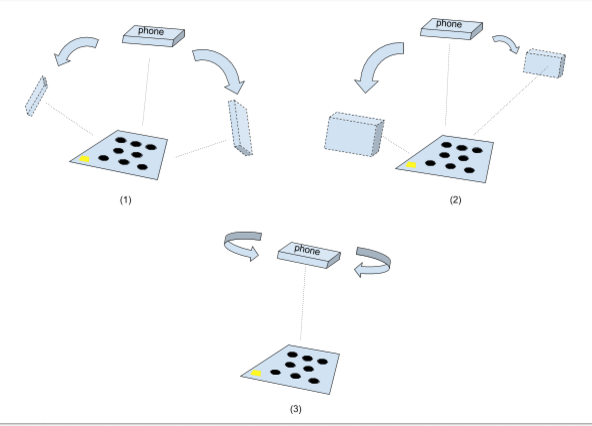
איור 5. מניפולציה במכשיר שנבדק.
- אחרי הצילום, התצוגה המקדימה של המצלמה תיעלם ותהליך הניתוח יתחיל. ממתינים בסבלנות עד שהניתוח יסתיים. בדרך כלל התהליך נמשך דקה עד חמש דקות, בהתאם לביצועים של הטלפון. הטלפון ישמיע צליל וירטוט בסיום הניתוח. אם הניתוח יסתיים בהצלחה, תופיע תוצאה מספרית במסך.
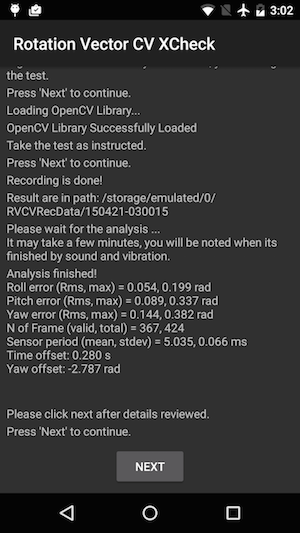
איור 6. סיום הבדיקה.
- לוחצים על הבא כדי לעבור למסך של 'הצלחה' או 'כישלון' ולבדוק את התוצאה.
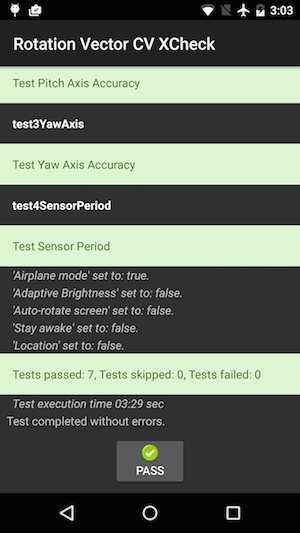
איור 7. עברתם את הבדיקה.
- כדי לקבל את התוצאות הטובות ביותר, כדאי לפעול לפי הטיפים הבאים:
- זוהי בדיקה ידנית מורכבת, לכן מומלץ לנסות אותה כמה פעמים כדי לקבל את התוצאות הטובות ביותר.
- כדי לקבל תוצאות טובות, צריך לבצע כיול של ה-accelerometer, ה-gyroscope וה-magnetometer לפני הבדיקה.
פתרון בעיות
- סימפטום: הבדיקה קרסה כשהתחלתם את בדיקת המקרה או מיד אחרי שסיימתם את הקלטת הסרטון.
הסיבה: סביר להניח שמדובר בבעיית תאימות של OpenCV Manager. מסמנים את התיבה logcat
כדי לאשר. אם זה נכון, בודקים את הגרסה והארכיטקטורה של OpenCV Manager שמותקן.
- סימפטום: הבדיקה נכשלת לעיתים קרובות בגלל שגיאות מסוג 'Too many invalid frame'.
הסיבה: סביר להניח שהסיבה לכך היא איכות הסרטון. מוודאים שהתנאים הבאים מתקיימים:
- יש מספיק תאורה סביבתית לצורך הבדיקה. התוצאות הטובות ביותר בדרך כלל מתקבלות בתאורה טבעית. עם זאת, אם אין לכם תאורה טבעית, גם תאורה רבה מכמה זוויות שלא יוצרת צללים בולטים תעשה את העבודה.
הימנעו מתאורה בזווית נמוכה כדי להפחית את הבהירות.
- התנועה במהלך צילום הסרטון חלקה. תנועה קופצנית גורמת לתנודות ולבלבול בתוכנת הראייה הממוחשבת.
- הדפוס צריך להופיע תמיד במלואו בפריים של קטע הווידאו המקדים, ולהיות ממוקם בסביבת המרכז. התבנית צריכה להיות בגודל של 1/4 עד 1/2 מחלון התצוגה המקדימה של הסרטון. אם התבנית קטנה מדי, רמת הדיוק יורדת.
אם התבנית גדולה מדי, העיוות בעדשה בולט יותר וקשה יותר לשמור על התבנית תמיד בתוך מסגרת הצילום של הסרטון.
- המצלמה מצליחה להתמקד היטב. בחלק מהמכשירים יש בעיות באיכות המיקוד במהלך צילום הווידאו. בדרך כלל הסיבה לכך היא שיש מעט מדי תנודות בסצנה, למשל, משטח רצפה חלק בצבע אחיד. בדרך כלל עוזר להעביר את דפוס הבדיקה למיקום עם משטח בעל טקסטורה או להוסיף אובייקטים מסביב לדפוס הבדיקה.
- ייצוב התמונה מושבת.
- סימפטום: הבדיקה של הטיה קדימה ואחורה ופיתול פועלת כמו שצריך, אבל הבדיקה של נטייה לצדדים נכשלת באופן קבוע.
הסיבה: קודם כול, צריך לוודא שהחיישן של השדה המגנטי מכוונן היטב.
וקטור הסיבוב לא פועל טוב אם חיישן השדה המגנטי לא מכויל.
יכול להיות גם שצילום הסרטון גורם לבעיות בציר ההטיה. מחזיקים את המכשיר יציב ועוברים מסביב לתבנית הבדיקה בחלק של הטיה (yaw) בבדיקה. קשה לשמור על איכות הווידאו בזמן סיבוב המכשיר ביד.
שליחת משוב
אם השלבים שלמעלה לא עוזרים, חשוב לפעול לפי השלבים הבאים לשליחת משוב כדי לדווח על הבעיה.
כשמדווחים על באג, צריך להכין את הפרטים הבאים:
- Android bugreport
- צילום מסך אם מופיעה הודעת שגיאה כלשהי במסך.
- התוכן של
/sdcard/RVCVRecData/
. התיקייה הזו מכילה קובצי וידאו, ולכן היא עשויה להיות גדולה למדי אם כבר ניגשת לבחינה כמה פעמים. כדי להקטין את הגודל, אפשר לנקות את התיקייה ולבצע את הבדיקה שוב. בודקים את קובצי הווידאו כדי למצוא בעיות בולטות בהקלטה.
- צילום מסך של אפליקציית OpenCV Manager.
דוגמאות התוכן והקוד שבדף הזה כפופות לרישיונות המפורטים בקטע רישיון לתוכן. Java ו-OpenJDK הם סימנים מסחריים או סימנים מסחריים רשומים של חברת Oracle ו/או של השותפים העצמאיים שלה.
עדכון אחרון: 2025-07-27 (שעון UTC).
[[["התוכן קל להבנה","easyToUnderstand","thumb-up"],["התוכן עזר לי לפתור בעיה","solvedMyProblem","thumb-up"],["סיבה אחרת","otherUp","thumb-up"]],[["חסרים לי מידע או פרטים","missingTheInformationINeed","thumb-down"],["התוכן מורכב מדי או עם יותר מדי שלבים","tooComplicatedTooManySteps","thumb-down"],["התוכן לא עדכני","outOfDate","thumb-down"],["בעיה בתרגום","translationIssue","thumb-down"],["בעיה בדוגמאות/בקוד","samplesCodeIssue","thumb-down"],["סיבה אחרת","otherDown","thumb-down"]],["עדכון אחרון: 2025-07-27 (שעון UTC)."],[],[],null,["# Rotation vector CV crosscheck\n\n**Figure 1.** Thumbnail of test pattern. Download the\nfull-resolution image linked above.\n\nThis page provides the steps to properly test the compatibility of your [rotation vector\nsensor](/docs/core/interaction/sensors/sensor-types#rotation_vector) implementation. This test should be run when the device declares the\nTYPE_ROTATION_VECTOR composite sensor feature.\n\nTest\n----\n\n1. Install OpenCV Manager on the Android device being tested.\n2. Download the `OpenCV-3.0.0-android-sdk.zip` package from [SourceForge.net](https://sourceforge.net/projects/opencvlibrary/files/opencv-android/3.0.0).\n3. Find the APK from the `apk` folder inside the downloaded archive. Load the APK on the device from a computer using the `adb install` command with the `--bypass-low-target-sdk-block` option. For devices running Android 13 or lower, this `--bypass-low-target-sdk-block` option isn't necessary. For more information, see [Install an app](http://developer.android.com/tools/help/adb#move).\n4. If there is an active account logged into Google Play, locate OpenCV Manager in Google Play\n and disable *Auto-update* in the context menu (the popup menu from the \"...\" button).\n\n\n **Figure 2.** Disabling Auto-update in Google Play.\n5. Print out the linked [test pattern](/static/docs/compatibility/cts/images/acircles_pattern.pdf), disabling any scaling options when printing. The pattern should fit US Letter paper in landscape or anything bigger.\n\n **Note:** The inline picture above is low\n resolution and just for illustration. Please do not directly print it as your\n pattern.\n6. Place the pattern on a horizontal surface.\n7. Start the **Rotation Vector CV Crosscheck** in the CTS Verifier app. Follow the guide to turn on airplane mode, turn off auto rotate, and adjust adaptive brightness and location if these changes have not been made. \n\n\n **Figure 3.** Initiating the test.\n8. When the video preview appears, place the phone three feet (or one meter) over the pattern so the main camera is facing the pattern with yellow marker on the screen and yellow marker on the pattern aligned at the same corner. \n\n\n **Figure 4.** Placing the test pattern.\n9. While keeping the pattern entirely in the camera view, rotate the Android device under test (DUT) around the pattern in three different directions, one by one (1, 2 and then 3 illustrated in picture below) as prompted by the rotation range indicator. Keep movement smooth and steady for the best result. \n\n\n **Figure 5.** Manipulating the device under test.\n10. After the capture, the camera preview will disappear and the analysis process will start. Wait patiently for analysis to finish; it usually takes one to five minutes depending on the phone performance. The phone will sound and vibrate at analysis completion. A numerical result will be presented on screen if the analysis is successful. \n\n\n **Figure 6.** Finishing the test.\n11. Click **next** to proceed to the pass/fail screen and review the result. \n\n\n **Figure 7.** Passing the test.\n12. Follow these tips for best results:\n 1. Since this is a manual test with complexity, you may want to try it a few times for the best results.\n 2. Accelerometer, gyroscope, and magnetometer should be calibrated before testing for good results.\n\nTroubleshoot\n------------\n\n1. Symptom: Test crashed when starting test case or immediately after finishing video recording. \n Cause: Likely an OpenCV Manager compatibility issue. Check `logcat` to confirm. If confirmed, check version and arch of the installed OpenCV Manager.\n2. Symptom: Test fails frequently due to \"Too many invalid frame\" errors. \n Cause: Likely due to video quality. Confirm the following conditions:\n 1. There is enough ambient lighting for the test. Natural light usually gives the best result. However, when it is not available, abundant light from multiple angles that does not form obvious shadows works, as well. Avoid low angle lighting to reduce glare.\n 2. The motion during video taking is smooth. Jerky movement causes blur and confuses the computer vision software.\n 3. The pattern should always be entirely in video preview frame and located around the center. The pattern should be 1/4 \\~ 1/2 the size of the video preview window. If the pattern is too small, the accuracy is reduced. If the pattern is too big, lens distortion is more obvious, and it is more difficult to keep the pattern always inside video recording frame.\n 4. The camera is able to focus well. Some devices have trouble in focusing during video recording. This is usually due to there is too few variations in the scene, e.g. solid color smooth floor surface. Moving test pattern to a place with textured surface or introducing objects around the test pattern usually helps.\n 5. Image stabilization is turned off.\n3. Symptom: The pitch and roll test works fine, but the yaw test regularly fails. \n Cause: First, make sure the magnetic field sensor is well calibrated. Rotation vector does not function well if magnetic field sensor is not calibrated. \n It is also possible that yaw axis fails due to video taking. Hold the device steady and walk/move around the test pattern for the yaw section of test. It is hard to maintain the quality of video while rotating device in hand.\n\nReport feedback\n---------------\n\nIf the steps above do not help, please make sure to follow the feedback steps below to report your issue.\n\nPlease gather the following information when reporting a bug:\n\n1. Android bugreport\n2. Screenshot if there is any error message on screen.\n3. Contents of `/sdcard/RVCVRecData/`. This folder contains video files and thus can be quite large if the test has already been taken multiple times. Clearing the folder and performing the test again will help reduce size. Inspect video files inside to find obvious issues in recording.\n4. Screenshot of the OpenCV Manager app."]]