
2025 年 3 月 27 日より、AOSP のビルドとコントリビューションには aosp-main
ではなく android-latest-release
を使用することをおすすめします。詳細については、AOSP の変更をご覧ください。
回転ベクトル CV のクロスチェック
コレクションでコンテンツを整理
必要に応じて、コンテンツの保存と分類を行います。
図 1. テストパターンのサムネイル。上のリンクからフル解像度の画像をダウンロードしてください。
このページでは、回転ベクトル センサーの実装の互換性を適切にテストする手順を説明します。このテストは、デバイスで TYPE_ROTATION_VECTOR 複合センサー機能が宣言されている場合に実行する必要があります。
テスト
- テストする Android デバイスに OpenCV Manager をインストールします。
- SourceForge.net から
OpenCV-3.0.0-android-sdk.zip
パッケージをダウンロードします。
- ダウンロードしたアーカイブ内の
apk
フォルダから APK を探します。--bypass-low-target-sdk-block
オプションを指定し adb install
コマンドを使用して、パソコンからデバイスに APK を読み込みます。Android 13 以前を搭載しているデバイスについては、この --bypass-low-target-sdk-block
オプションは必要ありません。詳細については、アプリをインストールするをご覧ください。
Google Play にログインしているアクティブなアカウントがある場合は、Google Play で OpenCV Manager を探し、コンテキスト メニュー([...] ボタンでポップアップされるメニュー)で自動更新を無効にします。
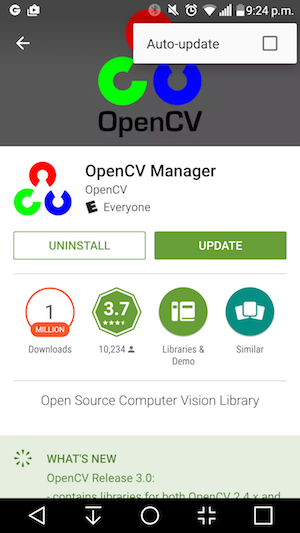
図 2. Google Play で自動更新を無効化
- 拡大縮小オプションを無効にして、こちらのリンクのテストパターンを印刷します。このテストパターンは、横向きの US レター紙に収まるサイズになっています。
注: 上記のインライン画像は低解像度であり、あくまでも例として示したものです。これを直接テストパターンとして印刷しないでください。
- テストパターンを水平面に置きます。
- CTS 検証ツールアプリで回転ベクトル CV クロスチェックを開始します。ガイドに沿って機内モードをオンにし、自動回転をオフにして、明るさの自動調節と位置を調整します(変更済みでない場合)。
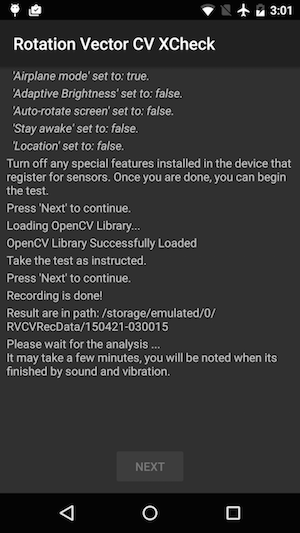
図 3. テストの開始
- 動画プレビューが表示されたら、スマートフォンをテストパターンの 1 メートル上で、メインカメラがテストパターンを向くようにし、テストパターンの黄色のマーカーと画面上の黄色のマーカーを同じ角で合わせます。
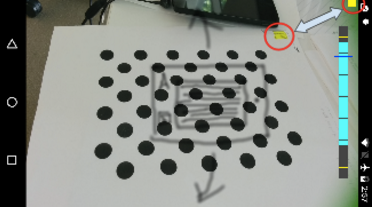
図 4. テストパターンの配置
- パターン全体がカメラビューに収まるようにしながら、テスト対象の Android デバイス(DUT)を回転範囲表示の指示に従って、パターンのまわりを回転させます。下図の示す 3 通りの方向に 1 方向ずつ、1、2、3 の順で回転させます。滑らかで安定した動きを維持してください。
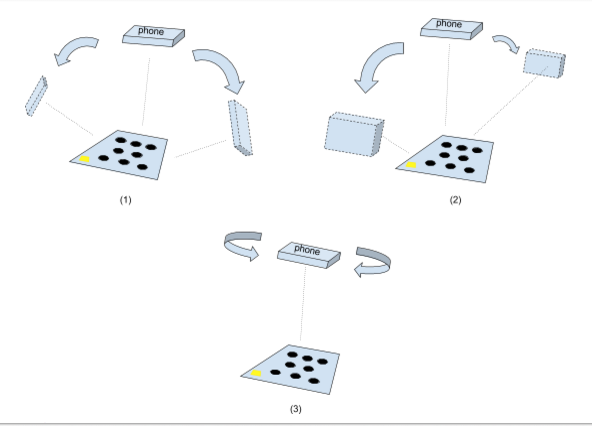
図 5. テスト対象デバイスを動かす
- キャプチャ後、カメラのプレビューが消え、解析プロセスが開始します。解析が終わるまでしばらく待ちます。通常、スマートフォンの性能に応じて 1~5 分かかります。解析が完了すると、スマートフォンがバイブレーションと音で知らせます。解析が成功すると、結果の数値が画面に表示されます。
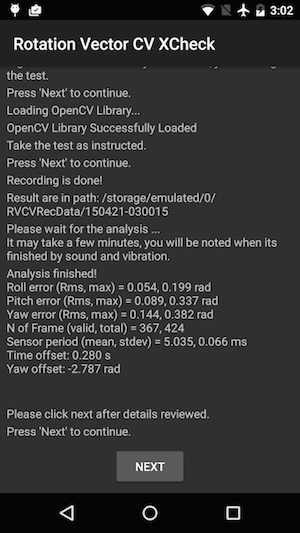
図 6. テストの終了
- [NEXT] をクリックして合否の画面に進み、結果を確認します。
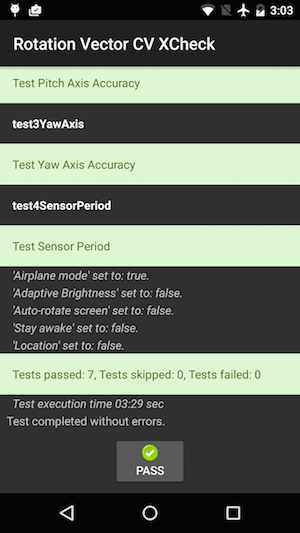
図 7. テストに合格する
- 次のヒントを参考にしてください。
- この手動テストは複雑であるため、何度か試してみることをおすすめします。
- 適切な結果を得るには、加速度計、ジャイロスコープ、磁力計をテストの前に較正してください。
トラブルシューティング
- 症状: テストケースの開始時または録画終了直後にテストがクラッシュした。
原因: OpenCV Manager の互換性に関する問題の可能性があります。logcat
をチェックして、それが正しいかどうか確認します。正しいと確認した場合、インストールされている OpenCV Manager のバージョンとアーキテクチャをチェックします。
- 症状: 「Too many invalid frame」(無効なフレームが多すぎる)というエラーでテストが何度も失敗する。
原因: 動画の品質が原因である可能性があります。次の条件を確認してください。
- テストに十分な周囲光がある。通常は自然光が最適です。それが利用できない場合は、はっきりとした影が生じないように複数の角度から大量の光を当てても構いません。反射を抑えるため、照射角度の狭い照明は使わないでください。
- 動画撮影中の動きが滑らかである。動きがぎくしゃくしているとぼけた映像となり、コンピュータ ビジョンのソフトウェアが混乱します。
- パターンは常に全体が動画プレビュー フレーム内にあり、中央付近に配置されている。パターンのサイズが動画プレビュー ウィンドウの 1/4~1/2 になるようにしてください。パターンが小さすぎると、精度が低下します。
パターンが大きすぎると、レンズ歪みが強くなり、常に録画フレーム内に収めることが難しくなります。
- カメラのピント合わせが正しく機能している。一部のデバイスでは、録画中のピント合わせに問題が発生します。これは一般に、シーンの変化が少なすぎるためです(無地の滑らか床面など)。通常、テストパターンを模様のある平面に置くか、テストパターンの周囲に物体を置くと改善されます。
- 手ぶれ補正機能がオフになっている。
- 症状: ピッチとロールのテストは正常だが、ヨーのテストが常に失敗する。
原因: まず、磁気センサーの較正を確認してください。
磁気センサーが較正されていないと、回転ベクトルは正常に機能しません。
また、撮影が原因となってヨー軸で失敗する場合があります。デバイスをしっかりと持ってテストパターンのまわりを移動しながら、ヨーのテストを行ってください。デバイスを手の中で回転させながら動画の品質を維持するのは容易でありません。
フィードバックを送信
上記の手順でも問題が解決しない場合は、以下のフィードバック手順に沿って問題をお知らせください。
バグを報告する際は、以下の情報をご確認ください。
- Android の bugreport
- エラーメッセージが表示された場合は、そのスクリーンショット。
/sdcard/RVCVRecData/
の内容。このフォルダには動画ファイルが含まれているため、テストが複数回行われている場合は非常に大きなサイズになります。フォルダを空にしてもう一度テストを行うと、サイズが小さくなります。中の動画ファイルを調べて、録画に明らかな問題がないか確認してください。
- OpenCV Manager アプリのスクリーンショット。
このページのコンテンツやコードサンプルは、コンテンツ ライセンスに記載のライセンスに従います。Java および OpenJDK は Oracle および関連会社の商標または登録商標です。
最終更新日 2025-07-27 UTC。
[[["わかりやすい","easyToUnderstand","thumb-up"],["問題の解決に役立った","solvedMyProblem","thumb-up"],["その他","otherUp","thumb-up"]],[["必要な情報がない","missingTheInformationINeed","thumb-down"],["複雑すぎる / 手順が多すぎる","tooComplicatedTooManySteps","thumb-down"],["最新ではない","outOfDate","thumb-down"],["翻訳に関する問題","translationIssue","thumb-down"],["サンプル / コードに問題がある","samplesCodeIssue","thumb-down"],["その他","otherDown","thumb-down"]],["最終更新日 2025-07-27 UTC。"],[],[],null,["# Rotation vector CV crosscheck\n\n**Figure 1.** Thumbnail of test pattern. Download the\nfull-resolution image linked above.\n\nThis page provides the steps to properly test the compatibility of your [rotation vector\nsensor](/docs/core/interaction/sensors/sensor-types#rotation_vector) implementation. This test should be run when the device declares the\nTYPE_ROTATION_VECTOR composite sensor feature.\n\nTest\n----\n\n1. Install OpenCV Manager on the Android device being tested.\n2. Download the `OpenCV-3.0.0-android-sdk.zip` package from [SourceForge.net](https://sourceforge.net/projects/opencvlibrary/files/opencv-android/3.0.0).\n3. Find the APK from the `apk` folder inside the downloaded archive. Load the APK on the device from a computer using the `adb install` command with the `--bypass-low-target-sdk-block` option. For devices running Android 13 or lower, this `--bypass-low-target-sdk-block` option isn't necessary. For more information, see [Install an app](http://developer.android.com/tools/help/adb#move).\n4. If there is an active account logged into Google Play, locate OpenCV Manager in Google Play\n and disable *Auto-update* in the context menu (the popup menu from the \"...\" button).\n\n\n **Figure 2.** Disabling Auto-update in Google Play.\n5. Print out the linked [test pattern](/static/docs/compatibility/cts/images/acircles_pattern.pdf), disabling any scaling options when printing. The pattern should fit US Letter paper in landscape or anything bigger.\n\n **Note:** The inline picture above is low\n resolution and just for illustration. Please do not directly print it as your\n pattern.\n6. Place the pattern on a horizontal surface.\n7. Start the **Rotation Vector CV Crosscheck** in the CTS Verifier app. Follow the guide to turn on airplane mode, turn off auto rotate, and adjust adaptive brightness and location if these changes have not been made. \n\n\n **Figure 3.** Initiating the test.\n8. When the video preview appears, place the phone three feet (or one meter) over the pattern so the main camera is facing the pattern with yellow marker on the screen and yellow marker on the pattern aligned at the same corner. \n\n\n **Figure 4.** Placing the test pattern.\n9. While keeping the pattern entirely in the camera view, rotate the Android device under test (DUT) around the pattern in three different directions, one by one (1, 2 and then 3 illustrated in picture below) as prompted by the rotation range indicator. Keep movement smooth and steady for the best result. \n\n\n **Figure 5.** Manipulating the device under test.\n10. After the capture, the camera preview will disappear and the analysis process will start. Wait patiently for analysis to finish; it usually takes one to five minutes depending on the phone performance. The phone will sound and vibrate at analysis completion. A numerical result will be presented on screen if the analysis is successful. \n\n\n **Figure 6.** Finishing the test.\n11. Click **next** to proceed to the pass/fail screen and review the result. \n\n\n **Figure 7.** Passing the test.\n12. Follow these tips for best results:\n 1. Since this is a manual test with complexity, you may want to try it a few times for the best results.\n 2. Accelerometer, gyroscope, and magnetometer should be calibrated before testing for good results.\n\nTroubleshoot\n------------\n\n1. Symptom: Test crashed when starting test case or immediately after finishing video recording. \n Cause: Likely an OpenCV Manager compatibility issue. Check `logcat` to confirm. If confirmed, check version and arch of the installed OpenCV Manager.\n2. Symptom: Test fails frequently due to \"Too many invalid frame\" errors. \n Cause: Likely due to video quality. Confirm the following conditions:\n 1. There is enough ambient lighting for the test. Natural light usually gives the best result. However, when it is not available, abundant light from multiple angles that does not form obvious shadows works, as well. Avoid low angle lighting to reduce glare.\n 2. The motion during video taking is smooth. Jerky movement causes blur and confuses the computer vision software.\n 3. The pattern should always be entirely in video preview frame and located around the center. The pattern should be 1/4 \\~ 1/2 the size of the video preview window. If the pattern is too small, the accuracy is reduced. If the pattern is too big, lens distortion is more obvious, and it is more difficult to keep the pattern always inside video recording frame.\n 4. The camera is able to focus well. Some devices have trouble in focusing during video recording. This is usually due to there is too few variations in the scene, e.g. solid color smooth floor surface. Moving test pattern to a place with textured surface or introducing objects around the test pattern usually helps.\n 5. Image stabilization is turned off.\n3. Symptom: The pitch and roll test works fine, but the yaw test regularly fails. \n Cause: First, make sure the magnetic field sensor is well calibrated. Rotation vector does not function well if magnetic field sensor is not calibrated. \n It is also possible that yaw axis fails due to video taking. Hold the device steady and walk/move around the test pattern for the yaw section of test. It is hard to maintain the quality of video while rotating device in hand.\n\nReport feedback\n---------------\n\nIf the steps above do not help, please make sure to follow the feedback steps below to report your issue.\n\nPlease gather the following information when reporting a bug:\n\n1. Android bugreport\n2. Screenshot if there is any error message on screen.\n3. Contents of `/sdcard/RVCVRecData/`. This folder contains video files and thus can be quite large if the test has already been taken multiple times. Clearing the folder and performing the test again will help reduce size. Inspect video files inside to find obvious issues in recording.\n4. Screenshot of the OpenCV Manager app."]]