
2025년 3월 27일부터 AOSP를 빌드하고 기여하려면 aosp-main
대신 android-latest-release
를 사용하는 것이 좋습니다. 자세한 내용은 AOSP 변경사항을 참고하세요.
회전 벡터 CV 크로스체크
컬렉션을 사용해 정리하기
내 환경설정을 기준으로 콘텐츠를 저장하고 분류하세요.
그림 1. 테스트 패턴 썸네일. 위에 링크가 걸린 전체 해상도 이미지를 다운로드하세요.
이 페이지에서는 회전 벡터 센서 구현의 호환성을 올바로 테스트하기 위한 단계를 안내합니다. 테스트는 기기에서 TYPE_ROTATION_VECTOR 복합 센서 기능을 선언할 때 실행해야 합니다.
테스트
- 테스트 대상 Android 기기에 OpenCV Manager를 설치합니다.
-
SourceForge.net에서
OpenCV-3.0.0-android-sdk.zip
패키지를 다운로드합니다.
- 다운로드한 파일 내
apk
폴더에서 APK를 찾습니다. adb install
명령어와 --bypass-low-target-sdk-block
옵션을 사용해 컴퓨터에서 기기로 APK를 로드합니다. Android 13 이하를 실행하는 기기에서는 이 --bypass-low-target-sdk-block
옵션이 필요하지 않습니다. 앱 설치하기에서 자세한 내용을 확인하세요.
Google Play에 로그인한 활성 계정이 있다면 Google Play에서 OpenCV Manager를 찾은 다음 컨텍스트 메뉴('...' 버튼을 눌러 표시되는 팝업 메뉴)에서 자동 업데이트를 중지합니다.
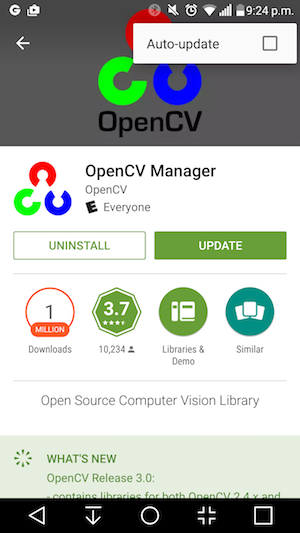
그림 2. Google Play에서 자동 업데이트 중지.
- 링크로 연결된 테스트 패턴을 인쇄합니다. 인쇄할 때 배율 옵션은 사용하지 않습니다. 패턴은 가로로 된 미국 레터 용지에 맞거나 그보다 더 큰 용지에 맞아야 합니다.
참고: 위의 인라인 사진은 해상도가 낮으며 참고용입니다. 이 사진을 패턴으로 직접 인쇄해서는 안 됩니다.
- 패턴을 평평한 수평면에 놓습니다.
- CTS 인증 도구 앱에서 Rotation Vector CV Crosscheck를 시작합니다. 아래와 같이 변경되지 않았다면 가이드에 따라 비행기 모드를 사용 설정하고 자동 회전을 사용 중지하고 밝기 자동 조절과 위치를 조정합니다.
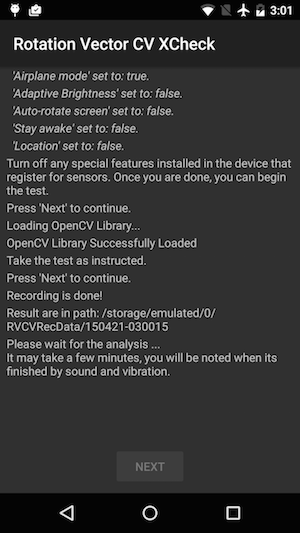
그림 3. 테스트 시작.
- 동영상 미리보기가 표시되면 패턴 1미터 위에서 기본 카메라로 패턴을 비춰 화면의 노란색 마커와 패턴의 노란색 마커가 같은 모서리에 정렬되도록 합니다.
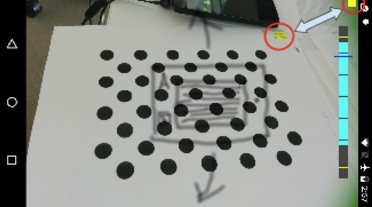
그림 4. 테스트 패턴 배치.
- 패턴이 카메라 뷰에 완전히 들어온 상태에서 Android DUT(테스트 대상 기기)를 패턴 주위로 회전시킵니다. 이때 회전 범위 표시기에 표시되는 메시지에 따라 세 가지 방향으로 하나씩 진행합니다(아래 그림과 같이 1번, 2번 후 3번 실행). 안정적으로 부드럽게 움직여야 최상의 결과를 얻을 수 있습니다.
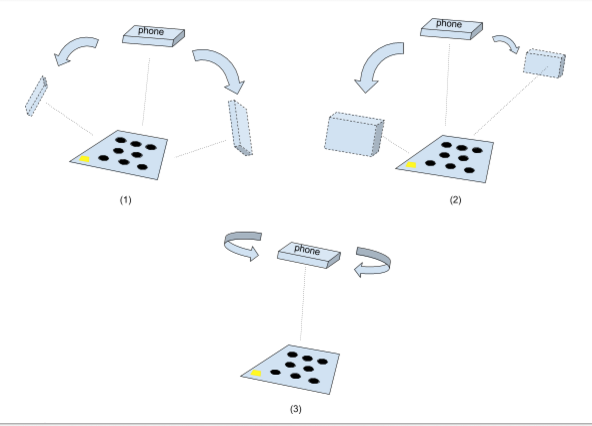
그림 5. 테스트 대상 기기 조작.
- 캡처가 끝나면 카메라 미리보기가 사라지고 분석 프로세스가 시작됩니다. 분석이 끝날 때까지 인내심을 갖고 기다립니다. 일반적으로 스마트폰 성능에 따라 1~5분 정도 소요됩니다. 분석이 완료되면 스마트폰에서 소리가 나고 진동이 울립니다. 분석에 성공하면 수치로 된 결과가 화면에 표시됩니다.
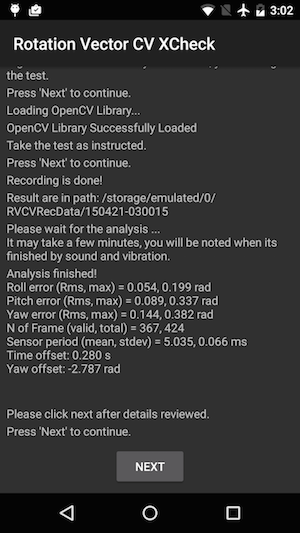
그림 6. 테스트 완료.
- Next를 클릭하여 성공/실패 화면으로 이동하고 결과를 검토합니다.
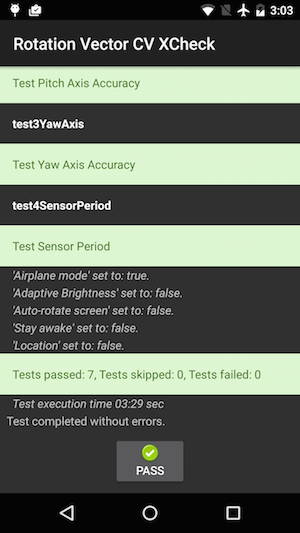
그림 7. 테스트 성공.
- 최상의 결과를 얻으려면 다음 도움말을 따릅니다.
- 이 테스트는 복잡한 수동 테스트이므로 최상의 결과를 얻으려면 몇 번 반복하는 것이 좋습니다.
- 좋은 결과를 얻기 위해 테스트 전에 가속도계, 자이로스코프, 자기계를 보정해야 합니다.
문제 해결
- 증상: 테스트 사례를 시작할 때 또는 동영상 녹화가 끝난 직후에 테스트가 비정상적으로 종료되었습니다.
원인: OpenCV Manager와의 호환성 문제일 수 있습니다. 확인하려면 logcat
을 살펴보세요. 확인되면 설치된 OpenCV Manager의 버전과 아키텍처를 확인합니다.
- 증상: 'Too many invalid frame' 오류로 인해 테스트가 자주 실패합니다.
원인: 동영상 품질 문제일 수 있습니다. 다음 조건을 확인합니다.
- 테스트할 때의 주변 조명이 충분히 밝은지 확인합니다. 일반적으로 자연광이 가장 좋은 결과를 냅니다. 하지만, 자연광을 이용할 수 없는 경우 그림자가 뚜렷이 생기지 않는 빛을 여러 각도에서 풍부하게 사용해도 됩니다.
빛 반사를 줄이기 위해 낮은 각도의 조명을 피합니다.
- 동영상을 찍을 때 모션이 부드러워야 합니다. 움직임이 일정하지 않으면 블러가 생기고 컴퓨터 비전 소프트웨어에 혼란을 주게 됩니다.
- 패턴은 항상 가운데를 중심으로 동영상 미리보기 프레임 안에 완전히 포함되도록 놓아야 합니다. 패턴은 동영상 미리보기 창의 1/4~1/2 크기여야 합니다. 패턴이 너무 작으면 정확도가 떨어집니다.
패턴이 너무 크면 렌즈 왜곡이 더 두드러지고 패턴을 동영상 녹화 프레임 안에 항상 유지하기가 더 어렵습니다.
- 카메라 초점을 잘 맞출 수 있어야 합니다. 일부 기기의 경우 동영상 녹화 중에 초점을 맞추는 데 문제가 발생합니다. 이는 대개 단색의 매끄러운 바닥 표면과 같이 장면에 변화가 너무 없기 때문입니다. 표면에 질감이 드러나는 곳으로 테스트 패턴을 옮기거나 테스트 패턴 주위에 물체를 가져다 놓으면 대개 도움이 됩니다.
- 이미지 떨림 보정이 꺼져 있는지 확인합니다.
- 증상: 피치(pitch) 및 롤(roll) 테스트는 정상적으로 이루어지지만 요(yaw) 테스트는 자주 실패합니다.
원인: 먼저 자기장 센서가 잘 보정되었는지 확인합니다.
자기장 센서가 보정되지 않으면 회전 벡터가 제대로 작동하지 않습니다.
동영상 촬영으로 인해 요(yaw) 축에 문제가 발생할 수도 있습니다. 기기를 단단히 잡고 테스트의 요(yaw) 섹션에 맞게 테스트 패턴 주위를 걷거나 움직입니다. 손에 기기를 들고 돌리면서 동영상 품질을 계속 유지하기는 쉽지 않습니다.
의견 보내기
위 단계를 진행해도 문제가 해결되지 않는 경우 아래의 단계에 따라 문제를 신고합니다.
버그를 신고할 경우 다음 정보를 수집합니다.
- Android 버그 신고
- 화면에 오류 메시지가 있는 경우 스크린샷
/sdcard/RVCVRecData/
의 콘텐츠. 이 폴더에는 동영상 파일이 있으므로 이미 테스트를 여러 번 진행한 경우 폴더 크기가 상당히 클 수 있습니다. 폴더를 지우고 테스트를 다시 진행하면 크기가 줄어듭니다. 내부 동영상 파일을 조사하여 녹화 시 명확한 문제가 있었는지 찾습니다.
- OpenCV Manager 앱의 스크린샷
이 페이지에 나와 있는 콘텐츠와 코드 샘플에는 콘텐츠 라이선스에서 설명하는 라이선스가 적용됩니다. 자바 및 OpenJDK는 Oracle 및 Oracle 계열사의 상표 또는 등록 상표입니다.
최종 업데이트: 2025-07-27(UTC)
[[["이해하기 쉬움","easyToUnderstand","thumb-up"],["문제가 해결됨","solvedMyProblem","thumb-up"],["기타","otherUp","thumb-up"]],[["필요한 정보가 없음","missingTheInformationINeed","thumb-down"],["너무 복잡함/단계 수가 너무 많음","tooComplicatedTooManySteps","thumb-down"],["오래됨","outOfDate","thumb-down"],["번역 문제","translationIssue","thumb-down"],["샘플/코드 문제","samplesCodeIssue","thumb-down"],["기타","otherDown","thumb-down"]],["최종 업데이트: 2025-07-27(UTC)"],[],[],null,["# Rotation vector CV crosscheck\n\n**Figure 1.** Thumbnail of test pattern. Download the\nfull-resolution image linked above.\n\nThis page provides the steps to properly test the compatibility of your [rotation vector\nsensor](/docs/core/interaction/sensors/sensor-types#rotation_vector) implementation. This test should be run when the device declares the\nTYPE_ROTATION_VECTOR composite sensor feature.\n\nTest\n----\n\n1. Install OpenCV Manager on the Android device being tested.\n2. Download the `OpenCV-3.0.0-android-sdk.zip` package from [SourceForge.net](https://sourceforge.net/projects/opencvlibrary/files/opencv-android/3.0.0).\n3. Find the APK from the `apk` folder inside the downloaded archive. Load the APK on the device from a computer using the `adb install` command with the `--bypass-low-target-sdk-block` option. For devices running Android 13 or lower, this `--bypass-low-target-sdk-block` option isn't necessary. For more information, see [Install an app](http://developer.android.com/tools/help/adb#move).\n4. If there is an active account logged into Google Play, locate OpenCV Manager in Google Play\n and disable *Auto-update* in the context menu (the popup menu from the \"...\" button).\n\n\n **Figure 2.** Disabling Auto-update in Google Play.\n5. Print out the linked [test pattern](/static/docs/compatibility/cts/images/acircles_pattern.pdf), disabling any scaling options when printing. The pattern should fit US Letter paper in landscape or anything bigger.\n\n **Note:** The inline picture above is low\n resolution and just for illustration. Please do not directly print it as your\n pattern.\n6. Place the pattern on a horizontal surface.\n7. Start the **Rotation Vector CV Crosscheck** in the CTS Verifier app. Follow the guide to turn on airplane mode, turn off auto rotate, and adjust adaptive brightness and location if these changes have not been made. \n\n\n **Figure 3.** Initiating the test.\n8. When the video preview appears, place the phone three feet (or one meter) over the pattern so the main camera is facing the pattern with yellow marker on the screen and yellow marker on the pattern aligned at the same corner. \n\n\n **Figure 4.** Placing the test pattern.\n9. While keeping the pattern entirely in the camera view, rotate the Android device under test (DUT) around the pattern in three different directions, one by one (1, 2 and then 3 illustrated in picture below) as prompted by the rotation range indicator. Keep movement smooth and steady for the best result. \n\n\n **Figure 5.** Manipulating the device under test.\n10. After the capture, the camera preview will disappear and the analysis process will start. Wait patiently for analysis to finish; it usually takes one to five minutes depending on the phone performance. The phone will sound and vibrate at analysis completion. A numerical result will be presented on screen if the analysis is successful. \n\n\n **Figure 6.** Finishing the test.\n11. Click **next** to proceed to the pass/fail screen and review the result. \n\n\n **Figure 7.** Passing the test.\n12. Follow these tips for best results:\n 1. Since this is a manual test with complexity, you may want to try it a few times for the best results.\n 2. Accelerometer, gyroscope, and magnetometer should be calibrated before testing for good results.\n\nTroubleshoot\n------------\n\n1. Symptom: Test crashed when starting test case or immediately after finishing video recording. \n Cause: Likely an OpenCV Manager compatibility issue. Check `logcat` to confirm. If confirmed, check version and arch of the installed OpenCV Manager.\n2. Symptom: Test fails frequently due to \"Too many invalid frame\" errors. \n Cause: Likely due to video quality. Confirm the following conditions:\n 1. There is enough ambient lighting for the test. Natural light usually gives the best result. However, when it is not available, abundant light from multiple angles that does not form obvious shadows works, as well. Avoid low angle lighting to reduce glare.\n 2. The motion during video taking is smooth. Jerky movement causes blur and confuses the computer vision software.\n 3. The pattern should always be entirely in video preview frame and located around the center. The pattern should be 1/4 \\~ 1/2 the size of the video preview window. If the pattern is too small, the accuracy is reduced. If the pattern is too big, lens distortion is more obvious, and it is more difficult to keep the pattern always inside video recording frame.\n 4. The camera is able to focus well. Some devices have trouble in focusing during video recording. This is usually due to there is too few variations in the scene, e.g. solid color smooth floor surface. Moving test pattern to a place with textured surface or introducing objects around the test pattern usually helps.\n 5. Image stabilization is turned off.\n3. Symptom: The pitch and roll test works fine, but the yaw test regularly fails. \n Cause: First, make sure the magnetic field sensor is well calibrated. Rotation vector does not function well if magnetic field sensor is not calibrated. \n It is also possible that yaw axis fails due to video taking. Hold the device steady and walk/move around the test pattern for the yaw section of test. It is hard to maintain the quality of video while rotating device in hand.\n\nReport feedback\n---------------\n\nIf the steps above do not help, please make sure to follow the feedback steps below to report your issue.\n\nPlease gather the following information when reporting a bug:\n\n1. Android bugreport\n2. Screenshot if there is any error message on screen.\n3. Contents of `/sdcard/RVCVRecData/`. This folder contains video files and thus can be quite large if the test has already been taken multiple times. Clearing the folder and performing the test again will help reduce size. Inspect video files inside to find obvious issues in recording.\n4. Screenshot of the OpenCV Manager app."]]