
Android Automotive provides a new System UI developed specifically for vehicles. Most components of the System UI are tightly-coupled with framework services. System UI refers to any element displayed on the screen that is not part of an app. The Automotive System UI (in the CarSystemUI element package) is an extension of the Android System UI (in the System UI package), which has been customized specifically for vehicles.
What is System UI?
Components specific to the Automotive System UI include:
| Component | Description |
|---|---|
| Lockscreen UI | Screen through which users are authenticated to a specific user account. |
| Navigation bar | System bar that can can be positioned on the left, bottom, or right of the screen and that can include facet buttons for navigation to different apps, toggle the notification panel, and provide vehicle controls (such as HVAC). This differs from the Android System UI implementation, which provides the Back, Home, and app-stack buttons. |
| Status bar | System bar positioned along the screen and that serves as a navigation bar. The
status bar also provides functionality to support:
|
| System UI | Refers to any element displayed on the screen that is not part of an app. |
| User Switcher UI | Screen through which a user can select a different user. |
| Volume UI | Dialog displayed when the driver uses physical volume buttons to change the volume on a device. |
How does System UI work?
System UI is an Android app that runs when a device is powered on. The app is started through reflection by the SystemServer. The most relevant entry points for user-visible aspects of System UI are listed below. Use these components to customize the Android System UI for Automotive-specific capabilities.
config_statusBarComponentconfig_systemUIFactoryComponent
CarSystemUI is an extension of the System UI package, meaning that classes and resources in the System UI package can be used and overridden by the CarSystemUI package.
Customize the System UI
Overlays
While you can modify the Android source code to customize the System UI, doing so makes it more difficult and complex to apply future Android updates. Instead, Android supports the use of an overlay directory, which enables you to replace resource files without modifying the source code. In the Android build system, the overlay system overrides files in a controlled manner. All modified files are clearly identified without traversing the entire tree of AOSP source code.
Overlay files must be placed in the PRODUCT_PACKAGE_OVERLAYS directory and must have
exactly the same sub-folders as the original AOSP root structure. For Android
10 or higher, PRODUCT_PACKAGE_OVERLAYS is set to:
PRODUCT_PACKAGE_OVERLAYS := packages/services/Car/car_product/overlay
The Automotive System UI uses resources from System UI and the CarSystemUI packages, which means that resources from each location can be overridden with overlays to affect the look-and-feel of the Automotive System UI.
To replace a file, replicate the directory structure of the file being replaced in the
/overlay directory you specified and then include the replacement in that
directory. For example, to replace:
frameworks/base/packages/CarSystemUI/res/layout/super_status_bar.xml
Add the replacement super_status_bar.xml file located in:
packages/services/Car/car_product/overlay/frameworks/base/packages/CarSystemUI/res/layout/
To replace frameworks/base/packages/SystemUI/res/values/config.xml,
(in System UI, not CarSystemUI), add the replacement config.xml file to:
packages/services/Car/car_product/overlay/frameworks/base/packages/SystemUI/res/layout/
or
packages/services/Car/car_product/overlay/frameworks/base/packages/CarSystemUI/res/layout/
Descriptions of the two primary customization entry point are provided below.
Navigation bar
The Automotive System UI can have three navigation bars on the left, bottom, and right of the screen. The visibility of each system bar is toggled with the following configurations:
config_enableLeftSystemBarconfig_enableBottomSystemBarconfig_enableRightSystemBar
Each bar has a provisioned and unprovisioned state, which can be customized by overlaying the respective layout files:
car_left_system_bar.xmlcar_left_system_bar_unprovisioned.xmlcar_system_bar.xml(layout for the bottom navigation bar)car_system_bar_unprovisioned.xmlcar_right_system_bar.xmlcar_right_system_bar_unprovisioned.xml
These layouts must contain
com.android.systemui.car.systembar.CarSystemBarView at the top level, which can
include any other necessary views. Buttons inside the navigation bars can be included using
com.android.systemui.car.systembar.CarSystemBarButton.
These views are inflated in CarSystemBar#createSystemBar,
if the device is properly provisioned for a given user.
Status bar
Consider the status bar as a navigation bar with additional functionality. Unlike the navigation bar, the status bar does not have a flag to disable it. You can modify the status bar with:
car_top_navigation_bar.xmlcar_top_navigation_bar_unprovisioned.xml
These layouts must contain com.android.systemui.statusbar.car.CarNavigationBarView
at the top level. The status bar contains status icons. To change the size of an icon, scale the
icon uniformly with a scale factor instead of specifying a specific size. For example, in an overlay
file /overlay/frameworks/base/packages/CarSystemUI/res/values/dimens.xml, add the
following dimensions to double the size of the icons:
<resources>
    <!-- The amount by which to scale up the status bar icons.-->
    <item name="status_bar_icon_scale_factor" format="float" type="dimen">2</item>
</resources>
The status bar resides in a special windowing layer that also includes
the notifications panel, the user switcher, heads up notifications (HUNs), and
the keyguard. The various layouts for these are included in
super_status_bar.xml.
System UI source code changes
Overlays may not provide the flexibility needed to sufficiently customize System UI behavior.
Alert. Changes made to Android source code are difficult to update in later releases of Android. We strongly recommend that you extend Automotive System UI code instead of directly modifying the code. This way, the underlying Automotive System UI source code can be upgraded with minimal merge conflicts because all customizations are implemented through known API surfaces.
Most aspects of the System UI can be customized through these two entry points:
config_statusBarComponentconfig_systemUIFactoryComponent
For example, if you create a class named
com.android.systemui.statusbar.car.custom.CustomCarStatusBar, which
extends CarStatusBar, update config_statusBarComponent to point
to this new component. Extending this class enables the customization of most elements that pertain
to the system bar and the notifications logic.
Likewise, you can create CustomCarSystemUIFactory and place it in
config_systemUIFactoryComponent. Use this class to update the functionality of the
VolumeUI and lockscreen.
Customize user switching and unlocking
The following material describes how to customize the user switching experience.
| Term | Description |
|---|---|
| Keyguard | Fullscreen dialog to prevent accidental interaction with the foreground app. Protects each user's privacy when multiple users are set up. |
| Loading dialog | Loading screen displayed when switching between Users. |
| Lockscreen, bouncer | Screen requiring a person to enter a PIN, pattern, or password. |
| User | Android user. |
| User picker | User picker screen displayed when a device is booted. |
| User switcher | User switcher displayed when switching screens from QuickSettings. |
Customize user switching
Keyguard and bouncer
In Android Automotive OS, the Keyguard screen with a user picker is displayed only when a user clicks the Cancel button on the lockscreen. The Keyguard screen is shown below.
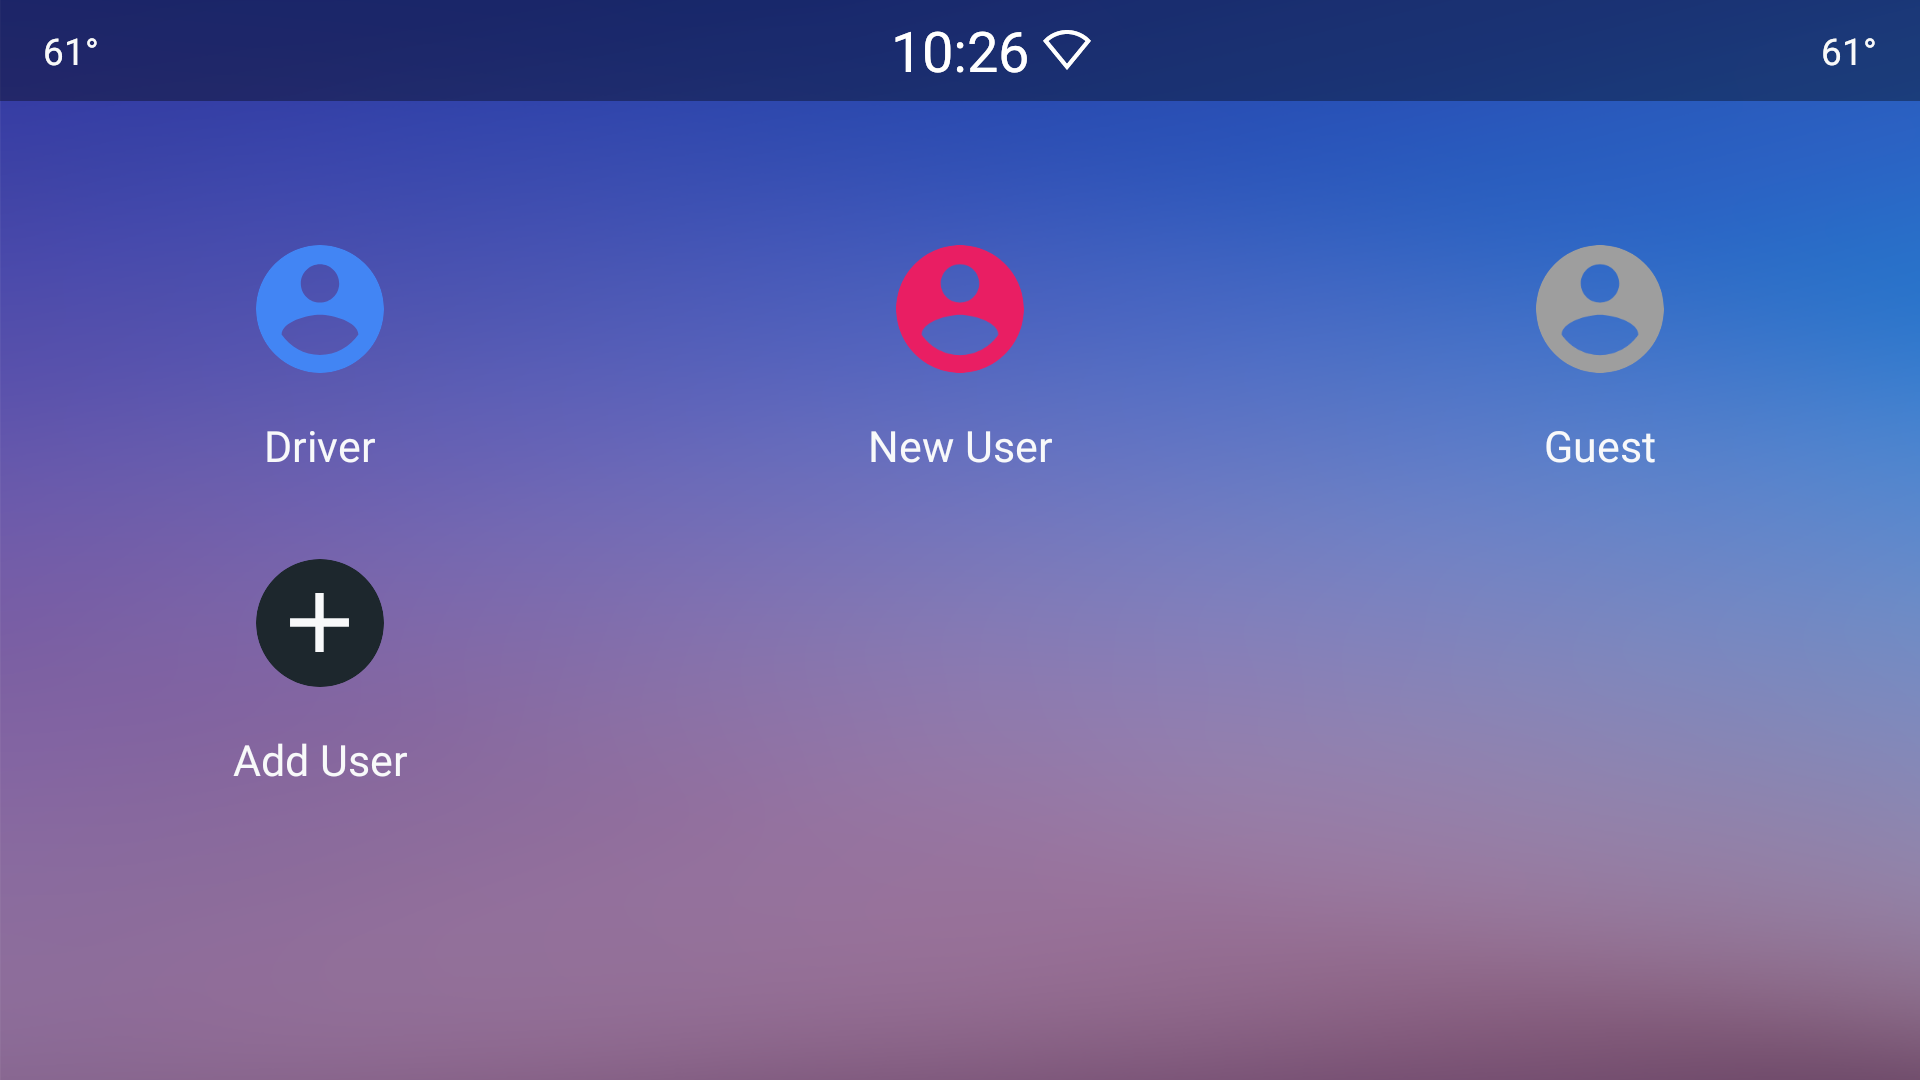
Figure 1. Keyguard screen
A lockscreen with a bouncer is displayed when the user has selected a privacy type with which to unlock the device, as shown below.
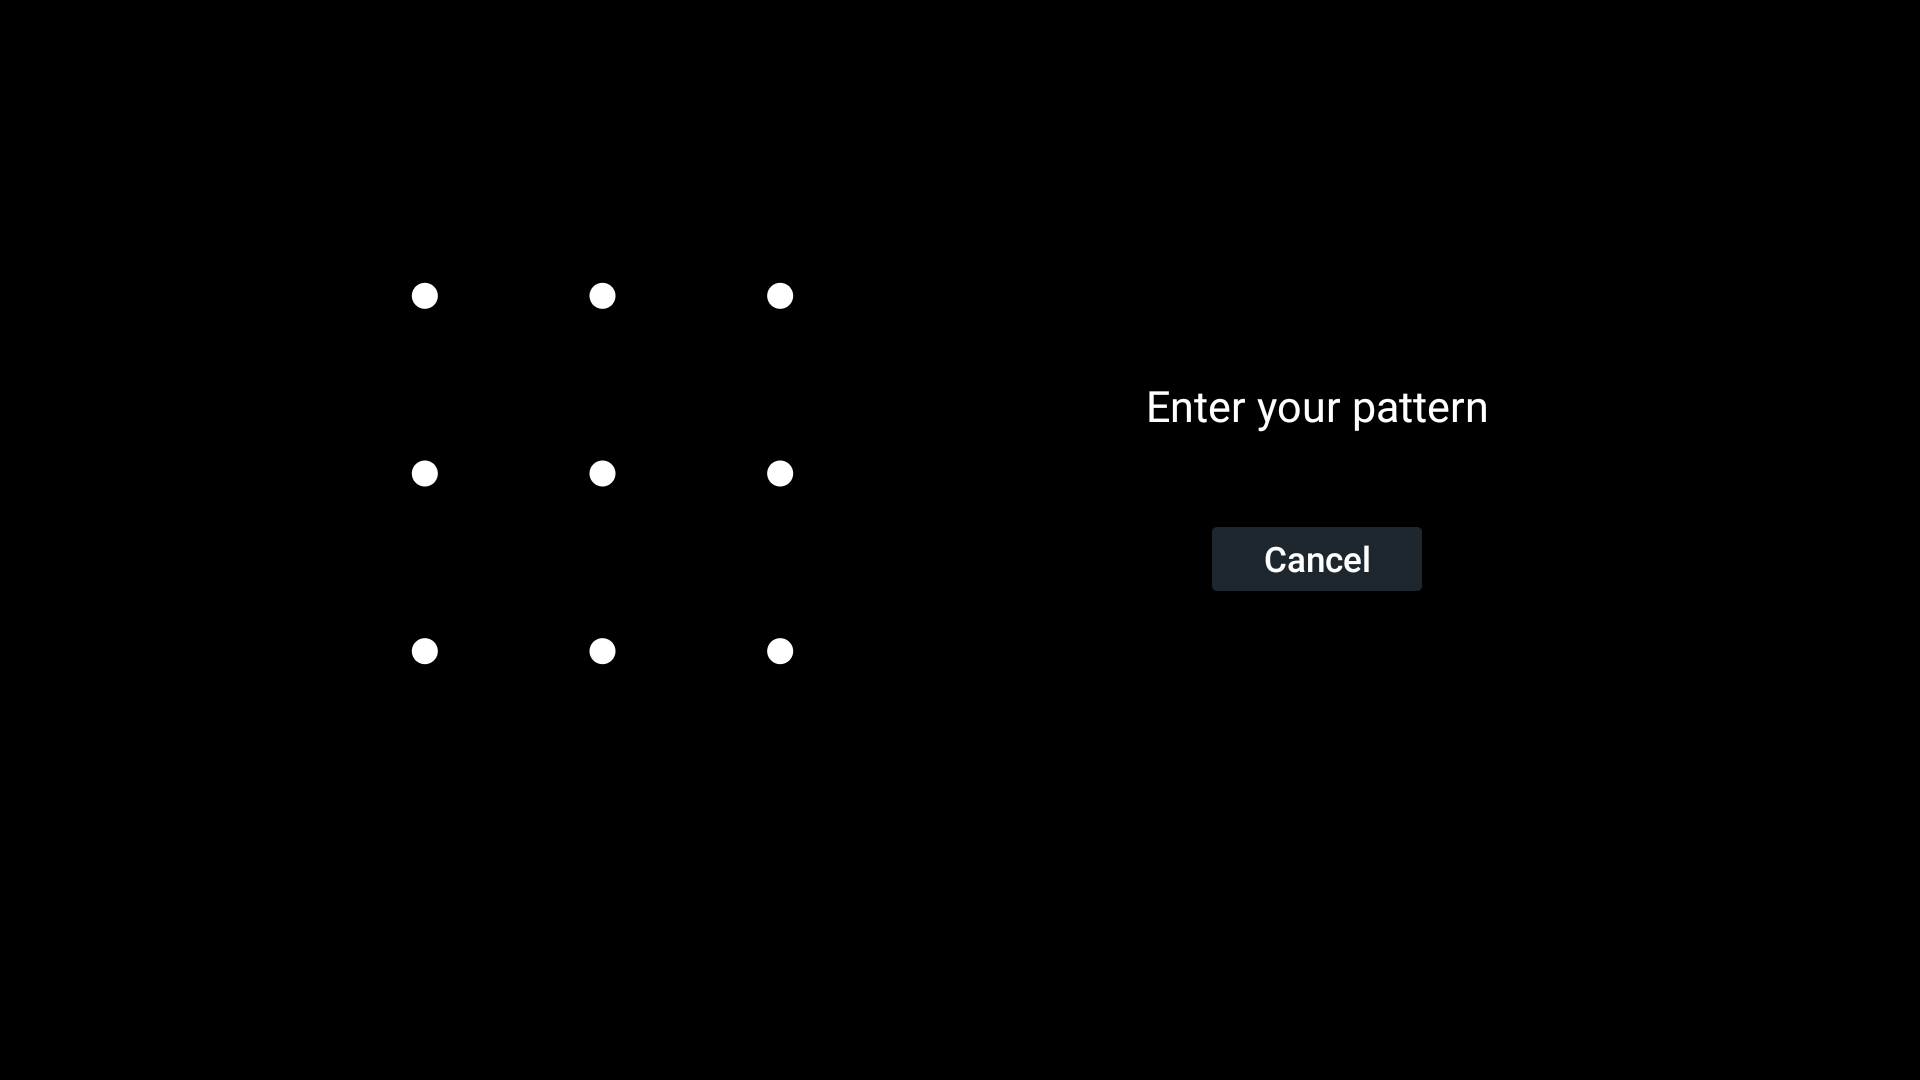
Figure 2. Lockscreen.
When the lock is set to manually trigger the power on or off, use the following instruction:
adb shell input keyevent 26
User picker
The user picker screen is displayed when a device integral to the car's System UI status bar
and Maps is rebooted. To learn more, see
FullscreenUserSwitcher.
Figure 3. User picker screen
The layout of this screen can be customized in
car_fullscreen_user_switcher.xml.
Loading screen
The loading screen is displayed whenever a user is switched, regardless of the entry point. For
example, through the user picker or the Settings screen. The loading screen is integral to the
framework System UI and maps to the public class entitled
CarUserSwitchingDialog.
See Figure 3 above for an example.
The theme can be customized with the
Theme_DeviceDefault_Light_Dialog_Alert_UserSwitchingDialog.
To set up the Android user, the initial Setup Wizard flow enables the driver to set up a user name for themselves. If the driver then associates the Android user with a Google account, the user name is selected from that account. However, if the driver specifies a name, for instance DriverB, and then later associates that user name to their Google Account with the name of Maddy, the originally assigned name (DriverB) is not changed because that name was explicitly set. The driver can change the name on the Settings menu only.
Layout can be customized in car_user_switching_dialog.xml.
OEMs can conceal the status and navigation bar by using the theme named
NoActionBar.Fullscreen.
(This is the original System UI, updated for the car reference UI.) For more information, see
Customization.
While OEMs can provide user interface entry points to switch users, results can sometimes be undesirable. Should this occur:
- The OEM creates and displays the custom loading screen (or dialog).
- Specific to the UX, the OEM launches the custom loading screen when a user selects the means to switch, which can be concealed when the user switch is completed.
- The OEM must set the priority window according to their preference. For example, a higher priority window type. Priority priority cannot exceed that of the Keyguard.
- The OEM sets
config_customUserSwitchUi=truein the core frameworkconfig.xmlas described inconfig_customuserswitchui. As a result, the framework does not displayCarUserSwitchingDialog.
Customize the lockscreen
The Lockscreen is an integral part of the System UI, which can be customized by the OEM.
To customize the flow, start with frameworks/base/packages/CarSystemUI/.
Customize first-time user setup
The Setup Wizard performs first-time user setup. This, too, can be customized. You can use the UserManager APIs to create a user. In some cases, this can be implemented in the background, thereby streamlining the Setup Wizard process.