
Use the instructions on this page to integrate the AAOS Debugging Restriction Controller (DRC).
Figure 1. DRC app example.
Architecture
The DRC architecture is illustrated in Figure 2. Components outlined in red (token issuer and DRC) have accompanying reference implementations that you can customize.
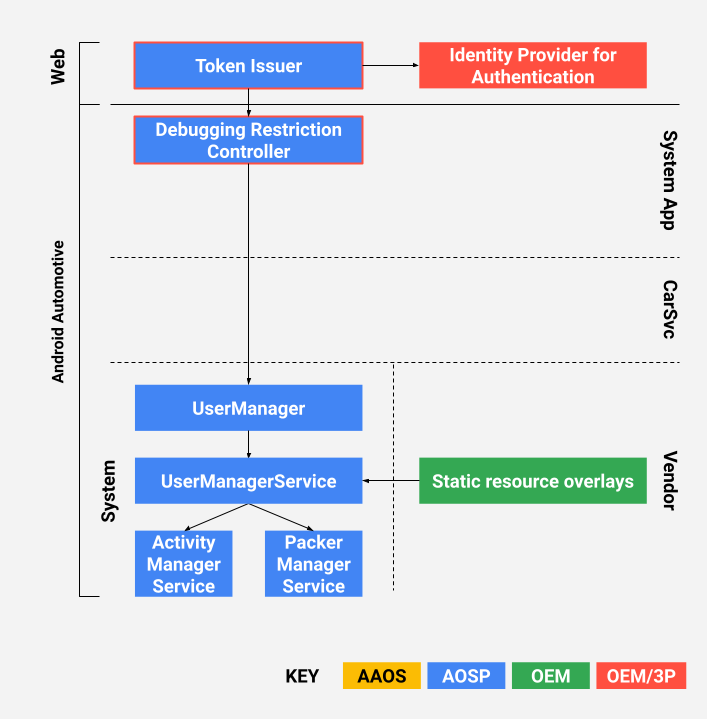
Figure 2. DRC architecture.
What is the DRC?
The car head unit includes the DRC app (see the reference implementation in
packages/apps/Car/DebuggingRestrictionController). The reference app includes
the logic for receiving an access token from the token issuer, validating the token, and
then applying debugging restriction changes as specified in the token. The logic includes
basic UX elements on the car-side.
What is the token issuer?
This is a web service that issues cryptographically signed access tokens (see the reference
implementation in packages/apps/Car/DebuggingRestrictionController/server).
The reference web service is a deployable Firebase Cloud function (to learn more, see
Cloud Functions for
Firebase).
Prerequisites
Before you deploy a reference implementation, be sure to complete the following tasks.
Prepare certificates for signing access tokens
The token issuer generates JSON Web Signatures (JWS) as access tokens. For optimal compatibility, the reference issuer only supports the RS256 algorithm (RSA signatures with SHA256). To facilitate key rotation, use a certificate chain instead of a single certificate to sign access tokens. A typical certificate chain should consist of a root CA certificate, an intermediate CA certificate, and an end-entity certificate.
The end-entity certificate signing the JWS tokens is no different than a standard TLS certificate. You can either purchase a certificate from public CAs such as DigiCert or maintain your own certificate chain using self-signed root CA certificates or Hardware Security Modules. The end-entity certificate should be a X509v3 certificate with a Subject Alternative Name (SAN) extension. The SAN extension contains an identifier (for example, hostname) of the token issuer. Lastly, RSA certificates should be preferred over EC certificates because the token issuer only supports RS256.
Google provides a shell script for generating self-signed certificates in
packages/apps/Car/DebuggingRestrictionController/server/genkey.sh.
Set up Firebase
The reference token issuer uses Firebase Authentication and Firebase Cloud Function.
To set up your Firebase account:
- To create a Firebase project, see Add Firebase to your Android project.
- To enable some Firebase authenticators, see Where do I start with Firebase Authentication?.
- To add an empty Firebase Cloud function, see Get Started.
- If not already done, install
Node.js, NPM, and Firebase tools to compile and deploy the token issuer.
Integrate the DRC app
The reference DRC app is located in
packages/apps/Car/DebuggingRestrictionController. The app can be built
bundled in AOSP with Soong or
unbundled with Gradle.
Bundled build
To build a bundled app:
- Copy the
applicationId,projectId, andapiKeyfromgoogle-services.jsonintopackages/apps/Car/DebuggingRestrictionController/soong/FirebaseApplication.java. Doing so enables the DRC app to correctly connect to Firebase. - Update these constants in
packages/apps/Car/DebuggingRestrictionController/soong/BuildConfig.java:TOKEN_USES_SELF_SIGNED_CAindicates if self-signed root CA certificates are used. If enabled, the DRC app trusts only the PEM-encoded root CA certificate specified inROOT_CA_CERT.TOKEN_ISSUER_API_NAMEis the name of the Firebase Cloud function and should match the Cloud function you created earlier in the Firebase Console.TOKEN_ISSUER_HOSTNAMEshould match the Subject Alternative Name in the end-entity certificate that will sign the access tokens.DRC_TEST_EMAILandDRC_TEST_PASSWORDare credentials for an optional test account, which can be pre-provisioned in Firebase if you've enabled Email/Password sign-in. These are used for instrumented tests only.
The app is now configured to use your Firebase account and your certificates.
In Android 9 and higher, you must set up
privileged permission allowlisting.
The allowlist must contain at least android.permission.MANAGE_USERS. For example:
<permissions>
  <privapp-permissions package="com.android.car.debuggingrestrictioncontroller">
    <permission name="android.permission.INTERNET"/>
    <permission name="android.permission.MANAGE_USERS"/>
  </privapp-permissions>
</permissions>
Unbundled build
Unbundled DRC builds use Gradle to compile the app.
To create an unbundled build:
- Confirm you've installed the Android SDK.
- Create a text file named
local.propertiesin the app's root directory. - Set the location of Android SDK:
sdk.dir=path/to/android/sdk
- To set up Firebase, copy
google-services.jsontopackages/apps/Car/DebuggingRestrictionController/app. Gradle parses the file and automatically sets up the rest. - Define the environment variables. As with bundled builds, you must specify:
$TOKEN_USES_SELF_SIGNED_CA: true or false;$ROOT_CA_CERT: path to the PEM-encoded root CA certificate;$TOKEN_ISSUER_API_NAME: name of the Firebase Cloud function;$TOKEN_ISSUER_HOST_NAME: SAN in the certificate;$DRC_TEST_EMAILand$DRC_TEST_EMAIL: credentials for a test account, debug builds only.
- To build the app with Gradle, run a command like this:
$ ./gradlew build
Integrate the token issuer
The reference token issuer is a Firebase Cloud Function implemented in Node.js.
The function can only be called by an authenticated user. Before deploying the app, you must set
up the private key and certificates used to sign the JWS tokens.
- Populate a JSON file with the following contents:
{
    "key": "---BEGIN PRIVATE KEY---\nRSA_PRIVATE_KEY\n-----END PRIVATE KEY-----\n",
    "certificates.0": "-----BEGIN CERTIFICATE-----\nTOKEN_SIGNING_CERT\n-----END CERTIFICATE-----\n",
    "certificates.1": "-----BEGIN CERTIFICATE-----\nINTERMEDIATE_CA_CERT\n-----END CERTIFICATE-----\n",
    "certificates.2": "-----BEGIN CERTIFICATE-----\nROOT_CA_CERT\n-----END CERTIFICATE-----\n",
    "expiration": "30m",
    "issuer": "Debugging Access Token Issuer",
    "audience": "IHU"
}
Certificates are ordered with the end-entity certificate first and root CA certificate at the end. The expiration period is customizable and can be set to a longer duration if an issued token takes some time before it can be received and consumed by a DRC app. Token revocation is not supported.
- Upload the configuration to Firebase:
- Deploy the Firebase Cloud function:
- To manage and monitor your token issuer, see Manage functions deployment and runtime options.
$ firebase functions:config:set api_config="$(cat YOUR_CONFIG.json)"
$ firebase deploy --only functions
Set default restrictions
Default restrictions can be applied before the first boot. Do this with static resource overlays to override the defaults in the Android framework. Restrictions can be respectively applied on different types of users. To learn about different types of users, see Multi-User Support.
The default restriction for the headless system user can be configured with
the config_defaultFirstUserRestrictions string-array in
frameworks/base/core/res/res/values/config.xml. Setting this restriction
automatically disables Android Debug Bridge (ADB) until the restriction is removed, for
example:
<string-array translatable="false" name="config_defaultFirstUserRestrictions">
  <item>no_debugging_features</item>
</string-array>
The default restrictions for regular users (for example, drivers and passengers),
and guests can be configured in
frameworks/base/core/res/res/xml/config_user_types.xml. You can overlay these
strings to set the default restrictions on each type of user respectively, for example:
<user-types>
  <full-type name="android.os.usertype.full.SECONDARY" >
    <default-restrictions no_debugging_features="true"/>
  </full-type>
  <full-type name="android.os.usertype.full.GUEST" >
    <default-restrictions no_debugging_features="true"/>
  </full-type>
</user-types>