
This page describes how to run AAOS Emulator as a Web Service and run it in a web browser to make it remotely accessible to users. Doing so provides an end-to-end, minimally viable reference through the Google Cloud Compute Engine. That said, you can use this service on any public or private cloud platform of your choice.
Purpose
This centralized configuration and setup make AAOS Emulator accessible to an entire company, supplier, and work-from-home developers. Doing so makes it more efficient to manage and upgrade the AAOS Emulator to new versions and eliminates the time needed to set up and manage local machines for individual users. This solution optimizes the use of hardware resources and enables a lower cost app development environment. For example, for purposes of:
- User research, user experience review, customer support, and training.
- Demos to potential customers and in sales channels.
- Test, validate, and even debug apps (including daily OEM HMI builds) at scale. Consider the Emulator a substitute for the test benches use to develop apps.
- OEM customer call center agents have a uniform, easy-to-access HU UI.
The benefits of using the AAOS Emulator are numerous:
- Use a setup script to create a customized and cloud-based AAOS Emulator (cloud emulator).
- Build a customized AAOS Cloud Emulator image for VM instances:
- Ready set-up of a cloud-based emulator.
- Public AAOS AVD images available to the service creator to start an AAOS AVD with a command. For example, public OEM AVD images as samples for partners to adapt and apply.
Architecture
The architecture of the cloud emulator example is illustrated below. Your first minimally viable service will work by adding your own OEM AVD images.
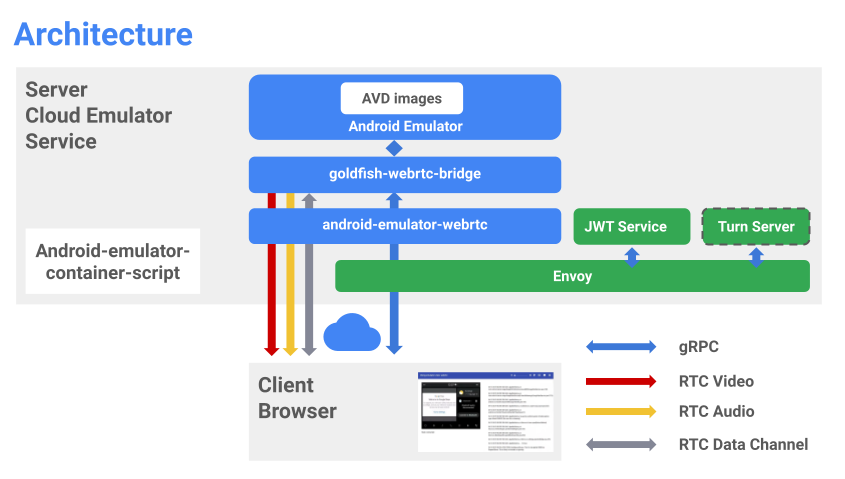
Figure 1. Cloud AVD architecture.
The key emulator building blocks are:
| Item | Purpose |
|---|---|
| Android Emulator | Emulator instance hosts AVD images |
| Goldfish-webrtc bridge | Linux app to provide communication between the react app and the AAOS Emulator |
| android-emulator-webrtc | React app to display the Emulator UI in a web browser. React also captures user input events and sends them back to the server. |
| Android Emulator Container Scripts | Python scripts to manage and create Docker images and containers for the above software modules. |
| Generates tokens to manage the access permissions of the emulator. | |
| Turn server | Establishes a WebRTC direct connection between the client and the server. Turn server is required only when the Emulator service is running behind firewalls or proxies. |
| Envoy | A proxy service to:
|
Set up emulator on a cloud VM
To create a GCP project:
- Go to the Google Cloud Console and Select a Project.
- To confirm that billing is enabled for your Google Cloud project, see Enable, disable, or change billing for a project .
- Enable the API.
Create a Linux VM in GCE
1. Enable nested virtualization
By default, nested virtualization is allowed at the project, folder, or organization level. Unless someone in your organization has disabled nested virtualization, you needn't do anything to enable it.
- Use the gcloud command-line tool
to confirm that Nested Virtualization is allowed:
gcloud beta resource-manager org-policies describe   \
  constraints/compute.disableNestedVirtualization  --effective --project=[PROJECT_ID]
2. Create an Ubuntu-1804-lts bootable disk
- Go to Cloud Console.
- Select the GCP project.
- Go to Navigation menu and select Compute Engine > Disks >
Create Disk.
- Provide a disk name. For example,
ubuntu1804lts - Select a Region and Zone. To support Nested Virtualization, make sure the Region and Zone you select support Haswell (or later) processors. To learn more, see Regions and Zones.
- Select the source image of
ubuntu-1804-bionic-v20210211 - Set an appropriate disk size (100GB or bigger is recommended).
- Provide a disk name. For example,
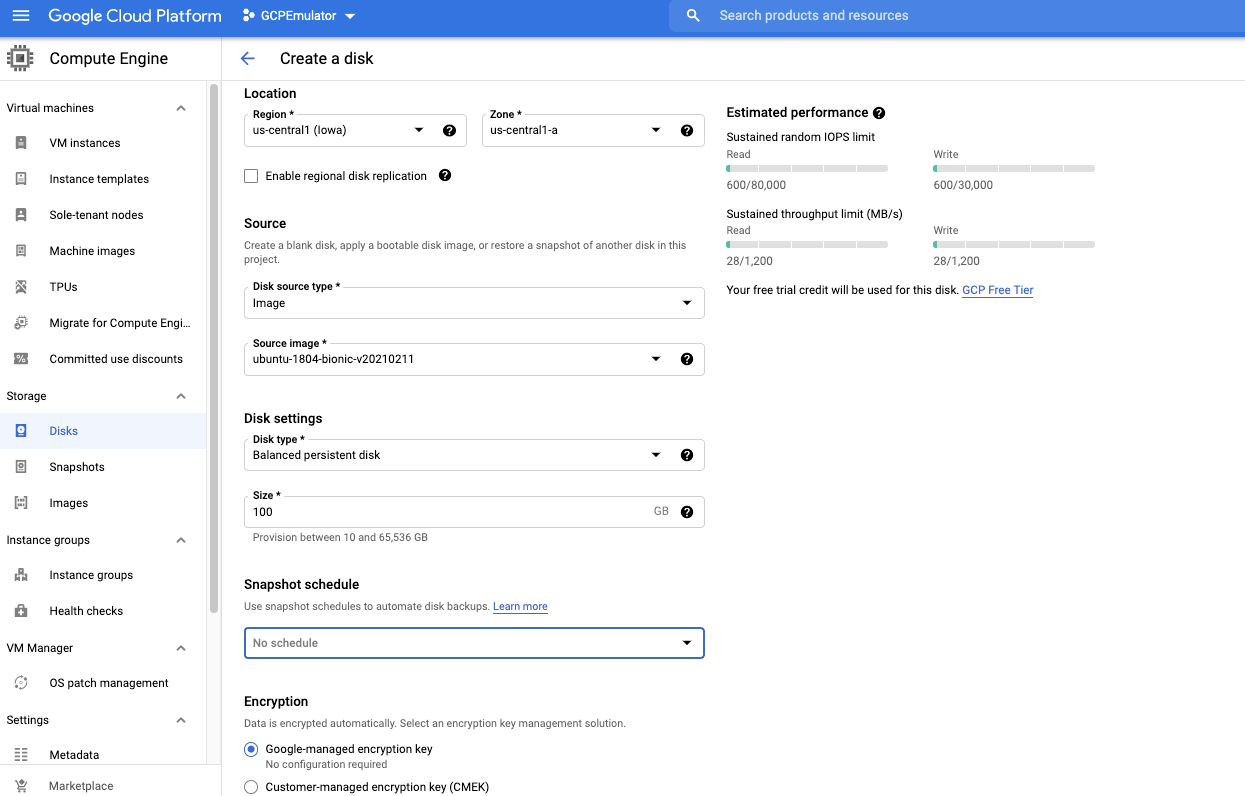
Figure 2. Create Ubuntu bootable disk.
3. Create a custom image with special license key to enable VMX
- Go to the Cloud Console.
- Open a Cloud Shell and use the following command:
gcloud compute images create [IMAGE NAME] --source-disk-zone [DISK ZONE] --source-disk [DISK NAME] \
  --licenses "https://www.googleapis.com/compute/v1/projects/vm-options/global/licenses/enable-vmx"
- Enter an Image name. For example,
aaos-emulator-image - Set Disk Zone to the zone in which you created the disk.
- Set the disk name to the name you used to create the disk.
For example:
gcloud compute images create aaos-emulator-image --source-disk-zone us-central1-a \ --source-disk ubuntu1804lts \ --licenses \ "https://www.googleapis.com/compute/v1/projects/vm-options/global/licenses/enable-vmx" - Enter an Image name. For example,
For details, see Nested Virtualization VM Instance.
4. Create a VM instance using the customized image
- Go to Cloud Console.
- Select the GCP project.
- Go to Navigation Menu > Compute Engine > VM instance.
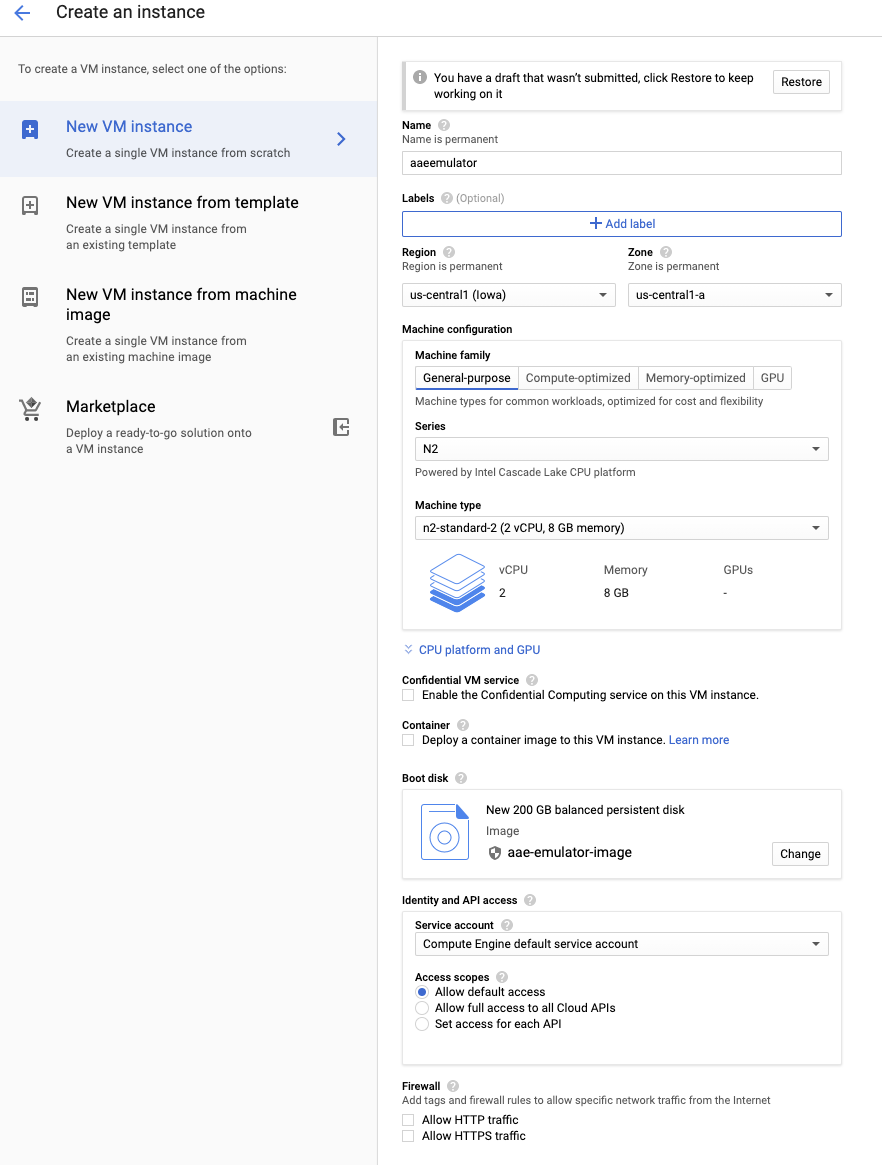
Figure 3. Create a VM instance.
- Enter an instance name. For example,
aaosemulator - Select the desired machine family and type. Make sure the machine contains four vCPUs and 16 GB of memory (or more).
- Select CPU platform to be Intel Cascade Lake (or later).
- Change the boot disk to the image created in the previous step.
- Enable Firewall for:
- Allow HTTP traffic
- Allow HTTPS traffic
5. Configure firewall to open port 80 and 443
- Go to Cloud Console.
- select the GCP project.
- Go to Navigation Menu > Compute Engine > VM instance > Set up firewall rule.
Install required software on the VM
- Install Python 3 and Python3-env:
sudo apt update
sudo apt install python3
sudo apt-get install python3-venv
- Install Android SDK
and ADB available on the path.
sudo apt install android-sdk
To install Docker and Docker-compose, see Docker and Docker-compose. Make sure you can run these as the non-root user.
- To confirm the CPU supports hardware virtualization (the command should result in a
non-zero number):
egrep -c '(vmx|svm)' /proc/cpuinfo
- Install the Kernel Virtual Machine (KVM). To install KVM, run:
sudo apt-get install qemu-kvm libvirt-daemon-system libvirt-clients bridge-utils
- To verify KVM is working:
sudo apt install cpu-checker
kvm-ok
INFO: /dev/kvm exists
KVM acceleration can be used
- To install Node.js and Node Packet Manager (NPM):
sudo apt install nodejs npm
Start the hosted containers
- To verify the installation, run the hosted Android Emulator containers from the public
repository. You can find details about the containers
here.
You can now run these containers without building them. For example:
docker run \
  -e ADBKEY="$(cat ~/.android/adbkey)" \
  --device /dev/kvm \
  --publish 8554:8554/tcp \
  --publish 5555:5555/tcp  \
  us-docker.pkg.dev/android-emulator-268719/images/30-google-x64:30.1.2
This pulls down the container (if it's not locally available) and launches it.
- When the container is launched, connect to the device by configuring ADB in the same way
as connecting an AVD on a local host. For example:
adb connect localhost:5555
adb devices
List of devices attached
localhost:5555 device
Set up the AAOS Emulator service
To set up the Emulator service:
- Install the Android Emulator Docker container script:
git clone https://github.com/google/android-emulator-container-scripts.git
cd android-emulator-container-script
source ./configure.sh
- This activates a virtual environment and makes the executable emu-docker available.
To get detailed information about its use, launch it:
emu-docker -h
- To create the Docker containers, accept the license agreements.
- Build the AAOS Emulator Docker container.
- Download an emulator build later than version 7154743. For example:
sdk-repo-linux-emulator-7154743.zip
- Download the AAOS emulator system image. For example,
sdk-repo-linux-system-images-7115454.zip:emu-docker create <emulator-zip> <system-image-zip>
- Create the Web Containers and set username and password for remote access.
./create_web_container.sh -p user1,passwd1
- Start the AAOS Emulator Web Service:
docker-compose -f js/docker/docker-compose-build.yaml -f js/docker/development.yaml up
You've successfully started an AAOS Emulator Web Service! Use the following to access it on a web browser:
https://<VM_External__IP>
Troubleshooting
If a connection error to the VM external IP occurs, make sure the VM is set up to allow both HTTP and HTTPS traffic. To validate this, see Running a basic Apache web server.
Set up the turn server
You can always use your own turn server. Provided below is an sample on a Google Cloud VM instance.
Note: To make the turn server work on a Google Cloud VM instance, be sure to configure the VM firewall rule to allow traffic on TCP and UDP ports 3478 and 3479.
- Install the coturn server:
sudo apt install coturn
systemctl stop coturn
echo "TURNSERVER_ENABLED=1"|sudo tee -a /etc/default/coturn
- Modify
/etc/turnserver.confby adding the following lines:lt-cred-mech #set your realm name realm=test #coturn username and password user=test:test123 # external-ip=<VM-Public-IP>/<VM-Private-IP> external-ip=34.193.52.134/10.128.0.2 systemctl start coturn
- Modify the Docker Compose YAML file to include the TURN configuration:
cd android-emulator-container-script
nano  js/docker/docker-compose-build.yaml
- Add the following two environment lines in the emulator section:
shm_size: 128M expose: - "8554" + environment: + - TURN=printf $SNIPPET - Restart the AAOS Emulator service with the turn configuration.
Be sure to replace the turn server IP, username, and credential below with your own:
export SNIPPET="{\"iceServers\":[{\"urls\":\"turn:35.193.52.134:3478\",\"username\":\"test\",\"credential\":\"test123\"}]}"
docker-compose -f js/docker/docker-compose-build.yaml up