

«دروازه خودرو با نرمافزار تعریفشده» (SDV) در سیستمهای «اطلاعات-سرگرمی درونخودرو» (IVI) ارتباط بین سیستمهای IVI و سرویسهای SDV ازراهدور را تسهیل میکند. دروازه به برنامههای جاوا سازنده اصلی محصول (OEM) و سرویسهای بومی، مثل لایه انتزاع سختافزار خودرو (VHAL)، اجازه میدهد با سرویسهای SDV تعامل داشته باشند. دروازه از روشهای ارتباطی تثبیتشده، ازجمله ثبت سرویس، شناسایی، و فراخوانیهای رویهای از دور (RPC) استفاده میکند.
این دروازه الزامات خاص پروژه AAOS SDV را برآورده میکند، مثلاً پیادهسازی مرجع VHAL را بااستفاده از «تونل داده SDV» برای اطلاعات دارایی فعال میکند. همچنین به برنامههای Android جاوا و Kotlin در IVI اجازه میدهد از پشته «ارتباطات SDV» استفاده کنند، بهعنوان سرویس ثبت شوند، سرویسهای SDV دیگر را پیدا کنند، و با آنها ارتباط برقرار کنند.
برای مکانهای کد «درگاه SDV» و نمونه کارخواههای «درگاه SDV»، به مکانهای کد مراجعه کنید.
مدلهای یکپارچهسازی «دروازه SDV»
استفاده از «ارتباطات SDV-IVI» ازطریق «دروازه SDV» در معماری IVI
«درگاه SDV» با برنامههای Java، سرویسهای بومی، پشته «ارتباطات SDV»، و شبکه خودرو تعامل دارد. شکل ۱ این تعاملات را نشان میدهد:
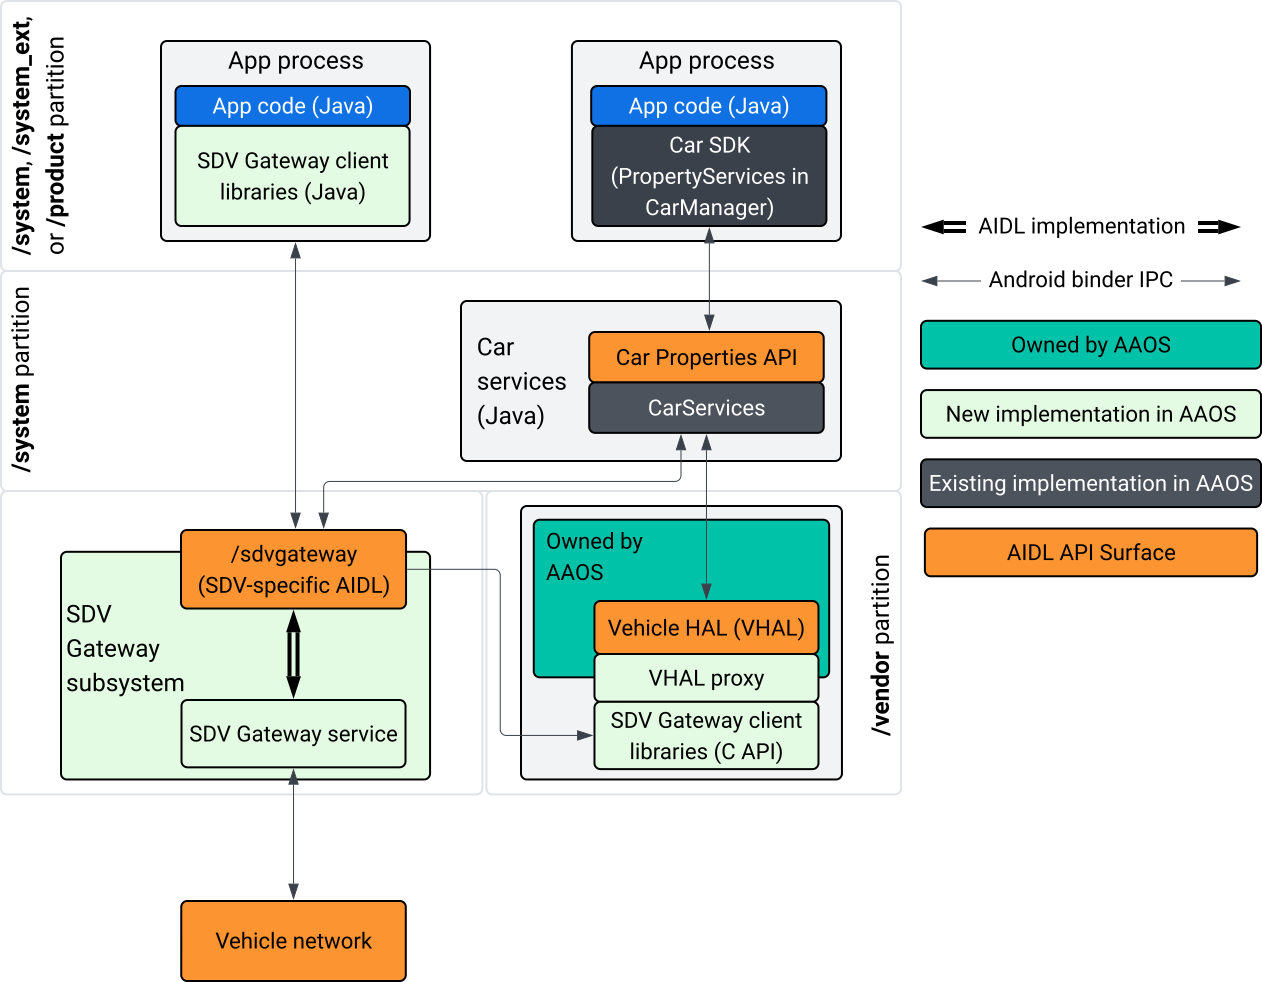
شکل ۱. تعاملهای «دروازه SDV».
در این نمودار سیستم:
- برنامهها ازطریق سرویسهای کارخواه خود با «درگاه SDV» تعامل دارند.
- «کیت توسعه نرمافزار AAOS SDV» موارد زیر را دراختیارتان قرار میدهد:
- میانای برنامهسازی کاربردی AIDL مربوط به ISdvGateway برای ارتباط بینفرایندی.
- کتابخانههای ارتباطات برای تعامل شبکه.
- میانای برنامهسازی کاربردی C راحت برای یکپارچهسازی سرویس بومی.
- میانای برنامهسازی کاربردی ISdvGateway AIDL توسط سرویس و زیرسیستم SDV Gateway پیادهسازی میشود.
- سرویس «درگاه SDV» موارد زیر را مدیریت میکند:
- کشف سرویس دوطرفه.
- ارتباط با سرویسهای SDV راه دور.
- منطق کسبوکار اصلی.
- زیرسیستم «درگاه SDV» به شبکه خودرو متصل میشود.
- سرویسهای بومی، ازجمله پیادهسازی VHAL، میتوانند مستقیماً یا ازطریق C API کیت توسعه نرمافزار از ISdvGateway AIDL API استفاده کنند.
- پراکسی VHAL بهعنوان پیادهسازی VHAL مرجع عمل میکند و یکپارچهسازی تخصیص VSIDL را دربرمیگیرد.
مدل یکپارچهسازی برای «درگاه SDV» در سرویس بومی IVI
مدل ادغام در «شکل ۲» نشان داده شده است:
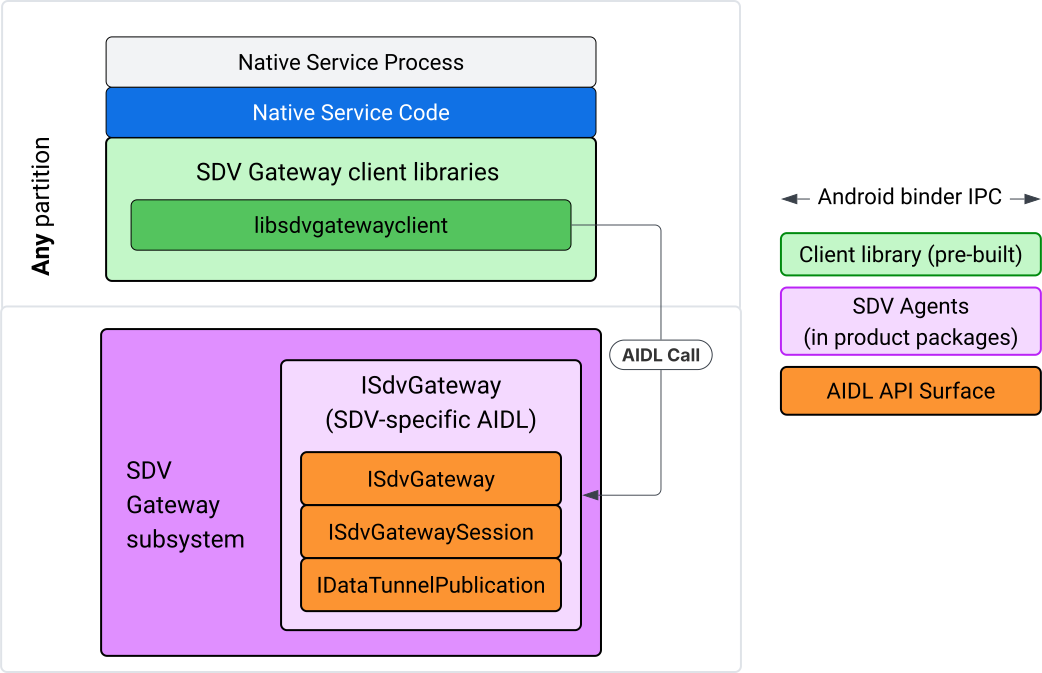
شکل ۲. مدل یکپارچهسازی «درگاه SDV».
استفاده از «درگاه SDV» در سرویس بومی IVI
شکل ۳ استفاده از «درگاه SDV» در IVI را نشان میدهد:
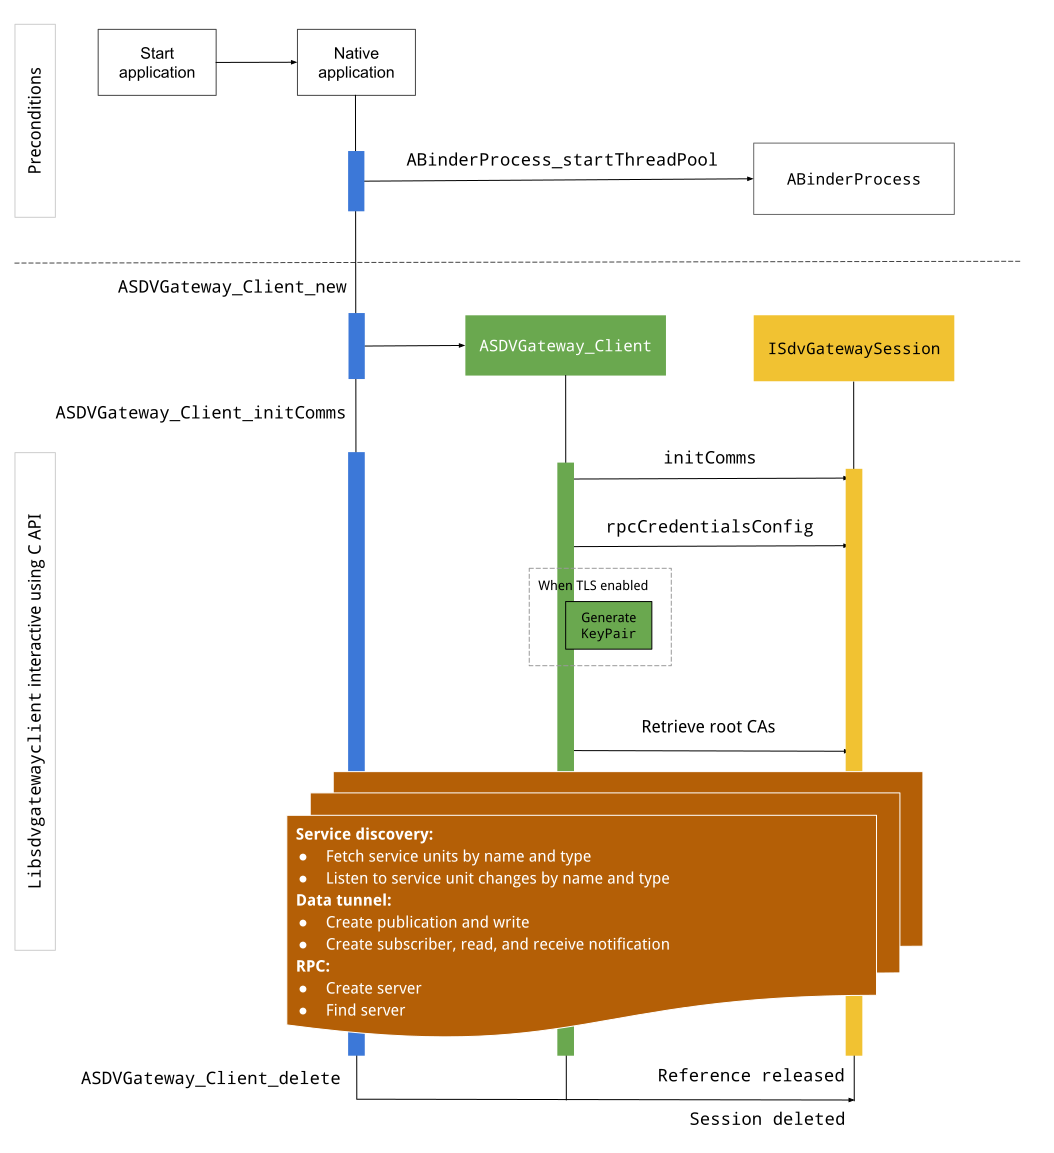
شکل ۳. درگاه SDV در IVI.
پیششرطها
شروع منبع رشته Binder:
کتابخانه کارخواه «درگاه SDV» برای دریافت بازخوانهای ناهمزمان از سرویسهای Binder به استخر رشته Binder شروعشده نیاز دارد.
وقتی استخر رشته Binder شروع نشده باشد، میانای برنامهسازی کاربردی موردنیاز برای ایجاد کارخواه «درگاه SDV» با خطا مواجه میشود.
کتابخانه مشتری «درگاه پرداخت» بومی را اضافه کنید
کتابخانه «کارخواه درگاه بومی» یک C API را آشکار میکند. نمونهای از
libsdvgatewayclient را بهعنوان وابستگی اضافه کنید تا از C API استفاده کنید:
cc_binary {
    name: "your_binary_name",
    srcs: ["main.cpp"],
    shared_libs: [
        "libsdvgatewayclient",
    ],
}
بار کردن کارخواه «درگاه پرداخت» بومی
#include "libsdvgatewayclient.h"
ایجاد نمونه کارخواه بومی
ASDVGateway_Client* client;
ASDVGateway_StatusCode_t statusCode = ASDVGateway_Client_new(
     &client, /*outStatus*/nullptr);
پساز ایجاد کارخواه، کارخواه:
وضعیت همه تعاملات بعدی با سرویس «دروازه» را حفظ میکند.
بهعنوان زمینه همه تعاملات با دیگر سرویسهای فعال SDV عمل میکند و بهعنوان اولین پارامترها به توابع C API منتقل میشود.
کدهای وضعیت و پیامهای خطا
اکثر توابع C API این تعریف را دارند:
ASDVGateway_StatusCode_t ApiFunctionName(..., ASDVGateway_Status_t* outStatus);
برای ارزیابی موفقیت، میتوانید کد وضعیت برگشتی را که از نوع ASDVGateway_StatusCode_t است بازرسی کنید. همچنین میتوانید اشارهگری را به ساختاری ارسال کنید که در آن تابع میتواند کد وضعیت و پیام خطا را تکمیل کند. اشارهگر بهعنوان آخرین پارامتر، با نام outStatus،
گذرانده میشود. مقدار تهی یعنی ساختار برونداد استفاده نمیشود.
تماسگیرنده باید ساختار وضعیت حافظه را برای پیام خطا تخصیص دهد. ساختار وضعیت میتواند هم کد وضعیت و هم پیام خطا را در خود جای دهد. مثالی از بازیابی پیام خطا هنگام ایجاد مشتری جدید دردسترس است.
برای ارزیابی موفقیت:
کد وضعیت برگشتی را که از نوع
ASDVGateway_StatusCode_tاست بازرسی کنید.اشارهگری را به ساختاری منتقل کنید که تابع بتواند کد وضعیت و پیام خطا را در آن پر کند.
- اشارهگر بهعنوان آخرین پارامتر، با نام
outStatus، ارسال میشود. - مقدار تهی یعنی از ساختار برونداد استفاده نمیشود.
- تماسگیرنده باید ساختار وضعیت حافظه را برای پیام خطا اختصاص دهد.
- ساختار وضعیت میتواند کد وضعیت و پیام خطا را در خود جای دهد.
- اشارهگر بهعنوان آخرین پارامتر، با نام
در اینجا نمونهای نشان داده شده است که نحوه بازیابی پیام خطا برای یک کارخواه جدید را نشان میدهد:
#include <iostream>
#include <array>

struct StatusWithErrorMsg : ASDVGateway_Status_t {
    StatusWithErrorMsg() {
        // Ensure the base struct pointers point to our internal buffer
        errorMessage = errorMessageBuffer.data();
        maxErrorMessageSize = errorMessageBuffer.size();

        // Good practice: Zero-initialize the buffer
        errorMessageBuffer.fill(0);
    }

    std::array<char, 256> errorMessageBuffer;
};

// --- Execution ---

ASDVGateway_Client* client = nullptr;
StatusWithErrorMsg status;

// Initialize the client
ASDVGateway_StatusCode_t statusCode = ASDVGateway_Client_new(&client, &status);

// Log Results
std::cout << "Returned statusCode:    " << statusCode << std::endl;
std::cout << "Status Struct Code:     " << status.statusCode << std::endl;
std::cout << "Status Error Message:   " << status.errorMessage << std::endl;
در این مثال:
کد وضعیت موجود در ساختار وضعیت همان مقدار کد وضعیت برگشتی را دارد.
پیام خطا فقط تا حد مجاز
maxErrorMessageSizeنویسه (شامل نویسه پایاندهنده تهی\0) تکمیل میشود. اگر خطایی رخ ندهد (کد وضعیتOKباشد)، پیام خطا رشتهای خالی است.
ارتباطات اولیه
Init comms ارتباط بین برنامه تماسگیرنده و سایر برنامهها را بااستفاده از SDV Comm Stack و SDV Gateway مقداردهی اولیه میکند. ارتباطات اولیه را میتوان در هر دو از این زمینهها فراخوانی کرد::
پساز ایجاد کارخواه.
قبلاز هرگونه تعامل «تونل داده»، «تماس از دور» (RPC)، یا «کشف سرویس».
مثالی در اینجا ارائه شده است:
ASDVGateway_InitCommsParams_t params{
.packageName = "android.sdv.samples.gateway.client",
.serviceBundleName = "NativeTestApp",
.serviceInstanceName = "default",
};
// Initialize communications and capture the status code
ASDVGateway_StatusCode_t statusCode = ASDVGateway_Client_initComms(client, ¶ms, &status);
// Recommended check
if (statusCode != ASDVGateway_StatusCode_OK) {
std::cerr << "Failed to init comms: " << status.errorMessage << std::endl;
}
کشف سرویس
میتوانید وقتی واحدهای سرویس با نوع یا نام خاصی ثبت یا لغو ثبت میشوند اعلان دریافت کنید. تابع برگشتی در رشتهای که متعلق به کارخواه دروازه است اعلام میشود. این برگشت تماس در ابتدا با همه واحدهای سرویس ثبتشده درست پساز تماس «میانای برنامهسازی کاربردی C» راهاندازی میشود. پساز راهاندازی اولیه، اعلانها با بهروزرسانیها ادامه مییابند تا زمانی که شنونده بهطور صریح ثبتنام خود را لغو کند.
class NativeSdvGatewayTestApp {
public:
    static void ServiceUnitChangeListenerCallback(
        const ASDVGateway_ServiceUnitChangeEventType eventType,
        const ASDVGateway_ServiceUnitDefinition* serviceUnitDefinition,
        void* userData
    ) {
        auto* testApp = reinterpret_cast<NativeSdvGatewayTestApp*>(userData);

        if (testApp) {
            // Logic to react when services are registered or unregistered
            // e.g., testApp->handleServiceChange(eventType, serviceUnitDefinition);
        }
    }
};

// --- Listener Registration ---

// Ensure thisApp remains in scope as long as the listener is active
NativeSdvGatewayTestApp* thisApp = get_current_app_context();

ASDVGateway_UnitType_t unitType{
    .sdvPackageName     = "android.sdv.samples.sdv_gateway",
    .serviceBundleName  = "DtPublisher",
    .unitTypeName       = "TirePressure",
};

// Register the listener
ASDVGateway_Client_registerListenerForServiceUnitChangeByType(
    client,
    &unitType,
    NativeSdvGatewayTestApp::ServiceUnitChangeListenerCallback,
    static_cast<void*>(thisApp), // userData
    &listenerHandle,
    &status
);

// --- Cleanup ---

// Unregistering stops all notification to the callback function
ASDVGateway_Client_unregisterListenerForServiceUnitChangeByType(
    client,
    listenerHandle,
    &status
);
برای بازیابی واحدهای سرویس ثبتشده بدون اعلانهای بیشتر، از
ASDVGateway_Client_fetchServiceUnitsByType و
ASDVGateway_Client_fetchServiceUnitsByName میاناهای برنامهسازی کاربردی استفاده کنید.
class NativeSdvGatewayTestApp {
public:
    /**
     * Callback triggered for each service unit found that matches the requested type.
     */
    static void FetchServiceUnitsCallback(
        const ASDVGateway_ServiceUnitDefinition* serviceUnitDefinition,
        void* userData
    ) {
        auto* app = reinterpret_cast<NativeSdvGatewayTestApp*>(userData);

        if (serviceUnitDefinition) {
            // The service unit is registered with service discovery.
            // Example: processServiceUnit(serviceUnitDefinition);
        }
    }
};

// --- Execution ---

ASDVGateway_UnitType_t unitType{
    .sdvPackageName     = "android.sdv.samples.sdv_gateway",
    .serviceBundleName  = "DtPublisher",
    .unitTypeName       = "TirePressure",
};

// Context used to differentiate between various fetchServiceUnits calls
void* userData = static_cast<void*>(thisApp);

ASDVGateway_Client_fetchServiceUnitsByType(
    client,
    &unitType,
    NativeSdvGatewayTestApp::FetchServiceUnitsCallback,
    userData,
    &status
);
این برگشت همزمان در رشته تماسگیرنده درطول
فراخوانی API ASDVGateway_Client_fetchServiceUnitsByType راهاندازی میشود. از
ASDVGateway_Client_fetchServiceUnitsByName برای دریافت واحدهای سرویس ثبتشده
براساس نام بهجای نوع واحد استفاده کنید:
ASDVGateway_StatusCode_t ASDVGateway_Client_fetchServiceUnitsByName(
    // [in]  Opaque pointer to a client object.
    const ASDVGateway_Client* client,

    // [in]  Pointer to a structure containing the package name,
    //       service bundle name, and service unit name.
    const ASDVGateway_UnitNameDiscoveryArgs_t* unitName,

    // [in]  Callback function to be called for each service unit
    //       definition registered. Called synchronously in the
    //       caller's thread before the fetch completes.
    ASDVGateway_FetchServiceUnitsCallback callback,

    // [in]  Optional value passed back as a parameter of the callback.
    void* userData,

    // [out] Optional pointer to status structure for result
    //       codes and error messages.
    ASDVGateway_Status_t* outStatus
);
جریان RPC
کتابخانه مشتری «درگاه» تنظیمات «امنیت لایه انتقال» (TLS) را برای ارتباط با دیگر برنامههای فعالشده با SDV مدیریت میکند. بهطور خاص، تنظیمات TLS موردنیاز برای ارتباط را بازیابی میکند. نحوه تعیین استفاده از TLS به این صورت است:
وقتی «حالت راهاندازی SDV» روی
LOCKEDتنظیم شده باشد، از TLS استفاده میشود.وقتی «حالت راهاندازی SDV» روی
UNLOCKEDتنظیم شده باشد، از ارتباط ناامن استفاده میشود. وقتی از TLS استفاده میشود، کتابخانه کارخواه «دروازه» جفت کلیدی تولید میکند که فقط فرایند برنامه از آن مطلع است. کارخواه اعتبارنامههای RPC را برای ایجاد کانال کارخواه RPC یا سرور RPC بازیابی میکند. RPC از یک SDV-RPC VLAN اختصاصی استفاده میکند. کتابخانه مشتری «دروازه» برای تغییر شبکه پیشفرض فرایند به VLAN «تماس از دور امن» درطول یا بعداز تماسASDVGateway_Client_initComms، تابع android_setprocnetwork را فرا میخواند.
دردسترس بودن RPC
کارخواهی که پیکربندی شده است تا در زمان راهاندازی اولیه شروع شود ممکن است قبلاز دردسترس قرار گرفتن SDV-RPC VLAN شروع شود. قبلاز تلاش برای ایجاد هرگونه سوکت کارخواه RPC یا سرور RPC، بررسی کنید که RPC دردسترس باشد:
// Check if the RPC (Remote Procedure Call) service is available
bool isRpcAvailable = ASDVGateway_Client_isRpcAvailable(client);

if (isRpcAvailable) {
    // Proceed with RPC calls
} else {
    // Handle the case where RPC is not yet ready or available
}
یا
// Check if the process is correctly bound to the SDV RPC Network Interface/VLAN
bool isRpcNetworkBound = ASDVGateway_Client_isProcessBoundToSdvRpcNetworkInterface(client);

if (!isRpcNetworkBound) {
    // Usually implies the process isn't running on the correct network interface
    // or the VLAN configuration is missing.
    std::cerr << "Warning: Process is not bound to the SDV RPC VLAN." << std::endl;
}
بااستفاده از
ASDVGateway_Client_setClientNotificationCallback شنوندهای برای رویدادهای مشتری تنظیم کنید تا وقتی وضعیت دردسترس بودن RPC تغییر میکند مطلع شوید.
اگر برنامه شبکه فرایند را تغییر دهد، ASDVGateway_Client_isProcessBoundToSdvRpcNetworkInterface ترجیح داده میشود زیرا هم دردسترس بودن RPC و هم اینکه فرایند به SDV-RPC VLAN متصل است را بررسی میکند.
تغییر شبکه پیشفرض فرایند
برای باز کردن سوکتها برای اتصالات اینترنتی، ممکن است لازم باشد شبکه پیشفرض فرایند را از SDV-RPC VLAN به شبکه دیگری تغییر دهید. برای لغو اتصال و اتصال مجدد فرایند به SDV-RPC VLAN، با
ASDVGateway_Client_unbindProcessFromSdvRpcNetworkInterface و
ASDVGateway_Client_bindProcessToSdvRpcNetworkInterface تماس بگیرید. این دو فراخوانی مانند کلیدهای سراسری عمل میکنند و رابط شبکه را که سوکتها به آن متصل هستند برای همه رشتههای فرایند تغییر میدهند.
// 1. Unbind: Sockets return to the "default" network interface (e.g., wlan0, eth0)
ASDVGateway_StatusCode_t unbindStatus =
    ASDVGateway_Client_unbindProcessFromSdvRpcNetworkInterface(client, &status);

// 2. Bind: Sockets are now bound to the dedicated SDV-RPC VLAN
ASDVGateway_StatusCode_t bindStatus =
    ASDVGateway_Client_bindProcessToSdvRpcNetworkInterface(client, &status);

// Validation
if (bindStatus == ASDVGateway_StatusCode_OK) {
    // Sockets are successfully bound to the SDV-RPC VLAN
}
اعلانهای RPC
شنونده کارخواه را تنظیم کنید تا اعلانهای مربوط به تغییرات در دسترس بودن RPC و بهروزرسانیهای گواهینامههای ریشه را که باید توسط سرور RPC پذیرفته شوند دریافت کند:
class NativeSdvGatewayTestApp {
public:
    static void ClientNotificationCallback(
        ASDVGateway_ClientNotificationType_t notificationType,
        void* userData
    ) {
        auto* testApp = reinterpret_cast<NativeSdvGatewayTestApp*>(userData);
        if (!testApp) return;

        switch (notificationType) {
            case ASDVGateway_ClientNotificationType_RootCertsChanged:
                std::cout << "onClientNotification: Root Certs Changed" << std::endl;
                // Handle certificate rotation logic here
                break;

            case ASDVGateway_ClientNotificationType_RpcAvailabilityChanged:
                std::cout << "onClientNotification: RPC Availability Changed" << std::endl;
                // Handle reconnection or UI updates here
                break;

            default:
                std::cout << "onClientNotification: Received Unknown Notification ("
                          << notificationType << ")" << std::endl;
                break;
        }
    }
};

// --- Registration ---

NativeSdvGatewayTestApp* thisApp = get_current_app_context();

// Register the notification callback to monitor system-level changes
ASDVGateway_StatusCode_t statusCode = ASDVGateway_Client_setClientNotificationCallback(
    client,
    NativeSdvGatewayTestApp::ClientNotificationCallback,
    static_cast<void*>(thisApp), // userData
    &status
);
جریان سرور RPC
برای ایجاد سرور RPC باید از اطلاعات اعتباری استفاده کنید:
ASDVGateway_RpcCredentials_t* rpcCredentials = nullptr;

// Retrieve the credentials from the client
ASDVGateway_StatusCode_t statusCode = ASDVGateway_Client_rpcCredentials(client, &rpcCredentials, &status);

// Validation: Differentiating between an error and a deliberate "insecure mode"
if (status.statusCode != ASDVGateway_StatusCode_OK) {
    std::cerr << "Error retrieving credentials: " << status.errorMessage << std::endl;
    return;
}

// Logic for choosing Security Credentials
if (rpcCredentials == nullptr) {
    // If the call succeeded but credentials are null, the system expects insecure communication
    std::cout << "Configuring for Insecure Mode" << std::endl;
} else {
    std::cout << "Configuring for Secure Mode:" << std::endl;
    std::cout << "  Private Key: " << (rpcCredentials->privateKeyPem ? "Present" : "Missing") << std::endl;
    std::cout << "  RootCerts:   " << rpcCredentials->rootCertsPem << std::endl;
    std::cout << "  CertChain:   " << rpcCredentials->certChainPem << std::endl;
    std::cout << "  SAN:         " << rpcCredentials->subjectAlternativeName << std::endl;
}

// --- Cleanup ---

// Release the memory once the RPC server/client is initialized
if (rpcCredentials != nullptr) {
    ASDVGateway_Client_deleteRpcCredentials(client, rpcCredentials);
}
وقتی سرور RPC را ایجاد کردید و درگاه شنود آن مشخص شد، سرور RPC را ثبت کنید تا بتواند برنامههای دیگر را پیدا کند:
ASDVGateway_RegisterRpcServerParams_t params{
.serviceUnitName = "android-sdv-samples-sunroof-sunroof",
.unitType = ASDVGateway_UnitType_t{
.sdvPackageName = "android.sdv.samples.sunroof",
.serviceBundleName = "SunroofServer",
.unitTypeName = "Sunroof",
},
.listeningPort = listeningPort,
.serverUnitMetadata = ASDVGateway_ServerUnitMetadata_t{
.version = 1,
},
};
// Register the RPC server with the SDV Gateway
ASDVGateway_StatusCode_t statusCode = ASDVGateway_Client_registerRpcServer(
client,
¶ms,
&status
);
// Basic error handling
if (statusCode != ASDVGateway_StatusCode_OK) {
std::cerr << "Failed to register RPC server: " << status.errorMessage << std::endl;
}
وقتی سیستم گواهینامههای ریشه را در زمان اجرا بهروزرسانی میکند (برای مثال، درطول تغییرات وضعیت ماشین مجازی)، سرورهای RPC باید فهرست گواهینامههای پذیرفتهشده خود را بازآوری کنند:
بااستفاده از
ASDVGateway_Client_setClientNotificationCallbackشنوندهای برای رویدادهای کارخواه تنظیم کنید تا وقتی گواهینامههای ریشه بهروزرسانی شد مطلع شوید.برای دریافت گواهینامههای ریشه بهروزشده، با
ASDVGateway_Client_rpcCredentialsتماس بگیرید.
جریان کارخواه RPC
جریان برای کارخواه RPC در اینجا آمده است:
ASDVGateway_FindRpcServerByNameParams_t params{
.packageName = "android.sdv.samples.cluster",
.serviceBundleName = "ClusterServer",
.serviceUnitName = "android-sdv-samples-cluster-cluster",
};
ASDVGateway_SocketAddress_t socketAddress;
ASDVGateway_RpcCredentials_t* rpcCredentials = nullptr;
// Perform the lookup to find the server's location and security requirements
ASDVGateway_StatusCode_t statusCode = ASDVGateway_Client_findRpcServerByName(
mClient,
¶ms,
&socketAddress,
&rpcCredentials,
&status
);
// Mandatory check: Distinguish between system errors and intentional "Insecure Mode"
if (status.statusCode != ASDVGateway_StatusCode_OK) {
std::cerr << "Failed to find RPC server: " << status.errorMessage << std::endl;
return;
}
// Logic for establishing the RPC channel
if (rpcCredentials == nullptr) {
std::cout << "Connecting via Insecure Mode to "
<< socketAddress.address << ":" << socketAddress.port << std::endl;
} else {
std::cout << "Connecting via Secure Mode to "
<< socketAddress.address << ":" << socketAddress.port << std::endl;
std::cout << " RootCerts: " << rpcCredentials->rootCertsPem << std::endl;
std::cout << " SAN: " << rpcCredentials->subjectAlternativeName << std::endl;
// Note: privateKeyPem and certChainPem are typically used if the client
// needs to perform mutual TLS (mTLS).
}
// Cleanup: Release the credential memory once the RPC channel is established
if (rpcCredentials != nullptr) {
ASDVGateway_Client_deleteRpcCredentials(client, rpcCredentials);
}
ایجاد ناشر و انتشار پیام
از ASDVGateway_Client_createPublication API برای ثبت واحد خدمات ناشر در «درگاه SDV» ازطریق میانای AIDL آن و ایجاد «صف پیام سریع» (FMQ) در فرایند برنامه استفاده میشود. Binder فقط برای راهاندازی FMQ دخیل است، نه برای نوشتن پیامها. سپس از ASDVGateway_Client_publishMessages API
برای انتشار پیامها در نشریه ایجادشده استفاده میشود. این کار شامل نوشتن در FMQ نشریه و اطلاعرسانی درباره نوشته شدن پیامها است.
ASDVGateway_CreatePublicationParams_t params{
.serviceUnitName = "mirror-position-adjust-impl-1",
.unitType = ASDVGateway_UnitType_t{
.sdvPackageName = "android.sdv.samples.sdv_gateway",
.serviceBundleName = "DtPublisher",
.unitTypeName = "MirrorPositionAdjust",
},
.publisherUnitMetadata = ASDVGateway_PublisherUnitMetadata_t{
.version = 1,
.messageSizeBytes = 64,
.messageCount = 16,
},
};
ASDVGateway_PublicationMetadata_t metadata;
// 1. Create the Publication (allocates resources on the gateway)
ASDVGateway_StatusCode_t createStatus = ASDVGateway_Client_createPublication(
client,
¶ms,
&metadata,
&status
);
if (status.statusCode != ASDVGateway_StatusCode_OK) {
std::cerr << "Failed to create publication: " << status.errorMessage << std::endl;
return;
}
// 2. Publish Messages
// Note: serializedMessage should contain your encoded protobuf data
std::vector<uint8_t> serializedMessage;
ASDVGateway_Client_publishMessages(
client,
serializedMessage.data(),
serializedMessage.size(),
metadata.publicationId,
&status
);
ایجاد مشترک با شنونده اعلان
برای مشترک شدن در نشریه و دریافت اعلانهای «تونل داده» (مثل دردسترس بودن پیام)، از ASDVGateway_Client_subscribeToPublicationByName
API استفاده کنید. این API همچنین FMQ را برای خواندن پیامهای منتشرشده تنظیم میکند. میتوانید
بازخوانی اعلان را هم درطول فرایند اشتراک و هم
پساز آن پیکربندی کنید.
#include <map>
#include <memory>
#include <iostream>

class NativeSdvGatewayTestApp {
public:
    struct SubscriptionContext {
        int32_t subscriptionId;
        std::string topicName;
        // Add other context-specific data here (e.g., counters, buffers)
    };

    /**
     * Callback triggered when new data is published to a subscribed topic.
     */
    static void SubscriptionNotificationCallback(
        const ASDVGateway_SubscriptionNotificationData_t* notification,
        void* userData
    ) {
        // The SDV Gateway client passes back the userData pointer.
        // We ensure validity by managing the lifecycle of SubscriptionContext
        // within the mSubscriptions map.
        auto* ctx = reinterpret_cast<SubscriptionContext*>(userData);

        if (ctx && notification) {
            // React to data being available for the subscription.
            // Example: handleIncomingData(notification->data, notification->size);
            std::cout << "Notification received for sub ID: " << ctx->subscriptionId << std::endl;
        }
    }

private:
    // Maps subscription handles/IDs to their respective contexts
    std::map<int32_t, std::unique_ptr<SubscriptionContext>> mSubscriptions;
};

// --- Usage ---
NativeSdvGatewayTestApp app;
هنگام مشترک شدن، میتوانید گزینههای اضافی را در کنار نام واحد خدمات ناشر مشخص کنید. این گزینهها به شما امکان میدهند جدیدترین پیام منتشرشده را قبلاز مشترک شدن بازیابی کنید و حداقل فاصله زمانی بین اعلانها را تعریف کنید.
ASDVGateway_SubscribeToPublicationByNameParams_t params{
.sdvVmName = "vm1",
.packageName = "test.package.impl.name",
.serviceBundleName = "TestBundleImpl",
.serviceUnitName = "GrpcServerImpl",
};
ASDVGateway_Subscriber_Options_t options{
// Ensure we receive the most recent message immediately upon subscribing
.flags = ASDVGATEWAY_SUBSCRIBER_OPTIONS_FLAG_FETCHLASTMESSAGE,
.minIntervalMs = 0, // No rate limiting; receive updates as they happen
};
// 1. Prepare the context for the callback
auto subCtx = std::make_unique<SubscriptionContext>();
ASDVGateway_PublicationMetadata_t metadata{};
// 2. Perform the subscription
ASDVGateway_StatusCode_t statusCode = ASDVGateway_Client_subscribeToPublicationByName(
client,
¶ms,
&options,
NativeSdvGatewayTestApp::SubscriptionNotificationCallback,
static_cast<void*>(subCtx.get()), // Pass the raw pointer as userData
&metadata,
&status
);
// 3. Validation and Lifecycle Management
if (status.statusCode != ASDVGateway_StatusCode_OK) {
// Error handling: subCtx will be automatically deleted here
std::cerr << "Subscription failed: " << status.errorMessage << std::endl;
return;
}
// Store the context using the publicationId as the key.
// Once moved, the map owns the lifetime of subCtx.
app.mSubscriptions.emplace(metadata.publicationId, std::move(subCtx));
از میانای برنامهسازی کاربردی ASDVGateway_Client_readAvailableMessages برای خواندن پیامهای
نشریه استفاده کنید:
uint32_t messagesAvailable = 0;

// 1. Check how many messages are waiting in the queue
ASDVGateway_StatusCode_t availStatus = ASDVGateway_Client_availableToRead(
    client,
    metadata.publicationId,
    &messagesAvailable,
    &status
);

if (status.statusCode != ASDVGateway_StatusCode_OK) {
    // Error handling for availability check
    return;
}

if (messagesAvailable == 0) {
    // No messages available for this publication at this time
    return;
}

// 2. Prepare the buffer
// metadata.messageSizeBytes was provided during the publication/subscription setup
std::vector<uint8_t> bytesForMessages;
bytesForMessages.resize(metadata.messageSizeBytes * messagesAvailable);

// 3. Read the messages from the Gateway into your local buffer
uint32_t actualMessageCount = 0; // Filled by the SDK with the number of messages read
ASDVGateway_StatusCode_t readStatus = ASDVGateway_Client_readAvailableMessages(
    client,
    metadata.publicationId,
    bytesForMessages.data(),
    bytesForMessages.size(),
    &actualMessageCount,
    &status
);

if (status.statusCode == ASDVGateway_StatusCode_OK) {
    // Successfully read 'actualMessageCount' messages
    // Process bytesForMessages...
}
برای تنظیم کردن تماس برگشتی پساز مشترک شدن، از
ASDVGateway_Client_setNotificationCallbackForPublicationId API استفاده کنید:
ASDVGateway_StatusCode_t ASDVGateway_Client_setNotificationCallbackForPublicationId(
    // [in]  Opaque pointer to the client object.
    const ASDVGateway_Client* client,

    // [in]  Identifies the specific publication to monitor.
    const int32_t publicationId,

    // [in]  Function pointer triggered when new data is available
    //       for the specified publication.
    ASDVGateway_SubscriptionNotificationCallback notificationCallback,

    // [in]  Optional user-defined context passed back to the callback.
    void* notificationCallbackUserData,

    // [out] Optional pointer to a status structure for result codes
    //       and error messages.
    ASDVGateway_Status_t* outStatus
);
راهاندازی سرویس init
ابتدا، هویت برای سرویسهای بومی را برای اختصاص دادن هویت سرویس به سرویس ازطریق شناسه Android (AID) آن دنبال کنید.
فرض کنید سرویس شما native_sdv_gateway_client_service نام دارد،
فایل اجرایی در پارتیشن /vendor در
/vendor/bin/native_sdv_gateway_client_service قرار دارد، و از
vendor_gateway_client بهعنوان شناسه Android (AID) برای اجرای سرویس استفاده میکنید.
با آن راهاندازی، میتوانید خدمات اولیه زیر را تعریف کنید:
service native_sdv_gateway_client_service /vendor/bin/native_sdv_gateway_client_service
    class core
    user vendor_gateway_client
    group inet
    disabled
    oneshot
این پیکربندی از پارامترهای زیر استفاده میکند:
-
vendor_gateway_clientشناسه برنامه ایجادشده یا انتخابشده برای سرویس است. -
group inetبرای کارخواههای دروازه SDV برای استفاده از رابط شبکه برای ارتباط بین ماشینهای مجازی SDV لازم است. گروههای دیگر را میتوانید درصورت نیاز اضافه کنید. - این مثال از
disabledوoneshotاستفاده میکند. ممکن است لازم باشد گزینههای خدمات را برای سرویس خودتان تنظیم کنید. سرویس را پسازsdv_gatewayشروع کنید.
ایجاد قوانین SELinux برای سرویس
برای استفاده از «میاناهای برنامهسازی کاربردی دروازه SDV»، به قوانین SELinux زیر برای سرویس نیاز دارید:
# Define the domain for the service
type native_sdv_gateway_client_service, domain;

# Define the executable file type on the vendor partition
type native_sdv_gateway_client_service_exec, exec_type, file_type, vendor_file_type;

# Macro to transition from 'init' to this service's domain upon execution
init_daemon_domain(native_sdv_gateway_client_service)

# Macro to grant the necessary permissions to communicate with the SDV Gateway
sdv_gateway_client_domain(native_sdv_gateway_client_service)
در قوانین SELinux:
init_daemon_domainاجازه میدهد سرویس ازinitشروع شود.
sdv_gateway_client_domainهمه اجازههای SELinux لازم را برای تعامل با «درگاه SDV» ارائه میدهد. خط زیر این قوانین را به فایل اجرایی اعطا میکند:/vendor/bin/native_sdv_gateway_client_service u:object_r:native_sdv_gateway_client_service_exec:s0
نمونه کد
برای کسب اطلاعات بیشتر درباره اجرای نمونه کد بومی که نحوه مستندسازی C
APIs را نشان میدهد، به
system/software_defined_vehicle/samples/sdv_gateway/NativeSdvGatewayTestApp/README.md مراجعه کنید.
دروازه SDV در برنامه IVI Java
مدل تعامل برای «درگاه SDV» در IVI در این نمودار نشان داده شده است:
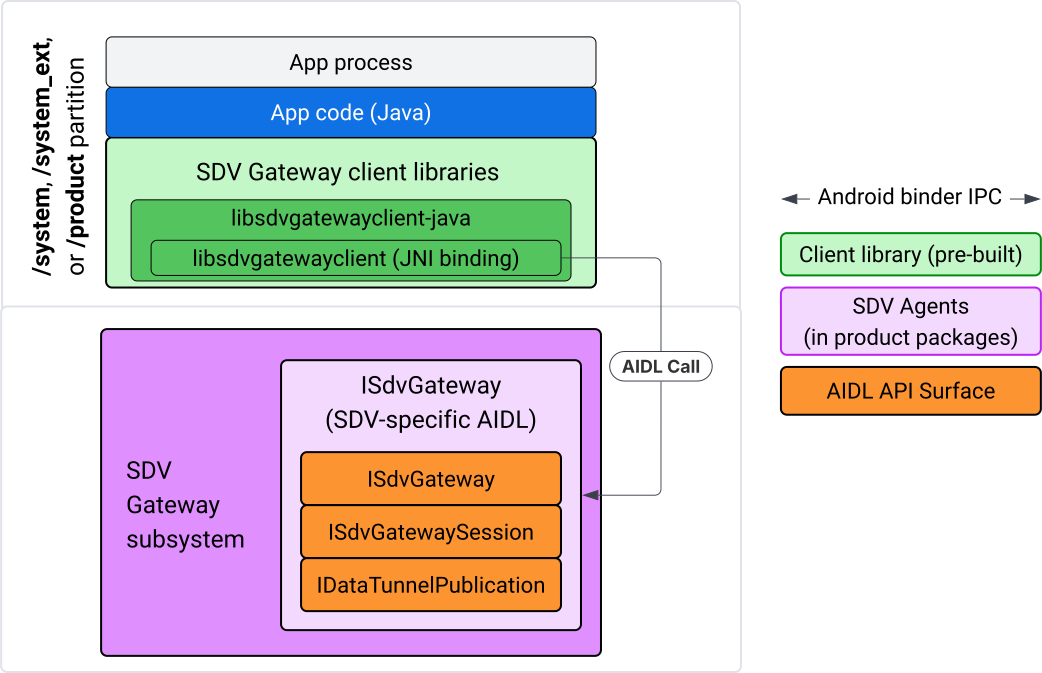
شکل ۴. درگاه SDV در برنامه Java IVI.
بهطور دقیق، مدل:
- همه تماسها را به لایه JNI ارسال میکند.
- میانای برنامهسازی کاربردی Java و C را بههم میچسباند.
- تعاملات AIDL با
ISdvGatewayرا تعریف میکند:- ارتباطات اولیه
- سرور RPC را پیدا یا ایجاد کنید
- ایجاد pub/sub
- انجام تعاملهای «تونل داده» کشف سرویس
- دریافت اعلان (برای مثال، دردسترس بودن دادهها)
- خواندن و نوشتن پیامها (FMQ برای pub/sub) برای ایجاد جفت کلید و گواهینامهها برای «امنیت لایه انتقال»
کتابخانههای کارخواه «دروازه» را اضافه کنید
کتابخانه جاوا و بستهبندی JNI برای libsdvgatewayclient C API در APEX در هدف IVI نصب شده است. وابستگی زمان گردآوری را به
کتابخانه Java، کتابخانه Java که باید در زمان اجرا استفاده شود، و
APEX موردنیاز حاوی کتابخانه Java اضافه کنید.
android_app {
    name: "YourAppName",
    // ...
    static_libs: [
        "libsdvgatewayclient-java",
    ],
    libs: [
        "libsdvgatewayclient-java-sdk.stubs",
    ],
    uses_libs: [
        "libsdvgatewayclient-java-sdk",
    ],
    required: [
        "com.sdv.google.gateway.client",
    ],
    // ...
}
در مورد برنامه غیر دستهبندیشدهای که خارج از درخت SDV ساخته شده است، فرایند مشابه است:
جایبان کتابخانه Java تولیدشده و JAR پشتیبانیکننده برای RPC را در پوشه libs برنامه کپی کنید. برای جزئیات، به
system/software_defined_vehicle/sdv_gateway/libsdvgatewayclient_apex/README.mdمراجعه کنید.فایل JAR چسبها را بهعنوان وابستگی فقط کامپایل اضافه کنید. برای مثال، با افزودن ورودی
compileOnlyبه بخشdependencies، پیکربندیهای Gradle را بهروز کنید تا به کُندهها وابسته باشد:dependencies { // The library supporting functions for SDK RPC. // Statically linked into the app APK. implementation(files("libs/libsdvgatewayclient-java.jar")) // Stub of the SDV-Gateway client library. // Used only for compilation; the real implementation is provided // by the com.sdv.google.gateway.client APEX at runtime. compileOnly(files("libs/libsdvgatewayclient-java-sdk.jar")) }کتابخانه Java را به بخش برنامه فایل
AndroidManifest.xmlاضافه کنید.<manifest xmlns:android="http://schemas.android.com/apk/res/android"> <application> <!-- Declares that this app requires the SDV Gateway client library. The 'android:required="true"' attribute ensures the app won't install/run if the library is missing from the system. --> <uses-library android:name="libsdvgatewayclient-java-sdk" android:required="true" /> </application> </manifest>
بار کردن کتابخانهها
ایجاد شیء SdvGatewayClient (ارائهشده توسط کتابخانه مشتری):
import google.sdv.gateway.client.SdvGatewayClient;

// --- Inside your Activity, Service, or ViewModel ---

// Initialize the SDV Gateway Client
SdvGatewayClient gatewayClient = new SdvGatewayClient();
ارتباطات اولیه
بااستفاده از نام برنامه بهعنوان نام بسته سرویس، با initComms() تماس بگیرید:
// Define a unique name for your service bundle (usually constant)
private static final String SERVICE_BUNDLE_NAME = "MySdvServiceBundle";

// ... inside an Activity or Service context ...

try {
    // Initialize communications with the SDV Gateway
    // context.getPackageName() provides "android.sdv.samples.gateway.client" or similar
    gatewayClient.initComms(context.getPackageName(), SERVICE_BUNDLE_NAME);

    Log.i("SDV_GATEWAY", "Communications initialized successfully");
} catch (Exception e) {
    // Unlike the C API which uses status codes,
    // the Java SDK often throws exceptions for initialization failures.
    Log.e("SDV_GATEWAY", "Failed to initialize communications", e);
}
کشف سرویس
«میانای برنامهسازی کاربردی Java» شامل روشهایی برای موارد زیر است:
وقتی واحدهای خدمات با نوع واحد خاصی (یا بهطور متناوب نام خاصی) ثبت یا لغو ثبت میشوند، اعلان دریافت کنید.
واحدهای خدمات فعلی را با نوع واحد خاصی فهرست کنید (یا بهطور جایگزین نام نوع واحد خدمات خاصی را مطابقت دهید). برای دریافت اعلان درباره تغییرات واحد سرویس، شنوندهای ایجاد کنید:
import google.sdv.gateway.client.ServiceUnitChangeListener;
import google.sdv.gateway.client.ServiceUnitChangeEventType;
import google.sdv.gateway.client.ServiceUnitDefinition;

// --- Implementation ---

ServiceUnitChangeListener listener = new ServiceUnitChangeListener() {
    @Override
    public void onServiceUnitChanged(
        ServiceUnitChangeEventType eventType,
        ServiceUnitDefinition serviceUnitDefinition
    ) {
        // This is triggered when services matching your criteria
        // are registered or unregistered on the vehicle network.
        if (eventType == ServiceUnitChangeEventType.REGISTERED) {
            // Handle new service discovery
        } else if (eventType == ServiceUnitChangeEventType.UNREGISTERED) {
            // Handle service removal
        }
    }
};
روش addListenerForServiceUnitChangeByName Java شنونده را مطلع میکند:
// 1. Register the listener for a specific service unit by name
AutoCloseable handle = gatewayClient.addListenerForServiceUnitChangeByName(
    new UnitNameDiscoveryArgs(
        "",                                   // sdvVmName (empty for local/auto-discovery)
        "android.sdv.samples.cluster",        // sdvPackageName
        "ClusterServer",                      // serviceBundleName
        "android-sdv-samples-cluster-cluster" // serviceUnitName
    ),
    listener
);

// --- Later in the application lifecycle ---

// 2. To stop receiving notifications and clean up resources, close the handle.
try {
    if (handle != null) {
        handle.close();
    }
} catch (Exception e) {
    Log.e("SDV_GATEWAY", "Error while closing the listener handle", e);
}
یا از روش addListenerForServiceUnitChangeByType جاوا برای
اعلام کردن به شنونده هنگام ثبت یا لغو ثبت سرویسهای دارای نوع واحد مشخصشده استفاده کنید:
// 1. Register a listener based on the Service Unit Type
AutoCloseable handle = gatewayClient.addListenerForServiceUnitChangeByType(
    new UnitType(
        "com.android.testapp.sdvcarmonitor", // sdvPackageName
        "SunroofRpcServer",                  // serviceBundleName
        "Sunroof"                            // unitTypeName
    ),
    listener
);

// --- Execution Loop / Lifecycle ---

// 2. To stop receiving notifications and clean up memory, close the handle.
// This effectively unregisters the listener from the SDV Gateway.
try {
    if (handle != null) {
        handle.close();
    }
} catch (Exception e) {
    Log.e("SDV_GATEWAY", "Failed to close the service unit listener handle", e);
}
برای addListenerForServiceUnitChangeByName و
addListenerForServiceUnitChangeByType، پساز اضافه شدن، شنونده از همه واحدهای سرویس ثبتشده مطلع میشود. برای دریافت فقط واحدهای خدمات ثبتشده
براساس نام یا نوع، از listServiceUnitsByName و listServiceUnitsByType
میاناهای برنامهسازی کاربردی Java استفاده کنید:
import google.sdv.gateway.client.ServiceUnitDefinition;
import google.sdv.gateway.client.UnitNameDiscoveryArgs;
import google.sdv.gateway.client.UnitType;

// --- 1. Synchronous Lookup by Specific Name ---
ServiceUnitDefinition[] definitionsByName = gatewayClient.listServiceUnitsByName(
    new UnitNameDiscoveryArgs(
        "",                                   // sdvVmName
        "android.sdv.samples.cluster",        // sdvPackageName
        "ClusterServer",                      // serviceBundleName
        "android-sdv-samples-cluster-cluster" // serviceUnitName
    )
);

// --- 2. Synchronous Lookup by Service Type ---
ServiceUnitDefinition[] definitionsByType = gatewayClient.listServiceUnitsByType(
    new UnitType(
        "com.android.testapp.sdvcarmonitor", // sdvPackageName
        "SunroofRpcServer",                  // serviceBundleName
        "Sunroof"                            // unitTypeName
    )
);

// Example processing
if (definitionsByType.length > 0) {
    ServiceUnitDefinition firstSunroof = definitionsByType[0];
    // Proceed to connect...
}
جریان سرور RPC
کاربران «درگاه SDV» در سیستمهای IVI از «فراخوانی رویهای از دور Google» (gRPC)
برای ارتباط با سرویسهای SDV استفاده میکنند. این تعاملات به تعریفهای proto
از کاتالوگ VSIDL متکی هستند که با تعریفهای
استفادهشده در SDV Core یکسان یا مشابه هستند. برای برنامههای Java، پیادهسازی انتخابی gRPC-Java است. تعریف نمونه پروتکل سرور، sunroof.proto، برای سرور برنامه ارائه شده است.
service Sunroof {
    /**
     * Retrieves the current state of the sunroof (e.g., position, tilt, status).
     *
     * @param .google.protobuf.Empty - No input parameters required.
     * @return SunroofStateResponse - The current telemetry data for the sunroof.
     */
    rpc GetSunroofState(.google.protobuf.Empty) returns (SunroofStateResponse) {}
}
دربرابر کتابخانه پروتو مربوطه پیوند دهید و سرویس را تعریف کنید:
import com.android.sdv.sdvgrpclibrary.SunroofGrpc;
import com.android.sdv.sdvgrpclibrary.SunroofStateResponse; // Assuming this is the generated class
import com.google.protobuf.Empty;
import io.grpc.stub.StreamObserver;

/**
 * Implementation of the Sunroof gRPC service.
 * This class handles the logic for the RPCs defined in your .proto file.
 */
static class SunroofGrpcImpl extends SunroofGrpc.SunroofImplBase {

    @Override
    public void getSunroofState(Empty request, StreamObserver<SunroofStateResponse> responseObserver) {
        // 1. Fetch current sunroof data (e.g., from a Hardware Abstraction Layer)
        int currentPosition = 50; // Example value: 50% open

        // 2. Build the Protobuf response message
        SunroofStateResponse response = SunroofStateResponse.newBuilder()
                .setPercentageOpen(currentPosition)
                .build();

        // 3. Send the response to the client using the observer
        responseObserver.onNext(response);

        // 4. Close the stream to signal that the RPC is finished
        responseObserver.onCompleted();
    }
}
سرور gRPC را با اعتبارنامههای کانال ایمن و غیرایمن ثبت کنید:
// 1. Define the type signature for the service
UnitType unitType = new UnitType(
    "com.android.testapp.sdvcarmonitor", // sdvPackageName
    "SunroofRpcServer",                  // serviceBundleName
    "Sunroof"                            // typeName (Unit Type)
);

// 2. Register the RPC server with the Gateway
// The gateway creates a mapping between the ServiceUnitName and your implementation.
server = gatewayClient.registerRpcServer(
    "SunroofRpcServerImpl-1",                       // serviceUnitName (Unique instance name)
    unitType,                                       // unitType defined earlier
    "SUNROOF_GRPC_SERVER_VALUE_HOLDER".getBytes(),  // appMetadataValueHolder (Static discovery data)
    1,                                              // appMetadataVersion
    new SunroofGrpcImpl()                           // The actual gRPC service implementation
);
در داخل، کتابخانه کارخواه شیء سرور gRPC،
SdvGatewayClient.java، را ایجاد میکند و همچنین بهروزرسانیهای گواهینامههای ریشه را مدیریت میکند:
// 1. Initialize credentials (Insecure for dev, TLS for production)
ServerCredentials serverCredentials = InsecureServerCredentials.create();

// 2. Build and start the OkHttp-based gRPC server
final int bindAnyPort = 0;
final Server server = OkHttpServerBuilder
    .forPort(bindAnyPort, serverCredentials)
    .addService(gRpcServerImplementation) // Your SunroofGrpcImpl
    .build()
    .start();

// The assigned port can now be retrieved using server.getPort()
int actualPort = server.getPort();

// 3. Prepare the JNI data structure
// This object mirrors the ASDVGateway_ServiceUnitDefinition_t C struct
JniServiceUnitDefinition definition = new JniServiceUnitDefinition();

// Fill the RPC service definition params (Port, Name, Type, etc.)
definition.setPort(actualPort);
definition.setServiceUnitName("SunroofRpcServerImpl-1");

// 4. Perform the cross-language call
// This jumps from Java -> JNI -> ASDVGateway_Client_registerRpcServer (C API)
mJniClient.nativeRegisterRpcServer(definition);
جریان کارخواه RPC
این نمونه کد تعریف پروتو سرور (tpms.proto) را برای سروری که برنامه بهعنوان کارخواه به آن متصل میشود ارائه میدهد:
/**
 * The TPMS service provides real-time pressure and temperature
 * data for all tires on the vehicle.
 */
service Tpms {
    /**
     * Returns the full state of all monitored tires.
     */
    rpc GetTpmsState(.google.protobuf.Empty) returns (TpmsStateResponse) {}

    /**
     * A filtered query that returns only the tires
     * below the recommended pressure threshold.
     */
    rpc GetLowTires(.google.protobuf.Empty) returns (LowTiresResponse) {}
}
پیوند دادن به کتابخانه پروتو مربوطه:
import com.android.sdv.sdvgrpclibrary.TpmsGrpc;
import io.grpc.ManagedChannel;

// --- Inside your Client Application ---

// 1. Request a ManagedChannel from the Gateway for a specific service unit
ManagedChannel managedChannel = gatewayClient.connectToRpcServerByName(
    "",                                     // sdvVmName (empty for local/auto-lookup)
    "android.sdv.samples.cluster",          // packageName
    "ClusterServer",                        // serviceBundleName
    "android-sdv-samples-cluster-cluster"  // serviceUnitName
);

// 2. Use the channel to create a gRPC stub (e.g., for the TPMS service)
TpmsGrpc.TpmsBlockingStub tpmsStub = TpmsGrpc.newBlockingStub(managedChannel);

// 3. Now you can call RPC methods directly
// TpmsStateResponse response = tpmsStub.getTpmsState(Empty.getDefaultInstance());
در داخل، میانای برنامهسازی کاربردی ASDVGateway_Client_findRpcServerByName برای پیدا کردن
سرور RPC فراخوانی میشود. اگر سرور RPC پیدا شود، کانال مدیریتشده در حالت ناامن ایجاد میشود یا برای استفاده از پیکربندی TLS تعیین میشود، مشابه جریان سرور RPC، بسته به پیکربندی «کشف سرویس». برنامه با شیء ManagedChannel و روشهای سرور تماس،
تهبرنامهها را ایجاد میکند:
import com.android.sdv.sdvgrpclibrary.TpmsGrpc;
import com.android.sdv.sdvgrpclibrary.TpmsStateResponse;
import com.google.protobuf.Empty;
import io.grpc.stub.MetadataUtils;

// 1. Create a "Blocking Stub" from the existing ManagedChannel.
// We apply an interceptor to attach mandatory metadata (headers)
// required by the SDV Gateway for authorization.
TpmsGrpc.TpmsBlockingStub tpmsStub = TpmsGrpc.newBlockingStub(managedChannel)
    .withInterceptors(MetadataUtils.newAttachHeadersInterceptor(mMetadata));

// 2. Execute the RPC call.
// Because this is a "BlockingStub," the thread will wait here until
// the vehicle service responds or times out.
TpmsStateResponse tpmsStateResponse = tpmsStub.getTpmsState(Empty.getDefaultInstance());

// 3. Extract the domain-specific state object from the Protobuf response.
// 'newState' can now be used to update your UI or application logic.
newState = tpmsStateResponse.getTpmsState();
تغییر شبکه پیشفرض فرایند
برای باز کردن سوکتها برای اتصالات اینترنتی، ممکن است لازم باشد شبکه پیشفرض فرایند را از SDV-RPC VLAN به شبکه دیگری تغییر دهید. برای لغو اتصال و اتصال مجدد فرایند به
SDV-RPC VLAN، با
unbindProcessFromSdvRpcNetworkInterface و
bindProcessToSdvRpcNetworkInterface تماس بگیرید. این دو فراخوانی بهعنوان کلیدهای عمومی عمل میکنند و رابط شبکه را که سوکتها به آن متصل هستند برای همه رشتههای فرایند تغییر میدهند.
// 1. Redirect all socket traffic from this process to the SDV-RPC VLAN.
// This call is required for making RPC calls or hosting RPC services for SDV.
gatewayClient.bindProcessToSdvRpcNetworkInterface();

// --- Process is now communicating over the SDV-RPC interface ---

// 2. Revert the process network binding back to the "default" interface.
// This allows the app to access internet resources again.
gatewayClient.unbindProcessFromSdvRpcNetworkInterface();
ایجاد ناشر و انتشار پیام
// 1. Define the interface and type for the publication
UnitType unitType = new UnitType(
    "android.sdv.samples.tires.interface", // sdvPackageName
    "TirePressurePublisherInterface",      // serviceBundleName
    "TirePressure"                         // typeName
);

// 2. Configure the Publisher's buffer and message constraints
PublisherUnitMetadata publisherUnitMetadata = new PublisherUnitMetadata(
    1,   // version
    64,  // message size in bytes (fixed size for performance)
    128  // max message count (buffer depth)
);

// 3. Create the Publication instance through the Gateway
Publisher tirePublisher = gatewayClient.createPublication(
    "tire-pressure-service-unit-name",
    unitType,
    publisherUnitMetadata
);

// 4. Prepare and publish a message
// In a real app, you would encode your sensor data into this byte array
byte[] msg = new byte[publisherUnitMetadata.messageSizeBytes];

// ... fill msg with data ...

tirePublisher.publish(msg);
در داخل، Java createPublication و میاناهای برنامهسازی کاربردی انتشار به
ASDVGateway_Client_createPublication و
ASDVGateway_Client_readAvailableMessages میاناهای برنامهسازی کاربردی بومی متکی هستند. برای اطلاعات دقیق درباره
C API، به استفاده از «درگاه SDV» در سرویس بومی IVI مراجعه کنید. شیء
Publisher زمینهای برای نوشتن پیامها و مدیریت چرخه حیات
انتشار فراهم میکند.
ایجاد مشترک با شنونده اعلان
میانای برنامهسازی کاربردی Java به شنونده اجازه میدهد بهعنوان پارامتر به روش اشتراک در
انتشار منتقل شود و شیء Subscription را برمیگرداند.
وقتی دادههای نشریه مشترکشده دردسترس قرار میگیرد، به
Listenerاطلاع داده میشود.Subscriptionبهعنوان یک شیء زمینهای عمل میکند و میتوان از آن برای خواندن پیامها و بستن اشتراک استفاده کرد.
// 1. Define the Listener to handle incoming data notifications
SubscriptionNotificationListener listener = new SubscriptionNotificationListener() {
    @Override
    public void onSubscriptionNotification(
        Subscription subscription,
        SubscriptionNotificationType notificationType
    ) {
        // Only process if the notification indicates new data is ready
        if (notificationType != SubscriptionNotificationType.DataAvailable) {
            return;
        }

        // Read the message from the subscription buffer
        byte[] content = subscription.readMessage();

        // Note: This callback often runs on a background thread provided by the SDK.
        // If you need to update the UI, use a Handler or View.post().
        processTireData(content);
    }
};

// 2. Subscribe to the publication by its unique name
Subscription tireSubscription = gatewayClient.subscribeToPublicationByName(
    "",                                  // sdvVmName (empty for auto-lookup)
    "android.sdv.samples.dt_publisher",  // packageName
    "SdvGatewayDtPublisher",             // serviceBundleName
    "tire",                              // serviceUnitName
    listener
);

// 3. Read Messages
// You can poll or register callbacks for new messages.
// When polling the message, call this method in a loop.
// When registering callbacks, call this method to get the message payload.
byte[] manualContent = tireSubscription.readMessage();
نمونه کد
بازخوانهای شنونده در یک رشته واحد که توسط کارخواه مدیریت میشود فراخوانده میشوند تا پردازش در شنوندگان به حداقل برسد و از تأخیر در دریافت اعلانهای مربوط به اشتراکهای دیگر جلوگیری شود. لایه Java از یک C API برای
مدیریت اشتراک، مدیریت اعلان، و بازیابی پیام استفاده میکند. برای
نمونهای از استفاده از میانای برنامهسازی کاربردی، نمونه برنامه Java ارائهشده در فایل باینری
در system/software_defined_vehicle/samples/sdv_gateway/README.md را ببینید.
مجوزهای لازم
فراخوانی کردن «میانای برنامهسازی کاربردی» کارخواه «درگاه SDV» به اجازههای ویژه نیاز ندارد، اما باید قوانین SELinux مناسب را برای برنامههایتان اعمال کنید.
- برای اشتراکها و انتشار تونل داده، به هیچ مجوزی نیاز ندارید.
- برای SDV RPC، به اجازههای زیر نیاز دارید:
android.permission.INTERNETandroid.permission.CONNECTIVITY_USE_RESTRICTED_NETWORKS
برای android.permission.CONNECTIVITY_USE_RESTRICTED_NETWORKS، همچنین به
فایل فهرست مجاز در etc/permissions در همان پارتیشن برنامه خود نیاز دارید، برای
مثال، برای SdvCarMonitorTestApp (نام بسته
com.android.testapp.sdvcarmonitor)، فایل بهاین شکل است:
<?xml version="1.0" encoding="utf-8"?>

<permissions>
    <privapp-permissions package="com.android.testapp.sdvcarmonitor">
        <permission name="android.permission.CONNECTIVITY_USE_RESTRICTED_NETWORKS"/>
    </privapp-permissions>
</permissions>
قوانین SELinux
برای استفاده از «میاناهای برنامهسازی کاربردی دروازه SDV»، برنامههای Java به اجازههایی مشابه خدمات بومی نیاز دارند. این اجازهها را بااستفاده از sdv_gateway_client_domain()
کلاندستور SELinux اعطا کنید:
sdv_gateway_client_domain(my_oem_sdv_gateway_client_app)
«تولیدکننده تجهیزات اصلی» دامنه my_oem_sdv_gateway_client_app را برای برنامههای Java
مجاز به استفاده از «درگاه SDV» تعریف میکند. فقط از برنامههای سیستم و
ممتاز از «درگاه SDV» استفاده کنید.
مکانهای کد
کد منبع «دروازه SDV» را در
system/software_defined_vehicle/sdv_gateway/ دریافت کنید. میتوانید نمونههای «دروازه SDV» را
برای موارد زیر دریافت کنید:
- میانای برنامهسازی کاربردی کارخواه C:
system/software_defined_vehicle/samples/sdv_gateway/NativeSdvGatewayTestApp/ - میانای برنامهسازی کاربردی Java کارخواه:
system/software_defined_vehicle/samples/sdv_gateway/SdvCarMonitorTestApp/