
این صفحه فهرست جامعی از آزمایشهای تحت مجموعه آزمایش تصویر دوربین (ITS) را ارائه میدهد که بخشی از تأییدکننده مجموعه آزمایش سازگاری اندروید (CTS) است. آزمایشهای ITS، آزمایشهای عملکردی هستند، به این معنی که کیفیت تصویر را اندازهگیری نمیکنند، اما نشان میدهند که تمام عملکردهای دوربین تبلیغشده مطابق انتظار کار میکنند. این سند به توسعهدهندگان و آزمایشکنندگان اجازه میدهد تا بفهمند که هر آزمایش بهطور جداگانه چه کاری انجام میدهد و چگونه میتوان خطاهای آزمایش را اشکالزدایی کرد.
در اندروید ۱۷ و بالاتر، تستهای Camera ITS در CTS Verifier به دو فعالیت تقسیم میشوند تا امکان اجرای موازی فراهم شود و زمان تست کاهش یابد: یک فعالیت برای تستهای feature_combination و sensor_fusion و دیگری برای سایر تستها.
دوربین ITS تستها را بر اساس ویژگیهای مورد نیاز دوربین، سطح API و سطح کلاس عملکرد رسانه (MPC) بررسی میکند. برای سطح API، ITS از ro.product.first_api_level برای بررسی تستهای اضافه شده در یک سطح API خاص که تجربیات منفی کاربر را برای عملکرد در سطوح API پایینتر آزمایش میکنند، استفاده میکند. ITS از ro.vendor.api_level برای بررسی تستهای ویژگیهای اضافه شده در یک سطح API خاص که نیاز به قابلیت سختافزاری جدید دارند، استفاده میکند. اگر ro.odm.build.media_performance_class برای یک دستگاه تعریف شده باشد، ITS بسته به سطح MPC، اجرای تستهای خاصی را الزامی میکند.
تستها بر اساس صحنه به بخشهای زیر گروهبندی میشوند:
صحنههای آزمایشی مبتنی بر تبلت
-
scene0: ضبط فراداده، لرزش، ژیروسکوپ، لرزش -
scene1: نوردهی، حساسیت، جبران مقدار نوردهی (EV)، YUV در مقابل JPEG و RAW -
scene2: تشخیص چهره، آزمایشهایی که نیاز به صحنههای رنگی دارند -
scene3: بهبود لبه، حرکت لنز -
scene4: نسبت ابعاد، برش، میدان دید -
scene6: بزرگنمایی -
scene7: سوئیچ چند دوربینه -
scene8: نورسنجی ناحیهای خودکار (AE) و تراز سفیدی خودکار (AWB) -
scene9: فشردهسازی JPEG -
scene_extensions: افزونههای دوربین -
scene_tele: تعویض لنز تلهفوتو -
scene_video: افت فریم
صحنههای آزمایشی مبتنی بر ریگ Gen2 / sensor_fusion
-
feature_combination: ترکیب ویژگیها -
scene_flash: فلاش خودکار، حداقل نرخ فریم -
scene_gen2_chart: تستهایی با استفاده از نمودار کاغذی Gen2 -
scene_ip: برابری تصویر بین برنامه دوربین پیشفرض و برنامه دوربین Jetpack (JCA) -
sensor_fusion: جبران زمانبندی دوربین و ژیروسکوپ
-
scene5: سایهزنی لنز
صحنه آزمایشی مبتنی بر تبلت با طیف رنگی گسترده
-
scene_wide_gamut: پروفایل و محدوده رنگ با گاموت وسیع
برای شرح هر صحنه به بخشهای جداگانه مراجعه کنید.
صحنههای آزمایشی مبتنی بر تبلت
صحنه0
آزمایشها نیازی به اطلاعات صحنه خاصی ندارند. با این حال، برای آزمایش ژیروسکوپ و لرزش، تلفن باید ثابت باشد.
test_jitter
لرزش را در مهرهای زمانی دوربین اندازهگیری میکند.
API های تست شده:
-
android.hardware.camera2.CaptureResult#SENSOR_TIMESTAMP -
android.hardware.camera2.CaptureRequest#CONTROL_AE_TARGET_FPS_RANGE
قبول: حداقل 30 میلیثانیه اختلاف بین فریمها وجود دارد.
در شکل زیر، به محدوده کوچک محور y توجه کنید. در واقع، Jitter در این نمودار کوچک است.

شکل ۱. نمودار test_jitter.
فراداده آزمون
اعتبار ورودیهای فراداده را با بررسی نتایج ضبط و اشیاء ویژگیهای دوربین آزمایش میکند. این آزمایش از مقادیر نوردهی و بهره auto_capture_request استفاده میکند زیرا محتوای تصویر مهم نیست.
API های تست شده:
-
android.hardware.camera2.CameraCharacteristics#INFO_SUPPORTED_HARDWARE_LEVEL -
android.hardware.camera2.CameraCharacteristics#SCALER_CROPPING_TYPE -
android.hardware.camera2.CameraCharacteristics#SENSOR_BLACK_LEVEL_PATTERN -
android.hardware.camera2.CameraCharacteristics#SENSOR_INFO_TIMESTAMP_SOURCE -
android.hardware.camera2.CaptureRequest#SENSOR_FRAME_DURATION -
android.hardware.camera2.CaptureResult#SENSOR_ROLLING_SHUTTER_SKEW
عبور: سطح سختافزار، rollingShutterSkew ، برچسبهای frameDuration ، timestampSource ، croppingType ، blackLevelPattern ، pixel_pitch ، میدان دید (FoV) و فاصله ابرکانونی موجود هستند و مقادیر معتبری دارند.
درخواست_تست_کپچر_مچ
با خواندن فرادادههای ضبطشده، آزمایش میکند که آیا دستگاه مقادیر صحیح نوردهی و بهره را مینویسد یا خیر.
API های تست شده:
-
android.hardware.camera2.CameraCharacteristics#SENSOR_INFO_EXPOSURE_TIME_RANGE -
android.hardware.camera2.CameraCharacteristics#SENSOR_INFO_SENSITIVITY_RANGE -
android.hardware.camera2.CaptureRequest#SENSOR_EXPOSURE_TIME -
android.hardware.camera2.CaptureRequest#SENSOR_SENSITIVITY -
android.hardware.camera2.CaptureResult#SENSOR_EXPOSURE_TIME -
android.hardware.camera2.CaptureResult#SENSOR_SENSITIVITY
پاس: مقادیر فراداده درخواست و ضبط در تمام شاتها مطابقت دارند.
رویدادهای حسگر تست
برای دستگاههایی که پشتیبانی از ادغام حسگرها را تبلیغ میکنند، این آزمایش بررسی میکند که آیا دستگاه رویدادهای حسگر را جستجو و چاپ میکند یا خیر. حسگرهای مورد انتظار شتابسنج، ژیروسکوپ و مغناطیسسنج هستند. این آزمایش فقط در صورتی کار میکند که صفحه نمایش روشن باشد، به این معنی که دستگاه در حالت آماده به کار نباشد.
API های تست شده:
عبور: رویدادهای مربوط به هر حسگر دریافت میشوند.
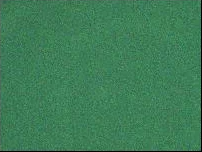
تست_رنگ_جامد_تست_الگو
آزمایش میکند که آیا الگوهای تست رنگ ثابت برای بیصدا کردن دوربین به درستی تولید میشوند یا خیر. اگر بیصدا کردن دوربین پشتیبانی میشود، الگوهای تست رنگ ثابت نیز باید پشتیبانی شوند. اگر بیصدا کردن دوربین پشتیبانی نمیشود، الگوهای تست رنگ ثابت فقط در صورتی آزمایش میشوند که این قابلیت تبلیغ شده باشد.
اگر تصاویر خام پشتیبانی شوند، تخصیص رنگ نیز آزمایش میشود. رنگهای آزمایششده سیاه، سفید، قرمز، آبی و سبز هستند. برای دوربینهایی که از تصاویر خام پشتیبانی نمیکنند، فقط رنگ سیاه آزمایش میشود.
API های تست شده:
-
android.hardware.camera2.CameraCharacteristic#SENSOR_AVAILABLE_TEST_PATTERN_MODES -
android.hardware.camera2.CaptureResult#SENSOR_TEST_PATTERN_DATA -
android.hardware.camera2.CaptureResult#SENSOR_TEST_PATTERN_MODE
قبول: الگوهای آزمایشی پشتیبانیشده، رنگ صحیحی دارند و واریانس کمی در تصویر وجود دارد.
الگوی_آزمون_آزمون
پارامتر android.sensor.testPatternMode را برای ضبط فریمها برای هر الگوی آزمایشی معتبر آزمایش میکند و بررسی میکند که فریمها برای رنگهای ثابت و نوارهای رنگی به درستی تولید شدهاند. این آزمایش شامل مراحل زیر است:
- تصاویر را برای تمام الگوهای تست پشتیبانی شده ضبط میکند.
- بررسی صحت الگوی تست رنگ جامد و نوارهای رنگی را انجام میدهد.
API های تست شده:
-
android.hardware.camera2.CameraCharacteristic#SENSOR_AVAILABLE_TEST_PATTERN_MODES -
android.hardware.camera2.CaptureResult#SENSOR_TEST_PATTERN_MODE
قبول: الگوهای آزمایشی پشتیبانیشده به درستی تولید میشوند.

شکل ۲. مثالی از test_test_patterns.
test_tonemap_curve
تبدیل الگوی آزمایشی از خام به YUV با tonemap خطی را آزمایش میکند. این آزمایش برای تولید یک الگوی تصویر بینقص برای تبدیل tonemap به android.sensor.testPatternMode = 2 ( COLOR_BARS ) نیاز دارد. تأیید میکند که خط لوله دارای خروجیهای رنگی مناسب با tonemap خطی و ورودی تصویر ایدهآل است (به test_test_patterns متکی است).
API های تست شده:
-
android.hardware.camera2.CaptureRequest#DISTORTION_CORRECTION_MODE -
android.hardware.camera2.CaptureRequest#SENSOR_TEST_PATTERN_MODE -
android.hardware.camera2.CaptureRequest#TONEMAP_CURVE -
android.hardware.camera2.CaptureRequest#TONEMAP_MODE
قبول: YUV و RAW شبیه به یکدیگر به نظر میرسند.

شکل ۳. مثال خام test_tonemap_curve.
شکل ۴. مثال YUV از test_tonemap_curve.
test_unified_timestamp
بررسی میکند که آیا رویدادهای حسگر تصویر و حسگر حرکت در یک دامنه زمانی هستند یا خیر.
API های تست شده:
-
android.hardware.camera2.CaptureResult#SENSOR_TIMESTAMP -
android.hardware.Sensor -
android.hardware.SensorEvent -
android.hardware.Sensor#TYPE_ACCELEROMETER -
android.hardware.Sensor#TYPE_GYROSCOPE
گذر: مهرهای زمانی حرکت بین دو مهر زمانی تصویر قرار دارند.
محدودیت_ارتعاش_آزمون
بررسی میکند که آیا ویبره دستگاه مطابق انتظار عمل میکند یا خیر.
API های تست شده:
-
android.hardware.Sensor -
android.hardware.SensorEvent -
android.hardware.Sensor#TYPE_ACCELEROMETER -
android.os.Vibrator -
android.hardware.camera2.CameraDevice#setCameraAudioRestriction
قبول: وقتی صدای دستگاه توسط API محدودیت صدای دوربین بیصدا میشود، دستگاه نمیلرزد.
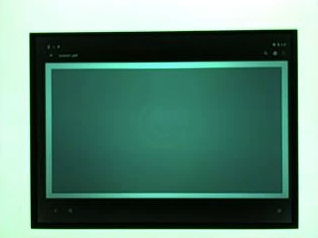
صحنه ۱_۱
scene1 یک نمودار خاکستری است. نمودار خاکستری باید ۳۰٪ مرکز میدان دید دوربین را پوشش دهد. انتظار میرود نمودار خاکستری به طور متوسط با ۳A (AE، AWB و AF) رقابت کند، زیرا ناحیه مرکزی هیچ ویژگی ندارد. با این حال، درخواست ضبط، کل صحنه را مشخص میکند که شامل ویژگیهای کافی برای همگرایی ۳A است.
دوربینهای RFoV را میتوان در WFoV یا تجهیزات تست RFoV آزمایش کرد. اگر یک دوربین RFoV در تجهیزات تست WFoV آزمایش شود، نمودار به اندازه ۲/۳ مقیاسبندی میشود تا مرزهایی برای نمودار خاکستری در FoV مشخص شود تا به همگرایی ۳A کمک کند. برای توضیحات بیشتر در مورد تجهیزات تست دوربین، به Camera ITS-in-a-box مراجعه کنید.

شکل ۵. نمودار صحنه ۱ در اندازه کامل (چپ)، نمودار با مقیاس ۲/۳ (راست).
test_ae_precapture_trigger
هنگام استفاده از تریگر پیشضبط، وضعیت دستگاه AE را آزمایش میکند. پنج درخواست دستی را با غیرفعال بودن AE ضبط میکند. آخرین درخواست دارای تریگر پیشضبط AE است که باید نادیده گرفته شود زیرا AE غیرفعال است.
API های تست شده:
-
android.hardware.camera2.CaptureRequest#CONTROL_AE_MODE -
android.hardware.camera2.CaptureRequest#CONTROL_AE_PRECAPTURE_TRIGGER -
android.hardware.camera2.CaptureResult#CONTROL_AE_STATE
عبور: AE همگرا میشود.
تست_خودکار_در_مقابل_دستی
تستهایی که عکسهای خودکار و دستی را ثبت کردهاند، یکسان به نظر میرسند.
API های تست شده:
-
android.hardware.camera2.CaptureRequest#COLOR_CORRECTION_GAINS -
android.hardware.camera2.CaptureRequest#COLOR_CORRECTION_TRANSFORM -
android.hardware.camera2.CaptureResult#TONEMAP_CURVE -
android.hardware.camera2.CaptureResult#TONEMAP_MODE
رد: افزایش و تبدیل دستی تراز سفیدی گزارش شده در هر نتیجهی ثبت، با estimate تراز سفیدی خودکار از الگوریتم 3A دوربین مطابقت دارد.
شکل ۶. مثال خودکار در مقابل خودکار دستی.

شکل ۷. مثالی از تراز سفیدی خودکار در مقابل دستی.
شکل ۸. مثال تبدیل تراز سفیدی دستی در تست خودکار در مقابل دستی.
تست_سیاه_سفید
آزمایش میکند که آیا دستگاه تصاویر کاملاً سیاه و سفید تولید میکند یا خیر. دو عکس میگیرد، اولی با بهره بسیار کم و نوردهی کوتاه که منجر به یک عکس سیاه میشود و دومی با بهره بسیار بالا و نوردهی طولانی که منجر به یک عکس سفید میشود.
API های تست شده:
-
android.hardware.camera2.CaptureRequest#SENSOR_EXPOSURE_TIME -
android.hardware.camera2.CaptureRequest#SENSOR_SENSITIVITY
Pass: تصاویر سیاه و سفید تولید میکند. کانالهای اشباعشده از تصاویر سفید دارای مقادیر RGB [255، 255، 255] با حاشیه خطای کمتر از 1٪ اختلاف هستند.

شکل ۹. تست_سیاه_سفید، مثال سیاه.

شکل ۱۰. تست_سیاه_سفید، مثال سفید.
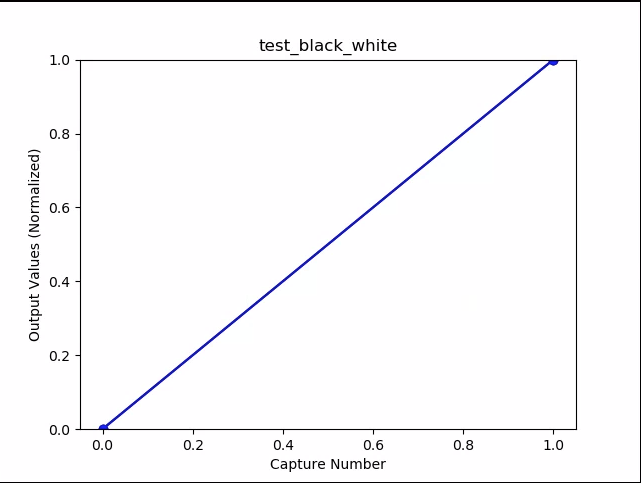
شکل ۱۱. test_black_white، نمودار به معنی مثال است.
تست_برست_کپ
تأیید میکند که کل خط لوله ضبط میتواند با سرعت ضبط کامل و زمان CPU همگام باشد.
API های تست شده:
Pass: مجموعهای از تصاویر با اندازه کامل را ثبت میکند، افت فریم و روشنایی تصویر را بررسی میکند.
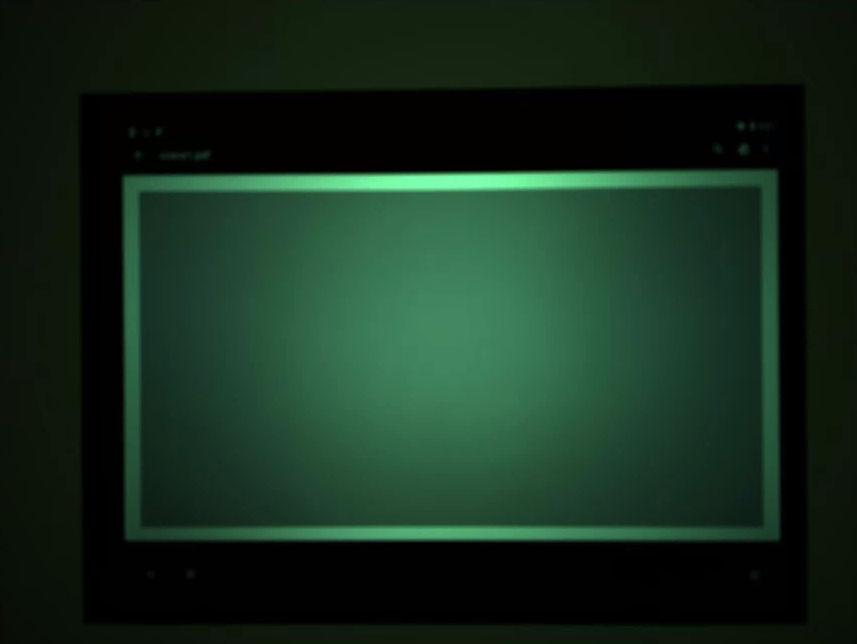
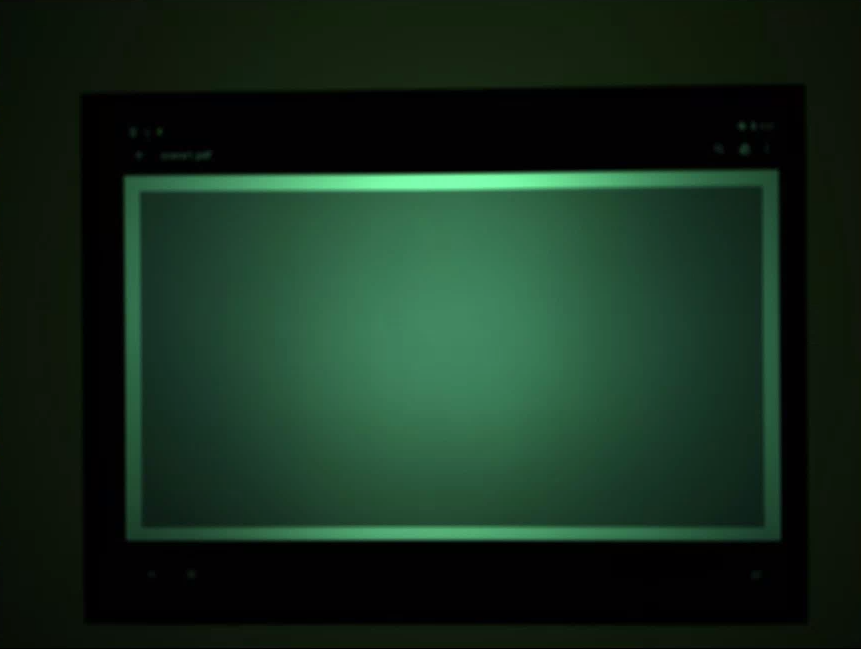
test_burst_sameness_manual
۵ تصویر متوالی ۵۰ تایی با تنظیمات دستی میگیرد و بررسی میکند که همه آنها یکسان باشند. از این تست برای شناسایی فریمهای پراکندهای که به طور متفاوتی پردازش شدهاند یا دارای مصنوعات هستند، استفاده کنید.
API های تست شده:
-
android.hardware.camera2.CameraMetadata#REQUEST_AVAILABLE_CAPABILITIES_MANUAL_SENSOR -
android.hardware.camera2.CameraMetadata#SYNC_MAX_LATENCY_PER_FRAME_CONTROL
امتیاز مثبت: تصاویر از نظر بصری و مقادیر RGB یکسان هستند.
شکست: افزایش یا کاهش نمودار میانگین RGB را در ابتدای هر انفجار نشان میدهد.
- تلرانس برای
first_API_level< 30، 3% است. - تلرانس برای
first_API_level>= 30، 2% است.
شکل ۱۲. مثال میانگین test_burst_sameness_manual.
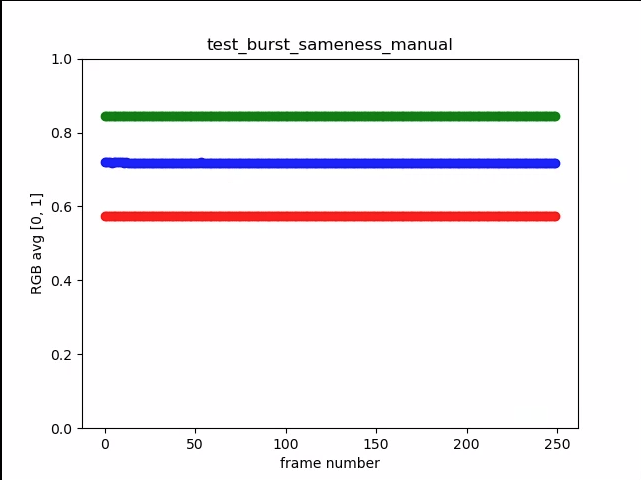
شکل ۱۳. test_burst_sameness_manual_plot_means
تست_کراپ_منطقه_خام
بررسی میکند که آیا جریانهای RAW قابل برش نیستند یا خیر.
API های تست شده:
-
android.hardware.camera2.CameraCharacteristics#SENSOR_INFO_ACTIVE_ARRAY_SIZE -
android.hardware.camera2.CaptureResult#SCALER_CROP_REGION -
android.hardware.camera2.CaptureRequest#SCALER_CROP_REGION
Pass: تصاویر YUV برش مرکزی میخورند اما تصاویر RAW برش نمیخورند.
شکل ۱۴. مثال محصول خام حاصل از مقایسهی test_crop_region_raw.
شکل ۱۵. مثال کامل از فایل خام comp با فرمت test_crop_region_raw.

شکل ۱۶. مثال برش YUV از فایل test_crop_region_raw comp.

شکل ۱۷. مثال کامل test_crop_region_raw YUV.
مناطق_برش_آزمون
بررسی میکند که آیا برش نواحی کار میکند یا خیر. یک تصویر کامل را میگیرد و تکههایی از پنج ناحیه مختلف (گوشهها و مرکز) ایجاد میکند. تصاویری با مجموعه برش برای پنج ناحیه میگیرد. مقادیر تکه و تصویر برش داده شده را مقایسه میکند.
API های تست شده:
-
android.hardware.camera2.CameraCharacteristics#SENSOR_INFO_ACTIVE_ARRAY_SIZE -
android.hardware.camera2.CaptureRequest#SCALER_CROP_REGION
گذر: تصویر ناحیه برش خورده با تکهای که مربوط به تصویر برش خورده است، مطابقت دارد.
جبران خسارت test_ev
آزمایشهایی که نشان میدهد جبران مقدار نوردهی (EV) اعمال میشود. این آزمایش شامل یک بخش پایه و یک بخش پیشرفته است.
بخش پایه، آزمایش میکند که جبران EV با استفاده از محدودهای که با CONTROL_AE_COMPENSATION_STEP ایجاد شده است، اعمال میشود یا خیر. هشت فریم در هر مقدار جبران ثبت میشود.
بخش پیشرفته، نوردهی را در هشت مرحله افزایش میدهد و روشنایی اندازهگیری شده را در مقابل روشنایی مورد انتظار بررسی میکند. مقادیر مورد انتظار از روشنایی تصویر بدون اعمال جبران EV محاسبه میشوند و اگر مقادیر محاسبه شده از محدوده مقدار واقعی تصویر بیشتر باشند، مقدار مورد انتظار اشباع میشود. اگر مقادیر مورد انتظار و مقادیر اندازهگیری شده مطابقت نداشته باشند یا اگر تصاویر در پنج مرحله بیش از حد نوردهی شوند، آزمایش با شکست مواجه میشود.
API های تست شده:
-
android.hardware.camera2.CameraCharacteristics#CONTROL_AE_COMPENSATION_STEP -
android.hardware.camera2.CaptureRequest#CONTROL_AE_EXPOSURE_COMPENSATION -
android.hardware.camera2.CaptureRequest#CONTROL_AE_LOCK -
android.hardware.camera2.CaptureResult#CONTROL_AE_STATE -
android.hardware.camera2.CaptureRequest#CONTROL_AWB_LOCK -
android.hardware.camera2.CaptureResult#TONEMAP_CURVE -
android.hardware.camera2.CaptureResult#TONEMAP_MODE
مرحله مقدماتی: تصاویر افزایش نوردهی را بدون نوردهی بیش از حد در پنج مرحله نشان میدهند.

شکل ۱۸. آزمون_ev_compensation_basic.
مرحله پیشرفته بخش: با افزایش تنظیمات جبران EV، افزایش لوما را ثبت میکند. هشت فریم ضبط شده برای هر تنظیم جبران EV، مقادیر لوما پایداری دارند.
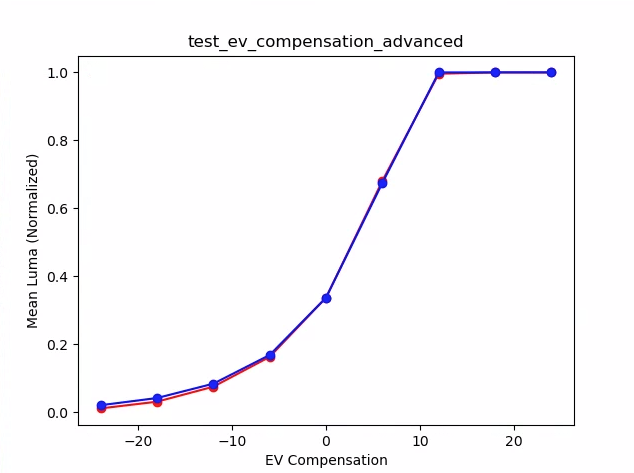
شکل ۱۹. نمودار میانگینهای test_ev_compensation_advanced_plot.
test_exposure_x_iso
آزمایش میکند که آیا با تغییر ISO و زمان نوردهی، نوردهی ثابتی حاصل میشود یا خیر. مجموعهای از عکسها را میگیرد که ISO و زمان نوردهی برای متعادل کردن یکدیگر انتخاب شدهاند. نتایج باید روشنایی یکسانی داشته باشند، اما در طول این توالی، تصویر باید نویز بیشتری داشته باشد. بررسی میکند که مقادیر میانگین پیکسلهای نمونه به یکدیگر نزدیک باشند. بررسی میکند که تصاویر به ۰ یا ۱ محدود نشده باشند (که باعث میشود مانند خطوط صاف به نظر برسند). این آزمایش را میتوان با تصاویر RAW نیز با تنظیم پرچم debug در فایل پیکربندی خود اجرا کرد.
API های تست شده:
-
android.hardware.camera2.CaptureRequest#SENSOR_EXPOSURE_TIME -
android.hardware.camera2.CaptureRequest#SENSOR_SENSITIVITY
قبول: تصاویر روشنایی یکسانی دارند، اما با افزایش ISO نویز بیشتری پیدا میکنند. صفحات RGB زمانی که مقدار نوردهی ISO* در فضای بهره آزمایش شده ثابت باشد، مسطح هستند.
مکانیزم خرابی: در شکل زیر، با افزایش مقادیر ضریب بهره (محور x)، مقادیر میانگین صفحه RGB نرمال شده (محور y) شروع به انحراف از مقادیر ضریب بهره پایین میکنند.

شکل ۲۰. نمودار_آزمون_میزان_در معرض_قرار_گرفتن.

شکل ۲۱. test_exposure_mult=1.00.

شکل ۲۲. test_exposure_mult=64.00.
تست_چفت
بررسی میکند که آیا تنظیمات (نوردهی و بهره) برای دوربینهای FULL و LEVEL_3 روی فریم مناسب قفل میشوند یا خیر. با استفاده از درخواستهای پشت سر هم، مجموعهای از عکسها را میگیرد و پارامترهای درخواست ضبط را بین عکسها تغییر میدهد. بررسی میکند که تصاویر دارای ویژگیهای مورد انتظار باشند.
API های تست شده:
قبول: تصاویر [۲، ۳، ۶، ۸، ۱۰، ۱۲، ۱۳] دارای ISO یا نوردهی افزایشیافته هستند و با میانگین RGB بالاتری در نمودار شکل زیر نشان داده شدهاند.

شکل ۲۳. نمودار test_latching به معنی مثال است.

شکل ۲۴. تست لچینگ i=00.

شکل ۲۵. تست لچینگ i=01.

شکل ۲۶. تست لچینگ i=02.

شکل ۲۷. تست لچینگ i=03.

شکل ۲۸. تست لچینگ i=04.

شکل ۲۹. تست لچینگ i=05.

شکل ۳۰. تست لچینگ i=06.

شکل ۳۱. تست لچینگ i=07.

شکل ۳۲. تست لچینگ i=08.

شکل ۳۳. تست لچینگ i=09.

شکل ۳۴. تست لچینگ i=10.

شکل ۳۵. تست لچینگ i=11.

شکل ۳۶. تست لچینگ i=12.
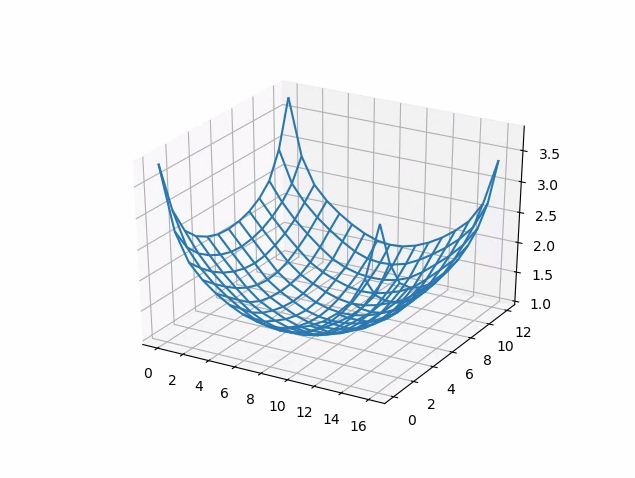
تست_خطی بودن
آزمایش میکند که آیا پردازش دستگاه میتواند به پیکسلهای خطی معکوس شود. با دستگاهی که به سمت یک هدف یکنواخت نشانه رفته است، توالی از عکسها را ثبت میکند.
API های تست شده:
-
android.hardware.camera2.CameraCharacteristics#SENSOR_INFO_SENSITIVITY_RANGE -
android.hardware.camera2.CaptureRequest#BLACK_LEVEL_LOCK -
android.hardware.camera2.CaptureRequest#SENSOR_SENSITIVITY -
android.hardware.camera2.CaptureRequest#TONEMAP_CURVE -
android.hardware.camera2.CaptureRequest#TONEMAP_MODE
قبول: مقادیر R، G، B باید با افزایش حساسیت به صورت خطی افزایش یابند.

شکل ۳۷. نمودار test_linearity به معنی مثال است.
test_locked_burst
قفل 3A و YUV burst (با استفاده از تنظیم خودکار) را آزمایش میکند. این آزمایش به گونهای طراحی شده است که حتی در دستگاههای محدودی که MANUAL_SENSOR یا PER_FRAME_CONTROLS ندارند نیز با موفقیت انجام شود. این آزمایش، ثبات تصویر YUV را بررسی میکند در حالی که بررسی نرخ فریم در CTS است.
API های تست شده:
-
android.hardware.camera2.CaptureRequest#CONTROL_AE_LOCK -
android.hardware.camera2.CaptureRequest#CONTROL_AWB_LOCK
قبول: تصاویر گرفته شده ثابت به نظر میرسند.

شکل ۳۸. مثال test_locked_burst frame0.

شکل ۳۹. مثال فریم ۱ قفل شده در تست ۱.

شکل ۴۰. مثال فریم ۲ قفل شده در تست.
صحنه ۱_۲
scene 1_2 از نظر عملکردی یک کپی یکسان از scene 1_1 است که با پیادهسازی یک ساختار زیرنویس، مدت زمان طولانی scene 1 را کاهش میدهد.
تصحیح_پارام_رنگ_آزمون
بررسی میکند که پارامترهای android.colorCorrection.* هنگام تنظیم اعمال میشوند یا خیر. تصاویری با مقادیر تبدیل و بهرهی متفاوت میگیرد و بررسی میکند که آیا آنها به طور متناظر متفاوت به نظر میرسند یا خیر. تبدیل و بهرهها به گونهای انتخاب میشوند که خروجی را به طور فزایندهای قرمز یا آبی کنند. از یک نقشهی رنگ خطی استفاده میکند.
نگاشت تُن (Tone Mapping) تکنیکی است که در پردازش تصویر برای نگاشت یک مجموعه از رنگها به مجموعهای دیگر استفاده میشود تا ظاهر تصاویر با دامنه دینامیکی بالا را در رسانهای که دامنه دینامیکی محدودتری دارد، تقریب بزند.
API های تست شده:
-
android.hardware.camera2.CaptureRequest#COLOR_CORRECTION_GAINS -
android.hardware.camera2.CaptureRequest#COLOR_CORRECTION_MODE -
android.hardware.camera2.CaptureRequest#COLOR_CORRECTION_TRANSFORM
قبول: مقادیر R و B با توجه به تبدیل افزایش مییابند.
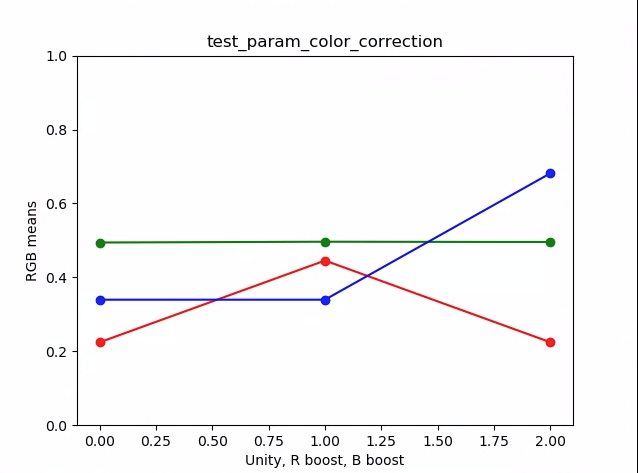
شکل ۴۱. نمودار test_param_color_correction به معنی مثال است.
در شکلهای زیر، محور x نشاندهندهی درخواستهای ضبط است: ۰ = واحد، ۱ = تقویت قرمز و ۲ = تقویت آبی.
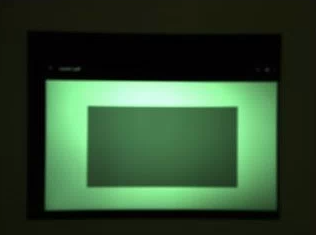
شکل ۴۲. مثال واحد test_param_color_correction req=0.
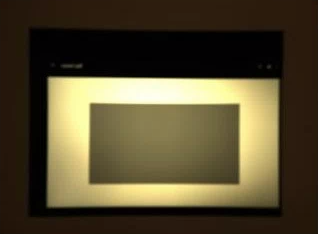
شکل ۴۳. مثال تقویت رنگ قرمز در test_param_color_correctness req=1.
شکل ۴۴. مثال تقویت رنگ آبی در test_param_color_correction req=2.
test_param_flash_mode
بررسی میکند که آیا پارامتر android.flash.mode اعمال شده است یا خیر. نوردهی را به صورت دستی روی سمت تاریک تنظیم میکند تا مشخص شود که آیا فلش زده شده است یا خیر، و از یک نقشه رنگ خطی استفاده میکند. مرکز تصویر کاشی را بررسی میکند تا ببیند آیا گرادیان بزرگی ایجاد شده است تا تأیید کند که آیا فلش زده شده است یا خیر.
API های تست شده:
گذر: مرکز تصویر کاشی دارای گرادیان زیادی است، به این معنی که فلاش زده شده است.
شکل ۴۵. مثال test_param_flash_mode 1.

شکل ۴۶. مثالی از یک کاشی در test_param_flash_mode.
شکل ۴۷. مثال test_param_flash_mode 2.

شکل ۴۸. مثال دو کاشی test_param_flash_mode.
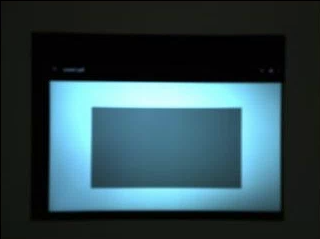
کاهش_پارام_نویز_آزمون
بررسی میکند که پارامتر android.noiseReduction.mode هنگام تنظیم، به درستی اعمال شده باشد. تصاویر را با دوربین کمنور ثبت میکند. از بهره آنالوگ بالا برای اطمینان از نویزدار بودن تصویر ثبت شده استفاده میکند. سه تصویر را ثبت میکند، برای NR خاموش، سریع و با کیفیت بالا. همچنین تصویری را با بهره کم و NR خاموش ثبت میکند و از واریانس این به عنوان مبنا استفاده میکند. هرچه نسبت سیگنال به نویز (SNR) بالاتر باشد، کیفیت تصویر بهتر است.
API های تست شده:
گذر: SNR با حالتهای مختلف کاهش نویز تغییر میکند و رفتاری مشابه نمودار زیر دارد:
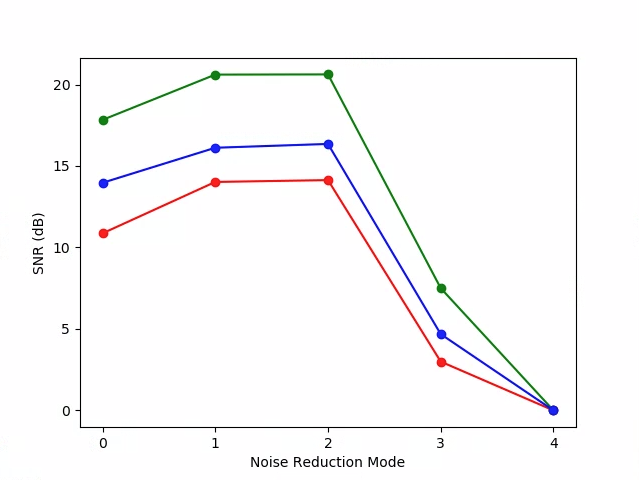
شکل ۴۹. نمودار test_param_noise_reduction مثال SNR ها.
۰: خاموش، ۱: سریع، ۲: HQ، ۳: MIN، ۴: ZSL

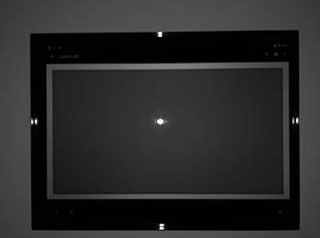
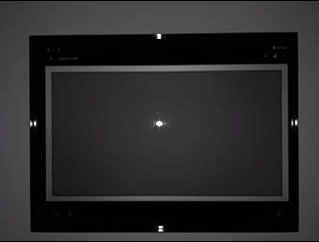
شکل ۵۰. مثالی از تست_پارام_کاهش_نویز با بهره بالا nr=0.
شکل ۵۱. مثالی از تست_پارام_کاهش_نویز با بهره بالا nr=1.
شکل ۵۲. مثالی از تست_پارام_کاهش_نویز با بهره بالا nr=2.
شکل ۵۳. مثالی از test_param_noise_reduction با بهره بالا nr=3.
شکل ۵۴. مثالی از تابع test_param_noise_reduction با بهره پایین.
test_param_shading_mode
بررسی میکند که آیا پارامتر android.shading.mode اعمال شده است یا خیر.
API های تست شده:
-
android.hardware.camera2.CaptureRequest#SHADING_MODE -
android.hardware.camera2.CaptureRequest#STATISTICS_LENS_SHADING_MAP_MODE -
android.hardware.camera2.CaptureResult#STATISTICS_LENS_SHADING_CORRECTION_MAP
Pass: حالتهای سایهزنی تغییر میکنند و نقشههای سایهزنی لنز مطابق انتظار اصلاح میشوند.
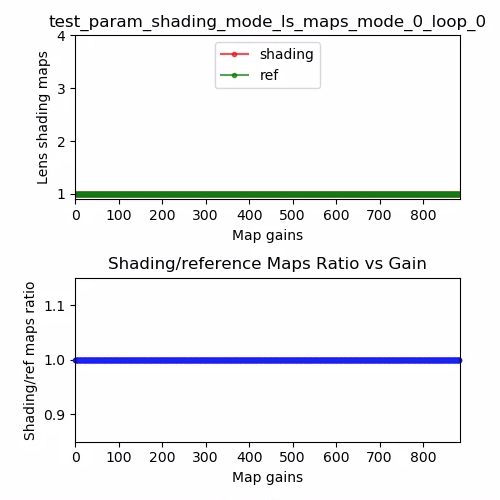
شکل ۵۵. نقشه سایه لنز test_param_shading_mode، مثال حلقه حالت ۰.
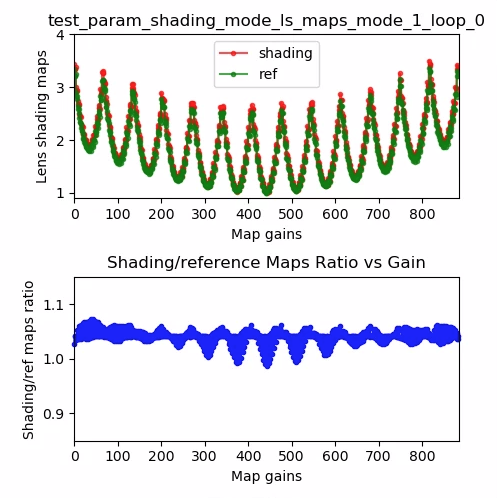
شکل ۵۶. نقشه سایه لنز test_param_shading_mode، مثال حلقه ۰ حالت ۱.
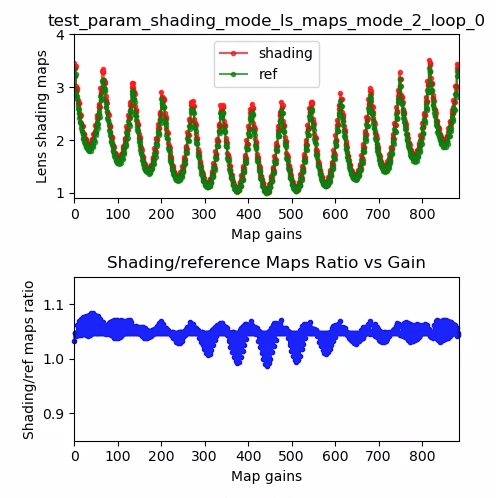
شکل ۵۷. نقشه سایه لنز test_param_shading_mode، مثال حلقه ۰ حالت ۲.
test_param_tonemap_mode
بررسی میکند که آیا پارامتر android.tonemap.mode اعمال شده است یا خیر. منحنیهای tonemap متفاوتی را به هر کانال R، G و B اعمال میکند و بررسی میکند که تصاویر خروجی مطابق انتظار اصلاح شدهاند. این بررسی شامل دو تست test1 و test2 است.
API های تست شده:
-
android.hardware.camera2.CameraMetadata#TONEMAP_MODE_CONTRAST_MODE -
android.hardware.camera2.CameraMetadata#TONEMAP_MODE_FAST -
android.hardware.camera2.CaptureRequest#TONEMAP_CURVE -
android.hardware.camera2.CaptureRequest#TONEMAP_MODE
عبور:
-
test1: هر دو تصویر دارای یک نقشه رنگ خطی هستند، اماn=1گرادیان تندتری دارد. کانال G (سبز) برای تصویرn=1روشنتر است. -
test2: همان tonemap، اما با طول متفاوت. تصاویر یکسان هستند.
شکل ۵۸. تابع test_param_tonemap_mode با n=0.
شکل ۵۹. تابع test_param_tonemap_mode با n=1.
تست_پست_خام_حساسیت_تقویت
بررسی افزایش حساسیت خام پس از پردازش. مجموعهای از تصاویر خام و YUV با حساسیتهای مختلف را ثبت میکند، ترکیب افزایش حساسیت خام را ارسال میکند و بررسی میکند که آیا میانگین پیکسلهای خروجی با تنظیمات درخواست مطابقت دارد یا خیر.
API های تست شده:
-
android.hardware.camera2.CameraCharacteristics#CONTROL_POST_RAW_SENSITIVITY_BOOST_RANGE -
android.hardware.camera2.CameraMetadata#REQUEST_AVAILABLE_CAPABILITIES_RAW -
android.hardware.camera2.CaptureRequest#CONTROL_POST_RAW_SENSITIVITY_BOOST -
android.hardware.camera2.CaptureRequest#SENSOR_SENSITIVITY
Pass: تصاویر خام با افزایش بوست تیرهتر میشوند در حالی که روشنایی تصاویر YUV ثابت میماند.
شکل ۶۰. مثال test_post_raw_sensitivity_boost raw s=3583 boost=0100.

شکل ۶۱. مثال test_post_raw_sensitivity_boost raw s=1792 boost=0200.

شکل ۶۲. مثال test_post_raw_sensitivity_boost raw s=0896 boost=0400.

شکل ۶۳. مثال test_post_raw_sensitivity_boost raw s=0448 boost=0800.

شکل ۶۴. مثال test_post_raw_sensitivity_boost raw s=0224 boost=1600.

شکل ۶۵. مثال test_post_raw_sensitivity_boost raw s=0112 boost=3199.
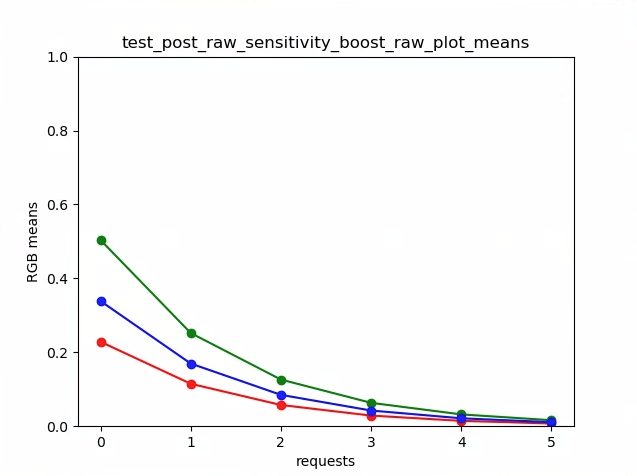
شکل ۶۶. نمودار خام test_post_raw_sensitivity_boost به معنی مثال است.

شکل ۶۷. مثال test_post_raw_sensitivity_boost YUV s=0112 boost=3199.

شکل ۶۸. مثال test_post_raw_sensitivity_boost YUV s=0448 boost=0800.

شکل ۶۹. مثال test_post_raw_sensitivity_boost YUV s=0896 boost=0400.

شکل ۷۰. مثال test_post_raw_sensitivity_boost YUV s=1792 boost=0200.

شکل ۷۱. مثال test_post_raw_sensitivity_boost YUV s=3585 boost=0100.

شکل ۷۲. test_post_raw_sensitivity_boost_yuv_plot_means
نوردهی_خام_آزمایشی
مجموعهای از تصاویر خام را با زمان نوردهی افزایشی ثبت میکند و مقادیر پیکسلها را اندازهگیری میکند.
API های تست شده:
-
android.hardware.camera2.CameraMetadata#REQUEST_AVAILABLE_CAPABILITIES_RAW -
android.hardware.camera2.CaptureRequest#SENSOR_EXPOSURE_TIME
گذر: افزایش ISO (افزایش) پیکسلها را به نور حساستر میکند، بنابراین نمودار به سمت چپ حرکت میکند.

شکل ۷۳. مثال test_raw_exposure ISO=55.
۱۰⁰ برابر با ۱ میلیثانیه، ۱۰¹ برابر با ۱۰ میلیثانیه و ۱۰⁻¹ برابر با ۰.۱ میلیثانیه است.

شکل ۷۴. مثال test_raw_exposure ISO=132.

شکل ۷۵. مثال test_raw_exposure ISO=209.

شکل ۷۶. مثال ISO=۲۸۶ در test_raw_exposure.

شکل ۷۷. مثال test_raw_exposure ISO=363.

شکل ۷۸. مثال test_raw_exposure ISO=440.
کاهش نویز_بازپردازش_آزمون
آزمایش میکند که آیا android.noiseReduction.mode برای درخواستهای پردازش مجدد اعمال شده است یا خیر. تصاویر پردازش شده را با دوربین کمنور ضبط میکند. از بهره آنالوگ بالا برای تأیید نویزدار بودن تصویر ضبط شده استفاده میکند. سه تصویر پردازش شده را ضبط میکند، برای NR خاموش، سریع و با کیفیت بالا. یک تصویر پردازش شده را با بهره کم و NR خاموش ضبط میکند و از واریانس این به عنوان پایه استفاده میکند.
API های تست شده:
عبور: سریع >= خاموش، HQ >= سریع، و HQ >> خاموش.

شکل ۷۹. مثال نمودار حالت SNR در مقابل NR معمولی.
test_tonemap_sequence
یک توالی از نماها را با منحنیهای تونمپ مختلف آزمایش میکند. ۳ نما دستی با تونمپ خطی میگیرد. ۳ نما دستی با تونمپ پیشفرض میگیرد. دلتا بین هر جفت فریم متوالی را محاسبه میکند.
API های تست شده:
مرحلهی عبور: سه فریم یکسان و به دنبال آن مجموعهای متفاوت از سه فریم یکسان وجود دارد.

شکل ۸۰. مثال test_tonemap_sequence i=0.

شکل ۸۱. مثال test_tonemap_sequence i=1.

شکل ۸۲. مثال test_tonemap_sequence i=2.

شکل ۸۳. مثال test_tonemap_sequence i=3.

شکل ۸۴. مثال test_tonemap_sequence i=4.

شکل ۸۵. مثال test_tonemap_sequence i=5.
test_yuv_jpeg_all
بررسی میکند که آیا تمام اندازهها و فرمتهای گزارششده برای ضبط تصویر کار میکنند یا خیر. از یک درخواست دستی با یک نقشه رنگ خطی استفاده میکند تا YUV و JPEG هنگام تبدیل توسط ماژول image_processing_utils یکسان به نظر برسند. تصاویر به طور پیشفرض ذخیره نمیشوند، اما میتوان با فعال کردن debug_mode را ذخیره کرد.
API های تست شده:
-
android.hardware.camera2.CaptureRequest#TONEMAP_CURVE -
android.hardware.camera2.CaptureRequest#TONEMAP_MODE -
android.graphics.ImageFormat#JPEG
پاس: تمام مراکز تصویر دارای حداکثر اختلاف جذر میانگین مربعات (RMS) (مقدار سیگنال) در تصاویر تبدیل شده RGB با ۳٪ از تصویر YUV با بالاترین وضوح هستند.

شکل ۸۶. مثال test_yuv_jpeg_all.
test_yuv_plus_dng
آزمایش میکند که آیا اندازهها و قالبهای گزارششده برای ضبط تصویر کار میکنند یا خیر.
API های تست شده:
Pass: تست کامل میشود و تصاویر درخواستی را برمیگرداند.

شکل ۸۷. مثال test_yuv_plus_dng.
صحنه ۱_۳
scene 1_3 از نظر عملکردی یک کپی یکسان از scene 1_1 است که با پیادهسازی یک ساختار زیرنویس، مدت زمان طولانی scene 1 را کاهش میدهد.
نتیجه_آزمون_ضبط
آزمایش میکند که آیا دادههای معتبر در اشیاء CaptureResult برگردانده میشوند یا خیر. این آزمایش شامل یک ضبط خودکار، یک ضبط دستی و یک ضبط خودکار دوم است.
API های تست شده:
-
android.hardware.camera2.CaptureRequest#CONTROL_AE_MODE -
android.hardware.camera2.CaptureRequest#CONTROL_AE_REGIONS -
android.hardware.camera2.CaptureRequest#CONTROL_AF_MODE -
android.hardware.camera2.CaptureRequest#CONTROL_AF_REGIONS -
android.hardware.camera2.CaptureRequest#CONTROL_AWB_MODE -
android.hardware.camera2.CaptureRequest#CONTROL_AWB_REGIONS -
android.hardware.camera2.CaptureRequest#CONTROL_MODE -
android.hardware.camera2.CaptureRequest#COLOR_CORRECTION_GAINS -
android.hardware.camera2.CaptureRequest#COLOR_CORRECTION_TRANSFORM -
android.hardware.camera2.CaptureRequest#COLOR_CORRECTION_MODE -
android.hardware.camera2.CaptureRequest#SENSOR_EXPOSURE_TIME -
android.hardware.camera2.CaptureRequest#SENSOR_SENSITIVITY -
android.hardware.camera2.CaptureResult#STATISTICS_LENS_SHADING_CORRECTION_MAP -
android.hardware.camera2.CaptureRequest#STATISTICS_LENS_SHADING_MAP_MODE -
android.hardware.camera2.CaptureRequest#TONEMAP_CURVE -
android.hardware.camera2.CaptureRequest#TONEMAP_MODE
Pass: فراداده برای همه تصاویر ثبت شده معتبر است و تنظیمات دستی به تصویر دوم خودکار نفوذ نمیکند. اصلاح سایه لنز را برای تصاویر ثبت شده رسم میکند.
شکل ۸۸. test_capture_result_plot_lsc_auto_ch0.
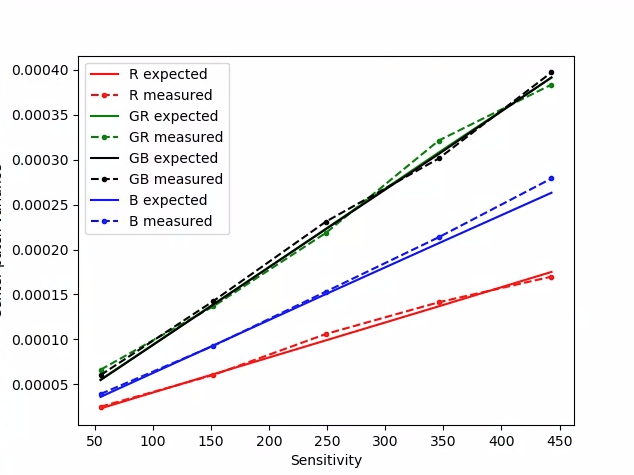
test_dng_noise_model
تأیید میکند که پارامترهای مدل خام DNG صحیح هستند. نمودار، واریانس اندازهگیری شده یک بخش مرکزی کارت خاکستری را در عکسهای خام گرفته شده در طیف وسیعی از حساسیتها نشان میدهد و این مقادیر را با واریانس مورد انتظار در هر حساسیت توسط مدل نویز DNG در دوربین HAL (بر اساس پارامترهای O،S برگردانده شده در اشیاء نتیجه ضبط) مقایسه میکند. برای جزئیات بیشتر در مورد مدل نویز DNG، سند زیر را در مورد مدل نویز DNG دانلود کنید.
API های تست شده:
-
android.hardware.camera2.CameraCharacteristics#SENSOR_INFO_SENSITIVITY_RANGE -
android.hardware.camera2.CameraCharacteristics#SENSOR_INFO_WHITE_LEVEL -
android.hardware.camera2.CameraCharacteristics#SENSOR_MAX_ANALOG_SENSITIVITY -
android.hardware.camera2.CaptureResult#SENSOR_NOISE_PROFILE -
android.hardware.camera2.CaptureRequest#SENSOR_SENSITIVITY
قبول: پارامترهای مدل خام DNG صحیح هستند. مقادیر RGB مورد انتظار با مقادیر RGB واقعی اندازهگیری شده مطابقت دارند.
شکل ۸۹. test_dng_noise_model_plog.
test_jpeg
آزمایشهایی که تصاویر YUV و تصاویر JPEG دستگاه را تبدیل کردند، یکسان به نظر میرسند. آزمایش، 10٪ از مرکز تصویر را در نظر میگیرد و مقدار RGB را محاسبه میکند و تأیید میکند که آنها مطابقت دارند.
API های تست شده:
قابل قبول: میانگین اختلاف RGB بین هر تصویر کمتر از ۳٪ باشد.

شکل ۹۰. test_jpeg_fmt=jpg.jpg.

شکل ۹۱. test_jpeg=fmt=yuv.jpg.
حساسیت_برگشتی_تست_خام
مجموعهای از تصاویر خام را با بهرههای افزایشی ثبت میکند و نویز را اندازهگیری میکند. فقط تصاویر خام را به صورت پشت سر هم ثبت میکند.
API های تست شده:
-
android.hardware.camera2.CameraCharacteristics#SENSOR_INFO_ACTIVE_ARRAY_SIZE -
android.hardware.camera2.CameraCharacteristics#SENSOR_INFO_SENSITIVITY_RANGE -
android.hardware.camera2.CameraCharacteristics#SENSOR_INFO_WHITE_LEVEL -
android.hardware.camera2.CameraCharacteristics#SENSOR_MAX_ANALOG_SENSITIVITY -
android.hardware.camera2.CameraMetadata#REQUEST_AVAILABLE_CAPABILITIES_RAW
پاس: هر شات از شات قبلی پر سر و صداتر است، زیرا بهره در حال افزایش است.
از واریانس سلول شبکه آمار مرکزی استفاده میکند.
شکل ۹۲. واریانس حساسیت_برگشتی_آزمون_خام.
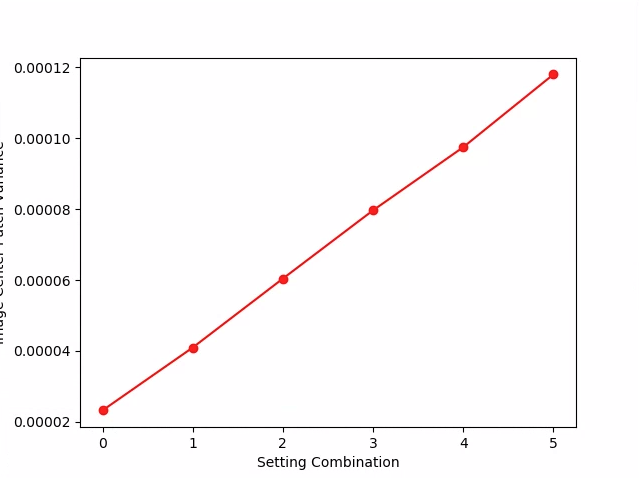
حساسیت_خام_آزمون
مجموعهای از تصاویر خام را با حساسیتهای فزاینده ثبت میکند و نویز (واریانس) را در ۱۰٪ مرکزی تصویر اندازهگیری میکند. بررسی میکند که هر عکس نویز بیشتری نسبت به عکس قبلی دارد.
API های تست شده:
-
android.hardware.camera2.CameraCharacteristics#SENSOR_INFO_PRE_CORRECTION_ACTIVE_ARRAY_SIZE -
android.hardware.camera2.CameraCharacteristics#SENSOR_INFO_SENSITIVITY_RANGE -
android.hardware.camera2.CameraCharacteristics#SENSOR_INFO_WHITE_LEVEL -
android.hardware.camera2.CameraCharacteristics#SENSOR_MAX_ANALOG_SENSITIVITY -
android.hardware.camera2.CameraMetadata#REQUEST_AVAILABLE_CAPABILITIES_RAW
پاس: واریانس با هر ضربه افزایش مییابد.

شکل ۹۳. واریانس حساسیت آزمون خام.
test_yuv_plus_jpeg
تستهای ضبط یک فریم واحد به عنوان خروجی YUV و JPEG. از یک درخواست دستی با یک نقشه رنگ خطی استفاده میکند تا YUV و JPEG هنگام تبدیل توسط ماژول image_processing_utils یکسان به نظر برسند.
API های تست شده:
-
android.hardware.camera2.CaptureRequest#TONEMAP_CURVE -
android.hardware.camera2.CaptureRequest#TONEMAP_MODE -
android.graphics.ImageFormat#JPEG
Pass: تصاویر YUV و JPEG مشابه هستند و کمتر از ۱٪ RMS (مقدار سیگنال) تفاوت دارند.

شکل ۹۴. test_yuv_plus_jpeg با فرمت JPEG.

شکل ۹۵. test_yuv_plus_jpeg با فرمت YUV.
test_yuv_plus_raw
در صورت پشتیبانی، ضبط یک فریم واحد را به صورت خروجی خام (خام ۱۰ بیتی و ۱۲ بیتی) و YUV آزمایش میکند. از یک درخواست دستی با نقشه رنگ خطی استفاده میکند، بنابراین انتظار میرود خام و YUV یکسان باشند. مقادیر RGB مرکزی ۱۰٪ تصاویر تبدیل شده RGB را مقایسه میکند. android.shading.mode را ثبت میکند.
API های تست شده:
-
android.hardware.camera2.CameraMetadata#REQUEST_AVAILABLE_CAPABILITIES_RAW -
android.hardware.camera2.CaptureResult#STATISTICS_LENS_SHADING_CORRECTION_MAP -
android.hardware.camera2.CaptureRequest#COLOR_CORRECTION_MODE -
android.hardware.camera2.CaptureRequest#COLOR_CORRECTION_GAINS -
android.hardware.camera2.CaptureRequest#COLOR_CORRECTION_TRANSFORM -
android.hardware.camera2.CaptureRequest#CONTROL_AWB_MODE -
android.hardware.camera2.CaptureRequest#CONTROL_MODE -
android.hardware.camera2.CaptureRequest#SHADING_MODE -
android.hardware.camera2.CaptureRequest#TONEMAP_CURVE -
android.hardware.camera2.CaptureRequest#TONEMAP_MODE -
android.hardware.graphics.ImageFormat#RAW10 -
android.hardware.graphics.ImageFormat#RAW12
قبول: تصاویر YUV و خام مشابه هستند و کمتر از 3.5٪ RMS (مقدار جذر میانگین مربعات یک سیگنال) اختلاف دارند.
شکل ۹۶. test_yuv_plus_raw_shading=1_raw.jpg.
شکل ۹۷. test_yuv_plus_raw_shading=1_yuv.jpg.
اولویت_حساسیت_آزمون
CONTROL_AE_PRIORITY_MODE_SENSOR_SENSITIVITY_PRIORITY را در تنظیمات مختلف ISO آزمایش میکند تا ارتباط بین ISO بالاتر و افزایش سطح نویز را تأیید کند.
API های تست شده:
-
android.hardware.camera2.CameraMetadata#CONTROL_AE_PRIORITY_MODE_SENSOR_SENSITIVITY_PRIORITY -
android.hardware.camera2.CaptureRequest#SENSOR_SENSITIVITY -
android.hardware.camera2.CaptureResult#SENSOR_SENSITIVITY -
android.hardware.camera2.CaptureRequest#CONTROL_AE_PRIORITY_MODE -
android.hardware.camera2.CaptureResult#CONTROL_AE_PRIORITY_MODE -
android.hardware.camera2.CameraCharacteristics#SENSOR_INFO_SENSITIVITY_RANGE -
android.hardware.camera2.CaptureRequest#CONTROL_AE_MODE -
android.hardware.camera2.CaptureResult#CONTROL_AE_MODE -
android.hardware.camera2.CameraMetadata#CONTROL_AE_MODE_ON -
android.hardware.camera2.CameraCharacteristics#CONTROL_AE_AVAILABLE_PRIORITY_MODES
قبول: ایزوی بالاتر منجر به افزایش سطح نویز میشود.
معیارهای رد شدن از آزمون
در صورت برآورده شدن هر یک از معیارهای زیر، از تست test_sensitivity_priority.py صرف نظر میشود:
- این دستگاه دارای اولین سطح API (
first_api_level) 35 یا کمتر است. - دستگاه
CONTROL_AE_PRIORITY_MODE_SENSOR_SENSITIVITY_PRIORITYرا درCONTROL_AE_AVAILABLE_PRIORITY_MODESاعلام نمیکند.
اولویت_زمان_قرارگیری_در_آزمون
CONTROL_AE_PRIORITY_MODE_SENSOR_EXPOSURE_TIME_PRIORITY را در زمانهای نوردهی مختلف آزمایش میکند و روشنایی پایدار را در محدودهای که ISO میتواند جبران کند، بررسی میکند.
API های تست شده:
-
android.hardware.camera2.CameraMetadata#CONTROL_AE_PRIORITY_MODE_SENSOR_EXPOSURE_TIME_PRIORITY -
android.hardware.camera2.CaptureRequest#SENSOR_EXPOSURE_TIME -
android.hardware.camera2.CaptureResult#SENSOR_EXPOSURE_TIME -
android.hardware.camera2.CaptureRequest#CONTROL_AE_PRIORITY_MODE -
android.hardware.camera2.CaptureResult#CONTROL_AE_PRIORITY_MODE -
android.hardware.camera2.CameraCharacteristics#SENSOR_INFO_SENSITIVITY_RANGE -
android.hardware.camera2.CaptureResult#SENSOR_SENSITIVITY -
android.hardware.camera2.CaptureRequest#CONTROL_AE_MODE -
android.hardware.camera2.CaptureResult#CONTROL_AE_MODE -
android.hardware.camera2.CameraMetadata#CONTROL_AE_MODE_ON -
android.hardware.camera2.CameraCharacteristics#CONTROL_AE_AVAILABLE_PRIORITY_MODES
قابل قبول: اگر ISO در محدوده جبران خود باشد، روشنایی در طول زمانهای نوردهی پایدار است (در محدوده تلرانس).
معیارهای رد شدن از آزمون
در صورت برآورده شدن هر یک از معیارهای زیر، از آزمون test_exposure_time_priority صرف نظر میشود:
- این دستگاه دارای اولین سطح API (
first_api_level) 35 یا کمتر است. - دستگاه
CONTROL_AE_PRIORITY_MODE_SENSOR_EXPOSURE_TIME_PRIORITYرا درCONTROL_AE_AVAILABLE_PRIORITY_MODESاعلام نمیکند.
صحنه ۲_الف
scene2_a دارای سه چهره با پسزمینه خاکستری و لباسهای خنثی است. چهرهها طوری انتخاب شدهاند که طیف وسیعی از رنگهای پوست را داشته باشند. نمودار باید جهتگیری صحیحی داشته باشد تا تشخیص چهره به طور بهینه کار کند.

شکل ۹۸. صحنه ۲_یک مثال.
تست_اتوفرمینگ
رفتار قاببندی خودکار دستگاه دوربین را آزمایش میکند. بزرگنمایی زیادی انجام میدهد به طوری که هیچ یک از چهرههای موجود در صحنه قابل مشاهده نباشند، حالت قاببندی خودکار را با تنظیم AUTOFRAMING در CaptureRequest روی True فعال میکند و بررسی میکند که آیا همه چهرههای موجود در صحنه اصلی میتوانند هنگام همگرایی حالت (یعنی زمانی که AUTOFRAMING_STATE در CaptureResult روی AUTOFRAMING_STATE_CONVERGED تنظیم شده است) شناسایی شوند یا خیر.
API های تست شده:
-
android.hardware.camera2.CameraCharacteristics#CONTROL_AUTOFRAMING_AVAILABLE -
android.hardware.camera2.CaptureRequest#CONTROL_AUTOFRAMING -
android.hardware.camera2.CaptureResult#CONTROL_AUTOFRAMING -
android.hardware.camera2.CaptureResult#CONTROL_AUTOFRAMING_STATE
قبول: هر سه چهره شناسایی میشوند.
test_display_p3
آزمایشها نمایش P3 ضبط شده در JPEG با استفاده از API ColorSpaceProfiles . آزمایش میکند که JPEG ضبط شده دارای یک پروفایل ICC مناسب در هدر خود است و اینکه تصویر حاوی رنگهایی خارج از محدوده sRGB است.
API های تست شده:
-
android.hardware.camera2.params.ColorSpaceProfiles -
android.hardware.camera2.params.SessionConfiguration#setColorSpace
Pass: فایل JPEG شامل پروفایل Display P3 ICC و رنگهایی خارج از محدوده sRGB است.
اثرات_آزمون
فریم را برای افکتهای دوربین پشتیبانیشده ضبط میکند و بررسی میکند که آیا آنها به درستی تولید شدهاند یا خیر. این آزمایش فقط افکتها را OFF و MONO بررسی میکند، اما تصاویر را برای همه افکتهای پشتیبانیشده ذخیره میکند.
API های تست شده:
-
android.hardware.camera2.CameraCharacteristics#CONTROL_AVAILABLE_EFFECTS -
android.hardware.camera2.CaptureRequest#CONTROL_EFFECT_MODE
Pass: تصویر صحنه را با جلوههای OFF و یک تصویر تکرنگ با جلوههای تنظیمشده روی MONO ثبت میکند.

شکل ۹۹. اثرات_آزمون_MONO.
کلیدهای_در معرض_آزمون_سازگار
این آزمایش میانگین روشنایی (luma) یک تصویر با قابلیت AE را با یک تصویر بدون قابلیت AE که پارامترهای نوردهی (حساسیت، زمان نوردهی، مدت زمان فریم، افزایش حساسیت پس از پردازش خام) دریافتی در CaptureResult تصویر با قابلیت AE را به صورت دستی اعمال میکند، مقایسه میکند.
API های تست شده:
-
android.hardware.camera2.CaptureRequest#SENSOR_SENSITIVITY -
android.hardware.camera2.CaptureRequest#SENSOR_EXPOSURE_TIME -
android.hardware.camera2.CaptureRequest#SENSOR_FRAME_DURATION -
android.hardware.camera2.CaptureRequest#CONTROL_POST_RAW_SENSITIVITY_BOOST -
android.hardware.camera2.CaptureResult#SENSOR_SENSITIVITY -
android.hardware.camera2.CaptureResult#SENSOR_EXPOSURE_TIME -
android.hardware.camera2.CaptureResult#SENSOR_FRAME_DURATION -
android.hardware.camera2.CaptureResult#CONTROL_POST_RAW_SENSITIVITY_BOOST
قبولی: تفاوت نسبی در لوما بین دو تصرف کمتر از ۴ درصد است.
ترکیبهای قالب تست
ترکیبهای مختلف فرمتهای خروجی را آزمایش میکند.
API های تست شده:
android.hardware.camera2.CameraCharacteristics#SCALER_STREAM_CONFIGURATION_MAPandroid.hardware.camera2.params.StreamConfigurationMap#getOutputSizes()android.hardware.camera2.CameraCaptureSession#captureBurst()
قبول: تمام ترکیبها با موفقیت ثبت میشوند.
تعداد_چهرههای_آزمون
تشخیص چهره را آزمایش میکند.
API های تست شده:
-
android.hardware.camera2.CaptureResult#STATISTICS_FACES -
android.hardware.camera2.CaptureResult#STATISTICS_FACE_DETECT_MODE
پاس: سه چهره پیدا میکند.
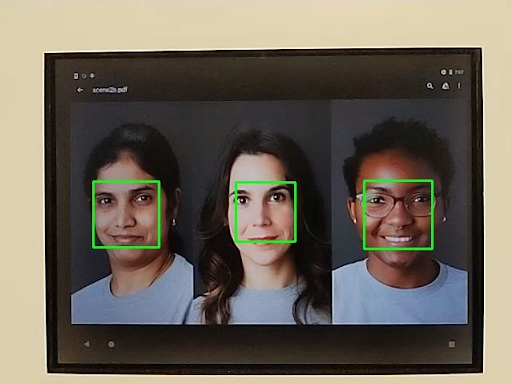
شکل ۱۰۰. مثال حالت تشخیص چهره test_num_faces شماره ۱.
test_reprocess_uv_swap
بررسی میکند که پردازش مجدد YUV صفحات U و V را جابجا نمیکند. این امر با محاسبه مجموع اختلاف مطلق (SAD) بین تصویر پردازش مجدد شده و یک تصویر ضبط شده پردازش نشده تشخیص داده میشود. اگر جابجایی صفحات U و V خروجی تصویر پردازش مجدد شده منجر به افزایش SAD شود، فرض میشود که خروجی دارای صفحات U و V صحیح است.
API های تست شده:
-
android.hardware.camera2.CameraDevice#createCaptureSession -
android.hardware.camera2.CameraMetadata#REQUEST_AVAILABLE_CAPABILITIES_YUV_REPROCESSING -
android.hardware.camera2.CaptureRequest#EDGE_MODE -
android.hardware.camera2.CaptureResult#NOISE_REDUCTION_MODE
پاسخ مثبت: جای صفحات U و V عوض نمیشود.

شکل ۱۰۱. مثال test_reprocess_uv_swap.
صحنه ۲_ب
scene2_b دارای سه چهره با پسزمینه خاکستری و لباسهای خنثی است. چهرهها طوری انتخاب شدهاند که طیف وسیعی از رنگهای پوست را داشته باشند. نمودار باید جهتگیری صحیحی داشته باشد تا تشخیص چهره به طور بهینه کار کند.
تعداد_چهرههای_آزمایشی
تشخیص چهره را در پیشنمایش با افزایش تنوع رنگ پوست در صحنههای چهره آزمایش میکند.
API های تست شده:
-
android.hardware.camera2.CaptureResult#STATISTICS_FACES -
android.hardware.camera2.CaptureResult#STATISTICS_FACE_DETECT_MODE
قبولی: سه چهره با نشانههای چهره در کادرهای محدوده چهره پیدا میکند.
Figure 102. test_num_faces face detection mode 1 example.
test_yuv_jpeg_capture_sameness
Captures two images using the largest common YUV and JPEG formats with the same aspect ratio as the largest JPEG format not exceeding a resolution of 1920x1440. Sets jpeg.quality to 100 and captures a dual surface request. Converts both images to RGB arrays and calculates the 3D root mean square (RMS) difference between the two images.
In addition, this test verifies that the YUV outputs for all supported stream use cases are reasonably similar to the YUV with the STILL_CAPTURE use case.
APIs tested:
-
android.hardware.camera2.CameraCharacteristics#SCALER_AVAILABLE_STREAM_USE_CASES -
android.hardware.camera2.CaptureRequest#JPEG_QUALITY -
android.graphics.ImageFormat#JPEG
Pass: YUV and JPEG images for the STILL_CAPTURE use case have less than 3% RMS (root-mean-square value of a signal) difference; YUV images for all supported use cases have less than 4% CIELAB difference from YUV images with the STILL_CAPTURE use case.
scene2_c
test_num_faces
Tests face detection with increased skin tone diversity in face scenes.
APIs tested:
-
android.hardware.camera2.CaptureResult#STATISTICS_FACES -
android.hardware.camera2.CaptureResult#STATISTICS_FACE_DETECT_MODE
Pass: Finds three faces.
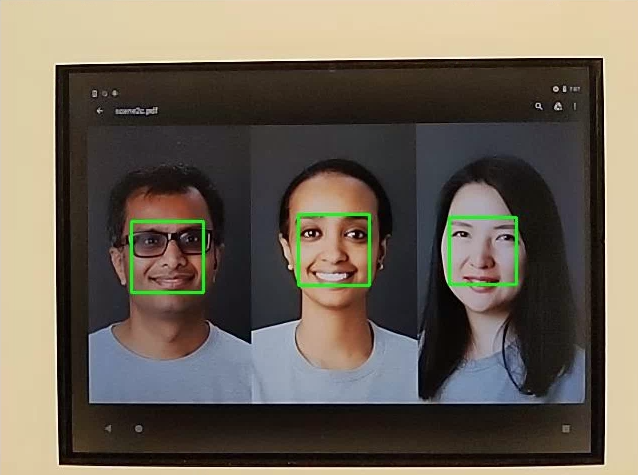
Figure 103. test_num_faces face detection mode example.
test_jpeg_capture_perf_class
Tests JPEG capture latency for the S performance class as specified in section 2.2.7.2 Camera in the CDD.
Pass: MUST have camera2 JPEG capture latency < 1000 ms for 1080p resolution as measured by the CTS camera PerformanceTest under ITS lighting conditions (3000K) for both primary cameras.
test_camera_launch_perf_class
Tests camera launch latency for the S performance class as specified section 2.2.7.2 Camera in the CDD.
Pass: MUST have camera2 startup latency (open camera to first preview frame) < 600ms as measured by the CTS camera PerformanceTest under ITS lighting conditions (3000K) for both primary cameras.
test_default_camera_hdr
Tests that default camera capture is Ultra HDR for performance class 15 as specified in section 2.2.7.2 Camera of the CDD.
Pass: Default camera package capture MUST be Ultra HDR for a performance class 15 device.
scene2_d
test_preview_num_faces
Tests face detection in preview with increased skin tone diversity in face scenes.
APIs tested:
-
android.hardware.camera2.CaptureResult#STATISTICS_FACES -
android.hardware.camera2.CaptureResult#STATISTICS_FACE_DETECT_MODE
Pass: Finds three faces with face landmarks in the face bounding boxes.
scene2_e
test_continuous_picture
50 VGA resolution frames are captured with the capture request first setting android.control.afMode = 4 (CONTINUOUS_PICTURE).
APIs tested:
-
android.hardware.camera2.CaptureRequest#CONTROL_AF_MODE -
android.hardware.camera2.CaptureResult#CONTROL_AE_STATE -
android.hardware.camera2.CaptureResult#CONTROL_AF_STATE -
android.hardware.camera2.CaptureResult#CONTROL_AWB_STATE
Pass: 3A system settles by the end of a 50-frame capture.
test_num_faces
Tests face detection with increased skin tone diversity in face scenes.
APIs tested:
-
android.hardware.camera2.CaptureResult#STATISTICS_FACES -
android.hardware.camera2.CaptureResult#STATISTICS_FACE_DETECT_MODE
Pass: Finds 3 faces.
scene2_f
scene2_f has three faces with a white background and white clothing. The faces have a wide range of skin tones and high contrast with the background.

Figure 104. scene2_f example.
test_preview_num_faces
Tests face detection with increased skin tone diversity in face scenes.
APIs tested:
-
android.hardware.camera2.CaptureResult#STATISTICS_FACES -
android.hardware.camera2.CaptureResult#STATISTICS_FACE_DETECT_MODE
Pass: Finds three faces with face landmarks in the face bounding boxes.

Figure 105. test_num_faces_fd_mode_1 example.
scene2_g
scene2_g has three profile faces with a white background and white clothing. The faces have a wide range of skin tones and high contrast with the background.
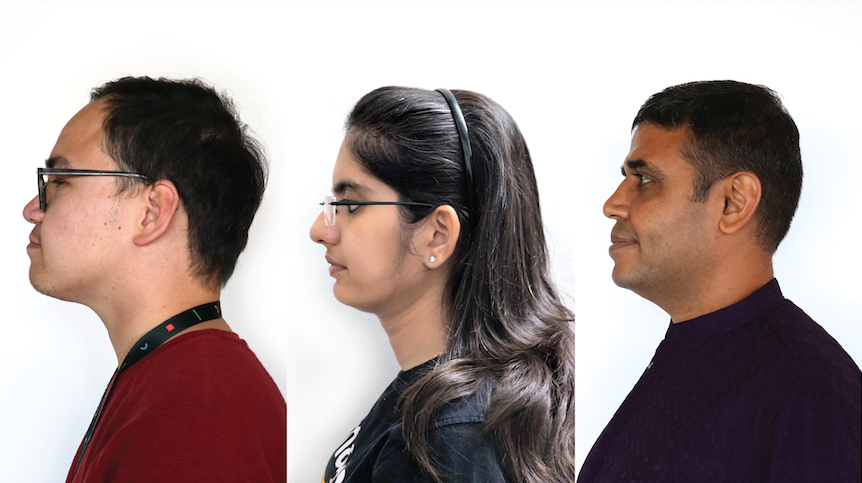
Figure 106. scene2_g example.
test_preview_num_faces
Tests face detection with increased skin tone diversity in face scenes.
APIs tested:
-
android.hardware.camera2.CaptureResult#STATISTICS_FACES -
android.hardware.camera2.CaptureResult#STATISTICS_FACE_DETECT_MODE
Pass: Finds three faces with face landmarks in the face bounding boxes.
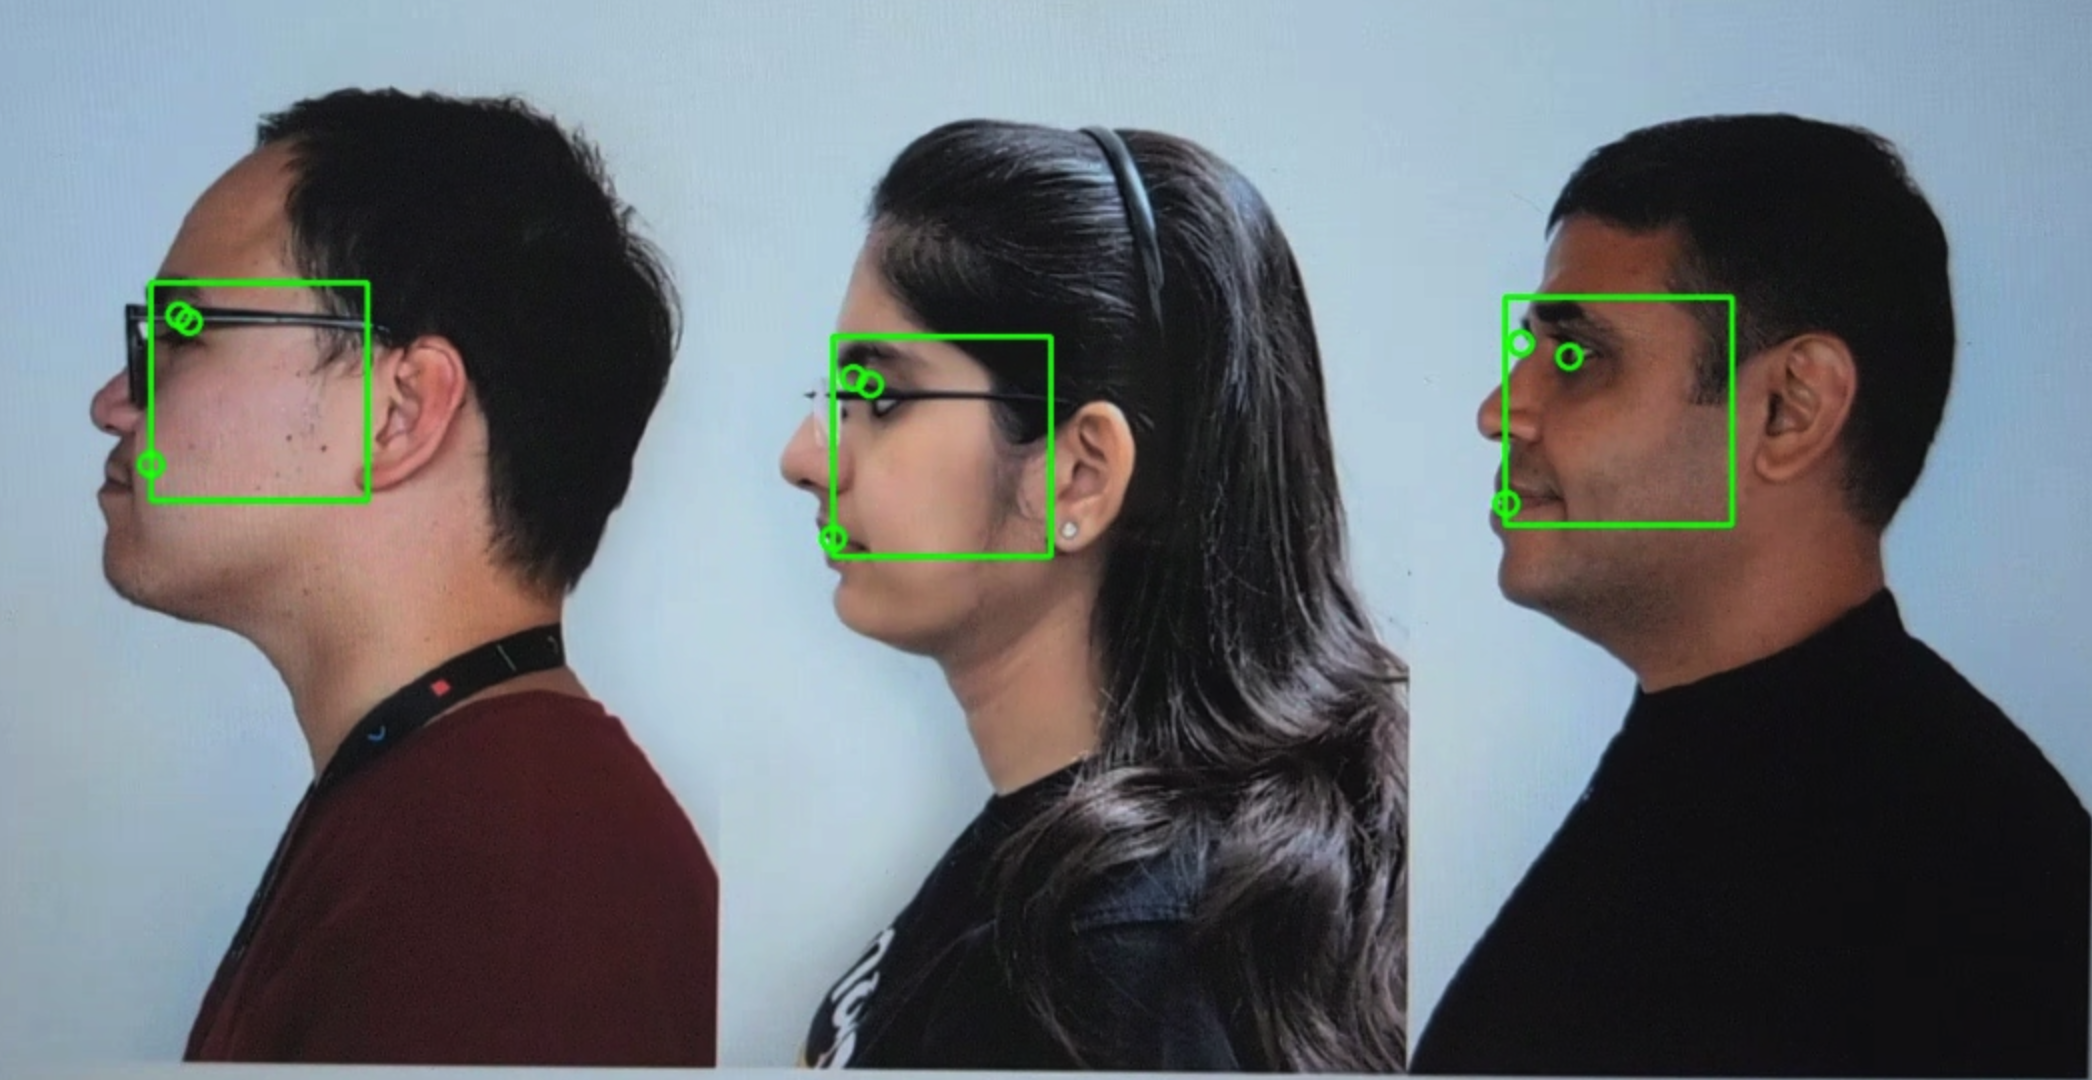
Figure 107. test_preview_num_faces example.
صحنه ۳
scene3 uses the ISO12233 chart, and most tests use a chart extractor method to find the chart in the scene. For this reason, most of the saved images don't have borders like the images for scenes 1, 2, or 4, but only the chart. The chart must be in the correct orientation for the chart finder to work optimally. In Android 17 and higher, scene3 uses ArUco markers for chart detection.

Figure 108. scene3 chart.
test_edge_enhancement
Tests that the android.edge.mode parameter is applied correctly. Captures non-reprocess images for each edge mode and returns sharpness of the output image and the capture result metadata. Processes a capture request with a given edge mode, sensitivity, exposure time, focus distance, and output surface parameter. In Android 17 and higher, uses ArUco markers to define the chart area that contains the necessary sharp edges.
Pass: HQ mode (2) sharper than OFF mode (0). FAST mode (1) sharper than OFF mode. HQ mode sharper or equal to FAST mode.
APIs tested:
Impacted camera parameters:
-
EDGE_MODE

Figure 109. test_edge_enhancement edge=0 example.

Figure 110. test_edge_enhancement edge=1 (fast mode) example.

Figure 111. test_edge_enhancement edge=2 (high quality mode) example.
test_flip_mirror
Tests if the image is properly oriented as per 7.5.2 Front-Facing Camera in the CDD. In Android 17 and higher, uses ArUco markers to validate both presence and orientation of the chart. Mirrored, flipped, or rotated images can be identified by the diamond feature near the center.
Pass: All markers are detected and correctly aligned. Image isn't flipped, mirrored, or rotated.
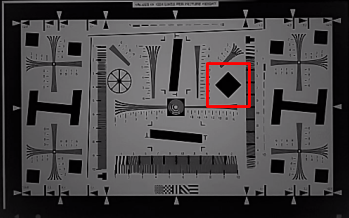
Figure 112. test_flip_mirror scene patch example.
test_imu_drift
Tests if the inertial measurement unit (IMU) has stable output for 30 seconds while the device is stationary and capturing a high-definition preview.
APIs tested:
-
android.hardware.Sensor -
android.hardware.SensorEvent -
android.hardware.Sensor#TYPE_GYROSCOPE -
android.hardware.Sensor#TYPE_ROTATION_VECTOR
Pass:
- The drift of the gyroscope is less than 0.01 rad over the test time.
- The variance of the gyroscope reading is less than 1E-7 rad 2 /s 2 /Hz over the test time.
- The drift of the rotation vector is less than 0.01 rad over the test time.
- (Not yet mandated) The drift of the gyroscope is less than 1 degree per second.
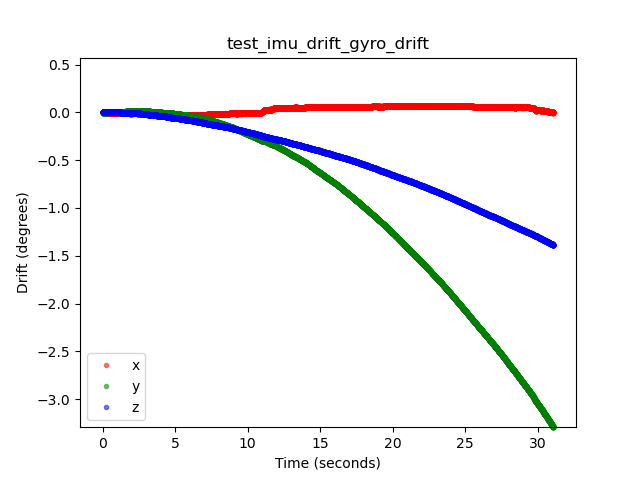
Figure 113. test_imu_drift gyroscope drift example.
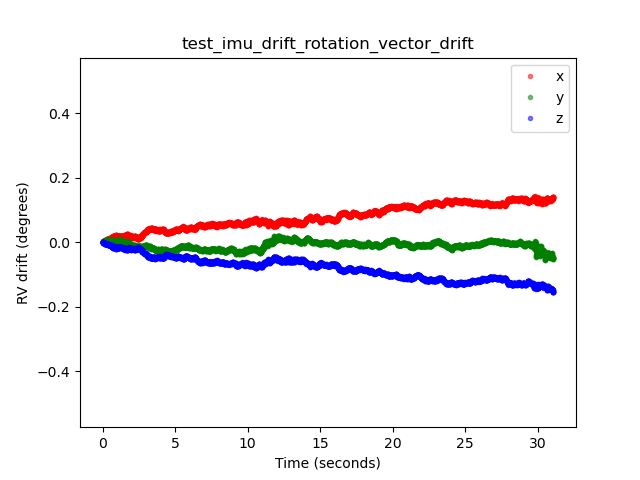
Figure 114. test_imu_drift rotation vector drift example.
test_landscape_to_portrait
Tests if the landscape-to-portrait override functions correctly for landscape-oriented sensors.
APIs tested:
-
android.hardware.camera2.CameraCharacteristics#SCALER_AVAILABLE_ROTATE_AND_CROP_MODES -
android.hardware.camera2.CameraCharacteristics#SENSOR_ORIENTATION -
android.hardware.camera2.CameraCharacteristics#getCameraCharacteristics
Pass: The test locates a chart with the expected rotation (0 degrees when the landscape-to-portrait override is disabled, 90 degrees when enabled).

Figure 115. test_landscape_to_portrait example.
test_lens_movement_reporting
Tests if the lens movement flag is properly reported. Captures a burst of 24 images with the first 12 frames at the optimum focus distance (as found by 3A) and the last 12 frames at the minimum focus distance. Around frame 12, the lens moves causing the sharpness to drop. The sharpness eventually stabilizes as the lens moves to the final position.
The lens movement flag should be asserted in all frames where the sharpness is intermediate to sharpness in the first few frames with the lens stationary at optimum focal distance, and the final few frames where the lens is stationary in the minimum focal distance. The exact frame the lens moves isn't important: what is important is that the movement flag is asserted when the lens is moving.
In Android 17 and higher, this test uses ArUco markers to define the chart area that contains the necessary sharp edges. This method provides a stable detection for cameras from Ultra-Wide (UW) to tele applications.
APIs tested:
-
android.hardware.camera2.CameraCharacteristics#LENS_INFO_MINIMUM_FOCUS_DISTANCE -
android.hardware.camera2.CaptureResult#LENS_STATE -
android.hardware.camera2.CaptureResult#LENS_FOCUS_DISTANCE -
android.hardware.camera2.CaptureResult#SENSOR_TIMESTAMP -
android.hardware.camera2.CaptureRequest#LENS_FOCUS_DISTANCE
Pass: Lens movement flag is True in the frame with sharpness change.
Fail mechanisms:
-
lens_moving: True(android.hardware.camera2.CaptureResult#LENS_STATE= 1) intest_log.DEBUGis asserted only in frames where sharpness isn't changing. - Frames with
lens_moving: False(android.hardware.camera2.CaptureResult#LENS_STATE= 0) intest_log.DEBUGhas a sharpness difference compared to the first few frames at optimum focal distance or the last few frames at minimum focus distance.
test_reprocess_edge_enhancement
Tests if supported reprocess methods for edge enhancement work properly. Processes a capture request with a given reprocess edge mode and compares different modes to capture with reprocess edge modes disabled.
APIs tested:
-
android.hardware.camera2.CaptureRequest#EDGE_MODE -
android.hardware.camera2.CaptureRequest#REPROCESS_EFFECTIVE_EXPOSURE_FACTOR
Pass: Sharpness for the different edge modes is correct. HQ (mode 2) is sharper than OFF (mode 0), and improvement between different modes is similar.
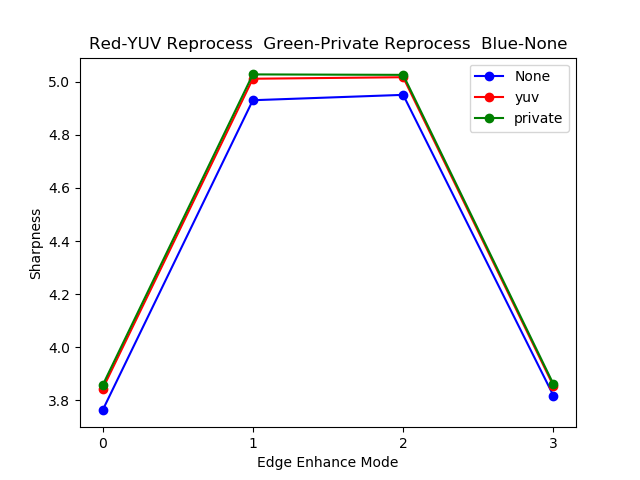
Figure 116. test_reprocess_edge_enhancement plot example.
scene4
scene4 consists of a black circle on a white background inside a square.
Tests in scene4 can be sensitive to alignment, so starting in Android 15, you can use check_alignment.py in the tools directory to enable a check of the DUT and chart alignment.

Figure 117. scene4 example.
test_30_60fps_preview_fov_match
Tests that 30 FPS and 60 FPS preview videos have the same FoV. The test captures two videos, one with 30 FPS and another with 60 FPS. A representative frame is selected from each video and analyzed to verify that the FoV changes in the two videos are within specifications. Tests that the circle's aspect ratio remains constant, the center of the circle remains stable, and the radius of the circle remains constant.
APIs tested:
-
android.hardware.camera2.CaptureRequest#CONTROL_AE_TARGET_FPS_RANGE -
android.hardware.camera2.CaptureRequest#SENSOR_FRAME_DURATION -
android.hardware.camera2.CaptureRequest#SENSOR_EXPOSURE_TIME -
android.hardware.camera2.CaptureResult#LENS_DISTORTION -
android.hardware.camera2.CaptureResult#LENS_FOCAL_LENGTH -
android.hardware.camera2.CaptureResult#LENS_INTRINSIC_CALIBRATION
Pass: Images aren't stretched, the center of images don't differ by more than 3%, and the maximum aspect ratio change between 30 FPS and 60 FPS videos is no more than 7.5%
Fail mechanisms:
- The circle from the 30 FPS video is significantly different in size from the 60 FPS video.
- The circle in the captured image is distorted by the processing pipeline.
- The circle in the captured image is cropped due to an extreme aspect ratio capture request reducing the height or width of the image.
- The circle in the captured image has a reflection in the center and doesn't appear fully filled.
test_aspect_ratio_and_crop
Tests if images are distorted or cropped unexpectedly in the image pipeline. Takes pictures of a circle over all formats. Verifies the circle isn't distorted, the circle doesn't move from the center of image, and the circle doesn't change size incorrectly with different aspect ratios or resolutions.
APIs tested:
-
android.hardware.camera2.CaptureResult#LENS_DISTORTION -
android.hardware.camera2.CaptureResult#LENS_FOCAL_LENGTH -
android.hardware.camera2.CaptureResult#LENS_INTRINSIC_CALIBRATION
Pass: Images aren't stretched, the center of images don't differ by more than 3%, and the maximum possible FoV is preserved.
Fail mechanisms:
- The camera isn't aligned with the circle displayed on the tablet in the center of the captured scene.
- The circle in the captured image is distorted by the processing pipeline.
- The lower resolution image is double cropped in the image pipeline creating different FoV between high and low resolution images.
- The circle in the captured image is cropped due to an extreme aspect ratio capture request reducing the height or width of the image.
- The circle in the captured image has a reflection in the center and doesn't appear fully filled.
test_multi_camera_alignment
Tests the camera calibration parameters related to camera positioning for multi-camera systems. Using the multi-camera physical subcameras, takes a picture with one of the physical cameras. Finds the circle center. Projects the circle center to the world coordinates for each camera. Compares the difference between the cameras' circle centers in world coordinates. Reprojects the world coordinate back to pixel coordinates and compares against originals as a validity check. Compares the circle sizes checking if the focal lengths of the cameras are different.
APIs tested:
-
android.hardware.camera2.CameraCharacteristics#getPhysicalCameraIds() -
android.hardware.camera2.CameraCharacteristics#LENS_DISTORTION -
android.hardware.camera2.CameraCharacteristics#LENS_INFO_AVAILABLE_FOCAL_LENGTHS -
android.hardware.camera2.CameraCharacteristics#LENS_INTRINSIC_CALIBRATION -
android.hardware.camera2.CameraCharacteristics#LENS_POSE_ROTATION -
android.hardware.camera2.CameraCharacteristics#LENS_POSE_TRANSLATION -
android.hardware.camera2.CameraMetadata#REQUEST_AVAILABLE_CAPABILITIES_LOGICAL_MULTI_CAMERA -
android.hardware.camera2.CaptureRequest#SCALER_CROP_REGION -
android.hardware.camera2.CaptureRequest#DISTORTION_CORRECTION_MODE
Pass: Circle centers and sizes are as expected in projected images compared to captured images using camera calibration data and focal lengths.
Fail mechanisms:
-
LENS_INTRINSIC_CALIBRATION,LENS_POSE_TRANSLATION, andLENS_POSE_ROTATIONare design values and not actual calibration data. - The camera system isn't appropriate for the test setup, for example, testing a wide and an ultra-wide camera system with the RFoV test rig. For more information, see Camera ITS-in-a-box FAQ Q1 .
test_preview_aspect_ratio_and_crop
Similar to the test_aspect_ratio_and_crop test for still captures, checks the supported preview formats to verify that the preview frames aren't stretched or cropped inappropriately. Verifies that the aspect ratio of the circle doesn't change, the cropped images keep the circle in center of the frame, and the circle size doesn't change for a constant format or with different resolutions (FoV check).
APIs tested:
-
android.hardware.camera2.CaptureResult#LENS_DISTORTION -
android.hardware.camera2.CaptureResult#LENS_FOCAL_LENGTH -
android.hardware.camera2.CaptureResult#LENS_INTRINSIC_CALIBRATION -
android.hardware.camera2.CameraCharacteristics#SCALAR_AVAILABLE_CAPABILITIES_STREAM_USE_CASES -
android.media.MediaRecorder -
android.media.CamcorderProfile
Pass: Images aren't stretched, the center of images don't differ by more than 3%, and the maximum possible FoV is preserved.
test_preview_stabilization_fov
Checks the supported preview sizes to help ensure the FoV is cropped appropriately. The test captures two videos, one with preview stabilization ON , and another with preview stabilization OFF . A representative frame is selected from each video, and analyzed to verify that the FoV changes in the two videos are within spec.
APIs tested:
-
android.hardware.camera2.CameraCharacteristics#SCALAR_AVAILABLE_CAPABILITIES_STREAM_USE_CASES -
android.media.MediaRecorder -
android.media.CamcorderProfile
Pass: The circle aspect ratio remains about constant, the center location of the circle remains stable, and the size of circle changes no more than 20%.
test_video_aspect_ratio_and_crop
Takes videos of a circle inside of a square over all video formats. Extracts the key frames, and verifies the aspect ratio of the circle doesn't change, the cropped images keep the circle in center, and the circle size doesn't change for a constant format or with different resolution (FoV check).
APIs tested:
-
android.hardware.camera2.CameraCharacteristics#SCALAR_AVAILABLE_CAPABILITIES_STREAM_USE_CASES -
android.hardware.camera2.CaptureResult#LENS_DISTORTION -
android.hardware.camera2.CaptureResult#LENS_FOCAL_LENGTH -
android.hardware.camera2.CaptureResult#LENS_INTRINSIC_CALIBRATION -
android.media.MediaRecorder -
android.media.CamcorderProfile
Pass: Video frames aren't stretched, the center of frames don't differ by more than 3%, and the maximum possible FoV is preserved.
scene6
scene6 is a grid of uniquely identifiable ArUco markers. Tests in scene6 can be sensitive to alignment, so starting in 15, you can use check_alignment.py in the tools directory to enable a check of the DUT and chart alignment.

Figure 118. scene6 example.
test_in_sensor_zoom
Tests the behavior of the camera in-sensor zoom feature, which produces cropped raw images.
With the stream use case set to CROPPED_RAW , the test takes two captures over the zoom range, a full FoV raw image and a cropped raw image. The test converts the images to RGB arrays, downscales the full-sized cropped raw image to the size reported by SCALER_RAW_CROP_REGION , and calculates the 3D RMS difference between the two images.
APIs tested:
-
android.hardware.camera2.CameraCharacteristics#CONTROL_ZOOM_RATIO_RANGE -
android.hardware.camera2.CameraCharacteristics#SCALAR_AVAILABLE_CAPABILITIES_STREAM_USE_CASES -
android.hardware.camera2.CameraMetadata#SCALER_AVAILABLE_STREAM_USE_CASES_CROPPED_RAW -
android.hardware.camera2.CaptureRequest#CONTROL_ZOOM_RATIO -
android.hardware.camera2.CaptureResult#SCALER_RAW_CROP_REGION
Pass: The 3D RMS difference between the downscaled cropped raw image and the full FoV raw image is less than the threshold set in the test.
test_zoom
Tests the camera zoom behavior from the ultrawide lens to the wide lens. Takes captures over the zoom range and checks if the ArUco markers get bigger as the camera zooms in. The test also checks if the center marker's position changes predictably over each capture. The distance from the center marker's center to the image center can either change at a constant rate with respect to the zoom ratio until a physical camera switch, or it can change monotonically towards the location of the same marker after a physical camera switch. The Jetpack Camera App ( JCA ) must be installed on the device before testing.
APIs tested:
-
android.hardware.camera2.CameraCharacteristics#CONTROL_ZOOM_RATIO_RANGE -
android.hardware.camera2.CameraCharacteristics#LENS_INFO_AVAILABLE_FOCAL_LENGTHS -
android.hardware.camera2.CaptureRequest#CONTROL_ZOOM_RATIO -
android.hardware.camera2.CaptureResult#LENS_FOCAL_LENGTH
Pass: Relative size of captured ArUco marker is accurate against requested zoom ratio to verify that the camera is zooming correctly, and marker distance to the image center changes according to the criteria stated in the test description.

Figure 119. test_zoom to find the contour of the ArUco marker closest to the center.
test_low_latency_zoom
Tests the camera low latency zoom behavior. Takes captures over the zoom range with android.control.settingsOverride = 1 (SETTINGS_OVERRIDE_ZOOM) , and checks if the markers in the output images match the zoom ratios in the capture metadata. The same camera capture session is used to converge 3A and take captures.
APIs tested:
-
android.hardware.camera2.CameraCharacteristics#CONTROL_AVAILABLE_SETTINGS_OVERRIDES -
android.hardware.camera2.CameraCharacteristics#CONTROL_ZOOM_RATIO_RANGE -
android.hardware.camera2.CaptureRequest#CONTROL_SETTINGS_OVERRIDE -
android.hardware.camera2.CaptureRequest#CONTROL_ZOOM_RATIO -
android.hardware.camera2.CaptureResult#CONTROL_SETTINGS_OVERRIDE
Pass: Relative size of captured marker is accurate against the zoom ratio result metadata.
test_preview_video_zoom_match
Tests that while recording and zooming, video preview and video output display and record the same output. Calculates the size of the marker closest to the center at different zoom ratios and checks whether the size of the marker increases as the zoom ratio increases.
APIs tested:
-
android.hardware.camera2.CameraCharacteristics#CONTROL_ZOOM_RATIO_RANGE -
android.hardware.camera2.CameraCharacteristics#LENS_INFO_AVAILABLE_FOCAL_LENGTHS -
android.hardware.camera2.CaptureRequest#CONTROL_ZOOM_RATIO -
android.hardware.camera2.CaptureResult#LENS_FOCAL_LENGTH
Pass: Relative size of captured marker is accurate against requested zoom ratio in video and preview.
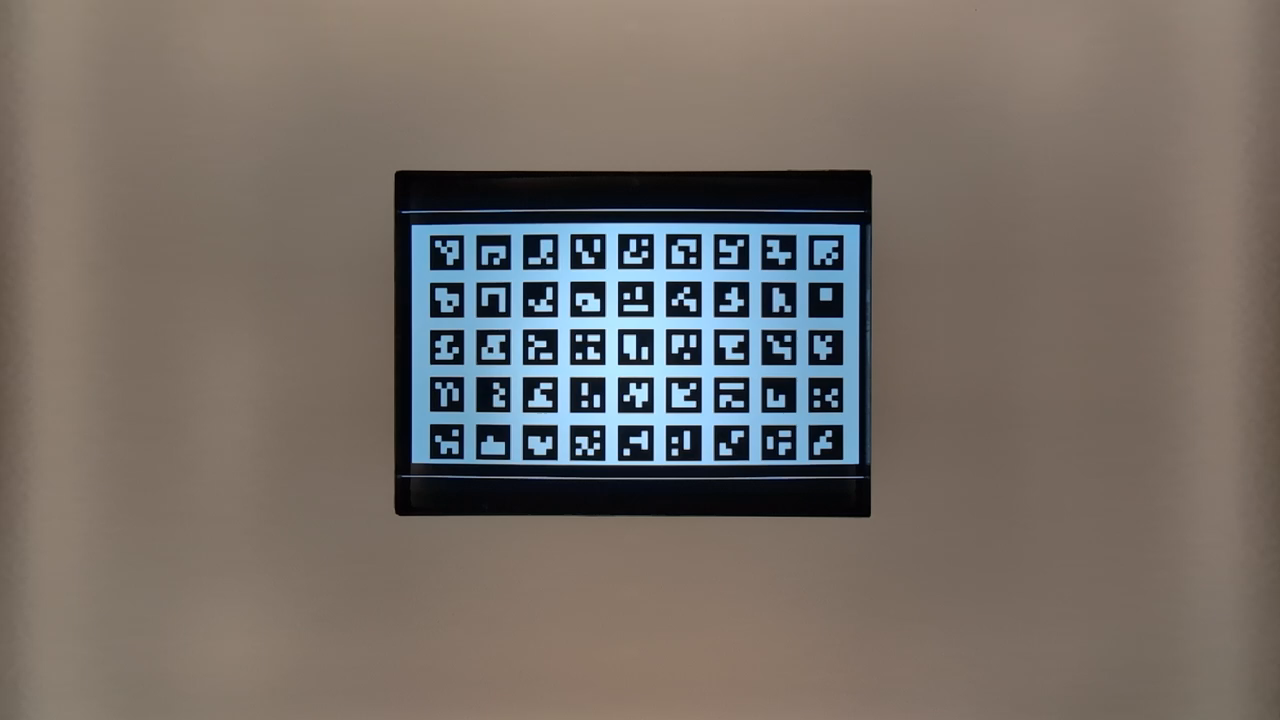
Figure 120. HD_1280x720_key_frame.png (before zoom).
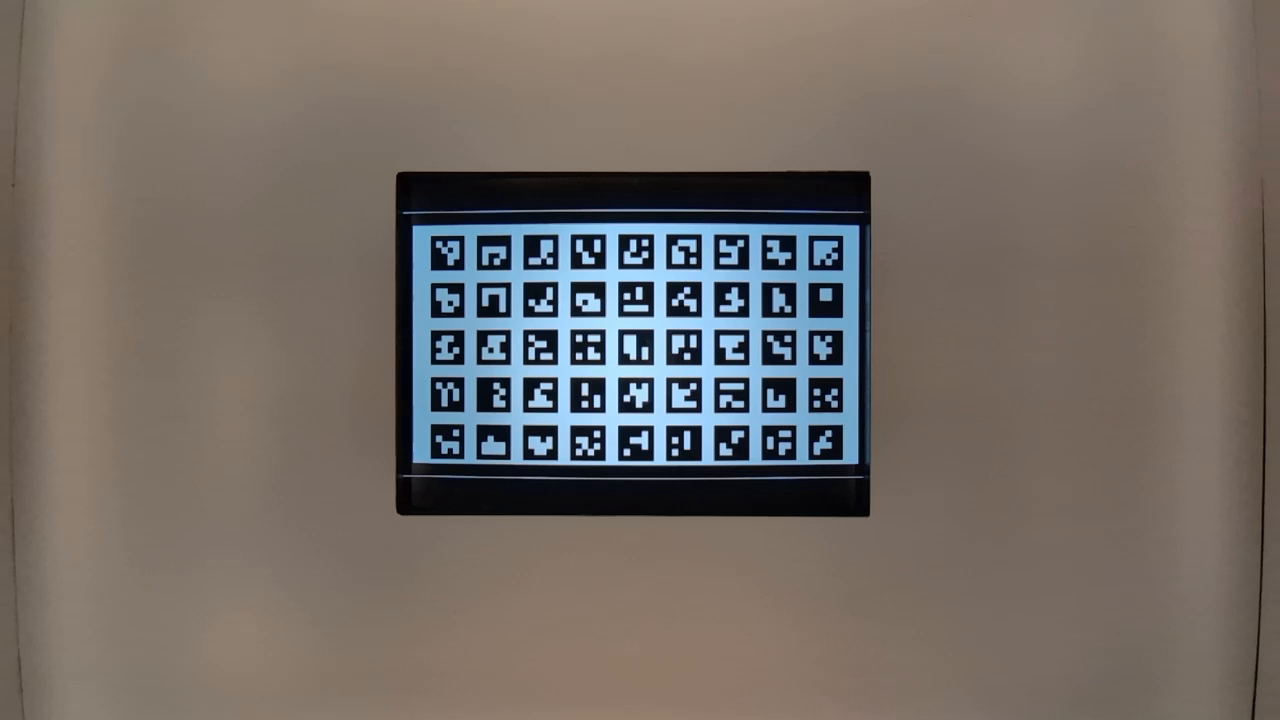
Figure 121. preview_1280x720_key_frame.png (before zoom).
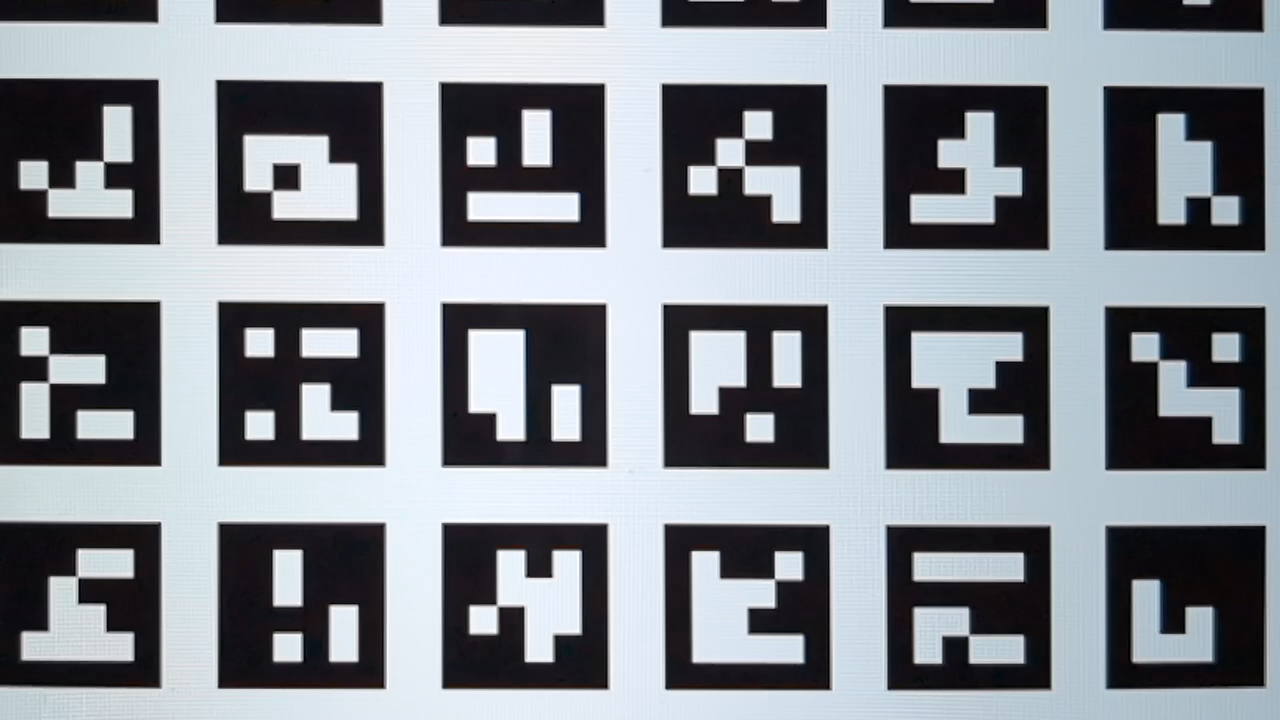
Figure 122. HD_1280x720_key_frame.png (after zoom).
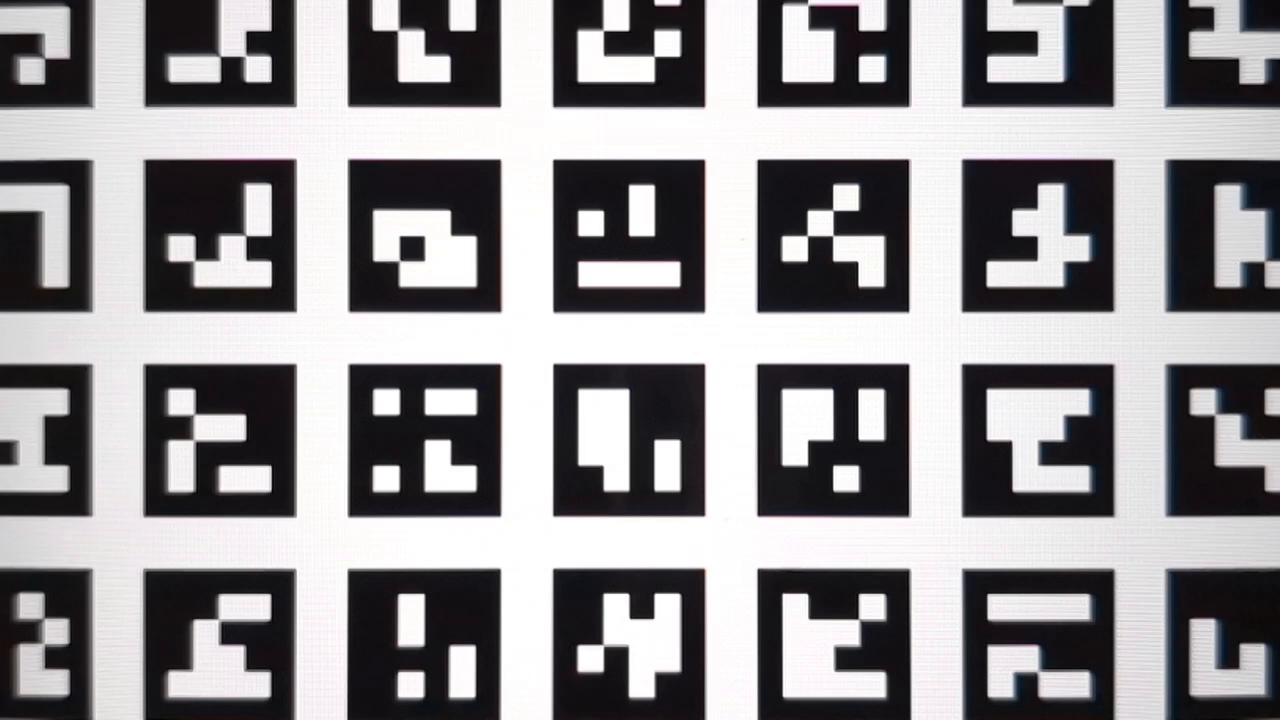
Figure 123. preview_1280x720_key_frame.png (after zoom).
test_preview_zoom
Tests that the zoom ratio of each preview frame matches the corresponding capture metadata from the ultrawide lens to the wide lens. The test takes preview frames over the zoom range and finds the ArUco marker closest to the center. The test then checks if the center marker's position changes predictably over each capture. The distance from the center marker's center to the image center can either change at a constant rate with respect to the zoom ratio until a physical camera switch, or it can change monotonically towards the location of the same marker after a physical camera switch.
APIs tested:
-
android.hardware.camera2.CameraCharacteristics#CONTROL_ZOOM_RATIO_RANGE -
android.hardware.camera2.CameraCharacteristics#LENS_INFO_AVAILABLE_FOCAL_LENGTHS -
android.hardware.camera2.CaptureRequest#CONTROL_ZOOM_RATIO -
android.hardware.camera2.CaptureResult#LENS_FOCAL_LENGTH
Pass: The relative size of the selected ArUco marker is accurate for the reported zoom ratio of the corresponding capture result for all of the preview frames. The relative distance of the selected marker from the center of the image is accurate for the reported zoom ratio of the corresponding capture result of all the preview frames.
Figure 124. test_preview_zoom images showing selected marker closest to the center
test_session_characteristics_zoom
Tests the zoom ratio range for all supported session configurations listed in CameraCharacteristics#INFO_SESSION_CONFIGURATION_QUERY_VERSION . For each of those configurations, if CameraDeviceSetup#isSessionConfigurationSupported returns true , the test verifies that the zoom ratio range returned in CameraDeviceSetup#getSessionCharacteristics can be reached.
APIs tested:
-
android.hardware.camera2.CameraCharacteristics#INFO_SESSION_CONFIGURATION_QUERY_VERSION -
android.hardware.camera2.CameraDevice.CameraDeviceSetup#isSessionConfigurationSupported -
android.hardware.camera2.CameraDevice.CameraDeviceSetup#getSessionCharacteristics
Pass: Both the minimum and maximum zoom ratios can be reached for each supported SessionConfiguration listed in CameraCharacteristics#INFO_SESSION_CONFIGURATION_QUERY_VERSION .
صحنه7
scene7 is a rectangular frame divided into four equal quadrants, each filled with a different color. In the center of the rectangle is a slanted edge chart for sharpness checks. Four ArUco markers are aligned with the four outer corners of the rectangle to assist in obtaining accurate coordinates of the main rectangle frame at varying zoom ratios.

Figure 125. scene7.
test_multi_camera_switch
This test verifies that during preview recording at varying zoom ratios, the switch between the ultrawide (UW) and wide (W) lenses results in similar RGB values.
The test uses different zoom ratios within the predefined range to perform a dynamic preview recording and identify the point at which the physical camera changes. This point marks the crossover from the UW to the W lens.
The frames captured at and before the crossover point are analyzed for auto exposure (AE), auto white balance (AWB), and autofocus (AF).
The AE check verifies that the luma change is within the expected range for both UW and W lens images. The AWB check verifies that the ratios of red-green and blue-green are within threshold values for both UW and W lens images. The AF check evaluates the sharpness estimation value based on the average gradient magnitude between UW and W lens images.
While executing this test if the Moire effect interferes with the results, use a higher resolution tablet from the list of Camera ITS approved list of tablets .
APIs tested:
-
android.hardware.camera2.CameraCharacteristics#CONTROL_ZOOM_RATIO_RANGE -
android.hardware.camera2.CaptureRequest#CONTROL_ZOOM_RATIO -
android.media.CamcorderProfile -
android.media.MediaRecorder
Pass: For the test to pass, the AE and AWB checks must pass. The AF check results are only used for logging purposes. The following are the criteria for each check:
- AE check: The luma change (Y value) between the UW and W lens images must be less than 4% for all the color patches if the device supports both
ae_regionsandawb_regions. If onlyae_regionsis supported then only the gray color patch values must meet the criteria. - AWB check: The difference between the red-green and blue-green values for the UW and W lens images must be less than 3% for the gray color patch and must be less than 10% for other color patches if the device supports both
ae_regionsandawb_regions. - AF check: The image sharpness for the W lens capture must be higher than the sharpness with the UW capture.

Figure 126. Gray patch taken with UW lens.
Figure 127. Gray patch taken with W lens.
scene8
scene8 is a rectangular frame divided into four equal regions, each containing a portrait taken with a different exposure or overlaid with a different color shade (blue shade, increased exposure, decreased exposure, yellow shade). Four ArUco markers are aligned with the four outer corners of the rectangle to obtain accurate coordinates of the main rectangle frame.

Figure 128. scene8 example.
test_ae_awb_regions
Tests that the RGB and luma values differ when preview recording at different AE and AWB regions.
The test records an 8 second preview recording, performing AE and AWB metering on each quadrant for 2 seconds each. The test then extracts a frame from each region's preview recording, and uses the extracted frames to perform the following AE and AWB checks:
- AE check: Verifies that the frame metering the region with decreased exposure has an increased luma value of more than 1% than the frame metering the region with increased exposure. This verifies that images are brightened when metering a dark region.
- AWB check: Verifies that the ratio of red to blue (of the image's average RGB values) in the frame with the blue metering region is more than 2% higher than the frame with the yellow metering region. This verifies that images have a balanced RGB value when metering a yellow (warm) or blue (cool) region.
APIs tested:
-
android.hardware.camera2.CaptureRequest#CONTROL_AWB_REGIONS -
android.hardware.camera2.CaptureRequest#CONTROL_AE_REGIONS -
android.hardware.camera2.CameraCharacteristics#CONTROL_MAX_REGIONS_AE -
android.hardware.camera2.CameraCharacteristics#CONTROL_MAX_REGIONS_AWB
Pass: The AE and AWB checks both pass.

Figure 129. Frame metering dark region with increased exposure.
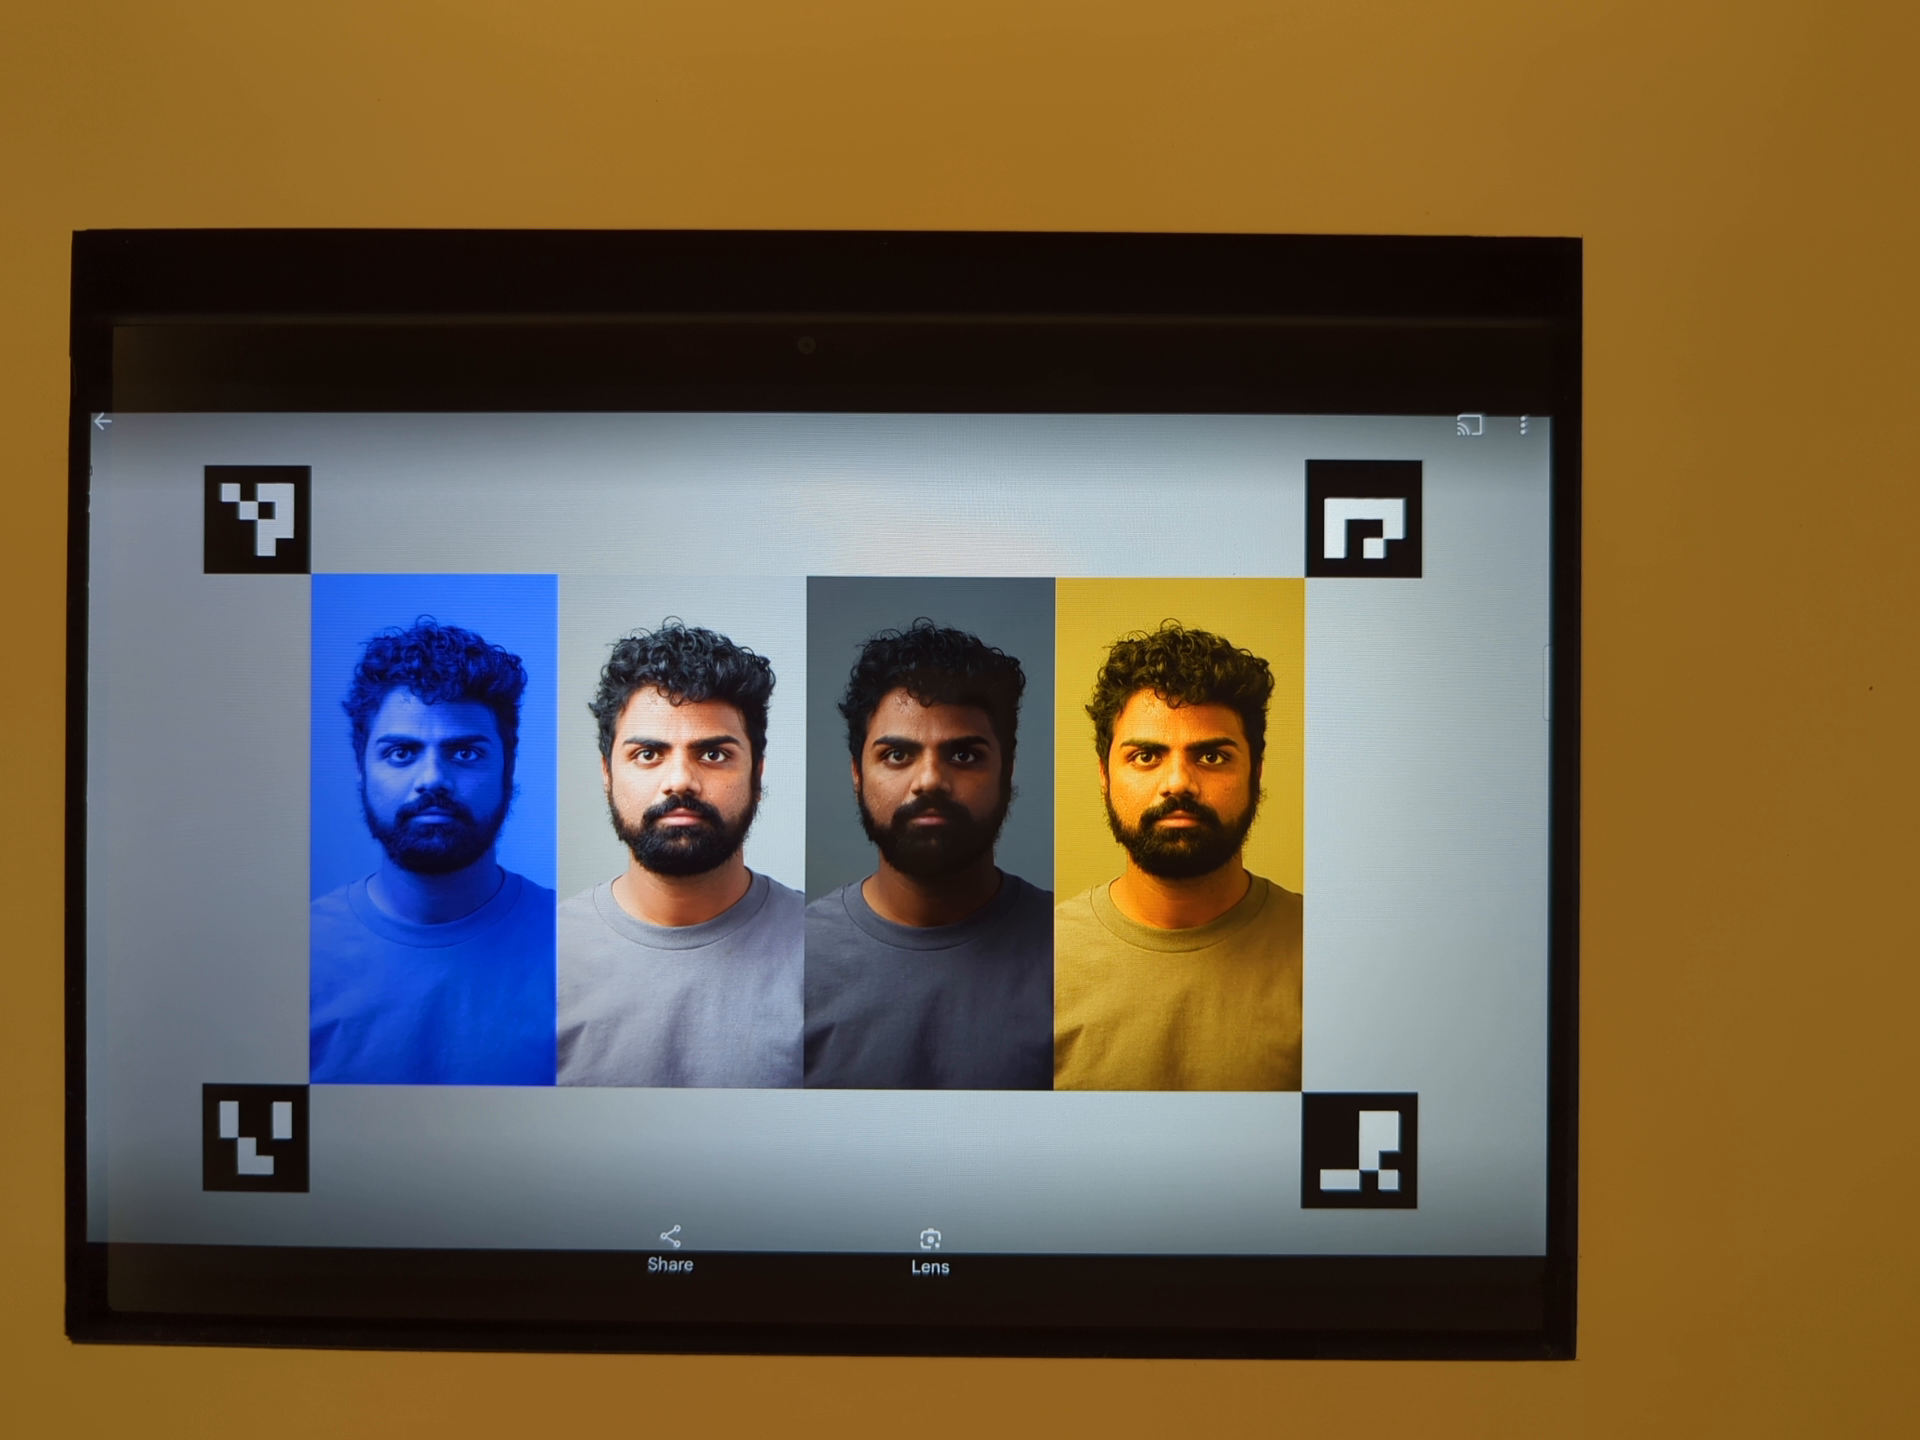
Figure 130. Frame metering lighter region with decreased exposure.
Fail mechanisms:
Accurate detection of all four ArUco markers is essential for this test. If the initial detection fails, the system attempts a second detection pass using a black and white version of the image. The following grayscale image represents the secondary processing step:

Figure 131. ArUco markers misalignment.
test_color_correction_mode_cct
Tests COLOR_CORRECTION_MODE across different color temperatures and tints, verifying changes in RGB ratios against the capture scene, scene8 .
APIs tested:
-
android.hardware.camera2.CaptureRequest#COLOR_CORRECTION_MODE -
android.hardware.camera2.CaptureResult#COLOR_CORRECTION_MODE -
android.hardware.camera2.CaptureRequest#COLOR_CORRECTION_COLOR_TEMPERATURE -
android.hardware.camera2.CaptureResult#COLOR_CORRECTION_COLOR_TEMPERATURE -
android.hardware.camera2.CaptureRequest#COLOR_CORRECTION_COLOR_TINT -
android.hardware.camera2.CaptureResult#COLOR_CORRECTION_COLOR_TINT -
android.hardware.camera2.CameraCharacteristics#COLOR_CORRECTION_COLOR_TEMPERATURE_RANGE -
android.hardware.camera2.CameraMetadata#COLOR_CORRECTION_MODE_CCT -
android.hardware.camera2.CameraCharacteristics#COLOR_CORRECTION_AVAILABLE_ABERRATION_MODES
Pass: RGB ratios exhibit the anticipated increases or decreases relative to the selected color temperatures and tints.
Test skip criteria
The test_color_correction_mode_cct test is skipped if any of the following criteria are met:
- The device has a first API level (
first_api_level) of 35 or lower. - The device doesn't advertise
COLOR_CORRECTION_MODE_CCTinCOLOR_CORRECTION_AVAILABLE_ABERRATION_MODES.
scene9
scene9 consists of thousands of randomly sized and colored circles to create a scene with very low repeatability to stress JPEG compression algorithms.

Figure 132. scene9 example.
test_jpeg_high_entropy
Tests that camera JPEG compression works on scene9 with high entropy and the JPEG quality factor set to 100%. The zoom factor is increased to verify that the scene displayed on the tablet fills the camera FoV.
APIs tested:
Pass: JPEG file is compressed properly, written, and read back from disk.
test_jpeg_quality
Tests the camera JPEG compression quality. Step JPEG qualities through android.jpeg.quality and verifies that the quantization tables change correctly.
APIs tested:
Pass: Quantization matrix decreases with quality increase. (The matrix represents the division factor.)

Figure 133. Pixel 4 rear camera luma and chroma DQT matrix averages versus JPEG quality.

Figure 134. Failed test example.
scene_extensions
The scene_extensions tests are for camera extensions and must use Camera ITS-in-a-Box , as they require precise control of the testing environment. Additionally, all light leakage must be controlled. This might require covering the test rig, DUT, and tablet with a drop cloth as well as eliminating light leakage from the front screen of the DUT.
scene_hdr
The scene_hdr scene consists of a portrait on the left and a low-contrast QR code on the right.

Figure 135. scene_hdr example.
test_hdr_extension
Tests the HDR extension . Takes captures with and without the extension enabled, and checks if the extension makes the QR code more detectable.
APIs tested:
-
android.hardware.camera2.CameraExtensionCharacteristics#getSupportedExtensions -
android.hardware.camera2.CameraExtensionSession#capture
Pass: The HDR extension reduces the number of contrast changes needed to detect the QR code or reduces the gradient across the QR code.
scene_low_light
The scene_low_light scene consists of a grid of squares of varying shades of gray against a black background and the grid of squares are bound by a red outline. The squares are arranged in a Hilbert curve orientation.

Figure 136. scene_low_light example.
test_night_extension
Tests the Night extension . Takes captures with the extension enabled, and performs the following:
- Detects the presence of 20 squares
- Computes the luma bounded by each square
- Computes the average luma value of the first 6 squares according to the Hilbert curve grid orientation
- Computes the difference in luma value of consecutive squares (for example, square2 - square1) up to squares 5 and 6 (square6 - square5), and finds the average of the five computed differences.
For devices running Android 16 or higher, the capture request includes a metered region corresponding to the rectangle bounding the grid of squares. This addition changes the threshold pass criteria.
APIs tested:
-
android.hardware.camera2.CameraExtensionCharacteristics#getSupportedExtensions -
android.hardware.camera2.CameraExtensionSession#capture
Pass:
- For devices running Android 16 or higher, the average luma value of the first 6 squares must be at least 80, and the average difference in luma value of consecutive squares up to squares 5 and 6 must be at least 18.75.
- For devices running Android 15 and lower, the average luma value of the first 6 squares must be at least 85, and the average difference in luma value of consecutive squares up to squares 5 and 6 must be at least 17.
The following luminance plot shows what a passing test result looks like.
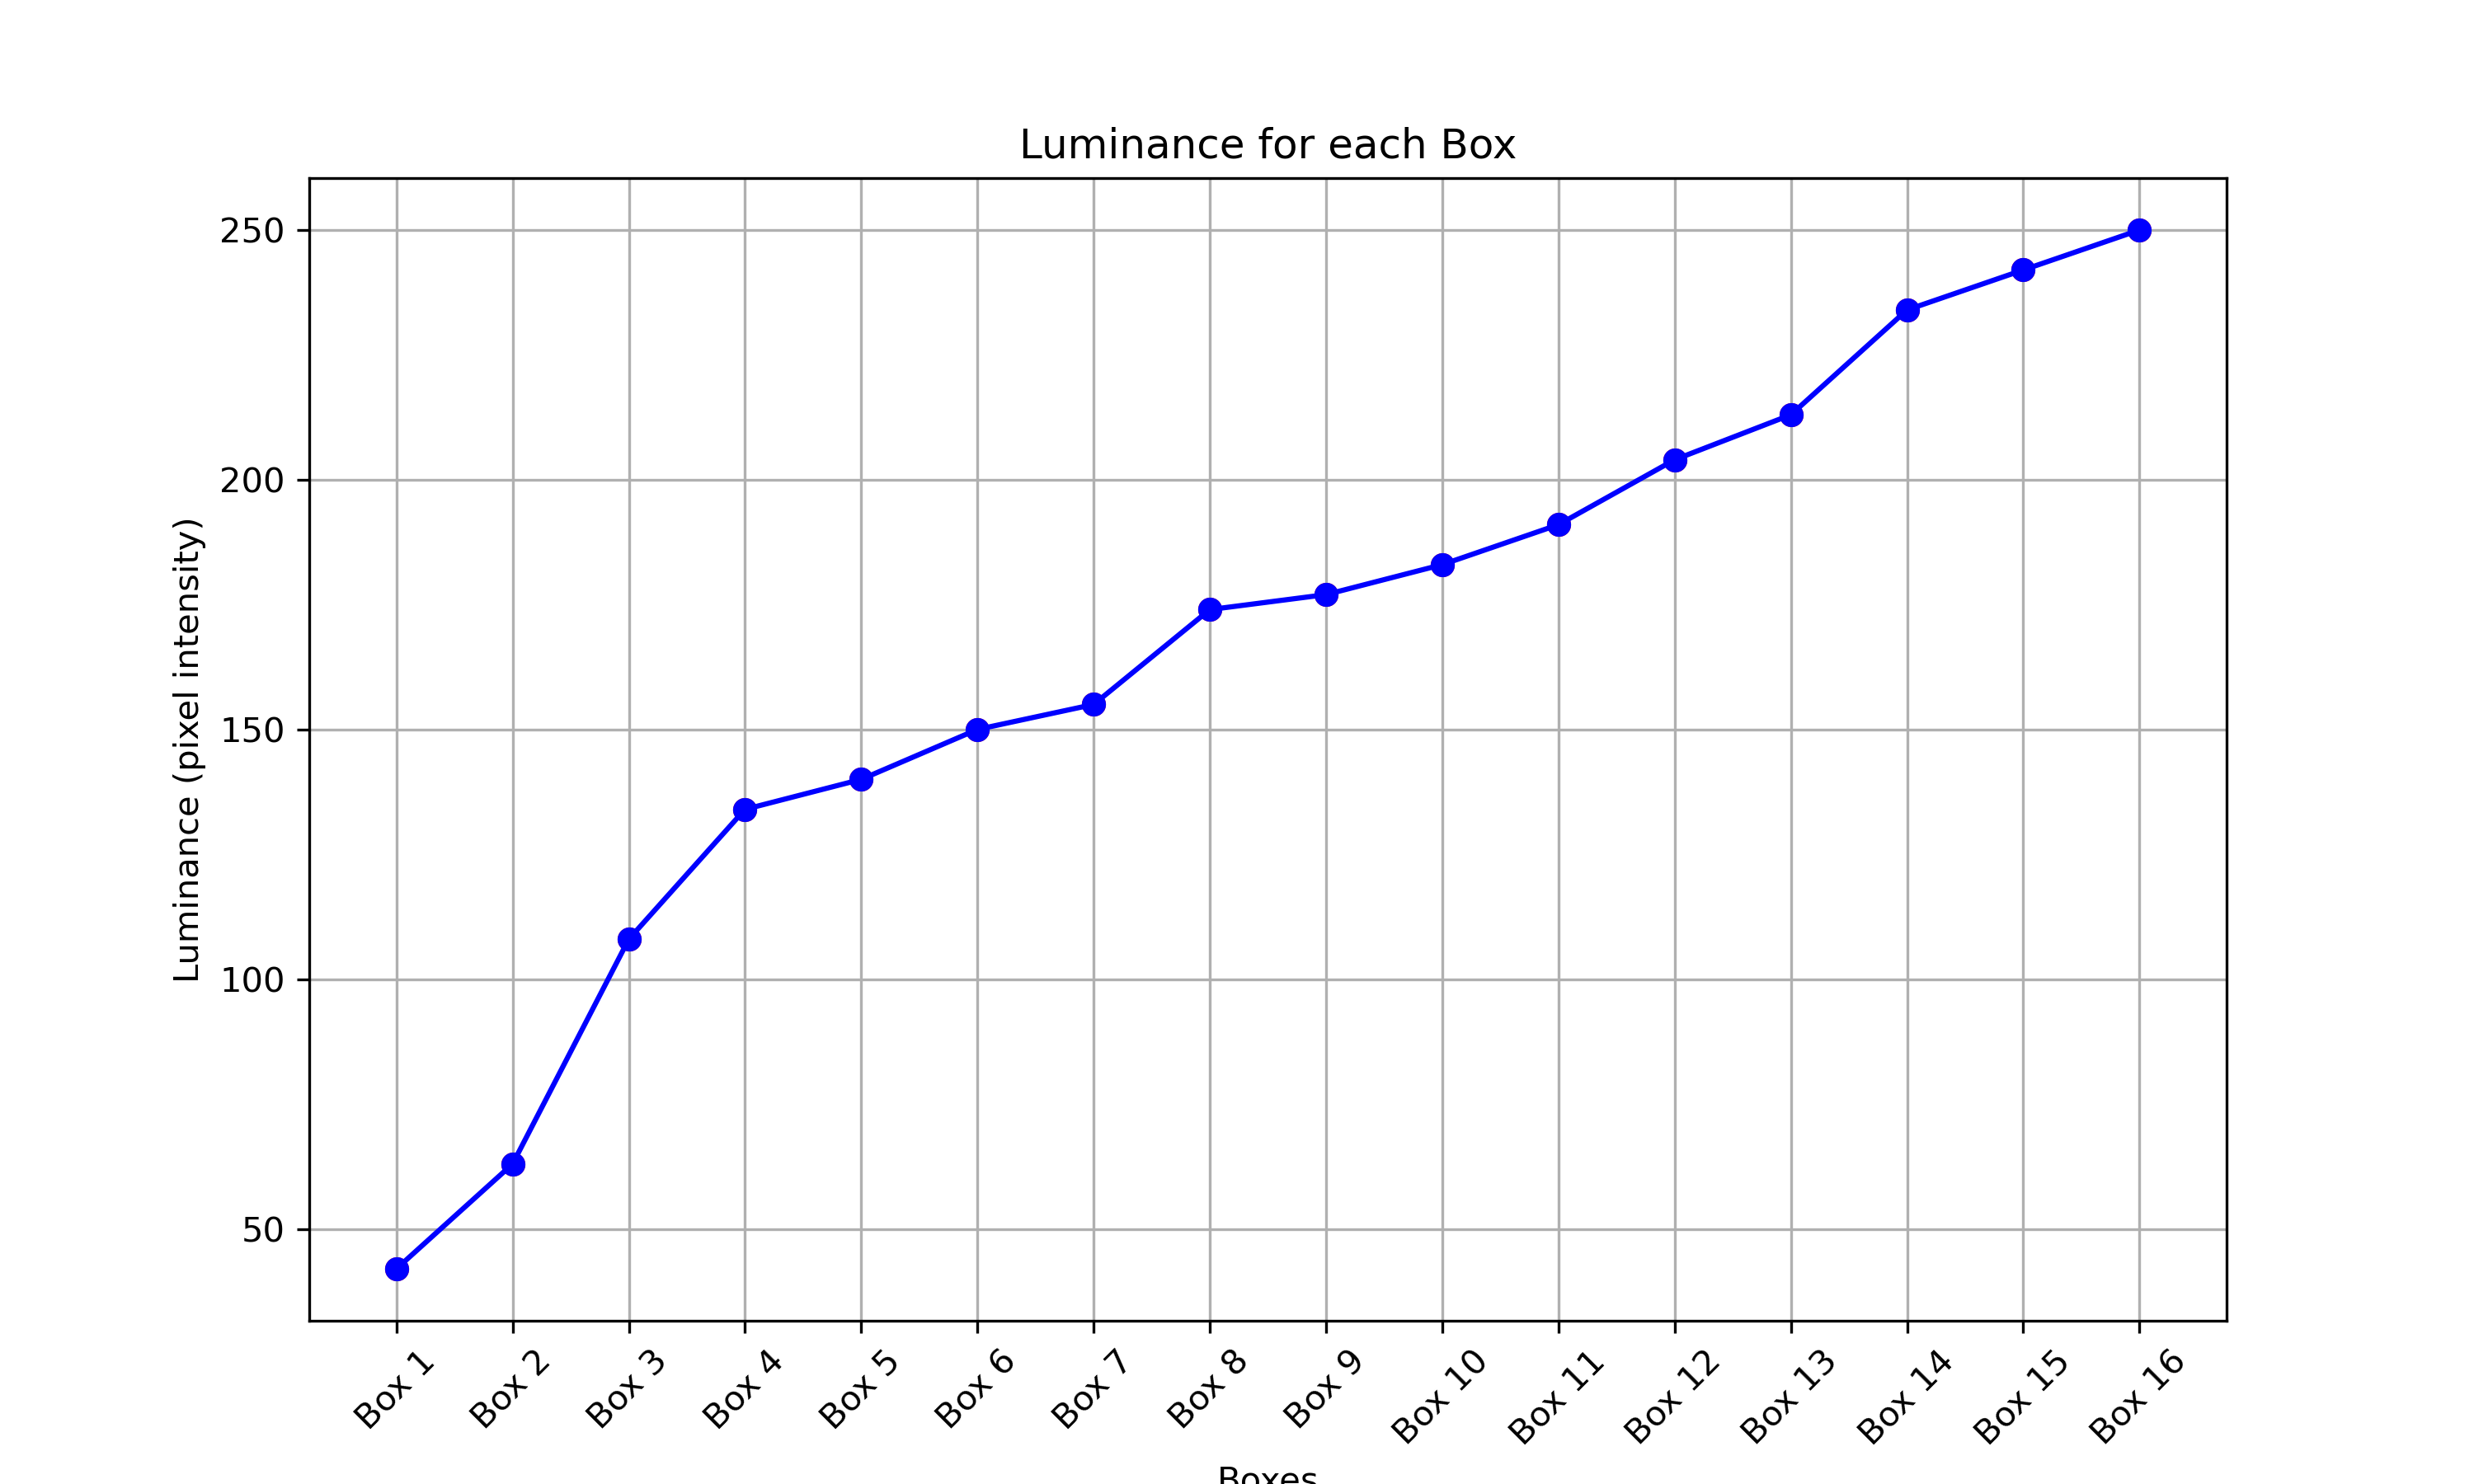
Figure 137. Low light night scene passing test example.
test_low_light_boost_extension
Tests the Low Light Boost AE mode . If Camera2 supports low light boost AE mode, then this test is performed for Camera2. If the night mode camera extension is supported and the extension supports low light boost AE mode, then this test is also performed for the night mode camera extension. This test sets the AE mode to low light boost, takes a frame from the preview, and performs the following:
- Detects the presence of 20 boxes
- Computes the luma bounded by each box
- Computes the average luma value of the first 6 squares according to the Hilbert curve grid orientation
- Computes the difference in luma value of consecutive squares (for example, square2 - square1) up to squares 5 and 6 (square6 - square5), and finds the average of the five computed differences.
For devices running Android 16 or higher, the capture request includes a metered region corresponding to the rectangle bounding the grid of squares. This addition changes the threshold pass criteria.
APIs tested:
-
android.hardware.camera2.CameraCharacteristics.CONTROL_AE_AVAILABLE_MODES -
android.hardware.camera2.CameraMetadata#CONTROL_AE_MODE_ON_LOW_LIGHT_BOOST_BRIGHTNESS_PRIORITY -
android.hardware.camera2.CameraExtensionCharacteristics#getSupportedExtensions
Pass:
For devices running Android 16 or higher, the average luma value of the first 6 squares must be at least 54, and the average difference in luma value of consecutive squares up to squares 5 and 6 must be at least 17.
For devices running Android 15 and lower, the average luma value of the first 6 squares must be at least 70, and the average difference in luma value of consecutive squares up to squares 5 and 6 must be at least 18.
scene_tele
A key requirement for scene_tele tests is that the chart distance must be at least the minimum focus distance of the telephoto lens. As this minimum focus distance can differ between devices, you must configure your setup to suit the specific telephoto camera.
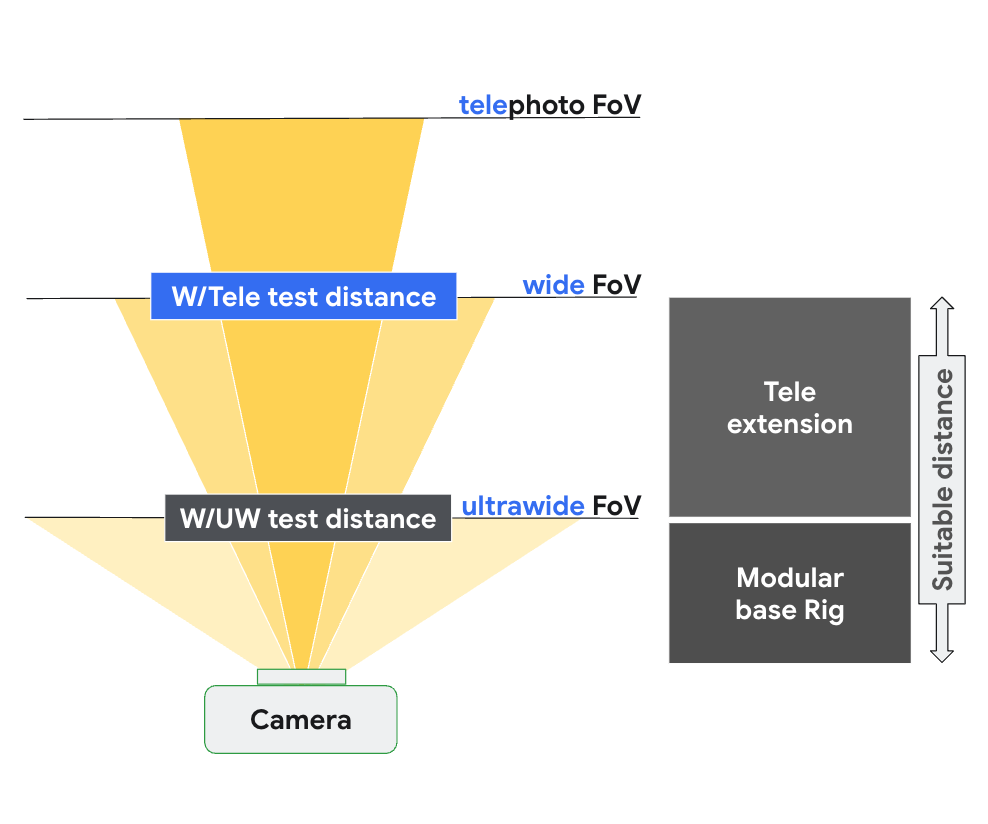
Figure 138. scene_tele setup based on focus distance of wide and tele camera.
For more information on test hardware setup, see Tele extension rig setup .
scene6_tele
The scene6_tele scene consists of a grid of ArUco markers on a white background.
If scene6_tele captures look overexposed in the modular rig , remove the front plate of the modular rig .
Disconnect the WFoV test rig from the extension and remove the phone mount.
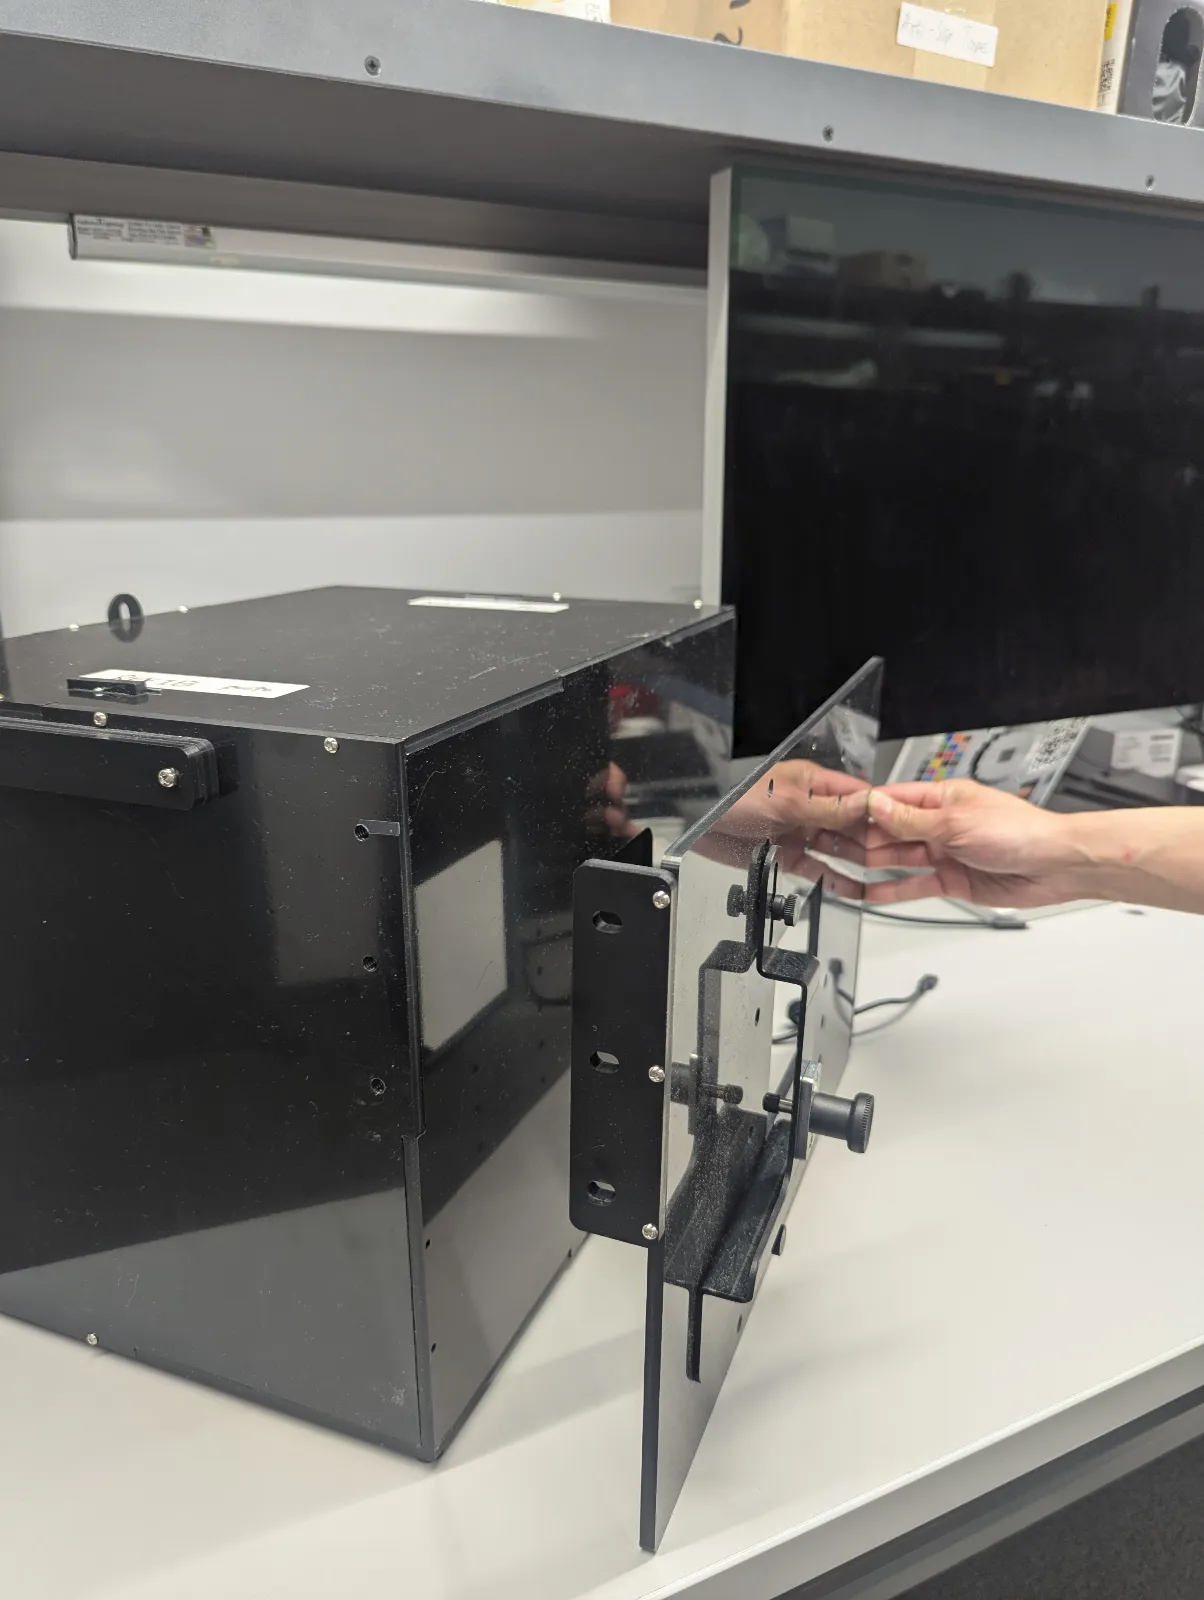
Figure 139. Disconnect the WFoV test rig from the extension and remove the phone mount.
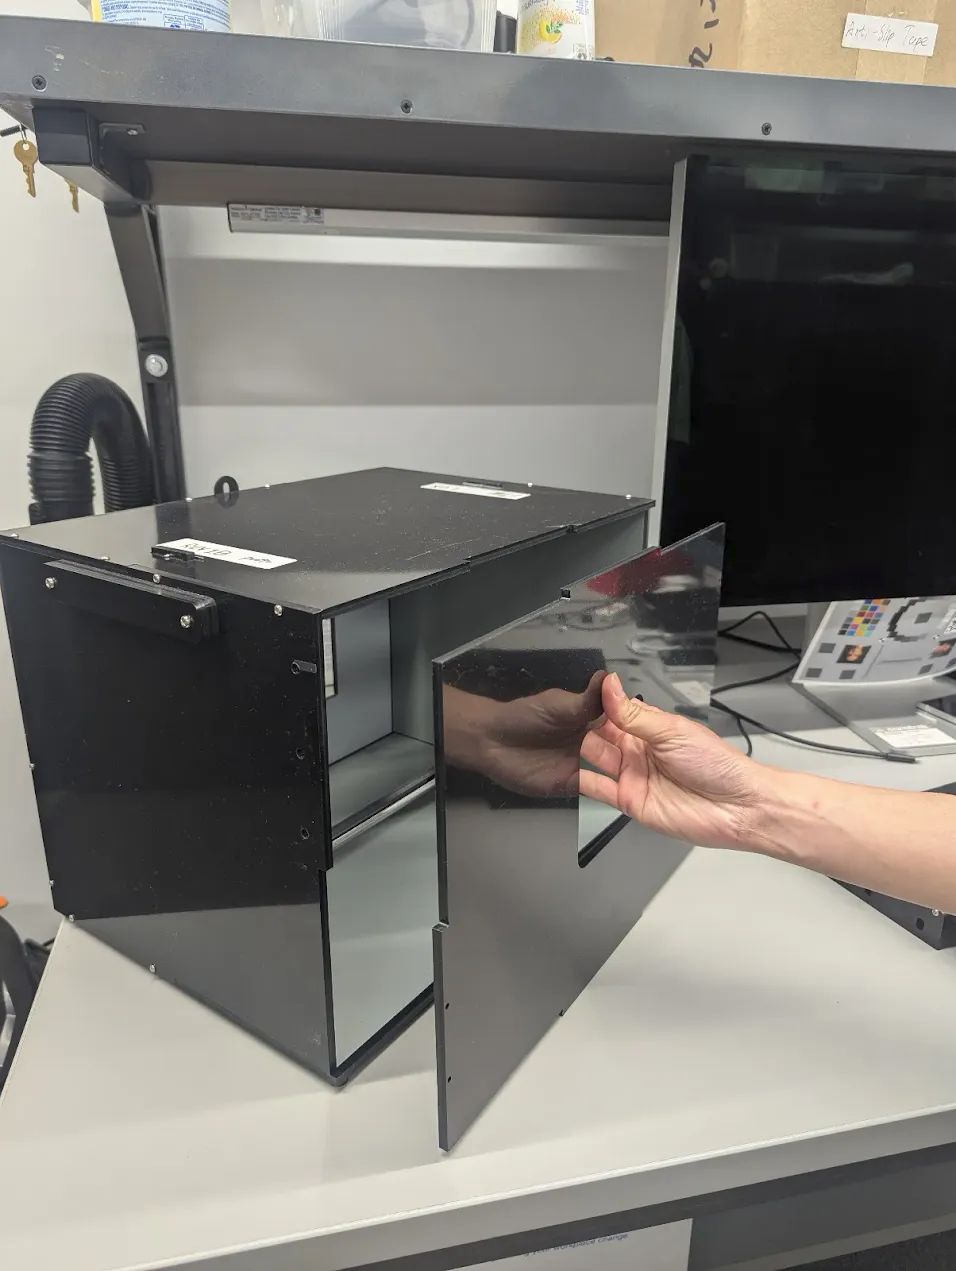
Figure 140. Remove the front plate.
test_zoom_tele
Tests the camera zoom behavior from the wide lens to the telephoto lens. The test is identical to test_zoom , but tests the camera zoom behavior from the wide lens to the telephoto lens.
APIs tested:
-
android.hardware.camera2.CameraCharacteristics#CONTROL_ZOOM_RATIO_RANGE -
android.hardware.camera2.CameraCharacteristics#LENS_INFO_AVAILABLE_FOCAL_LENGTHS -
android.hardware.camera2.CaptureRequest#CONTROL_ZOOM_RATIO -
android.hardware.camera2.CaptureResult#LENS_FOCAL_LENGTH
Pass: Relative size of captured ArUco marker is accurate against requested zoom ratio to verify that the camera is zooming correctly, and marker distance to the image center changes according to the criteria listed in test_zoom .
test_preview_zoom_tele
Tests the camera zoom behavior for preview frames from the wide lens to the telephoto lens. The test is identical to test_preview_zoom , but tests the camera zoom behavior for preview frames from the wide lens to the telephoto lens.
APIs tested:
-
android.hardware.camera2.CameraCharacteristics#CONTROL_ZOOM_RATIO_RANGE -
android.hardware.camera2.CameraCharacteristics#LENS_INFO_AVAILABLE_FOCAL_LENGTHS -
android.hardware.camera2.CaptureRequest#CONTROL_ZOOM_RATIO -
android.hardware.camera2.CaptureResult#LENS_FOCAL_LENGTH
Pass: Relative size of captured ArUco marker is accurate against requested zoom ratio to verify that the camera is zooming correctly, and marker distance to the image center changes according to the criteria listed in test_preview_zoom .
scene7_tele
scene7_tele is identical to scene7 , but set up for telephoto lens testing. It's a rectangular frame divided into four equal quadrants, each filled with a different color. In the center of the rectangle is a slanted edge chart for sharpness checks. Four ArUco markers are aligned with the four outer corners of the rectangle to assist in obtaining accurate coordinates of the main rectangle frame at varying zoom ratios.
test_multi_camera_switch_tele
This test verifies that during preview recording at varying zoom ratios, the switch between the wide (W) and telephoto (tele) lenses results in similar RGB values.
The test uses different zoom ratios within the predefined range to perform a dynamic preview recording and identify the point at which the physical camera changes. This point marks the crossover from the W to the tele lens.
The frames captured at and before the crossover point are analyzed for AE, AWB, and AF.
The AE check verifies that the luma change is within the expected range for both W and tele lens images. The AWB check verifies that the ratios of red-green and blue-green are within threshold values for both W and tele lens images. The AF check evaluates the sharpness estimation value based on the average gradient magnitude between W and tele lens images.
APIs tested:
-
android.hardware.camera2.CameraCharacteristics#CONTROL_ZOOM_RATIO_RANGE -
android.hardware.camera2.CaptureRequest#CONTROL_ZOOM_RATIO -
android.media.CamcorderProfile -
android.media.MediaRecorder
Pass: For the test to pass, the AE, AWB, and AF checks must all pass. The following are the criteria for each check:
- AE check: The luma change between the W and tele lens images must be less than 4%.
- AWB check: In the LAB color space, the delta C between red-green and blue-green for wide and telephoto cannot exceed 10.
- AF check: The image sharpness of the tele lens must be higher than the W lens.
scene_video
scene_video is a video scene consisting of four different colored circles moving back and forth at different frame rates against a white background.
Figure 141. scene_video example.
test_preview_frame_drop
Tests that the requested preview frame rate is maintained with a dynamic scene. This test runs on all cameras that are exposed to third-party apps.
APIs tested:
-
android.hardware.camera2.CameraCharacteristics#CONTROL_AE_AVAILABLE_TARGET_FPS_RANGES -
android.hardware.camera2.CameraCharacteristics#SCALAR_AVAILABLE_CAPABILITIES_STREAM_USE_CASES -
android.hardware.camera2.CaptureResult#CONTROL_AE_TARGET_FPS_RANGE -
android.media.CamcorderProfile -
android.media.MediaRecorder
Pass: The preview frame rate is at the maximum of the requested frame rate range, and the average variation between consecutive frames is less than the relative tolerance set in the test.
Gen2 rig / sensor_fusion-based test scenes
feature_combination
The feature_combination tests verify that features work correctly when multiple camera features are enabled at the same time. These tests use the same checkerboard image that is used in the sensor fusion scene .
test_feature_combination
Tests all combinations of different stream combinations, video stabilization mode, target FPS range, 10-bit HDR video, and Ultra HDR that are supported by the camera device.
For Android 16 and higher, the test runs all combinations of supported features, and logs the results into a proto file. Failure assertions are called only for combinations of features for which isSessionConfigurationSupported returns True .
APIs tested:
-
android.hardware.camera2.CameraDevice.CameraDeviceSetup#isSessionConfigurationSupported -
android.hardware.camera2.CameraDevice.CameraDeviceSetup#createCaptureRequest
Pass: For each supported feature combination:
- The preview stream is stabilized if preview stabilization is on.
- The preview frame rate falls within the configured
AE_TARGET_FPS_RANGE. - The recorded preview stream's color space matches what's set.
- The Ultra HDR capture has a valid gain map.
scene_flash
The scene_flash tests require a dark scene in the sensor fusion box. In Android 17 and higher, scene_flash testing can be performed using the Gen2 rig .
test_auto_flash
Tests that auto-flash is triggered in a dark scene for rear-facing and front-facing cameras. For front-facing cameras, auto-flash uses the screen to illuminate the scene, not a physical flash unit. The test verifies that auto-flash is fired by checking that the center of the tile image is brighter with auto-flash enabled. To trigger auto-flash, the lights in the test rig must be turned off. The lights can be turned off automatically with the Arduino controller. The scene must be completely dark for the test to work correctly. The Jetpack Camera App ( JCA ) must be installed on the device before testing. Auto-flash for rear-facing cameras relies on the AE state to be triggered, but auto-flash for front-facing cameras doesn't rely on AE and is always triggered.
In Android 17 and higher, tests non1-x zoom levels to verify correct functionality across all supported zoom ranges.
APIs tested:
-
android.hardware.camera2.CameraCharacteristics#FLASH_INFO_AVAILABLE -
android.hardware.camera2.CaptureRequest#CONTROL_AE_MODE -
android.hardware.camera2.CaptureRequest#CONTROL_AE_PRECAPTURE_TRIGGER -
android.hardware.camera2.CaptureResult#CONTROL_AE_STATE -
android.hardware.camera2.CaptureRequest#FLASH_MODE
Pass: The center of the tile image with auto-flash enabled is brighter than the original scene image for all cameras.
test_flash_strength
Tests that flash strength control in SINGLE mode is implemented correctly.
Verifies that if the device supports flash strength control during camera use in SINGLE mode, the flash strength changes with different requested strength levels. Verifies that flash strength control works with different AE_MODES . For example, if the auto-exposure mode is ON or OFF , the flash strength level has an effect on brightness, and if the mode is ON_AUTO_FLASH , the flash strength level has no effect on brightness.
To conduct the test, lights in the test rig must be turned off. The lights can be turned off automatically with the Arduino controller. The scene must be completely dark for the test to work correctly.
APIs tested:
-
android.hardware.camera2.CameraCharacteristics#FLASH_INFO_STRENGTH_DEFAULT_LEVEL -
android.hardware.camera2.CameraCharacteristics#FLASH_INFO_STRENGTH_MAXIMUM_LEVEL -
android.hardware.camera2.CameraCharacteristics#FLASH_SINGLE_STRENGTH_DEFAULT_LEVEL -
android.hardware.camera2.CameraCharacteristics#FLASH_SINGLE_STRENGTH_MAX_LEVEL
Pass:
When the auto-exposure mode is ON or OFF , the brightness of the image patches increases as the flash strength level increases from no flash to FLASH_SINGLE_STRENGTH_MAX_LEVEL . When the auto-exposure mode is ON_AUTO_FLASH , the difference in brightness of the image patches is within tolerance as the flash strength level increases from no flash to FLASH_SINGLE_STRENGTH_MAX_LEVEL .
test_led_snapshot
Tests that the LED snapshots don't saturate or tint the image.
This test adds a lighting controller to the Sensor Fusion Box to control the lights. With the lights set to OFF , the test takes a capture with the AUTO_FLASH mode set to ON . During this capture, the test runs a precapture sequence with the aePrecapture trigger set to START , and sets the capture intent to Preview to take the capture with flash.
Because the capture has a distinctive hotspot due to flash, the test computes the flash image mean of the entire capture and verifies whether the value is within the (68, 102) range. To check if the image is reasonably white balanced, the test calculates the red-green and blue-green ratios and verifies whether the ratios are within 0.95 and 1.05.
APIs tested:
-
android.hardware.camera2.CameraCharacteristics#FLASH_INFO_AVAILABLE -
android.hardware.camera2.CaptureRequest#CONTROL_AE_MODE -
android.hardware.camera2.CaptureRequest#FLASH_MODE
Pass: The red-green and blue-green ratios are within 0.95 and 1.05. The flash image mean is within the (68, 102) range.
test_night_mode_indicator
Tests the functionality of the night mode indicator, a feature that indicates whether the camera is operating in low light conditions and will benefit from a Night Mode Camera extension still capture. This feature is available only on devices that support Night Mode Camera extensions.
This test checks that the night mode indicator correctly reflects the lighting conditions during camera preview. The test performs the following steps:
- Initialization: The test initializes an
ItsSessionand retrieves camera properties. It also establishes a connection with the lighting controller. - Skip Conditions: The test is skipped if the device doesn't support the required API level or the night mode indicator feature.
- Camera2 Session:
- The test starts a preview capture session using a
Camera2session. - The light is turned on and a preview frame is captured.
- The test verifies that the night mode indicator is in the
OFFstate. - The light is turned off and a preview frame is captured.
- The test verifies that the night mode indicator is in the
ONstate.
- The test starts a preview capture session using a
- Camera extension session:
- The test repeats the same procedure as for the
Camera2session, but using aCameraExtensionsession with theEXTENSION_NIGHTextension.
- The test repeats the same procedure as for the
- Cleanup: The test closes
ItsSessionand releases the lighting controller.
APIs tested:
Pass:
- When the light is on, the night mode indicator should be in the
OFFstate. - When the light is off, the night mode indicator should be in the
ONstate. - Applies to both
Camera2andCameraExtensionsessions.
test_preview_min_frame_rate
Tests that the preview frame rate decreases correctly in a dark scene. For this test to work correctly, the lights in the test rig must be turned off by the controller or manually by the test operator.
APIs tested:
-
android.hardware.camera2.CameraCharacteristics#CONTROL_AE_AVAILABLE_TARGET_FPS_RANGES -
android.hardware.camera2.CameraCharacteristics#SCALAR_AVAILABLE_CAPABILITIES_STREAM_USE_CASES -
android.hardware.camera2.CaptureResult#CONTROL_AE_TARGET_FPS_RANGE -
android.media.CamcorderProfile -
android.media.MediaRecorder
Pass: The preview frame rate is at the minimum of the requested frame rate range, and the variation between frames is less than the absolute tolerance set in the test.
test_torch_strength
Tests that flash strength control in TORCH mode is implemented correctly.
Verifies that if the device supports flash strength control during camera use in TORCH mode, the torch strength changes with different requested strength levels. Verifies that flash strength control works with different AE_MODES . For example, if the auto-exposure mode is ON or OFF , the flash strength level has an effect on brightness, and if the mode is ON_AUTO_FLASH , the flash strength level has no effect on brightness. Verifies that the torch strength stays the same throughout the duration of a burst, simulating a video capture session. To conduct the test, lights in the test rig must be turned off. The lights can be turned off automatically with the Arduino controller. The scene must be completely dark for the test to work correctly.
APIs tested:
-
android.hardware.camera2.CameraCharacteristics#FLASH_INFO_STRENGTH_DEFAULT_LEVEL -
android.hardware.camera2.CameraCharacteristics#FLASH_INFO_STRENGTH_MAXIMUM_LEVEL -
android.hardware.camera2.CameraCharacteristics#FLASH_TORCH_STRENGTH_DEFAULT_LEVEL -
android.hardware.camera2.CameraCharacteristics#FLASH_TORCH_STRENGTH_MAX_LEVEL
Pass:
When the auto-exposure mode is ON or OFF , the brightness of the image burst patches increases as the flash strength level increases from no flash to FLASH_TORCH_STRENGTH_MAX_LEVEL . When the auto-exposure mode is ON_AUTO_FLASH , the difference in brightness of the image burst patches are within tolerance as the flash strength level increases from no flash to FLASH_TORCH_STRENGTH_MAX_LEVEL .
scene_gen2_chart
In Android 17 and higher, scene_gen2_chart uses the Gen2 paper chart.
This test chart consists of facial samples, a QR code, gray-scale patches, a Siemens star, a color chart, and slanted squares.

Figure 142. Gen2 chart sample example.
test_tonemap_sequence
This test evaluates a device's default tone map curve against a linear curve and two exponential curves (one with uniform points and the other with non-uniform points). For a passing result, the default curve's brightness must exceed that of the linear and the exponential curves. Additionally, the linear curve must be brighter than the exponential curves, and the two exponential curves should have similar brightness levels.
The test also verifies the accuracy of the device's default curve. This is done by extracting the default curve, re-inputting it, and then comparing the resulting image's brightness to the original default curve's image.
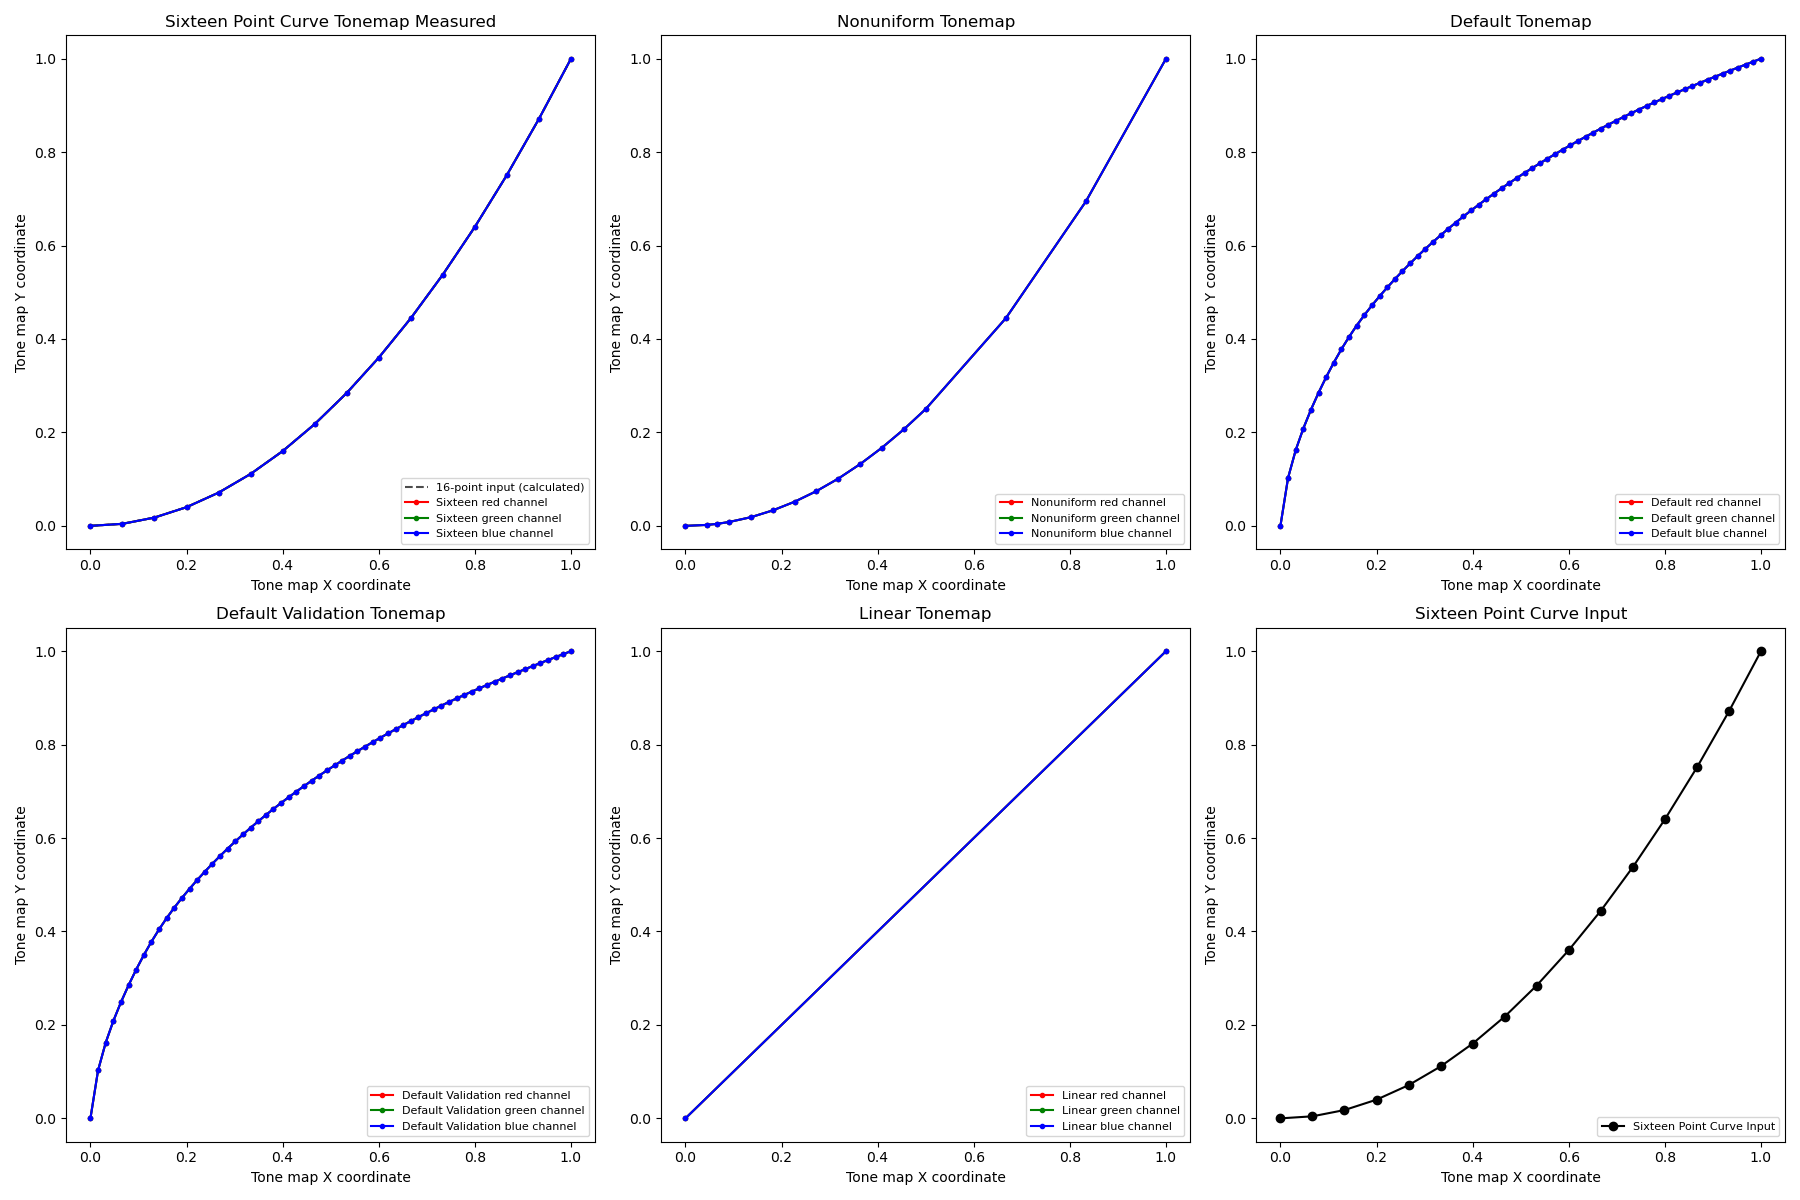
Figure 143. Test tonemap sequence plot.
APIs tested:
-
android.hardware.camera2.CameraMetadata#TONEMAP_MODE_CONTRAST_MODE -
android.hardware.camera2.CameraMetadata#TONEMAP_MODE_FAST -
android.hardware.camera2.CaptureRequest#TONEMAP_CURVE -
android.hardware.camera2.CaptureRequest#TONEMAP_MODE
Pass: The brightness difference between the default and linear curves is more than 15%, while the difference between the two exponential curves is less than 8%.
test_multi_camera_switch
This test verifies color and exposure consistency during dynamic zoom transitions. It verifies that switching between the Ultrawide (UW) and Wide (W) lenses during preview recording maintains near-identical CIELAB values, preventing visible shifts in the user experience.
The test executes a dynamic preview recording across a predefined zoom range to trigger the physical camera "crossover" point, where the ultra wide lens switches to the wide lens. The test identifies the exact frame where the lens switch happens. Frames immediately preceding and following this crossover point are captured and analyzed for stability in auto exposure (AE), and auto white balance (AWB).
The AE check confirms that Luma fluctuations remain within an acceptable range during the lens handoff. The AWB check verifies that red-green and blue-green ratios stay within defined thresholds of color neutrality.
APIs tested:
-
android.hardware.camera2.CameraCharacteristics#CONTROL_ZOOM_RATIO_RANGE -
android.hardware.camera2.CaptureRequest#CONTROL_ZOOM_RATIO -
android.media.CamcorderProfile -
android.media.MediaRecorder
Pass: For the test to pass, the following AE and AWB checks need to pass:
- AE check: The luma change (Y value) between the UW and W lens images must be less than 4% for all the color patches if the device supports both
ae_regionsandawb_regions. If onlyae_regionsis supported then only the gray color patch values must meet the criteria. - AWB check: The difference between the red-green and blue-green values for the UW and W lens images must be less than 3% for the gray color patch and must be less than 10% for other color patches if the device supports both
ae_regionsandawb_regions.

Figure 144. Gray patch taken with UW lens.

Figure 145. Gray patch taken with W lens.
scene_ip
In Android 16 and higher, scene scene_ip enables image parity checks between the default camera app and the Jetpack camera app (JCA) to identify major differences between captured images. The JCA replicates social media app captures and provides a baseline image that social media apps then process and refine.
Hardware setup requirements
The following hardware setup is required for scene_ip tests:
- Tests are executed in the Gen2 camera ITS-in-a-box .
- The lighting and servo controllers that are part of the Gen2 rig are used to control the test environment.
- A test feature chart is placed inside the Gen2 rig.

Figure 146. Gen2chart_sample example.
Test skip criteria
The scene_ip tests are skipped if any of the following criteria are met:
- The device has a first API level (
first_api_level) of 35 or lower. - The device isn't a phone device with front and rear primary camera devices (for example, a tablet or TV).
test_default_jca_ip
Takes captures of the test feature chart under controlled lighting conditions using the default camera app and the JCA and performs the following checks:
FoV: Checks that the default camera app and JCA captures have the same FoV. This check uses the center QR Code feature extracted from the captures chart image.
Brightness: Checks that the brightness difference measured between the default camera app and JCA doesn't exceed 10. This check uses the dynamic range patch for brightness measurement.
White balance: Checks that the white balance difference between the default camera app and JCA doesn't exceed 4. This check uses the dynamic range patch for brightness measurement.
Color rendering: Checks that the color rendering difference between the default camera app and JCA doesn't exceed 6.
Pass: Test passes the FoV, brightness, and white balance checks. In Android 16, this test isn't mandated ( NOT_YET_MANDATED ). For Android 17 and higher, the FoV, brightness, and white balance parity checks are mandated. The color rendering check isn't mandated ( NOT_YET_MANDATED ) in Android 17.
test_jca_jpegr_ip
Verifies that the white balance difference between the JPEG_R JCA preview snapshot and captured images doesn't exceed 4.
APIs tested:
Pass: The white balance difference between the JCA preview snapshot and the captured JPEG_R image is within the threshold (default is 4).
sensor_fusion
Sensor fusion tests require specific phone movement in front of a checkerboard pattern and ArUco markers. For optimum results, verify that the test chart is mounted flat. Charts that aren't flat affect the rotation calculations for many of the tests. The chart must fill the back of the sensor fusion box by printing at 17x17 in. (43x43 cm). The sensor_fusion tests can be automated with the Sensor Fusion Box .

Figure 147. Sensor fusion chart.

Figure 148. Sensor fusion chart that fills the back of the sensor fusion box.
test_lens_intrinsic_calibration
Tests that the optical center of the lens intrinsic changes when the lens moves due to optical image stabilization (OIS). If lens intrinsic samples are supported, tests that the optical center of the lens intrinsic samples changes when the lens moves due to OIS.
APIs tested:
-
android.hardware.camera2.CameraCharacteristics#LENS_INTRINSIC_CALIBRATION -
android.media.MediaRecorder -
android.media.CamcorderProfile
Pass: The optical center of the lens intrinsic changes by 1 pixel or more. If lens intrinsic samples are supported, the optical centers of the lens intrinsic samples change by 1 pixel or more.
The following figure is an example test_lens_intrinsic_calibration plot showing changes of principal points in pixels for each frame:
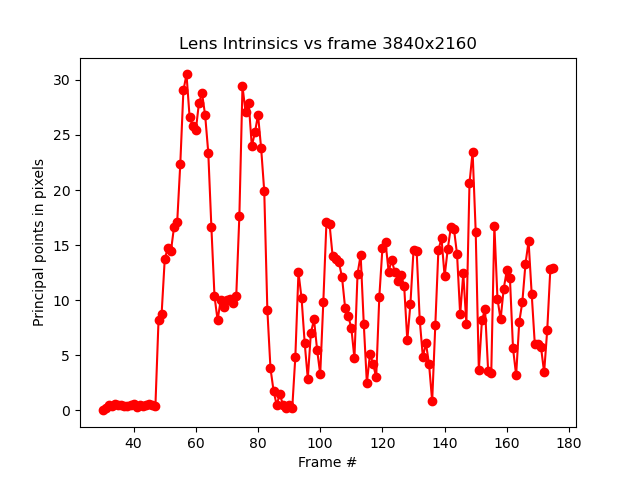
Figure 149. Example of test_lens_intrinsic_calibration plot showing changes of principal points in pixels for each frame.
test_multi_camera_frame_sync
Tests that frame timestamps captured by logical camera are within 10 ms by computing angles of squares within the checkerboard to determine the timestamp.
APIs tested:
-
android.hardware.camera2.CameraCharacteristics#LOGICAL_MULTI_CAMERA_SENSOR_SYNC_TYPE -
android.hardware.camera2.CameraCharacteristics#getPhysicalCameraIds() -
android.hardware.camera2.CameraMetadata#REQUEST_AVAILABLE_CAPABILITIES_LOGICAL_MULTI_CAMERA -
android.hardware.camera2.params.OutputConfiguration#setPhysicalCameraId()
Pass: The angle between images from each camera doesn't change appreciably as the phone is rotated.
test_preview_distortion
Tests that distortion is corrected throughout each preview frame taken at various zoom levels. For each preview frame, the test calculates ideal points based on camera intrinsics and extrinsics.
In the example image, ideal points are shown in green; actual points are shown in red. The distortion error is calculated based on the RMS pixel distance between the actual points and ideal points. The green and red highlights on the image are used to visually detect the area of distortion error.
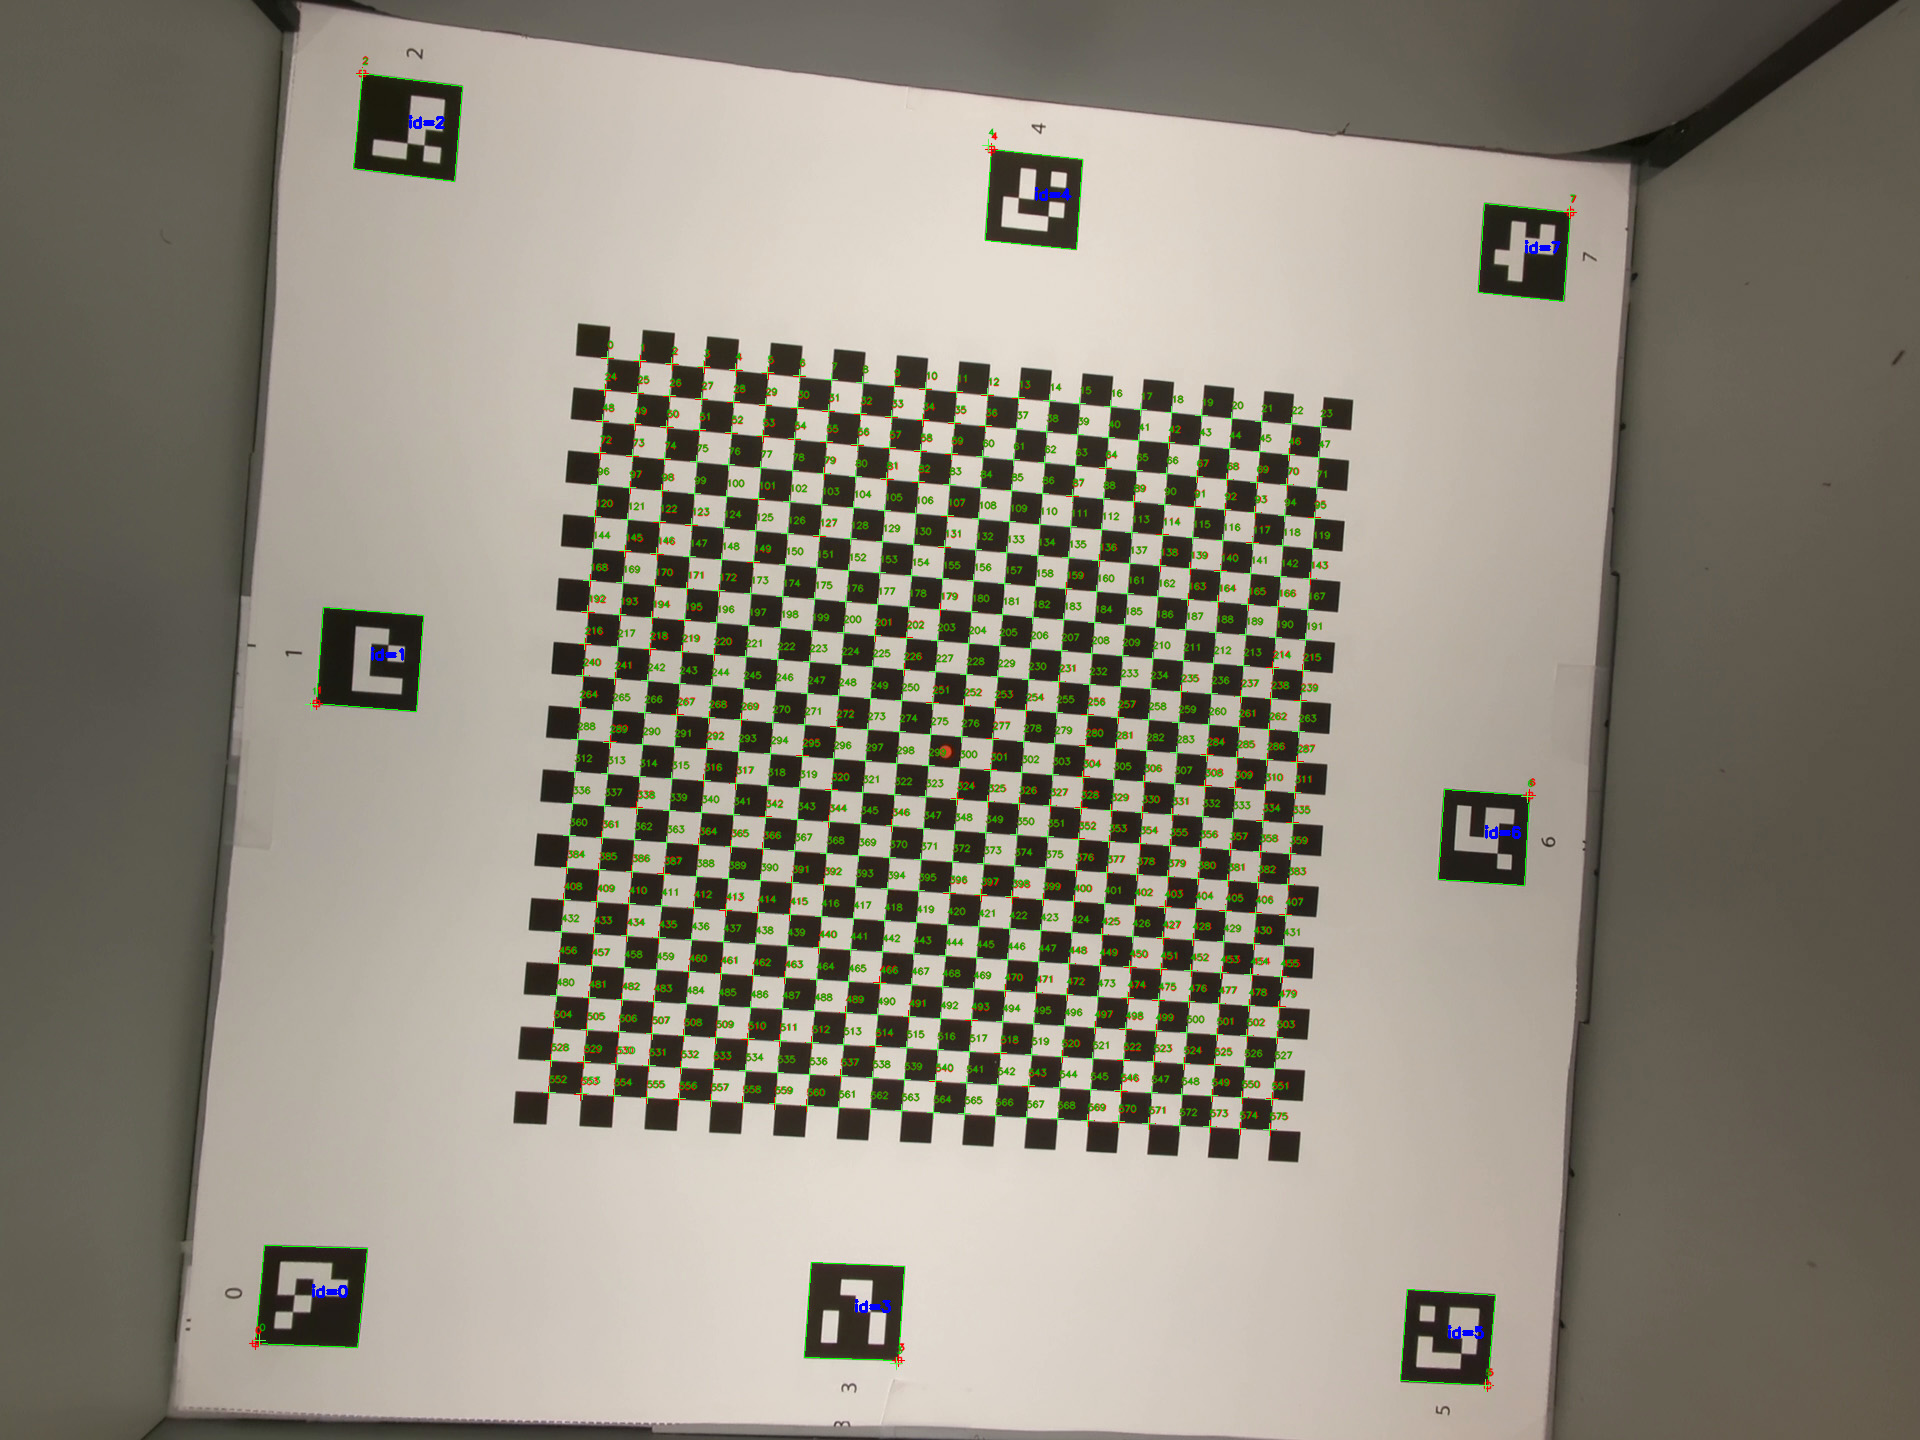
Figure 150. Image of checkerboard with ideal points as green and actual points as red.
APIs tested:
-
android.hardware.camera2.CameraCharacteristics#CONTROL_ZOOM_RATIO_RANGE -
android.hardware.camera2.CaptureRequest#CONTROL_ZOOM_RATIO -
android.hardware.camera2.CameraCharacteristics#getPhysicalCameraIds() -
android.media.CamcorderProfile -
android.media.MediaRecorder
Pass: The normalized distortion error of each preview frame is less than the threshold set in the test.
test_preview_stabilization
Tests that stabilized preview video rotates less than gyroscope.
APIs tested:
-
android.hardware.camera2.CameraCharacteristics#SCALAR_AVAILABLE_CAPABILITIES_STREAM_USE_CASES -
android.media.MediaRecorder -
android.media.CamcorderProfile
Pass: Maximum angle rotation over frames is less than 70% of gyroscope rotation.
The following are sample videos with and without stabilization:
Figure 151. Sample video with stabilization.
Figure 152. Sample video without stabilization.
test_sensor_fusion
Tests the timestamp difference between the camera and the gyroscope for AR and VR applications. The phone is rotated 90 degrees 10 times in front of the checkerboard pattern. Motion is about 2 s round trip. This test is skipped if no gyroscope is included or if the timestamp source REALTIME parameter isn't enabled.
The test_sensor_fusion test generates a number of plots. The two most important plots for debugging are:
test_sensor_fusion_gyro_events: Shows the gyroscope events for the phone during the test. Movement in the x and y direction implies the phone isn't securely mounted on the mounting plate, reducing the probability of the test passing. The number of cycles in the plot depends on the write speed for saving frames.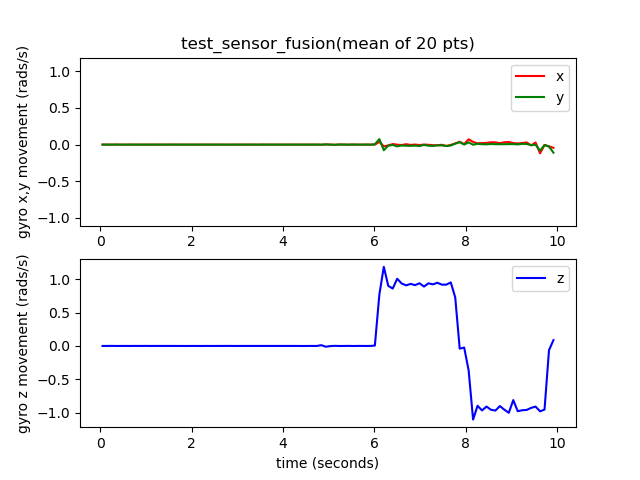
Figure 153. test_sensor_fusion gyroscope events example.
test_sensor_fusion_plot_rotations: Shows the alignment of the gyroscope and camera events. This plot must show matching movement between camera and gyroscope to +/-1 ms.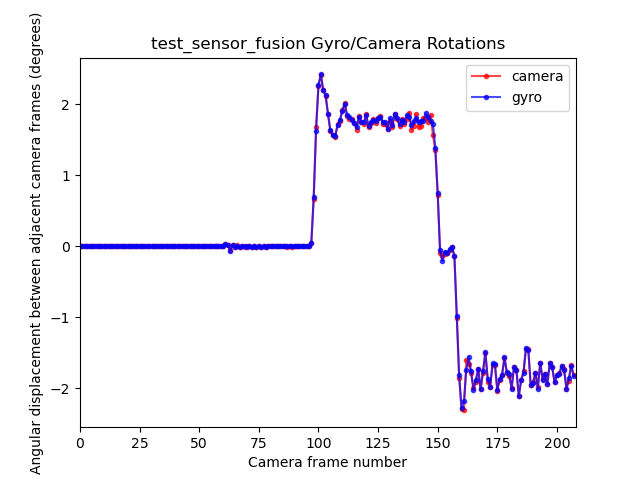
Figure 154. test_sensor_fusion plot rotations example.
APIs tested:
-
android.hardware.camera2.CameraCharacteristics#LENS_FACING -
android.hardware.camera2.CameraCharacteristics#SENSOR_INFO_TIMESTAMP_SOURCE -
android.hardware.camera2.CameraMetadata#SENSOR_INFO_TIMESTAMP_SOURCE_REALTIME -
android.hardware.camera2.CaptureRequest#CONTROL_AE_TARGET_FPS_RANGE -
android.hardware.camera2.CaptureRequest#SENSOR_FRAME_DURATION -
android.hardware.camera2.CaptureRequest#SENSOR_TIMESTAMP -
android.hardware.camera2.CaptureResult#SENSOR_ROLLING_SHUTTER_SKEW
Pass: Camera and gyroscope timestamps' offset is less than 1 ms as per 7.3.9 High Fidelity Sensors in the CDD.
Fail mechanisms:
- Offset error: The camera-gyroscope offset isn't correctly calibrated to within +/-1 ms.
- Frame drops: The pipeline isn't fast enough to capture 200 frames consecutively.
- Socket errors:
adbcan't reliably connect to the DUT long enough to execute the test. - The chart isn't mounted flat. The plot
test_sensor_fusion_plot_rotationshas frames where the gyroscope and camera rotation vary considerably as the camera rotates through the parts of the chart that aren't flat. - The camera isn't mounted flat. The plot
test_sensor_fusion_gyro_eventsshows movement in the X and Y planes. This failure is more common in front-facing cameras as the rear camera often has a raised bump to the rest of the phone body, creating a tilt when mounting the rear of the phone to the mounting plate.
test_video_stabilization
Deprecated: This test is deprecated from Android 17. For Android 17 and higher, this test is replaced by test_video_stabilization_jca .
Tests that stabilized video rotates less than gyroscope.
APIs tested:
-
android.hardware.camera2.CameraCharacteristics#SCALAR_AVAILABLE_CAPABILITIES_STREAM_USE_CASES -
android.media.MediaRecorder -
android.media.CamcorderProfile
Pass: Maximum angle rotation over frames is less than 60% of gyroscope rotation.
The following are sample videos with and without stabilization.
Figure 155. Sample video with stabilization.
Figure 156. Sample video without stabilization.
test_video_stabilization_jca
Tests that stabilized video captured using the JCA rotates less than the gyroscope. The JCA must be installed on the device before testing.
APIs tested:
-
android.hardware.camera2.CameraCharacteristics#SCALAR_AVAILABLE_CAPABILITIES_STREAM_USE_CASES -
android.media.CamcorderProfile -
android.media.MediaRecorder
Pass: The maximum angle rotation over frames extracted from video captured using the JCA is less than 70% of gyroscope rotats 4).
Diffuser-based test scene
scene5
scene5 requires a uniformly lit gray scene. This is accomplished by a diffuser placed over the camera lens. We recommend the following diffuser: www.edmundoptics.com/optics/window-diffusers/optical-diffusers/opal-diffusing-glass/46168 .
To prepare the scene, attach a diffuser in front of the camera and point the camera to a lighting source of around 2000 lux. Images captured for scene5 require diffuse lighting with no features evident. The following is a sample image:

Figure 157. scene5 capture example.
Because no tablets or controllers are required for this scene, tests use the TEST_BED_MANUAL testbed. For an example, see Manual testing config.yml file . The default config.yml file doesn't include TEST_BED_MANUAL but you can modify the file to include one.
test_lens_shading_and_color_uniformity
Tests that the lens shading correction is applied appropriately, and color of a monochrome uniform scene is evenly distributed. Performs this test on a YUV frame with auto 3A. Lens shading is evaluated based on the y channel. Measures the average y value for each sample block specified, and determines pass or fail by comparing with the center y value. The color uniformity test is evaluated in red-green and blue-green space.
APIs tested:
-
android.hardware.camera2.CaptureRequest#CONTROL_AE_MODE -
android.hardware.camera2.CaptureRequest#CONTROL_AWB_MODE
Pass: At the specified radius of the image, the variance of red-green and blue-green value must be less than 20% to pass the test.
Fail mechanisms:
- Excessive vignetting in images
- Black border artifacts in images

Figure 158. test_lens_shading_and_color_uniformity_y_plane.

Figure 159. test_lens_shading_and_color_uniformity_color_uniformity.

Figure 160. test_lens_shading_and_color_uniformity_lens_shading_result.
Wide-gamut tablet-based test scene
scene_wide_gamut
scene_wide_gamut is a rectangular frame divided into four equal quadrants, each filled with a different color. This requires the tablet to display the chart in wide gamut, and the DUT capture a wide gamut photograph of the screen.
These tests verify that the captured image adheres to the correct color profile and color range.
test_display_p3
Tests Display P3 capture in JPEG using the ColorSpaceProfiles API. Tests that the captured JPEG has an appropriate ICC profile in its header, and that the image contains certain percentile of colors outside of the sRGB gamut.
APIs tested:
-
android.hardware.camera2.params.ColorSpaceProfiles -
android.hardware.camera2.params.SessionConfiguration#setColorSpace
Pass: The JPEG contains a Display P3 ICC profile and more than 1 percent of colors outside the sRGB gamut.

Figure 161. test_display_p3 example.