
To implement a Voice Interaction Application (VIA), you complete these steps:
- Create a VIA skeleton.
- (optional) Implement a setup/sign-in flow.
- (optional) Implement a Settings screen.
- Declare required permissions in the manifest file.
- Implement a voice plate UI.
- Implement voice recognition (must include RecognitionService API implementation).
- Implement utterance (optionally, you can implement the TextToSpeech API).
- Implement commands fulfillment. See this content in Fulfilling Commands.
The following sections describe how to complete each step mentioned above.
Create a VIA skeleton
Manifests
An app is detected as one with Voice Interaction when the following is included in the manifest:
AndroidManifest.xml
<manifest xmlns:android="http://schemas.android.com/apk/res/android"
    package="com.example.myvoicecontrol">
    ...

  <application ... >
    <service android:name=".MyInteractionService"
        android:label="@string/app_name"
        android:permission="android.permission.BIND_VOICE_INTERACTION"
        android:process=":interactor">
      <meta-data
          android:name="android.voice_interaction"
          android:resource="@xml/interaction_service" />
      <intent-filter>
        <action android:name=
          "android.service.voice.VoiceInteractionService" />
      </intent-filter>
    </service>
  </application>
</manifest>
In this example:
- VIAs must expose a service that extends
VoiceInteractionService, with an intent filter for the actionVoiceInteractionService.SERVICE_INTERFACE ("android.service.voice.VoiceInteractionService"). - This service must hold the
BIND_VOICE_INTERACTIONsystem signature permission. - This service should include an
android.voice_interactionmetadata file to contain the following:res/xml/interaction_service.xml
<voice-interaction-service
    xmlns:android="http://schemas.android.com/apk/res/android"
    android:sessionService=
      "com.example.MyInteractionSessionService"
    android:recognitionService=
      "com.example.MyRecognitionService"
    android:settingsActivity=
      "com.example.MySettingsActivity"
    android:supportsAssist="true"
    android:supportsLaunchVoiceAssistFromKeyguard="true"
    android:supportsLocalInteraction="true" />
For details about each field, see R.styleable#VoiceInteractionService.
Given that all VIAs are also voice recognizer services, you must also
include the following in your manifest:
AndroidManifest.xml
<manifest ...>
  <uses-permission android:name="android.permission.RECORD_AUDIO"/>
  <application ...>
    ...
    <service android:name=".RecognitionService" ...>
      <intent-filter>
        <action android:name="android.speech.RecognitionService" />
        <category android:name="android.intent.category.DEFAULT" />
      </intent-filter>
      <meta-data
        android:name="android.speech"
        android:resource="@xml/recognition_service" />
    </service>
  </application>
</manifest>
Voice recognition services also require the following piece of metadata:
res/xml/recognition_service.xml
<recognition-service
    xmlns:android="http://schemas.android.com/apk/res/android"
    android:settingsActivity="com.example.MyRecognizerSettingsActivity" />
VoiceInteractionService, VoiceInteractionSessionService, and VoiceInteractionSession
The following diagram depicts the life-cycle of each of these entities:
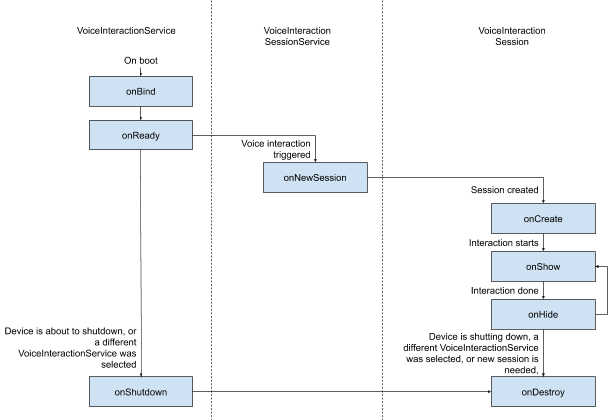
Figure 1. Lifecycles
As stated before, VoiceInteractionService is the entrypoint
to a VIA. The main responsibilities of this service are:
- Initialize any processes that should be kept running for as long as this VIA is the active one. For example, hotword detection.
- Reports supported voice actions (see Voice Assistant Tap-to-Read).
- Launch voice interaction sessions from lock screen (keyguard).
In its simplest form, a VoiceInteractionService implementation would look like this:
public class MyVoiceInteractionService extends VoiceInteractionService {
    private static final List<String> SUPPORTED_VOICE_ACTIONS =
        Arrays.asList(
            CarVoiceInteractionSession.VOICE_ACTION_READ_NOTIFICATION,
            CarVoiceInteractionSession.VOICE_ACTION_REPLY_NOTIFICATION,
            CarVoiceInteractionSession.VOICE_ACTION_HANDLE_EXCEPTION
    );

    @Override
    public void onReady() {
        super.onReady();
        // TODO: Setup hotword detector
    }

    @NonNull
    @Override
    public Set<String> onGetSupportedVoiceActions(
            @NonNull Set<String> voiceActions) {
        Set<String> result = new HashSet<>(voiceActions);
        result.retainAll(SUPPORTED_VOICE_ACTIONS);
        return result;
    }
    ...
}
The implementation of VoiceInteractionService#onGetSupportedVoiceActions() is
required to handle
Voice Assistant Tap-to-Read.
A VoiceInteractionSessionService is used by the system to create and
interact with a VoiceInteractionSession. It only has one responsibility,
to start new sessions when requested.
public class MyVoiceInteractionSessionService extends VoiceInteractionSessionService {
    @Override
    public VoiceInteractionSession onNewSession(Bundle args) {
        return new MyVoiceInteractionSession(this);
    }
}
Finally, a VoiceInteractionSession is where most of the work
would be done. A single session instance might be reused to complete multiple
user interactions. In AAOS, a helper CarVoiceInteractionSession exists,
helping to implement some of the automotive unique functionalities.
public class MyVoiceInteractionSession extends CarVoiceInteractionSession {

    public InteractionSession(Context context) {
        super(context);
    }

    @Override
    protected void onShow(String action, Bundle args, int showFlags) {
        closeSystemDialogs();
        // TODO: Unhide UI and update UI state
        // TODO: Start processing audio input
    }
    ...
}
VoiceInteractionSession has a large set of callback methods that are
explained in the following sections. see the documentation for VoiceInteractionSession a complete list.
Implement a setup/sign-in flow
Setup and sign-in can occur:
- During device onboarding (Setup Wizard).
- During voice interaction service swapping (Settings).
- Upon first launch when the app is selected.
For details on the recommended user experience and visual guidance, see Preloaded Assistants: UX Guidance.
Setup during voice service swapping
It is always possible for the user to select a VIA that hasn't been properly configured. This can happen because:
- The user skipped Setup Wizard entirely or the user skipped the voice interaction configuration step.
- The user selected a VIA different from the one configured during the device onboarding.
In any case, a VoiceInteractionService has several ways to encourage the user
to complete setup:
- Notification reminder.
- Automatic voice reply when the user tries to use it.
Note: It is strongly discouraged to present a VIA setup flow without an explicit user request. This means that VIAs should avoid automatically displaying content on the HU during device boot or as a result of a user switch or unlock.
Notification reminder
A notification reminder is a non-intrusive way to indicate the need of setup, and to provide users with an affordance to navigate into the assistant setup flow.
Figure 2. Notification reminder
Here is how this flow would work:
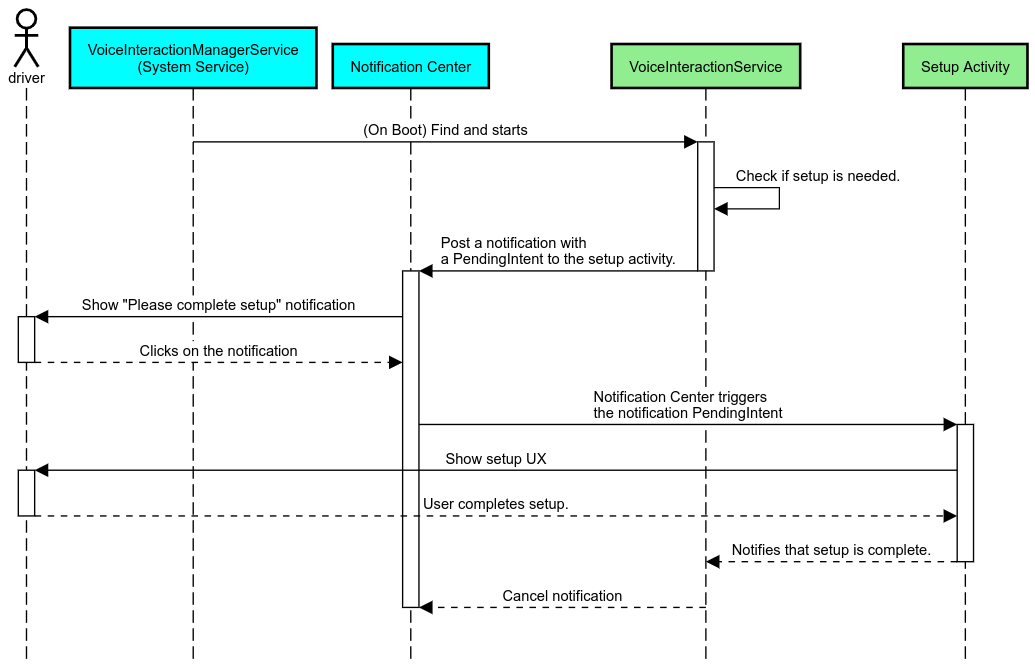
Figure 3. Notification reminder flow
Voice reply
This is the simplest flow to implement, initiating an utterance on
a VoiceInteractionSession#onShow() callback, explaining to the user what
needs to be done, and then asking them (if setup is allowed given the UX Restriction state)
if they want to initiate the setup flow. If setup isn't possible at the time, explain this
situation, too.
Setup on first use
It is always possible for the user to trigger a VIA that hasn't been properly configured. In such cases:
- Verbally inform the user about this situation (for example, "To work properly, I need you to complete a few steps … ").
- If the UX restrictions engine permits (see UX_RESTRICTIONS_NO_SETUP), ask the user if they want to start the setup process and then open the Settings screen for the VIA.
- Otherwise (for example, if the user is driving), leave a notification for the user to click on the option when it is safe to do so.
Build voice interaction setup screens
Setup and sign-in screens should be developed as regular activities. See the UX and visual guidelines for the UI development in Preloaded Assistants: UX Guidance.
General guidelines:
- VIAs should allow users to interrupt and resume setup at any time.
- Setup shouldn't be allowed if
UX_RESTRICTIONS_NO_SETUPrestriction is in effect. For details, see Driver Distraction Guidelines. - Setup screens should match the design system for each vehicle. General screen layout, icons, colors and other aspects should be consistent with the rest of the UI. See Customization for details.
Implement a settings screen

Figure 4. Settings integration
Settings screens are regular Android activities. If implemented, their entry point
must be declared in the res/xml/interaction_service.xml as part of the VIA
manifests (see
Manifests).
The Settings section is a good place to continue the setup and sign-in (if the user didn't complete
it) or offer a sign-out or switch user option if needed. Similar to the Setup
screens described above, these screens should:
- Provide the option to exit back to the previous screen in the screen stack (for example, to Car Settings).
- Not be permitted while driving. For details, see Driver Distraction Guidelines.
- Match each vehicle design system. For details, see Customization.
Declare the required permissions in the manifest file
Permissions required by a VIA can be split into three categories:
- System signature permissions. These are permissions only granted to pre-installed, system signed APKs. Users aren't able to grant these permissions, only OEMs can grant those when building their system images. For more information on obtaining signature permissions, see Grant System-Privileged Permissions.
- Dangerous permissions. These are permissions a user must grant using the PermissionsController dialog. OEMs can pre-grant some of these permissions to the default VoiceInteractionService. But given that this default might change from device to device, apps should be able to request these permissions when needed.
- Other permissions. These are all other permissions that don't require user intervention. These permissions are automatically granted by the system.
Given the above, the following section focuses only on requesting dangerous permissions. Permissions should only be requested while the user is in the sign-in or setting screens.
If the app doesn't have the permissions needed to operate, the recommended flow is to use a voice utterance to explain the situation to the user, and a notification to provide an affordance that the user can use to navigate back to the VIA settings screens. For details, see 1. Notification reminder.
Request permissions as part of the setting screen
Dangerous permissions are requested using regular ActivityCompat#requestPermission() method (or equivalent). For details about how to request permissions, see
Request App Permissions.
Figure 5. Request permissions
Notification listener permission
To implement the TTR flow, VIAs must be designated as a notification listener. This isn't a permission per-se, but instead a configuration that allows the system to send notifications to registered listeners. To learn if the VIA was given access to this information, apps can:
- (Optional) Check if there are notification listeners ahead of time by using
CarAssistUtils#assistantIsNotificationListener(). This could be done, for example, during the setup flow. - (Mandatory) React to handling the
CarVoiceInteractionSession#onShow()with actionVOICE_ACTION_HANDLE_EXCEPTIONand exceptionEXCEPTION_NOTIFICATION_LISTENER_PERMISSIONS_MISSING.
If this access isn't pre-granted, the VIA should direct the user to the Notification Access section of Car Settings, using a combination of utterances and notifications. The following code can be used to open the appropriate section of the settings app:
private void requestNotificationListenerAccess() {
    Intent intent = new Intent(Settings
        .ACTION_NOTIFICATION_LISTENER_SETTINGS);
    intent.putExtra(Settings.EXTRA_APP_PACKAGE, getPackageName());
    startActivity(intent);
}
Implement a voice plate UI
When a VoiceInteractionSession receives an onShow() callback,
it can present a voice plate UI. For visual and UX guidelines on voice plate implementation,see
Preloaded Assistants: UX Guidance.
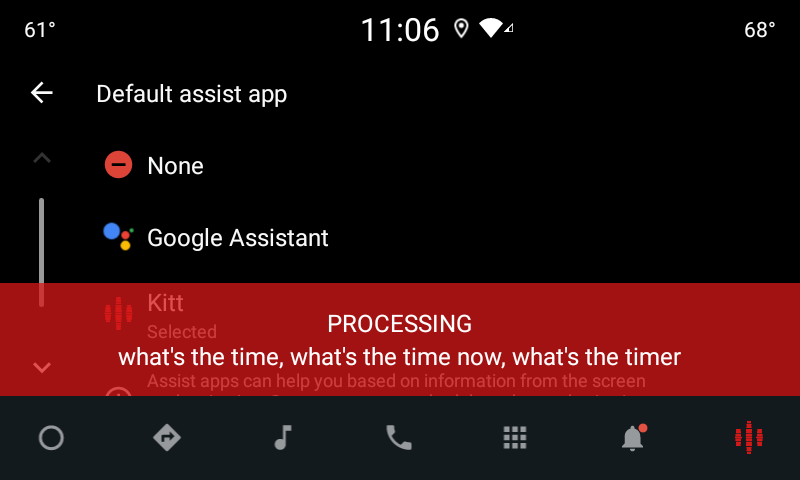
Figure 6. Displaying the voice plate
There are two options on how to implement this UI:
- Override
VoiceInteractionSession#onCreateContentView() - Launch an Activity using
VoiceInteractionSession#startAssistantActivity()
Use onCreateContentView()
This is the default way of presenting a voice plate. The VoiceInteractionSession
base class creates a window and manages its lifecycle for as long as a voice
session is alive. Apps must override VoiceInteractionSession#onCreateContentView()
and return a view that is attached to that window as soon as the session is
created. This view should initially be invisible. When a voice interaction starts,
this view should be made visible on VoiceInteractionSession#onShow()
and then invisible back again on VoiceInteractionSession#onHide().
public class MyVoiceInteractionSession extends CarVoiceInteractionSession {
    private View mVoicePlate;
    …

    @Override
    public View onCreateContentView() {
        mVoicePlate = inflater.inflate(R.layout.voice_plate, null);
        …
   }

    @Override
    protected void onShow(String action, Bundle args, int showFlags) {
        // TODO: Update UI state to "listening"
        mVoicePlate.setVisibility(View.VISIBLE);
    }

    @Override
    public void onHide() {
        mVoicePlate.setVisibility(View.GONE);
    }
    …
}
When using this method, you might want to adjust VoiceInteractionSession#onComputeInsets()
to account for obscured regions of your UI.
Use startAssistantActivity()
In this case, VoiceInteractionSession delegates handling of the voice
plate UI to a regular activity. When this option is used, a VoiceInteractionSession
implementation must disable the creation of its default content window (see Using onCreateContentView()) on the onPrepareShow()
callback. At VoiceInteractionSession#onShow(), the session would start the voice
plate activity using VoiceInteractionSession#startAssistantActivity(). This
method initiates the UI with the proper window settings and activity flags.
public class MyVoiceInteractionSession extends CarVoiceInteractionSession {
    …

    @Override
    public void onPrepareShow(Bundle args, int showFlags) {
        super.onPrepareShow(args, showFlags);
        setUiEnabled(false);
    }

    @Override
    protected void onShow(String action, Bundle args, int showFlags) {
        closeSystemDialogs();
        Intent intent = new Intent(getContext(), VoicePlateActivity.class);
        intent.putExtra(VoicePlateActivity.EXTRA_ACTION, action);
        intent.putExtra(VoicePlateActivity.EXTRA_ARGS, args);
        startAssistantActivity(intent);
    }

    …
}
To maintain a communication between this activity and the
VoiceInteractionSession, a set of internal Intents or service binding might be
required. For example, when VoiceInteractionSession#onHide() is invoked, the
session must be able to pass this request to the activity.
Important. In Automotive, only specially annotated
activities or activities listed in the UXR "allowlist" can be displayed while
driving. This applies to activities started with
VoiceInteractionSession#startAssistantActivity() as well. Remember to
either annotate your activity with <meta-data
android:name="distractionOptimized" android:value="true"/> or include this
activity in the systemActivityWhitelist key of the /packages/services/Car/service/res/values/config.xml
file. For more information, see Driver
Distraction Guidelines.
Implement voice recognition
In this section, you learn how to implement voice recognition through the detection and recognition of hotwords. A hotword is a trigger word used to start a new query or action by voice. For example, "OK Google" or "Hey Google".
DSP hotword detection
Android provides access to a always-on hotword detector at the DSP level by
means of the AlwaysOnHotwordDetector.
way to implement hotword detection with low CPU. The use of this functionality is
divided into two parts:
- Instantiation of an
AlwaysOnHotwordDetector. - Enrollment of a hotword detection sound model.
VoiceInteractionService implementation can create a hotword detector using
VoiceInteractionService#createAlwaysOnHotwordDetector(),
passing a keyphrase and locale they wish to use for detection. As a result, the
app receives an onAvailabilityChanged()
callback with one of the following possible values:
STATE_HARDWARE_UNAVAILABLE. DSP capability isn't available on the device. In this case, Software hotword detection is used.STATE_HARDWARE_UNSUPPORTED. DSP support isn't available in general, but DSP doesn't support given keyphrase and locale combination. The app can opt to use Software Hotword Detection.STATE_HARDWARE_ENROLLED. Hot word detection is ready and can be started by calling thestartRecognition()method.STATE_HARDWARE_UNENROLLED. A sound model for the requested keyphrase is not available, but enrollment is possible.
Enrollment of hotword detection sound models can be done by using IVoiceInteractionManagerService#updateKeyphraseSoundModel().
Multiple models can be registered in the system at a given time, but only one
model is associated with a AlwaysOnHotwordDetector.
DSP hotword detection might not be available in all devices. VIA developers
should check hardware capabilities using getDspModuleProperties()
method. For sample code showing
how to enroll sound models, see VoiceEnrollment/src/com/android/test/voiceenrollment/EnrollmentUtil.java.
See Concurrent capture regarding
concurrent hotword recognition.
Software hotword detection
As indicated above, DSP hotword detection might not be available in all devices (for example, Android emulator doesn't provide DSP emulation). In this case, software voice recognition is the only alternative. To avoid interfering with other apps that might need access to the microphone, VIAs must access audio input using:
- Audio capture must use MediaRecorder.AudioSource.HOTWORD.
- Hold
android.Manifest.permission.CAPTURE_AUDIO_HOTWORDpermission.
Both these constants are @hide and available only to bundled apps.
Manage audio input and voice recognition
Audio input would be implemented using the MediaRecorder class.
For more information on how to use this API, see the MediaRecorder
Overview. Voice interaction services are also expected to be RecognitionService
class implementations. Any app in the system that requires voice recognition uses the
to access this capability. To do voice recognition and have access to the microphone, VIAs
must hold android.permission.RECORD_AUDIO.
Apps accessing a RecognitionService
implementation are expected to hold this permission as well.
Before Android 10, microphone access was given to only one app at a time (with the exception of hotword detection, see above). Starting with Android 10, microphone access can be shared. For more information see Sharing Audio Input.
Access audio output
When the VIA is ready to provide verbal responses, it is important to follow this next set of guidelines:
- When requesting audio focus or managing audio output, the app
must use
AudioAttributes#USAGE_ASSISTANTandAudioAttributes#CONTENT_TYPE_SPEECHas audio attributes. - During speech recognition, audio focus must be requested with
AudioManage#AUDIOFOCUS_GAIN_TRANSIENT_EXCLUSIVE. Be aware that some media apps might not react properly to media commands (see Fulfilling Media Commands) while their audio focus is removed.