
The Dashcam app is designed to integrate with AAOS, providing drivers with video recording capabilities for enhanced safety and security. This guide outlines the technical requirements, integration steps, and best practices to ensure a successful implementation.
Prerequisites
Before you continue, ensure these preconditions are fulfilled:
SDK:
- SDK 31 or higher is required.
Hardware:
- EVS or Camera2 cameras available to AAOS.
- Sufficient internal storage space or support for removable external storage
must be available for video recordings.
Software requirements:
- Unbundled support. To learn more, see Unbundled Apps.
- Permissions. Dashcam requires system permissions.
Get the source code
Dashcam is part of AAOS unbundled apps. To check out the unbundled code, see Check out the code.
Browse the source code with Android Code Search.
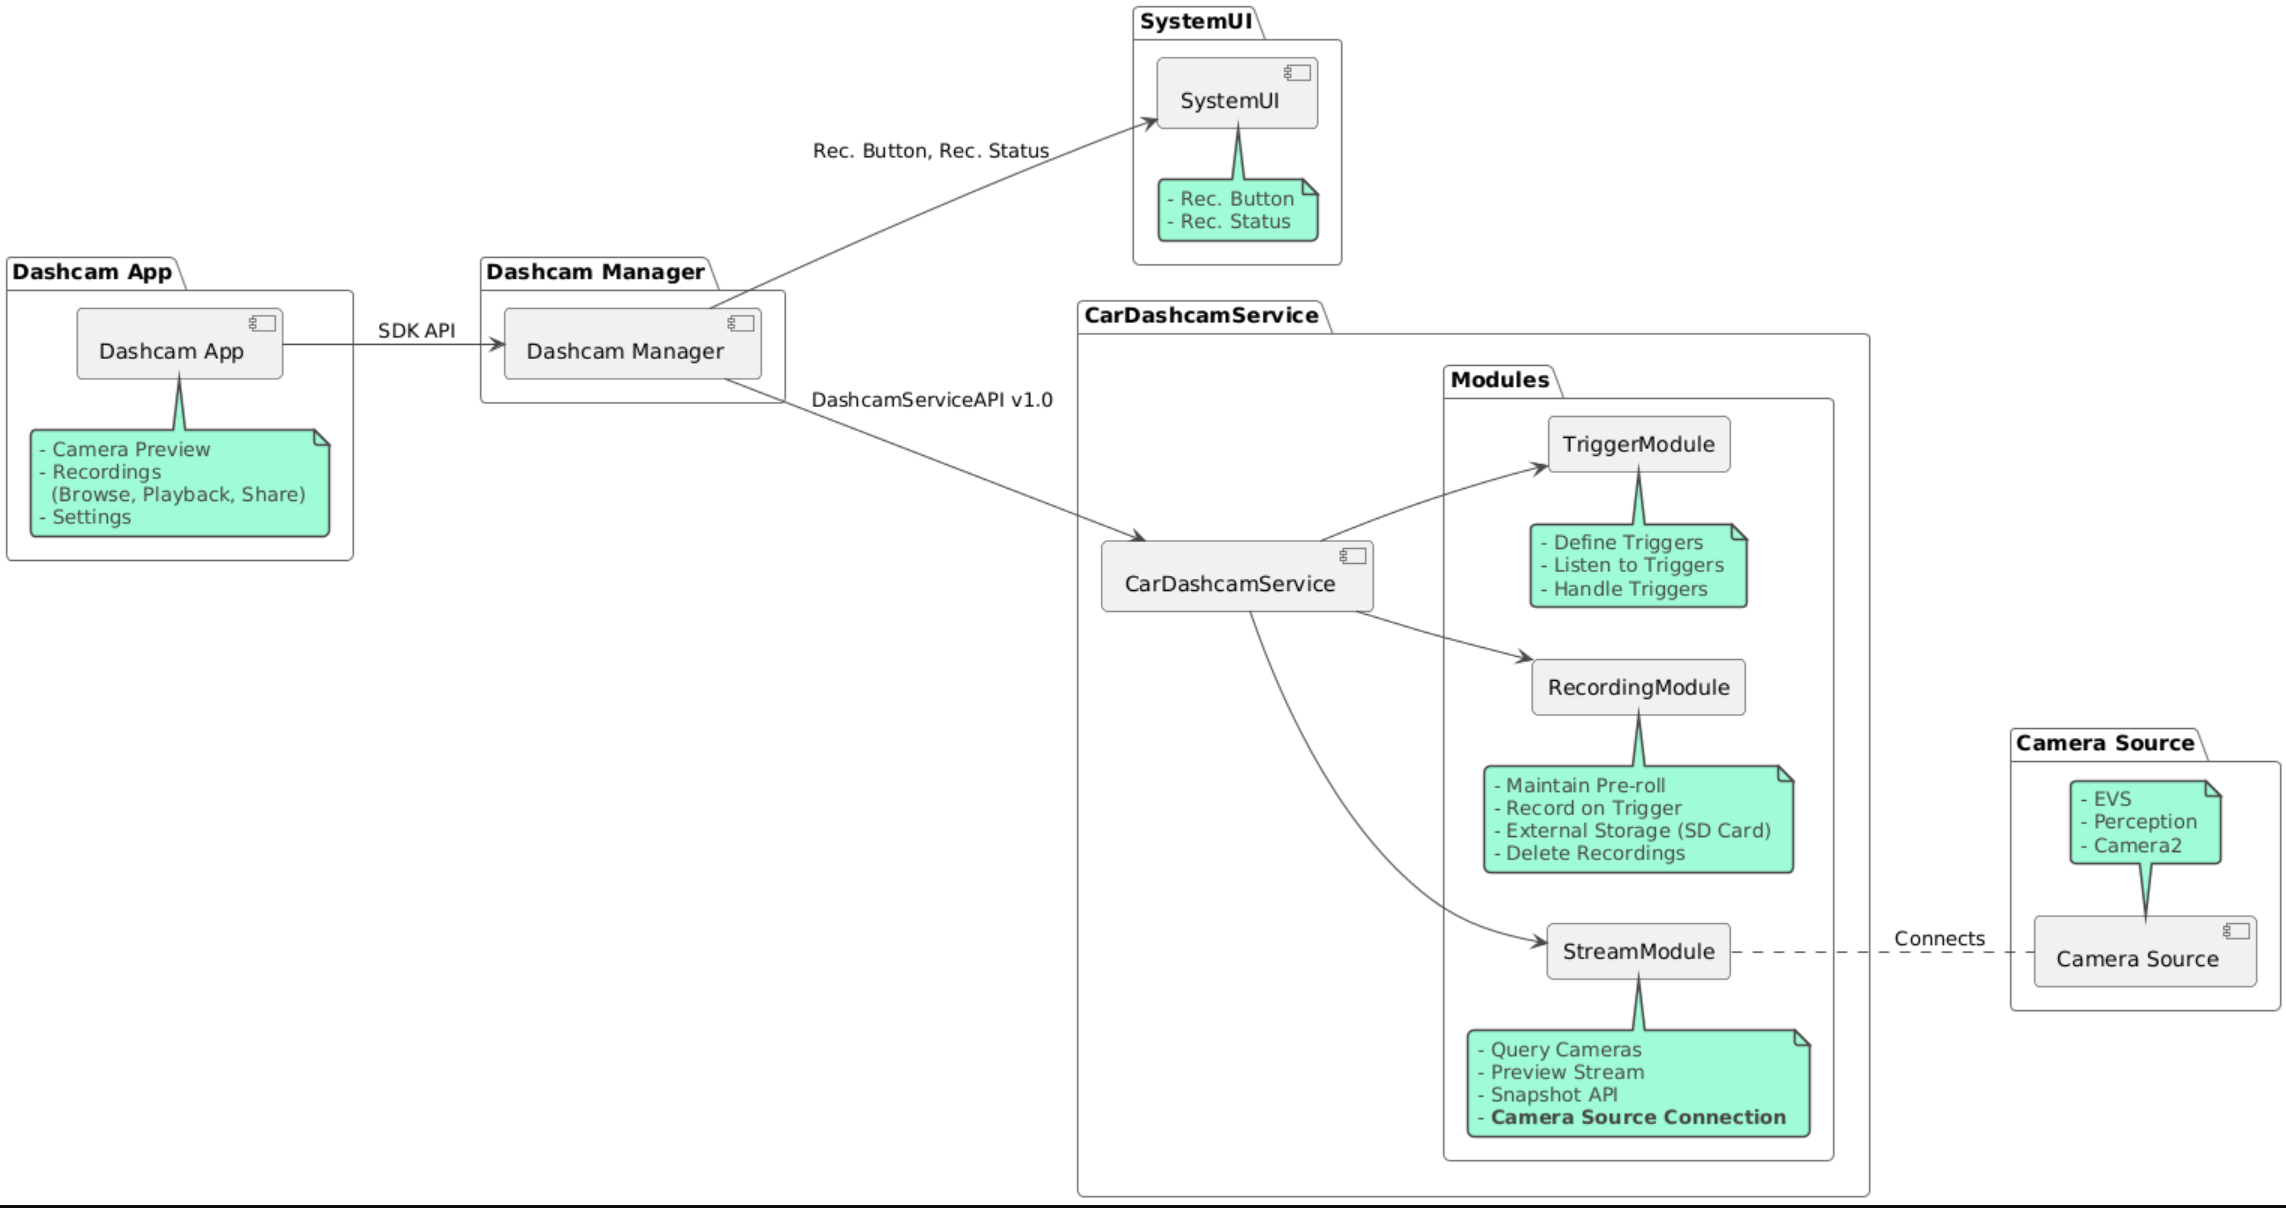
The source code is provided in these three modules:
- Dashcam Service. Streaming, recording, and triggering logic.
- Dashcam Manager. Connects to the Dashcam Service and exposes a stable API to clients
- Dashcam App. Reference Dashcam application using the Dashcam Manager API
Build Dashcam
Use Soong or Gradle to build Dashcam.
Soong
On Soong:
mma DashcamService DashcamManager-lib DashcamApp
The APKs are located in out/target/product/[lunch-target]/system/priv-app/
Gradle
On Gradle:
./gradlew :dashcam-app:assemble
./gradlew :dashcam-manager:assemble
./gradlew :dashcam-service:assemble
The APKs are located in out/aaos-apps-gradle-build/
Detailed instructions for building Dashcam with Gradle are provided in the
README file.
Permissions
Several system permissions are required for the Dashcam Service and the Dashcam App.
The most staight-forward way to grant these permissions is to include them in a prebuilt setup using either Blueprint or Make.
In Blueprint:
Android.bp
android_app_import {
    name: "DashcamApp-prebuilt",
    apk: "DashcamApp.apk",
    privileged: true,
    certificate: "platform",
    required: ["allowed_privapp_com.android.car.dashcam"],
}

prebuilt_etc {
    name: "allowed_privapp_com.android.car.dashcam",
    sub_dir: "default-permissions",
    src: "allowed_privapp_com.android.car.dashcam.xml",
    filename_from_src: true,
}
In Make:
dashcam.mk
PRODUCT_PACKAGES += \
    DashcamApp
PRODUCT_COPY_FILES :=\
vendor/[path-to-vendor-prebuilts]/apps/Dashcam/allowed_privapp_com.android.car.dashcam:$(TARGET_COPY_OUT_PRODUCT)/etc/permissions/com.android.car.dashcam.xml \
Create a permissions file named allowed_privapp_com.android.car.dashcam.xml:
<permissions>
  <privapp-permissions package="com.android.car.dashcam.service">
      <permission name="" />
  </privapp-permissions>
  <privapp-permissions package="com.android.car.dashcam.app">
      <permission name="" />
  </privapp-permissions>
</permissions>
Add permissions from Manifest to the permissions file.
Before using Dashcam, pregrant Camera2 permissions to the Dashcam Service as shown in AAOS Camera.
Add the pregranted permissions file to the Blueprint or Make file in the same manner as the permissions file.
In pre-grant-permissions-com.android.car.dashcam.xml:
<exceptions>
    <exception package="com.android.car.dashcam.service">
        <permission name="android.permission.CAMERA" fixed="false" />
        <permission name="android.permission.SYSTEM_CAMERA" fixed="false" />
        <permission name="android.permission.CAMERA_HEADLESS_SYSTEM_USER" fixed="false" />
    </exception>
</exceptions>
In Android.bp:
...
required["pre-grant-permissions-com.android.car.dashcaml"]
...

prebuilt_etc {
    name: "pre-grant-permissions-com.android.car.dashcaml",
    sub_dir: "default-permissions",
    src: "pre-grant-permissions-com.android.car.dashcam.xml",
    filename_from_src: true,
}
To learn more, see Integrate a prebuild into a system image and Add an allowlist.
Sideload
The permissions file can also be sideloaded. Use this method when the prebuilt Dashcam is not configured.
Using the permissions file created in the prebuilts section previously, run:
adb root
adb remount
adb push allowed_privapp_com.android.car.dashcam.xml /etc/permissions/allowed_privapp_com.android.car.dashcam.xml
adb shell chmod 644 /etc/permissions/allowed_privapp_com.android.car.dashcam.xml
Add the pregrant permissions file in a similar manner to etc/default-permissions/.
Configure overlays
Dashcam service has overlayable configurations.
Service configuration
dashcam-service/res/values/config.xml
This file contains configurations for the service:
config_fileThe name of the trigger configuration file in/assetsallow_internal_storageAllow recordings to be saved to internal storageboot_startup_enabledDashcam service start on device boot upnotifications_onShow notifications when recording startsdefault_app_componentThe default dashcam app, which has global recordings access and global trigger accessrecording_moduleComponentName ofIRecordingModuleimplementationstreaming_moduleComponentName ofIStreamingModuleimplementationtrigger_moduleComponentName ofITriggerModuleimplementation
Trigger configuration
To configure the recording triggers, create a copy of:
dashcam-service/src/assets/config.xml
and add this to the assets directory. Point to this file in the config_file element
in the service configuration file.
The trigger configuration consists of storage, camera, and trigger parts:
Storage
The storage configuration has the following elements:
maxStorageUsagePercentMaximum percent of available storage dashcam uses before pruning recordings.maxStorageUsageMegabytesMax amount of storage in megabytes dashcam uses before pruning recordings.maxAgeHoursBeforePruneMaximum number of hours before a recording is pruned. A recording can be pruned earlier if storage limits are met.
Camera
The camera configuration has the following elements:
Camera ID. ID of the camera with the camera prefix.
prerollLengthMsLength of the preroll to stored with each event.widthOptional width of the buffer returned by the camera.heightOptional height of the buffer returned by the camera.
<CameraConfig>
  <Camera
      ID="EVS:1"
      prerollLengthMs="10000"
      width="1920"
      height="1080" />
  <Camera
      ID="Camera2:1"
      prerollLengthMs="10000" />
</CameraConfig>
This example shows camera ID EVS:1 with a 10 second preroll at 1080p and camera ID Camera2:1 with a 10 second preroll and default width and height.
Trigger
The trigger configuration consists of a list of triggers defined by the following:
nameThe unique trigger name.camerasIDs of the cameras.sensorPropertyIDID of the sensor prefixed with the sensor group. Prefix options areVHALorSENSOR_MANAGER.descriptionDescription of the trigger that is displayed in the UI.recordingLengthMsDuration after the event to record in milliseconds.sensorValueTypeType of data produced by the sensor. Options areINT,INT_ARRAY,FLOAT,FLOAT_ARRAY, andBOOLEAN, STRING.thresholdTypeHow to evaluate the sensor value against thethresholdValue. Options areAVERAGE,BOOLEAN,EQUALS,LEAP,LEAP_AVERAGE,LEAP_OVER,PEAK, andPEAK_HOLD.thresholdValueThe value compared with the sensor value.thresholdExtraExtra value needed for some threshold types such as range forAVERAGE.triggerCooldownCool-down in milliseconds before firing another event of this type.
<EventTriggers>
  <EventTrigger
      name="AEB"
      cameras="EVS:1, EVS:2"
      sensorPropertyID="VHAL:289411073"
      description="Automatic Emergency Braking"
      recordingLengthMs="20000"
      sensorValueType="INT"
      thresholdType="EQUALS"
      thresholdValue="2"
      triggerCooldown="5000"/>
</EventTriggers>
This example shows a trigger in which TriggerModule monitors a VHAL sensor producing integer values.
TriggerModule compares equality against the threshold value. When the equality condition is met, a trigger
records on EVS cameras 1 and 2.
<EventTrigger
            name="SPEED"
            cameras="Camera2:0, Camera2:1,  Camera2:2,  Camera2:3"
            sensorPropertyID="VHAL:291504648"
            description="Over speed"
            recordingLengthMs="10000"
            sensorValueType="FLOAT"
            thresholdType="AVERAGE"
            thresholdValue="20.0"
            thresholdExtra="10"
            triggerCooldown="2000"/>
This example shows a trigger in which TriggerModule monitors a VHAL sensor producing float values.
TriggerModule compares the sensor average over a range of 10 samples to the threshold value of 20.0.
The sample range is set in thresholdExtra. A new event can only be triggered every
2000 milliseconds as set in triggerCooldown.
Modules
The Dashcam Service consists of three modules:
Stream contains the logic for handling streams from cameras.
Recording contains the logic for handling recordings.
Trigger contains the logic for triggering a recording from sensor data. The module APIs are defined in their corresponding interfaces,
IStreamModule,IRecorderModule, andITriggerModuleand exposed to theDashcamManagerthroughDashcamServiceAPI.
Overlay modules
Dashcam Service uses dashcam-service/res/values/config.xml to determine where
to find the module implementations. Default implementations are provided for each
module. However, each module can be overlaid by setting its component in the
corresponding config value.
Set OEM implementation component name of:
IRecorderModuletorecording_moduleIStreamModuletostreaming_moduleITriggerModuletotrigger_module
At runtime, the Dashcam service instantiates the component name set in config.xml for each module.
App developer's guide
Dashcam is a production ready and customizable dashcam solution. Dashcam
uses Dashcam Manager APIs to communicate with Dashcam service. The Dashcam
Manager API can be found at IDashcamManager. Any app with the required
permissions can use Dashcam Manager.
OverlayUI
The app can be customized with Runtime Resource Overlays. To learn more, see Runtime Resource Overlays. To see the list of overlayable elements, see overlayable.xml.
Extend triggers
Triggers can be extended for the current session with a call
to DashcamManager#addTrigger(). Added triggers persist for the current session
only.
Autostart
Autostart recording is not supported. However, a manual trigger can be
started onBoot with a call to DashcamManager.startRecording()
Best practices
Storage. External removable storage is highly recommended.
User experience. Design the Dashcam app's UI to be intuitive and user-friendly, adhering to AAOS design guidelines.
Performance optimization. Optimize the app's performance to minimize resource usage and ensure smooth operation in AAOS.
Troubleshooting
Camera Connectivity Issues. EVS or Camera2 must be supported and available in AAOS IVI.
Storage errors. Verify available storage space and manage recordings. External storage is highly recommended since using internal storage can prematurely cause storage to wear out.