
To be considered compatible with Android, device implementations must meet the requirements presented in the Android Compatibility Definition Document (CDD). The Android CDD evaluates the security of a biometric implementation using architectural security and spoofability.
- Architectural security: The resilience of a biometric pipeline against kernel or platform compromise. A pipeline is considered secure if kernel and platform compromises don't confer the ability to either read raw biometric data or inject synthetic data into the pipeline to influence the authentication decision.
- Biometric security performance: Biometric security performance is measured by the Spoof Acceptance Rate (SAR), False Acceptance Rate (FAR), and, when applicable, Imposter Acceptance Rate (IAR) of the biometric. SAR is a metric introduced in Android 9 to measure how resilient a biometric is against a physical presentation attack. When measuring biometrics you need to follow the protocols described below.
Android uses three types of metrics to measure biometric security performance.
- Spoof Acceptance Rate (SAR): Defines the metric of The chance that a biometric model accepts a previously recorded, known good sample. For example, with voice unlock this would measure the chances of unlocking a user's phone using a recorded sample of them saying: "Ok, Google" We call such attacks spoof attacks. Also known as Impostor Attack Presentation Match Rate (IAPMR).
- Imposter Acceptance Rate (IAR): Defines the metric of the chance that a biometric model accepts input that is meant to mimic a known good sample. For example, in the Smart Lock trusted voice (voice unlock) mechanism, this would measure how often someone trying to mimic a user's voice (using similar tone and accent) can unlock their device. We call such attacks imposter attacks.
- False Acceptance Rate (FAR): Defines the metrics of how often a model mistakenly accepts a randomly chosen incorrect input. While this is a useful measure, it doesn't provide sufficient information to evaluate how well the model stands up to targeted attacks.
Trust agents
Android 10 changes how Trust Agents behave. Trust Agents can't unlock a device, they can only extend the unlock duration for a device that is already unlocked. Trusted face is deprecated in Android 10.
Biometric classes
Biometric security is classified using the results from the architectural security and spoofability tests. A biometric implementation can be classified as either Class 3 (formerly Strong), Class 2, (formerly Weak), or Class 1 (formerly Convenience). The table below describes general requirements for each biometric class.
For more details, see the current Android CDD.
| Biometric class | Metrics | Biometric pipeline | Constraints |
|---|---|---|---|
| Class 3 (formerly Strong) |
SAR of all PAI species: 0-7% SAR of Level A PAI species: <=7% SAR of Level B PAI species: <=20% SAR of any individual PAI species <= 40% (strongly recommended <= 7%) FAR: 1/50k FRR: 10% |
Secure |
|
| Class 2 (formerly Weak) |
SAR of all PAI species: 7-20% SAR of Level A PAI species: <=20% SAR of Level B PAI species: <=30% SAR of any individual PAI species <= 40% (strongly recommended <= 20%) FAR: 1/50k FRR: 10% |
Secure |
|
| Class 1 (formerly Convenience) |
SAR of all PAI species: 20-30% SAR of Level A PAI species: <=30% SAR of Level B PAI species: <=40% SAR of any individual PAI species <= 40% (strongly recommended <= 30%) FAR: 1/50k FRR: 10% |
Insecure or secure |
|
Class 3 versus Class 2 versus Class 1 modalities
Biometric security classes are assigned based on the presence of a secure pipeline and the three acceptance rates - FAR, IAR, and SAR. In cases where an imposter attack doesn't exist, we consider only the FAR and SAR.
See the Android Compatibility Definition Document (CDD) for the measures to be taken for all unlock modalities.
Face and iris authentication
Evaluation process
The evaluation process is made up of two phases. The calibration phase determines the optimal presentation attack for a given authentication solution (that is the calibrated position). The test phase uses the calibrated position to perform multiple attacks and evaluates the number of times the attack was successful. Manufacturers of Android devices and biometric systems should contact Android for the most up-to-date test guidance by submitting this form.
It is important to first determine the calibrated position because the SAR should only be measured using attacks against the greatest point of weakness on the system.
Calibration phase
There are three parameters for face and iris authentication that need to be optimized during the calibration phase to ensure optimal values for the testing phase: presentation attack instrument (PAI), presentation format, and performance across subject diversity.
FACE
|
IRIS
|
Testing diversity
It's possible for face and iris models to perform differently across genders, age groups and races/ethnicities. Calibrate presentation attacks across a variety of faces to maximize the chances of uncovering gaps in performance.
Test phase
The test phase is when biometric security performance is measured using the optimized presentation attack from the previous phase.
Count attempts in the test phase
A single attempt is counted as the window between presenting a face (real or spoofed), and receiving some feedback from the phone (either an unlock event or a user visible message). Any tries where the phone is unable to get enough data to attempt a match shouldn't be included in the total number of attempts used to compute SAR.
Evaluation protocol
Enrollment
Before starting the calibration phase for either face or iris authentication navigate to the device settings and remove all existing biometric profiles. After all existing profiles have been removed, enroll a new profile with the target face or iris that will be used for calibration and testing. It is important to be in a brightly lit environment when adding a new face or iris profile and that the device is properly situated directly in front of the target face at a distance of 20 cm to 80 cm.
Calibration phase
Perform the calibration phase for each of the PAI species because different species have different sizes and other characteristics that may affect the optimal conditions for testing. Prepare the PAI.
FACE
|
IRIS
|
Conduct the calibration phase
Reference positions
- Reference position: The reference position is determined by placing the PAI at an appropriate distance (20-80cm) in front of the device in such a way where the PAI is clearly visible in the device's view but anything else being used (such as a stand for the PAI) isn't visible.
- Horizontal reference plane: While the PAI is in the reference position the horizontal plane between the device and the PAI is the horizontal reference plane.
- Vertical reference plane: While the PAI is in the reference position the vertical plane between the device and the PAI is the vertical reference plane.
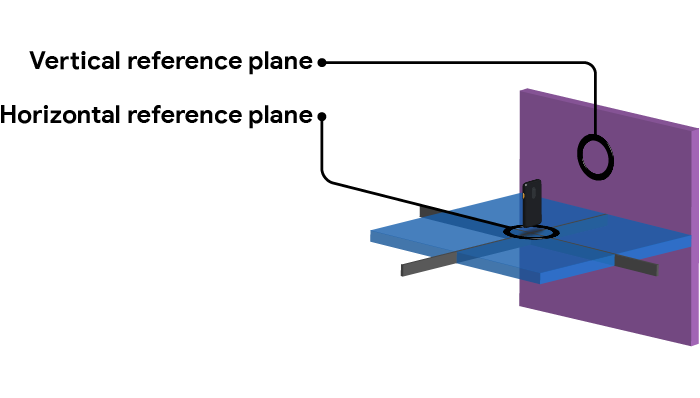
Figure 1. Reference planes.
Vertical arc
Determine the reference position then test the PAI in a vertical arc maintaining the same distance from the device as the reference position. Raise the PAI in the same vertical plane, creating a 10 degree angle between the device and the horizontal reference plane and test the face unlock.
Continue to raise and test the PAI in 10 degree increments until the PAI is no longer visible in the devices field of view. Record any positions that successfully unlocked the device. Repeat this process but moving the PAI in a downward arc, below the horizontal reference plane. See figure 2 below for an example of the arc tests.
Horizontal arc
Return the PAI to the reference position then move it along the horizontal plane to create a 10 degree angle with the vertical reference plane. Perform the vertical arc test with the PAI in this new position. Move the PAI along the horizontal plane in 10 degree increments and perform the vertical arc test in each new position.

Figure 2. Testing along the vertical and horizontal arc.
The arc tests need to be repeated in 10 degree increments for both the left and right side of the device as well as above and below the device.
The position that yields the most reliable unlocking results is the calibrated position for the type of PAI species (for example, 2D or 3D PAI species).
Testing phase
At the end of the calibration phase there should be one calibrated position per PAI species. If a calibrated position can't be established then the reference position should be used. The test methodology is common for testing both 2D and 3D PAI species.
- Across enrolled faces, where E>= 10, and includes at least 10 unique
faces.
- Enroll face/iris
- Using the calibrated position from the previous phase, perform U unlock attempts, counting attempts as described in the previous section, and where U >= 10. Record the number of successful unlocks S.
- The SAR can then be measured as:
Where:
- E = the number of enrollments
- U = the number of unlock attempts per enrollment
- Si = the number of successful unlocks for enrollment i
Iterations required to gain statistically valid samples of error rates: 95% confidence assumption for all below, large N
| Margin of error | Test iterations required per subject |
|---|---|
| 1% | 9595 |
| 2% | 2401 |
| 3% | 1067 |
| 5% | 385 |
| 10% | 97 |
Time required (30 sec per attempt, 10 subjects)
| Margin of error | Total time |
|---|---|
| 1% | 799.6 hours |
| 2% | 200.1 hours |
| 3% | 88.9 hours |
| 5% | 32.1 hours |
| 10% | 8.1 hours |
We recommend targeting a 5% margin of error, which gives a true error rate in the population of 2% to 12%.
Scope
The test phase measures the resilience of face authentication primarily against facsimiles of the target user's face. It doesn't address non-facsimile based attacks such as using LEDs, or patterns that act as main prints. While these haven't yet been shown to be effective against depth-based face authentication systems, there is nothing that conceptually prevents this from being true. It's both possible and plausible that future research will show this to be the case. At this point, this protocol will be revised to include measuring the resilience against these attacks.
Fingerprint authentication
In Android 9, the bar was set at a minimum resilience to PAIs as measured by a Spoof Acceptance Rate (SAR) that is less than or equal to 7%. A brief rationale of why 7% specifically can be found in this blog post.
Evaluation process
The evaluation process is made up of two phases. The calibration phase determines the optimal presentation attack for a given fingerprint authentication solution (that is, the calibrated position). The test phase uses the calibrated position to perform multiple attacks and evaluates the number of times the attack was successful. Manufacturers of Android devices and biometric systems should contact Android for the most up-to-date test guidance by submitting this form.
Calibration phase
There are three parameters for fingerprint authentication that need to be optimized to ensure optimal values for the testing phase: the presentation attack instrument (PAI), presentation format, and performance across subject diversity
- The PAI is the physical spoof, such as printed
fingerprints or a molded replica are all examples of presentation media. The
following spoof materials are strongly recommended
- Optical fingerprint sensors (FPS)
- Copy Paper/Transparency with non-conductive ink
- Knox Gelatin
- Latex Paint
- Elmer's Glue All
- Capacitive FPS
- Knox Gelatin
- Elmer's Carpenter's Interior Wood Glue
- Elmer's Glue All
- Latex Paint
- Ultrasonic FPS
- Knox Gelatin
- Elmer's Carpenter's Interior Wood Glue
- Elmer's Glue All
- Latex Paint
- Optical fingerprint sensors (FPS)
- The presentation format relates to further manipulation of the PAI or the environment, in a way that aids spoofing. For example, retouching or editing a high resolution image of a fingerprint prior to creating the 3D replica.
- Performance across subject diversity is especially relevant to tuning the algorithm. Testing the calibration flow across subject genders, age groups and races/ethnicities can often reveal substantially worse performance for segments of the global population and is an important parameter to calibrate in this phase.
Testing diversity
It's possible for the fingerprint readers to perform differently across gender, age groups and races/ethnicities. A small percentage of the population has fingerprints that are difficult to recognize, so a variety of fingerprints should be used to determine the optimal parameters for recognition and in spoof testing.
Testing phase
The test phase is when the biometric security performance is measured. At a minimum, testing should be done in a non-cooperative manner meaning that any fingerprints collected are done so by lifting them off another surface as opposed to having the target actively participate in collection of their fingerprint, such as making a cooperative mold of the subject's finger. The latter is allowed but not required.
Count attempts in the test phase
A single attempt is counted as the window between presenting a fingerprint (real or spoofed) to the sensor, and receiving some feedback from the phone (either an unlock event or a user visible message).
Any tries where the phone is unable to get enough data to attempt a match shouldn't be included in the total number of attempts used to compute SAR.
Evaluation protocol
Enrollment
Before starting the calibration phase for fingerprint authentication navigate to the device settings and remove all existing biometric profiles. After all existing profiles have been removed, enroll a new profile with the target fingerprint that will be used for calibration and testing. Follow all the on screen directions until the profile has been successfully enrolled.
Calibration phase
Optical FPS
This is similar to the calibration phases of ultrasonic and capacitive, but with both 2D and 2.5D PAI species of the target user's fingerprint.
- Lift a latent copy of the fingerprint off a surface.
- Test with 2D PAI species
- Place the lifted fingerprint on the sensor
- Test with 2.5D PAI species.
- Create a PAI of the fingerprint
- Place the PAI on the sensor
Ultrasonic FPS
Calibrating for ultrasonic involves lifting a latent copy of the target fingerprint. For example, this may be done using fingerprints lifted via fingerprint powder, or printed copies of a fingerprint and may include manual re-touching of the fingerprint image to achieve a better spoof.
After the latent copy of the target fingerprint has been obtained, a PAI is made.
Capacitive FPS
Calibrating for capacitive involves the same steps described above for ultrasonic calibration.
Testing phase
- Get at least 10 unique people to enroll using the same parameters used when calculating the FRR/FAR
- Create PAIs for each person
- The SAR can then be measured as:
Iterations required to gain statistically valid samples of error rates: 95% confidence assumption for all below, large N
| Margin of error | Test iterations required per subject |
|---|---|
| 1% | 9595 |
| 2% | 2401 |
| 3% | 1067 |
| 5% | 385 |
| 10% | 97 |
Time required (30sec per attempt, 10 subjects)
| Margin of error | Total time |
|---|---|
| 1% | 799.6 hours |
| 2% | 200.1 hours |
| 3% | 88.9 hours |
| 5% | 32.1 hours |
| 10% | 8.1 hours |
We recommend targeting a 5% margin of error, which gives a true error rate in the population of 2% to 12%.
Scope
This process is setup to test the resilience of fingerprint authentication primarily against facsimiles of the target user's fingerprint. The testing methodology is based on current material costs, availability and technology. This protocol will be revised to include measuring resilience against new materials and techniques as they become practical to execute.
Common considerations
While each modality requires a different test setup, there are a few common aspects that apply to all of them.
Test the actual hardware
Collected SAR/IAR metrics can be inaccurate when biometric models are tested under idealized conditions and on different hardware than it would actually appear on a mobile device. For example, voice unlock models that are calibrated in an anechoic chamber using a multi-microphone setup behave very differently when used on a single microphone device in a noisy environment. In order to capture accurate metrics, tests should be carried out on an actual device with the hardware installed, and failing that with the hardware as it would appear on the device.
Use known attacks
Most biometric modalities in use today have been successfully spoofed, and public documentation of the attack methodology exists. Below we provide a brief high-level overview of test setups for modalities with known attacks. We recommend using the setup outlined here wherever possible.
Anticipate new attacks
For modalities where significant new improvements have been made, the test setup document might not contain a suitable setup, and no known public attack may exist. Existing modalities may also need their test setup tuned in the wake of a newly discovered attack. In both cases you need to come up with a reasonable test setup. Please use the Site Feedback link at the bottom of this page to let us know if you have set up a reasonable mechanism that can be added.
Setups for different modalities
Fingerprint
| IAR | Not needed. |
| SAR |
|
Face and iris
| IAR | Lower bound will be captured by SAR so separately measuring this isn't needed. |
| SAR |
|
Voice
| IAR |
|
| SAR |
|