
Android Auto OS 13 以上版本提供相關功能,可供設定及管理乙太網路。圖 1 顯示汽車的網路架構圖範例:
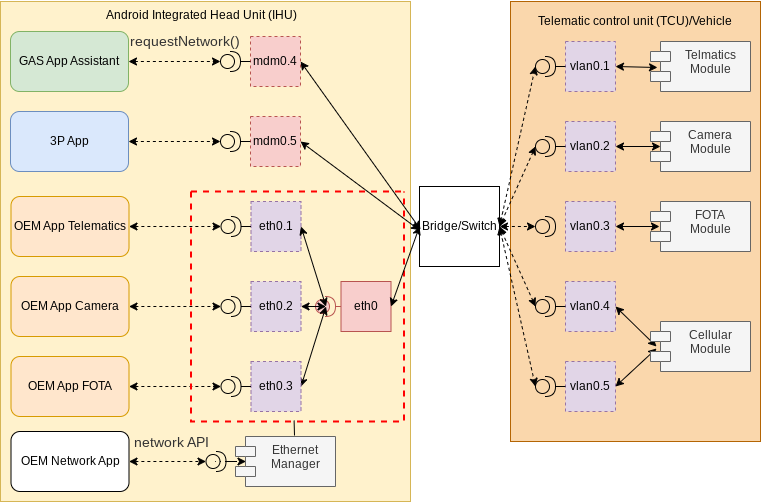
圖 1. Android Auto 網路連線。
下圖顯示 OEM 網路應用程式在 EthernetManager 類別中呼叫方法,以設定及管理板載乙太網路 (eth0.1、eth0.2 和 eth0.3)。圖 1 的其餘部分不在本文的討論範圍。
設定預設乙太網路設定
如要設定預設聯播網設定,請使用資源疊加
config_ethernet_interfaces:
<string-array translatable="false" name="config_ethernet_interfaces">
        <!--
        <item>eth1;12,13,14,15;ip=192.168.0.10/24 gateway=192.168.0.1 dns=4.4.4.4,8.8.8.8</item>
        <item>eth2;;ip=192.168.0.11/24</item>
        <item>eth3;12,13,14,15;ip=192.168.0.12/24;1</item>
        -->
    </string-array>
這個範例顯示 config.xml 的 config_ethernet_interfaces 資源疊加層。
程式碼重點
eth1、eth2和eth3是要設定的網路介面名稱。- 連續的
12, 13, 14, 15代表已啟用網路功能。 ip=、gateway=和dns用於設定網路的初始 IP 位址、閘道和 DNS。
啟用或停用網路介面
如要啟用網路介面,請呼叫 EthernetManager.enableInterface():
public final class InterfaceEnabler {
    private final Context mApplicationContext;
    private final EthernetManager mEthernetManager;
    private final OutcomeReceiver<String, EthernetNetworkManagementException> mOutcomeReceiver;

    public InterfaceEnabler(Context applicationContext,
            OutcomeReceiver<String, EthernetNetworkManagementException> outcomeReceiver) {
        mApplicationContext = applicationContext;
        mEthernetManager = applicationContext.getSystemService(EthernetManager.class);
        mOutcomeReceiver = outcomeReceiver;
    }

    public void enableInterface(String ifaceName) {
        mEthernetManager.enableInterface(ifaceName,
                mApplicationContext.getMainExecutor(),
                mOutcomeReceiver);
    }
}
程式碼重點
ifaceName是要啟用的網路介面名稱。getMainExecutor()會傳回應用程式環境。OutcomeReceiver是用來傳達完成情況的回呼,成功時會傳回更新後的網路名稱,發生錯誤時則會傳回EthernetNetworkManagementException。
啟用網路介面後,系統會使用 EthernetManager.updateConfiguration() 設定的設定。如果 EthernetManager.updateConfiguration() 未設定任何設定,網路介面會使用資源疊加 config_ethernet_interfaces,如果沒有疊加,則會使用預設乙太網路設定。
如要停用網路介面,請呼叫 EthernetManager.disableInterface():
public final class InterfaceEnabler {
    private final Context mApplicationContext;
    private final EthernetManager mEthernetManager;
    private final OutcomeReceiver<String, EthernetNetworkManagementException> mOutcomeReceiver;

    public InterfaceEnabler(Context applicationContext,
            OutcomeReceiver<String, EthernetNetworkManagementException> outcomeReceiver) {
        mApplicationContext = applicationContext;
        mEthernetManager = applicationContext.getSystemService(EthernetManager.class);
        mOutcomeReceiver = outcomeReceiver;
    }

    public void disableInterface(String ifaceName) {
        mEthernetManager.disableInterface(ifaceName,
                mApplicationContext.getMainExecutor(),
                mOutcomeReceiver);
    }
}
程式碼重點
ifaceName是要停用的網路介面名稱。getMainExecutor()會傳回應用程式環境。OutcomeReceiver是用來傳達完成情況的回呼,成功時會傳回更新後的網路名稱,發生錯誤時則會傳回EthernetNetworkManagementException。
更新網路設定
如要更新乙太網路設定,請呼叫 EthernetManager.updateConfiguration():
public final class ConfigurationUpdater {
    private final Context mApplicationContext;
    private final EthernetManager mEthernetManager;
    private final OutcomeReceiver<String, EthernetNetworkManagementException> mCallback;

    public ConfigurationUpdater(Context applicationContext,
            OutcomeReceiver<String, EthernetNetworkManagementException> callback) {
        mApplicationContext = applicationContext;
        mEthernetManager = applicationContext.getSystemService(EthernetManager.class);
        mCallback = callback;
    }

    public void updateNetworkConfiguration(String packageNames,
            String ipConfigurationText,
            String networkCapabilitiesText,
            String interfaceName)
            throws IllegalArgumentException, PackageManager.NameNotFoundException {

        EthernetNetworkUpdateRequest request = new EthernetNetworkUpdateRequest.Builder()
                .setIpConfiguration(getIpConfiguration(ipConfigurationText))
                .setNetworkCapabilities(getCapabilities(
                        interfaceName, networkCapabilitiesText, packageNames))
                .build();

        mEthernetManager.updateConfiguration(interfaceName, request,
                mApplicationContext.getMainExecutor(), mCallback);

    }
}
程式碼重點
getCapabilities()是輔助方法,可取得目前的網路功能,並呼叫convertToUIDs()將人類可讀的套件名稱轉換為 Linux 唯一 ID (UID)。一般而言,您不會預先知道相關聯套件的 UID。因此,如要使用EthernetManager.updateConfiguration()限制部分應用程式的存取權,必須使用這些應用程式的 UID。request是內部網路要使用的設定。要求可包含 IP 設定和網路功能的新設定。如果網路已向連線堆疊註冊,系統會根據設定更新網路。這項設定不會在重新啟動後保留。getMainExecutor()會傳回叫用監聽器的執行者。mCallback是用於傳達完成情況的回呼,成功時會傳回更新後的網路名稱,發生錯誤時則會傳回EthernetNetworkManagementException。
updateConfiguration() 可能會更新 Android 連線堆疊視為不可變更的網路特徵。系統會關閉網路、更新,然後重新啟動,以更新這些不可變更的屬性。
限制網路只能存取部分應用程式
您可以使用 EthernetManager#updateConfiguration,將存取權限制為僅限允許的 UID 子集。如果需要使用這個方法,例如僅供一小部分原始設備製造商 (OEM) 應用程式使用的車輛內部網路,請使用這個方法。
Android 主要會依據 UID 追蹤應用程式。下列程式碼來自 UIDToPackageNameConverter.java,說明如何從一連串的套件名稱取得一系列 UID:
public static Set<Integer> convertToUids(Context applicationContext, String packageNames)
            throws PackageManager.NameNotFoundException {
        final PackageManager packageManager = applicationContext.getPackageManager();
        final UserManager userManager = applicationContext.getSystemService(UserManager.class);

        final Set<Integer> uids = new ArraySet<>();
        final List<UserHandle> users = userManager.getUserHandles(true);

        String[] packageNamesArray = packageNames.split(",");
        for (String packageName : packageNamesArray) {
            boolean nameNotFound = true;
            packageName = packageName.trim();
            for (final UserHandle user : users) {
                try {
                    final int uid =
                            packageManager.getApplicationInfoAsUser(packageName, 0, user).uid;
                    uids.add(uid);
                    nameNotFound = false;
                } catch (PackageManager.NameNotFoundException e) {
                    // Although this may seem like an error scenario, it is OK as all packages are
                    // not expected to be installed for all users.
                    continue;
                }
            }

            if (nameNotFound) {
                throw new PackageManager.NameNotFoundException("Not installed: " + packageName);
            }
        }
        return uids;
程式碼重點
getApplicationInfoAsuser().uid用於從套件名稱擷取 UID。uids是產生的整數陣列。
EthernetManagerTest.kt 中的下列程式碼說明如何使用允許使用網路的應用程式 UID 更新網路介面設定:
val allowedUids = setOf(Process.myUid())
        val nc = NetworkCapabilities.Builder(request.networkCapabilities)
                .setAllowedUids(allowedUids).build()
        updateConfiguration(iface, capabilities = nc).expectResult(iface.name)
程式碼重點
allowUids是允許使用網路的應用程式 UID 集。updateConfiguration()會更新設定,將網路限制為提供的 UID 集。