
เนื้อหาต่อไปนี้มีไว้สำหรับนักพัฒนาแอป
หากต้องการให้แอปรองรับการหมุน คุณต้องดำเนินการต่อไปนี้
- วาง
FocusParkingViewในเลย์เอาต์กิจกรรมที่เกี่ยวข้อง - ตรวจสอบว่ามุมมองที่โฟกัสได้ (หรือโฟกัสไม่ได้)
- ใช้
FocusAreaเพื่อตัดมุมมองที่โฟกัสได้ทั้งหมด ยกเว้นFocusParkingView
แต่ละงานมีรายละเอียดด้านล่าง หลังจากที่คุณตั้งค่าสภาพแวดล้อมเพื่อพัฒนาแอปที่เปิดใช้การหมุนแล้ว
ตั้งค่าตัวควบคุมแบบหมุน
คุณต้องควบคุมแบบหมุนหรือใช้อุปกรณ์แทนก่อนจึงจะเริ่มพัฒนาแอปที่พร้อมใช้งานตัวควบคุมแบบหมุนได้ คุณมีตัวเลือกดังที่อธิบายไว้ด้านล่าง
โปรแกรมจำลอง
source build/envsetup.sh && lunch car_x86_64-userdebug
m -j
emulator -wipe-data -no-snapshot -writable-system
หรือจะใช้ aosp_car_x86_64-userdebug ก็ได้
วิธีเข้าถึงตัวควบคุมแบบหมุนที่จำลอง
- แตะจุด 3 จุดที่ด้านล่างของแถบเครื่องมือ
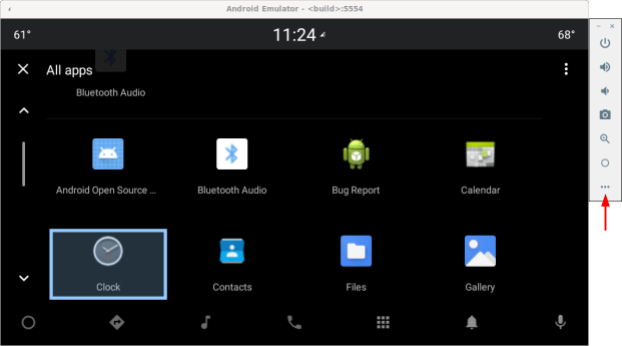
รูปที่ 1 เข้าถึงตัวควบคุมแบบหมุนจำลอง - เลือกปุ่มหมุนของรถยนต์ในหน้าต่างการควบคุมแบบขยาย
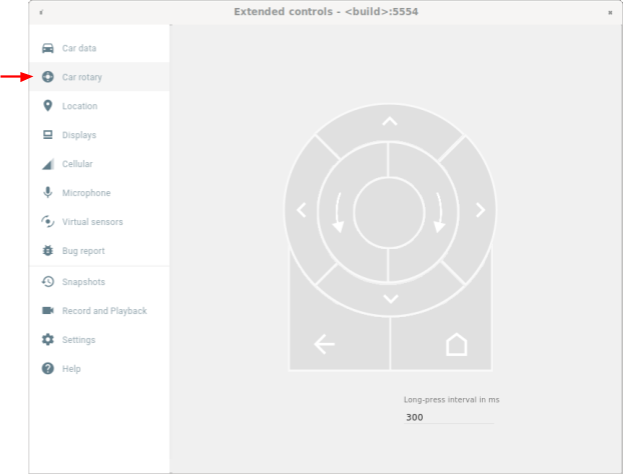
รูปที่ 2 เลือก Rotary สำหรับรถยนต์
แป้นพิมพ์ USB
- เสียบแป้นพิมพ์ USB เข้ากับอุปกรณ์ที่ใช้ระบบปฏิบัติการ Android Automotive (AAOS) ในบางกรณี วิธีนี้อาจทำให้แป้นพิมพ์บนหน้าจอไม่ปรากฏขึ้น
- ใช้บิลด์
userdebugหรือeng - เปิดใช้การกรองเหตุการณ์สําคัญ
adb shell settings put secure android.car.ROTARY_KEY_EVENT_FILTER 1
- ดูตารางด้านล่างเพื่อหาแป้นที่สอดคล้องกันสำหรับการดำเนินการแต่ละรายการ
คีย์ การดำเนินการแบบหมุน Q หมุนทวนเข็มนาฬิกา E หมุนตามเข็มนาฬิกา ก กดไปทางซ้าย D กดไปทางขวา W กดขึ้น อา กดลง F หรือคอมมา ปุ่มตรงกลาง R หรือ Esc ปุ่มย้อนกลับ
คำสั่ง ADB
คุณสามารถใช้คำสั่ง car_service เพื่อแทรกเหตุการณ์การป้อนข้อมูลแบบหมุนได้ คำสั่งเหล่านี้สามารถเรียกใช้ได้ในอุปกรณ์ที่ใช้ Android Automotive OS (AAOS) หรือในโปรแกรมจำลอง
| คำสั่ง car_service | การป้อนข้อมูลด้วยปุ่มหมุน |
|---|---|
adb shell cmd car_service inject-rotary |
หมุนทวนเข็มนาฬิกา |
adb shell cmd car_service inject-rotary -c true |
หมุนตามเข็มนาฬิกา |
adb shell cmd car_service inject-rotary -dt 100 50 |
หมุนทวนเข็มนาฬิกาหลายครั้ง (100 มิลลิวินาทีที่ผ่านมาและ 50 มิลลิวินาทีที่ผ่านมา) |
adb shell cmd car_service inject-key 282 |
กดไปทางซ้าย |
adb shell cmd car_service inject-key 283 |
กดไปทางขวา |
adb shell cmd car_service inject-key 280 |
กดขึ้น |
adb shell cmd car_service inject-key 281 |
กดลง |
adb shell cmd car_service inject-key 23 |
การคลิกปุ่มกลาง |
adb shell input keyevent inject-key 4 |
การคลิกปุ่มย้อนกลับ |
ตัวควบคุมแบบหมุนของ OEM
เมื่อฮาร์ดแวร์ตัวควบคุมแบบหมุนพร้อมใช้งาน ตัวเลือกนี้จะสมจริงที่สุด ซึ่งมีประโยชน์อย่างยิ่งสำหรับการทดสอบการหมุนอย่างรวดเร็ว
FocusParkingView
FocusParkingView คือมุมมองแบบโปร่งใสในไลบรารี UI ของรถ (car-ui-library)
RotaryService ใช้เพื่อรองรับการนำทางด้วยตัวควบคุมแบบหมุน
FocusParkingView ต้องเป็นมุมมองแรกที่โฟกัสได้
ในเลย์เอาต์ โดยต้องอยู่นอก FocusArea ทั้งหมด แต่ละกรอบต้องมี FocusParkingView 1 รายการ หากคุณใช้เลย์เอาต์พื้นฐาน car-ui-library ซึ่งมี FocusParkingView อยู่แล้ว ก็ไม่จำเป็นต้องเพิ่ม FocusParkingView อื่น ตัวอย่าง FocusParkingView ใน
RotaryPlaygroundแสดงอยู่ด้านล่าง
<FrameLayout
   xmlns:android="http://schemas.android.com/apk/res/android"
   android:layout_width="match_parent"
   android:layout_height="match_parent">
   <com.android.car.ui.FocusParkingView
       android:layout_width="wrap_content"
       android:layout_height="wrap_content"/>
   <FrameLayout
       android:layout_width="match_parent"
       android:layout_height="match_parent"/>
</FrameLayout>
เหตุผลที่ต้องมี FocusParkingView มีดังนี้
- Android จะไม่ล้างโฟกัสโดยอัตโนมัติเมื่อตั้งค่าโฟกัสในหน้าต่างอื่น หากคุณพยายามล้างโฟกัสในหน้าต่างก่อนหน้า Android จะโฟกัสมุมมองในหน้าต่างนั้นอีกครั้ง ซึ่งส่งผลให้มีโฟกัส 2 หน้าต่างพร้อมกัน การเพิ่ม
FocusParkingViewลงในหน้าต่างแต่ละบานจะช่วยแก้ปัญหานี้ได้ มุมมองนี้เป็นแบบโปร่งใสและปิดใช้การไฮไลต์โฟกัสเริ่มต้นไว้ ผู้ใช้จึงมองไม่เห็นไม่ว่าโฟกัสอยู่หรือไม่ก็ตาม รายการนี้สามารถรับโฟกัสเพื่อให้RotaryServiceหยุดโฟกัสไว้ได้เพื่อนำไฮไลต์โฟกัสออก - หากมี
FocusAreaเพียงรายการเดียวในหน้าต่างปัจจุบัน การบิดตัวควบคุมในFocusAreaจะทำให้RotaryServiceย้ายโฟกัสจากมุมมองทางด้านขวาไปยังมุมมองทางด้านซ้าย (และในทางกลับกัน) การเพิ่มมุมมองนี้ลงในหน้าต่างแต่ละบานจะช่วยแก้ปัญหาได้ เมื่อRotaryServiceระบุว่าเป้าหมายโฟกัสคือFocusParkingViewก็จะสามารถระบุได้ว่าการวนรอบกำลังจะเกิดขึ้น และเมื่อถึงจุดนั้นก็จะหลีกเลี่ยงการวนรอบโดยไม่ย้ายโฟกัส - เมื่อตัวควบคุมแบบหมุนเปิดแอป Android จะโฟกัสที่มุมมองแรกที่โฟกัสได้ ซึ่งก็คือ
FocusParkingViewเสมอFocusParkingViewจะกำหนดมุมมองที่ดีที่สุดที่จะโฟกัส จากนั้นจึงใช้โฟกัส
มุมมองที่โฟกัสได้
RotaryService สร้างขึ้นจากแนวคิดที่มีอยู่ของโฟกัสมุมมองในเฟรมเวิร์ก Android ซึ่งย้อนกลับไปตั้งแต่สมัยที่โทรศัพท์มีแป้นพิมพ์จริงและปุ่ม D-pad
แอตทริบิวต์ android:nextFocusForward ที่มีอยู่มีไว้สำหรับโรตารี (ดูการปรับแต่ง FocusArea) แต่ android:nextFocusLeft, android:nextFocusRight, android:nextFocusUp และ android:nextFocusDown ไม่ได้มีไว้สำหรับโรตารี
RotaryService จะมุ่งเน้นเฉพาะมุมมองที่โฟกัสได้ มุมมองบางอย่าง เช่น Button มักจะโฟกัสได้ ส่วนรายการอื่นๆ เช่น TextView และ ViewGroup มักจะไม่ มุมมองที่คลิกได้จะโฟกัสโดยอัตโนมัติและมุมมองจะคลิกได้โดยอัตโนมัติเมื่อมีตัวรับฟังการคลิก หากตรรกะอัตโนมัตินี้ส่งผลให้เกิดโหมดโฟกัสที่ต้องการ คุณก็ไม่จําเป็นต้องตั้งค่าโหมดโฟกัสของมุมมองอย่างชัดเจน หากตรรกะอัตโนมัติไม่ได้ทําให้โฟกัสได้ตามที่คุณต้องการ ให้ตั้งค่าแอตทริบิวต์ android:focusable เป็น true หรือ false หรือตั้งค่าโฟกัสได้ของมุมมองด้วยโปรแกรมโดยใช้ View.setFocusable(boolean) มุมมองต้องเป็นไปตามข้อกำหนดต่อไปนี้ RotaryService จึงจะโฟกัสที่มุมมองนั้นได้
- โฟกัสได้
- เปิดใช้
- แสดง
- มีค่าความกว้างและความสูงที่ไม่ใช่ 0
หากมุมมองไม่เป็นไปตามข้อกำหนดเหล่านี้ทั้งหมด เช่น ปุ่มที่โฟกัสได้แต่ปิดอยู่ ผู้ใช้จะใช้ตัวควบคุมแบบหมุนเพื่อโฟกัสที่มุมมองนั้นไม่ได้ หากต้องการโฟกัสที่มุมมองที่ปิดใช้ ให้พิจารณาใช้สถานะที่กําหนดเองแทน android:state_enabled เพื่อควบคุมลักษณะที่มุมมองปรากฏโดยไม่ระบุว่า Android ควรปิดใช้มุมมองนั้น แอปสามารถแจ้งให้ผู้ใช้ทราบถึงสาเหตุที่มุมมองถูกปิดใช้เมื่อแตะ ส่วนถัดไปจะอธิบายวิธีดำเนินการนี้
สถานะที่กำหนดเอง
วิธีเพิ่มสถานะที่กําหนดเอง
- วิธีเพิ่มแอตทริบิวต์ที่กําหนดเองลงในมุมมอง เช่น หากต้องการเพิ่มสถานะที่กำหนดเอง
state_rotary_enabledให้กับคลาสมุมมองCustomViewให้ใช้คำสั่งต่อไปนี้<declare-styleable name="CustomView"> <attr name="state_rotary_enabled" format="boolean" /> </declare-styleable> - หากต้องการติดตามสถานะนี้ ให้เพิ่มตัวแปรอินสแตนซ์ลงในมุมมองพร้อมกับเมธอดการเข้าถึง ดังนี้
private boolean mRotaryEnabled; public boolean getRotaryEnabled() { return mRotaryEnabled; } public void setRotaryEnabled(boolean rotaryEnabled) { mRotaryEnabled = rotaryEnabled; } - วิธีอ่านค่าของแอตทริบิวต์เมื่อสร้างมุมมอง
TypedArray a = context.obtainStyledAttributes(attrs, R.styleable.CustomView);
mRotaryEnabled = a.getBoolean(R.styleable.CustomView_state_rotary_enabled);
- ในคลาสมุมมอง ให้ลบล้างเมธอด
onCreateDrawableState()แล้วเพิ่มสถานะที่กําหนดเองตามความเหมาะสม เช่น@Override protected int[] onCreateDrawableState(int extraSpace) { if (mRotaryEnabled) extraSpace++; int[] drawableState = super.onCreateDrawableState(extraSpace); if (mRotaryEnabled) { mergeDrawableStates(drawableState, { R.attr.state_rotary_enabled }); } return drawableState; } - ทําให้ตัวแฮนเดิลการคลิกของมุมมองทํางานแตกต่างกันไปตามสถานะ เช่น ตัวแฮนเดิลการคลิกอาจไม่ทําการใดๆ หรืออาจแสดงข้อความแจ้งเมื่อ
mRotaryEnabledเป็นfalse - หากต้องการให้ปุ่มปรากฏว่าปิดใช้ ให้ใช้
app:state_rotary_enabledแทนandroid:state_enabledในองค์ประกอบภาพพื้นหลังของมุมมอง หากยังไม่มี คุณจะต้องเพิ่มข้อมูลต่อไปนี้xmlns:app="http://schemas.android.com/apk/res-auto"
- หากมุมมองปิดใช้ในเลย์เอาต์ใด ให้แทนที่
android:enabled="false"ด้วยapp:state_rotary_enabled="false"แล้วเพิ่มเนมสเปซappดังที่แสดงด้านบน - หากมีการปิดใช้มุมมองของคุณแบบเป็นโปรแกรม ให้แทนที่การเรียกใช้
setEnabled()ด้วยการเรียกใช้setRotaryEnabled()
FocusArea
ใช้ FocusAreas เพื่อแบ่งมุมมองที่โฟกัสได้ออกเป็นบล็อกเพื่อให้ไปยังส่วนต่างๆ ได้ง่ายขึ้นและสอดคล้องกับแอปอื่นๆ ตัวอย่างเช่น หากแอปมีแถบเครื่องมือ แถบเครื่องมือควรอยู่ใน FocusArea แยกต่างหากจากส่วนอื่นๆ ของแอป แถบแท็บและองค์ประกอบการนําทางอื่นๆ ควรแยกออกจากส่วนอื่นๆ ของแอปด้วย โดยปกติแล้วรายการขนาดใหญ่ควรมี FocusArea เป็นของตัวเอง หากไม่ได้ตั้งค่าไว้ ผู้ใช้จะต้องเลื่อนดูรายการทั้งหมดเพื่อเข้าถึงมุมมองบางอย่าง
FocusArea เป็นคลาสย่อยของ LinearLayout ใน car-ui-library
เมื่อเปิดใช้ฟีเจอร์นี้ FocusArea จะวาดไฮไลต์เมื่อโฟกัสที่องค์ประกอบย่อย ดูข้อมูลเพิ่มเติมได้ที่การปรับแต่งไฮไลต์โฟกัส
เมื่อสร้างบล็อกการนําทางในไฟล์เลย์เอาต์ หากคุณต้องการใช้ LinearLayout เป็นคอนเทนเนอร์สําหรับบล็อกนั้น ให้ใช้ FocusArea แทน
หรือจะตัดบล็อกใน FocusArea ก็ได้
อย่าฝัง FocusArea ใน FocusArea อื่น
เนื่องจากจะทําให้ระบุลักษณะการนําทางไม่ได้ ตรวจสอบว่ามุมมองที่โฟกัสได้ทั้งหมดอยู่ภายใน FocusArea
ตัวอย่าง FocusArea ใน
RotaryPlayground แสดงอยู่ด้านล่าง
<com.android.car.ui.FocusArea
       android:layout_margin="16dp"
       android:layout_width="match_parent"
       android:layout_height="wrap_content"
       android:orientation="vertical">
       <EditText
           android:layout_width="match_parent"
           android:layout_height="wrap_content"
           android:singleLine="true">
       </EditText>
   </com.android.car.ui.FocusArea>
FocusArea จะทํางานดังนี้
- เมื่อจัดการกับการหมุนและการขยับ
RotaryServiceจะมองหาอินสแตนซ์ของFocusAreaในลําดับชั้นของมุมมอง - เมื่อได้รับเหตุการณ์การหมุน
RotaryServiceจะย้ายโฟกัสไปยังมุมมองอื่นที่รับโฟกัสในFocusAreaเดียวกันได้ - เมื่อได้รับเหตุการณ์การแตะเตือน
RotaryServiceจะย้ายโฟกัสไปยังมุมมองอื่นซึ่งสามารถรับโฟกัสในFocusAreaอีกรายการหนึ่ง (โดยปกติจะอยู่ติดกัน)
หากคุณไม่ได้ใส่ FocusAreas ไว้ในเลย์เอาต์ ระบบจะถือว่ามุมมองรูทเป็นพื้นที่โฟกัสโดยนัย ผู้ใช้จะแตะเพื่อไปยังส่วนต่างๆ ในแอปไม่ได้ แต่ระบบจะสลับไปยังมุมมองที่โฟกัสได้ทั้งหมดแทน ซึ่งอาจเพียงพอสำหรับกล่องโต้ตอบ
การปรับแต่ง FocusArea
คุณใช้แอตทริบิวต์มุมมองมาตรฐาน 2 รายการต่อไปนี้เพื่อปรับแต่งการไปยังส่วนต่างๆ ด้วยปุ่มหมุนได้
android:nextFocusForwardช่วยให้นักพัฒนาแอประบุลำดับการหมุนในพื้นที่โฟกัสได้ ซึ่งเป็นแอตทริบิวต์เดียวกับที่ใช้ควบคุมลําดับ Tab สําหรับการไปยังส่วนต่างๆ ด้วยแป้นพิมพ์ อย่าใช้แอตทริบิวต์นี้เพื่อสร้างลูป แต่ให้ใช้app:wrapAround(ดูด้านล่าง) เพื่อสร้างลูปแทนandroid:focusedByDefaultช่วยให้นักพัฒนาแอประบุมุมมองโฟกัสเริ่มต้นในหน้าต่างได้ อย่าใช้แอตทริบิวต์นี้และapp:defaultFocus(ดูด้านล่าง) ในFocusAreaเดียวกัน
FocusArea ยังกำหนดแอตทริบิวต์บางอย่างเพื่อปรับแต่งการไปยังส่วนต่างๆ ด้วยปุ่มหมุนด้วย
คุณปรับแต่งพื้นที่โฟกัสโดยนัยด้วยแอตทริบิวต์เหล่านี้ไม่ได้
- (Android 11 QPR3, Android 11 Car,
Android 12)
app:defaultFocusใช้เพื่อระบุรหัสของมุมมองที่รับค่าสืบทอดซึ่งโฟกัสได้ ซึ่งควรโฟกัสเมื่อผู้ใช้แตะFocusAreaนี้ - (Android 11 QPR3, Android 11 Car,
Android 12)
app:defaultFocusOverridesHistoryสามารถตั้งค่าเป็นtrueเพื่อให้โฟกัสไปที่มุมมองที่ระบุไว้ข้างต้น แม้ว่าจะมีประวัติเพื่อระบุว่าโฟกัสอยู่ที่มุมมองอื่นในFocusAreaนี้ก็ตาม - (Android 12)
ใช้app:nudgeLeftShortcut,app:nudgeRightShortcut,app:nudgeUpShortcutและapp:nudgeDownShortcutเพื่อระบุรหัสของมุมมองที่สืบทอดซึ่งโฟกัสได้ ซึ่งควรโฟกัสเมื่อผู้ใช้ปัดไปในทิศทางหนึ่งๆ ดูข้อมูลเพิ่มเติมได้ที่เนื้อหาเกี่ยวกับแป้นพิมพ์ลัดในการแตะเบาๆด้านล่าง(Android 11 QPR3, Android 11 Car, เลิกใช้งานแล้วใน Android 12)
app:nudgeShortcutและapp:nudgeShortcutDirectionรองรับทางลัดการแตะเบาๆ เพียงรายการเดียว - (Android 11 QPR3, Android 11 Car,
Android 12)
หากต้องการเปิดใช้การหมุนแบบวนซ้ำในFocusAreaนี้ ให้ตั้งค่าapp:wrapAroundเป็นtrueโดยทั่วไปแล้วจะใช้เมื่อจัดเรียงข้อมูลพร็อพเพอร์ตี้เป็นวงกลมหรือรูปไข่ - (Android 11 QPR3, Android 11 Car,
Android 12)
หากต้องการปรับระยะห่างจากขอบของข้อความไฮไลต์ในFocusAreaนี้ ให้ใช้app:highlightPaddingStart,app:highlightPaddingEnd,app:highlightPaddingTop,app:highlightPaddingBottom,app:highlightPaddingHorizontalและapp:highlightPaddingVertical - (Android 11 QPR3, Android 11 Car,
Android 12)
หากต้องการปรับขอบเขตที่รับรู้ของFocusAreaนี้เพื่อค้นหาเป้าหมายการกระตุ้น ให้ใช้app:startBoundOffset,app:endBoundOffset,app:topBoundOffset,app:bottomBoundOffset,app:horizontalBoundOffsetและapp:verticalBoundOffset - (Android 11 QPR3, Android 11 Car,
Android 12)
หากต้องการระบุรหัสของFocusArea(หรือพื้นที่) ที่อยู่ติดกันในทิศทางที่ระบุ ให้ใช้app:nudgeLeft,app:nudgeRight,app:nudgeUpและapp:nudgeDownใช้ตัวเลือกนี้เมื่อการค้นหาเชิงเรขาคณิตที่ใช้โดยค่าเริ่มต้นไม่พบเป้าหมายที่ต้องการ
โดยปกติการนudge จะไปยังส่วนต่างๆ ของ FocusArea แต่การใช้แป้นพิมพ์ลัดสำหรับการกระตุ้นเตือนบางครั้งการกระตุ้นเตือนจะไปยังส่วนต่างๆ ภายใน FocusArea ก่อน ผู้ใช้จึงอาจต้องกระตุ้นเตือน 2 ครั้งเพื่อไปยัง FocusArea ถัดไป แป้นพิมพ์ลัดของ "แตะเบาๆ" จะมีประโยชน์เมื่อ FocusArea มีรายการยาวๆ ตามด้วยปุ่มการดำเนินการแบบลอย ดังตัวอย่างด้านล่าง
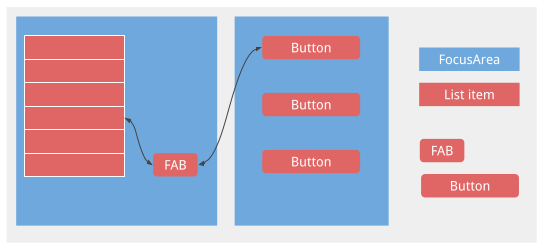
หากไม่มีทางลัดการแตะเตือน ผู้ใช้จะต้องเลื่อนดูรายการทั้งหมดเพื่อไปยัง FAB
การปรับแต่งโฟกัสไฮไลต์
ดังที่ระบุไว้ข้างต้น RotaryService สร้างขึ้นจากแนวคิดโฟกัสการดูที่มีอยู่ของเฟรมเวิร์ก Android เมื่อผู้ใช้หมุนและขยับ RotaryService จะย้ายโฟกัสไปรอบๆ โดยโฟกัสที่มุมมองหนึ่งและเลิกโฟกัสอีกมุมมองหนึ่ง ใน Android เมื่อโฟกัสที่มุมมองหนึ่งๆ มุมมองนั้นจะมีลักษณะดังนี้
- ระบุไฮไลต์โฟกัสของตนเองไว้ Android จะวาดไฮไลต์โฟกัสของมุมมอง
- ไม่ระบุการไฮไลต์โฟกัส และไม่ได้ปิดใช้การไฮไลต์โฟกัสเริ่มต้น Android จะวาดการไฮไลต์โฟกัสเริ่มต้นสำหรับมุมมอง
แอปที่ออกแบบมาเพื่อการสัมผัสมักจะไม่ได้ระบุไฮไลต์โฟกัสที่เหมาะสม
เฟรมเวิร์ก Android จะเป็นผู้ระบุไฮไลต์โฟกัสเริ่มต้น และ OEM สามารถลบล้างได้ นักพัฒนาแอปจะได้รับเครดิตเมื่อธีมที่ใช้มาจาก
Theme.DeviceDefault
ใช้การไฮไลต์โฟกัสเริ่มต้นทุกครั้งที่เป็นไปได้เพื่อให้ผู้ใช้ได้รับประสบการณ์การใช้งานที่สอดคล้องกัน
หากต้องการไฮไลต์โฟกัสที่มีรูปร่างที่กำหนดเอง (เช่น กลมหรือรูปเม็ดยา) หรือหากใช้ธีมที่ไม่ได้มาจาก Theme.DeviceDefault ให้ใช้ทรัพยากร car-ui-library เพื่อระบุไฮไลต์โฟกัสของคุณเองสำหรับแต่ละมุมมอง
หากต้องการระบุไฮไลต์โฟกัสที่กำหนดเองสำหรับมุมมอง ให้เปลี่ยนภาพวาดพื้นหลังหรือพื้นหน้าของมุมมองเป็นภาพวาดที่แตกต่างออกไปเมื่อโฟกัสที่มุมมอง โดยทั่วไปแล้ว คุณจะต้องเปลี่ยนพื้นหลัง รูปภาพที่วาดได้ต่อไปนี้จะสร้างไฮไลต์โฟกัสทรงกลมหากใช้เป็นพื้นหลังสำหรับมุมมองสี่เหลี่ยมจัตุรัส
<selector xmlns:android="http://schemas.android.com/apk/res/android">
   <item android:state_focused="true" android:state_pressed="true">
      <shape android:shape="oval">
         <solid android:color="@color/car_ui_rotary_focus_pressed_fill_color"/>
         <stroke
            android:width="@dimen/car_ui_rotary_focus_pressed_stroke_width"
            android:color="@color/car_ui_rotary_focus_pressed_stroke_color"/>
      </shape>
   </item>
   <item android:state_focused="true">
      <shape android:shape="oval">
         <solid android:color="@color/car_ui_rotary_focus_fill_color"/>
         <stroke
            android:width="@dimen/car_ui_rotary_focus_stroke_width"
            android:color="@color/car_ui_rotary_focus_stroke_color"/>
      </shape>
   </item>
   <item>
      <ripple...>
         ...
      </ripple>
   </item>
</selector>
(Android 11 QPR3, Android 11 Car, Android 12) การอ้างอิงทรัพยากรที่ตัวหนาในตัวอย่างข้างต้นระบุทรัพยากรที่ car-ui-library กำหนด OEM จะลบล้างค่าเหล่านี้เพื่อให้สอดคล้องกับการไฮไลต์โฟกัสเริ่มต้นที่ระบุ วิธีนี้ช่วยให้สีไฮไลต์โฟกัส ความหนาของเส้นขีด และอื่นๆ ไม่เปลี่ยนแปลงเมื่อผู้ใช้ไปยังส่วนต่างๆ ระหว่างมุมมองที่มีไฮไลต์โฟกัสที่กำหนดเองกับมุมมองที่มีไฮไลต์โฟกัสเริ่มต้น รายการสุดท้ายคือภาพกระเพื่อมที่ใช้ในการสัมผัส ค่าเริ่มต้นที่ใช้สำหรับทรัพยากรแบบหนาจะปรากฏดังนี้
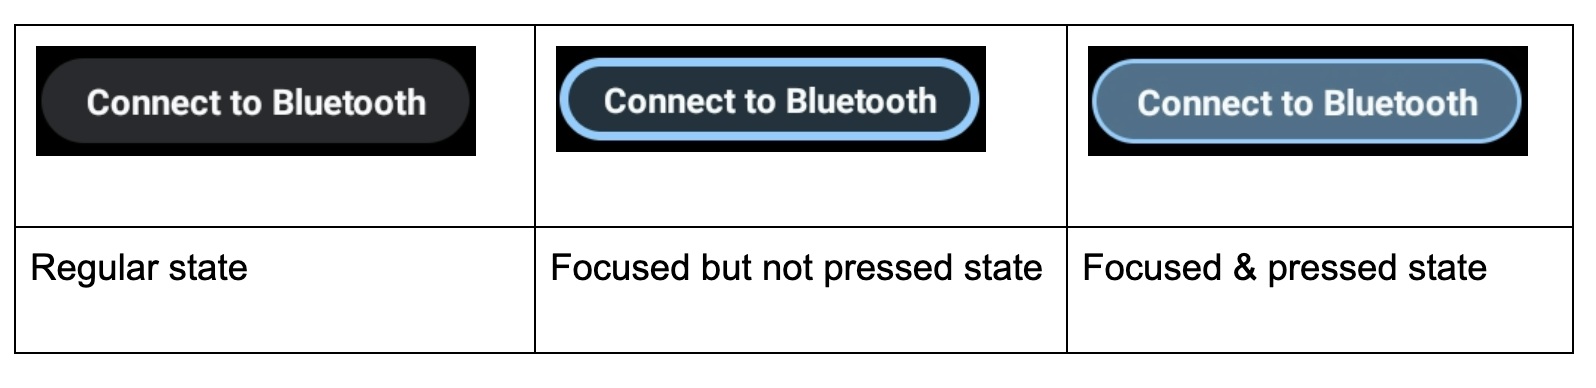
นอกจากนี้ ระบบจะเรียกใช้ไฮไลต์โฟกัสที่กำหนดเองเมื่อปุ่มมีสีพื้นหลังที่เป็นสีเดียวกันเพื่อดึงดูดความสนใจของผู้ใช้ ดังตัวอย่างด้านล่าง ซึ่งอาจทำให้เห็นไฮไลต์โฟกัสได้ยาก ในกรณีนี้ ให้ระบุไฮไลต์โฟกัสที่กำหนดเองโดยใช้สีรอง ดังนี้
 |
- (Android 11 QPR3, Android 11 Car,
Android 12)
car_ui_rotary_focus_fill_secondary_color
car_ui_rotary_focus_stroke_secondary_color - (Android 12)
car_ui_rotary_focus_pressed_fill_secondary_color
car_ui_rotary_focus_pressed_stroke_secondary_color
เช่น
 |
 |
|
| โฟกัสอยู่ ไม่ได้กด | โฟกัส กด |
การเลื่อนด้วยปุ่มหมุน
หากแอปใช้ RecyclerView คุณควรใช้ CarUiRecyclerView แทน วิธีนี้ช่วยให้มั่นใจได้ว่า UI ของคุณจะสอดคล้องกับ UI ของผู้อื่น เนื่องจากการปรับแต่งของ OEM จะมีผลกับ CarUiRecyclerView ทั้งหมด
หากองค์ประกอบในรายการโฟกัสได้ทั้งหมด คุณก็ไม่ต้องดำเนินการใดๆ เพิ่มเติม การไปยังส่วนต่างๆ ด้วยปุ่มหมุนจะย้ายโฟกัสไปยังองค์ประกอบต่างๆ ในรายการ และรายการจะเลื่อนขึ้นเพื่อแสดงองค์ประกอบที่โฟกัสใหม่
(Android 11 QPR3, Android 11 Car, Android 12)
หากมีองค์ประกอบที่โฟกัสได้และโฟกัสไม่ได้ผสมกัน หรือหากองค์ประกอบทั้งหมดโฟกัสไม่ได้ คุณสามารถเปิดใช้การเลื่อนด้วยปุ่มหมุน ซึ่งจะช่วยให้ผู้ใช้ใช้ตัวควบคุมแบบหมุนเพื่อเลื่อนดูรายการทีละรายการได้โดยไม่ต้องข้ามรายการที่โฟกัสไม่ได้ หากต้องการเปิดใช้การเลื่อนแบบหมุน ให้ตั้งค่าแอตทริบิวต์ app:rotaryScrollEnabled เป็น true
(Android 11 QPR3, Android 11 Car,
Android 12)
คุณสามารถเปิดใช้การเลื่อนแบบหมุนในมุมมองที่เลื่อนได้ทั้งหมด ซึ่งรวมถึง avCarUiRecyclerView ด้วยวิธี setRotaryScrollEnabled() ใน CarUiUtils หากดำเนินการดังกล่าว คุณจะต้องดำเนินการดังนี้
- ทำให้มุมมองที่เลื่อนได้โฟกัสได้เพื่อให้โฟกัสได้เมื่อไม่มีมุมมองที่โฟกัสได้ซึ่งสืบทอดมาจากมุมมองนั้นแสดงอยู่
- ปิดใช้การไฮไลต์โฟกัสเริ่มต้นในมุมมองที่เลื่อนได้โดยการเรียกใช้
setDefaultFocusHighlightEnabled(false)เพื่อให้มุมมองที่เลื่อนได้ดูเหมือนว่าไม่ได้โฟกัส - ตรวจสอบว่าได้โฟกัสที่มุมมองที่เลื่อนได้ก่อนองค์ประกอบที่สืบทอดโดยเรียกใช้
setDescendantFocusability(ViewGroup.FOCUS_BEFORE_DESCENDANTS) - ฟัง MotionEvents ด้วย
SOURCE_ROTARY_ENCODERและAXIS_VSCROLLหรือAXIS_HSCROLLเพื่อระบุระยะทางที่จะเลื่อนและทิศทาง (ผ่านเครื่องหมาย)
เมื่อเปิดใช้การเลื่อนแบบหมุนใน CarUiRecyclerView และผู้ใช้หมุนไปยังพื้นที่ที่ไม่มีมุมมองที่โฟกัสได้ แถบเลื่อนจะเปลี่ยนจากสีเทาเป็นสีน้ำเงิน ราวกับว่าเป็นการระบุว่าโฟกัสอยู่ที่แถบเลื่อน คุณใช้เอฟเฟกต์ที่คล้ายกันได้หากต้องการ
MotionEvents จะเหมือนกับเหตุการณ์ที่เกิดจากล้อเลื่อนบนเมาส์ ยกเว้นแหล่งที่มา
โหมดการจัดการโดยตรง
โดยปกติแล้ว การแตะเบาๆ และการหมุนจะเป็นการไปยังส่วนต่างๆ ของอินเทอร์เฟซผู้ใช้ ส่วนการกดปุ่มกลางจะเป็นการดําเนินการ แต่ก็ไม่ได้เป็นเช่นนั้นเสมอไป เช่น หากผู้ใช้ต้องการปรับระดับเสียงปลุก ผู้ใช้อาจใช้ตัวควบคุมแบบหมุนเพื่อไปยังแถบเลื่อนระดับเสียง กดปุ่มกลาง หมุนตัวควบคุมเพื่อปรับระดับเสียงปลุก แล้วกดปุ่มย้อนกลับเพื่อกลับไปที่การนําทาง ซึ่งเรียกว่าโหมดการจัดการโดยตรง (DM) ในโหมดนี้ ตัวควบคุมแบบหมุนจะใช้เพื่อโต้ตอบกับมุมมองโดยตรงแทนการไปยังส่วนต่างๆ
ติดตั้งใช้งาน DM ได้ 2 วิธีดังนี้ หากต้องการจัดการเฉพาะการหมุนและมุมมองที่ต้องการควบคุมให้ตอบสนองต่อ ACTION_SCROLL_FORWARD และ ACTION_SCROLL_BACKWARD AccessibilityEvent อย่างเหมาะสม ให้ใช้กลไกแบบง่าย หรือใช้กลไกที่ขั้นสูง
กลไกแบบง่ายเป็นตัวเลือกเดียวในหน้าต่างระบบ ส่วนแอปจะใช้กลไกใดก็ได้
กลไกที่เรียบง่าย
(Android 11 QPR3, Android 11 Car,
Android 12)
แอปของคุณควรเรียกใช้
DirectManipulationHelper.setSupportsRotateDirectly(View view, boolean enable)
RotaryService จะรับรู้เมื่อผู้ใช้อยู่ในโหมด DM และเข้าสู่โหมด DM เมื่อผู้ใช้กดปุ่มกลางขณะที่โฟกัสอยู่ที่มุมมอง เมื่ออยู่ในโหมด DM ระบบจะหมุนด้วยแป้น ACTION_SCROLL_FORWARD หรือ ACTION_SCROLL_BACKWARD และออกจากโหมด DM เมื่อผู้ใช้กดปุ่มย้อนกลับ กลไกง่ายๆ นี้จะสลับสถานะที่เลือกของมุมมองเมื่อเข้าสู่และออกจากโหมด DM
หากต้องการให้ผู้ใช้ทราบว่าอยู่ในโหมด DM ให้ทำให้มุมมองของคุณดูแตกต่างออกไปเมื่อเลือก เช่น เปลี่ยนพื้นหลังเมื่อ android:state_selected เป็น true
กลไกขั้นสูง
แอปจะกำหนดว่า RotaryService เข้าสู่และออกจากโหมด DM เมื่อใด กดปุ่มกลางขณะที่โฟกัสอยู่ที่มุมมอง DM ควรเข้าสู่โหมด DM และปุ่มย้อนกลับควรออกจากโหมด DM เพื่อให้ผู้ใช้ได้รับประสบการณ์การใช้งานที่สอดคล้องกัน หากไม่ได้ใช้ปุ่ม "ศูนย์" และ/หรือการแตะเบาๆ ปุ่มเหล่านี้จะเป็นวิธีอื่นในการออกจากโหมด DM สำหรับแอปอย่าง Maps คุณสามารถใช้ปุ่มเพื่อแสดง DM เพื่อเข้าสู่โหมด DM
มุมมองต้องมีคุณสมบัติต่อไปนี้จึงจะรองรับโหมด DM ขั้นสูง
- (Android 11 QPR3, Android 11 Car,
Android 12) ต้องคอยฟังเหตุการณ์
KEYCODE_DPAD_CENTERเพื่อเข้าสู่โหมด DM และคอยฟังเหตุการณ์KEYCODE_BACKเพื่อออกจากโหมด DM โดยเรียกใช้DirectManipulationHelper.enableDirectManipulationMode()ในแต่ละกรณี หากต้องการฟังเหตุการณ์เหล่านี้ ให้ทําอย่างใดอย่างหนึ่งต่อไปนี้- ลงทะเบียน
OnKeyListener
หรือ
- ขยายมุมมอง แล้วลบล้างเมธอด
dispatchKeyEvent()ของมุมมองนั้น
- ลงทะเบียน
- ควรฟังเหตุการณ์ Nudge (
KEYCODE_DPAD_UP,KEYCODE_DPAD_DOWN,KEYCODE_DPAD_LEFTหรือKEYCODE_DPAD_RIGHT) หากมุมมองควรจัดการ Nudge - ควรฟัง
MotionEventและรับจํานวนการหมุนในAXIS_SCROLLหากมุมมองต้องการจัดการการหมุน ซึ่งทำได้หลายวิธีดังนี้- ลงทะเบียน
OnGenericMotionListener - ขยายมุมมองและลบล้างเมธอด
dispatchTouchEvent()ของมุมมอง
- ลงทะเบียน
- คุณต้องออกจากโหมด DM เมื่อข้อมูลโค้ดหรือกิจกรรมที่มุมมองนั้นอยู่ไม่ใช่แบบอินเทอร์แอกทีฟเพื่อไม่ให้ระบบค้างอยู่ในโหมด DM
- ควรระบุตัวช่วยในการมองเห็นเพื่อระบุว่ามุมมองอยู่ในโหมด DM
ตัวอย่างมุมมองที่กำหนดเองซึ่งใช้โหมด DM เพื่อเลื่อนและซูมแผนที่มีดังนี้
/** Whether this view is in DM mode. */
private boolean mInDirectManipulationMode;


/** Initializes the view. Called by the constructors. */
private void init() {
   setOnKeyListener((view, keyCode, keyEvent) -> {
      boolean isActionUp = keyEvent.getAction() == KeyEvent.ACTION_UP;
      switch (keyCode) {
         // Always consume KEYCODE_DPAD_CENTER and KEYCODE_BACK events.
         case KeyEvent.KEYCODE_DPAD_CENTER:
            if (!mInDirectManipulationMode && isActionUp) {
               mInDirectManipulationMode = true;
               DirectManipulationHelper.enableDirectManipulationMode(this, true);
               setSelected(true); // visually indicate DM mode
            }
            return true;
         case KeyEvent.KEYCODE_BACK:
            if (mInDirectManipulationMode && isActionUp) {
               mInDirectManipulationMode = false;
               DirectManipulationHelper.enableDirectManipulationMode(this, false);
               setSelected(false);
            }
            return true;
        // Consume controller nudge events only when in DM mode.
        // When in DM mode, nudges pan the map.
        case KeyEvent.KEYCODE_DPAD_UP:
           if (!mInDirectManipulationMode) return false;
           if (isActionUp) pan(0f, -10f);
           return true;
        case KeyEvent.KEYCODE_DPAD_DOWN:
           if (!mInDirectManipulationMode) return false;
           if (isActionUp) pan(0f, 10f);
           return true;
        case KeyEvent.KEYCODE_DPAD_LEFT:
           if (!mInDirectManipulationMode) return false;
           if (isActionUp) pan(-10f, 0f);
           return true;
        case KeyEvent.KEYCODE_DPAD_RIGHT:
           if (!mInDirectManipulationMode) return false;
           if (isActionUp) pan(10f, 0f);
           return true;
        // Don't consume other key events.
        default:
           return false;
      }
   });


   // When in DM mode, rotation zooms the map.
   setOnGenericMotionListener(((view, motionEvent) -> {
      if (!mInDirectManipulationMode) return false;
      float scroll = motionEvent.getAxisValue(MotionEvent.AXIS_SCROLL);
      zoom(10 * scroll);
      return true;
   }));
}


@Override
public void onPause() {
   if (mInDirectManipulationMode) {
      // To ensure that the user doesn't get stuck in DM mode, disable DM mode
      // when the fragment is not interactive (e.g., a dialog shows up).
      mInDirectManipulationMode = false;
      DirectManipulationHelper.enableDirectManipulationMode(this, false);
   }
   super.onPause();
}
ดูตัวอย่างเพิ่มเติมได้ในโปรเจ็กต์ RotaryPlayground
ActivityView
เมื่อใช้ ActivityView
ActivityViewไม่ควรโฟกัสได้- (Android 11 QPR3, Android 11 Car,
เลิกใช้งานแล้วใน Android 11)
เนื้อหาของActivityViewต้องมีFocusParkingViewเป็นมุมมองที่โฟกัสได้รายการแรก และapp:shouldRestoreFocusแอตทริบิวต์ต้องเป็นfalse - เนื้อหาของ
ActivityViewไม่ควรมีandroid:focusByDefaultยอดดู
สำหรับผู้ใช้แล้ว ActivityView ไม่ควรส่งผลต่อการนำทาง ยกเว้นว่าพื้นที่โฟกัสจะครอบคลุม ActivityView ไม่ได้ กล่าวคือ คุณไม่สามารถมีจุดสนใจเดียวที่มีเนื้อหาทั้งภายในและภายนอก ActivityView หากคุณไม่ได้เพิ่ม FocusArea ใดๆ ลงใน ActivityView ระบบจะถือว่ารูทของลําดับชั้นมุมมองใน ActivityView เป็นพื้นที่โฟกัสโดยนัย
ปุ่มที่ทำงานเมื่อกดค้างไว้
ปุ่มส่วนใหญ่จะทําให้เกิดการดำเนินการบางอย่างเมื่อคลิก ปุ่มบางปุ่มจะทำงานเมื่อกดค้างไว้แทน
เช่น ปุ่มกรอไปข้างหน้าและกรอกลับมักจะทำงานเมื่อกดค้างไว้ หากต้องการให้ปุ่มดังกล่าวรองรับปุ่มหมุน ให้ฟังหา KEYCODE_DPAD_CENTER KeyEvents ดังนี้
mButton.setOnKeyListener((v, keyCode, event) ->
{
    if (keyCode != KEYCODE_DPAD_CENTER) {
        return false;
    }
    if (event.getAction() == ACTION_DOWN) {
        mButton.setPressed(true);
        mHandler.post(mRunnable);
    } else {
        mButton.setPressed(false);
        mHandler.removeCallbacks(mRunnable);
    }
    return true;
});
ซึ่ง mRunnable จะดำเนินการ (เช่น กรอกลับ) และกำหนดเวลาให้ทำงานหลังจากรอเวลา
โหมดสัมผัส
ผู้ใช้สามารถใช้ตัวควบคุมแบบหมุนเพื่อโต้ตอบกับจอภาพหลักในรถได้ 2 วิธี นั่นคือ โดยใช้ตัวควบคุมแบบหมุนหรือโดยการสัมผัสหน้าจอ เมื่อใช้ตัวควบคุมแบบหมุน ระบบจะไฮไลต์มุมมองที่โฟกัสได้มุมมองใดมุมมองหนึ่ง เมื่อแตะหน้าจอ จะไม่มีไฮไลต์โฟกัสปรากฏขึ้น ผู้ใช้สามารถสลับระหว่างโหมดการป้อนข้อมูลต่อไปนี้ได้ทุกเมื่อ
- ปุ่มหมุน → แตะ เมื่อผู้ใช้แตะหน้าจอ ข้อความไฮไลต์โฟกัสจะหายไป
- แตะ → โรตารี่ เมื่อผู้ใช้เขย่ง หมุน หรือกดปุ่ม "ตรงกลาง" ข้อความไฮไลต์โฟกัสจะปรากฏขึ้น
ปุ่มย้อนกลับและปุ่มหน้าแรกจะไม่มีผลกับโหมดอินพุต
โรตารีใช้แนวคิดโหมดสัมผัสที่มีอยู่ของ Android
คุณสามารถใช้ View.isInTouchMode() เพื่อระบุโหมดการป้อนข้อมูลของผู้ใช้ คุณใช้ OnTouchModeChangeListener เพื่อฟังการเปลี่ยนแปลงได้ แม้ว่าจะใช้เพื่อปรับแต่งอินเทอร์เฟซผู้ใช้สำหรับโหมดการป้อนข้อมูลปัจจุบันได้ แต่ให้หลีกเลี่ยงการเปลี่ยนแปลงที่สำคัญเนื่องจากอาจทำให้สับสน
การแก้ปัญหา
ในแอปที่ออกแบบมาเพื่อสัมผัส การมีมุมมองที่โฟกัสได้แบบซ้อนกันเป็นเรื่องปกติ
เช่น อาจมี FrameLayout รอบๆ ImageButton ซึ่งทั้ง 2 รายการโฟกัสได้ การดำเนินการนี้ไม่ส่งผลเสียต่อการควบคุมด้วยการสัมผัส แต่อาจส่งผลให้ผู้ใช้ได้รับประสบการณ์การใช้งานที่ไม่ดีสำหรับการควบคุมแบบหมุน เนื่องจากผู้ใช้ต้องหมุนตัวควบคุม 2 ครั้งเพื่อไปยังมุมมองแบบอินเทอร์แอกทีฟถัดไป Google ขอแนะนำให้คุณทำให้ผู้ใช้โฟกัสได้ทั้งมุมมองด้านนอกหรือมุมมองด้านใน แต่ไม่ใช่ทั้ง 2 อย่าง เพื่อให้ผู้ใช้ได้รับประสบการณ์การใช้งานที่ดี
หากปุ่มหรือสวิตช์เสียโฟกัสเมื่อกดผ่านตัวควบคุมแบบหมุน แสดงว่าอาจเกิดจากเงื่อนไขข้อใดข้อหนึ่งต่อไปนี้
- ปุ่มหรือสวิตช์ปิดอยู่ (ชั่วคราวหรือถาวร) เนื่องจากมีการกดปุ่ม ไม่ว่าจะในกรณีใด คุณสามารถแก้ไขปัญหานี้ได้ 2 วิธีดังนี้
- ปล่อยสถานะ
android:enabledเป็นtrueและใช้สถานะที่กําหนดเองเพื่อทําให้ปุ่มหรือสวิตช์เป็นสีเทาตามที่อธิบายไว้ในสถานะที่กําหนดเอง - ใช้คอนเทนเนอร์ล้อมรอบปุ่มหรือสวิตช์และทำให้โฟกัสคอนเทนเนอร์ได้แทนปุ่มหรือสวิตช์ (ตัวรับฟังการคลิกต้องอยู่ในคอนเทนเนอร์)
- ปล่อยสถานะ
- กำลังเปลี่ยนปุ่มหรือสวิตช์ ตัวอย่างเช่น การดำเนินการที่เกิดขึ้นเมื่อกดปุ่มหรือสลับสวิตช์อาจทริกเกอร์การรีเฟรชการดำเนินการที่ใช้ได้ ซึ่งจะทำให้ปุ่มใหม่มาแทนที่ปุ่มที่มีอยู่ ปัญหานี้แก้ไขได้ 2 วิธี ดังนี้
- ตั้งค่าไอคอนและ/หรือข้อความของปุ่มหรือสวิตช์ที่มีอยู่แทนการสร้างปุ่มหรือสวิตช์ใหม่
- เพิ่มคอนเทนเนอร์ที่โฟกัสได้รอบๆ ปุ่มหรือสวิตช์ ดังที่อธิบายไว้ข้างต้น
RotaryPlayground
RotaryPlayground เป็นแอปอ้างอิงสำหรับโรตารี ใช้เพื่อดูวิธีผสานรวมฟีเจอร์การหมุนเข้ากับแอป RotaryPlayground รวมอยู่ในบิลด์โปรแกรมจำลองและบิลด์สำหรับอุปกรณ์ที่ใช้ Android Automotive OS (AAOS)
RotaryPlaygroundrepository:packages/apps/Car/tests/RotaryPlayground/- เวอร์ชัน: Android 11 QPR3, Android 11 Car และ Android 12
แอป RotaryPlayground จะแสดงแท็บต่อไปนี้ทางด้านซ้าย
- การ์ด ทดสอบการไปยังส่วนต่างๆ ของโฟกัส การข้ามองค์ประกอบที่โฟกัสไม่ได้ และการป้อนข้อความ
- Direct Manipulation ทดสอบวิดเจ็ตที่รองรับโหมดการจัดการโดยตรงแบบง่ายและขั้นสูง แท็บนี้มีไว้สำหรับการดําเนินการโดยตรงภายในหน้าต่างแอปโดยเฉพาะ
- การดําเนินการกับ UI ของระบบ ทดสอบวิดเจ็ตที่รองรับการจัดการโดยตรงในหน้าต่างของระบบที่รองรับเฉพาะโหมดการจัดการโดยตรงแบบง่ายเท่านั้น
- ตารางกริด ทดสอบการไปยังส่วนต่างๆ ของเมนูด้วยปุ่มหมุนตามรูปแบบ Z โดยการเลื่อน
- การแจ้งเตือน ทดสอบการแตะเพื่อแสดงและซ่อนการแจ้งเตือนล่วงหน้า
- เลื่อน ทดสอบการเลื่อนดูเนื้อหาที่โฟกัสได้และโฟกัสไม่ได้ผสมกัน
- WebView ทดสอบการไปยังส่วนต่างๆ ของลิงก์ใน
WebView - กำหนดเอง
FocusAreaทดสอบการปรับแต่งFocusAreaดังนี้- ยิงได้จากลูกอ้อมประตู
android:focusedByDefaultและapp:defaultFocus.
- เป้าหมายการกระตุ้นให้ดำเนินการที่ชัดเจน
- แป้นพิมพ์ลัดสำหรับขยับ
FocusAreaที่ไม่มีมุมมองที่โฟกัสได้