اعتبارًا من 27 آذار (مارس) 2025، ننصحك باستخدام android-latest-release
بدلاً من aosp-main
لإنشاء AOSP والمساهمة فيه. لمزيد من المعلومات، يُرجى الاطّلاع على التغييرات في AOSP.
إجراء اختبارات NFC على أجهزة متعددة (Android 15)
تنظيم صفحاتك في مجموعات
يمكنك حفظ المحتوى وتصنيفه حسب إعداداتك المفضّلة.
يوضِّح هذا المستند كيفية إجراء اختبارات NFC على أجهزة متعددة.
استيفاء المتطلبات الأساسية
قبل إجراء اختبارات NFC على أجهزة متعددة، عليك اتّباع الخطوات التالية:
- تجهيز جهاز مزوّد بتطبيق Android 15
- اتّبِع متطلبات CTS-V.
- اتّبِع خطوات إعداد CTS-V.
تجهيز جهاز DUT وقارئ NFC PN532 لإجراء الاختبار
بعد الانتهاء من الخطوات السابقة، اتّبِع الخطوات التالية لإجراء الاختبار:
استعد لاختبار DUT وجهاز قراءة NFC PN532 باتّباع الخطوات التالية:
- وصِّل جهاز DUT بجهاز مضيف عبر USB.
- امنح المضيف أذونات للوصول إلى جهاز DUT عبر ADB.
ثبِّت تطبيق أداة التحقّق في مجموعة أدوات اختبار التوافق (CtsVerifier.apk
) على جهاز التحقّق من الأجهزة (DUT):
extract root/out/host/linux-x86/cts-verifier/android-cts-verifier.zip
cd android-cts-verifier
adb install -r -g CtsVerifier.apk
ثبِّت حِزم APK المطلوبة لاختبار NFC:
cd MultiDevice
adb install -r -g NfcEmulatorTestApp.apk
إعداد تقنية NFC لوحدة التحكّم في البيانات
اتّبِع الخطوات التالية لتشغيل إعداد NFC لوحدة التحكّم في الجهاز:
- على جهاز DUT، انتقِل إلى قائمة الإعدادات.
- ابحث عن قسم الاتصال القصير المدى (NFC) أو الأجهزة المتصلة.
- تأكَّد من أنّ مفتاح التبديل الخاص بتقنية NFC مفعّل.
ضَع شريحة NFC على قارئ NFC في الهاتف باتّباع الخطوات التالية:
- احصل على شريحة NFC من طراز PN532. ننصح باستخدام الوحدة المتكاملة PN532 التي لا تتضمّن بلوتوث منخفض الطاقة.
- اربط شريحة PN532 NFC بالمضيف Linux باستخدام كابل USB.
- ضَع شريحة NFC PN532 فوق قارئ NFC في الهاتف كما هو موضّح في الصورة التالية:
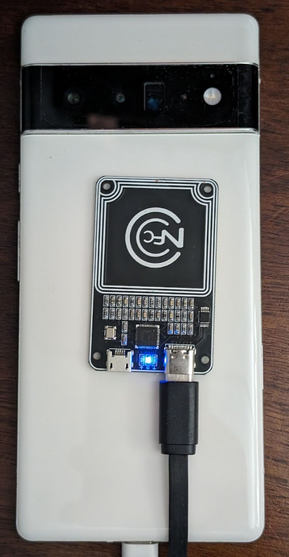
الشكل 1: موضع شريحة NFC
إعداد بيئة الاختبار
اتّبِع الخطوات التالية لإعداد البيئة الاختبارية:
نفِّذ هذه الأوامر لإعداد بيئة الاختبار:
cd MultiDevice
source build/envsetup.sh
يتحقّق هذا الأمر من Python ويُعدّ متغيّر PYTHONPATH
البيئة. إذا لم يتم طباعة أي أخطاء في المحطة الطرفية، تكون البيئة جاهزة
لتشغيل اختبارات الأجهزة المتعددة.
إذا ظهرت لك رسالة الخطأ libtinfo.so.6: no version information
available (required by /bin/sh)
أثناء التشغيل، نفِّذ الأمر التالي
لإعادة تسمية ملف libtinfo.so.6
:
mv $ENV_DIRECTORY/lib/libtinfo.so.6 $ENV_DIRECTORY/lib/libtinfo.so.6.bak
يمكنك إعداد منصة الاختبار من خلال ضبط أرقام التعريف التسلسلية للجهازَين، وهما جهاز الاختبار وPN532 NFC
reader في MultiDevice/config.yml
:
TestBeds:
- Name: CtsNfcHceMultiDeviceTestCases-py-ctsv
Controllers:
AndroidDevice:
- serial: "<device-id>"
TestParams:
pn532_serial_path: "<pn532-serial-path>"
إجراء اختبارات NFC
لإجراء اختبارات NFC:
افتح تطبيق CTS-V وانقر على اختبارات NFC:
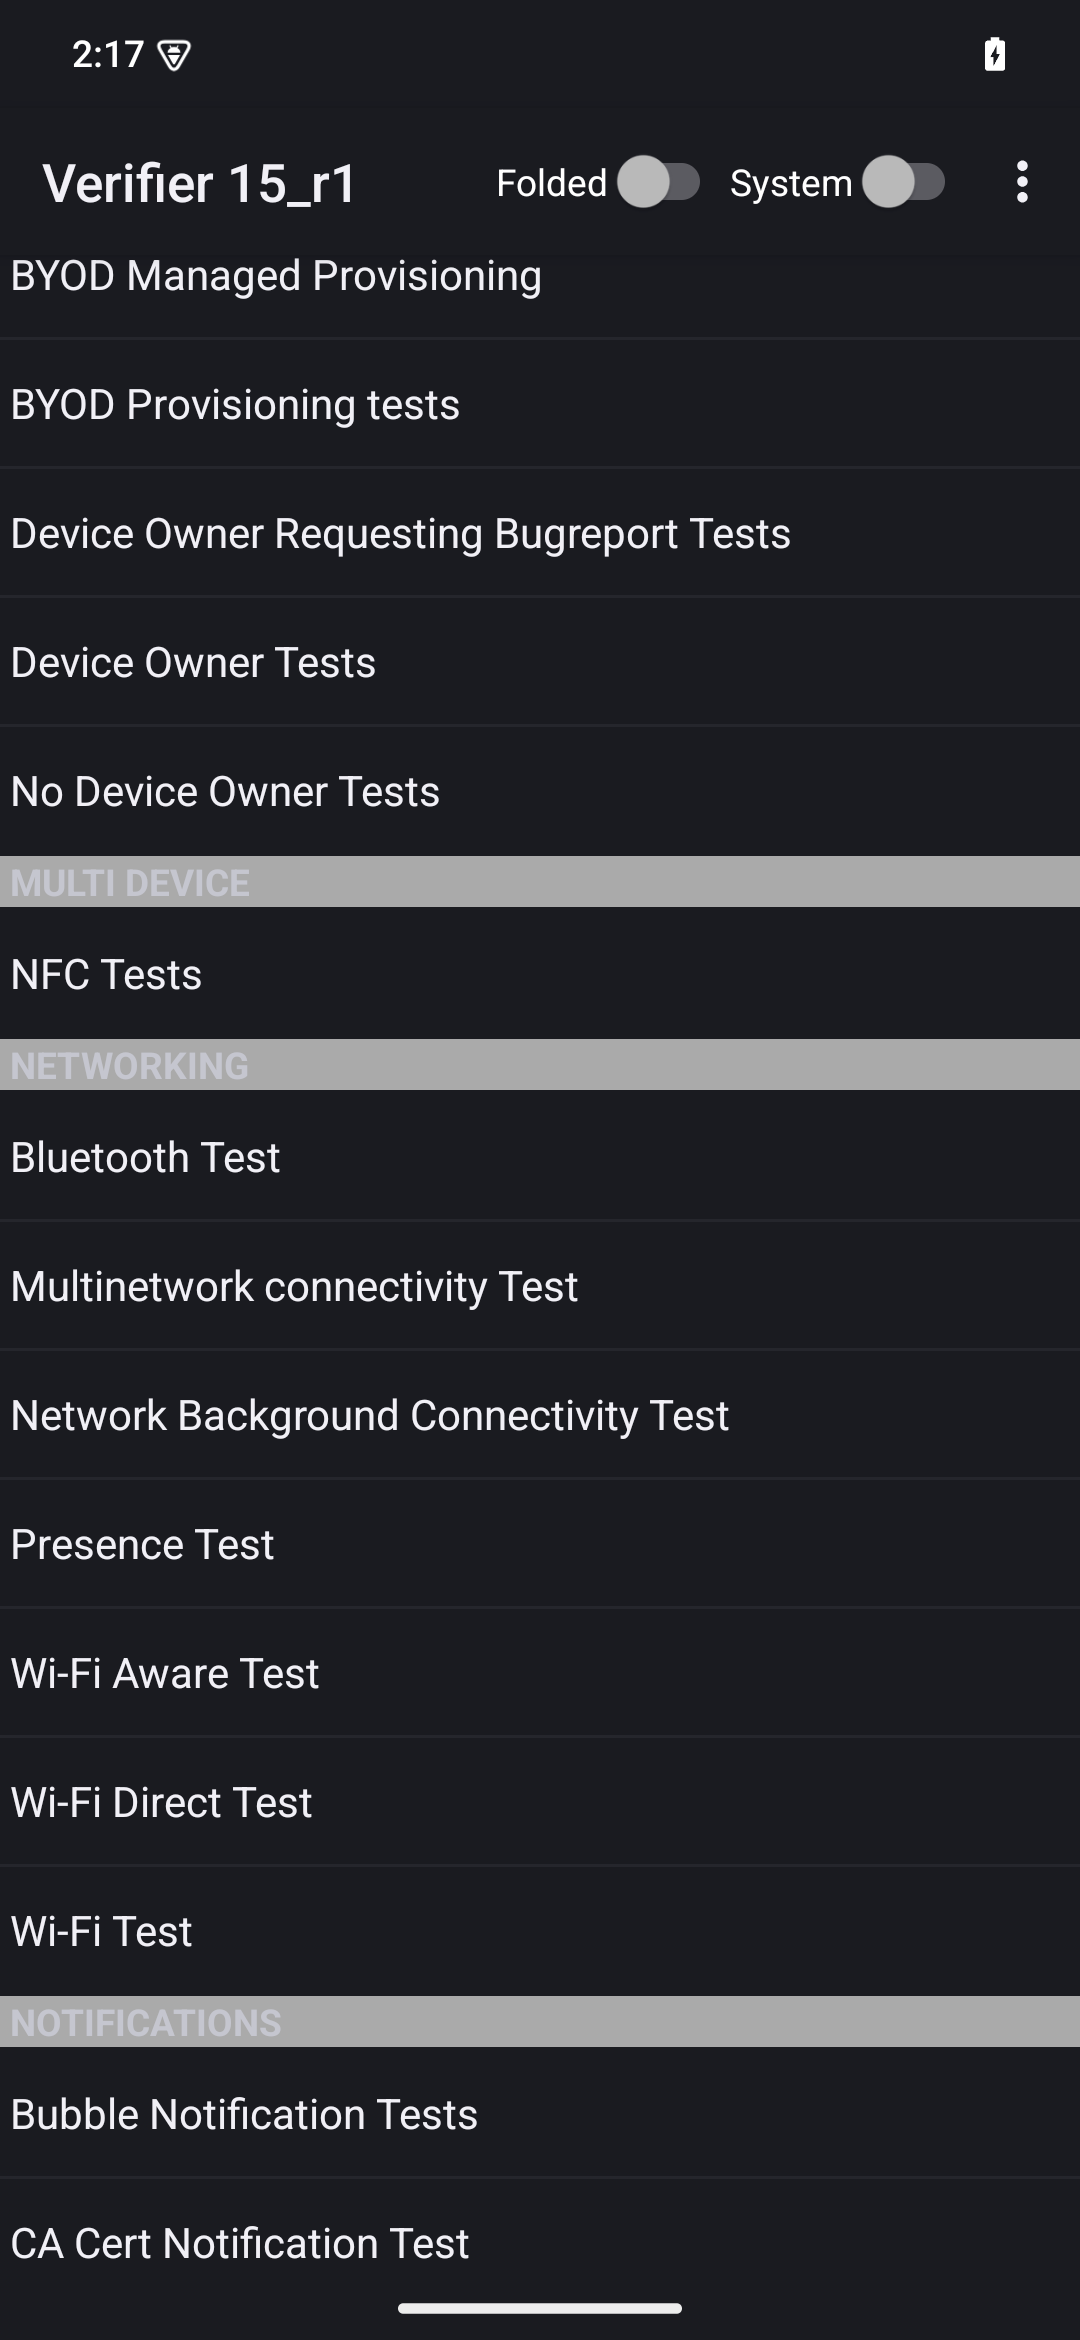
الشكل 2: تطبيق CTS-V
تظهر نافذة المعلومات التي تتضمّن قائمة بحالات الاختبار:
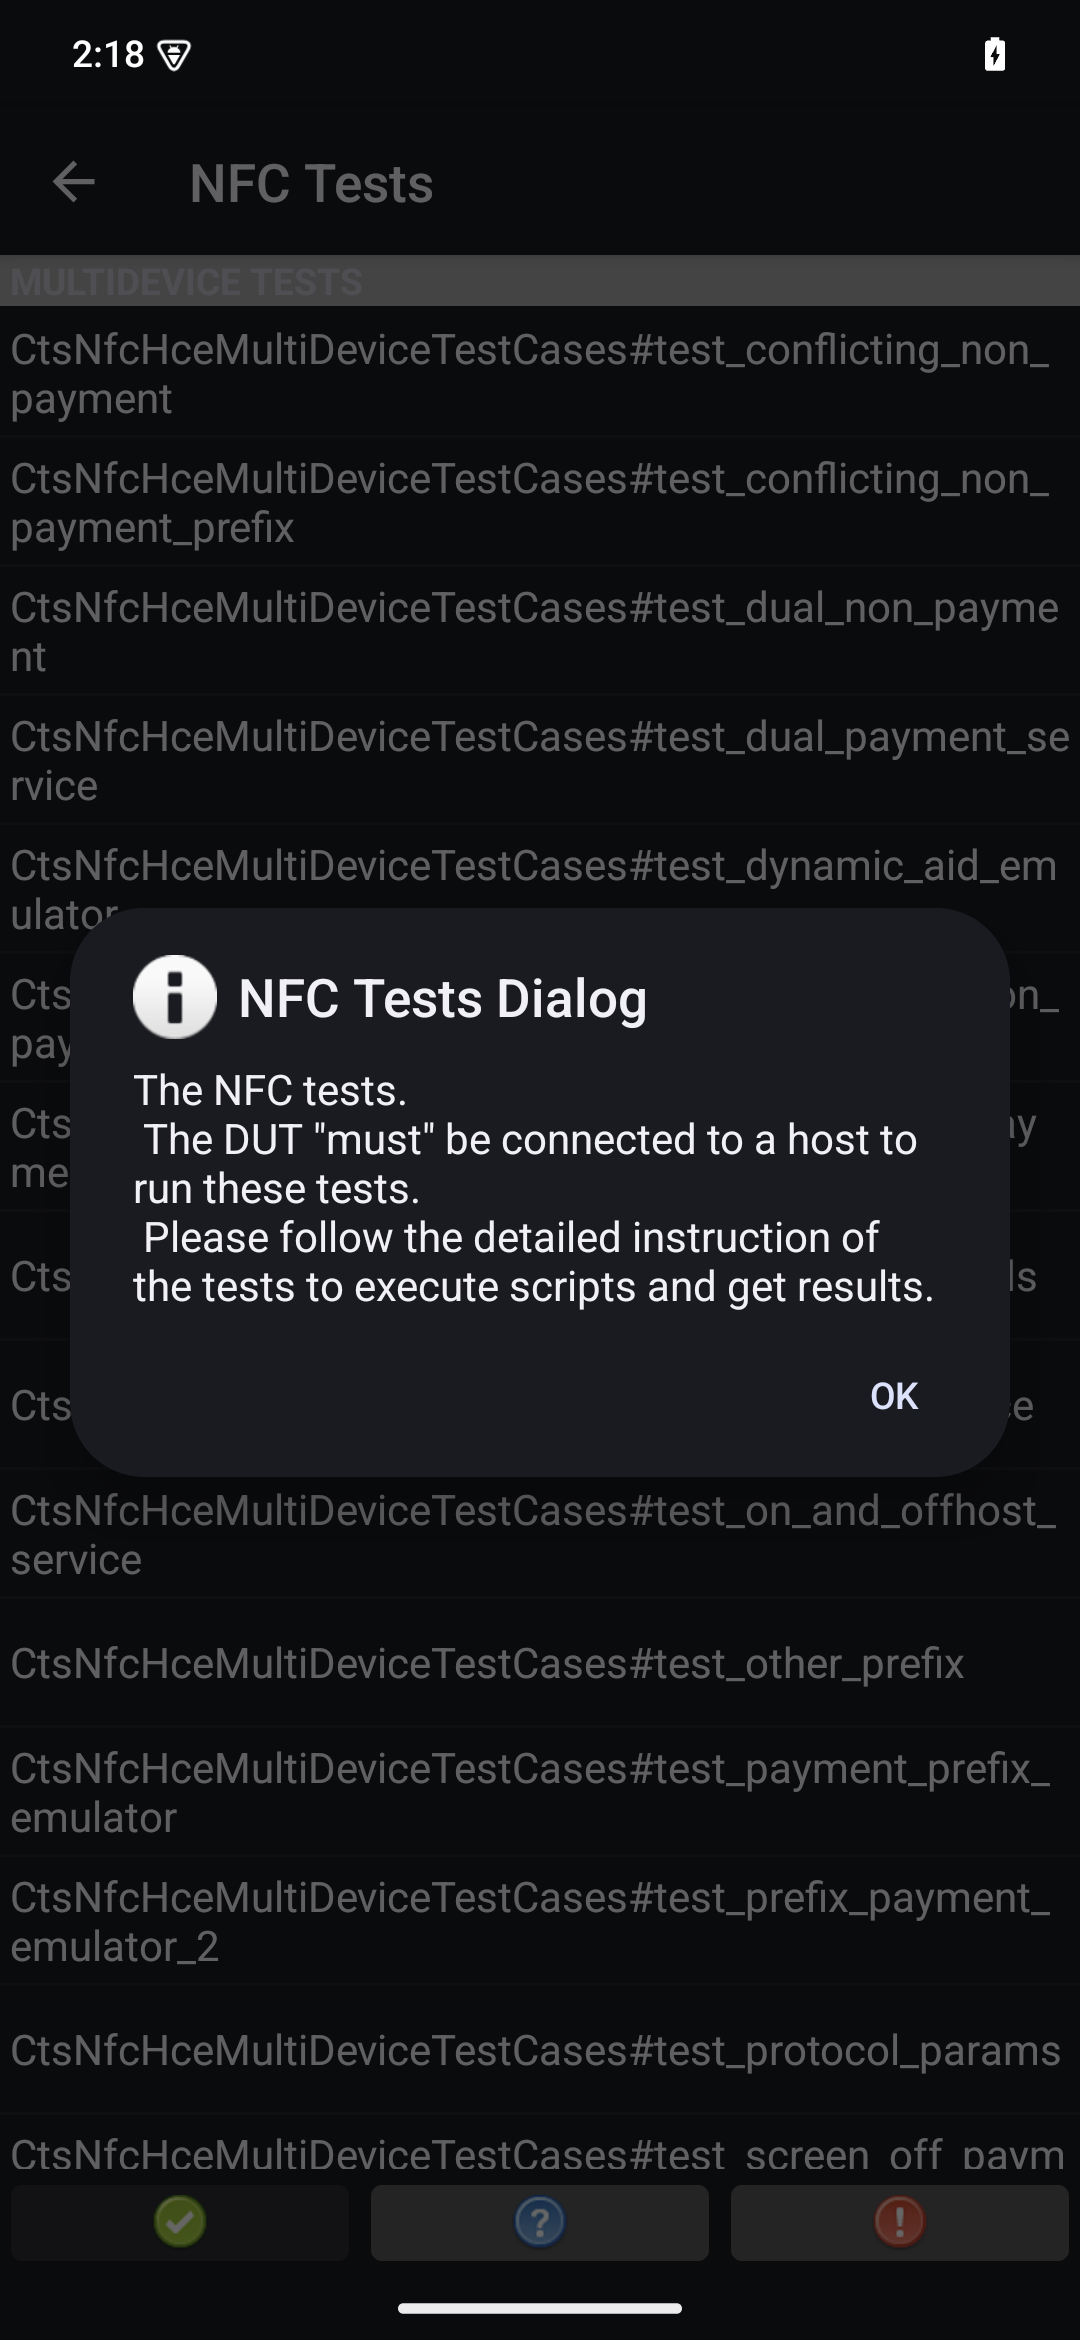
الشكل 3: حالات اختبار تطبيق CTS-V
يمكنك إجراء الاختبارات على المضيف باتّباع الخطوات التالية:
MultiDevice$ python3 tools/run_all_tests.py
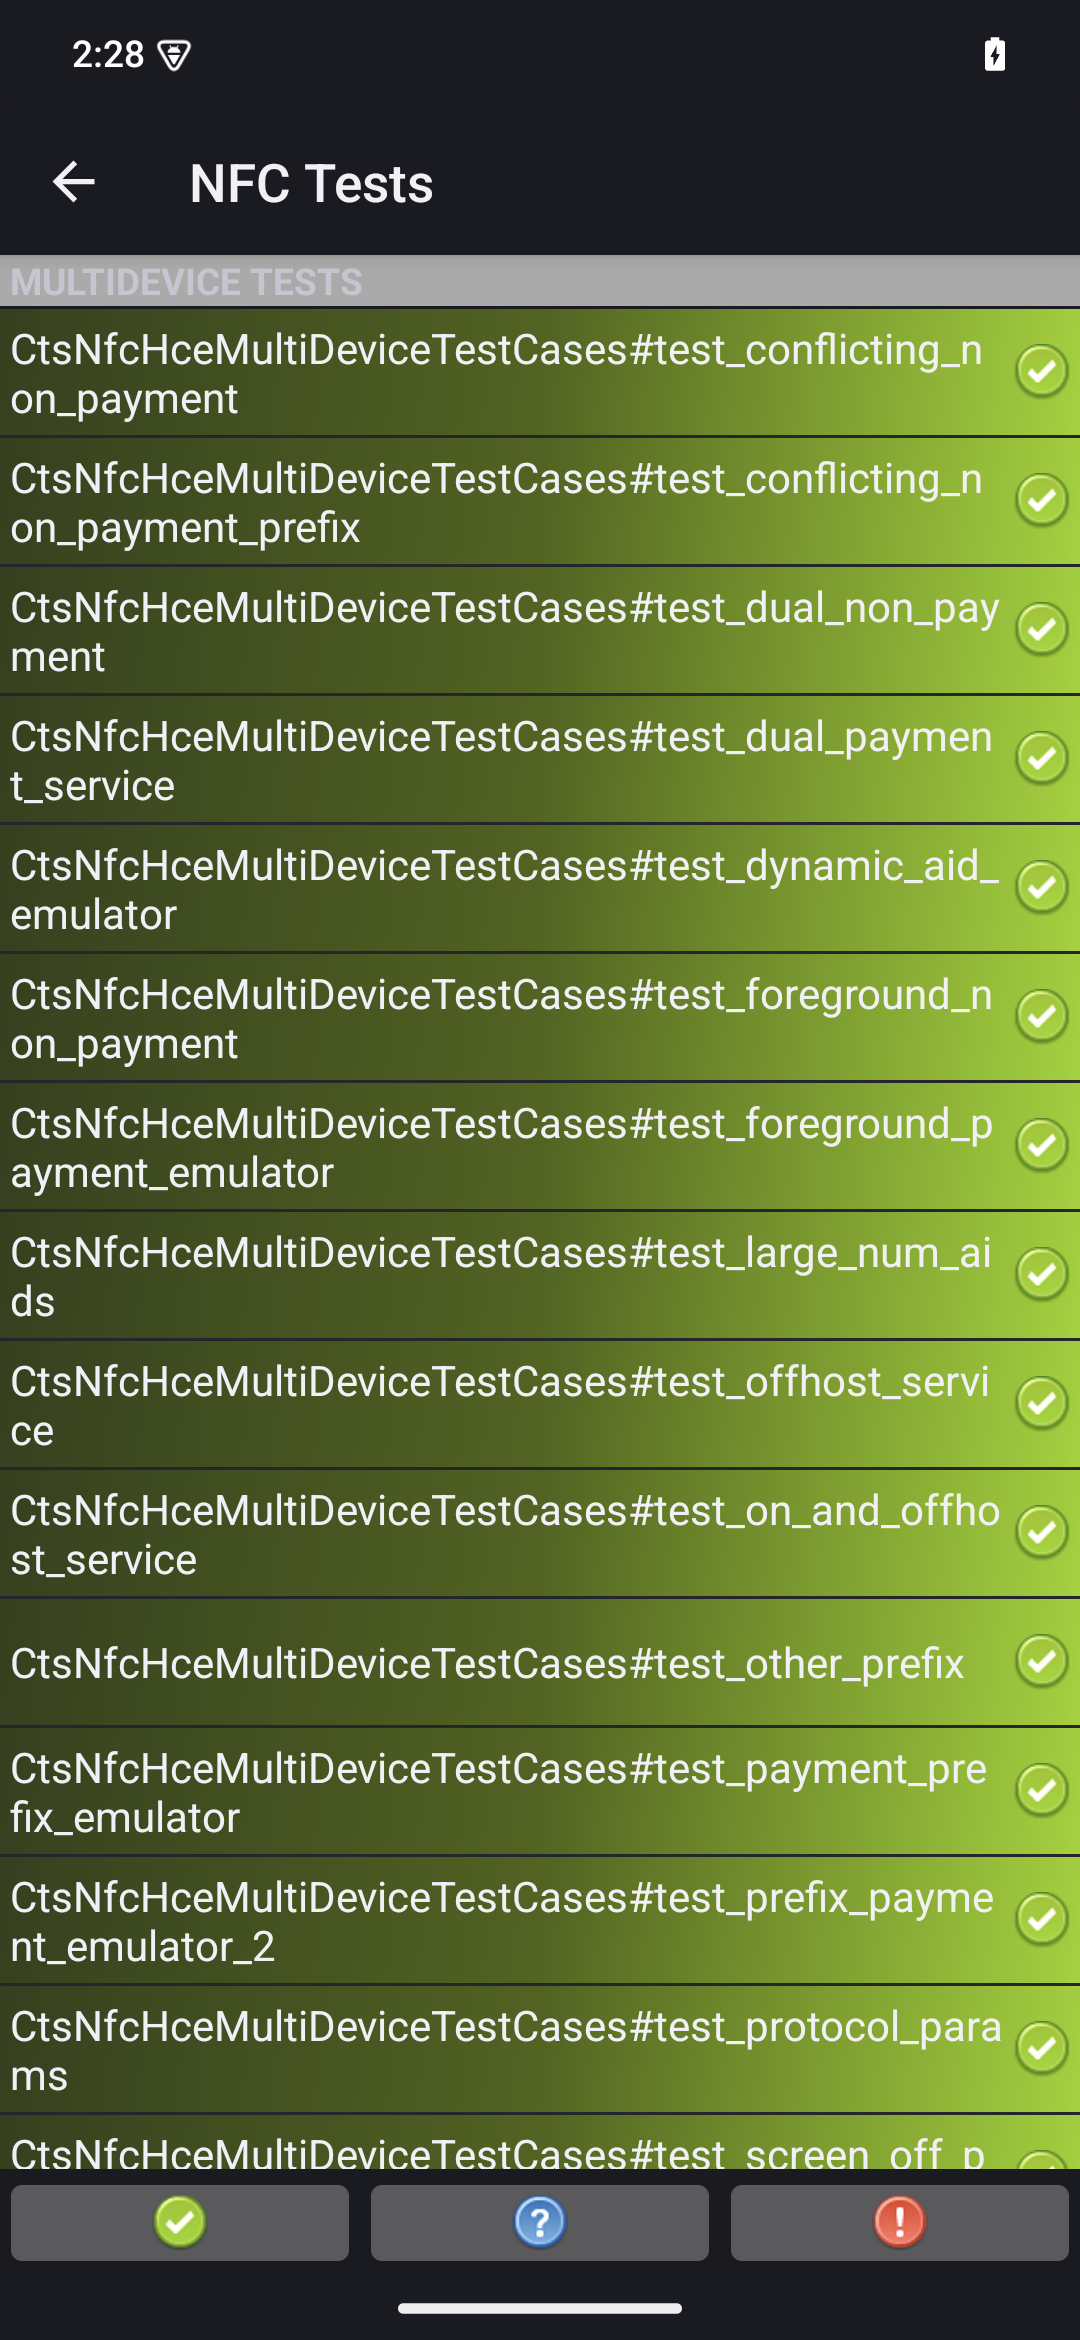
عند اكتمال الاختبارات، يتم تعديل نتائجها في تطبيق CTS-V. تظهر الاختبارات الناجحة باللون الأخضر:
الشكل 4: نتائج اختبار CTS-V
إذا ظهرت لك أيّ أخطاء مميّزة باللون الأحمر، استخدِم الأمر التالي لإعادة تنفيذ
الاختبارات التي تعذّر إكمالها:
python3 tools/run_all_tests.py --test_cases "`TestCaseA`" "`TestCaseB`" --test_files "`TestFileA`"
المكان:
TestCaseA
وTestCaseB
هما اسما حالات الاختبار كما تظهر في CTS-V.
TestFileA
هو ملف الاختبار الذي يحتوي على حالات الاختبار.
مثلاً:
python3 tools/run_all_tests.py --test_cases "test_conflicting_non_payment" "test_conflicting_non_payment_prefix" --test_files "CtsNfcHceMultiDeviceTestCases-py-ctsv"
يخضع كل من المحتوى وعيّنات التعليمات البرمجية في هذه الصفحة للتراخيص الموضحّة في ترخيص استخدام المحتوى. إنّ Java وOpenJDK هما علامتان تجاريتان مسجَّلتان لشركة Oracle و/أو الشركات التابعة لها.
تاريخ التعديل الأخير: 2025-07-27 (حسب التوقيت العالمي المتفَّق عليه)
[[["يسهُل فهم المحتوى.","easyToUnderstand","thumb-up"],["ساعَدني المحتوى في حلّ مشكلتي.","solvedMyProblem","thumb-up"],["غير ذلك","otherUp","thumb-up"]],[["لا يحتوي على المعلومات التي أحتاج إليها.","missingTheInformationINeed","thumb-down"],["الخطوات معقدة للغاية / كثيرة جدًا.","tooComplicatedTooManySteps","thumb-down"],["المحتوى قديم.","outOfDate","thumb-down"],["ثمة مشكلة في الترجمة.","translationIssue","thumb-down"],["مشكلة في العيّنات / التعليمات البرمجية","samplesCodeIssue","thumb-down"],["غير ذلك","otherDown","thumb-down"]],["تاريخ التعديل الأخير: 2025-07-27 (حسب التوقيت العالمي المتفَّق عليه)"],[],[],null,["# Run multi-device NFC tests (Android 15)\n\nThis document explains how to run multi-device NFC tests.\n\nMeet prerequisites\n------------------\n\nBefore you run multi-device NFC tests, do the following:\n\n1. Prepare a device with your Android 15 implementation.\n2. Follow CTS-V [requirements](/docs/compatibility/cts/verifier#requirements).\n3. Follow CTS-V [setup](/docs/compatibility/cts/verifier#setup).\n\nPrepare a DUT and a PN532 NFC reader for the test\n-------------------------------------------------\n\nAfter you finish the previous steps, follow these steps to run\nprepare a DUT and a PN532 NFC reader for the test:\n\n1. Connect the DUT to a host machine over USB.\n2. Grant permissions for the host to access the DUT over ADB.\n3. Install the CTS Verifier app (`CtsVerifier.apk`) on the DUT:\n\n extract root/out/host/linux-x86/cts-verifier/android-cts-verifier.zip\n\n cd android-cts-verifier\n\n adb install -r -g CtsVerifier.apk\n\n4. Install the NFC test required APKs:\n\n cd MultiDevice\n\n adb install -r -g NfcEmulatorTestApp.apk\n\nSet up NFC for the DUT\n----------------------\n\nFollow these steps to run set up NFC for the DUT:\n\n1. On the DUT, go to the **Settings** menu.\n2. Look for the **NFC** or **Connected Devices** section.\n3. Ensure the NFC toggle switch is turned on.\n4. Position an NFC chip on the phone's NFC reader:\n\n 1. Acquire a PN532 NFC chip. We recommend the [All-In-One PN532](https://shop.mtoolstec.com/product/mtools-all-in-one-pn532), non-BLE option.\n 2. Attach the PN532 NFC chip to the Linux host using a USB cable.\n 3. Place the PN532 NFC chip over the phone's NFC reader as shown in the following image:\n\n **Figure 1.** NFC chip placement.\n\nSet up the test environment\n---------------------------\n\nFollow these steps to run set up the test environment:\n\n1. Run these commands to set up the test environment:\n\n cd MultiDevice\n\n source build/envsetup.sh\n\n This command checks the Python and sets up the `PYTHONPATH` environment\n variable. If no errors are printed to the terminal, the environment is ready\n to run the multi-device tests.\n\n If you see the error message `libtinfo.so.6: no version information\n available (required by /bin/sh)` at runtime, run the following command\n to rename the `libtinfo.so.6` file: \n\n mv $ENV_DIRECTORY/lib/libtinfo.so.6 $ENV_DIRECTORY/lib/libtinfo.so.6.bak\n\n2. Set up the test bed by setting the device serial IDs of the DUT and PN532 NFC\n reader in `MultiDevice/config.yml`:\n\n TestBeds:\n - Name: CtsNfcHceMultiDeviceTestCases-py-ctsv\n Controllers:\n AndroidDevice:\n - serial: \"\u003cdevice-id\u003e\"\n TestParams:\n pn532_serial_path: \"\u003cpn532-serial-path\u003e\"\n\nRun the NFC tests\n-----------------\n\nTo run the NFC tests:\n\n1. Open the CTS-V app and tap **NFC Tests**:\n\n **Figure 2.** The CTS-V app.\n\n The info window with list of test cases appears:\n\n **Figure 3.** CTS-V app test cases.\n2. Run the tests on your host:\n\n MultiDevice$ python3 tools/run_all_tests.py\n\n When the tests are completed, the test results are updated in the CTS-V\n app. Successful tests are green:\n\n **Figure 4.** CTS-V test results.\n3. If you see any failures marked in red, use the following command to rerun\n the failed tests:\n\n python3 tools/run_all_tests.py --test_cases \"`\u003cvar translate=\"no\"\u003eTestCaseA\u003c/var\u003e`\" \"`\u003cvar translate=\"no\"\u003eTestCaseB\u003c/var\u003e`\" --test_files \"`\u003cvar translate=\"no\"\u003eTestFileA\u003c/var\u003e`\"\n\n Where:\n - \u003cvar translate=\"no\"\u003eTestCaseA\u003c/var\u003e and \u003cvar translate=\"no\"\u003eTestCaseB\u003c/var\u003e are the names of the test cases as displayed in CTS-V.\n - \u003cvar translate=\"no\"\u003eTestFileA\u003c/var\u003e is the test file containing the test cases.\n\n For example: \n\n python3 tools/run_all_tests.py --test_cases \"test_conflicting_non_payment\" \"test_conflicting_non_payment_prefix\" --test_files \"CtsNfcHceMultiDeviceTestCases-py-ctsv\""]]