
Nesta página, descrevemos como implementar um AppCard.
Etapa 1: adicionar todas as importações
Para adicionar as importações:
static_libs: [
     …
     "car-app-card",
],
Etapa 2: adicionar SimpleAppCardContentProvider ao manifesto
Substitua
android:authorities(em negrito) pelo nome do seu pacote.<!-- App Card Content Provider that is required to communicate relevant App Cards with the system android.car.permission.BIND_APP_CARD_PROVIDER is an essential permission that will only allow the system to communicate with the AppCardContentProvider The content provider must also be exported and enabled --> <provider android:name=".SimpleAppCardContentProvider" android:authorities="com.example.appcard.sample" android:permission="@string/host_permission" android:exported="true" android:enabled="true"> <intent-filter> <!-- This intent filter will allow the system to find and connect with the application's AppCardContentProvider --> <action android:name="com.android.car.appcard.APP_CARD_PROVIDER" /> </intent-filter> </provider>
Etapa 3: adicionar SimpleAppCardContentProvider ao manifesto
Para adicionar
SimpleAppCardContentProviderao manifesto:class SimpleAppCardContentProvider : AppCardContentProvider() { /** Must return same authority as defined in manifest */ override val authority: String = AUTHORITY /** Setup [AppCardContentProvider] and its constituents */ override fun onCreate(): Boolean { return super.onCreate() } /** Setup an [AppCard] that is being requested */ override fun onAppCardAdded(id: String, ctx: AppCardContext): AppCard { return when (id) { APPCARD_ID -> //TODO: create app card else -> throw IllegalStateException("Unidentified app card ID: $id") } } /** List of supported [AppCard] IDs */ override val appCardIds: List<String> = listOf(APPCARD_ID).toMutableList() /** Clean up when an [AppCard] is removed */ override fun onAppCardRemoved(id: String) { when (id) { APPCARD_ID -> //TODO: create app card } } /** Handle an [AppCardContext] change for a particular [AppCard] ID */ override fun onAppCardContextChanged( id: String, appCardContext: AppCardContext ) { when (id) { APPCARD_ID -> //TODO: update AppCardContext } } companion object { private const val AUTHORITY = "com.example.appcard.sample" private const val APPCARD_ID = "sampleAppCard" } }
Etapa 4: criar um AppCard
Para criar um AppCard:
override fun onAppCardAdded(id: String, ctx: AppCardContext): AppCard {
  return when (id) {
    APPCARD_ID -> createAppCard(ctx)

    else -> throw IllegalStateException("Unidentified app card ID: $id")
  }
}

private fun createAppCard(appCardContext: AppCardContext): ImageAppCard {
  return ImageAppCard.newBuilder(APPCARD_ID)
    .setPrimaryText("Hello")
    .setSecondaryText("World")
    .setHeader(
      Header.newBuilder("header")
        .setTitle("Code Lab")
        .build()
    )
    .addButton(
      Button.newBuilder(
        "button",
        Button.ButtonType.PRIMARY,
        object : OnClickListener {
          override fun onClick() {
            //no-op
          }
        }
      )
        .setText("Click me!")
        .build()
    )
   .build()
}
Exemplo:
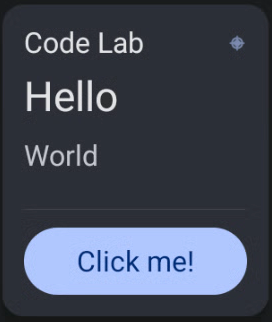
Figura 1. Crie um AppCard.
Etapa 5: ativar o clicker de botões
Para ativar o clicker:
   private var clickCounter = 0

   private fun createAppCard(appCardContext: AppCardContext): ImageAppCard {
      ...
       .addButton(
        Button.newBuilder(
          "button",
           Button.ButtonType.PRIMARY,
           object : OnClickListener {
             override fun onClick() {
               clickCounter++
               sendAppCardUpdate(createAppCard(appCardContext))
             }
           }
         )
           .setText(
             if (clickCounter == 0) "Click me!" else "Clicked: $clickCounter"
           )
           .build()
         )
      ...
    }

    override fun onAppCardRemoved(id: String) {
      when (id) {
        APPCARD_ID -> clickCounter = 0
      }
    }
Exemplo:
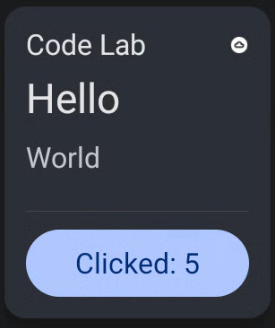
Figura 2. Ative o clicker de botões.
Etapa 6: atualizar a imagem do cabeçalho
Para atualizar a imagem no cabeçalho:
private fun createAppCard(appCardContext: AppCardContext): ImageAppCard { val headerImageSize = appCardContext.imageAppCardContext.getMaxImageSize(Header::class.java) val logo = resToBitmap( android.R.drawable.ic_menu_compass, headerImageSize.width, headerImageSize.height ) ... .setHeader( Header.newBuilder("header") .setTitle("Code Lab") .setImage( Image.newBuilder("image") .setContentScale(Image.ContentScale.FILL_BOUNDS) .setColorFilter(Image.ColorFilter.TINT) .setImageData(logo) .build() ) .build() ) ... } private fun resToBitmap(res: Int, width: Int, height: Int): Bitmap { val drawable = context?.getDrawable(res) return drawableToBitmap(drawable!!, width, height) } private fun drawableToBitmap(d: Drawable, width: Int, height: Int): Bitmap { val bitmap = Bitmap.createBitmap(width, height, Bitmap.Config.ARGB_8888) val canvas = Canvas(bitmap) val left = 0 val top = 0 d.setBounds(left, top, canvas.width, canvas.height) d.draw(canvas) return bitmap } ``` For example:  **Figure 3.** Change the name to the header.Repita esse processo para adicionar uma imagem a qualquer componente que a aceite.
Etapa 7: adicionar mais interações
Para criar uma barra de progresso com controles:
 private var progressOn = false

 private var progressTimer: Timer? = null

 private var progressCounter = 0

 override fun onAppCardRemoved(id: String) {
   when (id) {
     APPCARD_ID -> {
       clickCounter = 0
       progressCounter = 0
       progressTimer?.cancel()
     }
   }
 }

 private fun createAppCard(appCardContext: AppCardContext): ImageAppCard {
   val buttonImageSize = appCardContext.imageAppCardContext.getMaxImageSize(Button::class.java)
   val progressPlayPauseImage = resToBitmap(
     if (progressOn) {
       android.R.drawable.ic_media_pause
     } else {
       android.R.drawable.ic_media_play
     },
     buttonImageSize.width,
     buttonImageSize.height
   )
   ...
     .setProgressBar(
       createProgressBar()
     )
     .addButton(
       Button.newBuilder(
         "progressButton",
         Button.ButtonType.NO_BACKGROUND,
         object : OnClickListener {
           override fun onClick() {
             progressOn = !progressOn
             if (progressOn) {
               progressTimer = Timer()
               progressTimer?.scheduleAtFixedRate(object : TimerTask() {
                 override fun run() {
                 progressCounter++
                 if (progressCounter > 60) progressCounter = 0
                 sendAppCardComponentUpdate(APPCARD_ID, createProgressBar())
               }
             }, SECONDS_TO_MS, SECONDS_TO_MS)
           } else {
             progressTimer?.cancel()
             progressTimer = null
           }
           sendAppCardUpdate(createAppCard(appCardContext))
         }
       }
     )
       .setImage(
         Image.newBuilder("buttonImage")
           .setContentScale(Image.ContentScale.FILL_BOUNDS)
           .setColorFilter(Image.ColorFilter.TINT)
           .setImageData(progressPlayPauseImage)
           .build()
       )
       .build()
   )
 ...
 }

 private fun createProgressBar(): ProgressBar {
   return ProgressBar.newBuilder(PROGRESS_BAR_ID, 0, 60)
     .setProgress(progressCounter)
     .build()
 }

 companion object {
   ...
   private const val PROGRESS_BAR_ID = "progress"
   private const val SECONDS_TO_MS = 1000L
 }
Adicionamos um botão Reproduzir ou pausar à barra de progresso que pode ser atualizada a cada segundo. Devido a restrições de tamanho, consulte setText no botão de clique
adicionado para refletir a contagem de cliques, .setText("$clickCounter")

Figura 4. Adicione um botão. |
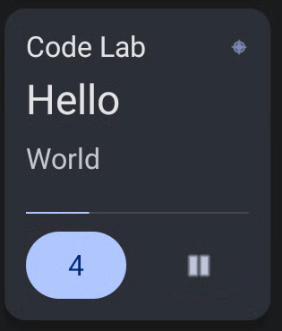
Figura 5. Botão renderizado. |
Etapa 8: iniciar a atividade
Desde que o app esteja em conformidade com
background-starts#exceptions, você poderá iniciar uma atividade doonClickListenerdo botão.class SampleRoutingActivity : AppCompatActivity() { override fun onStart() { super.onStart() val intent = Intent(ACTION_LOCATION_SOURCE_SETTINGS).apply { setFlags(FLAG_ACTIVITY_CLEAR_TOP) } startActivity(intent) finish() } }Para iniciar a atividade, adicione um botão no AppCard. Se não houver nenhuma, adicione uma atividade de roteamento ao seu app:
override fun onStart() {
super.onStart()
val intent = Intent(ACTION_LOCATION_SOURCE_SETTINGS).apply {
  setFlags(FLAG_ACTIVITY_CLEAR_TOP)
}
startActivity(intent)
finish()
 }
}
Quando a classe é chamada, o usuário é redirecionado para as configurações de Localização.
setFlags(FLAG_ACTIVITY_CLEAR_TOP)é aplicado para garantir que o usuário não possa voltar à atividade original.Adicione um botão no AppCard para iniciar a atividade:
 private fun createAppCard(appCardContext: AppCardContext): ImageAppCard {
   val locationImage = resToBitmap(
     android.R.drawable.ic_menu_call,
     buttonImageSize.width,
     buttonImageSize.height
   )
   ...
     .addButton(
       Button.newBuilder(
        "activityButton",
        Button.ButtonType.SECONDARY,
        object : OnClickListener {
          override fun onClick() {
            // no-op
          }
        }
       )
        .setImage(
          Image.newBuilder("locationButtonImage")
            .setContentScale(Image.ContentScale.FILL_BOUNDS)
            .setColorFilter(Image.ColorFilter.TINT)
            .setImageData(locationImage)
            .build()
        )
        .setIntent(
          RoutingActivityIntent
            .newBuilder("com.example.appcard.sample.SampleRoutingActivity")
            .build()
        )
        .build()
      )
    ...
}
Devido a restrições de espaço, o botão do clicker foi removido no host AppCard. O AppCard aparece da seguinte maneira:
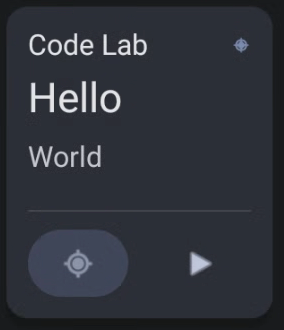
Figura 6. AppCard sem botão de clique.