Kể từ ngày 27 tháng 3 năm 2025, bạn nên sử dụng android-latest-release
thay vì aosp-main
để xây dựng và đóng góp cho AOSP. Để biết thêm thông tin, hãy xem phần Thay đổi đối với AOSP.
Chạy kiểm thử NFC trên nhiều thiết bị (Android 15)
Sử dụng bộ sưu tập để sắp xếp ngăn nắp các trang
Lưu và phân loại nội dung dựa trên lựa chọn ưu tiên của bạn.
Tài liệu này giải thích cách chạy kiểm thử NFC trên nhiều thiết bị.
Đáp ứng các điều kiện tiên quyết
Trước khi chạy kiểm thử NFC trên nhiều thiết bị, hãy làm như sau:
- Chuẩn bị một thiết bị để triển khai Android 15.
- Tuân thủ các yêu cầu của CTS-V.
- Làm theo quy trình thiết lập CTS-V.
Chuẩn bị DUT và máy đọc NFC PN532 cho kiểm thử
Sau khi hoàn tất các bước trước, hãy làm theo các bước sau để chạy
chuẩn bị DUT và trình đọc NFC PN532 cho kiểm thử:
- Kết nối DUT với máy chủ qua USB.
- Cấp quyền cho máy chủ truy cập vào DUT qua ADB.
Cài đặt ứng dụng Trình xác minh CTS (CtsVerifier.apk
) trên thiết bị được kiểm thử (DUT):
extract root/out/host/linux-x86/cts-verifier/android-cts-verifier.zip
cd android-cts-verifier
adb install -r -g CtsVerifier.apk
Cài đặt các tệp APK cần thiết cho kiểm thử NFC:
cd MultiDevice
adb install -r -g NfcEmulatorTestApp.apk
Thiết lập NFC cho thiết bị dùng thử
Hãy làm theo các bước sau để chạy quy trình thiết lập NFC cho thiết bị được kiểm thử (DUT):
- Trên thiết bị được kiểm thử (DUT), hãy chuyển đến trình đơn Cài đặt.
- Tìm phần NFC hoặc Thiết bị đã kết nối.
- Đảm bảo bạn đã bật nút bật/tắt NFC.
Đặt chip NFC trên đầu đọc NFC của điện thoại:
- Mua một chip NFC PN532. Bạn nên sử dụng tuỳ chọn All-In-One PN532 (Tất cả trong một PN532) không phải BLE.
- Gắn chip NFC PN532 vào máy chủ Linux bằng cáp USB.
- Đặt chip NFC PN532 lên đầu đọc NFC của điện thoại như trong hình sau:
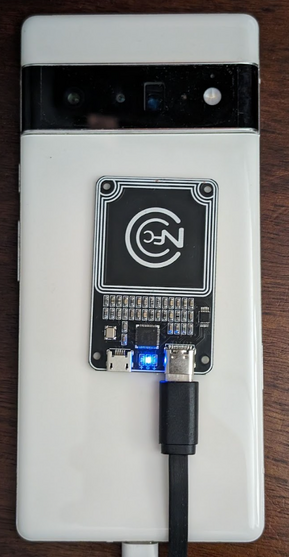
Hình 1. Vị trí đặt chip NFC.
Thiết lập môi trường kiểm thử
Hãy làm theo các bước sau để thiết lập môi trường thử nghiệm:
Chạy các lệnh sau để thiết lập môi trường kiểm thử:
cd MultiDevice
source build/envsetup.sh
Lệnh này kiểm tra Python và thiết lập biến môi trường PYTHONPATH
. Nếu không có lỗi nào được in ra thiết bị đầu cuối, thì môi trường đã sẵn sàng để chạy các chương trình kiểm thử nhiều thiết bị.
Nếu bạn thấy thông báo lỗi libtinfo.so.6: no version information
available (required by /bin/sh)
trong thời gian chạy, hãy chạy lệnh sau để đổi tên tệp libtinfo.so.6
:
mv $ENV_DIRECTORY/lib/libtinfo.so.6 $ENV_DIRECTORY/lib/libtinfo.so.6.bak
Thiết lập môi trường thử nghiệm bằng cách đặt mã nhận dạng thiết bị của DUT và đầu đọc NFC PN532 trong MultiDevice/config.yml
:
TestBeds:
- Name: CtsNfcHceMultiDeviceTestCases-py-ctsv
Controllers:
AndroidDevice:
- serial: "<device-id>"
TestParams:
pn532_serial_path: "<pn532-serial-path>"
Chạy kiểm thử NFC
Cách chạy kiểm thử NFC:
Mở ứng dụng CTS-V rồi nhấn vào NFC Tests (Kiểm thử NFC):
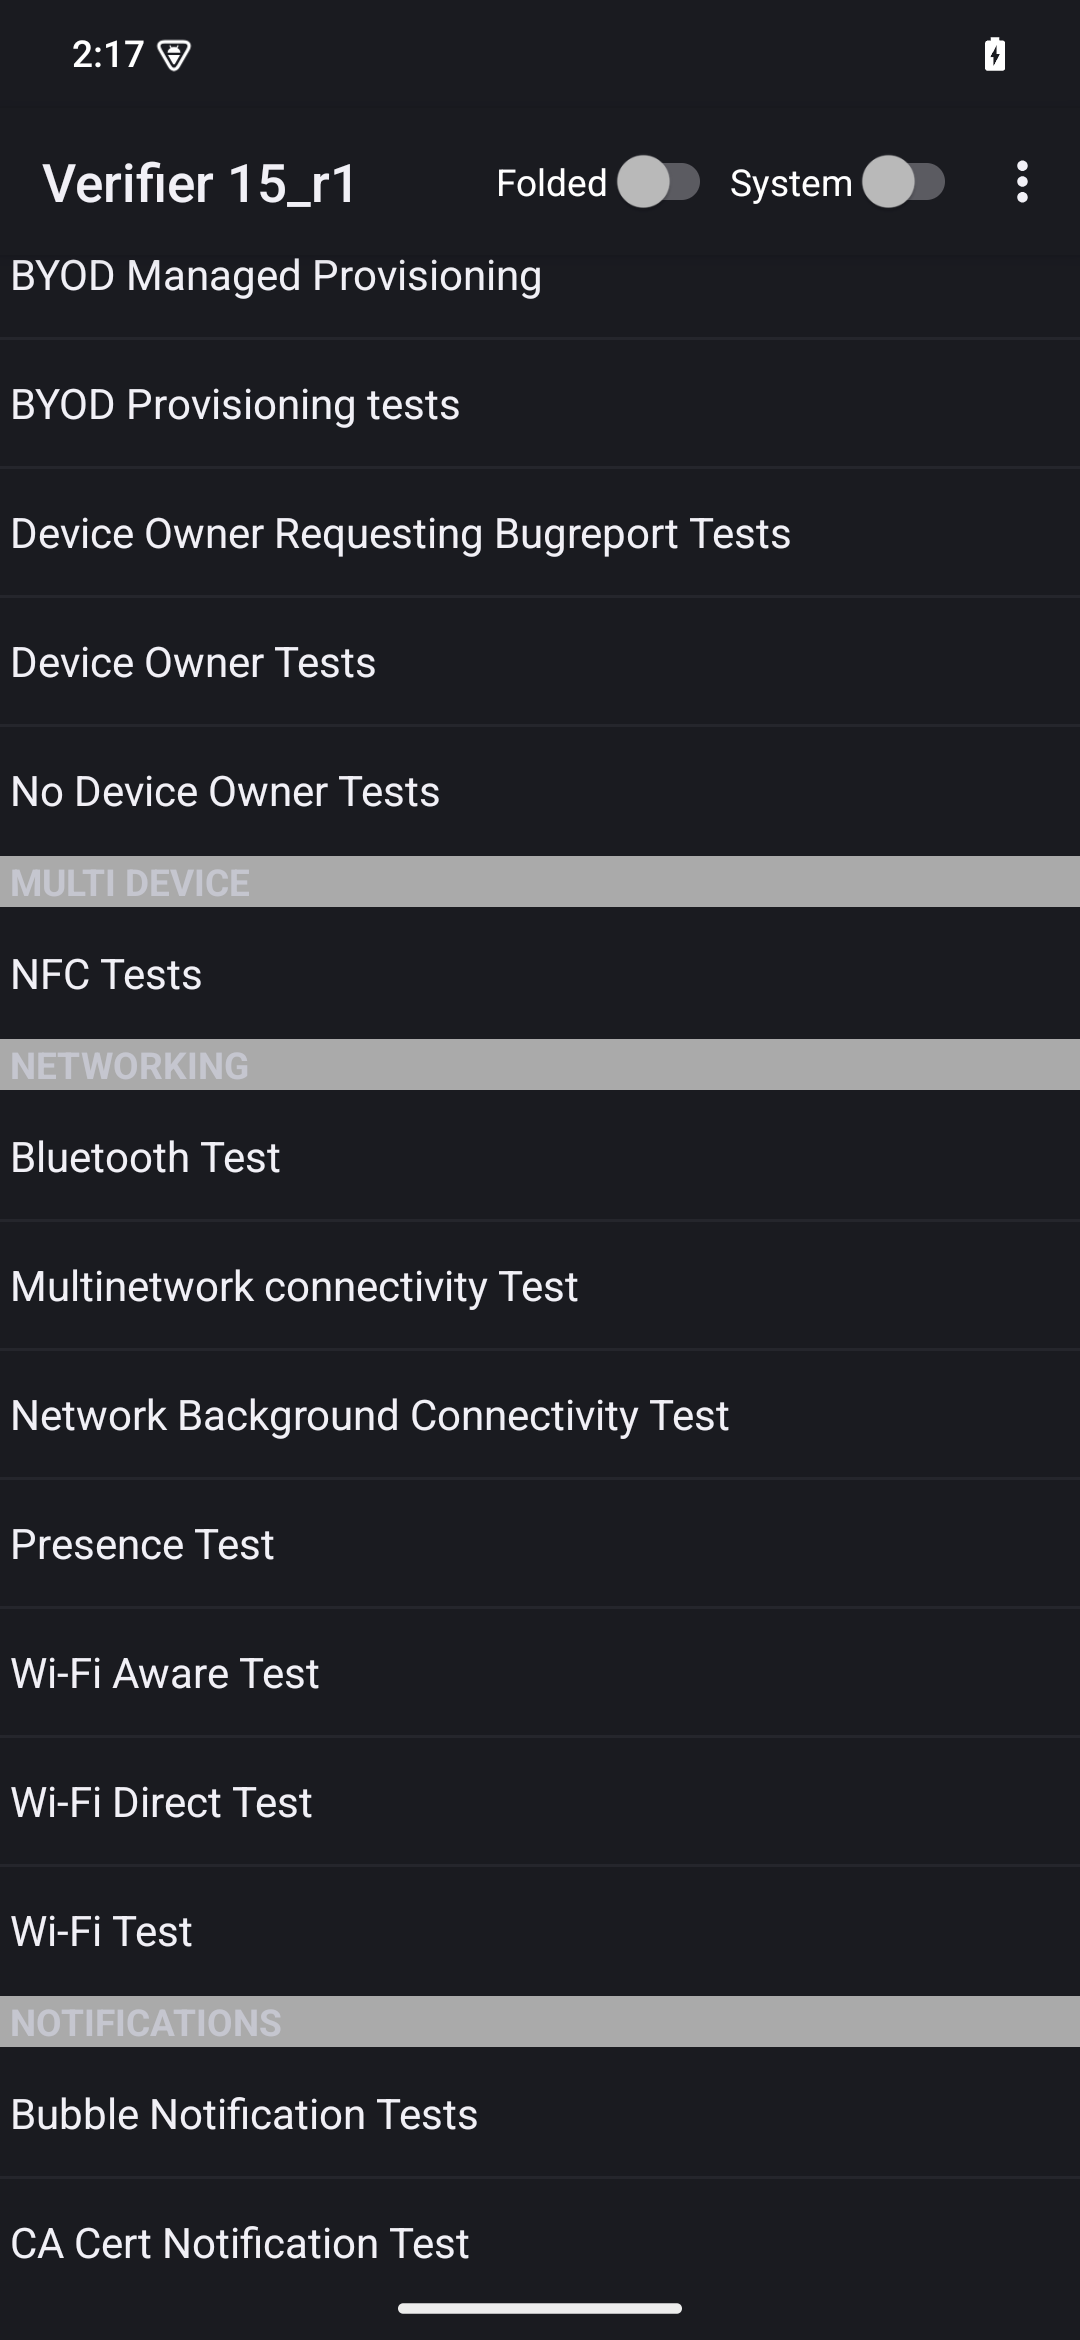
Hình 2. Ứng dụng CTS-V.
Cửa sổ thông tin có danh sách các trường hợp kiểm thử sẽ xuất hiện:
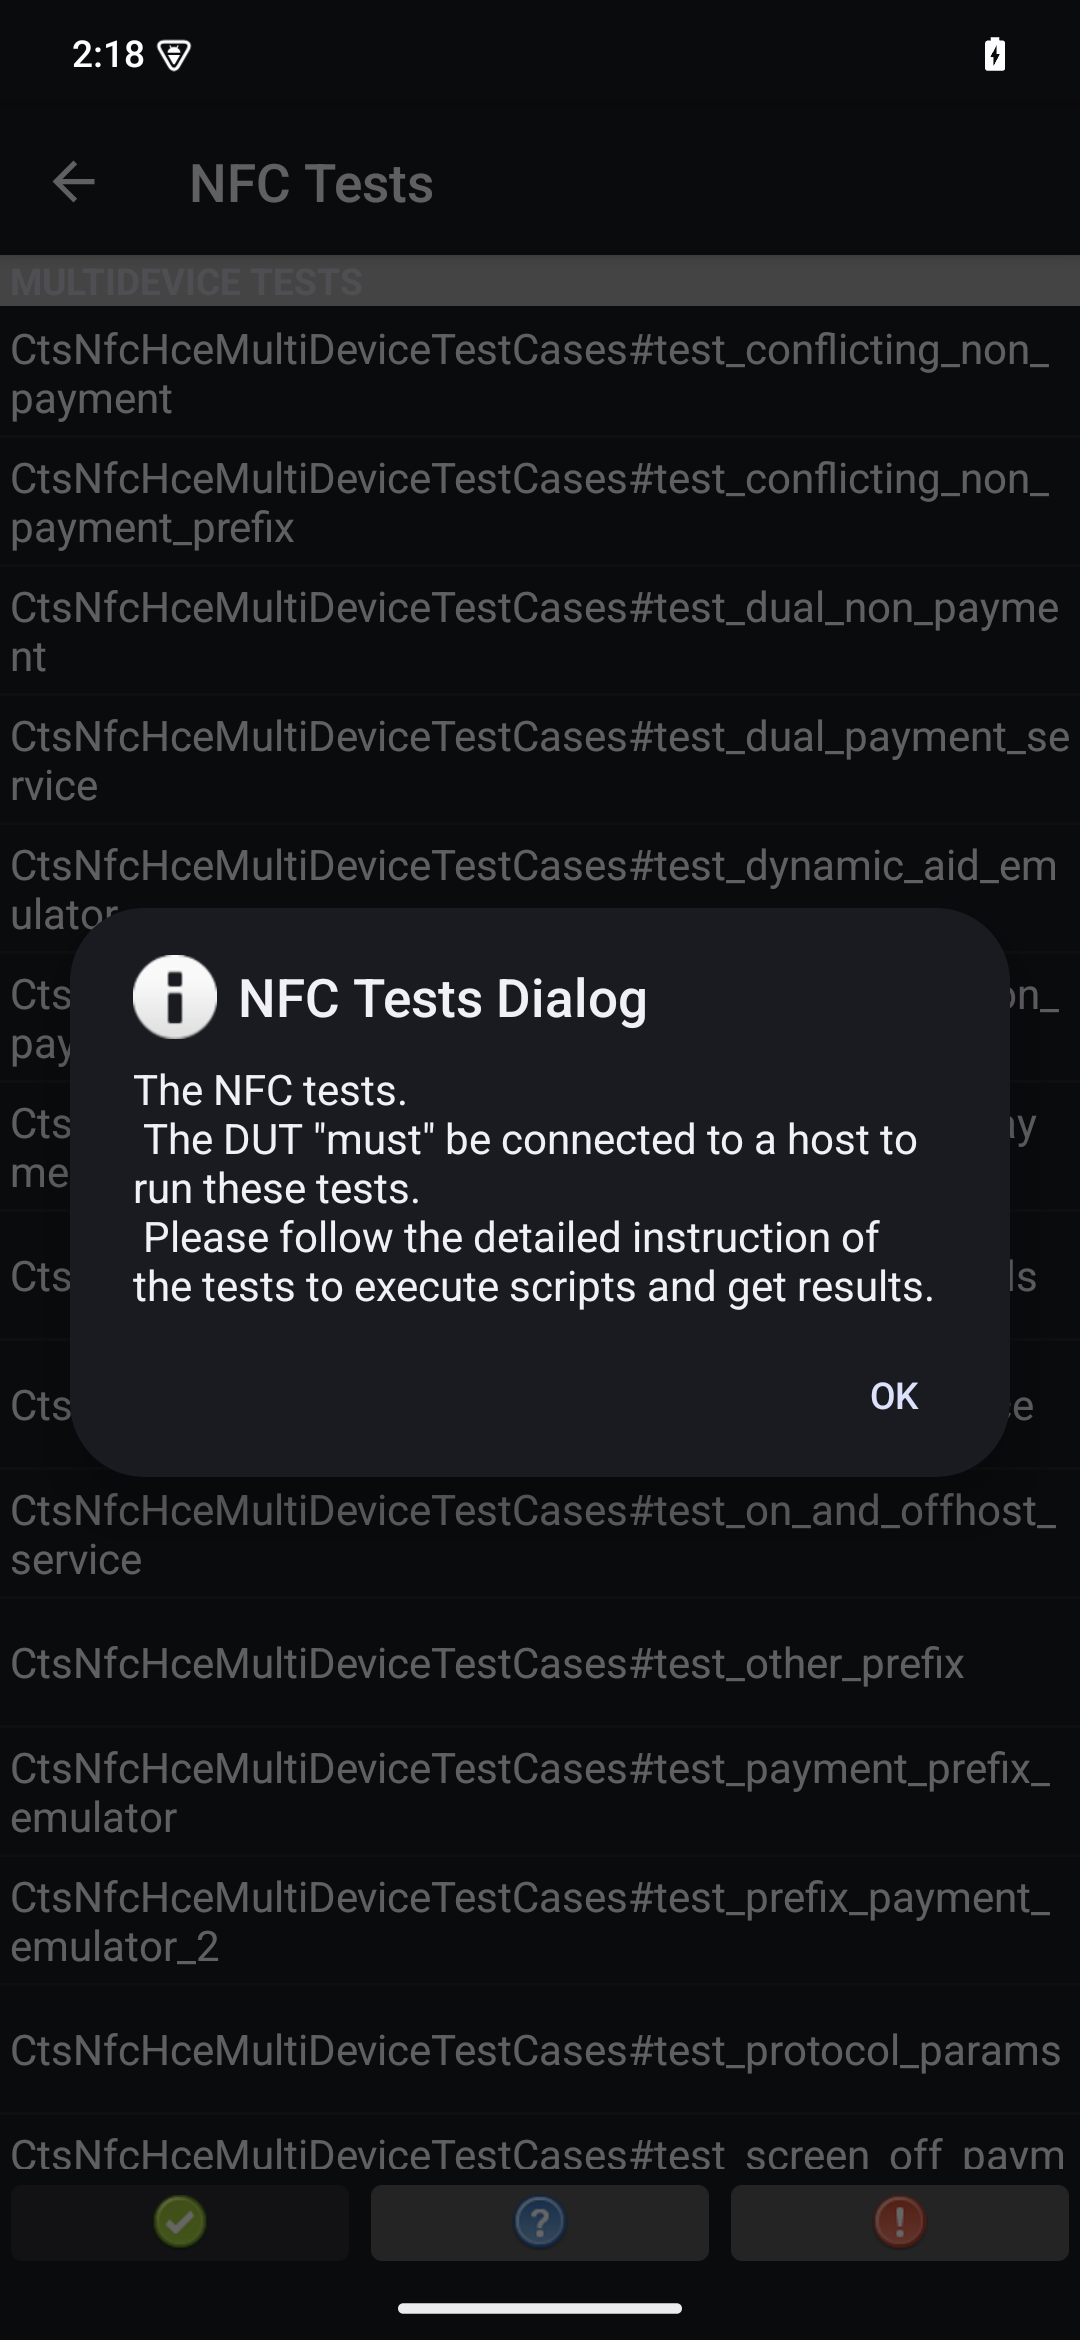
Hình 3. Các trường hợp kiểm thử ứng dụng CTS-V.
Chạy các chương trình kiểm thử trên máy chủ:
MultiDevice$ python3 tools/run_all_tests.py
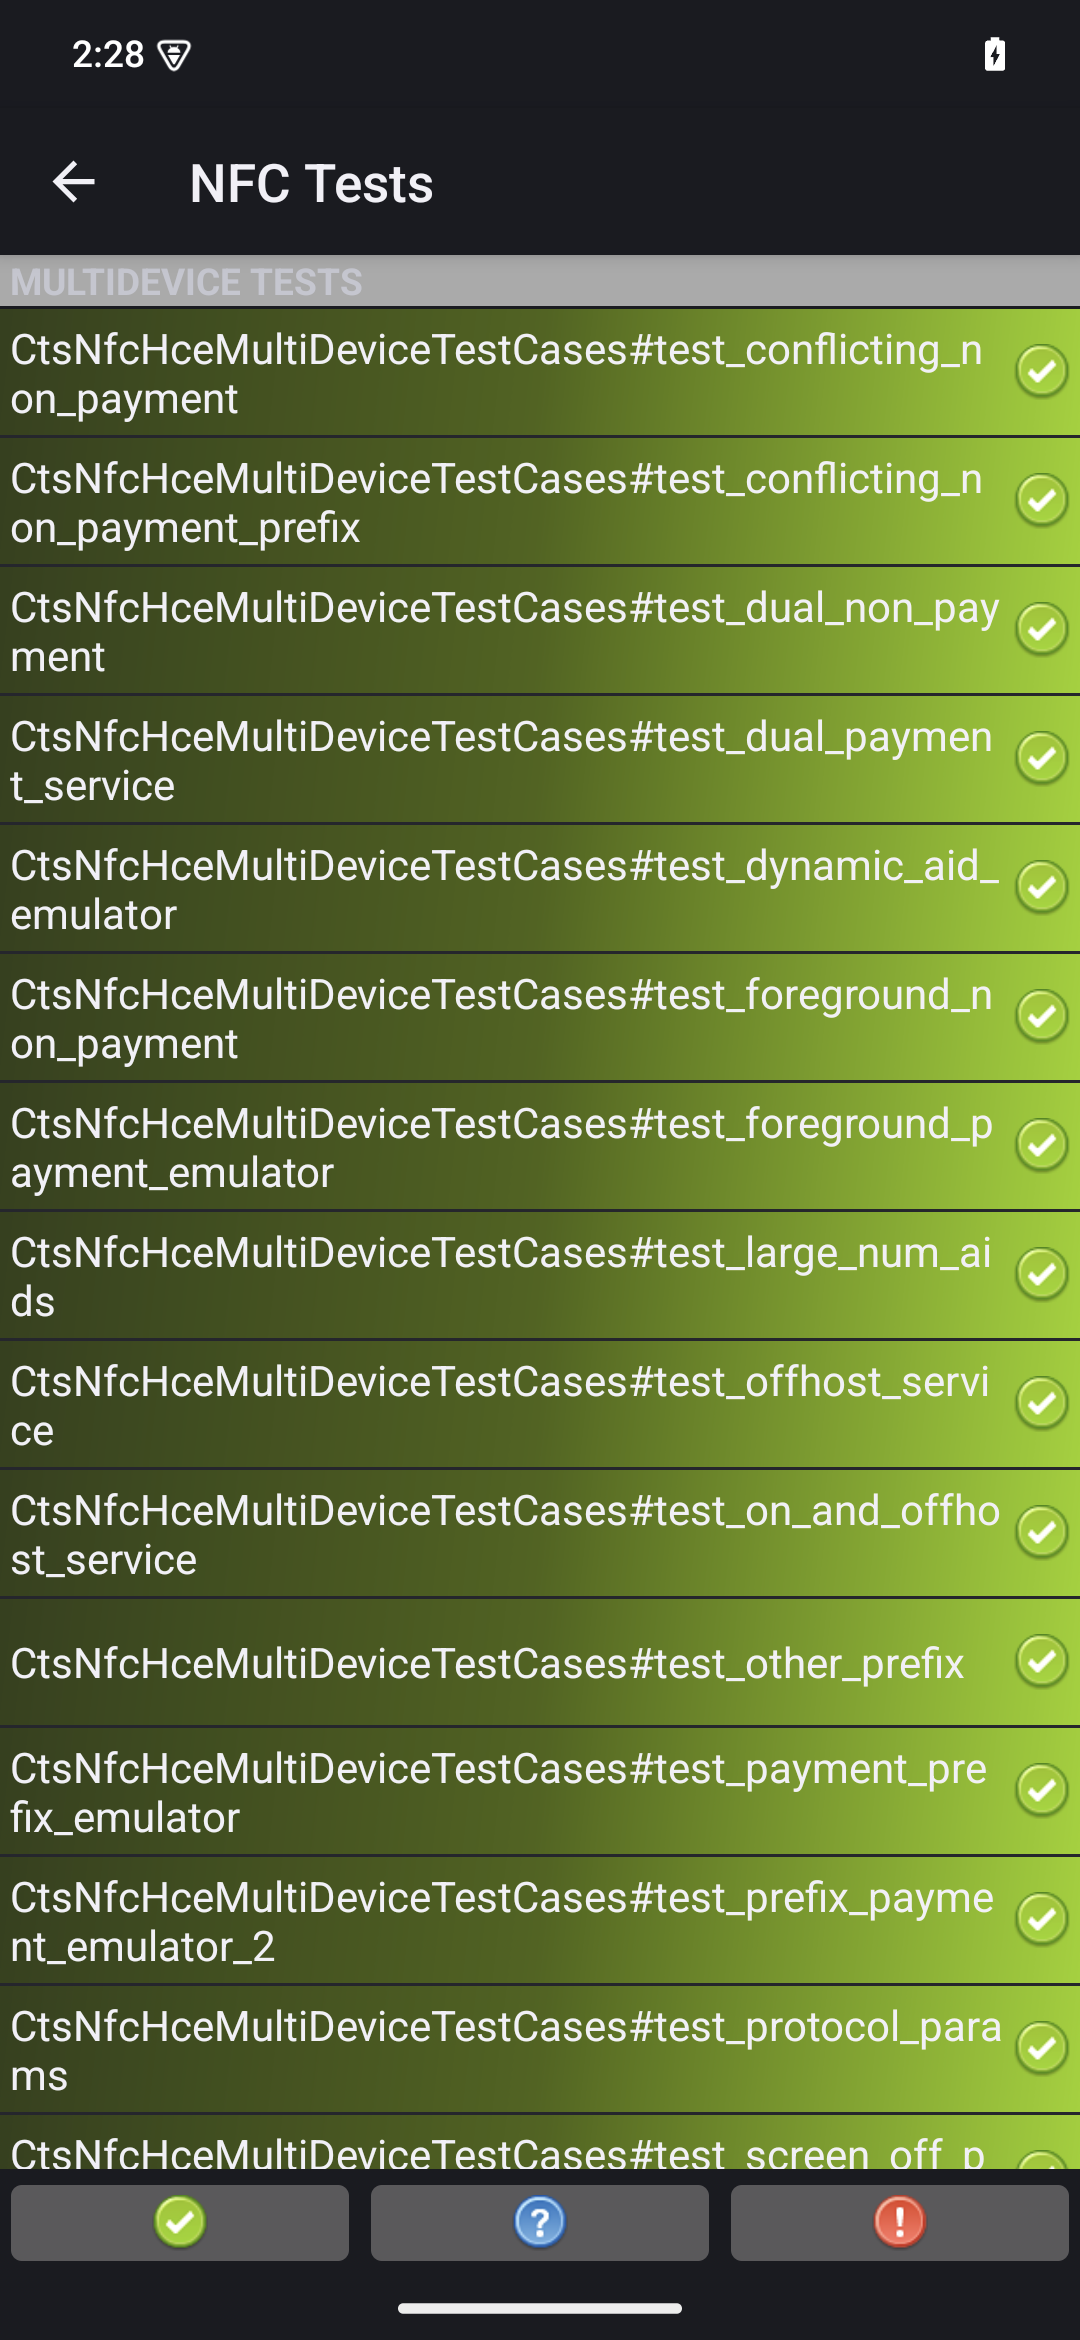
Khi kiểm thử hoàn tất, kết quả kiểm thử sẽ được cập nhật trong ứng dụng CTS-V. Các kiểm thử thành công sẽ có màu xanh lục:
Hình 4. Kết quả kiểm thử CTS-V.
Nếu bạn thấy bất kỳ lỗi nào được đánh dấu bằng màu đỏ, hãy sử dụng lệnh sau để chạy lại các bài kiểm thử không thành công:
python3 tools/run_all_tests.py --test_cases "`TestCaseA`" "`TestCaseB`" --test_files "`TestFileA`"
Trong trường hợp:
TestCaseA
và TestCaseB
là tên của các trường hợp kiểm thử như hiển thị trong CTS-V.
TestFileA
là tệp kiểm thử chứa các trường hợp kiểm thử.
Ví dụ:
python3 tools/run_all_tests.py --test_cases "test_conflicting_non_payment" "test_conflicting_non_payment_prefix" --test_files "CtsNfcHceMultiDeviceTestCases-py-ctsv"
Nội dung và mã mẫu trên trang này phải tuân thủ các giấy phép như mô tả trong phần Giấy phép nội dung. Java và OpenJDK là nhãn hiệu hoặc nhãn hiệu đã đăng ký của Oracle và/hoặc đơn vị liên kết của Oracle.
Cập nhật lần gần đây nhất: 2025-07-27 UTC.
[[["Dễ hiểu","easyToUnderstand","thumb-up"],["Giúp tôi giải quyết được vấn đề","solvedMyProblem","thumb-up"],["Khác","otherUp","thumb-up"]],[["Thiếu thông tin tôi cần","missingTheInformationINeed","thumb-down"],["Quá phức tạp/quá nhiều bước","tooComplicatedTooManySteps","thumb-down"],["Đã lỗi thời","outOfDate","thumb-down"],["Vấn đề về bản dịch","translationIssue","thumb-down"],["Vấn đề về mẫu/mã","samplesCodeIssue","thumb-down"],["Khác","otherDown","thumb-down"]],["Cập nhật lần gần đây nhất: 2025-07-27 UTC."],[],[],null,["# Run multi-device NFC tests (Android 15)\n\nThis document explains how to run multi-device NFC tests.\n\nMeet prerequisites\n------------------\n\nBefore you run multi-device NFC tests, do the following:\n\n1. Prepare a device with your Android 15 implementation.\n2. Follow CTS-V [requirements](/docs/compatibility/cts/verifier#requirements).\n3. Follow CTS-V [setup](/docs/compatibility/cts/verifier#setup).\n\nPrepare a DUT and a PN532 NFC reader for the test\n-------------------------------------------------\n\nAfter you finish the previous steps, follow these steps to run\nprepare a DUT and a PN532 NFC reader for the test:\n\n1. Connect the DUT to a host machine over USB.\n2. Grant permissions for the host to access the DUT over ADB.\n3. Install the CTS Verifier app (`CtsVerifier.apk`) on the DUT:\n\n extract root/out/host/linux-x86/cts-verifier/android-cts-verifier.zip\n\n cd android-cts-verifier\n\n adb install -r -g CtsVerifier.apk\n\n4. Install the NFC test required APKs:\n\n cd MultiDevice\n\n adb install -r -g NfcEmulatorTestApp.apk\n\nSet up NFC for the DUT\n----------------------\n\nFollow these steps to run set up NFC for the DUT:\n\n1. On the DUT, go to the **Settings** menu.\n2. Look for the **NFC** or **Connected Devices** section.\n3. Ensure the NFC toggle switch is turned on.\n4. Position an NFC chip on the phone's NFC reader:\n\n 1. Acquire a PN532 NFC chip. We recommend the [All-In-One PN532](https://shop.mtoolstec.com/product/mtools-all-in-one-pn532), non-BLE option.\n 2. Attach the PN532 NFC chip to the Linux host using a USB cable.\n 3. Place the PN532 NFC chip over the phone's NFC reader as shown in the following image:\n\n **Figure 1.** NFC chip placement.\n\nSet up the test environment\n---------------------------\n\nFollow these steps to run set up the test environment:\n\n1. Run these commands to set up the test environment:\n\n cd MultiDevice\n\n source build/envsetup.sh\n\n This command checks the Python and sets up the `PYTHONPATH` environment\n variable. If no errors are printed to the terminal, the environment is ready\n to run the multi-device tests.\n\n If you see the error message `libtinfo.so.6: no version information\n available (required by /bin/sh)` at runtime, run the following command\n to rename the `libtinfo.so.6` file: \n\n mv $ENV_DIRECTORY/lib/libtinfo.so.6 $ENV_DIRECTORY/lib/libtinfo.so.6.bak\n\n2. Set up the test bed by setting the device serial IDs of the DUT and PN532 NFC\n reader in `MultiDevice/config.yml`:\n\n TestBeds:\n - Name: CtsNfcHceMultiDeviceTestCases-py-ctsv\n Controllers:\n AndroidDevice:\n - serial: \"\u003cdevice-id\u003e\"\n TestParams:\n pn532_serial_path: \"\u003cpn532-serial-path\u003e\"\n\nRun the NFC tests\n-----------------\n\nTo run the NFC tests:\n\n1. Open the CTS-V app and tap **NFC Tests**:\n\n **Figure 2.** The CTS-V app.\n\n The info window with list of test cases appears:\n\n **Figure 3.** CTS-V app test cases.\n2. Run the tests on your host:\n\n MultiDevice$ python3 tools/run_all_tests.py\n\n When the tests are completed, the test results are updated in the CTS-V\n app. Successful tests are green:\n\n **Figure 4.** CTS-V test results.\n3. If you see any failures marked in red, use the following command to rerun\n the failed tests:\n\n python3 tools/run_all_tests.py --test_cases \"`\u003cvar translate=\"no\"\u003eTestCaseA\u003c/var\u003e`\" \"`\u003cvar translate=\"no\"\u003eTestCaseB\u003c/var\u003e`\" --test_files \"`\u003cvar translate=\"no\"\u003eTestFileA\u003c/var\u003e`\"\n\n Where:\n - \u003cvar translate=\"no\"\u003eTestCaseA\u003c/var\u003e and \u003cvar translate=\"no\"\u003eTestCaseB\u003c/var\u003e are the names of the test cases as displayed in CTS-V.\n - \u003cvar translate=\"no\"\u003eTestFileA\u003c/var\u003e is the test file containing the test cases.\n\n For example: \n\n python3 tools/run_all_tests.py --test_cases \"test_conflicting_non_payment\" \"test_conflicting_non_payment_prefix\" --test_files \"CtsNfcHceMultiDeviceTestCases-py-ctsv\""]]