

車輛資訊娛樂 (IVI) 系統上的軟體定義車輛 (SDV) 閘道,可促進 IVI 系統與遠端 SDV 服務之間的通訊。原始設備製造商 (OEM) Java 應用程式和原生服務 (例如車輛硬體抽象層 (VHAL)) 可透過閘道與 SDV 服務互動。閘道會使用既有的通訊方法,包括服務註冊、探索和遠端程序呼叫 (RPC)。
這個閘道符合特定 AAOS SDV 專案需求,例如使用 SDV 資料通道啟用 VHAL 參考實作,以取得屬性資訊。此外,IVI 上的 Java 和 Kotlin Android 應用程式也能使用 SDV Comms 堆疊、註冊為服務、尋找其他 SDV 服務,以及與這些服務通訊。
如要瞭解 SDV Gateway 程式碼位置和 SDV Gateway 用戶端範例,請參閱「程式碼位置」。
SDV Gateway 整合模型
透過 IVI 架構上的 SDV 閘道使用 SDV-IVI Comms
SDV 閘道會與 Java 應用程式、原生服務、SDV Comms 堆疊和車輛網路互動。圖 1 說明瞭這些互動:
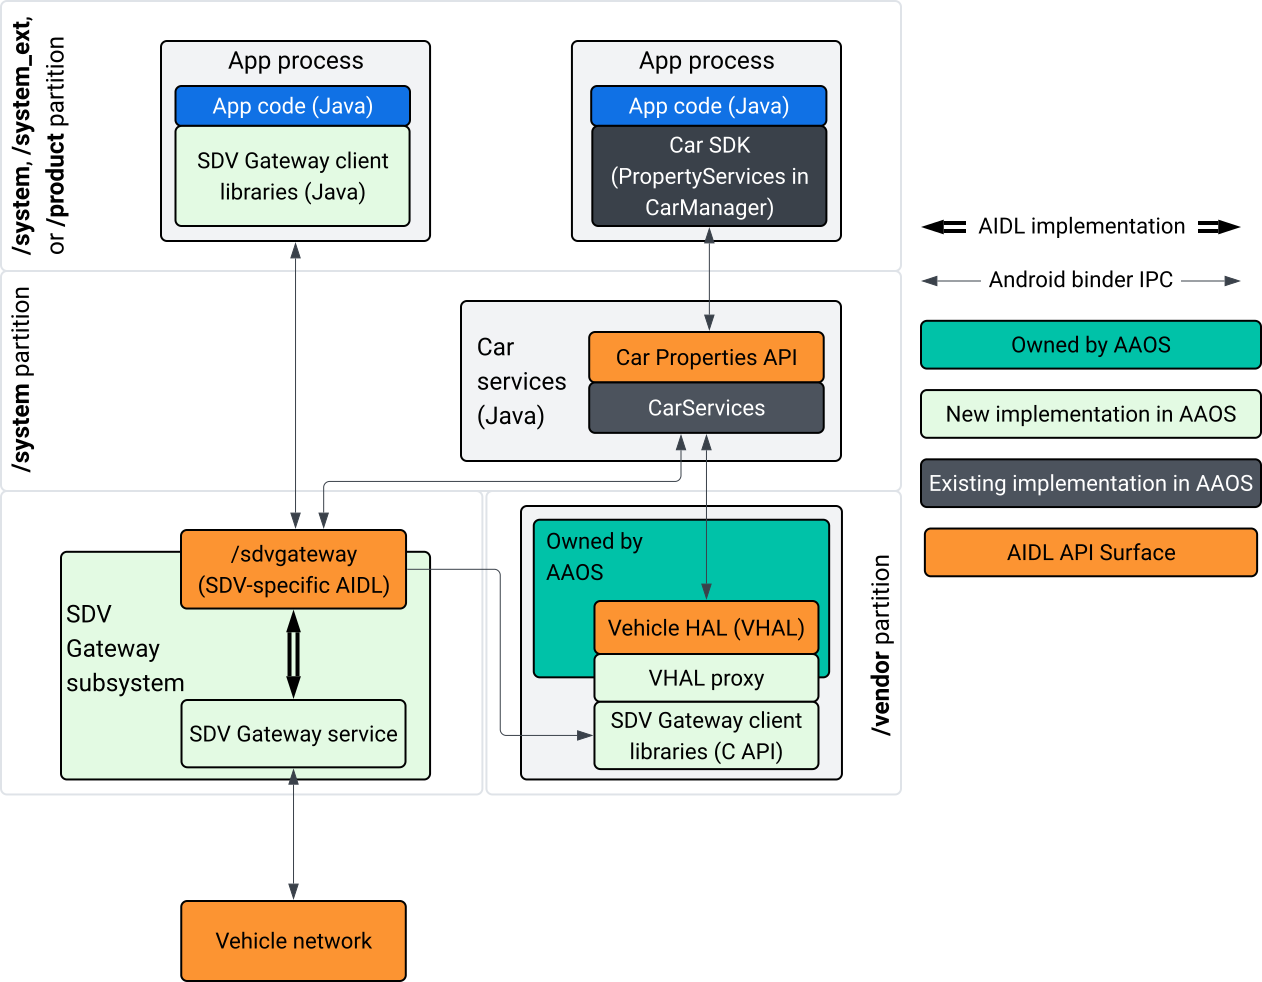
圖 1. SDV 閘道互動。
在這個系統圖中:
- 應用程式會透過用戶端服務與 SDV Gateway 互動。
- AAOS SDV SDK 提供以下功能:
- ISdvGateway AIDL API,用於處理序間通訊。
- 用於網路互動的通訊程式庫。
- 方便的 C API,可整合原生服務。
- ISdvGateway AIDL API 由 SDV Gateway 服務和子系統實作。
- SDV 閘道服務管理以下項目:
- 雙向服務探索。
- 與遠端 SDV 服務通訊。
- 核心商業邏輯。
- SDV 閘道子系統會連線至車輛網路。
- 原生服務 (包括 VHAL 實作項目) 可以直接使用 ISdvGateway AIDL API,也可以透過 SDK 的 C API 使用。
- VHAL Proxy 可做為 VHAL 參考實作項目,並整合 VSIDL 對應。
IVI 原生服務的 SDV 閘道整合模型
整合模型如圖 2 所示:
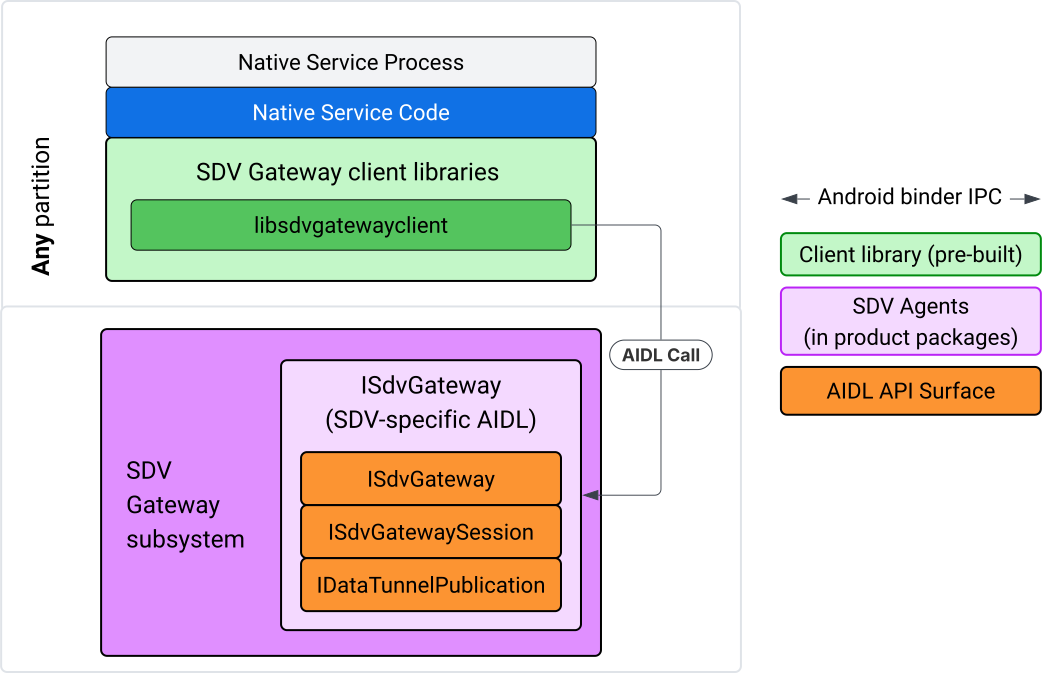
圖 2. SDV Gateway 整合模型。
在 IVI 原生服務上使用 SDV 閘道
圖 3 說明 IVI 上的 SDV 閘道使用情形:
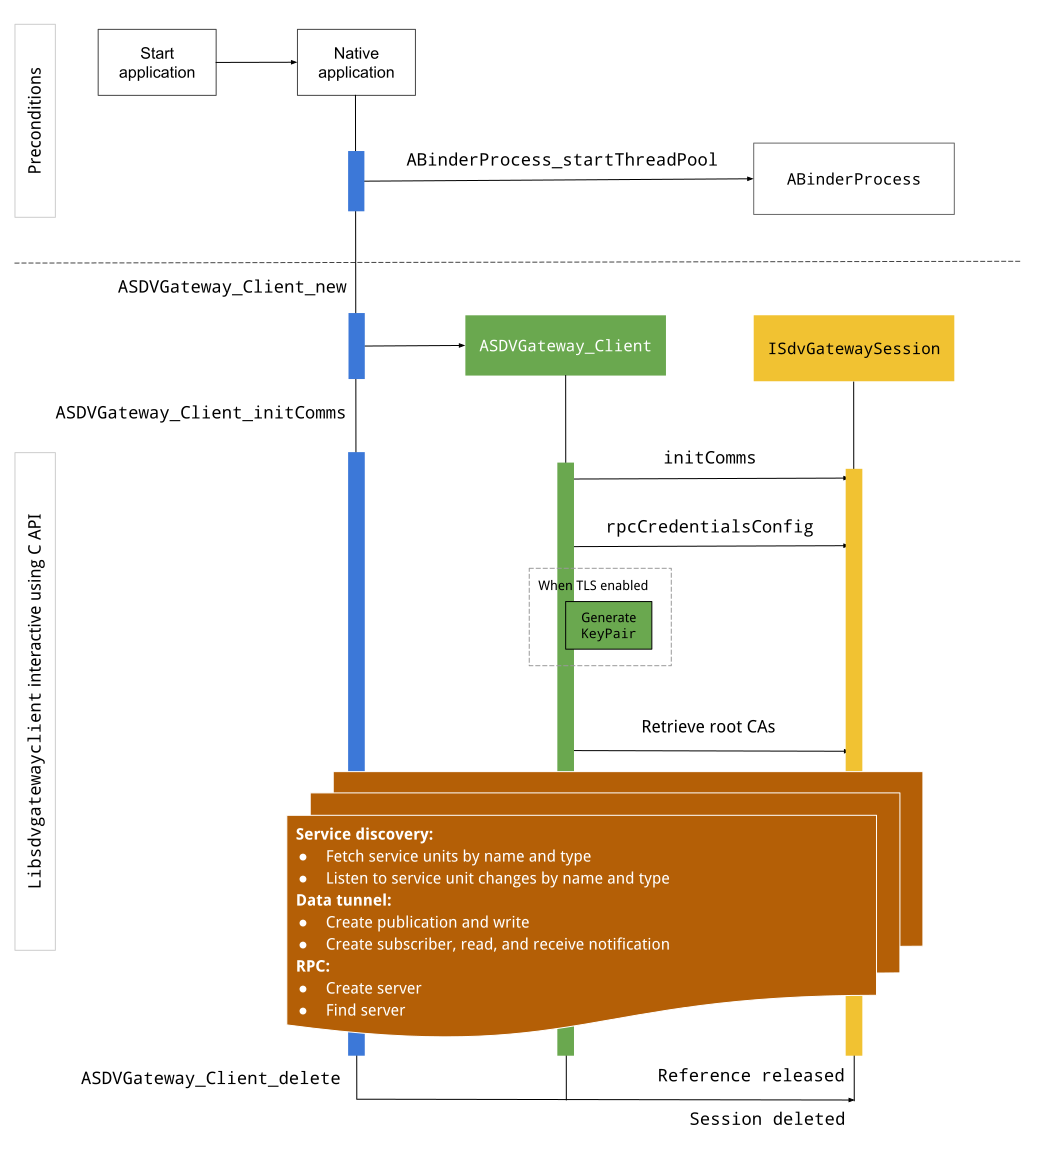
圖 3. IVI 上的 SDV 閘道。
先決條件
啟動 Binder 執行緒集區:
SDV Gateway 用戶端程式庫需要已啟動的繫結器執行緒集區,才能接收來自繫結器服務的非同步回呼。
如果未啟動 Binder 執行緒集區,建立 SDV 閘道用戶端所需的 API 就會失敗。
包含原生 Gateway 用戶端程式庫
Native Gateway 用戶端程式庫會公開 C API。新增 libsdvgatewayclient 的執行個體做為依附元件,即可使用 C API:
cc_binary {
    name: "your_binary_name",
    srcs: ["main.cpp"],
    shared_libs: [
        "libsdvgatewayclient",
    ],
}
載入原生 Gateway 用戶端
#include "libsdvgatewayclient.h"
建立原生用戶端執行個體
ASDVGateway_Client* client;
ASDVGateway_StatusCode_t statusCode = ASDVGateway_Client_new(
     &client, /*outStatus*/nullptr);
建立用戶端後,該用戶端會:
保存與 Gateway 服務後續互動的所有狀態。
做為與其他啟用 SDV 的服務互動時的內容,並做為第一個參數傳遞至 C API 函式。
狀態碼和錯誤訊息
大多數 C API 函式都有以下定義:
ASDVGateway_StatusCode_t ApiFunctionName(..., ASDVGateway_Status_t* outStatus);
如要評估是否成功,可以檢查傳回的狀態碼 (類型為 ASDVGateway_StatusCode_t)。您也可以將指標傳遞至結構,函式可在其中填入狀態碼和錯誤訊息。指標會以最後一個參數的形式傳遞,並命名為 outStatus。空值表示系統不會使用輸出結構。
呼叫端必須為錯誤訊息分配記憶體狀態結構。狀態結構可同時保留狀態碼和錯誤訊息。如要瞭解如何擷取建立新用戶端時的錯誤訊息,請參閱範例。
評估成效:
檢查傳回的狀態碼,其類型為
ASDVGateway_StatusCode_t。將指標傳遞至結構,函式可在其中填入狀態碼和錯誤訊息。
- 指標會以最後一個參數的形式傳遞,並命名為
outStatus。 - 空值表示系統不會使用輸出結構。
- 呼叫端必須為錯誤訊息分配記憶體狀態結構。
- 狀態結構可保留狀態碼和錯誤訊息。
- 指標會以最後一個參數的形式傳遞,並命名為
以下範例說明如何擷取新用戶端的錯誤訊息:
#include <iostream>
#include <array>

struct StatusWithErrorMsg : ASDVGateway_Status_t {
    StatusWithErrorMsg() {
        // Ensure the base struct pointers point to our internal buffer
        errorMessage = errorMessageBuffer.data();
        maxErrorMessageSize = errorMessageBuffer.size();

        // Good practice: Zero-initialize the buffer
        errorMessageBuffer.fill(0);
    }

    std::array<char, 256> errorMessageBuffer;
};

// --- Execution ---

ASDVGateway_Client* client = nullptr;
StatusWithErrorMsg status;

// Initialize the client
ASDVGateway_StatusCode_t statusCode = ASDVGateway_Client_new(&client, &status);

// Log Results
std::cout << "Returned statusCode:    " << statusCode << std::endl;
std::cout << "Status Struct Code:     " << status.statusCode << std::endl;
std::cout << "Status Error Message:   " << status.errorMessage << std::endl;
在這個例子中:
狀態結構中包含的狀態碼與傳回的狀態碼值相同。
錯誤訊息只會填入
maxErrorMessageSize字元限制 (包括空值終止字元\0)。如果沒有發生錯誤 (狀態碼為OK),錯誤訊息會是空字串。
Init comms
Init comms 會使用 SDV Comm Stack 和 SDV Gateway,初始化呼叫端應用程式和其他應用程式之間的通訊。您可以在下列任一情境中呼叫 Init comms:
建立用戶端後。
在任何資料通道、RPC 或服務探索互動之前。
範例如下:
ASDVGateway_InitCommsParams_t params{
.packageName = "android.sdv.samples.gateway.client",
.serviceBundleName = "NativeTestApp",
.serviceInstanceName = "default",
};
// Initialize communications and capture the status code
ASDVGateway_StatusCode_t statusCode = ASDVGateway_Client_initComms(client, ¶ms, &status);
// Recommended check
if (statusCode != ASDVGateway_StatusCode_OK) {
std::cerr << "Failed to init comms: " << status.errorMessage << std::endl;
}
服務探索
當特定類型或名稱的服務單元註冊或取消註冊時,您會收到通知。回呼函式會在閘道用戶端擁有的執行緒中收到通知。這個回呼最初會連同所有已註冊的服務單元一起觸發,就在 C API 呼叫之後。初始觸發後,通知會持續更新,直到明確取消註冊接聽程式為止。
class NativeSdvGatewayTestApp {
public:
    static void ServiceUnitChangeListenerCallback(
        const ASDVGateway_ServiceUnitChangeEventType eventType,
        const ASDVGateway_ServiceUnitDefinition* serviceUnitDefinition,
        void* userData
    ) {
        auto* testApp = reinterpret_cast<NativeSdvGatewayTestApp*>(userData);

        if (testApp) {
            // Logic to react when services are registered or unregistered
            // e.g., testApp->handleServiceChange(eventType, serviceUnitDefinition);
        }
    }
};

// --- Listener Registration ---

// Ensure thisApp remains in scope as long as the listener is active
NativeSdvGatewayTestApp* thisApp = get_current_app_context();

ASDVGateway_UnitType_t unitType{
    .sdvPackageName     = "android.sdv.samples.sdv_gateway",
    .serviceBundleName  = "DtPublisher",
    .unitTypeName       = "TirePressure",
};

// Register the listener
ASDVGateway_Client_registerListenerForServiceUnitChangeByType(
    client,
    &unitType,
    NativeSdvGatewayTestApp::ServiceUnitChangeListenerCallback,
    static_cast<void*>(thisApp), // userData
    &listenerHandle,
    &status
);

// --- Cleanup ---

// Unregistering stops all notification to the callback function
ASDVGateway_Client_unregisterListenerForServiceUnitChangeByType(
    client,
    listenerHandle,
    &status
);
如要擷取已註冊的服務單元,且不希望收到進一步通知,請使用 ASDVGateway_Client_fetchServiceUnitsByType 和 ASDVGateway_Client_fetchServiceUnitsByName API。
class NativeSdvGatewayTestApp {
public:
    /**
     * Callback triggered for each service unit found that matches the requested type.
     */
    static void FetchServiceUnitsCallback(
        const ASDVGateway_ServiceUnitDefinition* serviceUnitDefinition,
        void* userData
    ) {
        auto* app = reinterpret_cast<NativeSdvGatewayTestApp*>(userData);

        if (serviceUnitDefinition) {
            // The service unit is registered with service discovery.
            // Example: processServiceUnit(serviceUnitDefinition);
        }
    }
};

// --- Execution ---

ASDVGateway_UnitType_t unitType{
    .sdvPackageName     = "android.sdv.samples.sdv_gateway",
    .serviceBundleName  = "DtPublisher",
    .unitTypeName       = "TirePressure",
};

// Context used to differentiate between various fetchServiceUnits calls
void* userData = static_cast<void*>(thisApp);

ASDVGateway_Client_fetchServiceUnitsByType(
    client,
    &unitType,
    NativeSdvGatewayTestApp::FetchServiceUnitsCallback,
    userData,
    &status
);
在 ASDVGateway_Client_fetchServiceUnitsByType API 呼叫期間,回呼會在呼叫端的執行緒中同步觸發。使用 ASDVGateway_Client_fetchServiceUnitsByName 依名稱而非單元類型取得已註冊的服務單元:
ASDVGateway_StatusCode_t ASDVGateway_Client_fetchServiceUnitsByName(
    // [in]  Opaque pointer to a client object.
    const ASDVGateway_Client* client,

    // [in]  Pointer to a structure containing the package name,
    //       service bundle name, and service unit name.
    const ASDVGateway_UnitNameDiscoveryArgs_t* unitName,

    // [in]  Callback function to be called for each service unit
    //       definition registered. Called synchronously in the
    //       caller's thread before the fetch completes.
    ASDVGateway_FetchServiceUnitsCallback callback,

    // [in]  Optional value passed back as a parameter of the callback.
    void* userData,

    // [out] Optional pointer to status structure for result
    //       codes and error messages.
    ASDVGateway_Status_t* outStatus
);
遠端程序呼叫 (RPC) 流程
Gateway 用戶端程式庫會處理傳輸層安全標準 (TLS) 設定,以便與其他啟用 SDV 的應用程式通訊。具體來說,這個類別會擷取通訊所需的 TLS 設定。TLS 使用情況的判斷方式如下:
SDV 開機模式為
LOCKED時,會使用 TLS。SDV 開機模式為
UNLOCKED時,會使用不安全的通訊方式。使用 TLS 時,Gateway 用戶端程式庫會產生只有應用程式程序知道的金鑰組。用戶端會擷取 RPC 憑證,以建立 RPC 伺服器或 RPC 用戶端管道。RPC 使用專屬的 SDV-RPC VLAN。 Gateway 用戶端程式庫會呼叫 android_setprocnetwork,在ASDVGateway_Client_initComms呼叫期間或之後,將程序的預設網路切換至 SDV-RPC VLAN。
RPC 適用情形
如果用戶端設定為在提早啟動時啟動,可能會在 SDV-RPC VLAN 可用之前啟動。嘗試建立任何 RPC 伺服器或 RPC 用戶端通訊端之前,請先檢查 RPC 是否可用:
// Check if the RPC (Remote Procedure Call) service is available
bool isRpcAvailable = ASDVGateway_Client_isRpcAvailable(client);

if (isRpcAvailable) {
    // Proceed with RPC calls
} else {
    // Handle the case where RPC is not yet ready or available
}
或
// Check if the process is correctly bound to the SDV RPC Network Interface/VLAN
bool isRpcNetworkBound = ASDVGateway_Client_isProcessBoundToSdvRpcNetworkInterface(client);

if (!isRpcNetworkBound) {
    // Usually implies the process isn't running on the correct network interface
    // or the VLAN configuration is missing.
    std::cerr << "Warning: Process is not bound to the SDV RPC VLAN." << std::endl;
}
使用 ASDVGateway_Client_setClientNotificationCallback 設定用戶端事件的監聽器,在 RPC 可用性狀態變更時收到通知。如果應用程式切換程序的網路,建議使用 ASDVGateway_Client_isProcessBoundToSdvRpcNetworkInterface,因為這會同時檢查 RPC 是否可用,以及程序是否繫結至 SDV-RPC VLAN。
切換程序的預設網路
您可能需要將 SDV-RPC VLAN 從程序的預設網路切換為開啟網際網路連線的通訊端。呼叫 ASDVGateway_Client_unbindProcessFromSdvRpcNetworkInterface 和 ASDVGateway_Client_bindProcessToSdvRpcNetworkInterface,取消繫結程序並重新繫結至 SDV-RPC VLAN。這兩項呼叫會像全域切換器一樣,切換通訊端繫結的網路介面,適用於程序的所有執行緒。
// 1. Unbind: Sockets return to the "default" network interface (e.g., wlan0, eth0)
ASDVGateway_StatusCode_t unbindStatus =
    ASDVGateway_Client_unbindProcessFromSdvRpcNetworkInterface(client, &status);

// 2. Bind: Sockets are now bound to the dedicated SDV-RPC VLAN
ASDVGateway_StatusCode_t bindStatus =
    ASDVGateway_Client_bindProcessToSdvRpcNetworkInterface(client, &status);

// Validation
if (bindStatus == ASDVGateway_StatusCode_OK) {
    // Sockets are successfully bound to the SDV-RPC VLAN
}
遠端程序呼叫 (RPC) 通知
設定用戶端監聽器,接收 RPC 可用性異動通知,以及 RPC 伺服器必須接受的根憑證更新:
class NativeSdvGatewayTestApp {
public:
    static void ClientNotificationCallback(
        ASDVGateway_ClientNotificationType_t notificationType,
        void* userData
    ) {
        auto* testApp = reinterpret_cast<NativeSdvGatewayTestApp*>(userData);
        if (!testApp) return;

        switch (notificationType) {
            case ASDVGateway_ClientNotificationType_RootCertsChanged:
                std::cout << "onClientNotification: Root Certs Changed" << std::endl;
                // Handle certificate rotation logic here
                break;

            case ASDVGateway_ClientNotificationType_RpcAvailabilityChanged:
                std::cout << "onClientNotification: RPC Availability Changed" << std::endl;
                // Handle reconnection or UI updates here
                break;

            default:
                std::cout << "onClientNotification: Received Unknown Notification ("
                          << notificationType << ")" << std::endl;
                break;
        }
    }
};

// --- Registration ---

NativeSdvGatewayTestApp* thisApp = get_current_app_context();

// Register the notification callback to monitor system-level changes
ASDVGateway_StatusCode_t statusCode = ASDVGateway_Client_setClientNotificationCallback(
    client,
    NativeSdvGatewayTestApp::ClientNotificationCallback,
    static_cast<void*>(thisApp), // userData
    &status
);
遠端程序呼叫 (RPC) 伺服器流程
您必須使用憑證建立 RPC 伺服器:
ASDVGateway_RpcCredentials_t* rpcCredentials = nullptr;

// Retrieve the credentials from the client
ASDVGateway_StatusCode_t statusCode = ASDVGateway_Client_rpcCredentials(client, &rpcCredentials, &status);

// Validation: Differentiating between an error and a deliberate "insecure mode"
if (status.statusCode != ASDVGateway_StatusCode_OK) {
    std::cerr << "Error retrieving credentials: " << status.errorMessage << std::endl;
    return;
}

// Logic for choosing Security Credentials
if (rpcCredentials == nullptr) {
    // If the call succeeded but credentials are null, the system expects insecure communication
    std::cout << "Configuring for Insecure Mode" << std::endl;
} else {
    std::cout << "Configuring for Secure Mode:" << std::endl;
    std::cout << "  Private Key: " << (rpcCredentials->privateKeyPem ? "Present" : "Missing") << std::endl;
    std::cout << "  RootCerts:   " << rpcCredentials->rootCertsPem << std::endl;
    std::cout << "  CertChain:   " << rpcCredentials->certChainPem << std::endl;
    std::cout << "  SAN:         " << rpcCredentials->subjectAlternativeName << std::endl;
}

// --- Cleanup ---

// Release the memory once the RPC server/client is initialized
if (rpcCredentials != nullptr) {
    ASDVGateway_Client_deleteRpcCredentials(client, rpcCredentials);
}
建立 RPC 伺服器並得知其接聽埠後,請註冊 RPC 伺服器,以便探索其他應用程式:
ASDVGateway_RegisterRpcServerParams_t params{
.serviceUnitName = "android-sdv-samples-sunroof-sunroof",
.unitType = ASDVGateway_UnitType_t{
.sdvPackageName = "android.sdv.samples.sunroof",
.serviceBundleName = "SunroofServer",
.unitTypeName = "Sunroof",
},
.listeningPort = listeningPort,
.serverUnitMetadata = ASDVGateway_ServerUnitMetadata_t{
.version = 1,
},
};
// Register the RPC server with the SDV Gateway
ASDVGateway_StatusCode_t statusCode = ASDVGateway_Client_registerRpcServer(
client,
¶ms,
&status
);
// Basic error handling
if (statusCode != ASDVGateway_StatusCode_OK) {
std::cerr << "Failed to register RPC server: " << status.errorMessage << std::endl;
}
系統在執行階段更新根憑證時 (例如在 VM 狀態變更期間),RPC 伺服器必須重新整理可接受的憑證清單:
使用
ASDVGateway_Client_setClientNotificationCallback設定用戶端事件的監聽器,在根憑證更新時接收通知。呼叫
ASDVGateway_Client_rpcCredentials即可取得更新後的根憑證。
RPC 用戶端流程
RPC 用戶端的流程如下:
ASDVGateway_FindRpcServerByNameParams_t params{
.packageName = "android.sdv.samples.cluster",
.serviceBundleName = "ClusterServer",
.serviceUnitName = "android-sdv-samples-cluster-cluster",
};
ASDVGateway_SocketAddress_t socketAddress;
ASDVGateway_RpcCredentials_t* rpcCredentials = nullptr;
// Perform the lookup to find the server's location and security requirements
ASDVGateway_StatusCode_t statusCode = ASDVGateway_Client_findRpcServerByName(
mClient,
¶ms,
&socketAddress,
&rpcCredentials,
&status
);
// Mandatory check: Distinguish between system errors and intentional "Insecure Mode"
if (status.statusCode != ASDVGateway_StatusCode_OK) {
std::cerr << "Failed to find RPC server: " << status.errorMessage << std::endl;
return;
}
// Logic for establishing the RPC channel
if (rpcCredentials == nullptr) {
std::cout << "Connecting via Insecure Mode to "
<< socketAddress.address << ":" << socketAddress.port << std::endl;
} else {
std::cout << "Connecting via Secure Mode to "
<< socketAddress.address << ":" << socketAddress.port << std::endl;
std::cout << " RootCerts: " << rpcCredentials->rootCertsPem << std::endl;
std::cout << " SAN: " << rpcCredentials->subjectAlternativeName << std::endl;
// Note: privateKeyPem and certChainPem are typically used if the client
// needs to perform mutual TLS (mTLS).
}
// Cleanup: Release the credential memory once the RPC channel is established
if (rpcCredentials != nullptr) {
ASDVGateway_Client_deleteRpcCredentials(client, rpcCredentials);
}
建立發布者並發布訊息
ASDVGateway_Client_createPublication API 用於透過 AIDL 介面向 SDV 閘道註冊發布商服務單元,並在應用程式程序中建立快速訊息佇列 (FMQ)。Binder 僅用於設定 FMQ,不會用於寫入訊息。接著,使用 ASDVGateway_Client_publishMessages API 將訊息發布至建立的發布項目。這包括寫入發布項目的 FMQ,以及通知已寫入訊息。
ASDVGateway_CreatePublicationParams_t params{
.serviceUnitName = "mirror-position-adjust-impl-1",
.unitType = ASDVGateway_UnitType_t{
.sdvPackageName = "android.sdv.samples.sdv_gateway",
.serviceBundleName = "DtPublisher",
.unitTypeName = "MirrorPositionAdjust",
},
.publisherUnitMetadata = ASDVGateway_PublisherUnitMetadata_t{
.version = 1,
.messageSizeBytes = 64,
.messageCount = 16,
},
};
ASDVGateway_PublicationMetadata_t metadata;
// 1. Create the Publication (allocates resources on the gateway)
ASDVGateway_StatusCode_t createStatus = ASDVGateway_Client_createPublication(
client,
¶ms,
&metadata,
&status
);
if (status.statusCode != ASDVGateway_StatusCode_OK) {
std::cerr << "Failed to create publication: " << status.errorMessage << std::endl;
return;
}
// 2. Publish Messages
// Note: serializedMessage should contain your encoded protobuf data
std::vector<uint8_t> serializedMessage;
ASDVGateway_Client_publishMessages(
client,
serializedMessage.data(),
serializedMessage.size(),
metadata.publicationId,
&status
);
建立含有通知事件監聽器的訂閱者
如要訂閱發布內容並接收 Data Tunnel 通知 (例如訊息可用性),請使用 ASDVGateway_Client_subscribeToPublicationByName API。這項 API 也會設定 FMQ,以便讀取已發布的訊息。您可以在訂閱程序中或之後設定通知回呼。
#include <map>
#include <memory>
#include <iostream>

class NativeSdvGatewayTestApp {
public:
    struct SubscriptionContext {
        int32_t subscriptionId;
        std::string topicName;
        // Add other context-specific data here (e.g., counters, buffers)
    };

    /**
     * Callback triggered when new data is published to a subscribed topic.
     */
    static void SubscriptionNotificationCallback(
        const ASDVGateway_SubscriptionNotificationData_t* notification,
        void* userData
    ) {
        // The SDV Gateway client passes back the userData pointer.
        // We ensure validity by managing the lifecycle of SubscriptionContext
        // within the mSubscriptions map.
        auto* ctx = reinterpret_cast<SubscriptionContext*>(userData);

        if (ctx && notification) {
            // React to data being available for the subscription.
            // Example: handleIncomingData(notification->data, notification->size);
            std::cout << "Notification received for sub ID: " << ctx->subscriptionId << std::endl;
        }
    }

private:
    // Maps subscription handles/IDs to their respective contexts
    std::map<int32_t, std::unique_ptr<SubscriptionContext>> mSubscriptions;
};

// --- Usage ---
NativeSdvGatewayTestApp app;
訂閱時,您可以指定其他選項,以及發布商的服務單元名稱。您可以透過這些選項,在訂閱前擷取最近發布的訊息,並定義通知時間間隔下限。
ASDVGateway_SubscribeToPublicationByNameParams_t params{
.sdvVmName = "vm1",
.packageName = "test.package.impl.name",
.serviceBundleName = "TestBundleImpl",
.serviceUnitName = "GrpcServerImpl",
};
ASDVGateway_Subscriber_Options_t options{
// Ensure we receive the most recent message immediately upon subscribing
.flags = ASDVGATEWAY_SUBSCRIBER_OPTIONS_FLAG_FETCHLASTMESSAGE,
.minIntervalMs = 0, // No rate limiting; receive updates as they happen
};
// 1. Prepare the context for the callback
auto subCtx = std::make_unique<SubscriptionContext>();
ASDVGateway_PublicationMetadata_t metadata{};
// 2. Perform the subscription
ASDVGateway_StatusCode_t statusCode = ASDVGateway_Client_subscribeToPublicationByName(
client,
¶ms,
&options,
NativeSdvGatewayTestApp::SubscriptionNotificationCallback,
static_cast<void*>(subCtx.get()), // Pass the raw pointer as userData
&metadata,
&status
);
// 3. Validation and Lifecycle Management
if (status.statusCode != ASDVGateway_StatusCode_OK) {
// Error handling: subCtx will be automatically deleted here
std::cerr << "Subscription failed: " << status.errorMessage << std::endl;
return;
}
// Store the context using the publicationId as the key.
// Once moved, the map owns the lifetime of subCtx.
app.mSubscriptions.emplace(metadata.publicationId, std::move(subCtx));
使用 ASDVGateway_Client_readAvailableMessages API 從發布內容讀取訊息:
uint32_t messagesAvailable = 0;

// 1. Check how many messages are waiting in the queue
ASDVGateway_StatusCode_t availStatus = ASDVGateway_Client_availableToRead(
    client,
    metadata.publicationId,
    &messagesAvailable,
    &status
);

if (status.statusCode != ASDVGateway_StatusCode_OK) {
    // Error handling for availability check
    return;
}

if (messagesAvailable == 0) {
    // No messages available for this publication at this time
    return;
}

// 2. Prepare the buffer
// metadata.messageSizeBytes was provided during the publication/subscription setup
std::vector<uint8_t> bytesForMessages;
bytesForMessages.resize(metadata.messageSizeBytes * messagesAvailable);

// 3. Read the messages from the Gateway into your local buffer
uint32_t actualMessageCount = 0; // Filled by the SDK with the number of messages read
ASDVGateway_StatusCode_t readStatus = ASDVGateway_Client_readAvailableMessages(
    client,
    metadata.publicationId,
    bytesForMessages.data(),
    bytesForMessages.size(),
    &actualMessageCount,
    &status
);

if (status.statusCode == ASDVGateway_StatusCode_OK) {
    // Successfully read 'actualMessageCount' messages
    // Process bytesForMessages...
}
如要在訂閱後設定回呼,請使用 ASDVGateway_Client_setNotificationCallbackForPublicationId API:
ASDVGateway_StatusCode_t ASDVGateway_Client_setNotificationCallbackForPublicationId(
    // [in]  Opaque pointer to the client object.
    const ASDVGateway_Client* client,

    // [in]  Identifies the specific publication to monitor.
    const int32_t publicationId,

    // [in]  Function pointer triggered when new data is available
    //       for the specified publication.
    ASDVGateway_SubscriptionNotificationCallback notificationCallback,

    // [in]  Optional user-defined context passed back to the callback.
    void* notificationCallbackUserData,

    // [out] Optional pointer to a status structure for result codes
    //       and error messages.
    ASDVGateway_Status_t* outStatus
);
設定 init 服務
首先,請按照「原生服務的身分」一文的說明,透過服務的 Android ID (AID) 指派服務身分。
假設您的服務名為 native_sdv_gateway_client_service,可執行檔位於 /vendor 分割區的 /vendor/bin/native_sdv_gateway_client_service,且您使用 vendor_gateway_client 做為執行服務的 Android ID (AID)。完成設定後,您就可以定義下列 init 服務:
service native_sdv_gateway_client_service /vendor/bin/native_sdv_gateway_client_service
    class core
    user vendor_gateway_client
    group inet
    disabled
    oneshot
這項設定會使用下列參數:
vendor_gateway_client是為服務建立或選取的 AID。group inet是 SDV 閘道用戶端使用網路介面在 SDV VM 之間通訊時的必要條件。您可以在需要時新增其他群組。- 本範例使用
disabled和oneshot。你可能需要調整服務的服務選項。在sdv_gateway之後啟動服務。
為服務建立 SELinux 規則
如要使用 SDV Gateway API,您需要服務的下列 SELinux 規則:
# Define the domain for the service
type native_sdv_gateway_client_service, domain;

# Define the executable file type on the vendor partition
type native_sdv_gateway_client_service_exec, exec_type, file_type, vendor_file_type;

# Macro to transition from 'init' to this service's domain upon execution
init_daemon_domain(native_sdv_gateway_client_service)

# Macro to grant the necessary permissions to communicate with the SDV Gateway
sdv_gateway_client_domain(native_sdv_gateway_client_service)
在 SELinux 規則中:
init_daemon_domain允許從init啟動服務。sdv_gateway_client_domain提供與 SDV 閘道互動所需的所有 SELinux 權限。下列程式碼會將這些規則授予可執行檔:/vendor/bin/native_sdv_gateway_client_service u:object_r:native_sdv_gateway_client_service_exec:s0
程式碼範例
如要進一步瞭解如何執行原生程式碼範例,瞭解 C API 的記錄方式,請參閱system/software_defined_vehicle/samples/sdv_gateway/NativeSdvGatewayTestApp/README.md。
IVI Java 應用程式上的 SDV 閘道
IVI 上的 SDV 閘道互動模型如以下圖表所示:
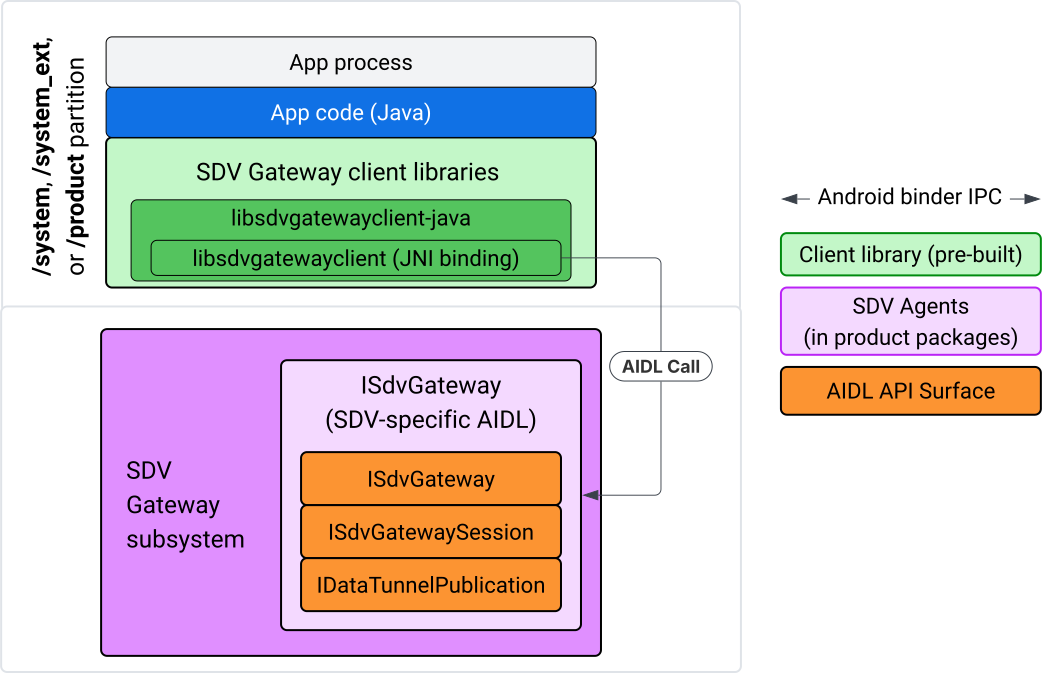
圖 4. IVI Java 應用程式上的 SDV 閘道。
具體來說,模型:
- 將所有呼叫作業分派至 JNI 層。
- 將 Java 和 C API 黏合在一起。
- 定義與
ISdvGateway的 AIDL 互動:- Init comms
- 尋找或建立 RPC 伺服器
- 建立發布/訂閱項目
- 執行服務探索資料通道互動
- 接收通知 (例如資料可用)
- 讀取及寫入訊息 (適用於 Pub/Sub 的 FMQ),以建立金鑰組和 TLS 憑證
加入 Gateway 用戶端程式庫
Java 程式庫和 libsdvgatewayclient C API 的 JNI 包裝函式會安裝在 IVI 目標的 APEX 中。將編譯時間依附元件新增至 Java 程式庫存根、必須在執行階段使用的 Java 程式庫,以及包含 Java 程式庫的必要 APEX。
android_app {
    name: "YourAppName",
    // ...
    static_libs: [
        "libsdvgatewayclient-java",
    ],
    libs: [
        "libsdvgatewayclient-java-sdk.stubs",
    ],
    uses_libs: [
        "libsdvgatewayclient-java-sdk",
    ],
    required: [
        "com.sdv.google.gateway.client",
    ],
    // ...
}
如果是 SDV 樹狀結構外部建構的未綁定應用程式,程序類似:
將產生的 Java 程式庫虛設常式 JAR 和 RPC 支援 JAR 複製到應用程式 libs 資料夾。詳情請參閱「
system/software_defined_vehicle/sdv_gateway/libsdvgatewayclient_apex/README.md」。將存根 JAR 新增為僅供編譯的依附元件。舉例來說,請在
dependencies區段中新增compileOnly項目,更新 Gradle 設定以依附於存根:dependencies { // The library supporting functions for SDK RPC. // Statically linked into the app APK. implementation(files("libs/libsdvgatewayclient-java.jar")) // Stub of the SDV-Gateway client library. // Used only for compilation; the real implementation is provided // by the com.sdv.google.gateway.client APEX at runtime. compileOnly(files("libs/libsdvgatewayclient-java-sdk.jar")) }將 Java 程式庫新增至
AndroidManifest.xml檔案的應用程式區段。<manifest xmlns:android="http://schemas.android.com/apk/res/android"> <application> <!-- Declares that this app requires the SDV Gateway client library. The 'android:required="true"' attribute ensures the app won't install/run if the library is missing from the system. --> <uses-library android:name="libsdvgatewayclient-java-sdk" android:required="true" /> </application> </manifest>
載入程式庫
建立 SdvGatewayClient 物件 (由用戶端程式庫提供):
import google.sdv.gateway.client.SdvGatewayClient;

// --- Inside your Activity, Service, or ViewModel ---

// Initialize the SDV Gateway Client
SdvGatewayClient gatewayClient = new SdvGatewayClient();
Init comms
使用應用程式名稱做為服務套件名稱,呼叫 initComms():
// Define a unique name for your service bundle (usually constant)
private static final String SERVICE_BUNDLE_NAME = "MySdvServiceBundle";

// ... inside an Activity or Service context ...

try {
    // Initialize communications with the SDV Gateway
    // context.getPackageName() provides "android.sdv.samples.gateway.client" or similar
    gatewayClient.initComms(context.getPackageName(), SERVICE_BUNDLE_NAME);

    Log.i("SDV_GATEWAY", "Communications initialized successfully");
} catch (Exception e) {
    // Unlike the C API which uses status codes,
    // the Java SDK often throws exceptions for initialization failures.
    Log.e("SDV_GATEWAY", "Failed to initialize communications", e);
}
服務探索
Java API 包含下列方法:
在特定類型的服務單元 (或符合特定名稱) 註冊或取消註冊時,接收通知。
列出目前具有特定單元類型的服務單元 (或比對特定服務單元類型名稱)。如要接收服務單元變更通知,請建立監聽器:
import google.sdv.gateway.client.ServiceUnitChangeListener;
import google.sdv.gateway.client.ServiceUnitChangeEventType;
import google.sdv.gateway.client.ServiceUnitDefinition;

// --- Implementation ---

ServiceUnitChangeListener listener = new ServiceUnitChangeListener() {
    @Override
    public void onServiceUnitChanged(
        ServiceUnitChangeEventType eventType,
        ServiceUnitDefinition serviceUnitDefinition
    ) {
        // This is triggered when services matching your criteria
        // are registered or unregistered on the vehicle network.
        if (eventType == ServiceUnitChangeEventType.REGISTERED) {
            // Handle new service discovery
        } else if (eventType == ServiceUnitChangeEventType.UNREGISTERED) {
            // Handle service removal
        }
    }
};
addListenerForServiceUnitChangeByName Java 方法會通知監聽器:
// 1. Register the listener for a specific service unit by name
AutoCloseable handle = gatewayClient.addListenerForServiceUnitChangeByName(
    new UnitNameDiscoveryArgs(
        "",                                   // sdvVmName (empty for local/auto-discovery)
        "android.sdv.samples.cluster",        // sdvPackageName
        "ClusterServer",                      // serviceBundleName
        "android-sdv-samples-cluster-cluster" // serviceUnitName
    ),
    listener
);

// --- Later in the application lifecycle ---

// 2. To stop receiving notifications and clean up resources, close the handle.
try {
    if (handle != null) {
        handle.close();
    }
} catch (Exception e) {
    Log.e("SDV_GATEWAY", "Error while closing the listener handle", e);
}
或者,您也可以使用 addListenerForServiceUnitChangeByType Java 方法,在註冊或取消註冊指定單元類型的服務時,通知監聽器:
// 1. Register a listener based on the Service Unit Type
AutoCloseable handle = gatewayClient.addListenerForServiceUnitChangeByType(
    new UnitType(
        "com.android.testapp.sdvcarmonitor", // sdvPackageName
        "SunroofRpcServer",                  // serviceBundleName
        "Sunroof"                            // unitTypeName
    ),
    listener
);

// --- Execution Loop / Lifecycle ---

// 2. To stop receiving notifications and clean up memory, close the handle.
// This effectively unregisters the listener from the SDV Gateway.
try {
    if (handle != null) {
        handle.close();
    }
} catch (Exception e) {
    Log.e("SDV_GATEWAY", "Failed to close the service unit listener handle", e);
}
對於 addListenerForServiceUnitChangeByName 和 addListenerForServiceUnitChangeByType,新增監聽器後,系統會通知監聽器所有已註冊的服務單元。如要只依名稱或類型取得已註冊的服務單元,請使用 listServiceUnitsByName 和 listServiceUnitsByType Java API:
import google.sdv.gateway.client.ServiceUnitDefinition;
import google.sdv.gateway.client.UnitNameDiscoveryArgs;
import google.sdv.gateway.client.UnitType;

// --- 1. Synchronous Lookup by Specific Name ---
ServiceUnitDefinition[] definitionsByName = gatewayClient.listServiceUnitsByName(
    new UnitNameDiscoveryArgs(
        "",                                   // sdvVmName
        "android.sdv.samples.cluster",        // sdvPackageName
        "ClusterServer",                      // serviceBundleName
        "android-sdv-samples-cluster-cluster" // serviceUnitName
    )
);

// --- 2. Synchronous Lookup by Service Type ---
ServiceUnitDefinition[] definitionsByType = gatewayClient.listServiceUnitsByType(
    new UnitType(
        "com.android.testapp.sdvcarmonitor", // sdvPackageName
        "SunroofRpcServer",                  // serviceBundleName
        "Sunroof"                            // unitTypeName
    )
);

// Example processing
if (definitionsByType.length > 0) {
    ServiceUnitDefinition firstSunroof = definitionsByType[0];
    // Proceed to connect...
}
遠端程序呼叫 (RPC) 伺服器流程
IVI 系統中的 SDV Gateway 用戶端會使用 Google 遠端程序呼叫 (gRPC) 與 SDV 服務通訊。這些互動依賴 VSIDL 目錄中的 proto 定義,這些定義與 SDV Core 上使用的定義一致或相似。如果是 Java 應用程式,則會選擇 gRPC-Java 實作方式。應用程式伺服器提供範例伺服器 proto 定義 sunroof.proto。
service Sunroof {
    /**
     * Retrieves the current state of the sunroof (e.g., position, tilt, status).
     *
     * @param .google.protobuf.Empty - No input parameters required.
     * @return SunroofStateResponse - The current telemetry data for the sunroof.
     */
    rpc GetSunroofState(.google.protobuf.Empty) returns (SunroofStateResponse) {}
}
連結對應的 proto 程式庫,並定義服務:
import com.android.sdv.sdvgrpclibrary.SunroofGrpc;
import com.android.sdv.sdvgrpclibrary.SunroofStateResponse; // Assuming this is the generated class
import com.google.protobuf.Empty;
import io.grpc.stub.StreamObserver;

/**
 * Implementation of the Sunroof gRPC service.
 * This class handles the logic for the RPCs defined in your .proto file.
 */
static class SunroofGrpcImpl extends SunroofGrpc.SunroofImplBase {

    @Override
    public void getSunroofState(Empty request, StreamObserver<SunroofStateResponse> responseObserver) {
        // 1. Fetch current sunroof data (e.g., from a Hardware Abstraction Layer)
        int currentPosition = 50; // Example value: 50% open

        // 2. Build the Protobuf response message
        SunroofStateResponse response = SunroofStateResponse.newBuilder()
                .setPercentageOpen(currentPosition)
                .build();

        // 3. Send the response to the client using the observer
        responseObserver.onNext(response);

        // 4. Close the stream to signal that the RPC is finished
        responseObserver.onCompleted();
    }
}
使用安全和不安全管道憑證註冊 gRPC 伺服器:
// 1. Define the type signature for the service
UnitType unitType = new UnitType(
    "com.android.testapp.sdvcarmonitor", // sdvPackageName
    "SunroofRpcServer",                  // serviceBundleName
    "Sunroof"                            // typeName (Unit Type)
);

// 2. Register the RPC server with the Gateway
// The gateway creates a mapping between the ServiceUnitName and your implementation.
server = gatewayClient.registerRpcServer(
    "SunroofRpcServerImpl-1",                       // serviceUnitName (Unique instance name)
    unitType,                                       // unitType defined earlier
    "SUNROOF_GRPC_SERVER_VALUE_HOLDER".getBytes(),  // appMetadataValueHolder (Static discovery data)
    1,                                              // appMetadataVersion
    new SunroofGrpcImpl()                           // The actual gRPC service implementation
);
在內部,用戶端程式庫會建立 gRPC 伺服器物件 SdvGatewayClient.java,並處理根憑證的更新:
// 1. Initialize credentials (Insecure for dev, TLS for production)
ServerCredentials serverCredentials = InsecureServerCredentials.create();

// 2. Build and start the OkHttp-based gRPC server
final int bindAnyPort = 0;
final Server server = OkHttpServerBuilder
    .forPort(bindAnyPort, serverCredentials)
    .addService(gRpcServerImplementation) // Your SunroofGrpcImpl
    .build()
    .start();

// The assigned port can now be retrieved using server.getPort()
int actualPort = server.getPort();

// 3. Prepare the JNI data structure
// This object mirrors the ASDVGateway_ServiceUnitDefinition_t C struct
JniServiceUnitDefinition definition = new JniServiceUnitDefinition();

// Fill the RPC service definition params (Port, Name, Type, etc.)
definition.setPort(actualPort);
definition.setServiceUnitName("SunroofRpcServerImpl-1");

// 4. Perform the cross-language call
// This jumps from Java -> JNI -> ASDVGateway_Client_registerRpcServer (C API)
mJniClient.nativeRegisterRpcServer(definition);
RPC 用戶端流程
這個程式碼範例提供應用程式以用戶端身分連線的伺服器專用伺服器 Proto 定義 (tpms.proto):
/**
 * The TPMS service provides real-time pressure and temperature
 * data for all tires on the vehicle.
 */
service Tpms {
    /**
     * Returns the full state of all monitored tires.
     */
    rpc GetTpmsState(.google.protobuf.Empty) returns (TpmsStateResponse) {}

    /**
     * A filtered query that returns only the tires
     * below the recommended pressure threshold.
     */
    rpc GetLowTires(.google.protobuf.Empty) returns (LowTiresResponse) {}
}
連結至對應的 proto 程式庫:
import com.android.sdv.sdvgrpclibrary.TpmsGrpc;
import io.grpc.ManagedChannel;

// --- Inside your Client Application ---

// 1. Request a ManagedChannel from the Gateway for a specific service unit
ManagedChannel managedChannel = gatewayClient.connectToRpcServerByName(
    "",                                     // sdvVmName (empty for local/auto-lookup)
    "android.sdv.samples.cluster",          // packageName
    "ClusterServer",                        // serviceBundleName
    "android-sdv-samples-cluster-cluster"  // serviceUnitName
);

// 2. Use the channel to create a gRPC stub (e.g., for the TPMS service)
TpmsGrpc.TpmsBlockingStub tpmsStub = TpmsGrpc.newBlockingStub(managedChannel);

// 3. Now you can call RPC methods directly
// TpmsStateResponse response = tpmsStub.getTpmsState(Empty.getDefaultInstance());
在內部,系統會呼叫 ASDVGateway_Client_findRpcServerByName API 來尋找 RPC 伺服器。如果找到 RPC 伺服器,系統會以不安全模式建立代管管道,或指定使用 TLS 設定 (視服務探索設定而定),與 RPC 伺服器流程類似。應用程式會使用 ManagedChannel 物件建立存根,並呼叫伺服器方法:
import com.android.sdv.sdvgrpclibrary.TpmsGrpc;
import com.android.sdv.sdvgrpclibrary.TpmsStateResponse;
import com.google.protobuf.Empty;
import io.grpc.stub.MetadataUtils;

// 1. Create a "Blocking Stub" from the existing ManagedChannel.
// We apply an interceptor to attach mandatory metadata (headers)
// required by the SDV Gateway for authorization.
TpmsGrpc.TpmsBlockingStub tpmsStub = TpmsGrpc.newBlockingStub(managedChannel)
    .withInterceptors(MetadataUtils.newAttachHeadersInterceptor(mMetadata));

// 2. Execute the RPC call.
// Because this is a "BlockingStub," the thread will wait here until
// the vehicle service responds or times out.
TpmsStateResponse tpmsStateResponse = tpmsStub.getTpmsState(Empty.getDefaultInstance());

// 3. Extract the domain-specific state object from the Protobuf response.
// 'newState' can now be used to update your UI or application logic.
newState = tpmsStateResponse.getTpmsState();
切換程序的預設網路
您可能需要將 SDV-RPC VLAN 從程序的預設網路切換為開啟網際網路連線的通訊端。呼叫 unbindProcessFromSdvRpcNetworkInterface 和 bindProcessToSdvRpcNetworkInterface,取消繫結程序並重新繫結至 SDV-RPC VLAN。這兩個呼叫會做為全域切換器,切換通訊端繫結的網路介面,以用於程序的所有執行緒。
// 1. Redirect all socket traffic from this process to the SDV-RPC VLAN.
// This call is required for making RPC calls or hosting RPC services for SDV.
gatewayClient.bindProcessToSdvRpcNetworkInterface();

// --- Process is now communicating over the SDV-RPC interface ---

// 2. Revert the process network binding back to the "default" interface.
// This allows the app to access internet resources again.
gatewayClient.unbindProcessFromSdvRpcNetworkInterface();
建立發布者並發布訊息
// 1. Define the interface and type for the publication
UnitType unitType = new UnitType(
    "android.sdv.samples.tires.interface", // sdvPackageName
    "TirePressurePublisherInterface",      // serviceBundleName
    "TirePressure"                         // typeName
);

// 2. Configure the Publisher's buffer and message constraints
PublisherUnitMetadata publisherUnitMetadata = new PublisherUnitMetadata(
    1,   // version
    64,  // message size in bytes (fixed size for performance)
    128  // max message count (buffer depth)
);

// 3. Create the Publication instance through the Gateway
Publisher tirePublisher = gatewayClient.createPublication(
    "tire-pressure-service-unit-name",
    unitType,
    publisherUnitMetadata
);

// 4. Prepare and publish a message
// In a real app, you would encode your sensor data into this byte array
byte[] msg = new byte[publisherUnitMetadata.messageSizeBytes];

// ... fill msg with data ...

tirePublisher.publish(msg);
在內部,Java createPublication 和發布 API 依賴於原生 ASDVGateway_Client_createPublication 和 ASDVGateway_Client_readAvailableMessages API。如要進一步瞭解 C API,請參閱「在 IVI 原生服務上使用 SDV Gateway」。Publisher 物件提供撰寫訊息的環境,並管理發布內容的生命週期。
建立具有通知事件監聽器的訂閱者
Java API 允許將接聽程式做為參數傳遞至訂閱發布方法,並傳回 Subscription 物件。
Listener會在訂閱的出版物有可用資料時收到通知。Subscription可做為內容物件,用於讀取訊息及關閉訂閱項目。
// 1. Define the Listener to handle incoming data notifications
SubscriptionNotificationListener listener = new SubscriptionNotificationListener() {
    @Override
    public void onSubscriptionNotification(
        Subscription subscription,
        SubscriptionNotificationType notificationType
    ) {
        // Only process if the notification indicates new data is ready
        if (notificationType != SubscriptionNotificationType.DataAvailable) {
            return;
        }

        // Read the message from the subscription buffer
        byte[] content = subscription.readMessage();

        // Note: This callback often runs on a background thread provided by the SDK.
        // If you need to update the UI, use a Handler or View.post().
        processTireData(content);
    }
};

// 2. Subscribe to the publication by its unique name
Subscription tireSubscription = gatewayClient.subscribeToPublicationByName(
    "",                                  // sdvVmName (empty for auto-lookup)
    "android.sdv.samples.dt_publisher",  // packageName
    "SdvGatewayDtPublisher",             // serviceBundleName
    "tire",                              // serviceUnitName
    listener
);

// 3. Read Messages
// You can poll or register callbacks for new messages.
// When polling the message, call this method in a loop.
// When registering callbacks, call this method to get the message payload.
byte[] manualContent = tireSubscription.readMessage();
程式碼範例
系統會在用戶端管理的單一執行緒上叫用接聽程式回呼,盡量減少接聽程式內的處理作業,以免延遲接收其他訂閱項目的通知。Java 層會利用 C API 進行訂閱管理、通知處理和訊息擷取。如要瞭解如何使用 API,請參閱 system/software_defined_vehicle/samples/sdv_gateway/README.md二進位檔案中提供的 Java 應用程式範例。
所需權限
呼叫 SDV Gateway 用戶端 API 不需要特殊權限,但您必須為應用程式套用適當的 SELinux 規則。
- 如果是資料通道訂閱和發布作業,則不需要任何權限。
- 如要使用 SDV RPC,您需要下列權限:
android.permission.INTERNETandroid.permission.CONNECTIVITY_USE_RESTRICTED_NETWORKS
如果是 android.permission.CONNECTIVITY_USE_RESTRICTED_NETWORKS,您也需要在應用程式的相同分割區中,於 etc/permissions 下方建立允許清單檔案,例如 SdvCarMonitorTestApp (套件名稱 com.android.testapp.sdvcarmonitor) 的檔案如下:
<?xml version="1.0" encoding="utf-8"?>

<permissions>
    <privapp-permissions package="com.android.testapp.sdvcarmonitor">
        <permission name="android.permission.CONNECTIVITY_USE_RESTRICTED_NETWORKS"/>
    </privapp-permissions>
</permissions>
SELinux 規則
如要使用 SDV Gateway API,Java 應用程式必須具備與原生服務相同的權限。使用 sdv_gateway_client_domain()
SELinux 巨集授予這些權限:
sdv_gateway_client_domain(my_oem_sdv_gateway_client_app)
OEM 會為允許使用 SDV 閘道的 Java 應用程式定義 my_oem_sdv_gateway_client_app 網域。請只透過系統和具備特殊權限的應用程式使用 SDV 閘道。
程式碼位置
前往 system/software_defined_vehicle/sdv_gateway/ 取得 SDV 閘道的原始碼。您可以取得下列項目的 SDV 閘道範例:
- 用戶端 C API:
system/software_defined_vehicle/samples/sdv_gateway/NativeSdvGatewayTestApp/ - 用戶端 Java API:
system/software_defined_vehicle/samples/sdv_gateway/SdvCarMonitorTestApp/