
In Android 12, public APIs are available for implementing window-blur effects, such as background blur and blur behind.
Window blurs, or cross-window blurs, are used to blur the screen behind the given window. There are two types of window blurs, which can be used to achieve different visual effects:
Background blur allows you to create windows with blurred backgrounds, creating a frosted glass effect.
Blur behind allows you to blur the entire screen behind a (dialog) window, creating a depth of field effect.
The two effects can be used separately or combined, as shown in the following figure:
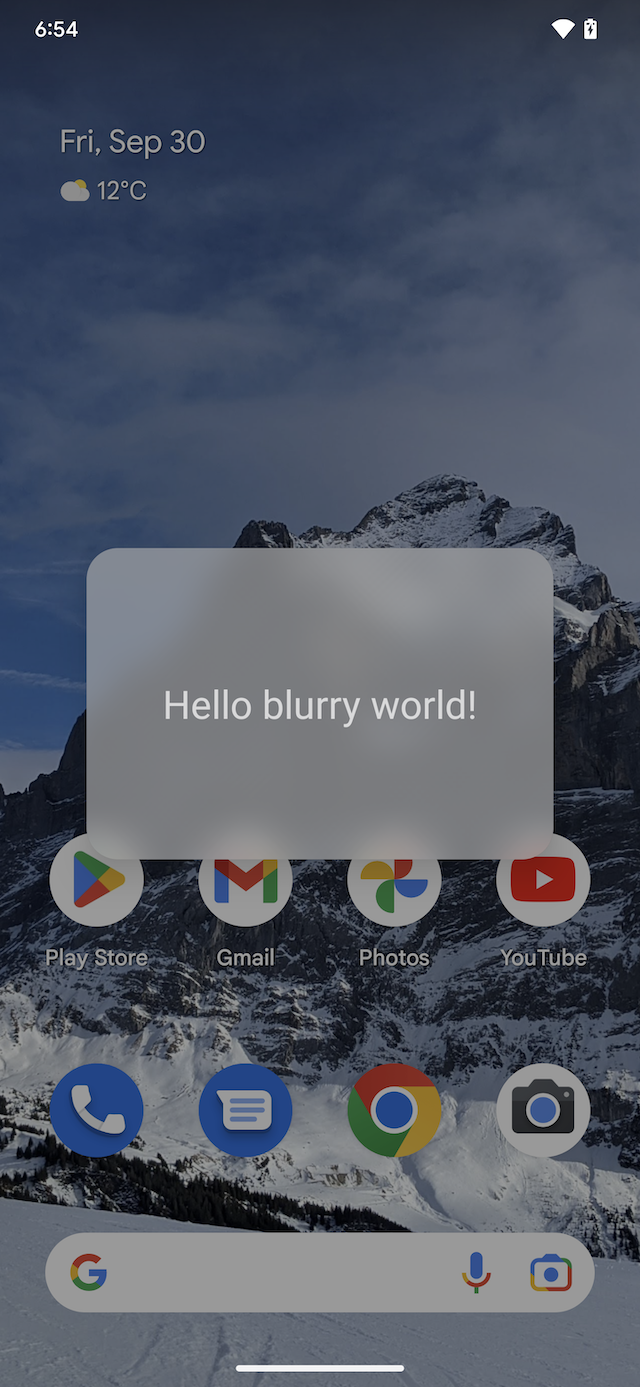
a |
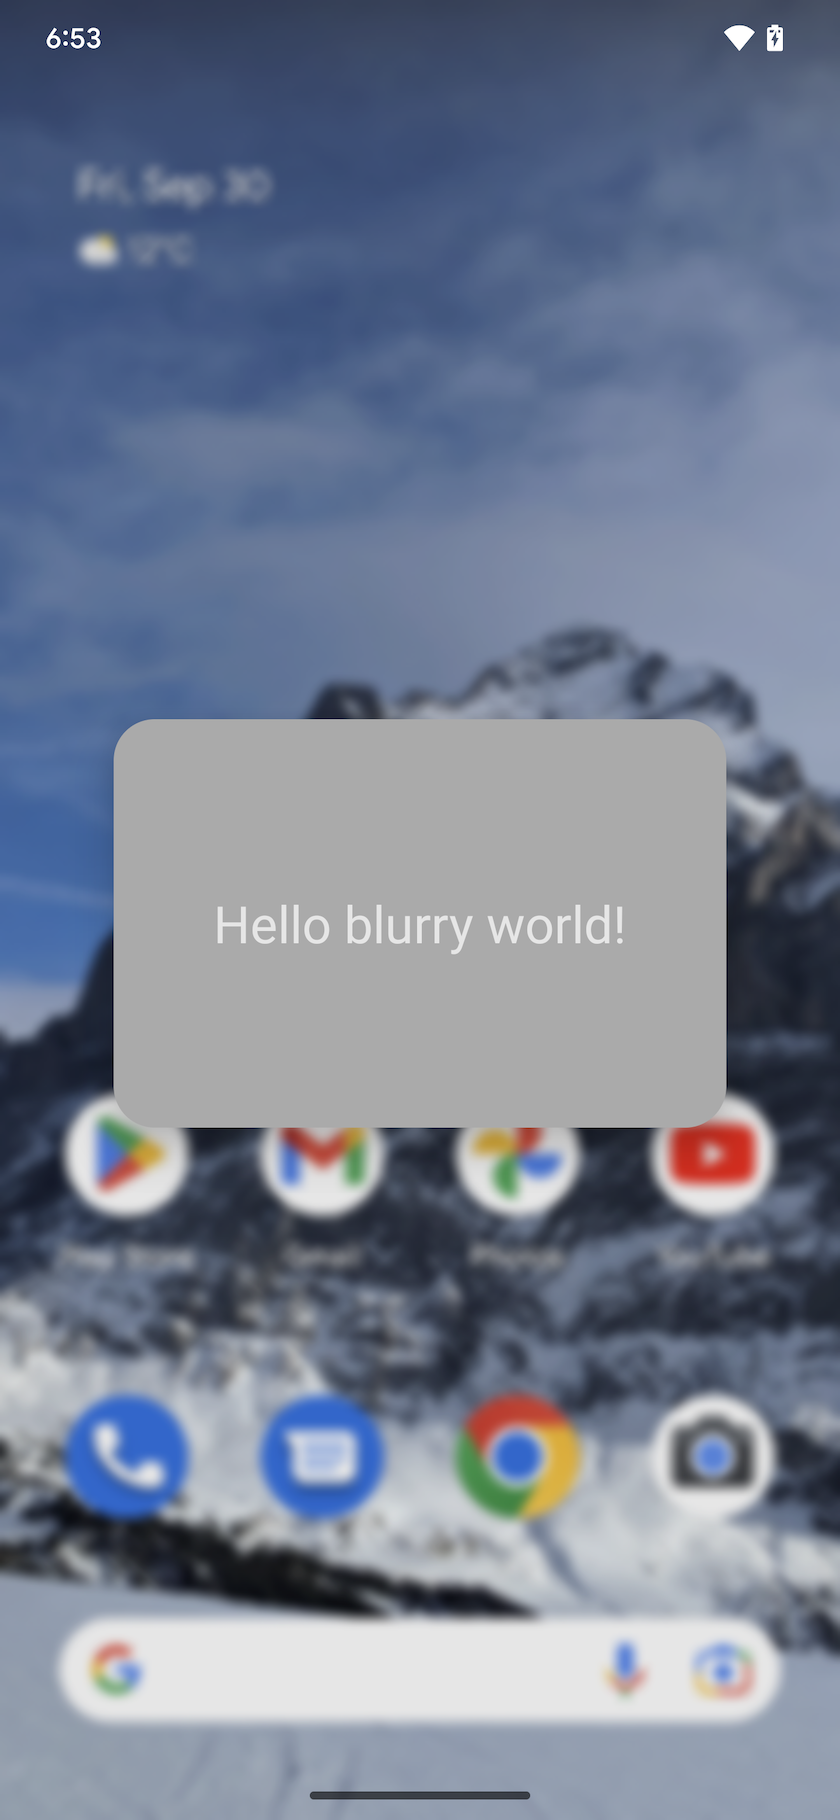
b |
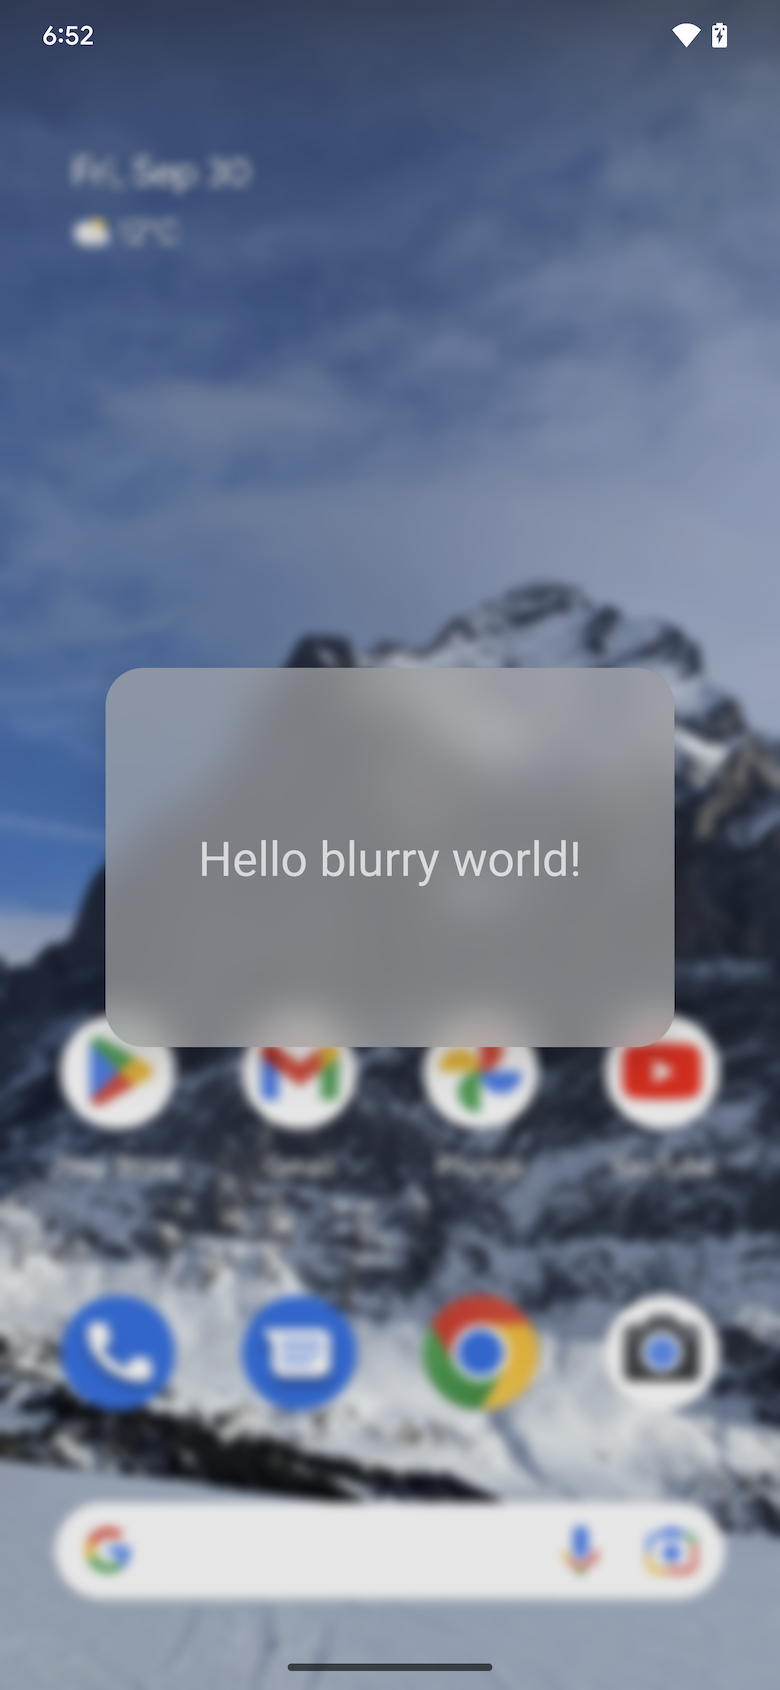 c |
Figure 1. Background blur only (a), blur behind only (b), background blur and blur behind (c)
The window blur feature works across windows, which means it also works when there’s another app behind your window. This effect isn’t the same as the blur render effect, which blurs the content inside the same window. Window blurs are useful for dialogs, bottom sheets, and other floating windows.
Implementation
App developers
App developers must supply a blur radius to create a blur effect. The blur radius controls how dense the blur is, that is, the higher the radius, the denser the blur. A blur of 0 px means no blur. For blur behind, a radius of 20 px creates a good depth of field effect, while a background blur radius of 80 px creates a good frosted glass effect. Avoid blur radii higher than 150 px, as this will significantly impact performance.
To achieve the desired blur effect and increase readability, choose a blur radius value complemented with a translucent layer of color.
Background blur
Use background blur on floating windows to create a window background effect which is a blurred image of the underlying content. To add a blurred background for your window, do the following:
Call Window#setBackgroundBlurRadius(int) to set a background blur radius. Or, in the window theme, set R.attr.windowBackgroundBlurRadius.
Set R.attr.windowIsTranslucent to true to make the window translucent. The blur is drawn under the window surface, so the window needs to be translucent to let the blur be visible.
Optionally, call Window#setBackgroundDrawableResource(int) to add a rectangular window background drawable with a translucent color. Or, in the window theme, set R.attr.windowBackground.
For a window with rounded corners, determine the rounded corners for the blurred area by setting a ShapeDrawable with rounded corners as the window background drawable.
Handle blur enabled and disabled states. Refer to the Guidelines to use window blur in apps section for more information.
Blur behind
The blur behind blurs the whole screen behind the window. This effect is used to direct the user's attention towards the window content by blurring anything on the screen behind the window.
To blur the content behind your window, follow these steps:
Add
FLAG_BLUR_BEHINDto the window flags, to enable blur behind. Or, in the window theme, set R.attr.windowBlurBehindEnabled.Call
WindowManager.LayoutParams#setBlurBehindRadiusto set a blur behind radius. Or, in the window theme, set R.attr.windowBlurBehindRadius.Optionally, choose a complementing dim amount.
Handle blur enabled and disabled states. Refer to the Guidelines to use window blur in apps section for more information.
Guidelines to use window blur in apps
Support for windows blur is dependent on the following:
Android version: The windows blur APIs are available only on Android 12 and higher. Check the device SDK for the Android version.
Graphics performance: Devices with less performant GPUs might choose not to support window blurs.
System state: The system server might temporarily disable window blurs at runtime, for example, during battery saving mode, while playing certain kinds of video content or due to a developer override.
In order to make your app compatible across Android versions, devices and system states, follow these guidelines:
Add a listener through WindowManager#addCrossWindowBlurEnabledListener, to notify you when the window blurs are enabled or disabled. Additionally, use
WindowManager#isCrossWindowBlurEnabledto query whether window blurs are currently enabled.Implement two versions for the window background, to accommodate the enabled or disabled state of window blurs.
When blurs are enabled, the window background should be translucent to make the blur visible. In this state, when blurs get disabled, the window content directly overlaps with the content of the underlying window, making the overlapping window less legible. To avoid such an effect, when window blurs are disabled, adapt the app's UI as follows:
For background blur, increase the alpha of the window background drawable, making it more opaque.
For blur behind, add a dim layer with a higher dim amount.
Example of blur behind and background blur
This section provides a working example of an activity that uses both blur behind and background blur.
The following example of MainActivity.java is a dialog with a blur
behind radius of 20 px and a background blur radius of 80 px. It has
rounded corners, defined in xml in the window background drawable. It correctly
handles different Android versions, different devices (that potentially don't
support window blurs) and runtime blur enabled or disabled changes. It ensures
that the dialog content is readable under any of those conditions by adjusting
the window background drawable alpha and the window dim amount.
public class MainActivity extends Activity {

    private final int mBackgroundBlurRadius = 80;
    private final int mBlurBehindRadius = 20;

    // We set a different dim amount depending on whether window blur is enabled or disabled
    private final float mDimAmountWithBlur = 0.1f;
    private final float mDimAmountNoBlur = 0.4f;

    // We set a different alpha depending on whether window blur is enabled or disabled
    private final int mWindowBackgroundAlphaWithBlur = 170;
    private final int mWindowBackgroundAlphaNoBlur = 255;

    // Use a rectangular shape drawable for the window background. The outline of this drawable
    // dictates the shape and rounded corners for the window background blur area.
    private Drawable mWindowBackgroundDrawable;

    @Override
    protected void onCreate(Bundle savedInstanceState) {
        super.onCreate(savedInstanceState);
        setContentView(R.layout.activity_main);

        mWindowBackgroundDrawable = getDrawable(R.drawable.window_background);
        getWindow().setBackgroundDrawable(mWindowBackgroundDrawable);

        if (buildIsAtLeastS()) {
            // Enable blur behind. This can also be done in xml with R.attr#windowBlurBehindEnabled
            getWindow().addFlags(WindowManager.LayoutParams.FLAG_BLUR_BEHIND);

            // Register a listener to adjust window UI whenever window blurs are enabled/disabled
            setupWindowBlurListener();
        } else {
            // Window blurs are not available prior to Android S
            updateWindowForBlurs(false /* blursEnabled */);
        }

        // Enable dim. This can also be done in xml, see R.attr#backgroundDimEnabled
        getWindow().addFlags(WindowManager.LayoutParams.FLAG_DIM_BEHIND);
    }

    /**
     * Set up a window blur listener.
     *
     * Window blurs might be disabled at runtime in response to user preferences or system states
     * (e.g. battery saving mode). WindowManager#addCrossWindowBlurEnabledListener allows to
     * listen for when that happens. In that callback we adjust the UI to account for the
     * added/missing window blurs.
     *
     * For the window background blur we adjust the window background drawable alpha:
     *     - lower when window blurs are enabled to make the blur visible through the window
     *       background drawable
     *     - higher when window blurs are disabled to ensure that the window contents are readable
     *
     * For window blur behind we adjust the dim amount:
     *     - higher when window blurs are disabled - the dim creates a depth of field effect,
     *       bringing the user's attention to the dialog window
     *     - lower when window blurs are enabled - no need for a high alpha, the blur behind is
     *       enough to create a depth of field effect
     */
    @RequiresApi(api = Build.VERSION_CODES.S)
    private void setupWindowBlurListener() {
        Consumer<Boolean> windowBlurEnabledListener = this::updateWindowForBlurs;
        getWindow().getDecorView().addOnAttachStateChangeListener(
                new View.OnAttachStateChangeListener() {
                    @Override
                    public void onViewAttachedToWindow(View v) {
                        getWindowManager().addCrossWindowBlurEnabledListener(
                                windowBlurEnabledListener);
                    }

                    @Override
                    public void onViewDetachedFromWindow(View v) {
                        getWindowManager().removeCrossWindowBlurEnabledListener(
                                windowBlurEnabledListener);
                    }
                });
    }

    private void updateWindowForBlurs(boolean blursEnabled) {
        mWindowBackgroundDrawable.setAlpha(blursEnabled && mBackgroundBlurRadius > 0 ?
                mWindowBackgroundAlphaWithBlur : mWindowBackgroundAlphaNoBlur);
        getWindow().setDimAmount(blursEnabled && mBlurBehindRadius > 0 ?
                mDimAmountWithBlur : mDimAmountNoBlur);

        if (buildIsAtLeastS()) {
            // Set the window background blur and blur behind radii
            getWindow().setBackgroundBlurRadius(mBackgroundBlurRadius);
            getWindow().getAttributes().setBlurBehindRadius(mBlurBehindRadius);
            getWindow().setAttributes(getWindow().getAttributes());
        }
    }

    private static boolean buildIsAtLeastS() {
        return Build.VERSION.SDK_INT >= Build.VERSION_CODES.S;
    }
}
To create rounded corners for the window, we define the window background in
res/drawable/window_background.xml as a ShapeDrawable with rounded corners
with radius 20 dp as follows:
<shape xmlns:android="http://schemas.android.com/apk/res/android" android:shape="rectangle" >
    <corners android:radius="20dp"/>
    <solid android:color="#AAAAAA"/>
</shape>
Window blurs blur the content of the window underneath the activity. The blurred image is drawn under this activity window, so the activity window needs to be translucent to allow for the blurring to be visible. To make the window translucent we set R.attr.windowIsTranslucent in the activity theme as follows:
<style name="Theme.BlurryDialog" parent="Theme.MaterialComponents.Dialog">
    <item name="android:windowIsTranslucent">true</item>
</style>
OEMs and partners
To have window blurring on a device, the OEM needs to declare that the device supports window blurs.
To check if your device can support window blurs, do the following:
Ensure that the device can handle the extra GPU load. Lower-end devices might not be able to handle the extra load, which can cause dropped frames. Only enable window blurs on tested devices with sufficient GPU power.
If you have a customized render engine, ensure that your render engine implements the blurring logic. The default Android 12 render engine implements the blurring logic in
BlurFilter.cpp.
Once you ensure that your device can support window blurs, set the following
surface flinger sysprop:
PRODUCT_VENDOR_PROPERTIES += \
       ro.surface_flinger.supports_background_blur=1
Validation
To validate that your app window has proper handling when switching between blur enabled and blur disabled states, follow these steps:
Open the UI that has blur.
Enable or disable window blurs by turning window blur on and off.
Verify that the window UI changes to and from a blurred state as expected.
Turn window blur on and off
To test how the window UI renders with the window blurs effect, enable or disable blurs using one of the following methods:
From Developer Options:
Settings -> System -> Developer options -> Hardware accelerated rendering -> Allow window-level blurs
From the terminal on a rooted device:
adb shell wm disable-blur 1 # 1 disables window blurs, 0 allows them
To check whether your Android 12+ device supports window
blurs and whether window blurs are currently enabled, run
adb shell wm disable-blur on a rooted device.
Troubleshooting
Use the following as a guide for troubleshooting during validation.
No blur drawn
Verify the blurs are currently enabled and your hardware supports them. Refer to Turn window blur on and off.
Ensure you set a translucent window background color. An opaque window background color hides the blurred area.
Test device doesn’t support window blurs
- Test your application on the Android 12 emulator. To set up an Android emulator, refer to Set up an Android emulator. Any Android virtual device you create with the emulator supports the window blurs.
No rounded corners
- Set a window background drawable to define rounded corners. This drawable determines the outline of the blurred area.
Updating the developer option doesn’t enable blurs
- Check whether the device is in battery-saving mode or whether it’s using multimedia tunneling. On some TV devices window blurs might also be disabled during video playback.
Background blur drawn fullscreen, not within the window bounds
Check android:windowIsFloating to ensure that your window is marked as floating.
Ensure that a window background drawable is set. This setting determines the outline of the blur area.
Updates from the listener are not applied on the screen
- The listener updates might be getting applied to an old window instance. Check if the window is getting destroyed and recreated with the right listener update.