
Dynamic System Updates (DSU) allows you to make an Android system image that users can download from the internet and try out without the risk of corrupting the current system image. This document describes how to support DSU.
Kernel requirements
See Implementing Dynamic Partitions for kernel requirements.
In addition, DSU relies on the device-mapper-verity (dm-verity) kernel feature to verify the Android system image. So you must enable the following kernel configs:
CONFIG_DM_VERITY=yCONFIG_DM_VERITY_FEC=y
Partition requirements
Starting in Android 11, DSU requires the /data
partition to use the F2FS or ext4 file system. F2FS gives better performance and
is recommended, but the difference should be insignificant.
Here are some examples of how long a dynamic system update takes with a Pixel device:
- Using F2FS:
- 109s, 8G user, 867M system, file system type: F2FS: encryption=aes-256-xts:aes-256-cts
- 104s, 8G user, 867M system, file system type: F2FS: encryption=ice
- Using ext4:
- 135s, 8G user, 867M system, file system type: ext4: encryption=aes-256-xts:aes-256-cts
If it takes much longer on your platform, you may want to check if the mount flag contains any flag that makes “sync” write, or you can specify an “async” flag explicitly to get better performance.
The metadata partition (16 MB or larger) is required for storing data related
to the installed images. It must be mounted during first stage mount.
The userdata partition must use F2FS or ext4 file system. When using F2FS,
include all F2FS related patches available in the
Android common kernel.
DSU was developed and tested with kernel/common 4.9. It's recommended to use kernel 4.9 and higher for this feature.
Vendor HAL behavior
Weaver HAL
The Weaver HAL provides a fixed number of slots for storing user keys. The DSU consumes two extra key slots. If an OEM has a Weaver HAL, it needs to have enough slots for a generic system image (GSI) and a host image.
Gatekeeper HAL
The Gatekeeper HAL needs to
support large USER_ID values, because the GSI offsets UIDs to the HAL by
+1000000.
Verify boot
If you want to support booting Developer GSI Images
in LOCKED state without disabling
verified boot, include Developer GSI keys by adding the following line
to the file device/<device_name>/device.mk:
$(call inherit-product, $(SRC_TARGET_DIR)/product/developer_gsi_keys.mk)
Rollback protection
When using DSU, the downloaded Android system image must be newer than the
current system image on the device. This is done by comparing the security patch
levels in the
Android Verified Boot
(AVB)
AVB property descriptor
of both system images: Prop: com.android.build.system.security_patch ->
'2019-04-05'.
For devices not using AVB, put the security patch level of the current system
image into the kernel cmdline or bootconfig with the bootloader:
androidboot.system.security_patch=2019-04-05.
Hardware requirements
When you launch a DSU instance, two temporary files are allocated:
- A logical partition to store
GSI.img(1~1.5 G) - An 8 GB empty
/datapartition as the sandbox for running the GSI
We recommend reserving at least 10 GB of free space before launching a DSU instance. DSU also supports allocation from an SD card. When an SD card is present, it has the highest priority for the allocation. SD card support is critical for lower-powered devices that might not have enough internal storage. When an SD card is present, make sure it's not adopted. DSU doesn't support adopted SD cards.
Available frontends
You can launch DSU using adb, an OEM app, or the one-click DSU loader (in
Android 11 or higher).
Launch DSU using adb
To launch DSU using adb, enter these commands:
$ simg2img out/target/product/.../system.img system.raw
$ gzip -c system.raw > system.raw.gz
$ adb push system.raw.gz /storage/emulated/0/Download
$ adb shell am start-activity \
-n com.android.dynsystem/com.android.dynsystem.VerificationActivity  \
-a android.os.image.action.START_INSTALL    \
-d file:///storage/emulated/0/Download/system.raw.gz  \
--el KEY_SYSTEM_SIZE $(du -b system.raw|cut -f1)  \
--el KEY_USERDATA_SIZE 8589934592
Launch DSU using an app
The main entry point to DSU is the android.os.image.DynamicSystemClient.java
API:
public class DynamicSystemClient {


...
...

     /**
     * Start installing DynamicSystem from URL with default userdata size.
     *
     * @param systemUrl A network URL or a file URL to system image.
     * @param systemSize size of system image.
     */
    public void start(String systemUrl, long systemSize) {
        start(systemUrl, systemSize, DEFAULT_USERDATA_SIZE);
    }
You must bundle/preinstall this app on the device. Because
DynamicSystemClient is a system API, you can't build the app with the regular
SDK API and you can't publish it on Google Play. The purpose of this app is:
- Fetch an image list and the corresponding URL with a vendor-defined scheme.
- Match the images in the list against the device and show compatible images for the user to select.
Invoke
DynamicSystemClient.startlike this:DynamicSystemClient aot = new DynamicSystemClient(...) aot.start( ...URL of the selected image..., ...uncompressed size of the selected image...);
The URL points to a gzipped, non-sparse, system image file, which you can make with the following commands:
$ simg2img ${OUT}/system.img ${OUT}/system.raw
$ gzip ${OUT}/system.raw
$ ls ${OUT}/system.raw.gz
The filename should follow this format:
<android version>.<lunch name>.<user defined title>.raw.gz
Examples:
o.aosp_taimen-userdebug.2018dev.raw.gzp.aosp_taimen-userdebug.2018dev.raw.gz
One-click DSU loader
Android 11 introduces the one-click DSU loader, which is a frontend in the developer settings.
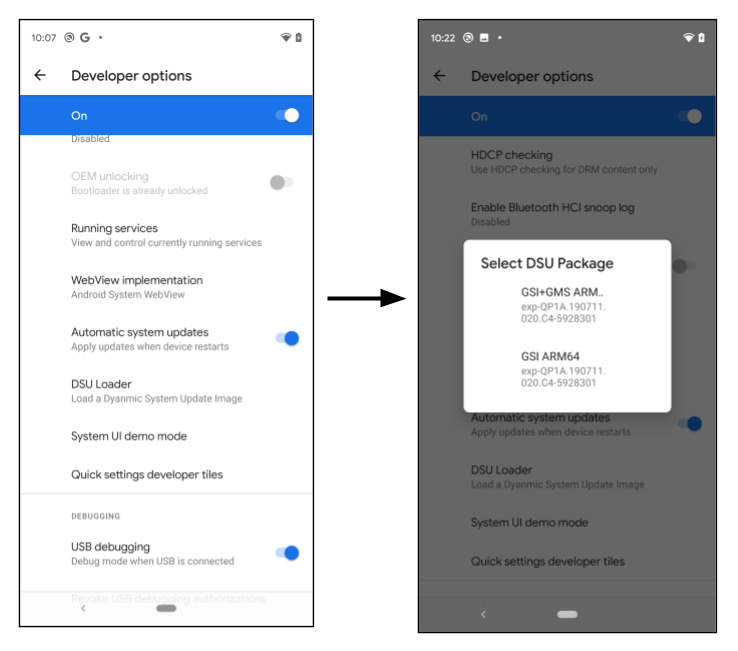
Figure 1. Launching the DSU loader
When the developer clicks the DSU Loader button, it fetches a pre-configured DSU JSON descriptor from the web and displays all applicable images in the floating menu. Select an image to start the DSU installation, and the progress shows on the notification bar.
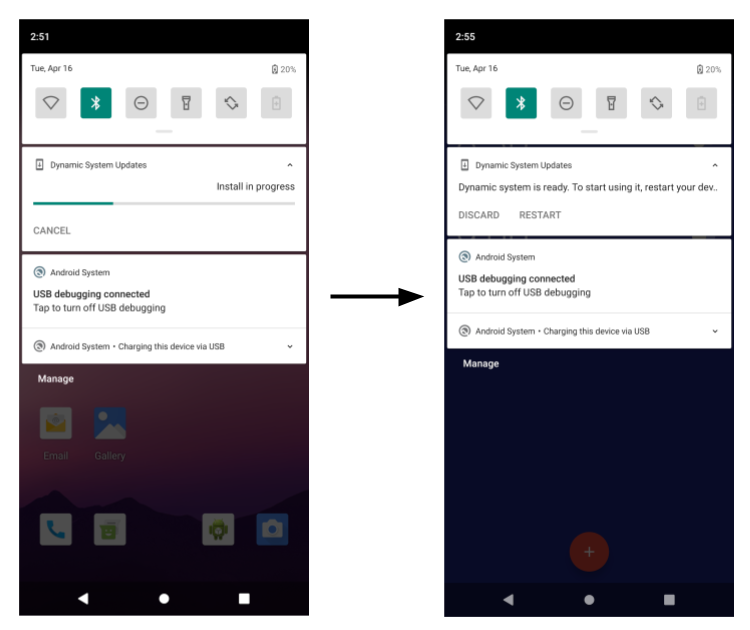
Figure 2. DSU image installation progress
By default, the DSU loader loads a JSON descriptor that contains the GSI images. The following sections demonstrate how to make OEM-signed DSU packages and load them from the DSU loader.
Feature flag
The DSU feature is under the settings_dynamic_android feature flag. Before
using DSU, make sure the corresponding feature flag is enabled.
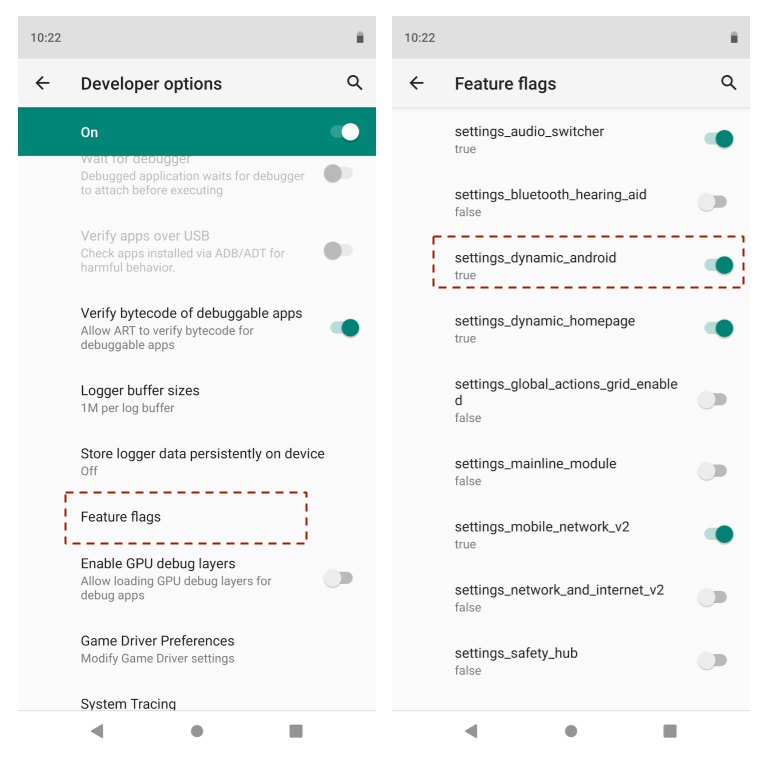
Figure 3. Enabling the feature flag
The feature flag UI might be unavailable on a device running a user build. In
this case, use the adb command instead:
$ adb shell setprop persist.sys.fflag.override.settings_dynamic_system 1
Vendor host system images on GCE (optional)
One of the possible storage locations for the system images is the Google Compute Engine (GCE) bucket. The release administrator uses the GCP storage console to add/delete/change the released system image.
The images must be public access, as shown here:
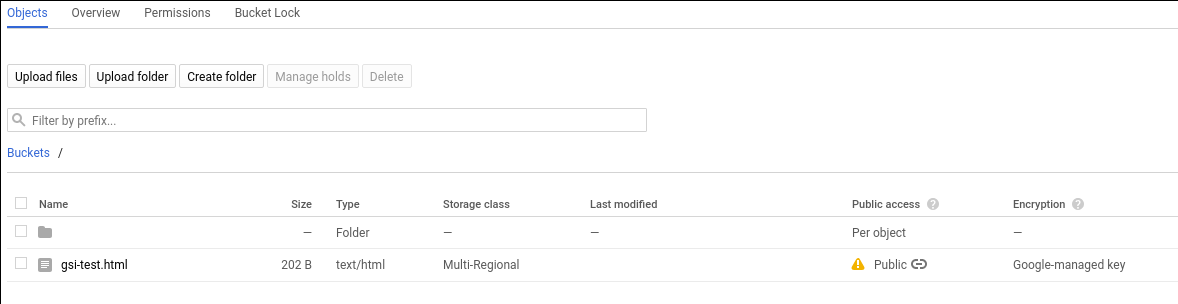
Figure 4. Public access in GCE
The procedure to make an item public is available in the Google Cloud documentation.
Multiple-partition DSU in ZIP file
Starting in Android 11, DSU can have more than one
partition. For example, it can contain a product.img in addition to the
system.img. When the device boots, the first stage init detects the
installed DSU partitions and replaces the on-device partition temporarily, when
the installed DSU is enabled. The DSU package may contain a partition that doesn't
have a corresponding partition on the device.
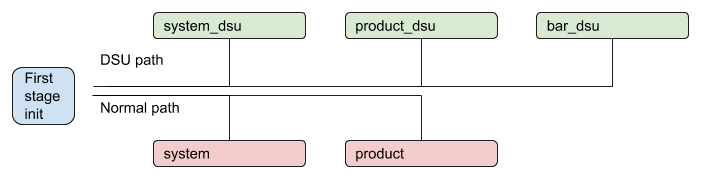
Figure 5. DSU process with multiple partitions
OEM-signed DSU
To make sure all images running on the device are authorized by the device manufacturer, all images within a DSU package must be signed. For example, assume there’s a DSU package that contains two partition images like below:
dsu.zip {
    - system.img
    - product.img
}
Both system.img and product.img must be signed by the OEM key before they
are put into the ZIP file. The common practice is to use an asymmetric
algorithm, for example, RSA, where the secret key is used to sign the package and the
public key is used to verify it. The first stage ramdisk must include the paring
public key, for example, /avb/*.avbpubkey. If the device already adopted AVB, the
existing signing procedure will suffice. The following sections illustrate the
signing process and highlight the placement of the AVB pubkey that is used to
verify the images in the DSU package.
DSU JSON descriptor
The DSU JSON descriptor describes DSU packages. It supports two primitives.
First, the include primitive includes additional JSON descriptors or redirects
the DSU loader to a new location. For example:
{
    "include": ["https://.../gsi-release/gsi-src.json"]
}
Second, the image primitive is used to describe released DSU packages. Inside
the image primitive there are several attributes:
The
nameanddetailsattributes are strings that are shown on the dialog for the user to select.The
cpu_api,vndk, andos_versionattributes are used for compatibility checks, which are described in the next section.The optional
pubkeyattribute describes the public key that pairs with the secret key that's used to sign the DSU package. When it’s specified, the DSU service can check if the device has the key used to verify the DSU package. This avoids installing an unrecognized DSU package, for example installing a DSU signed by OEM-A to a device made by OEM-B.The optional
tosattribute points to a text file that describes the terms of service for the corresponding DSU package. When a developer selects a DSU package with the terms of service attribute specified, the dialog box shown in Figure 6 opens, asking the developer to accept the terms of service before installing the DSU package.
Figure 6. Terms of service dialog box
For reference, here's a DSU JSON descriptor for the GSI:
{
   "images":[
      {
         "name":"GSI+GMS x86",
         "os_version":"10",
         "cpu_abi": "x86",
         "details":"exp-QP1A.190711.020.C4-5928301",
         "vndk":[
            27,
            28,
            29
         ],
         "pubkey":"",
         "tos": "https://dl.google.com/developers/android/gsi/gsi-tos.txt",
         "uri":"https://.../gsi/gsi_gms_x86-exp-QP1A.190711.020.C4-5928301.zip"
      },
      {
         "name":"GSI+GMS ARM64",
         "os_version":"10",
         "cpu_abi": "arm64-v8a",
         "details":"exp-QP1A.190711.020.C4-5928301",
         "vndk":[
            27,
            28,
            29
         ],
         "pubkey":"",
         "tos": "https://dl.google.com/developers/android/gsi/gsi-tos.txt",
         "uri":"https://.../gsi/gsi_gms_arm64-exp-QP1A.190711.020.C4-5928301.zip"
      },
      {
         "name":"GSI ARM64",
         "os_version":"10",
         "cpu_abi": "arm64-v8a",
         "details":"exp-QP1A.190711.020.C4-5928301",
         "vndk":[
            27,
            28,
            29
         ],
         "pubkey":"",
         "uri":"https://.../gsi/aosp_arm64-exp-QP1A.190711.020.C4-5928301.zip"
      },
      {
         "name":"GSI x86_64",
         "os_version":"10",
         "cpu_abi": "x86_64",
         "details":"exp-QP1A.190711.020.C4-5928301",
         "vndk":[
            27,
            28,
            29
         ],
         "pubkey":"",
         "uri":"https://.../gsi/aosp_x86_64-exp-QP1A.190711.020.C4-5928301.zip"
      }
   ]
}
Compatibility management
Several attributes are used to specify the compatibility between a DSU package and the local device:
cpu_apiis a string that describes the device architecture. This attribute is mandatory and is compared with thero.product.cpu.abisystem property. Their values must match exactly.os_versionis an optional integer that specifies an Android release. For example, for Android 10,os_versionis10and for Android 11,os_versionis11. When this attribute is specified, it must be equal to or greater than thero.system.build.version.releasesystem property. This check is used to prevent booting an Android 10 GSI image on an Android 11 vendor device, which is currently not supported. Booting an Android 11 GSI image on an Android 10 device is allowed.vndkis an optional array that specifies all VNDKs that are included in the DSU package. When it's specified, the DSU loader checks if the number extracted from thero.vndk.versionsystem property is included.
Revoke DSU keys for security
In the extremely rare case when the RSA key pair used to sign the DSU images is compromised, the ramdisk should be updated as soon as possible to remove the compromised key. In addition to updating the boot partition, you can block compromised keys using a DSU key revocation list (key blacklist) from an HTTPS URL.
The DSU key revocation list contains a list of revoked AVB public keys. During DSU installation, the public keys inside the DSU images are validated with the revocation list. If the images are found to contain a revoked public key, the DSU installation process stops.
The key revocation list URL should be a HTTPS URL to ensure the security strength, and is specified in a resource string:
frameworks/base/packages/DynamicSystemInstallationService/res/values/strings.xml@key_revocation_list_url
The string's value is
https://dl.google.com/developers/android/gsi/gsi-keyblacklist.json, which is a
revocation list for Google-released GSI keys. This resource string can be
overlaid and customized, so that OEMs who adopt the DSU feature can provide and
maintain their own key blacklist. This provides a way for the OEM to block
certain public keys without updating the device's ramdisk image.
The format of the revocation list is:
{
   "entries":[
      {
         "public_key":"bf14e439d1acf231095c4109f94f00fc473148e6",
         "status":"REVOKED",
         "reason":"Key revocation test key"
      },
      {
         "public_key":"d199b2f29f3dc224cca778a7544ea89470cbef46",
         "status":"REVOKED",
         "reason":"Key revocation test key"
      }
   ]
}
public_keyis the SHA-1 digest of the revoked key, in the format described in the generating the AVB pubkey section.statusindicates the revocation status of the key. Currently, the only supported value isREVOKED.reasonis an optional string describing the reason for revocation.
DSU procedures
This section describes how to perform several DSU configuration procedures.
Generate a new key pair
Use the openssl command to generate an RSA private/public key pair in .pem
format (for example, with size 2048 bit):
$ openssl genrsa -out oem_cert_pri.pem 2048
$ openssl rsa -in oem_cert_pri.pem -pubout -out oem_cert_pub.pem
The private key might not be accessible and is only kept in a hardware security module (HSM). In this case, there might be a x509 public key certificate available after key generation. See the Adding the pairing pubkey to the ramdisk section for instructions to generate the AVB public key from a x509 certificate.
To convert an x509 certificate to PEM format:
$ openssl x509 -pubkey -noout -in oem_cert_pub.x509.pem > oem_cert_pub.pem
Skip this step if the certificate is already a PEM file.
Add the pairing pubkey to the ramdisk
The oem_cert.avbpubkey must be put under /avb/*.avbpubkey to verify the
signed DSU package. First, convert the public key in PEM format to AVB public
key format:
$ avbtool extract_public_key --key oem_cert_pub.pem --output oem_cert.avbpubkey
Then include the public key in the first stage ramdisk with the following steps.
Add a prebuilt module to copy the
avbpubkey. For example, adddevice/<company>/<board>/oem_cert.avbpubkeyanddevice/<company>/<board>/avb/Android.mkwith content like this:include $(CLEAR_VARS) LOCAL_MODULE := oem_cert.avbpubkey LOCAL_MODULE_CLASS := ETC LOCAL_SRC_FILES := $(LOCAL_MODULE) ifeq ($(BOARD_USES_RECOVERY_AS_BOOT),true) LOCAL_MODULE_PATH := $(TARGET_RECOVERY_ROOT_OUT)/first_stage_ramdisk/avb else LOCAL_MODULE_PATH := $(TARGET_RAMDISK_OUT)/avb endif include $(BUILD_PREBUILT)Make the droidcore target depend on the added
oem_cert.avbpubkey:droidcore: oem_cert.avbpubkey
Generate the AVB pubkey attribute in the JSON descriptor
The oem_cert.avbpubkey is in the AVB public key binary format. Use SHA-1 to
make it readable before putting it into the JSON descriptor:
$ sha1sum oem_cert.avbpubkey | cut -f1 -d ' '
3e62f2be9d9d813ef5........866ac72a51fd20
This will be the content of the pubkey attribute of the JSON descriptor.
   "images":[
      {
         ...
         "pubkey":"3e62f2be9d9d813ef5........866ac72a51fd20",
         ...
      },
Sign a DSU package
Use one of these methods to sign a DSU package:
Method 1: Reuse the artifact made by the original AVB signing process to make a DSU package. An alternative approach is to extract the already signed images from the release package and use the extracted images to make the ZIP file directly.
Method 2: Use the following commands to sign DSU partitions if the private key is available. Each
imgwithin a DSU package (the ZIP file) is signed separately:$ key_len=$(openssl rsa -in oem_cert_pri.pem -text | grep Private-Key | sed -e 's/.*(\(.*\) bit.*/\1/') $ for partition in system product; do avbtool add_hashtree_footer \ --image ${OUT}/${partition}.img \ --partition_name ${partition} \ --algorithm SHA256_RSA${key_len} \ --key oem_cert_pri.pem done
For more information about adding add_hashtree_footer using avbtool, see
Using avbtool.
Verify the DSU package locally
It’s recommended to verify all local images against the pairing public key with these commands:
for partition in system product; do
    avbtool verify_image --image ${OUT}/${partition}.img  --key oem_cert_pub.pem
done
The expected output looks like this:
Verifying image dsu/system.img using key at oem_cert_pub.pem
vbmeta: Successfully verified footer and SHA256_RSA2048 vbmeta struct in dsu/system.img
: Successfully verified sha1 hashtree of dsu/system.img for image of 898494464 bytes

Verifying image dsu/product.img using key at oem_cert_pub.pem
vbmeta: Successfully verified footer and SHA256_RSA2048 vbmeta struct in dsu/product.img
: Successfully verified sha1 hashtree of dsu/product.img for image of 905830400 bytes
Make a DSU package
The following example makes a DSU package that contains a system.img and a
product.img:
dsu.zip {
    - system.img
    - product.img
}
After both images are signed, use the following command to make the ZIP file:
$ mkdir -p dsu
$ cp ${OUT}/system.img dsu
$ cp ${OUT}/product.img dsu
$ cd dsu && zip ../dsu.zip *.img && cd -
Customize the one-click DSU
By default, the DSU loader points to a metadata of GSI images which is
https://...google.com/.../gsi-src.json.
OEMs can overwrite the list by defining the persist.sys.fflag.override.settings_dynamic_system.list
property that points to their own JSON descriptor. For example, an OEM may
provide JSON metadata that includes GSI as well as OEM proprietary images like this:
{
    "include": ["https://dl.google.com/.../gsi-src.JSON"]
    "images":[
      {
         "name":"OEM image",
         "os_version":"10",
         "cpu_abi": "arm64-v8a",
         "details":"...",
         "vndk":[
            27,
            28,
            29
         ],
         "spl":"...",
         "pubkey":"",
         "uri":"https://.../....zip"
      },

}
It’s possible for an OEM to chain published DSU metadata as shown in Figure 7.
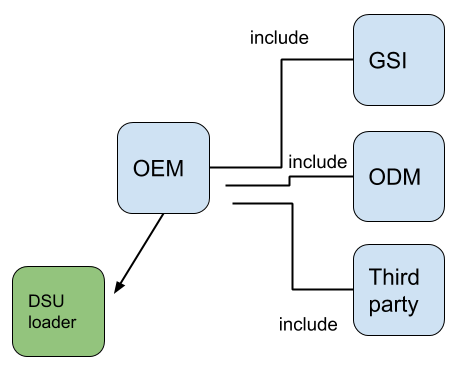
Figure 7. Chaining published DSU metadata