
OmniLab ATS is a testing tool that Android developers and test engineers can use to employ a user interface for running standard Android test suites, such as the Android Compatibility Test Suite (CTS). This tool acts as a web interface for various test frameworks, such as Trade Federation (TF) and Google Mobly, allowing you to run CTS and multi-device tests on a set of test devices with minimal setup, as well as establish a schedule to continuously run tests.
Introduction to OmniLab ATS 2.0
OmniLab ATS 2.0 migrates the underlying test execution infrastructure from Trade Federation to OmniLab. This change brings a more robust and efficient backend, while preserving the OmniLab ATS 1.0 user interface and workflows.
Key benefits of OmniLab ATS 2.0:
- Modernized infrastructure: Leverages the OmniLab platform for improved stability and performance.
- Seamless transition: No changes to the web UI or core test execution workflows.
- Future ready: Aligns with Google's unified testing infrastructure, enabling faster adoption of new features.
OmniLab ATS 2.0 includes new features such as bulk test plan updates, advanced device allocation, and more to come. Check the release notes for updates.
Upgrade to OmniLab ATS 2.0:
To use OmniLab ATS 2.0, you must upgrade your station to build R52
or later. Use the --force_ats_version 2 flag to switch to the new
Omnilab ATS 2.0, and the --force_update flag with the
mtt start command to upgrade to the latest build:
mtt start --force_ats_version 2 --force_update
During migration period, we recommend using the dogfood tag to access the
latest stable build with OmniLab ATS 2.0 features:
mtt start --force_ats_version 2 --tag dogfood --force_update
We plan to make OmniLab ATS 2.0 the default version in Q3 2026. We plan to phase out OmniLab ATS 1.0 by the end of 2026.
For more details on specific updates, known differences, and upgrade guidance, see OmniLab ATS 2.0 Upgrade Guide.
Set up OmniLab ATS
This section explains how to install and set up OmniLab ATS.
OmniLab ATS uses source code from these locations:
- OmniLab ATS source code
- TradeFed Cluster source code
Install OmniLab ATS
Follow any hardware and software requirements for the tests suites you run.
The requirements for CTS are found on source.android.com.
There are no additional hardware requirements for OmniLab ATS, but we recommend using CTS host requirement as a starting point.
There are two ways to install OmniLab ATS:
- Run the installer program.
- Install it manually, which requires installing multiple programs and resources.
Install with the installer program
The installer program is supported on Ubuntu 22.04 and higher. The installer installs and configures all the programs and resources needed to run OmniLab ATS.
To use the install program:
Run the installer program:
curl https://storage.googleapis.com/android-mtt.appspot.com/prod/install.sh | bash
Run
mtt versionto check the installed version of OmniLab ATS CLI.
Install manually
Install Docker
Follow the instructions for installing Docker Community Edition (CE) on your Linux machine.
Follow the post-installation steps to manage Docker as a non-root user.
You might need to restart your terminal window or sign out and sign in again for the permission changes to take effect.
Install Python 3
The OmniLab ATS CLI requires Ubuntu 22.04 or later. The CLI is verified against Python versions 3.10 through 3.13.
To install Python 3, run these commands:
sudo apt-get updatesudo apt install python3 python3-distutils
If you need a version of Python 3 not included in your standard distribution, first add the repository for Python 3 by doing one of the following:
Run this command:
sudo add-apt-repository ppa:deadsnakes/ppa
Build and install the repository from the source.
To install a specific Python 3 version (for example, 3.10), run these commands instead:
sudo apt-get updatesudo apt install python3.10 python3.10-distutils
Get the OmniLab ATS CLI
Download the command line interface (CLI) package here.
Start OmniLab ATS
Start OmniLab ATS with the following command:
mtt start
The first time the UI is started, it might take a few minutes to appear. The CLI
displays a web URL to access the UI in a browser. By default, the web URL is
localhost:8000. If needed, you can change the default port upon startup with
the --port flag.
If a newer version is available, you can update to the current version. You can check the Release Notes for the latest releases.
To update to the current version, run:
mtt start --force_update
To stop the app, run:
mtt stop
To view a list of other commands, use:
mtt --help
Back up and restore the database
To back up the OmniLab ATS database, stop the app and run the following command,
which backs up the current database into a TAR file named mtt-backup.tar in
your home directory:
docker run --rm --mount source=mtt-data,target=/data -v ~:/out ubuntu bash -c "cd /data && tar cvf /out/mtt-backup.tar ."
To restore, run the following command before starting the app:
docker run --rm --mount source=mtt-data,target=/data -v ~:/out ubuntu bash -c "cd /data && tar xvf /out/mtt-backup.tar"
Setup Wizard
After you install and run OmniLab ATS for the first time, the Setup Wizard takes you through a few steps to help you customize the tool for your environment. Any changes you make here can be reconfigured later through the Settings page.
Restore a configuration backup
If you have a configuration file backed up from another OmniLab ATS host, you can upload the file to copy any configurations modified from that host by clicking the Upload File button.
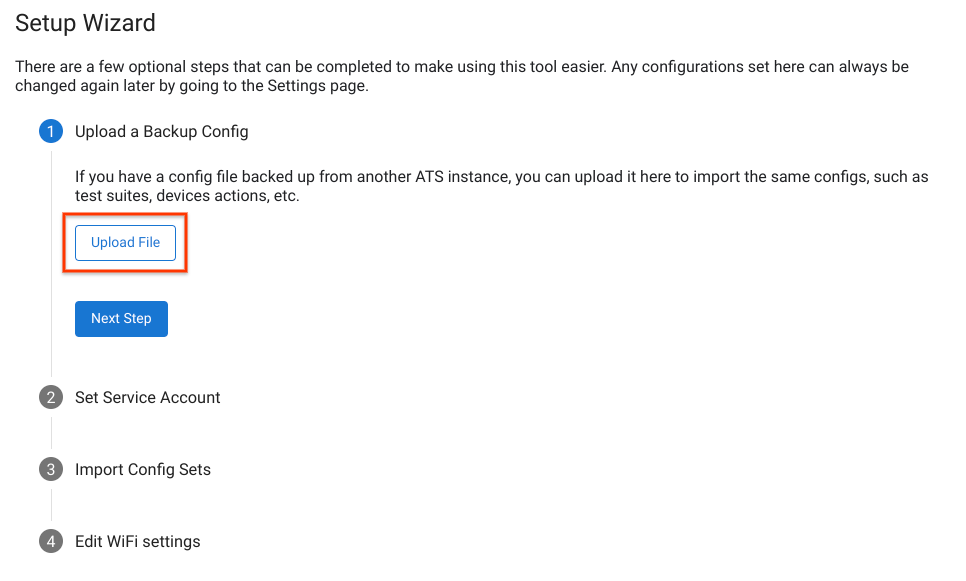
Figure 1. Restoring a Configuration Backup.
Set the default service account
You can set a service account that OmniLab ATS uses by default when accessing your resources (for example, Google Cloud Storage, Google Drive). To authenticate your service account, click Upload Service Account Key and select your service account's JSON key file.
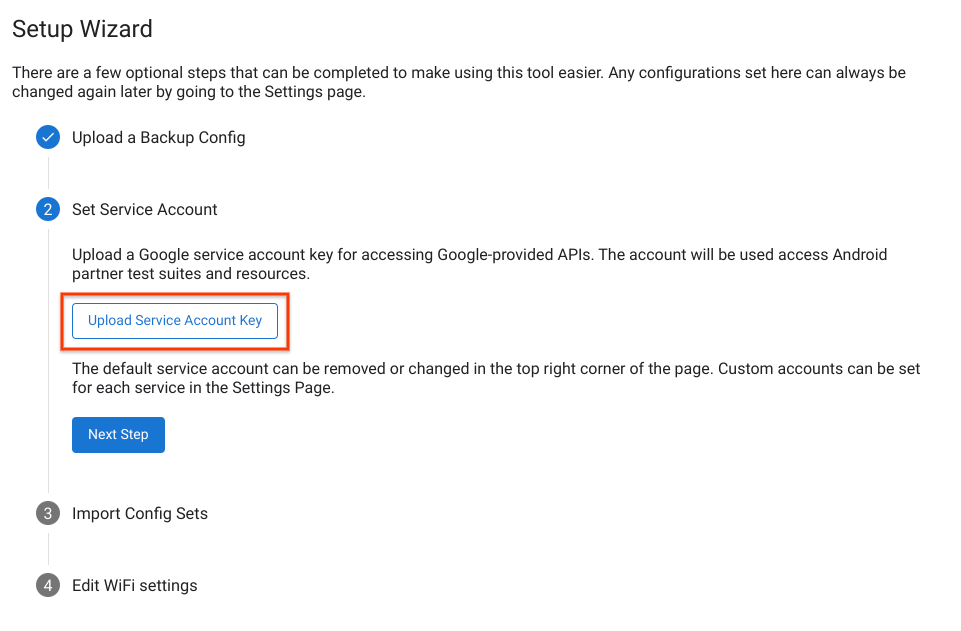
Figure 2. Setting the service account.
When the service account is authenticated successfully, the account email address appears in the top right corner of the page. To change the service account, click the account name, remove the current default account, and upload a new service account key.
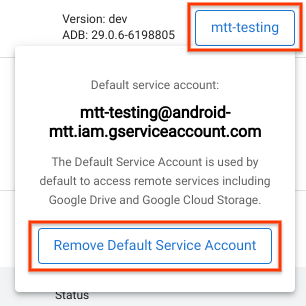
Figure 3. Changing the service account.
Import config sets
A config set is a bundle of configs for running test suites, including related device actions, and build channels. Config sets are hosted in a specific Google Cloud Storage (GCS) bucket. After authenticating the GCS build channel with your Google Account, you see a list of all config sets that are available to you.
Select any config sets you would like to add to your Test Station host and click Import Selected.
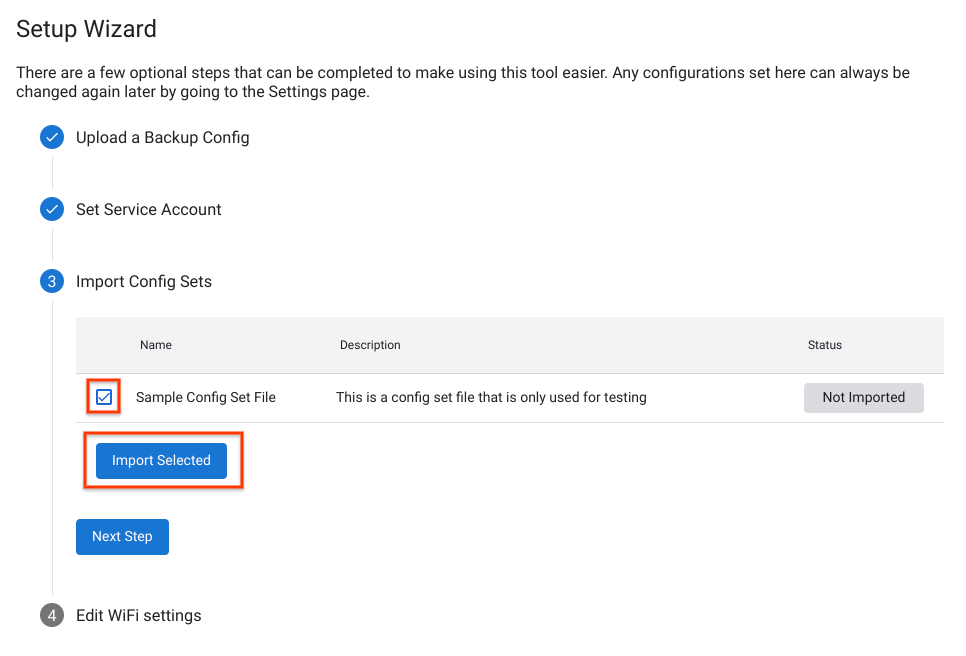
Figure 4. Importing a Config Set.
Include Wi-Fi settings
Some CTS tests require your device to connect to a Wi-Fi hotspot. To select your Wi-Fi network, enter the WiFi SSID and optional WiFi PSK.
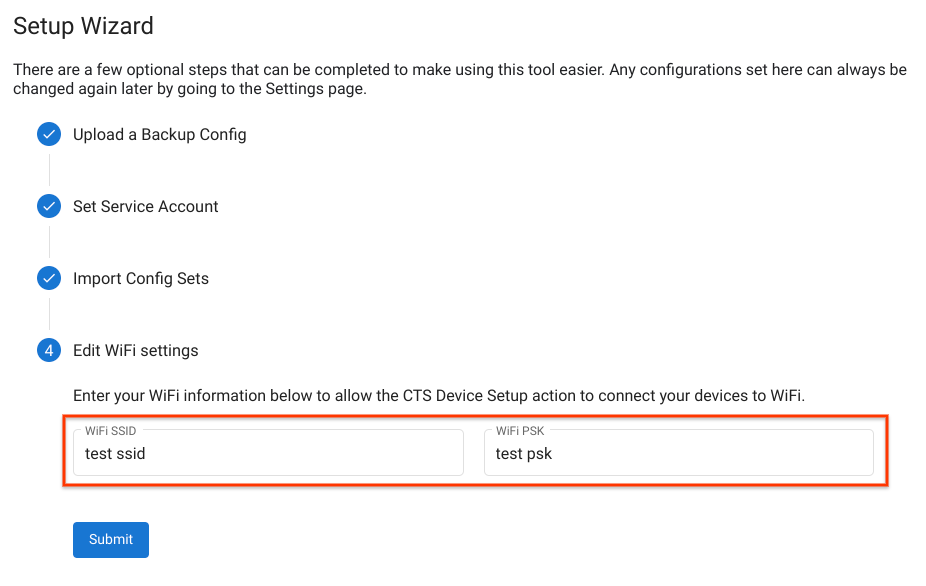
Figure 5. Wi-Fi hotspot settings.
After completing the Setup Wizard, the page reloads with the new settings applied.
Connect a device
USB debugging must be enabled to use a device for testing. To enable debugging:
Follow the instructions in Enable developer options and debugging.
If you plan to use test Android builds preloaded with custom ADB keys, put the custom
.adb_keyfiles under the~/.android/directory.The files are loaded automatically and passed to ADB to auto-enable USB debugging after the device is flashed for devices running those builds.
Connect the device to the host machine using USB.
The device appears in the OmniLab ATS Devices tab within one minute after refreshing the web interface. You can also view the state of the devices on this tab.

Figure 6. Connecting a device.
The different device states are:
- Available - The device is connected and ready to run a test.
- Allocated - The device is connected and is running a test. Each device can run only one test at a time, so the device must finish its current test before running a new one.
Run a test
Select a test
OmniLab ATS comes with a set of prebundled CTS configurations. To run one of these tests, go to the Test Suites tab and click Run test for the selected test.
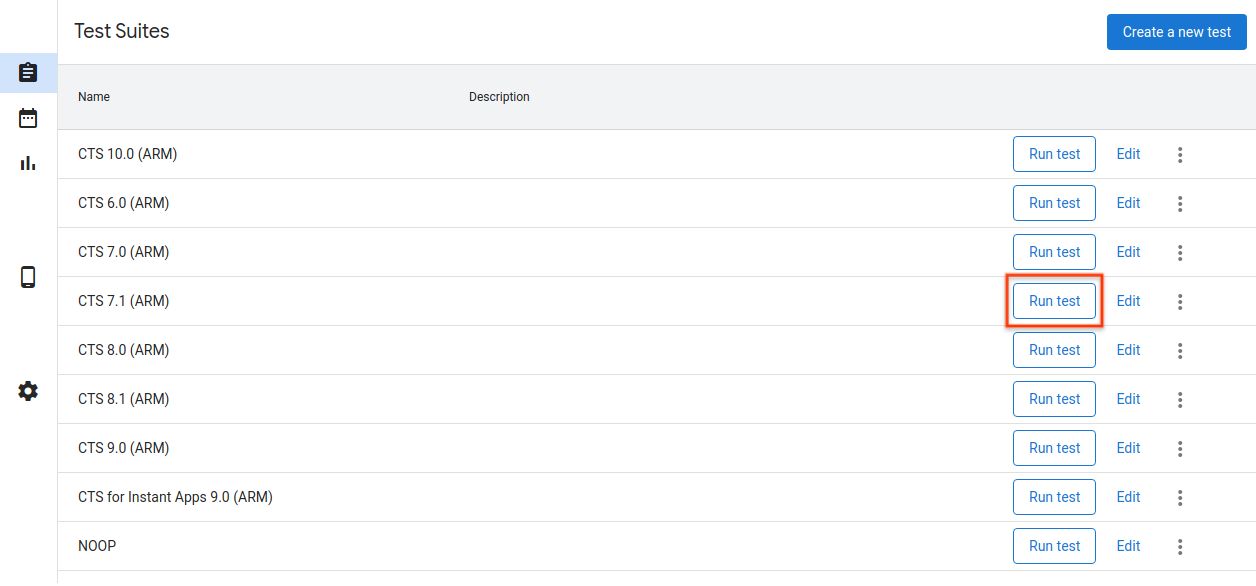
Figure 7. Selecting a test.
To edit or add new tests, see Adding tests.
Configure test run
Edit the parameters to use for this specific test run. Most parameters are prepopulated with values defined in the selected test configuration.
This step can be completed using the default values, but you can change any of the parameters, such as Max Retry and Command, to suit your needs.

Figure 8. Configuring a test run.
The test run parameters are:
- Name - Name of the test suite you want to run.
- Run Count - Number of times this test run should be executed when scheduled. Test runs are scheduled using Trade Federation, which runs up to 20 test runs in parallel if there's capacity to do so.
- Max Retry - Maximum number of times to retry a test run if at least one test fails. This is usually set to 4–6 retries for a full CTS run to handle flaky tests.
- Queue Timeout - If a test run remains in the Queued state for too long, it's automatically canceled. Specify the amount of time to wait before cancellation here. The default is 24 hours.
Command - The command to run the test suite. You can enter additional command line arguments here. For example, run a specific module in CTS 8.1 with:
cts-suite -m ShortModuleNameRetry Command - The command for retrying a test suite. You can add additional command line arguments here. For example, to retry only a specific module in CTS 8.1, use:
cts --retry 0 -m ShortModuleNameRetry arguments might differ from those available with the initial command, so check the supported parameters on the official site for the selected test suite.
Previous Test Run - If you want to re-run a previous test run:
Local - If the run was started on the current host, enter the test run ID seen when viewing the details of the test run.
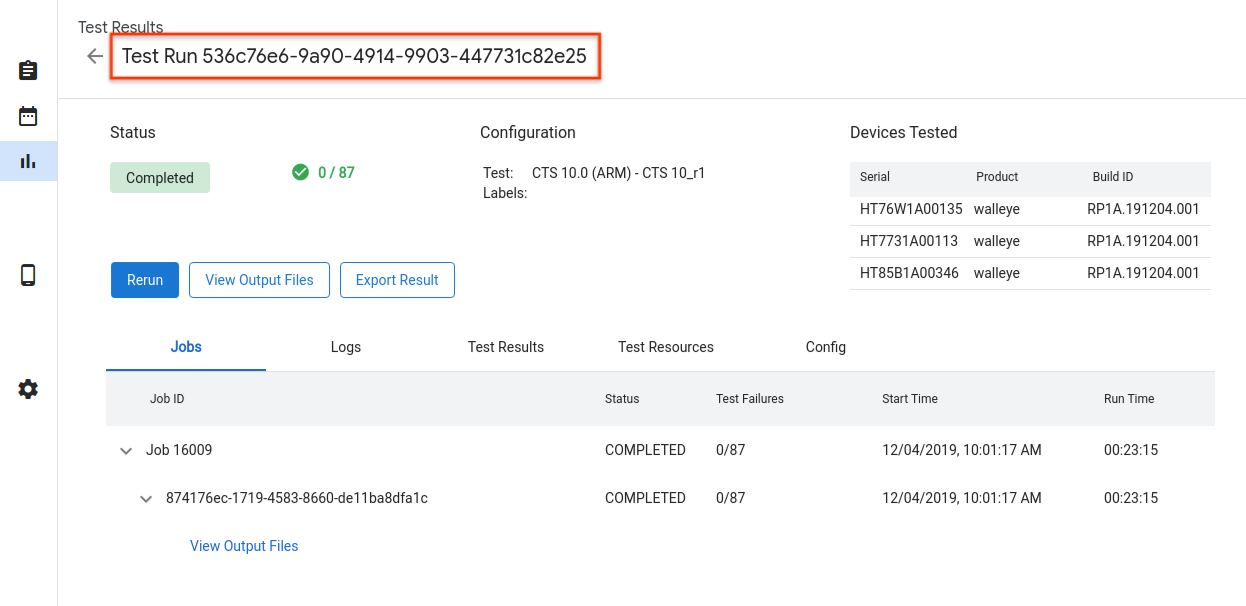
Figure 9. Local previous test run.
Remote - If the run was started on a different host, upload the test results file by selecting Remote, clicking Upload Test Results File, and selecting a file from your local storage.

Figure 10. Remote previous test run.
Select devices
Click the checkboxes to select the devices to allocate for running the test suite. The shard count should automatically change to match the number of devices selected.
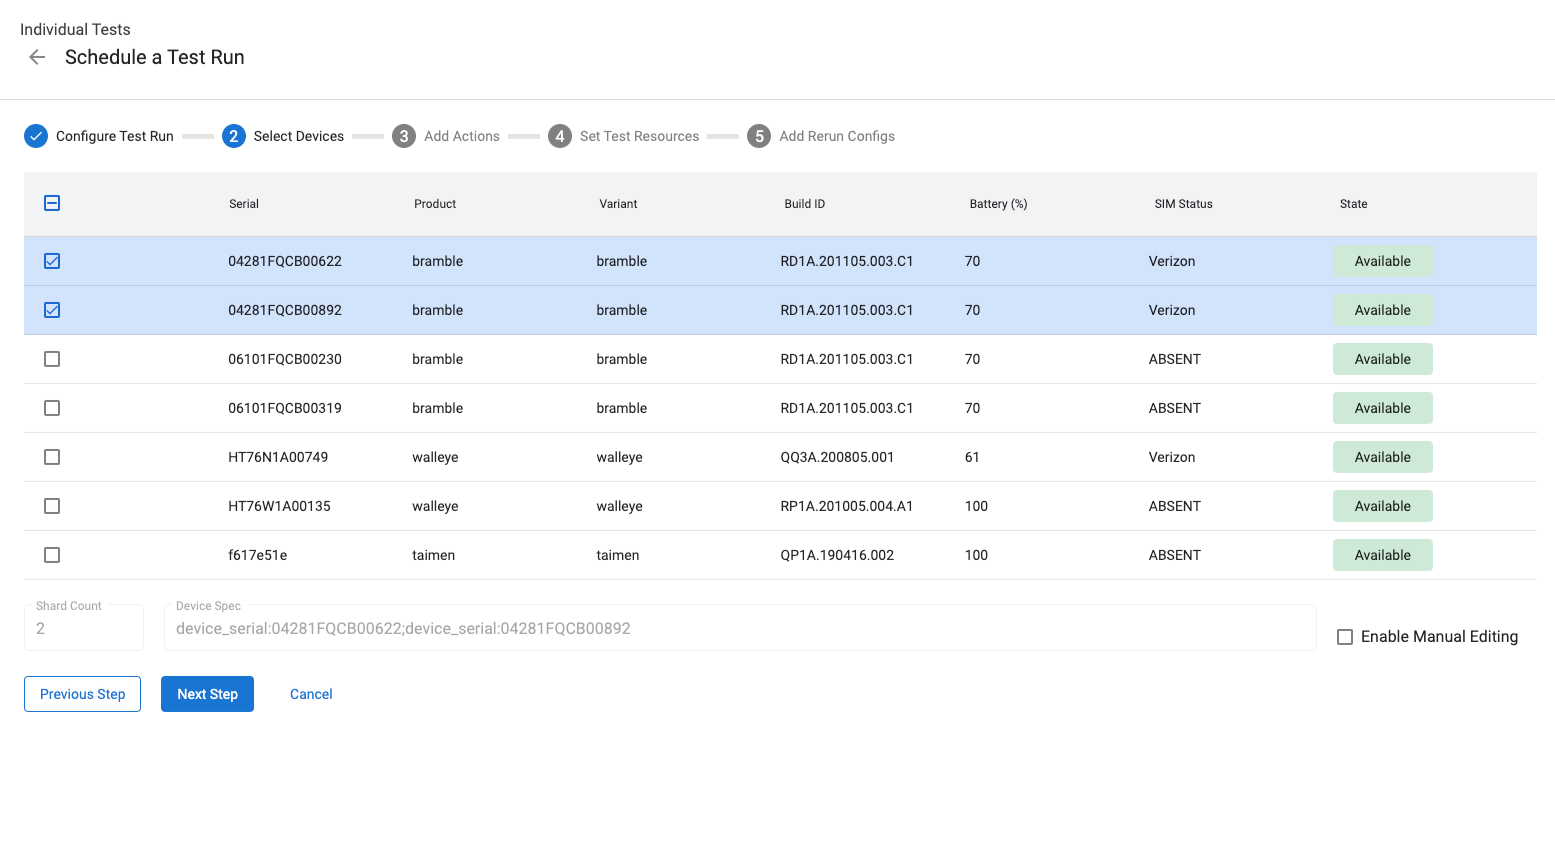
Figure 11. Selecting devices.
To select devices by attributes other than device serials, you can manually enter "Device Specs". For example, to select 3 devices whose product name is "bramble", enter the following:
product:bramble;product:bramble;product:bramble
The supported attributes are:
- build_id
- device_serial
- device_type
- hostname
- product
- product_variant
- sim_state
All selected devices must be in the Available state to execute the test run, and they all switch to the Allocated state when the test run is executed. A test run is in the Queued state while it's waiting for devices to become available.
Add device actions
Device actions are scripts that can be executed before each test run. Some device actions come already configured, such as flashing and rebooting. To create new device actions, see Create a new device action.
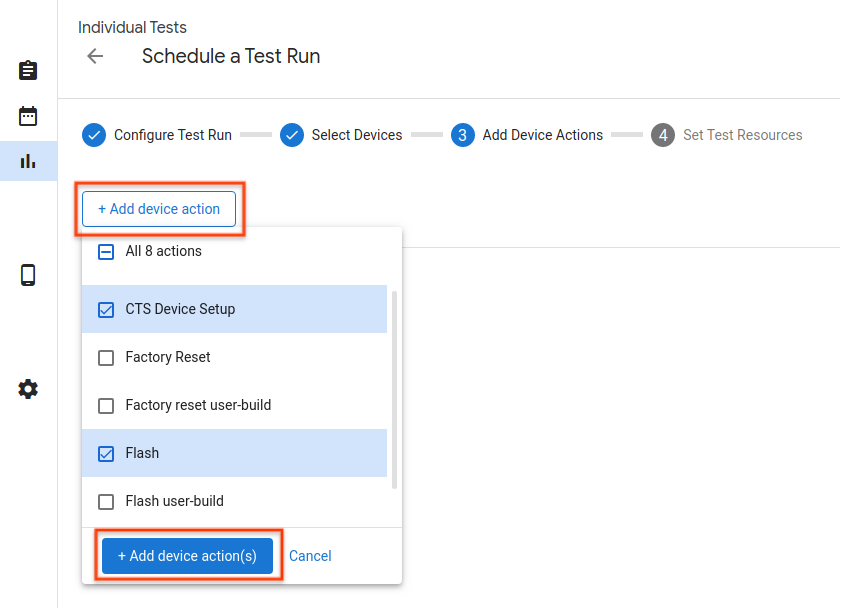
Figure 12. Device actions.
To add a device action to a test run, click Add new action, select the checkboxes for the actions to add, and click Add Action(s). Device actions are performed sequentially. You can reorder the actions by dragging them.
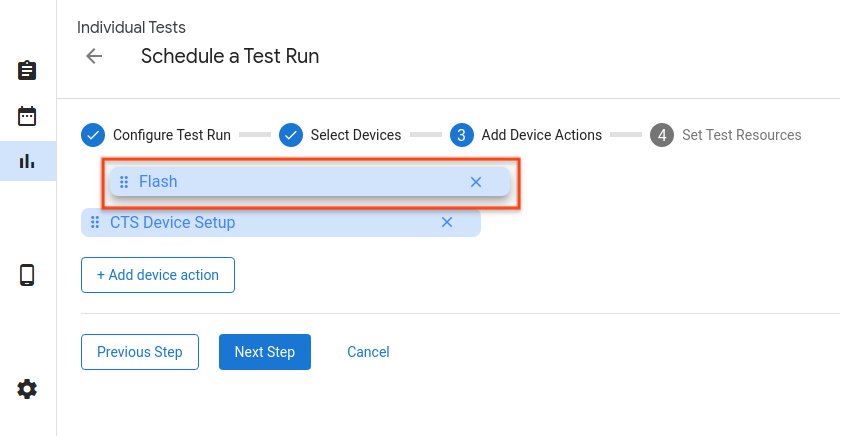
Figure 13. Reordering actions.
Set test resources
Test resources are files required to execute a test run. For example, running
CTS requires an android-cts*.zip file, and flashing a device requires you to
provide the build image.
The download URL for the test suite zip file should default to the Google Drive links given to partners. You can select a different file by clicking browse. In the popup window, you can enter a file download link, use a file from an authenticated build channel, or upload a file to use from local storage.
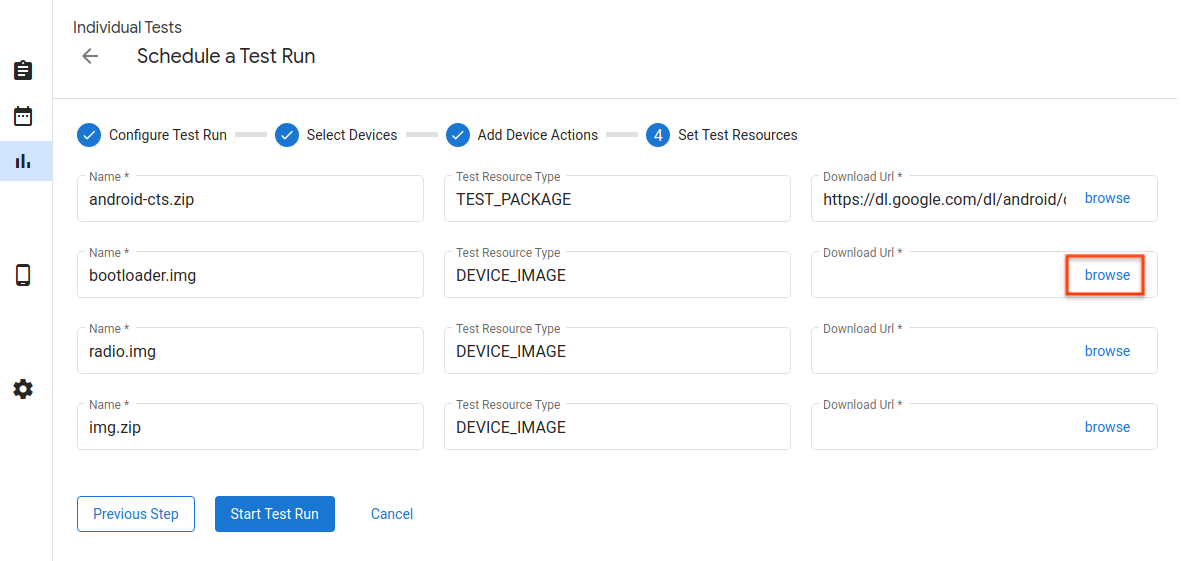
Figure 14. Test resources.
Below is the popup window for selecting a test resource by a web URL. You can enter the download URL link, and click Select button to confirm the selection.
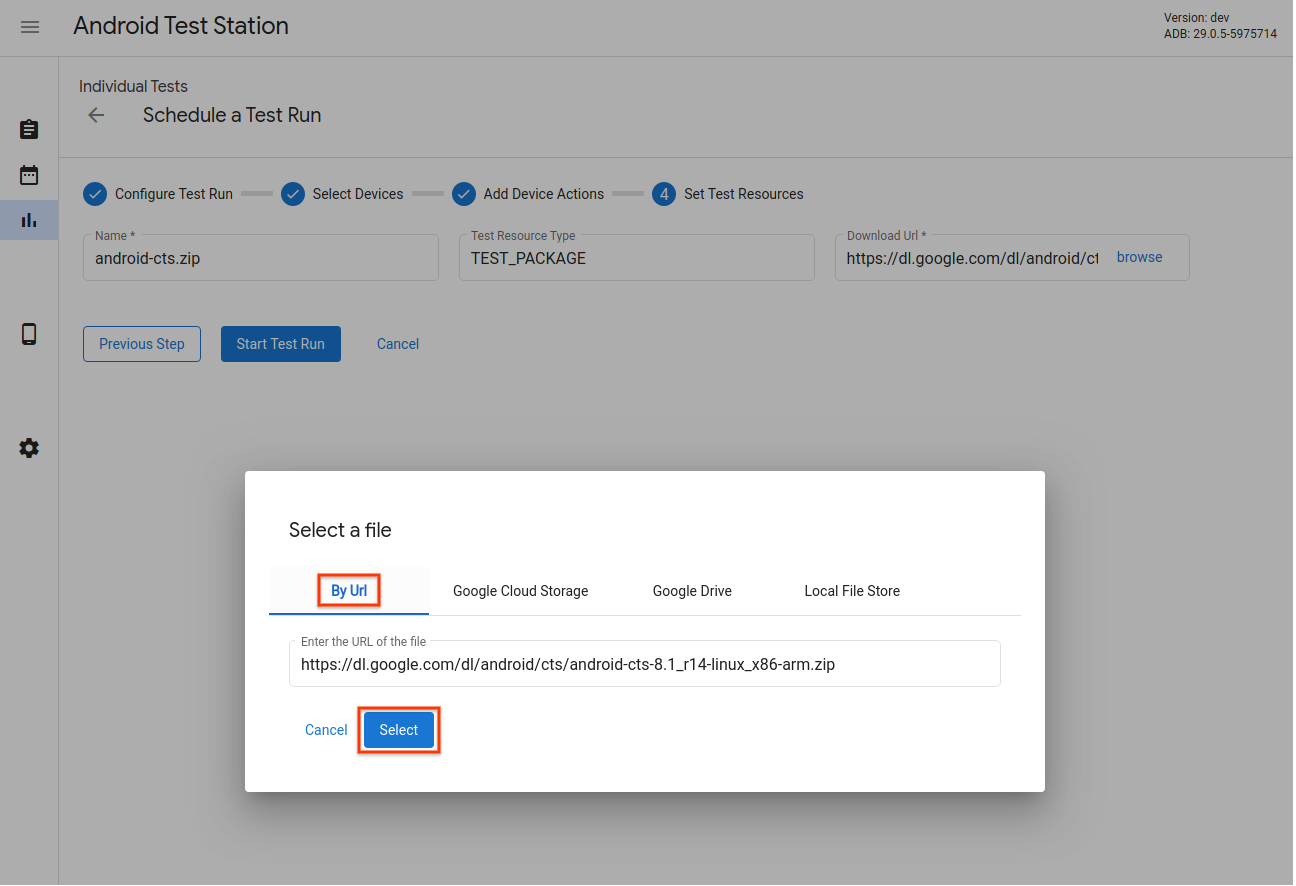
Figure 15. Test Resource Selector - Web URL.
If you have uploaded resources to Google Grive, Google Cloud Storage (GCS), or other channels, you can also navigate to the specific channel's tab and select resources there. Here is an example for selecting a resource from google drive.
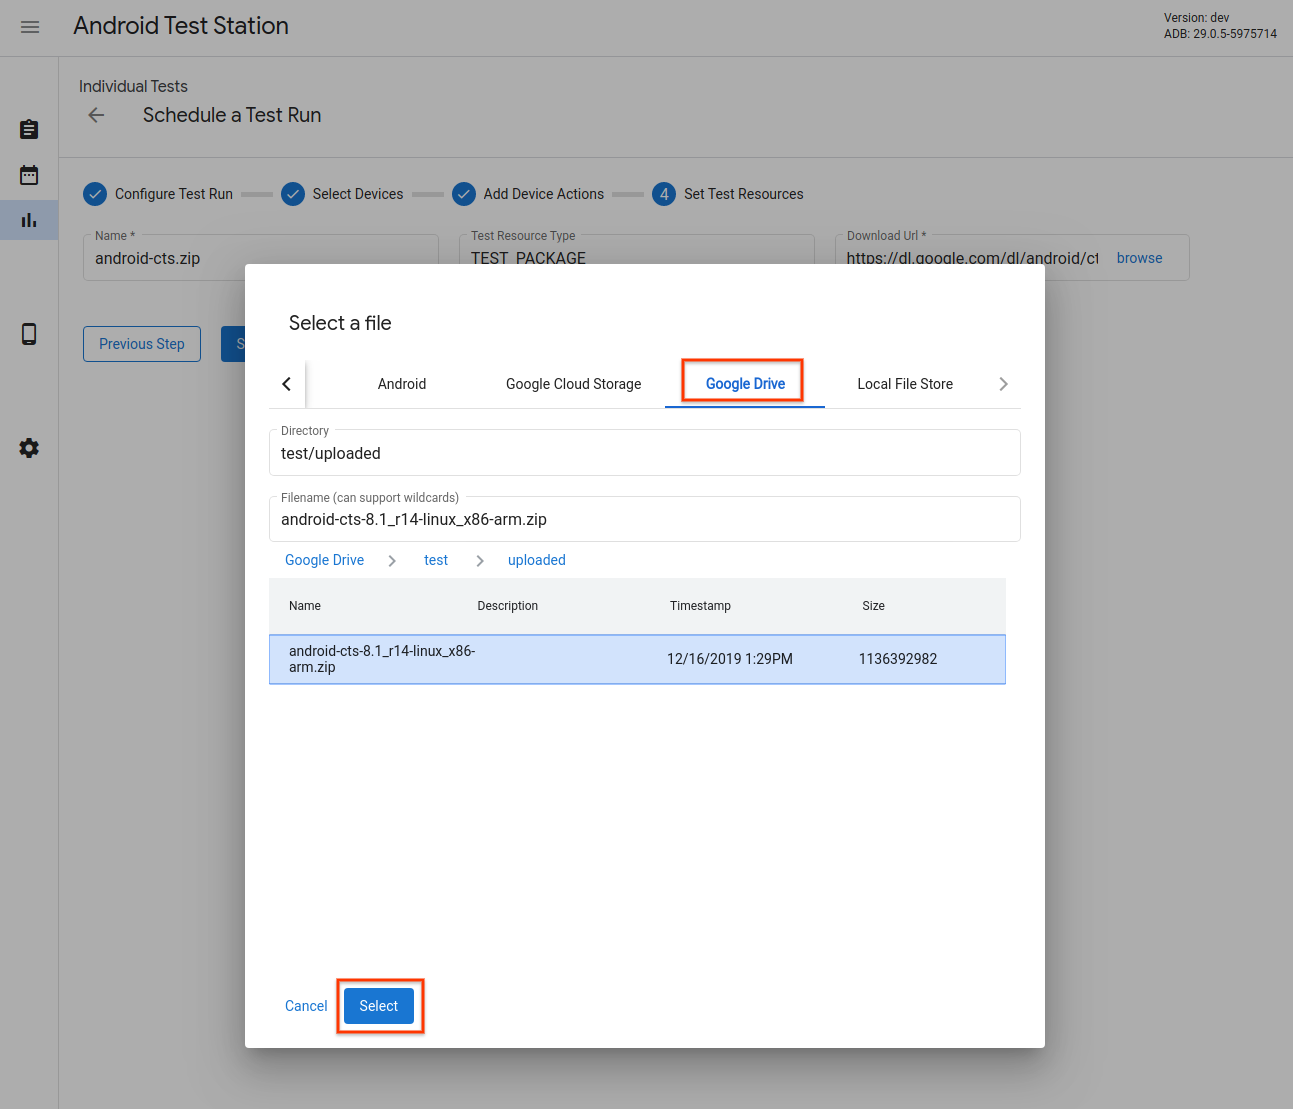
Figure 16. Test Resource Selector - Google Drive.
In addition to just selecting files, wildcard characters are also supported in Filename field. The documentation can be found here.
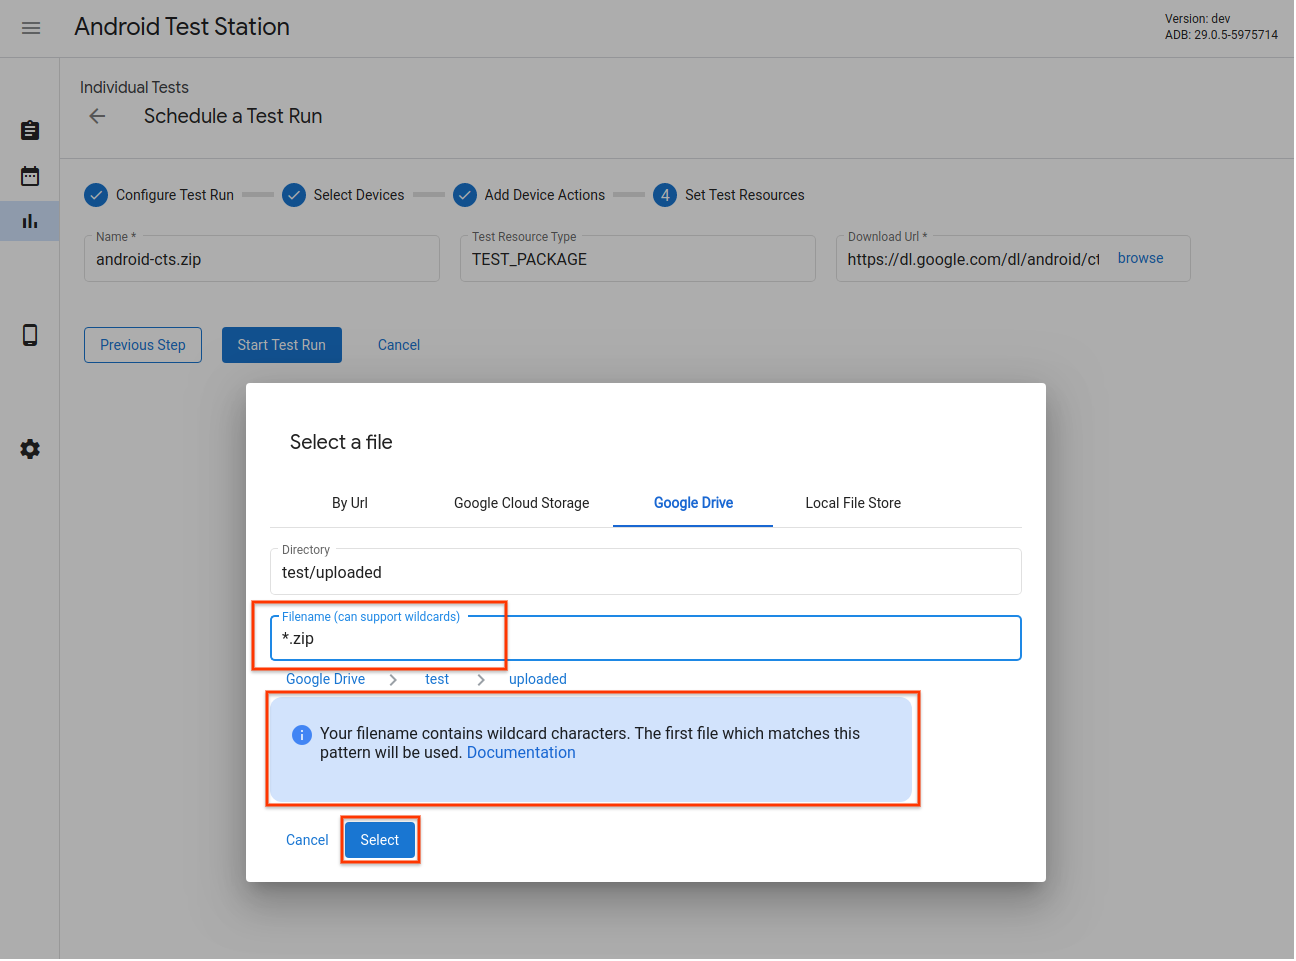
Figure 17. Test Resource Selector - Wildcard pattern support.
You can also select a file from OmniLab ATS's local file storage. You can upload files into this storage, or directly use local files and directories.
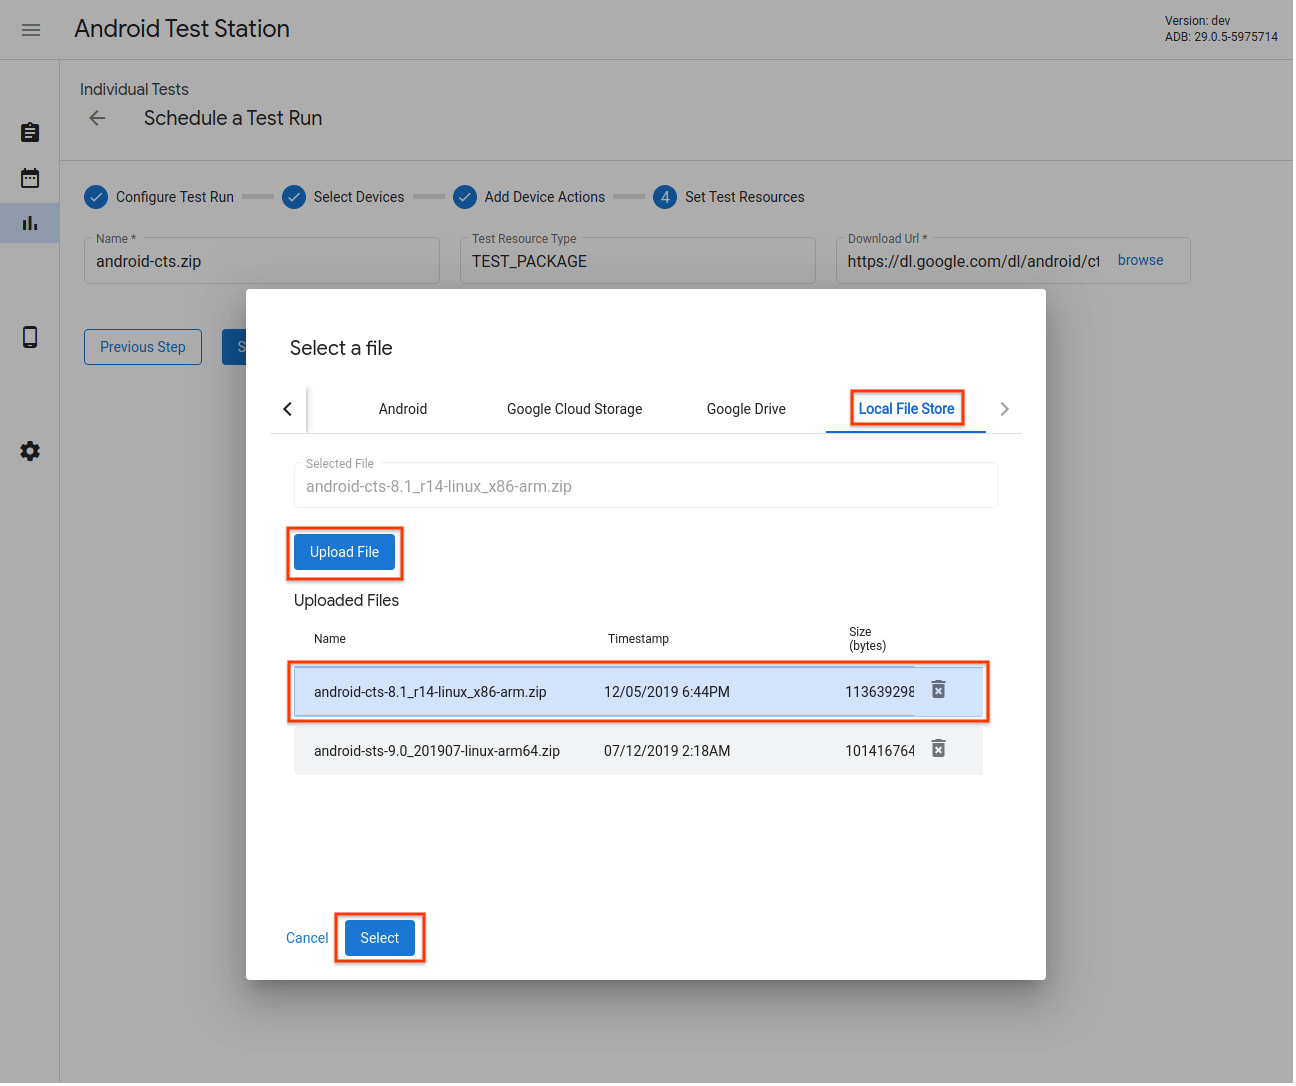
Figure 18. Test Resource Selector - Local file store.
Add rerun configs
You can schedule reruns that start after the primary run is complete and load its results, but can use different device, actions, or resources.
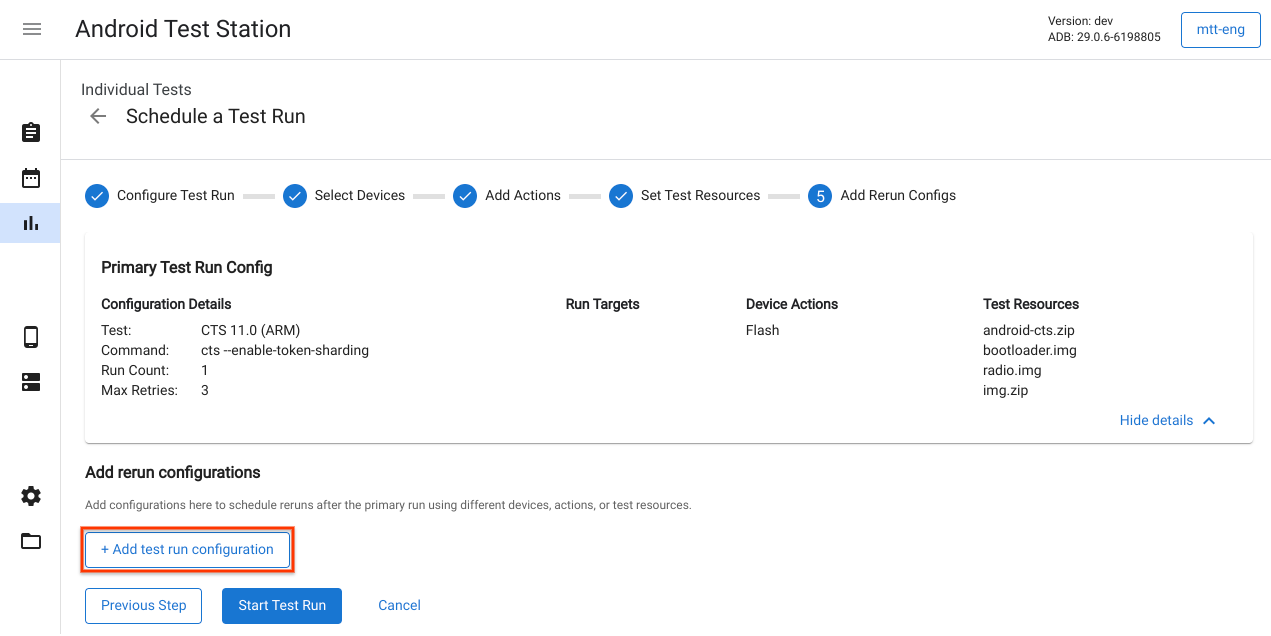
Figure 19. Adding Rerun Configs.
Start a test run
After you enter the information needed for the test run, click Start Test Run. If all of the information is valid, the test run starts, and you're redirected to a page to view the details and progress of the test run.

Figure 20. Starting a test run.
Create a test plan
Test plans are used to create test runs on a periodic schedule. For example, running CTS 9.0 every day at 5 PM. To create a new test plan, click Create a new test plan.

Figure 21. Creating a test plan.
Configure test plan
Enter the name of the test plan and any labels you want to add. Then select a schedule to use.
- Manual - The test plan creates test runs only when a user clicks Run test plan in the test plan list page.
- Periodic - The test plan automatically schedules test runs on the periodic schedule selected. For example, scheduling a test run every day at 5:00 PM.
- Custom - The test plan autmatically schedules test runs based on the
cron expression entered. For example,
to schedule a test run every day at 5:00 PM, the cron expression is
0 17 * * *.
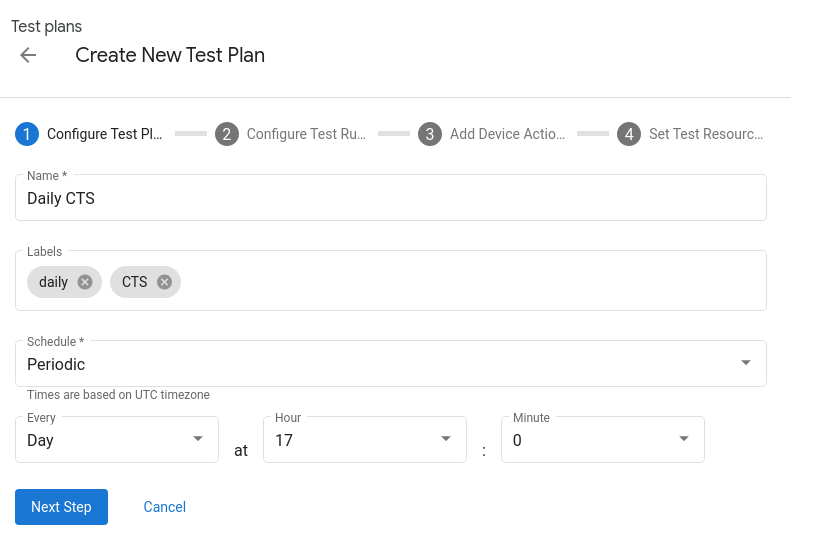
Figure 22. Configuring a test plan.
Add test suites
Add tests suites you want to be scheduled by the test plan by clicking + Add test run configuration. Select a test suite from the Name dropdown and click Next step. Then select the devices you would like to run the test on and click Add Configuration. You can add multiple configurations for each test plan.
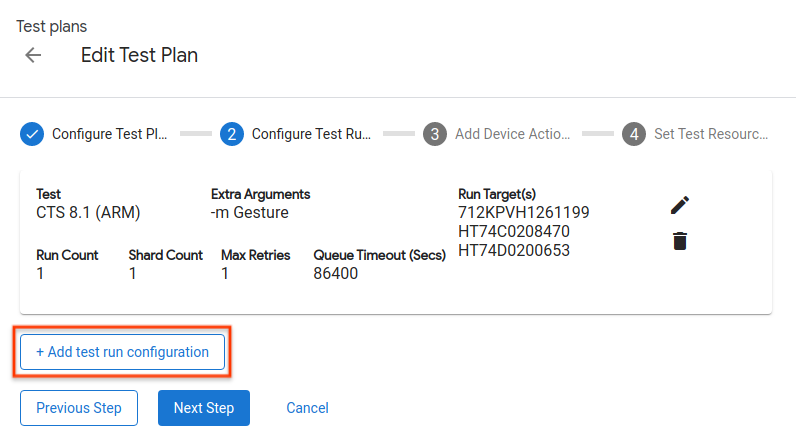
Figure 23. Configuring a test run.
Add device actions
Add the device actions you want to be executed before each test run. See Adding device actions for more details.
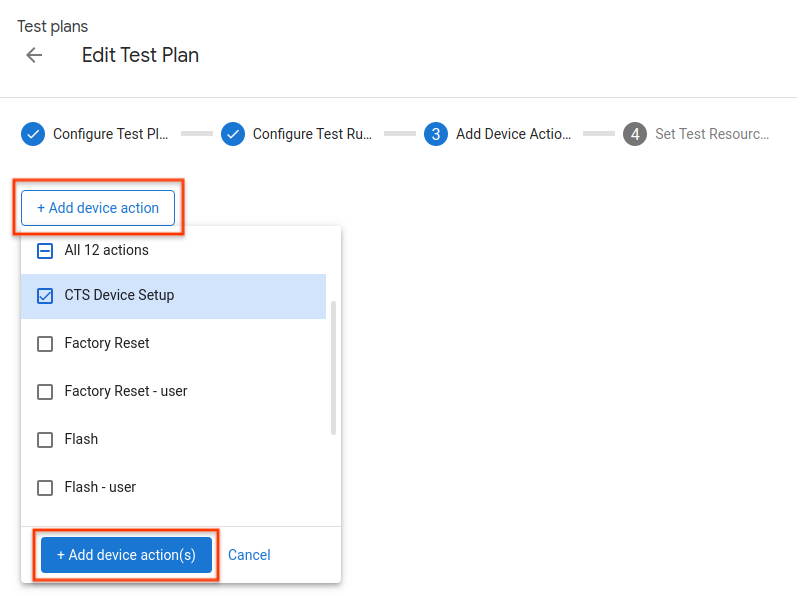
Figure 24. Adding device actions.
Set test resources
Adding test resources to test plans is the same as adding them to individual test runs. See Setting test resources for more details.
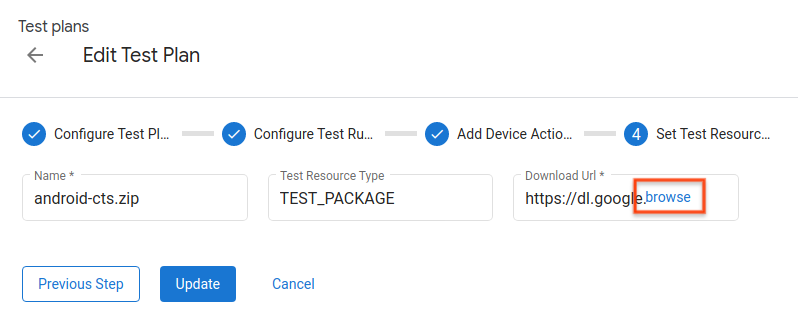
Figure 25. Setting test resources.
View test runs
Test run list
View the list of scheduled test runs on the Test Runs page. Click View to see more details about a test run.
You can also filter the list by entering a string into the filter bar and pressing the Enter key. You can use multiple filters by separating them with a comma. The filter returns all rows that contain the exact text (no substring matching) in any column, excluding Status and Created.
An empty filter returns all rows. There's currently no way to filter for rows with empty values.
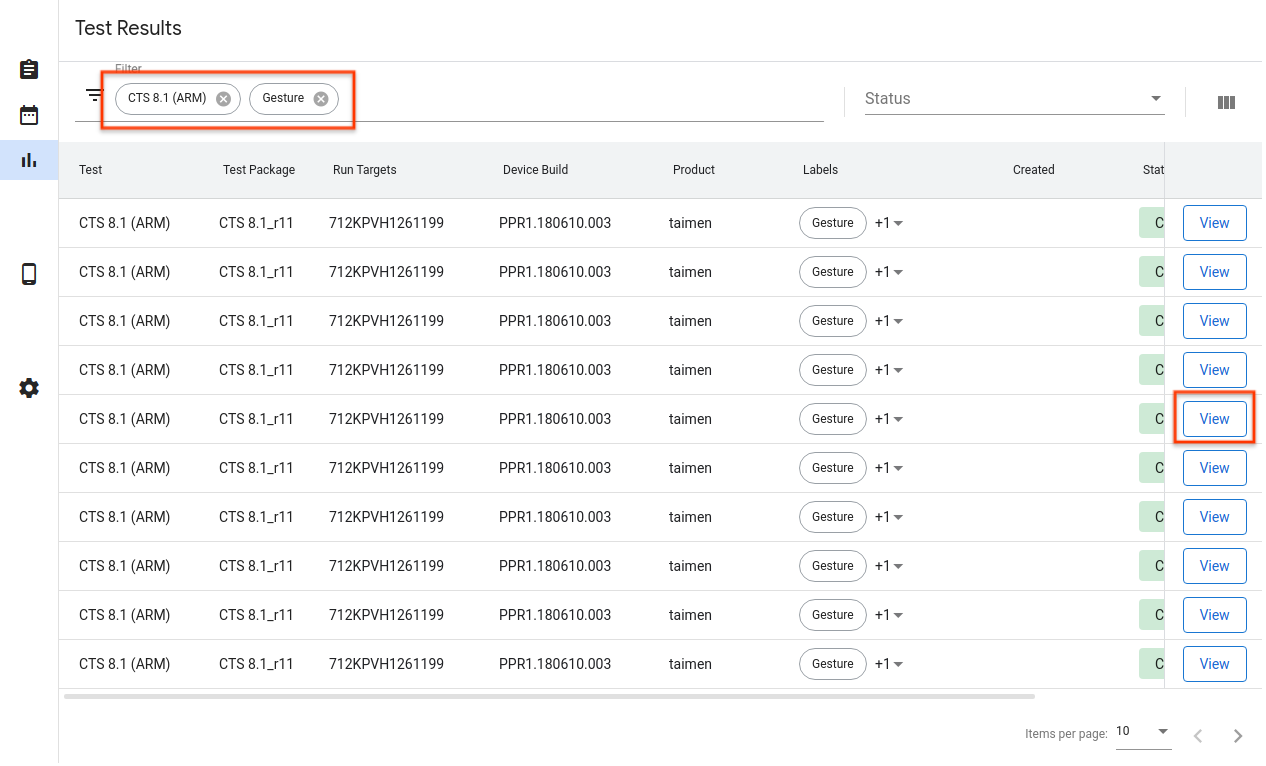
Figure 26. Test run list.
Test run details
You can view the details of a test run here, such as the status, logs, and results.
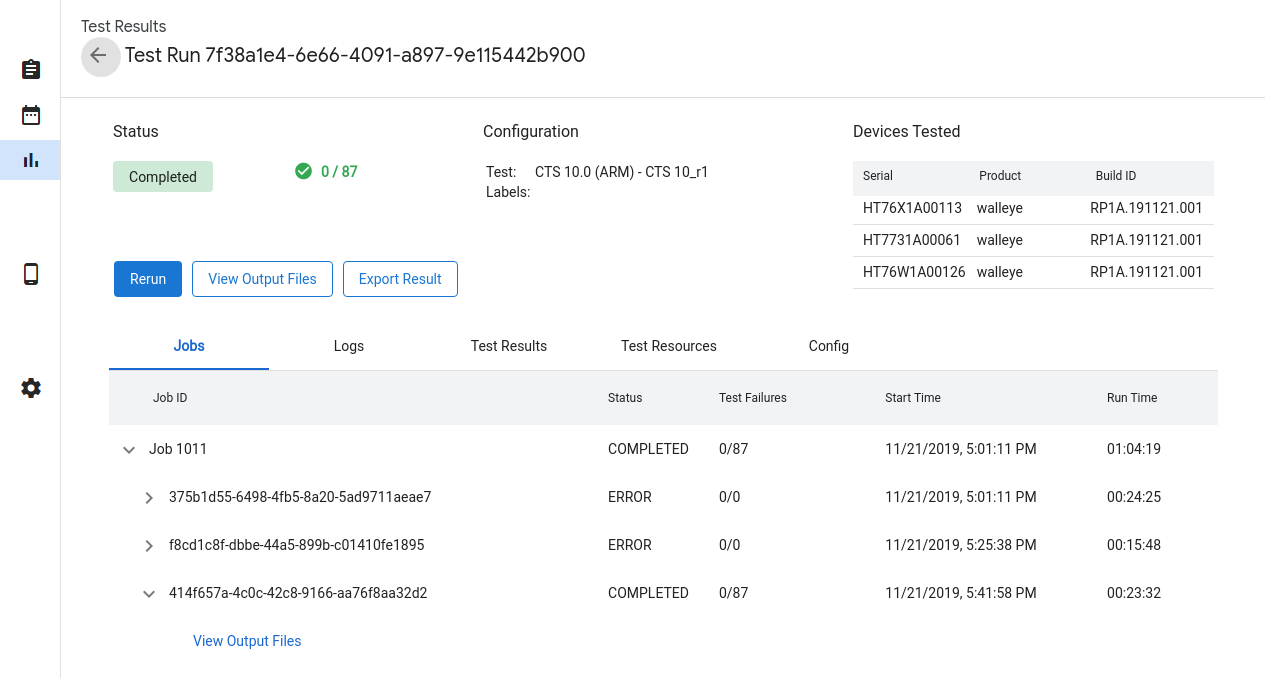
Figure 27. Test run details.
Test run status
The progress for a test run is shown in the Status section. If there's a related message, such as download progress, cancellation reason, or error message, it's shown here as well.
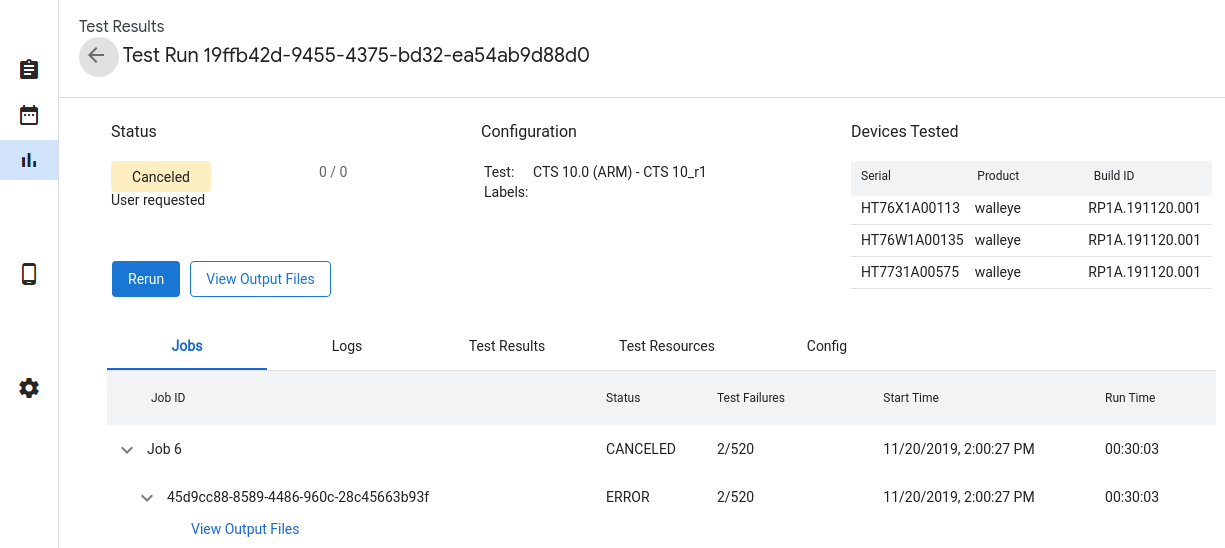
Figure 28. Test run status.
The test run states are:
- Pending - Required resources are being downloaded.
- Queued - The test is ready to be run when a device becomes available.
- Running - The test is running on an allocated device.
- Completed - The test has completed and reported its results.
- Canceled - The test was canceled by the user or timed out while trying to find available devices.
- Error - An error occurred that prevented the test from running.
Cancel a test run
If the test run hasn't completed, you can cancel it by clicking Cancel and then clicking Yes in the confirmation dialog. Test runs are also automatically canceled if they remain in the Queued state longer than the queue_timeout_seconds field. Canceling a test run while in a Running state might take a few minutes to take effect.

Figure 29. Canceling a test run.
Test run results
After a test run has finished, results are collected and displayed. You can
view additional details by clicking the arrow for each run. Click View Output
Files to see the test artifacts collected, such as test_result.xml and
test_result_failures.html.
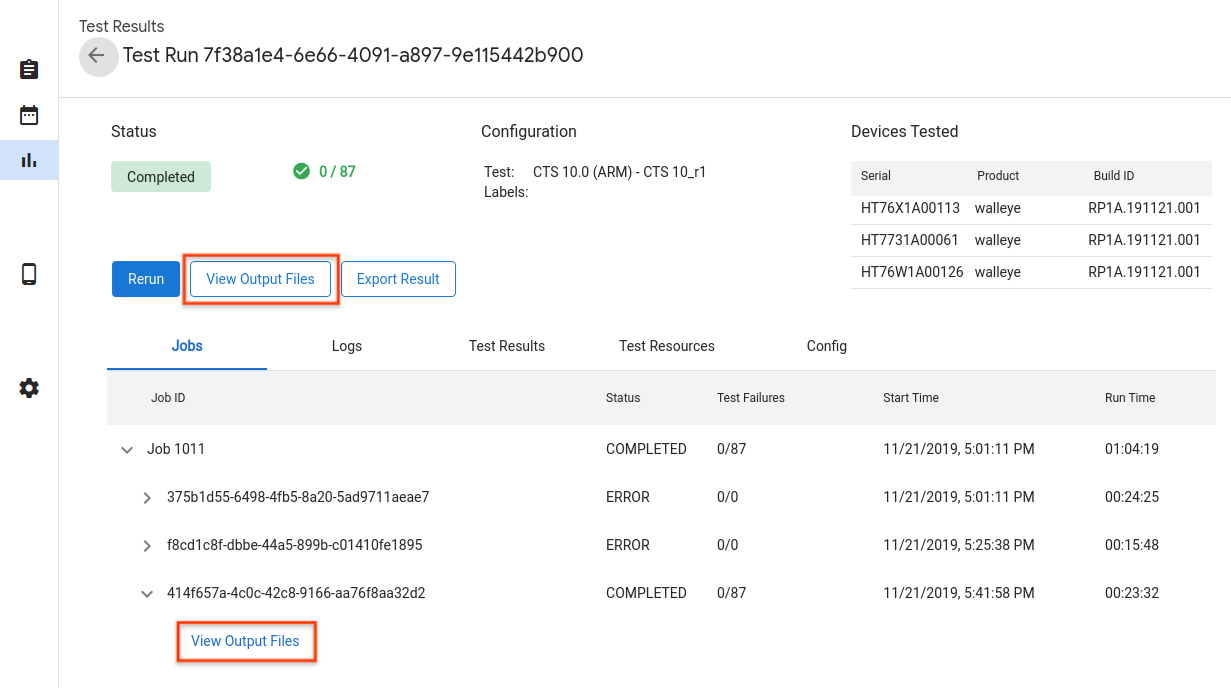
Figure 30. Test run results.
You can view live host and Tradefed logs in the Logs tab.
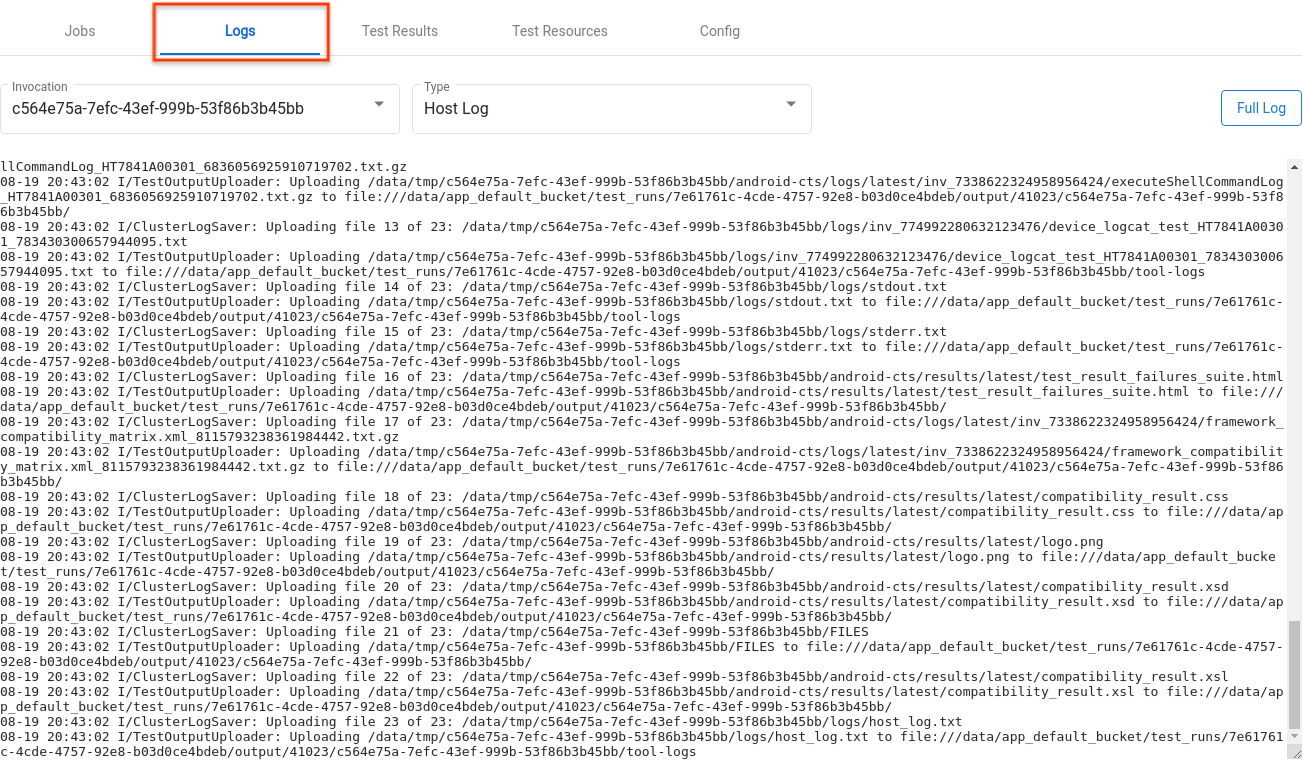
Figure 31. Logs tab.
The results for individual modules are on the Test Results tab.

Figure 32. Test Results tab.
You can download the files used as test resources by clicking Open in the Test Resources tab.
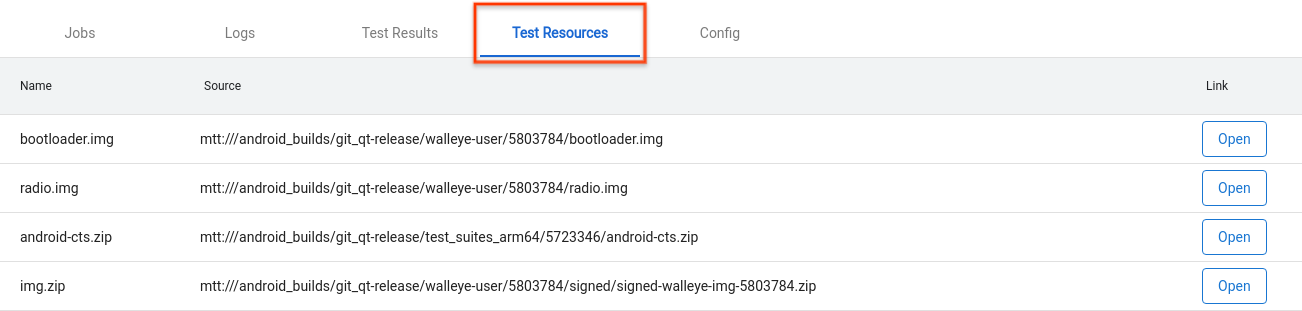
Figure 33. Test Resources tab.
To see the details of the test run, such as create_time, go to the Config tab.
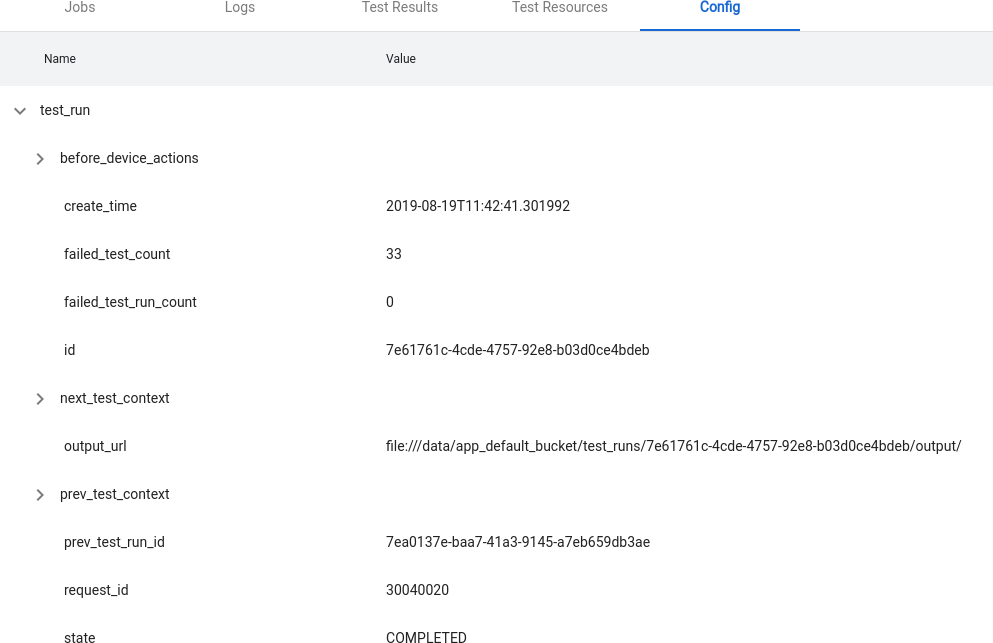
Figure 34. Config tab.
Advanced features
Manage config files
OmniLab ATS uses configuration files written in YAML to load predefined options such as tests, build channels, and device actions. Here's an example config file:
// example_file.yaml
tests:
- id : android.cts.9_0.arm
  name: CTS 9.0 (ARM)
  test_resource_defs:
  - name: android-cts.zip
    default_download_url: https://dl.google.com/dl/android/cts/android-cts-9.0_r7-linux_x86-arm.zip
    test_resource_type: TEST_PACKAGE
  command: cts
  env_vars:
  - name: TF_PATH
    value: ${TF_WORK_DIR}/android-cts/tools:${TF_WORK_DIR}/android-cts/testcases
  - name: LD_LIBRARY_PATH
    value: ${TF_WORK_DIR}/android-cts/lib:${TF_WORK_DIR}/android-cts/lib64
  setup_scripts:
  output_file_patterns:
  - android-cts/logs/latest/.*
  - android-cts/results/latest/.*\.html
  - android-cts/results/latest/compatibility_result\..*
  - android-cts/results/latest/logo.png
  - android-cts/results/latest/test_result.xml
  result_file: test_result.xml
  java_properties:
  - name: CTS_ROOT
    value: ${TF_WORK_DIR}
  context_file_dir: android-cts/results/
  context_file_pattern: '[\d_\.]+\.zip'
  retry_command_line: retry --retry 0
  runner_sharding_args: --shard-count ${TF_SHARD_COUNT}

build_channels:
- id: google_drive
  name: Google Drive
  provider_name: Google Drive

device_actions:
- id: flash
  name: Flash
  test_resource_defs:
  - name: bootloader.img
    test_resource_type: DEVICE_IMAGE
  - name: radio.img
    test_resource_type: DEVICE_IMAGE
  - name: img.zip
    test_resource_type: DEVICE_IMAGE
  tradefed_target_preparers:
  - class_name: com.android.tradefed.targetprep.RunHostCommandTargetPreparer
    option_values:
    - name: work-dir
      values:
      - ${TF_WORK_DIR}
    - name: host-setup-command
      values:
      - adb -s $SERIAL reboot-bootloader
      - fastboot -s $SERIAL flash bootloader bootloader.img
      - fastboot -s $SERIAL flash radio radio.img
      - fastboot -s $SERIAL reboot-bootloader
      - fastboot -s $SERIAL -w update img.zip
      - adb -s $SERIAL wait-for-device
    - name: host-cmd-timeout
      values:
      - 10m
When you set up your OmniLab ATS instance, you can share your configuration with other users by exporting it as a file. To do this, go to the Settings page and click Export in the top right.
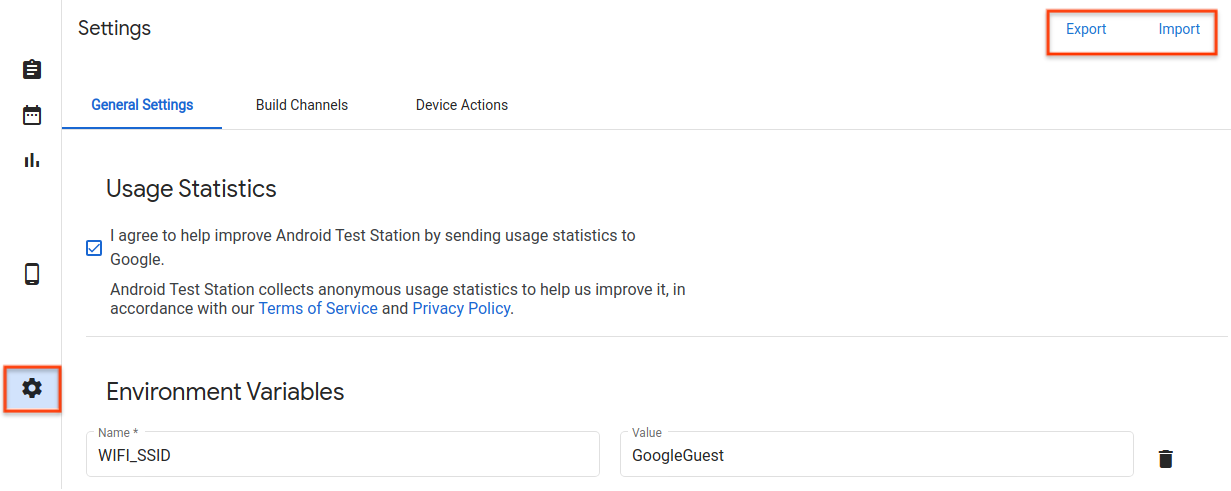
Figure 35. Configuration file management.
After your configuration file is downloaded, share the file with other users. They can add the configuration file to their OmniLab ATS instance by clicking Import and selecting the config file.
Create a new device action
Device actions are used for automating the device setup process. Actions are scripts executed on each device the test is running on before each test run, including before retries. To view a list of available device actions, go to the Settings page and click the Device Actions tab. Several device actions come already configured, such as rebooting and flashing.
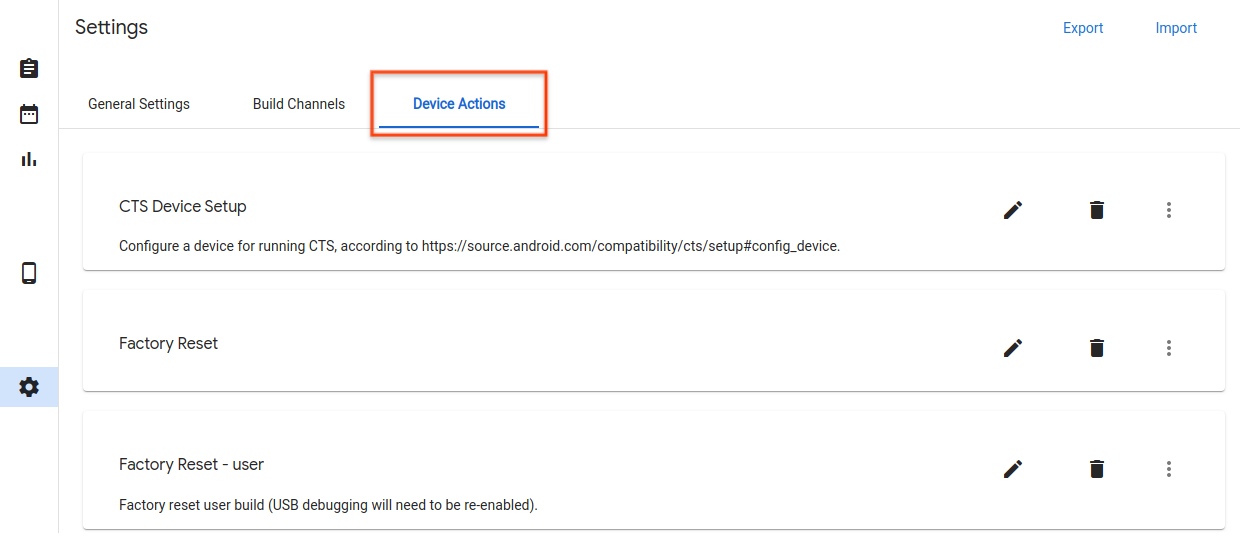
Figure 36. Device Actions tab.
Add a new device action
Click New device action.
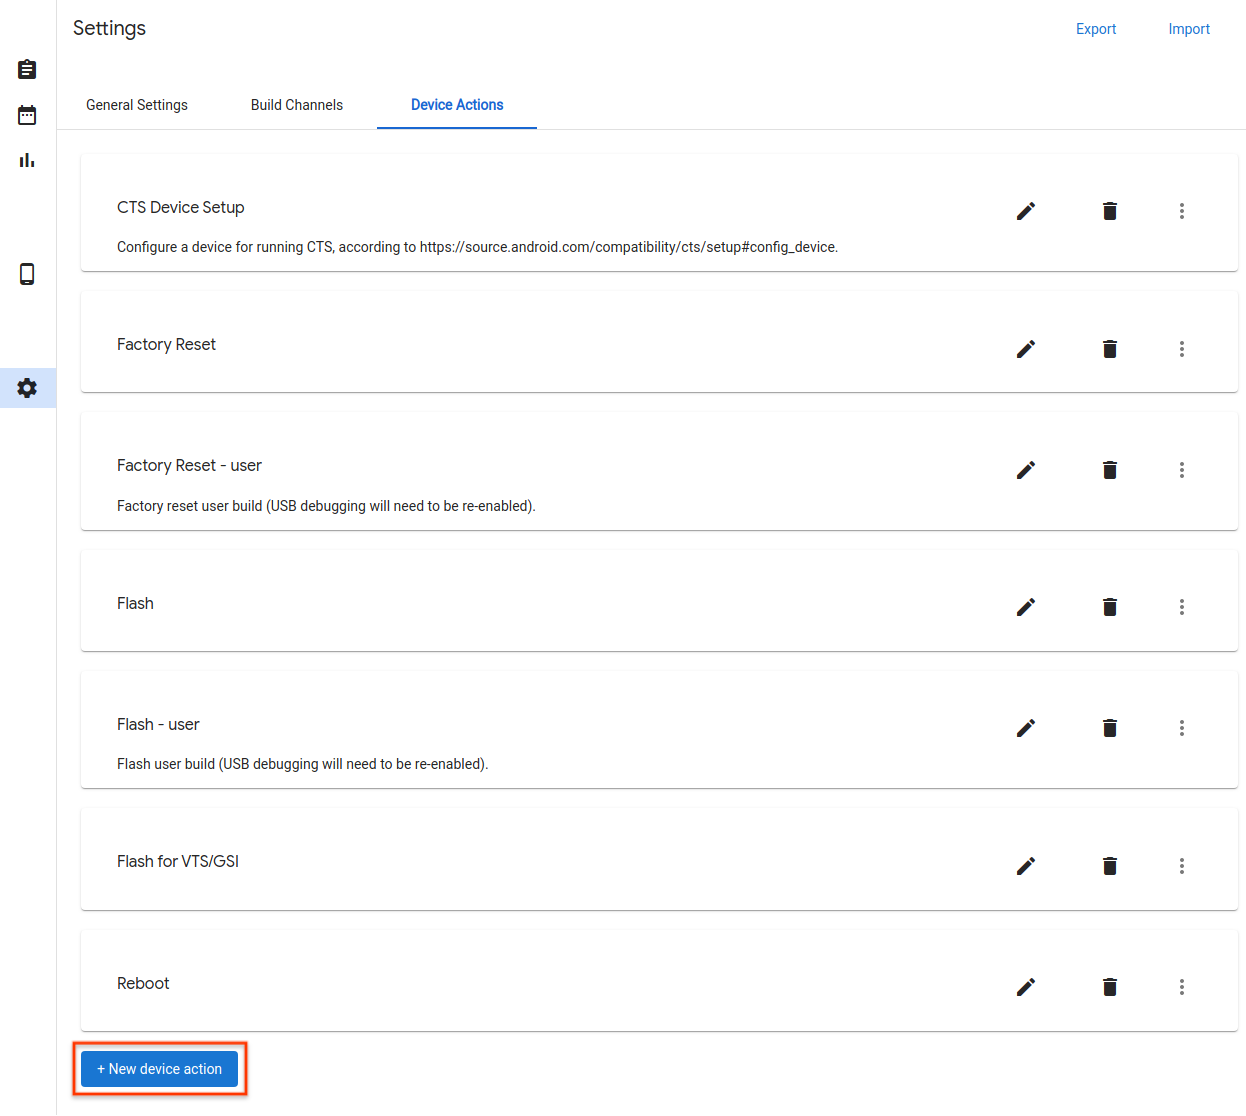
Figure 37. New device action button.
Enter a name and description.
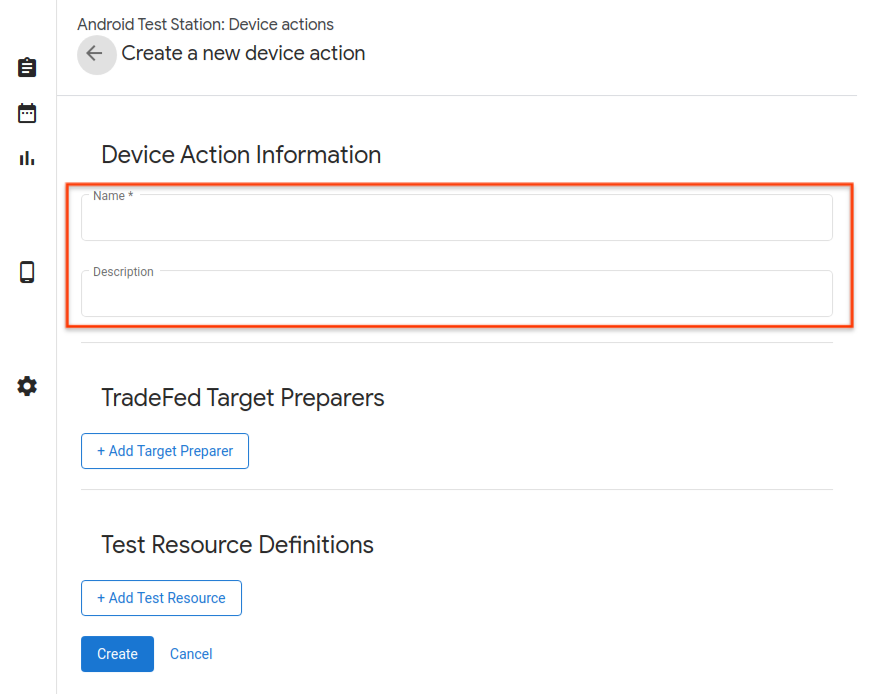
Figure 38. Device action name.
Click Add Target Preparer.
Enter the Trade Federation Target Preparer full class name, for example,
com.android.tradefed.targetprep.RunHostCommandTargetPreparer.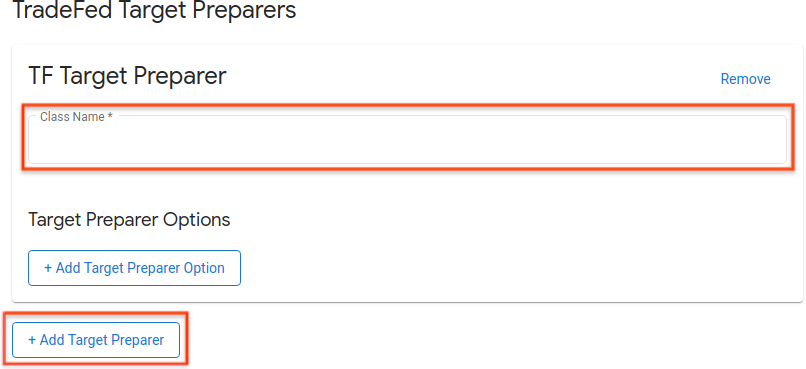
Figure 39. Adding a target preparer.
A list of available target preparers can be found in the com.android.tradefed.targetprep reference.
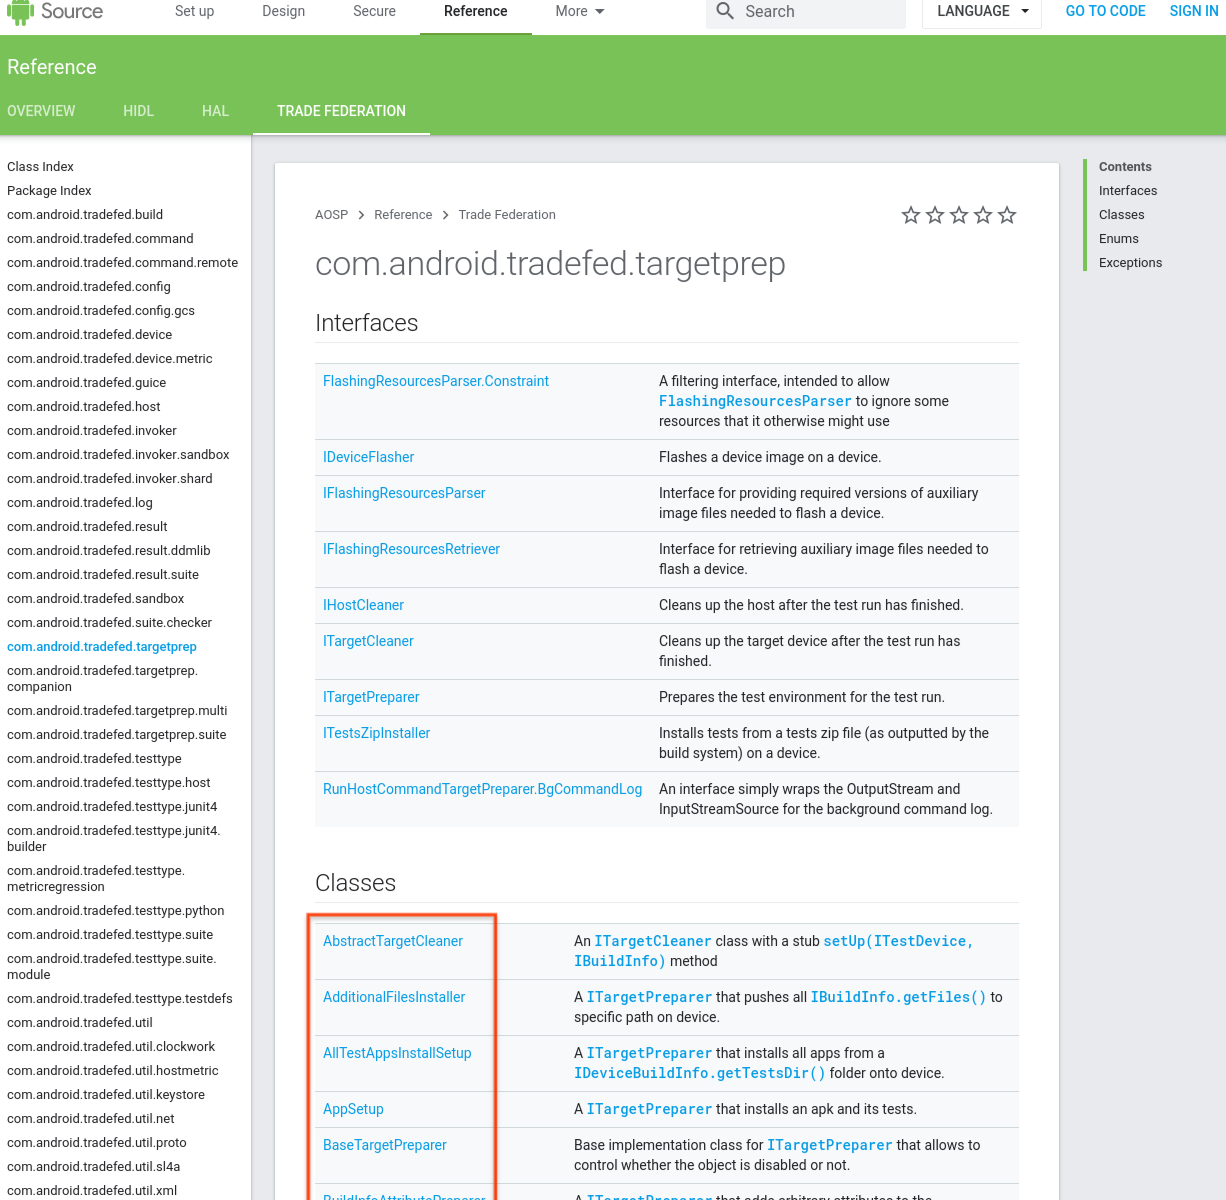
Figure 40. Target Preparer list.
Add any options to use with the target preparer. To view available options, check targetprep for the source code for each target preparer in AOSP:
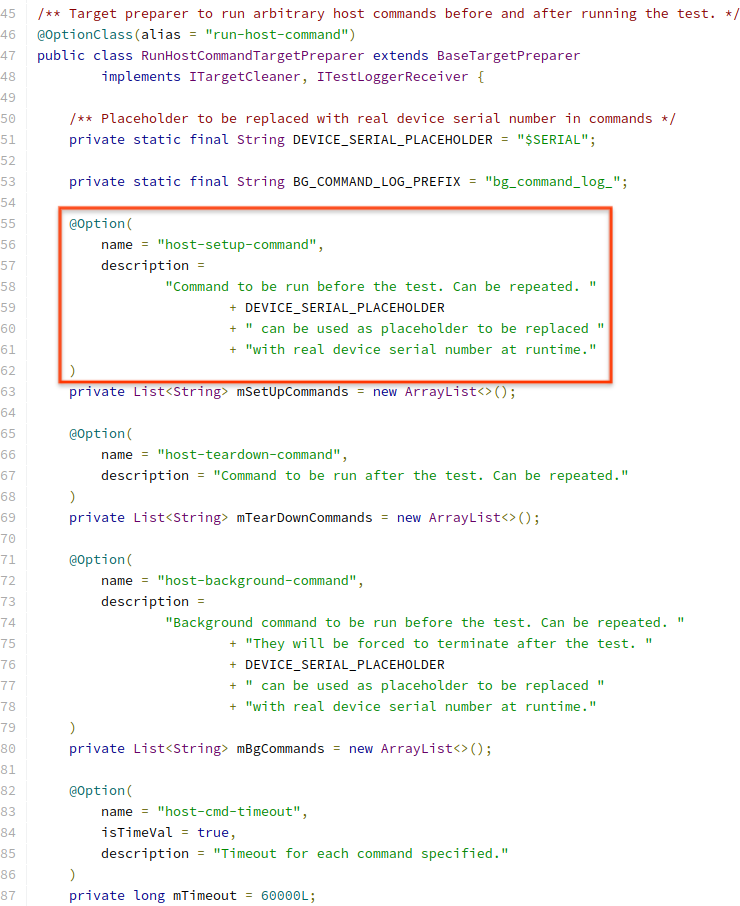
Figure 41. Action option example.
To add an option, click Add Target Preparer Option and enter the required values.
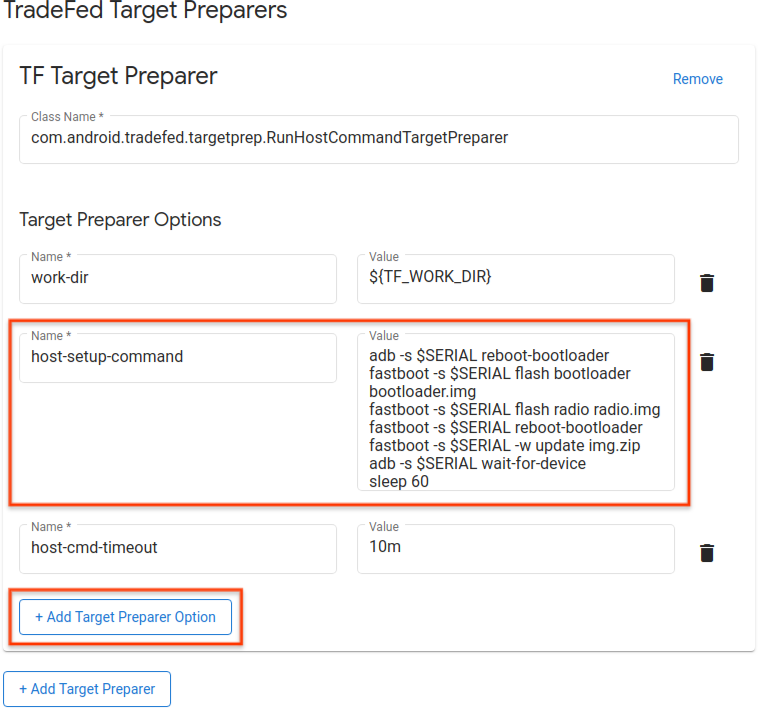
Figure 42. Action command example.
Define the test resources that are needed to execute the device action, for example, build images for flashing. To add a resource definition, click Add Test Resource and fill in the required fields. If you know where your files are located, you can provide a default download URL by clicking browse. If the target preparers accept directory as test resource, select Decompress. Then specify the relative Destination directory under the temporary working directory and the File Names to be decompressed. If no file names are given, all files are decompressed from the test resource.
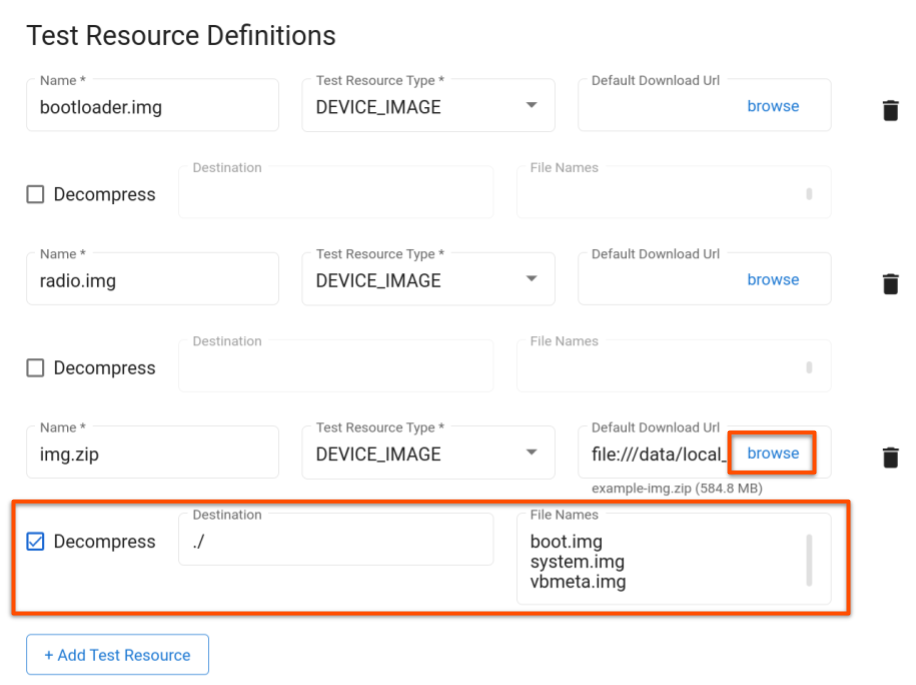
Figure 43. Action test resources.
Click Update.
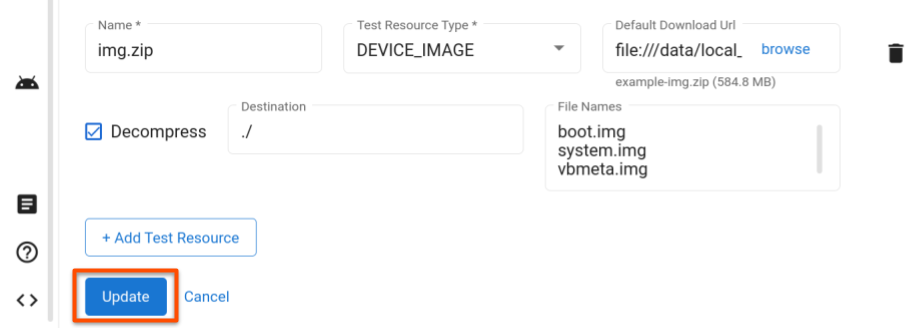
Figure 44. Action save changes.
Manage tests
Edit a test
To edit a saved test, go to the Tests page and click Edit on the row of the test you want to modify. After changing the test configuration, click Update.
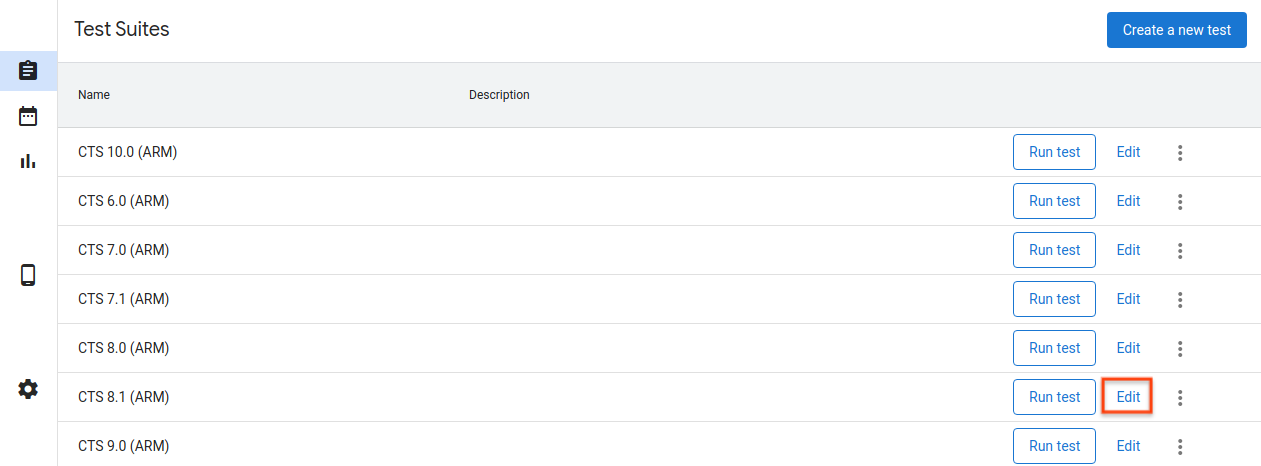
Figure 45. Editing a test.
Add a new test
To add a new test, go to the Tests page and click Create a New Test. Enter the appropriate information and click Create.
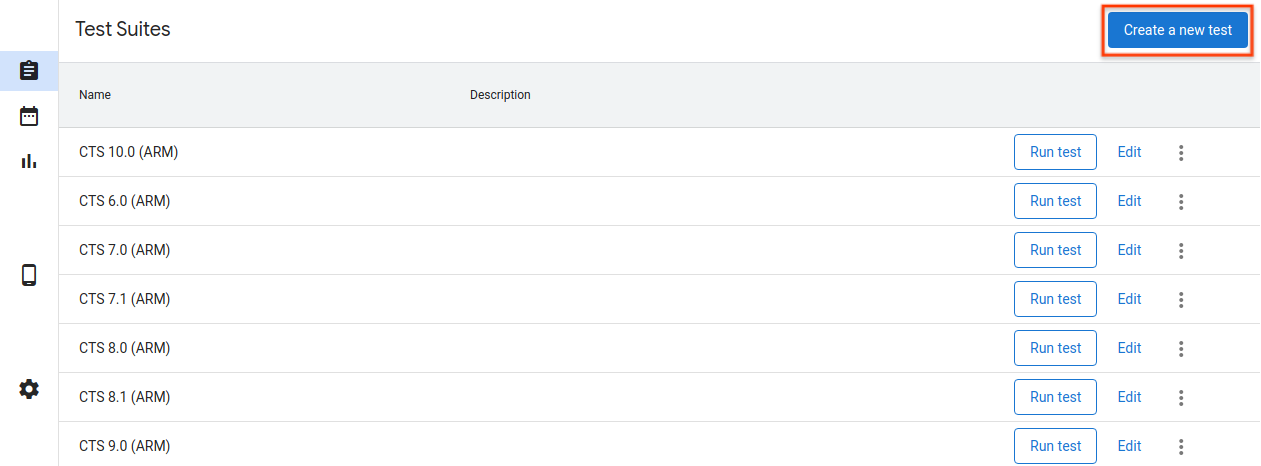
Figure 46. Creating a test.
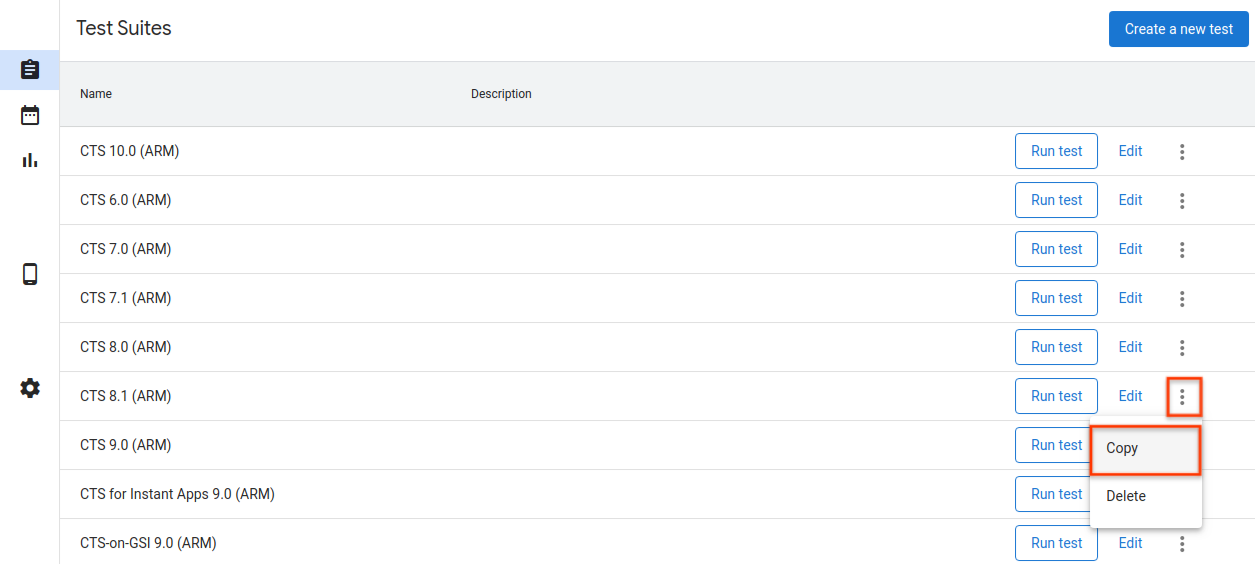
Figure 47. Copying a test.
Export host configurations
After you configure a host, you can export the host's configurations to a file. You can upload this file to other hosts to copy the saved configurations.
To export a host's configurations, go to the Settings page and click Export in the top right corner.
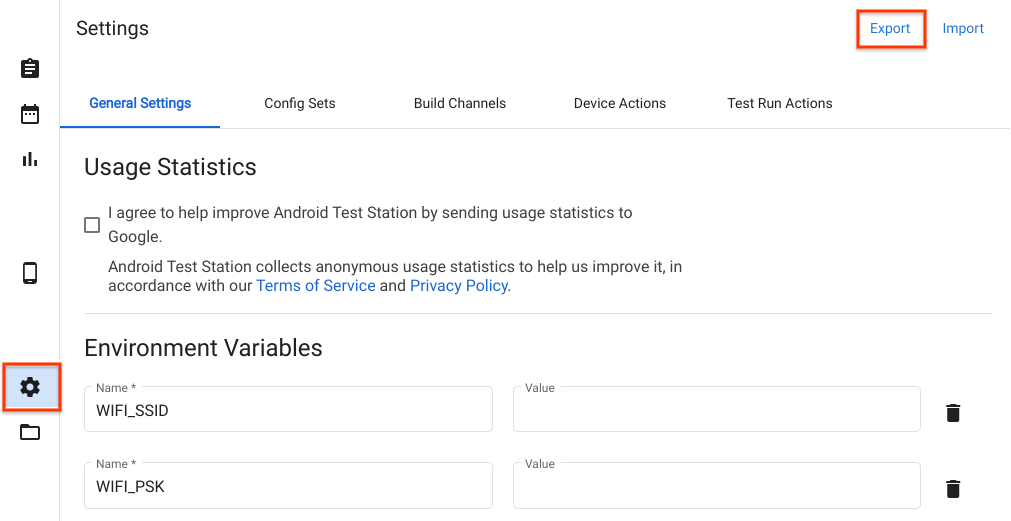
Figure 48. Exporting a host config.
To import a host configuration file, go to the Settings page and click Import in the top right corner.
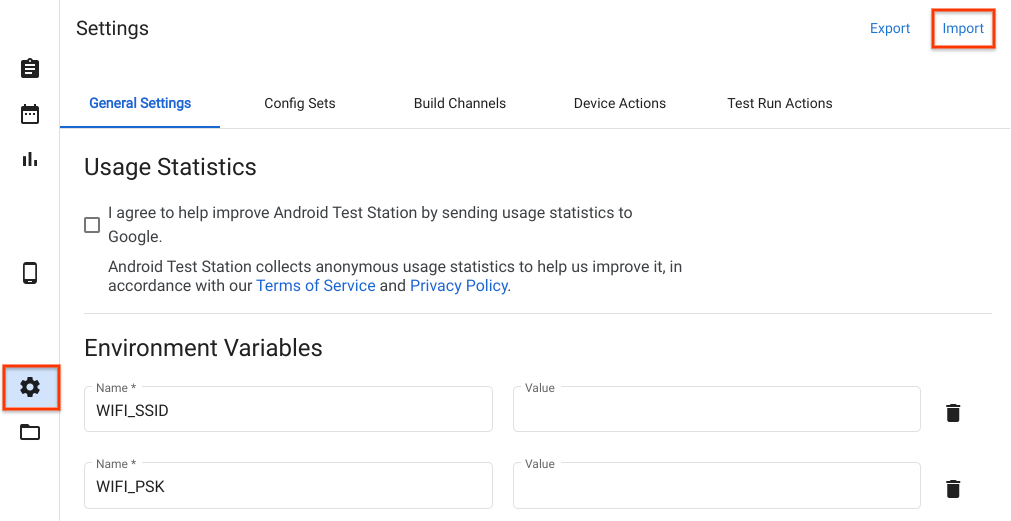
Figure 49. Importing a host config.
Use local files and directories
Starting in version R11, files in the $HOME/.ats_storage directory are
automatically accessible in OmniLab ATS. Copy or move a file into that
directory, then you can select it from the Local File tab when scheduling a
test run.
cp /path/to/file $HOME/.ats_storage
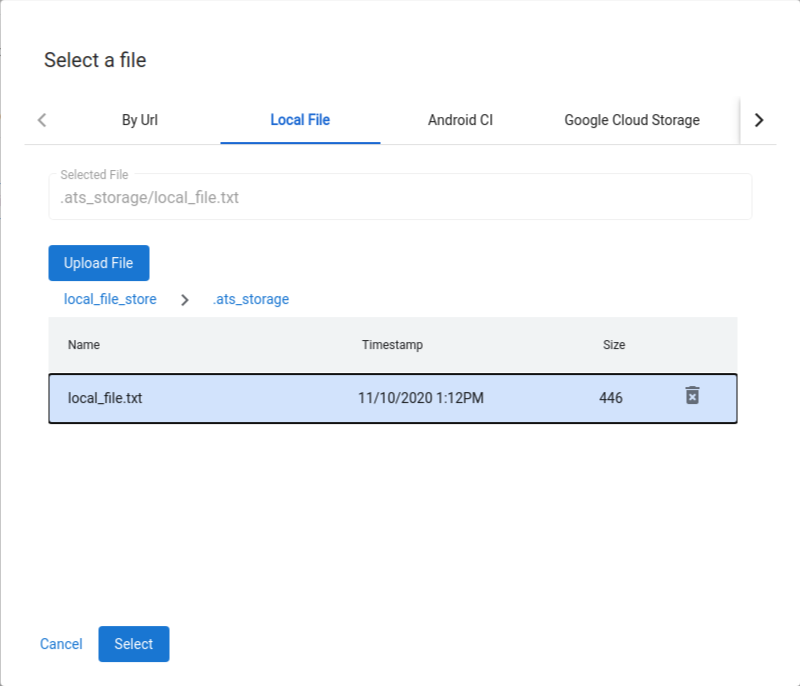
Figure 50. Selecting a file from the $HOME/.ats_storage directory.
You can mount additional directories into the local file store with the
--mount_local_path flag.
mtt start --mount_local_path=/path/to/dir1 --mount_local_path=/path/to/dir2:renamed_dir2
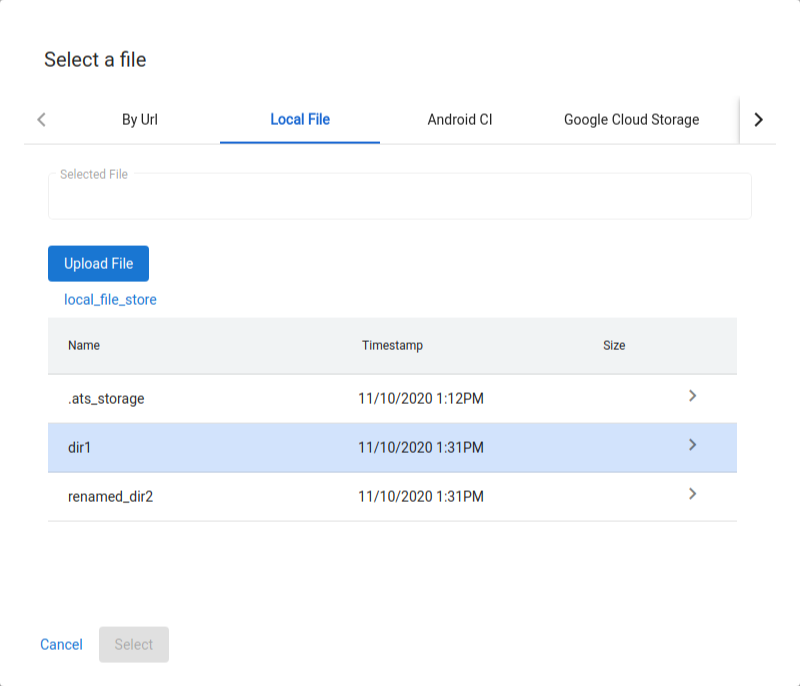
Figure 51. Additional directories mounted in the local file store.
Enable multi-host mode
With Multi-host mode, users can use a single ATS controller host to manage the devices and tests on multiple ATS worker hosts.
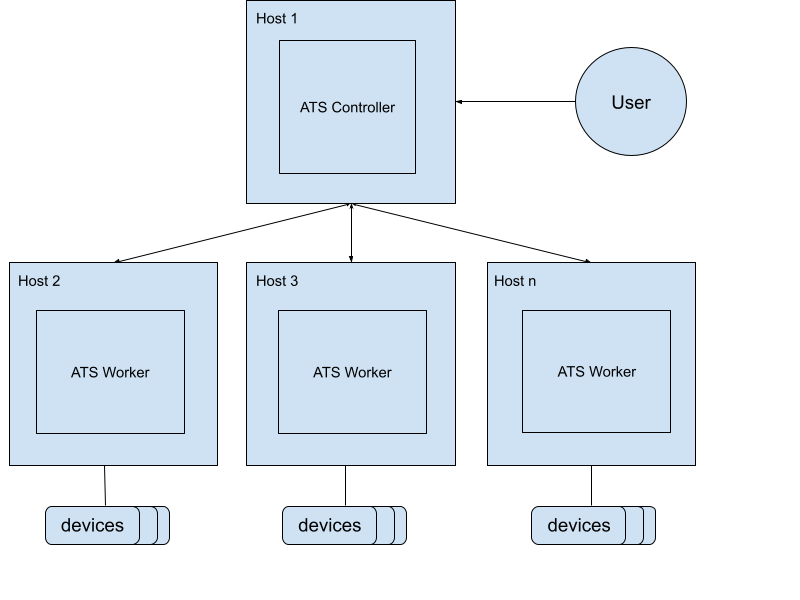
Figure 52. Multi-host mode architecture.
To start the ATS controller, use the following command:
mtt start --operation_mode=ON_PREMISECheck controller is accessible at
http://${CONTROLLER_HOSTNAME}:8000.To start the workers, use the following command:
mtt start --control_server_url=http://CONTROLLER_HOSTNAME:8000 --operation_mode=ON_PREMISE
If your network doesn't allow hosts to communicate with each other, you need to follow the more advanced setup instructions below on ATS worker.
Connect the two hosts using SSH tunnels. Select ports for the primary and file server ports, for example, 9000 and 9006.
ssh -L ATS_PORT:localhost:8000 -L FS_PORT:localhost:8006 CONTROLLER_HOSTNAMEConfigure and start ATS.
DOCKER_GATEWAY_IP_ADDRESS=$(ip -4 addr show dev docker0 | grep -Eo 'inet [.0-9]+/' | grep -Eo '[.0-9]+')socat tcp-listen:ATS_PORT,bind="${DOCKER_GATEWAY_IP_ADDRESS}",reuseaddr,fork tcp-connect:127.0.0.1:ATS_PORT &socat tcp-listen:FS_PORT,bind="${DOCKER_GATEWAY_IP_ADDRESS}",reuseaddr,fork tcp-connect:127.0.0.1:FS_PORT &mtt start --control_server_url=http://${DOCKER_GATEWAY_IP_ADDRESS}:ATS_PORT \ --control_file_server_url=http://${DOCKER_GATEWAY_IP_ADDRESS}:FS_PORT \ --operation_mode=ON_PREMISE
File cleaner
The file cleaner is a cron job that runs hourly to clean up files based on user-defined configurations. ATS has two default configurations to archive test run results and delete temporary files. This guide explains how to customize the policies and configs to manage your files effectively.
Policies
A policy defines the operation to be performed on files or directories, and the criteria to select targets. Available operations are shown in the table:
| Operation type | Parameters |
|---|---|
ARCHIVE | remove_file: If true, remove the file after archiving. |
DELETE |
Criteria are based on file attributes and system information. Available criteria are shown in the table:
| Criterion type | Description | Parameters |
|---|---|---|
LAST_MODIFIED_TIME | Filter files based on their last modification date and time. | ttl: Various kinds of time expressions are supported, for example, 10m, 2h, 7 days, 4w. See pytimeparse for supported formats. |
LAST_ACCESS_TIME | Filter files based on their last access date and time. | The same as LAST_MODIFIED_TIME. |
NAME_MATCH | Filter files based on their name using regular expression. | pattern: Regular expression, for example, [a-f0-9]{8}-([a-f0-9]{4}-){3}[a-f0-9]{12}\.zip to match result zips. |
SYSTEM_AVAILABLE_SPACE | Trigger actions based on the available space on the system. | threshold: Trigger action when the available space falls below the threshold, for example, 200(B), 200KB, 200MB, 200GB, 2TB. |
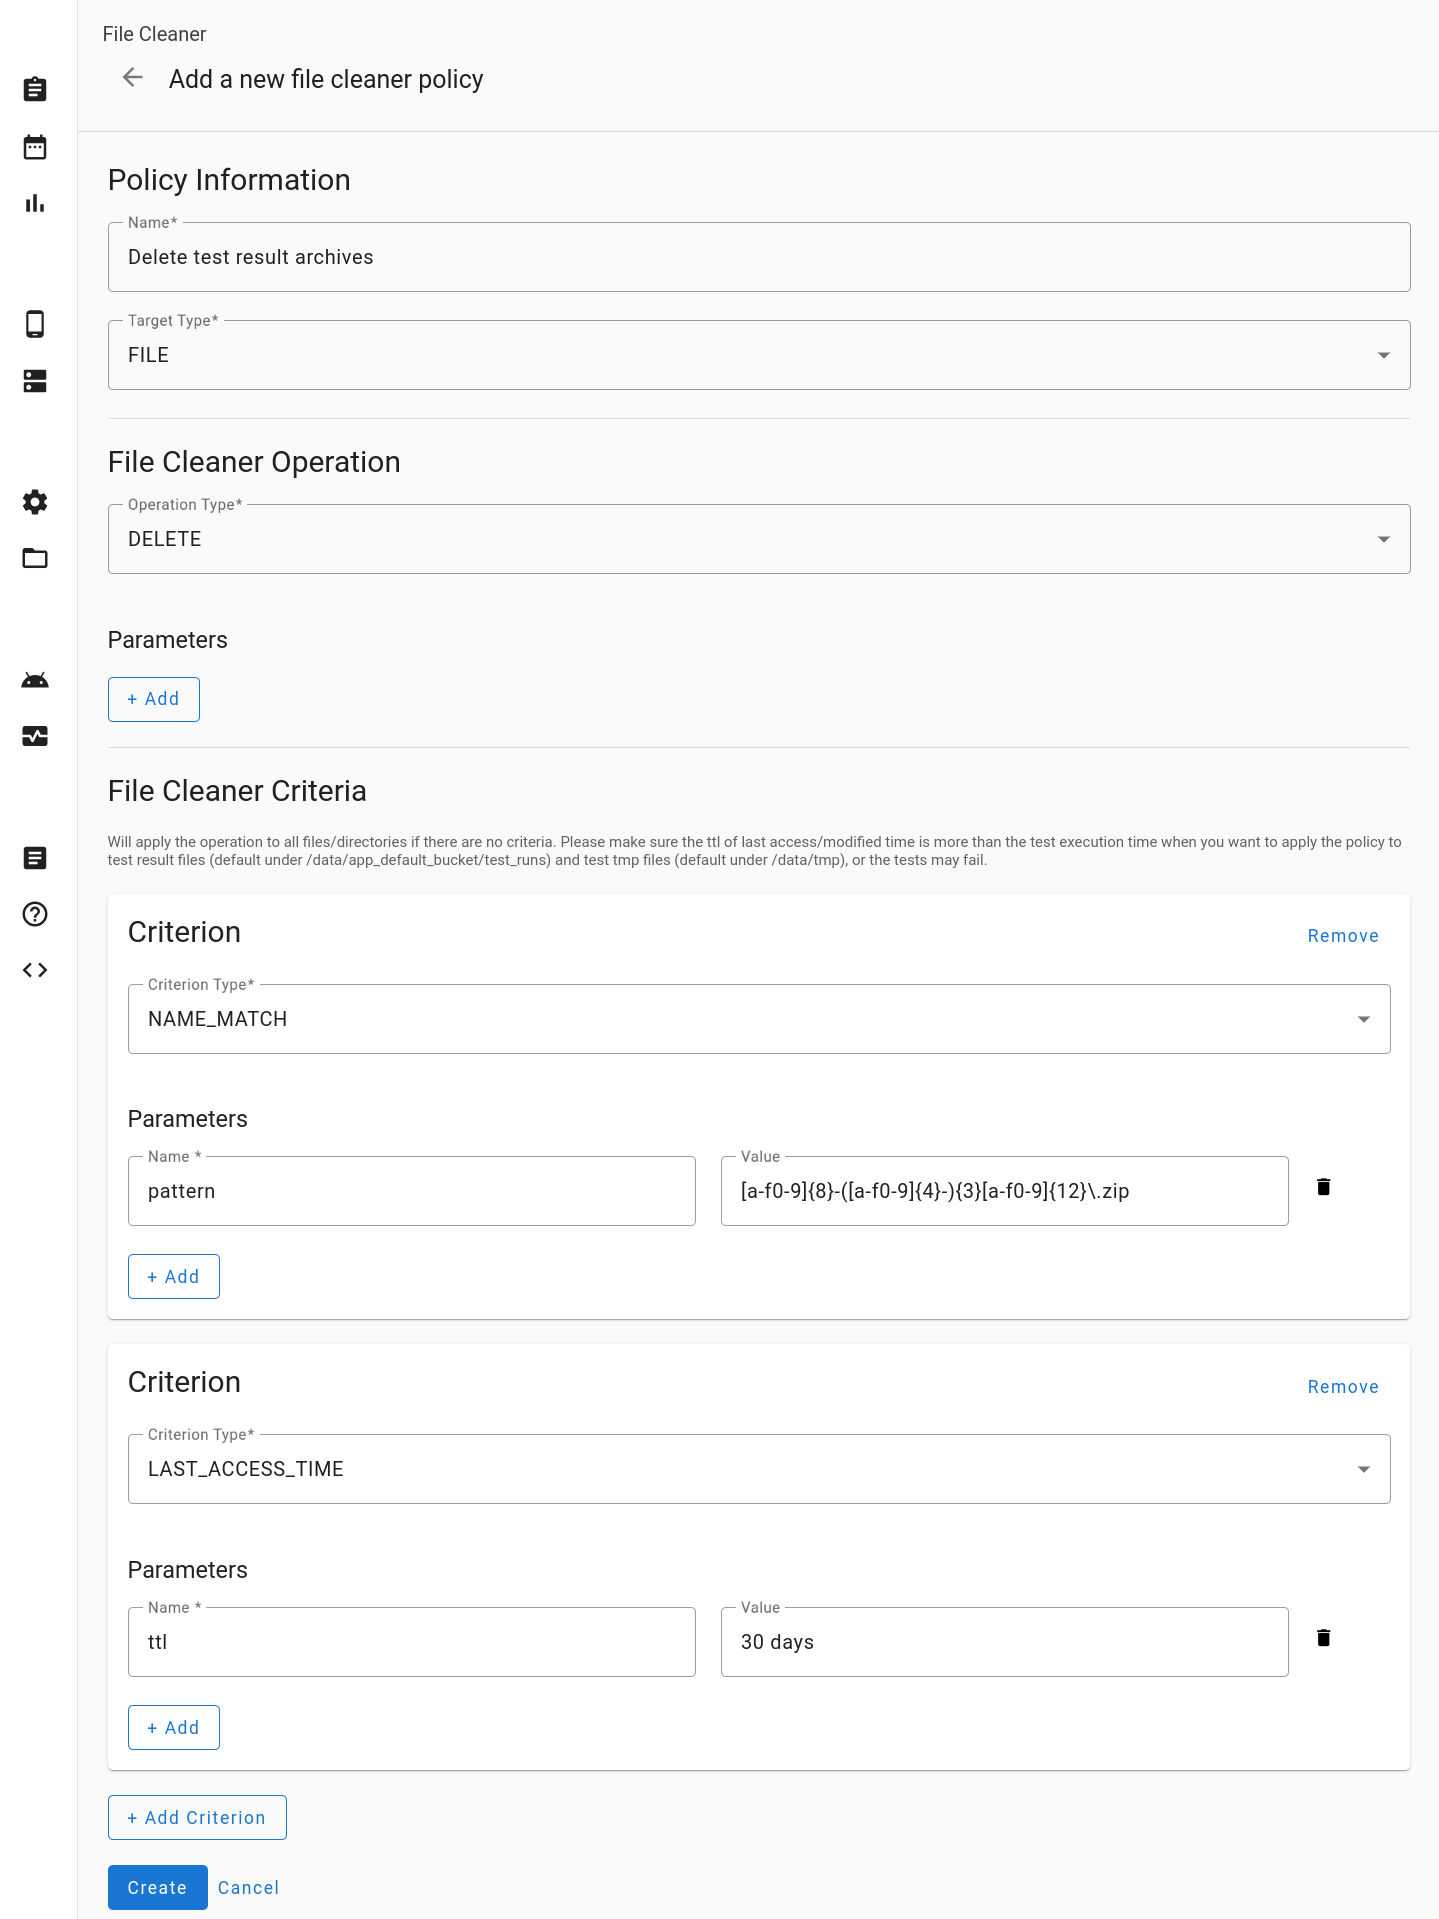
Figure 53. Add a new file cleaner policy.
Configs
A config combines one or more policies with specific directories. The files and directories within the specified directories are processed based on the defined policies. Policies are applied in the order they appear in the config.
All target directories must be located under the /data directory. If your
config specifies the target directory as logs, it's interpreted as
/data/logs.
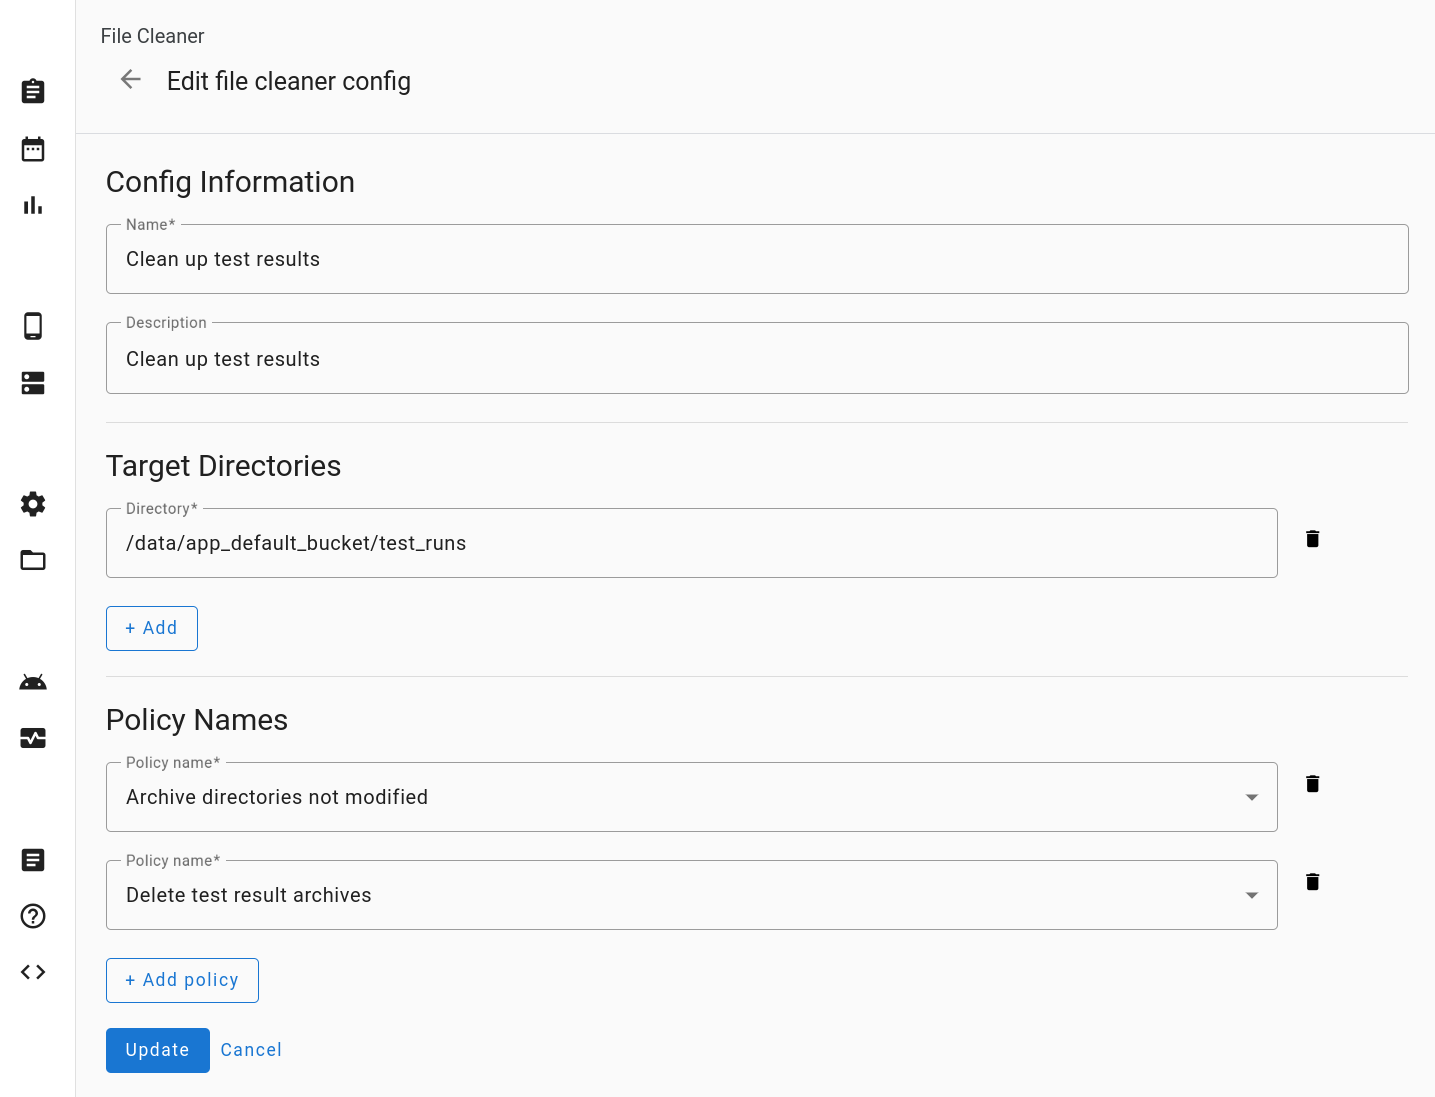
Figure 54. Edit the file cleaner config.
Reset
Clicking Reset Settings reverts the file cleaner configuration to its default state. This action clears ALL custom items.
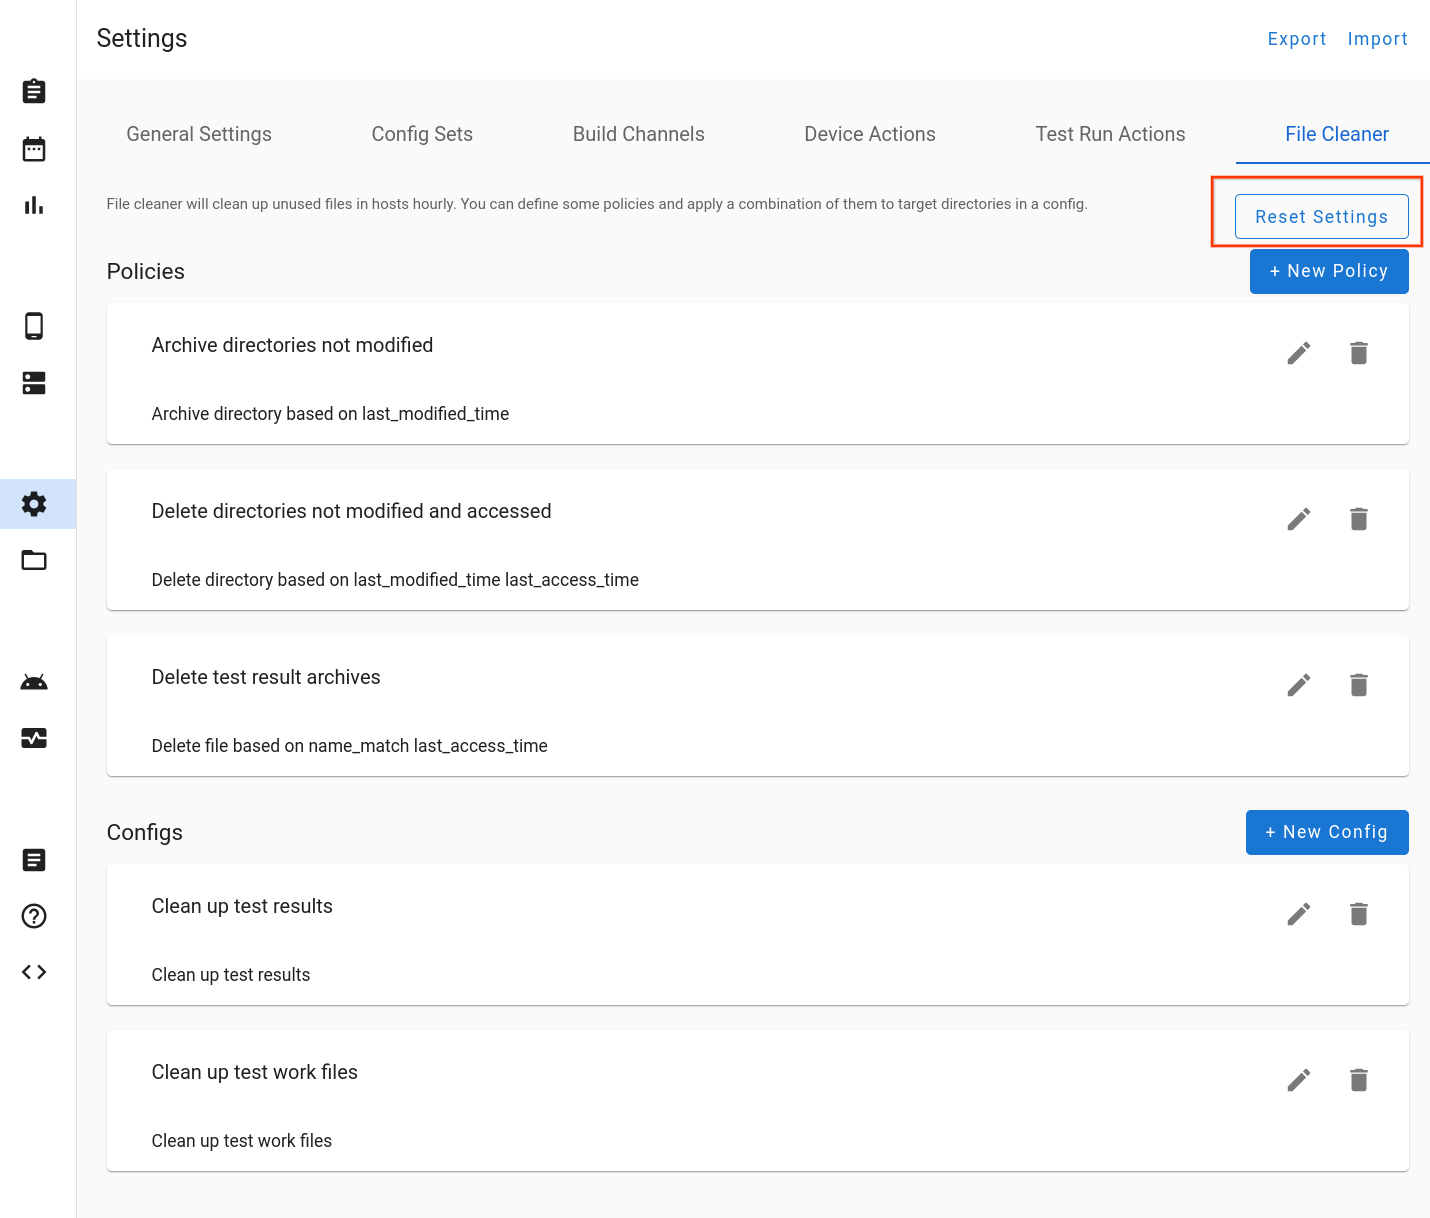
Figure 55. Reset file cleaner settings.
Support
Bug reports
Your contribution to OmniLab ATS helps improve the development of the tool, and we want your input! See the OmniLab ATS release notes for details on the latest release. To report bugs or offer suggestions, file a bug report. Partners should report bugs or suggestions using their partner channels.