
הערכת החומרה מתבצעת באמצעות התוכנה הבאה:
- Audacity (מותקן במחשב)
- MATLAB (מותקן במחשב)
- אפליקציית בדיקה של משוב פיזי (מותקנת ב-DUT)
מידע נוסף על דרישות המערכת זמין במאמרים בנושא Audacity ל-Windows, Audacity ל-Mac ו-MATLAB.
הגדרת Audacity
צריך להגדיר את Audacity כך שיקבל קלט מכרטיס הקול Sound Blaster בתדירות דגימת נתונים מסוימת. אחרי שמחברים את Sound Blaster ליציאת ה-USB במחשב, פותחים את Audacity ופועלים לפי ההוראות הבאות.
בוחרים באפשרות Line (USB Sound Blaster HD) כמקור למיקרופון הקלט על ידי חיבור פיזי של פלט ה-CCLD ליציאת הקלט Line In של Sound Blaster.

איור 1. בחירת קלט המיקרופון
מגדירים את תדירות הדגימה ל-48 kHz על ידי בחירה באפשרות 48000 בתפריט Project Rate.

איור 2. הגדרת תדירות הדגימה
הורדת MATLAB
מורידים את קובץ MATLAB.
מחפשים את הקובץ
Effect1NEffect2_V1p0_2020PM.m(עבור Effect1 ו-Effect 2) ואת הקובץEffect3_V1p0_2020PM.m(עבור Effect 3).
הגדרת אפליקציית הבדיקה בטלפון
בקטע הזה מוסבר איך מגדירים את אפליקציית הבדיקה בטלפון.
הכנה של אפליקציית הבדיקה
- מעתיקים את קוד המקור מתיבות הקוד של Java ו-Kotlin שבהמשך. בוחרים את האפשרות שהכי מתאימה לכם.
- כותבים קוד משלכם לפי הפרמטרים של ממשק המשתמש הגרפי שמוצגים באיור 3. אם צריך, משנים את הפרטים של קוד המקור של הפריסה כך שיתאימו לטלפון.
חשוב לוודא שהממשק הגרפי כולל שלושה לחצנים שאפשר ללחוץ עליהם ואינדיקטור חזותי להגדרת האזור שבו נמצא מד התאוצה.
- האזור שבו נמצא מד התאוצה מייצג את השטח של מסך המכשיר שבדרך כלל נוגעים בו ביד.
- במהלך המדידה, אפשר להזיז את מד התאוצה בתוך האזור התכול כדי למצוא את האזור במסך שבו האות הכי חזק.
מתקינים את הקוד במכשיר Android.
מומלץ מאוד להגדיר את שיטת הניווט במערכת למצב תנועות, אם מצב ברירת המחדל מוגדר כלחצנים.
- אם מגדירים את מצב התנועות, אפשר להניח את הטלפון כך שהחלק התחתון שלו עם מד התאוצה יהיה כמה שיותר קרוב למשטח, בלי שהממשקים הגרפיים של מערכת הניווט בטלפון יפריעו.
קוד מקור של Java
package com.example.hapticeffectassessment;

import static android.os.VibrationEffect.EFFECT_CLICK;

import android.graphics.Color;
import android.os.Bundle;
import android.os.VibrationEffect;
import android.os.Vibrator;
import android.widget.Button;
import androidx.appcompat.app.AppCompatActivity;

public class MainActivity extends AppCompatActivity {

 private static final long oneShotTiming = 20;
 private static final int oneShotAmplitude = 255;

 private static final long[] waveformTimings = {500, 500};
 private static final int[] waveformAmplitudes = {128, 255};

 @Override
 protected void onCreate(Bundle savedInstanceState) {
   super.onCreate(savedInstanceState);
   setContentView(R.layout.activity_main);

   Vibrator vibrator = getSystemService(Vibrator.class);

   // Click R.id.button1 button to generate Effect 1
   findViewById(R.id.button1).setOnClickListener(
       view -> vibrator.vibrate(VibrationEffect.createPredefined(EFFECT_CLICK)));

   // Click R.id.button2 button to generate Effect 2
   findViewById(R.id.button2).setOnClickListener(
       view -> vibrator.vibrate(VibrationEffect.createOneShot(oneShotTiming, oneShotAmplitude)));

   // Click R.id.button3 button to generate Effect 3
   findViewById(R.id.button3).setOnClickListener(view -> {
     vibrator.vibrate(VibrationEffect.createWaveform(waveformTimings, waveformAmplitudes, -1));

     // See quick results of Effect 3
     Button button = (Button) view;
     if (vibrator.hasAmplitudeControl()) {
       button.setText("Effect 3: PASS");
       button.setBackgroundColor(Color.GREEN);
       button.setTextColor(Color.BLACK);
     } else {
       button.setText("Effect 3: FAIL");
       button.setBackgroundColor(Color.RED);
       button.setTextColor(Color.WHITE);
     }
   });
 }
}
קוד מקור ב-Kotlin
package com.example.hapticeffectassessment

import android.graphics.Color
import android.os.Bundle
import android.os.VibrationEffect
import android.os.VibrationEffect.EFFECT_CLICK
import android.os.Vibrator
import android.widget.Button
import androidx.appcompat.app.AppCompatActivity
import kotlinx.android.synthetic.main.activity_main.*

class MainActivityKt : AppCompatActivity() {

 private val oneShotTiming: Long = 20
 private val oneShotAmplitude = 255

 private val waveformTimings = longArrayOf(500, 500)
 private val waveformAmplitudes = intArrayOf(128, 255)

 override fun onCreate(savedInstanceState: Bundle?) {
   super.onCreate(savedInstanceState)
   setContentView(R.layout.activity_main)

   val vibrator = getSystemService(Vibrator::class.java)

   // Click button1 to generate Effect 1
   button1.setOnClickListener {
     vibrator.vibrate(VibrationEffect.createPredefined(EFFECT_CLICK))
   }

   // Click button2 to generate Effect 2
   button2.setOnClickListener {
     vibrator.vibrate(VibrationEffect.createOneShot(oneShotTiming, oneShotAmplitude))
   }

   // Click button3 to generate Effect 3
   button3.setOnClickListener {
     vibrator.vibrate(
       VibrationEffect.createWaveform(waveformTimings, waveformAmplitudes, -1))

     // See quick results of Effect 3
     if (vibrator.hasAmplitudeControl()) {
       button3.text = "Effect 3: PASS"
       button3.setBackgroundColor(Color.GREEN)
       button3.setTextColor(Color.BLACK)
     } else {
       button3.text = "Effect 3: FAIL"
       button3.setBackgroundColor(Color.RED)
       button3.setTextColor(Color.WHITE)
     }
   }
 }
}
קוד המקור של הפריסה (activity_main.xml)
<?xml version="1.0" encoding="utf-8"?>
<androidx.constraintlayout.widget.ConstraintLayout xmlns:android="http://schemas.android.com/apk/res/android"
   xmlns:app="http://schemas.android.com/apk/res-auto"
   xmlns:tools="http://schemas.android.com/tools"
   android:layout_width="match_parent"
   android:layout_height="match_parent"
   tools:context=".MainActivity">

   <Button
       android:id="@+id/button1"
       android:layout_width="350dp"
       android:layout_height="60dp"
       android:layout_marginStart="32dp"
       android:layout_marginTop="5dp"
       android:layout_marginEnd="32dp"
       android:text="Effect 1"
       android:textSize="18sp"
       app:layout_constraintEnd_toEndOf="parent"
       app:layout_constraintStart_toStartOf="parent"
       app:layout_constraintTop_toTopOf="parent" />

   <Button
       android:id="@+id/button2"
       android:layout_width="350dp"
       android:layout_height="60dp"
       android:layout_marginStart="32dp"
       android:layout_marginTop="5dp"
       android:layout_marginEnd="32dp"
       android:text="Effect 2"
       android:textSize="18sp"
       app:layout_constraintEnd_toEndOf="parent"
       app:layout_constraintStart_toStartOf="parent"
       app:layout_constraintTop_toBottomOf="@+id/button1" />

   <Button
       android:id="@+id/button3"
       android:layout_width="350dp"
       android:layout_height="60dp"
       android:layout_marginStart="32dp"
       android:layout_marginTop="5dp"
       android:layout_marginEnd="32dp"
       android:text="Effect 3"
       android:textSize="18sp"
       app:layout_constraintEnd_toEndOf="parent"
       app:layout_constraintStart_toStartOf="parent"
       app:layout_constraintTop_toBottomOf="@+id/button2" />

   <View
       android:id="@+id/divider"
       android:layout_width="363dp"
       android:layout_height="1dp"
       android:layout_marginStart="32dp"
       android:layout_marginTop="10dp"
       android:layout_marginEnd="32dp"
       android:background="?android:attr/listDivider"
       app:layout_constraintEnd_toEndOf="parent"
       app:layout_constraintHorizontal_bias="0.5"
       app:layout_constraintStart_toStartOf="parent"
       app:layout_constraintTop_toBottomOf="@+id/button3" />

   <androidx.constraintlayout.widget.ConstraintLayout
       android:layout_width="363dp"
       android:layout_height="0dp"
       app:layout_constraintBottom_toBottomOf="parent"
       app:layout_constraintEnd_toEndOf="parent"
       app:layout_constraintHorizontal_bias="0.5"
       app:layout_constraintStart_toStartOf="parent"
       app:layout_constraintTop_toBottomOf="@+id/divider">

       <ImageView
           android:id="@+id/imageView"
           android:layout_width="wrap_content"
           android:layout_height="wrap_content"
           android:adjustViewBounds="true"
           android:scaleType="fitXY"
           app:layout_constraintBottom_toBottomOf="parent"
           app:layout_constraintEnd_toEndOf="parent"
           app:layout_constraintHorizontal_bias="0.5"
           app:layout_constraintStart_toStartOf="parent"
           app:layout_constraintTop_toTopOf="parent"
           app:srcCompat="@drawable/bluebar" />
   </androidx.constraintlayout.widget.ConstraintLayout>

</androidx.constraintlayout.widget.ConstraintLayout>
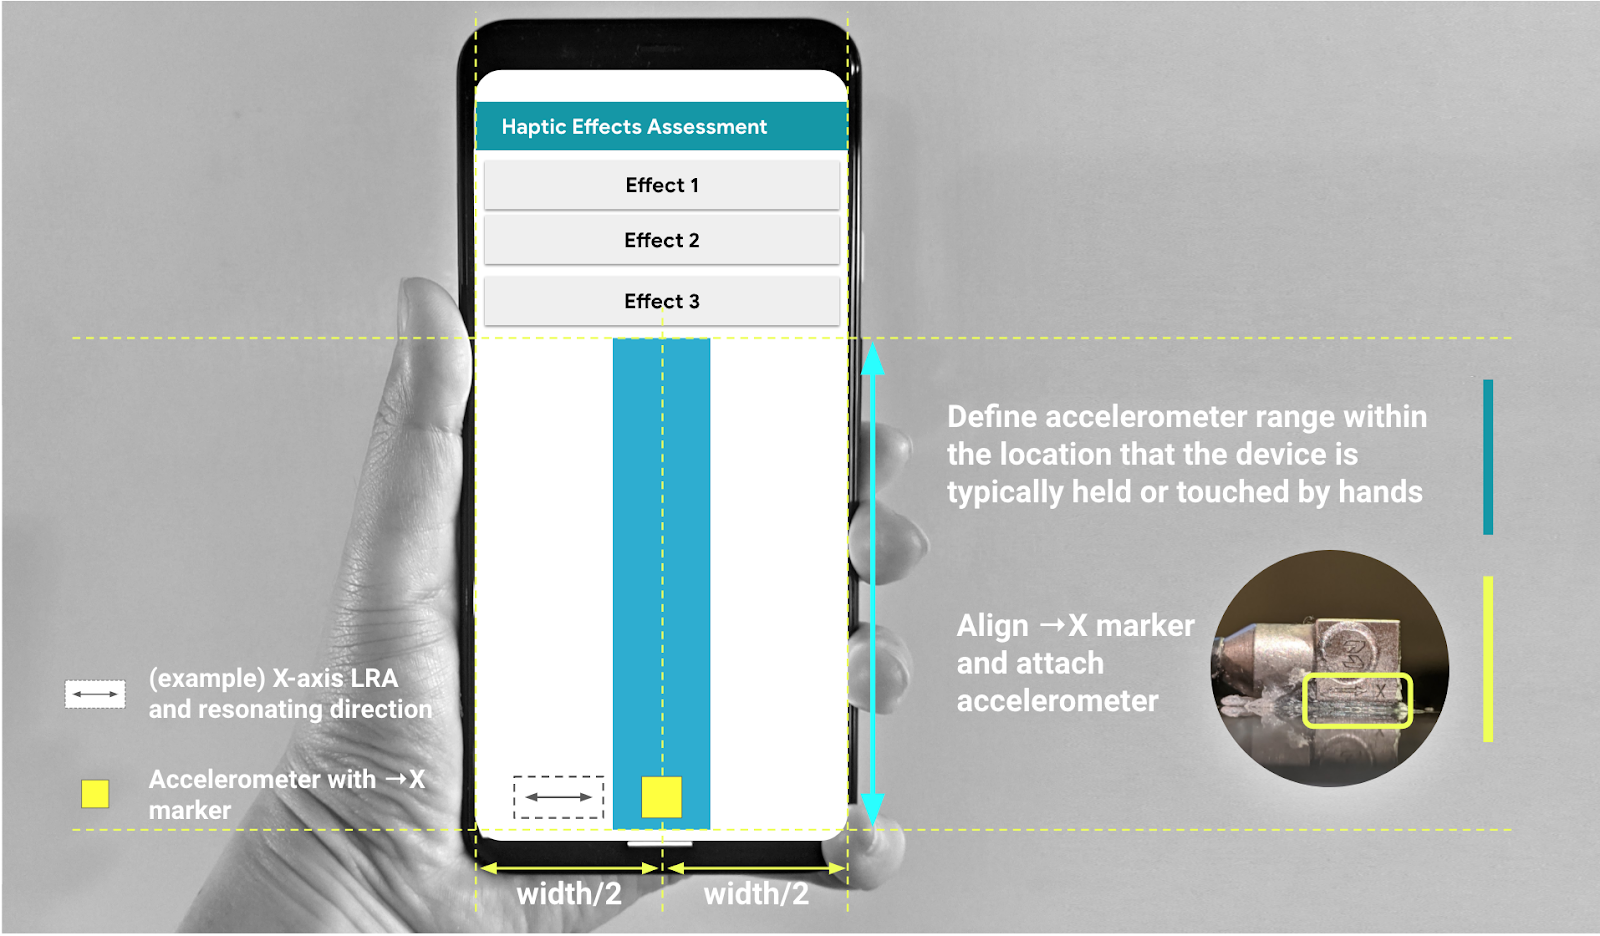
איור 3. הצמדת מד התאוצה לאורך האזור המומלץ בממשק המשתמש הגרפי