This document describes design of an APK caching solution for rapid installation of preloaded apps on a device that supports A/B partitions.
OEMs can place preloads and popular apps in the APK cache stored in the mostly empty B partition on new A/B-partitioned devices without impacting any user-facing data space. By having an APK cache available on the device, new or recently factory reset devices are ready for use almost immediately, without needing to download APK files from Google Play.
Use cases
- Store preloaded apps in B partition for faster setup
- Store popular apps in B partition for faster restoration
Prerequisites
To use this feature, the device needs:
- Android 8.1 (O MR1) release installed
- A/B partition implemented
Preloaded content can be copied only during first boot. This is because on devices supporting A/B system updates, the B partition doesn't actually store system image files, but instead preloaded content like retail demo resources, OAT files and the APK cache. After resources have been copied to the /data partition (this happens on first boot), the B partition will be used by over-the-air (OTA) updates for downloading updated versions of the system image.
Therefore, the APK cache cannot be updated through OTA; it can be preloaded only at a factory. Factory reset affects only the /data partition. The system B partition still has the preloaded content until the OTA image is downloaded. After factory reset, the system will go through first boot again. This means APK caching isn't available if the OTA image is downloaded to the B partition, and then the device is factory reset.
Implementation
Approach 1. Content on system_other partition
Pro: Preloaded content isn't lost after factory reset - it will be copied from the B partition after a reboot.
Con: Requires space on B partition. Boot after factory reset requires additional time to copy preloaded content.
In order for preloads to be copied during first boot, the system calls a script
in /system/bin/preloads_copy.sh. The script is called with a single
argument (path to the read-only mount point for system_b
partition):
To implement this feature, make these device-specific changes. Here is an example from Marlin:
- Add the script that does the copying to the
device-common.mkfile (in this case,device/google/marlin/device-common.mk), like so:# Script that copies preloads directory from system_other to data partition PRODUCT_COPY_FILES += \ device/google/marlin/preloads_copy.sh:system/bin/preloads_copy.sh - Edit the
init.common.rcfile to have it create the necessary/data/preloadsdirectory and subdirectories:mkdir /data/preloads 0775 system systemmkdir /data/preloads/media 0775 system systemmkdir /data/preloads/demo 0775 system systeminitfile source at: device/google/marlin/init.common.rc - Define a new SELinux domain in the file
preloads_copy.te:type preloads_copy, domain, coredomain; type preloads_copy_exec, exec_type, vendor_file_type, file_type; init_daemon_domain(preloads_copy) allow preloads_copy shell_exec:file rx_file_perms; allow preloads_copy toolbox_exec:file rx_file_perms; allow preloads_copy preloads_data_file:dir create_dir_perms; allow preloads_copy preloads_data_file:file create_file_perms; allow preloads_copy preloads_media_file:dir create_dir_perms; allow preloads_copy preloads_media_file:file create_file_perms; # Allow to copy from /postinstall allow preloads_copy system_file:dir r_dir_perms;
- Register the domain in a new
/sepolicy/file_contexts /system/bin/preloads_copy\.sh u:object_r:preloads_copy_exec:s0
- At build time, the directory with preloaded content must be copied to the
system_otherpartition:# Copy contents of preloads directory to system_other partition PRODUCT_COPY_FILES += \ $(call find-copy-subdir-files,*,vendor/google_devices/marlin/preloads,system_other/preloads) - The APK cache is located in
/data/preloads/file_cacheand has the following layout:/data/preloads/file_cache/ app.package.name.1/ file1 fileN app.package.name.N/
Approach 2. Content on user data image flashed at factory
This alternative approach assumes that preloaded content is already included in
the /data/preloads directory on the /data partition.
Pro: Works out of the box - no need to make device
customizations to copy files on first boot. Content is already on the
/data partition.
Con: Preloaded content is lost after a factory reset. While this might be acceptable for some, it might not always work for OEMs who factory reset devices after doing quality control inspections.
A new @SystemApi method, getPreloadsFileCache(), was added to
android.content.Context. It returns an absolute path to an
app-specific directory in the preloaded cache.
A new method, IPackageManager.deletePreloadsFileCache, was added
that allows deleting the preloads directory to reclaim all space. The method can
be called only by apps with SYSTEM_UID, i.e. system server or Settings.
App preparation
Only privileged apps can access the preloads cache directory. For that
access, apps must be installed in the /system/priv-app directory.
Validation
- After first boot, the device should have content in the
/data/preloads/file_cachedirectory. - The content in the
file_cache/directory must be deleted if the device runs low on storage.
Use the example ApkCacheTest app for testing APK cache.
- Build the app by running this command from the root directory:
make ApkCacheTest - Install the app as a privileged app. (Remember, only privileged apps can access the APK cache.)
This requires a rooted device:
adb root && adb remountadb shell mkdir /system/priv-app/ApkCacheTestadb push $ANDROID_PRODUCT_OUT/data/app/ApkCacheTest/ApkCacheTest.apk /system/priv-app/ApkCacheTest/adb shell stop && adb shell start - Simulate the file cache directory and its content if needed (also requiring root privileges):
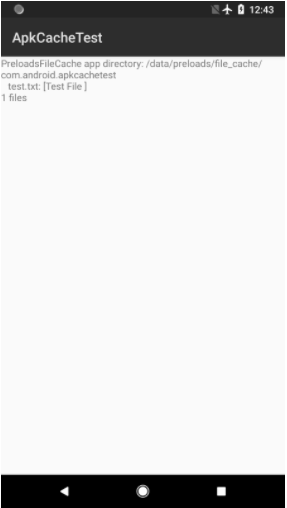
adb shell mkdir -p /data/preloads/file_cache/com.android.apkcachetestadb shell restorecon -r /data/preloadsadb shell "echo "Test File" > /data/preloads/file_cache/com.android.apkcachetest/test.txt" - Test the app. After installing the app and creating test
file_cachedirectory, open the ApkCacheTest app. It should show one filetest.txtand its contents. See this screenshot to see how these results appear in the user interface.
Figure 1. ApkCacheTest results.