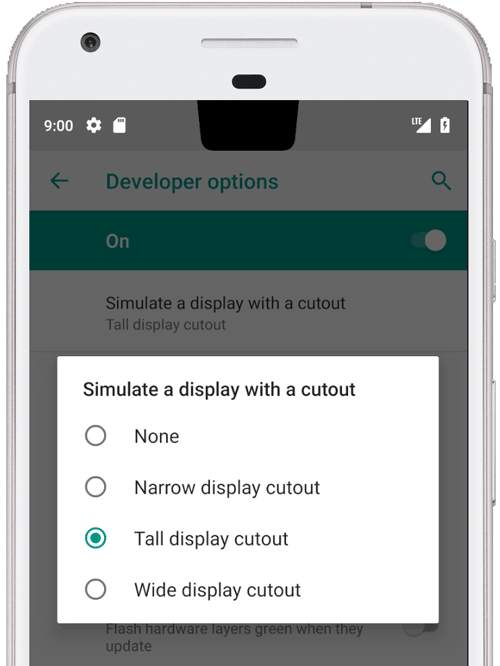
Android 9 新增支援功能,可在裝置上實作不同類型的螢幕凹口。螢幕凹口可讓您打造沉浸式無邊框體驗,同時為裝置正面的重要感應器保留空間。

圖 1. 頂端中央螢幕凹口
Android 9 支援下列類型的凹口:
- 靠上置中:頂端邊緣中央的凹口
- 頂端未置中:螢幕凹口可能位於角落或稍微偏離中心
- 底部:底部有凹口
- 雙鏡頭:頂端和底部各有一個凹口
範例和來源
以下 PhoneWindowManager.java 中的視窗管理員程式碼,說明顯示畫面影格如何在未設定 LAYOUT_IN_DISPLAY_CUTOUT_MODE_ALWAYS 時,插入安全區域。
// Ensure that windows with a DEFAULT or NEVER display cutout mode are laid out in
// the cutout safe zone.
if (cutoutMode != LAYOUT_IN_DISPLAY_CUTOUT_MODE_ALWAYS) {
    final Rect displayCutoutSafeExceptMaybeBars = mTmpDisplayCutoutSafeExceptMaybeBarsRect;
    displayCutoutSafeExceptMaybeBars.set(displayFrames.mDisplayCutoutSafe);
    if (layoutInScreen && layoutInsetDecor && !requestedFullscreen
            && cutoutMode == LAYOUT_IN_DISPLAY_CUTOUT_MODE_DEFAULT) {
        // At the top we have the status bar, so apps that are
        // LAYOUT_IN_SCREEN | LAYOUT_INSET_DECOR but not FULLSCREEN
        // already expect that there's an inset there and we don't need to exclude
        // the window from that area.
        displayCutoutSafeExceptMaybeBars.top = Integer.MIN_VALUE;
    }
    if (layoutInScreen && layoutInsetDecor && !requestedHideNavigation
            && cutoutMode == LAYOUT_IN_DISPLAY_CUTOUT_MODE_DEFAULT) {
        // Same for the navigation bar.
        switch (mNavigationBarPosition) {
            case NAV_BAR_BOTTOM:
                displayCutoutSafeExceptMaybeBars.bottom = Integer.MAX_VALUE;
                break;
            case NAV_BAR_RIGHT:
                displayCutoutSafeExceptMaybeBars.right = Integer.MAX_VALUE;
                break;
            case NAV_BAR_LEFT:
                displayCutoutSafeExceptMaybeBars.left = Integer.MIN_VALUE;
                break;
        }
    }
    if (type == TYPE_INPUT_METHOD && mNavigationBarPosition == NAV_BAR_BOTTOM) {
        // The IME can always extend under the bottom cutout if the navbar is there.
        displayCutoutSafeExceptMaybeBars.bottom = Integer.MAX_VALUE;
    }
    // Windows that are attached to a parent and laid out in said parent already avoid
    // the cutout according to that parent and don't need to be further constrained.
    // Floating IN_SCREEN windows get what they ask for and lay out in the full screen.
    // They will later be cropped or shifted using the displayFrame in WindowState,
    // which prevents overlap with the DisplayCutout.
    if (!attachedInParent && !floatingInScreenWindow) {
        mTmpRect.set(pf);
        pf.intersectUnchecked(displayCutoutSafeExceptMaybeBars);
        parentFrameWasClippedByDisplayCutout |= !mTmpRect.equals(pf);
    }
    // Make sure that NO_LIMITS windows clipped to the display don't extend under the
    // cutout.
    df.intersectUnchecked(displayCutoutSafeExceptMaybeBars);
}
SystemUI 會在凹口區域中算繪,並需要判斷可繪製的位置。PhoneStatusBarView.java 提供檢視區塊範例,可判斷螢幕凹口的位置、大小,以及導覽列的插邊是否會避開凹口區域。
覆寫 onApplyWindowInsets() 後,檢視區塊就能判斷凹口位置,並據此更新版面配置。
@Override
    public WindowInsets onApplyWindowInsets(WindowInsets insets) {
        if (updateOrientationAndCutout(mLastOrientation)) {
            updateLayoutForCutout();
            requestLayout();
        }
        return super.onApplyWindowInsets(insets);
    }
這些方法說明在所有情況下 (即頂端中央、頂端非中央、底部,以及所有旋轉方向的雙凹口),狀態列如何處理凹口。
需求條件
為確保應用程式不受螢幕凹口影響,請務必遵守下列規定:
- 狀態列至少會延伸至直向模式下凹口的長度
- 在全螢幕和橫向模式下,必須在凹口區域加上黑邊
裝置的短邊 (頂端和底部) 最多可各有一個凹口。
詳情請參閱 CDD。
實作
如要在裝置上實作螢幕凹口,您必須為系統 UI 設定下列值。
| 值 | 說明 |
|---|---|
quick_qs_offset_height
|
定義快速設定面板的上邊界。面板上方的空間會顯示時鐘和電池。 在 values-land 中,將值設為 |
quick_qs_total_height
|
通知欄展開時,快速設定面板 (快速設定面板已收合) 的總高度,包括面板上方含有時鐘的空間。
由於快速設定的版面配置方式,快速設定面板的總高度 (包括偏移) 必須靜態已知,因此這個值必須以相同的 delta |
status_bar_height_portrait
|
從架構的角度來看,狀態列的預設高度。 在大多數裝置中,這項設定預設為 24dp。如有凹口,請將這個值設為凹口的高度。視需要可比凹口高。 |
status_bar_height_landscape
|
橫向模式下的狀態列高度。凹口僅支援裝置的短邊,因此狀態列高度一律不會改變。 在沒有凹口的裝置中,這相當於 |
config_mainBuiltInDisplayCutout
|
定義凹口的形狀路徑。這是可由 您可以在路徑上指定 |
config_fillMainBuiltinDisplayCutout
|
這個布林值會決定是否要在軟體中繪製凹口路徑 (如上所述)。可用於模擬凹口,或填滿實體凹口以實現反鋸齒效果。 如為 true, |
如要查看預設定義,請參閱下列 dimens 檔案:
模擬凹口的疊加層範例:
<resources xmlns:xliff="urn:oasis:names:tc:xliff:document:1.2">

    <!-- The bounding path of the cutout region of the main built-in display.
         Must either be empty if there is no cutout region, or a string that is parsable by
         {@link android.util.PathParser}.

         The path is assumed to be specified in display coordinates with pixel units and in
         the display's native orientation, with the origin of the coordinate system at the
         center top of the display.

         To facilitate writing device-independent emulation overlays, the marker `@dp` can be
         appended after the path string to interpret coordinates in dp instead of px units.
         Note that a physical cutout should be configured in pixels for the best results.
         -->
    <string translatable="false" name="config_mainBuiltInDisplayCutout">
        M 0,0
        L -48, 0
        L -44.3940446283, 36.0595537175
        C -43.5582133885, 44.4178661152 -39.6, 48.0 -31.2, 48.0
        L 31.2, 48.0
        C 39.6, 48.0 43.5582133885, 44.4178661152 44.3940446283, 36.0595537175
        L 48, 0
        Z
        @dp
    </string>

    <!-- Whether the display cutout region of the main built-in display should be forced to
         black in software (to avoid aliasing or emulate a cutout that is not physically existent).
     -->
    <bool name="config_fillMainBuiltInDisplayCutout">true</bool>

    <!-- Height of the status bar -->
    <dimen name="status_bar_height_portrait">48dp</dimen>
    <dimen name="status_bar_height_landscape">28dp</dimen>
    <!-- Height of area above QQS where battery/time go (equal to status bar height if > 48dp) -->
    <dimen name="quick_qs_offset_height">48dp</dimen>
    <!-- Total height of QQS (quick_qs_offset_height + 128) -->
    <dimen name="quick_qs_total_height">176dp</dimen>

</resources>
驗證
如要驗證螢幕凹口實作項目,請在 tests/framework/base/windowmanager/src/android/server/wm 執行 CTS 測試。
