
রিকভারি সিস্টেমে ডিভাইস-নির্দিষ্ট কোড যুক্ত করার জন্য বেশ কিছু হুক অন্তর্ভুক্ত রয়েছে, যাতে OTA আপডেটগুলো অ্যান্ড্রয়েড সিস্টেম ছাড়াও ডিভাইসের অন্যান্য অংশও (যেমন, বেসব্যান্ড বা রেডিও প্রসেসর) আপডেট করতে পারে।
নিম্নলিখিত বিভাগ এবং উদাহরণগুলি ইয়োইয়োডাইন বিক্রেতার তৈরি টারডিস ডিভাইসটিকে কাস্টমাইজ করে।
বিভাজন মানচিত্র
অ্যান্ড্রয়েড ২.৩ সংস্করণ থেকে, প্ল্যাটফর্মটি eMMc ফ্ল্যাশ ডিভাইস এবং সেগুলিতে ব্যবহৃত ext4 ফাইলসিস্টেম সমর্থন করে। এটি পুরোনো সংস্করণগুলো থেকে মেমরি টেকনোলজি ডিভাইস (MTD) ফ্ল্যাশ ডিভাইস এবং yaffs2 ফাইলসিস্টেমও সমর্থন করে।
পার্টিশন ম্যাপ ফাইলটি TARGET_RECOVERY_FSTAB দ্বারা নির্দিষ্ট করা হয়; এই ফাইলটি রিকভারি বাইনারি এবং প্যাকেজ-বিল্ডিং টুল উভয়ই ব্যবহার করে। আপনি BoardConfig.mk-এর TARGET_RECOVERY_FSTAB-এ ম্যাপ ফাইলের নামটি নির্দিষ্ট করতে পারেন।
একটি নমুনা পার্টিশন ম্যাপ ফাইল দেখতে এইরকম হতে পারে:
device/yoyodyne/tardis/recovery.fstab
# mount point       fstype  device       [device2]        [options (3.0+ only)]

/sdcard     vfat    /dev/block/mmcblk0p1 /dev/block/mmcblk0
/cache      yaffs2  cache
/misc       mtd misc
/boot       mtd boot
/recovery   emmc    /dev/block/platform/s3c-sdhci.0/by-name/recovery
/system     ext4    /dev/block/platform/s3c-sdhci.0/by-name/system length=-4096
/data       ext4    /dev/block/platform/s3c-sdhci.0/by-name/userdata
ঐচ্ছিক /sdcard ব্যতীত, এই উদাহরণের সমস্ত মাউন্ট পয়েন্ট অবশ্যই সংজ্ঞায়িত করতে হবে (ডিভাইসগুলি অতিরিক্ত পার্টিশনও যোগ করতে পারে)। পাঁচ ধরনের ফাইলসিস্টেম সমর্থিত আছে:
- yaffs2
- একটি MTD ফ্ল্যাশ ডিভাইসের উপরে একটি yaffs2 ফাইলসিস্টেম। 'ডিভাইস' অবশ্যই MTD পার্টিশনের নাম হতে হবে এবং এটি
/proc/mtdতে থাকতে হবে। - এমটিডি
- একটি র' এমটিডি পার্টিশন, যা বুট এবং রিকভারির মতো বুটেবল পার্টিশনের জন্য ব্যবহৃত হয়। এমটিডি আসলে মাউন্ট করা হয় না, কিন্তু পার্টিশনটি সনাক্ত করার জন্য মাউন্ট পয়েন্টটি একটি কী হিসাবে ব্যবহৃত হয়। 'ডিভাইস' অবশ্যই
/proc/mtdতে থাকা এমটিডি পার্টিশনের নাম হতে হবে। - ext4
- একটি eMMc ফ্ল্যাশ ডিভাইসের উপরে একটি ext4 ফাইলসিস্টেম। 'ডিভাইস' অবশ্যই ব্লক ডিভাইসটির পাথ হতে হবে।
- ইএমএমসি
- একটি র eMMc ব্লক ডিভাইস, যা বুট এবং রিকভারির মতো বুটেবল পার্টিশনের জন্য ব্যবহৃত হয়। mtd টাইপের মতোই, eMMc আসলে কখনও মাউন্ট করা হয় না, কিন্তু টেবিলে ডিভাইসটির অবস্থান নির্ণয় করার জন্য মাউন্ট পয়েন্ট স্ট্রিংটি ব্যবহার করা হয়।
- ভিফ্যাট
- একটি ব্লক ডিভাইসের উপরে থাকা FAT ফাইলসিস্টেম, যা সাধারণত এসডি কার্ডের মতো বাহ্যিক স্টোরেজের জন্য ব্যবহৃত হয়। ডিভাইসটি হলো ব্লক ডিভাইস; ডিভাইস২ হলো একটি দ্বিতীয় ব্লক ডিভাইস যা সিস্টেম মাউন্ট করার চেষ্টা করে যদি প্রাথমিক ডিভাইসটি মাউন্ট করা ব্যর্থ হয় (পার্টিশন টেবিলসহ বা পার্টিশন টেবিল ছাড়া ফরম্যাট করা এসডি কার্ডের সাথে সামঞ্জস্য রক্ষার জন্য)।
সমস্ত পার্টিশন অবশ্যই রুট ডিরেক্টরিতে মাউন্ট করতে হবে (অর্থাৎ মাউন্ট পয়েন্ট ভ্যালুটি অবশ্যই একটি স্ল্যাশ দিয়ে শুরু হতে হবে এবং অন্য কোনো স্ল্যাশ থাকতে পারবে না)। এই সীমাবদ্ধতা শুধুমাত্র রিকভারি মোডে ফাইলসিস্টেম মাউন্ট করার ক্ষেত্রে প্রযোজ্য; মূল সিস্টেম সেগুলোকে যেকোনো জায়গায় মাউন্ট করতে পারে।
/boot,/recovery, এবং/miscডিরেক্টরিগুলো র টাইপের (mtd বা emmc) হতে হবে, অন্যদিকে/system,/data,/cache, এবং/sdcard(যদি থাকে) ডিরেক্টরিগুলো ফাইলসিস্টেম টাইপের (yaffs2, ext4, বা vfat) হতে হবে।
অ্যান্ড্রয়েড ৩.০ থেকে, recovery.fstab ফাইলে options নামে একটি অতিরিক্ত ঐচ্ছিক ফিল্ড যুক্ত হয়েছে। বর্তমানে একমাত্র সংজ্ঞায়িত অপশনটি হলো length , যা আপনাকে পার্টিশনের দৈর্ঘ্য স্পষ্টভাবে নির্দিষ্ট করার সুযোগ দেয়। পার্টিশন রিফরম্যাট করার সময় এই দৈর্ঘ্যটি ব্যবহৃত হয় (যেমন, ডেটা ওয়াইপ/ফ্যাক্টরি রিসেট অপারেশনের সময় ইউজারডেটা পার্টিশনের জন্য, অথবা একটি সম্পূর্ণ OTA প্যাকেজ ইনস্টল করার সময় সিস্টেম পার্টিশনের জন্য)। যদি length-এর মান নেগেটিভ হয়, তাহলে ফরম্যাট করার জন্য আকারটি প্রকৃত পার্টিশন আকারের সাথে length-এর মান যোগ করে নেওয়া হয়। উদাহরণস্বরূপ, "length=-16384" সেট করার অর্থ হলো, পার্টিশনটি রিফরম্যাট করার সময় এর শেষের ১৬কেবি অংশ ওভাররাইট হবে না । এটি ইউজারডেটা পার্টিশনের এনক্রিপশনের মতো ফিচারগুলোকে সমর্থন করে (যেখানে এনক্রিপশন মেটাডেটা পার্টিশনের শেষে সংরক্ষিত থাকে যা ওভাররাইট করা উচিত নয়)।
দ্রষ্টব্য: device2 এবং options ফিল্ডগুলো ঐচ্ছিক, যা পার্সিং-এর ক্ষেত্রে অস্পষ্টতা তৈরি করে। যদি লাইনের চতুর্থ ফিল্ডের এন্ট্রিটি একটি '/' অক্ষর দিয়ে শুরু হয়, তবে এটিকে device2 এন্ট্রি হিসেবে গণ্য করা হয়; আর যদি এন্ট্রিটি '/' অক্ষর দিয়ে শুরু না হয়, তবে এটিকে একটি options ফিল্ড হিসেবে গণ্য করা হয়।
বুট অ্যানিমেশন
ডিভাইস নির্মাতাদের অ্যান্ড্রয়েড ডিভাইস বুট করার সময় প্রদর্শিত অ্যানিমেশনটি কাস্টমাইজ করার ক্ষমতা রয়েছে। এটি করার জন্য, বুটঅ্যানিমেশন ফরম্যাটে নির্দিষ্ট বিবরণ অনুযায়ী সাজানো ও অবস্থিত একটি .zip ফাইল তৈরি করতে হবে।
অ্যান্ড্রয়েড থিংস ডিভাইসগুলোর ক্ষেত্রে, নির্বাচিত প্রোডাক্টে ছবিগুলো অন্তর্ভুক্ত করার জন্য আপনি অ্যান্ড্রয়েড থিংস কনসোলে জিপ করা ফাইলটি আপলোড করতে পারেন।
দ্রষ্টব্য: এই ছবিগুলো অবশ্যই অ্যান্ড্রয়েড ব্র্যান্ড নির্দেশিকা মেনে চলতে হবে। ব্র্যান্ড নির্দেশিকার জন্য, পার্টনার মার্কেটিং হাব -এর অ্যান্ড্রয়েড বিভাগটি দেখুন।
পুনরুদ্ধার UI
ভিন্ন ভিন্ন হার্ডওয়্যার (ফিজিক্যাল বাটন, এলইডি, স্ক্রিন ইত্যাদি) যুক্ত ডিভাইসগুলোকে সাপোর্ট করার জন্য, আপনি প্রতিটি ডিভাইসের স্ট্যাটাস প্রদর্শন করতে এবং ম্যানুয়ালি চালিত লুকানো ফিচারগুলো অ্যাক্সেস করার জন্য রিকভারি ইন্টারফেসটি কাস্টমাইজ করতে পারেন।
আপনার লক্ষ্য হলো ডিভাইস-নির্দিষ্ট কার্যকারিতা প্রদানের জন্য কয়েকটি C++ অবজেক্ট সহ একটি ছোট স্ট্যাটিক লাইব্রেরি তৈরি করা। ডিফল্টরূপে bootable/recovery/default_device.cpp ফাইলটি ব্যবহৃত হয়, এবং আপনার ডিভাইসের জন্য এই ফাইলটির একটি সংস্করণ লেখার সময় এটি অনুলিপি করার জন্য একটি ভালো সূচনা বিন্দু।
দ্রষ্টব্য: আপনি এখানে কোনো কমান্ড নেই (No Command here) লেখা একটি বার্তা দেখতে পারেন। টেক্সট পরিবর্তন করতে, পাওয়ার বাটন চেপে ধরে ভলিউম আপ বাটনটি চাপুন। যদি আপনার ডিভাইসে দুটি বাটনই না থাকে, তাহলে টেক্সট পরিবর্তন করতে যেকোনো একটি বাটন দীর্ঘক্ষণ চেপে ধরে রাখুন।
device/yoyodyne/tardis/recovery/recovery_ui.cpp
#include <linux/input.h>

#include "common.h"
#include "device.h"
#include "screen_ui.h"
হেডার এবং আইটেম ফাংশন
ডিভাইস ক্লাসের জন্য এমন ফাংশন প্রয়োজন যা হিডেন রিকভারি মেনুতে থাকা হেডার এবং আইটেমগুলো রিটার্ন করে। হেডারগুলো বর্ণনা করে কীভাবে মেনুটি পরিচালনা করতে হবে (যেমন, হাইলাইট করা আইটেমটি পরিবর্তন বা নির্বাচন করার কন্ট্রোল)।
static const char* HEADERS[] = { "Volume up/down to move highlight;",
                                 "power button to select.",
                                 "",
                                 NULL };

static const char* ITEMS[] =  {"reboot system now",
                               "apply update from ADB",
                               "wipe data/factory reset",
                               "wipe cache partition",
                               NULL };
দ্রষ্টব্য: লম্বা লাইনগুলো সংক্ষিপ্ত করা হয় (র্যাপ করা হয় না), তাই আপনার ডিভাইসের স্ক্রিনের প্রস্থের কথা মাথায় রাখুন।
চেককি কাস্টমাইজ করুন
এরপর, আপনার ডিভাইসের RecoveryUI ইমপ্লিমেন্টেশনটি সংজ্ঞায়িত করুন। এই উদাহরণে ধরে নেওয়া হয়েছে যে টারডিস ডিভাইসটিতে একটি স্ক্রিন আছে, তাই আপনি বিল্ট-ইন ScreenRecoveryUI ইমপ্লিমেন্টেশন থেকে ইনহেরিট করতে পারেন ( স্ক্রিনবিহীন ডিভাইসের জন্য নির্দেশাবলী দেখুন)। ScreenRecoveryUI থেকে কাস্টমাইজ করার মতো একমাত্র ফাংশনটি হলো CheckKey() , যা প্রাথমিক অ্যাসিঙ্ক্রোনাস কী হ্যান্ডলিংয়ের কাজ করে:
class TardisUI : public ScreenRecoveryUI {
  public:
    virtual KeyAction CheckKey(int key) {
        if (key == KEY_HOME) {
            return TOGGLE;
        }
        return ENQUEUE;
    }
};
KEY ধ্রুবক
KEY_* কনস্ট্যান্টগুলো linux/input.h ফাইলে সংজ্ঞায়িত করা আছে। রিকভারির বাকি সময়ে যা-ই ঘটুক না কেন, CheckKey() ফাংশনটি কল করা হয়: যেমন মেনু বন্ধ করা হলে, চালু করা হলে, প্যাকেজ ইনস্টলেশনের সময়, ইউজারডেটা মুছে ফেলার সময়, ইত্যাদি। এটি চারটি কনস্ট্যান্টের মধ্যে যেকোনো একটি রিটার্ন করতে পারে:
- টগল . মেনু এবং/অথবা টেক্সট লগ-এর প্রদর্শন চালু বা বন্ধ করুন।
- রিবুট করুন । অবিলম্বে ডিভাইসটি রিবুট করুন।
- উপেক্ষা করুন । এই কী-প্রেসটি উপেক্ষা করুন।
- এনকিউ (ENQUEUE )। এই কী-প্রেসটিকে সিনক্রোনাসভাবে ব্যবহারের জন্য কিউতে যুক্ত করুন (অর্থাৎ, ডিসপ্লে চালু থাকলে রিকভারি মেনু সিস্টেম দ্বারা)।
যখনই একই কী-এর জন্য একটি কী-ডাউন ইভেন্টের পরে একটি কী-আপ ইভেন্ট ঘটে, তখন CheckKey() কল করা হয়। (A-ডাউন B-ডাউন B-আপ A-আপ এই ঘটনাপ্রবাহের ফলে শুধুমাত্র CheckKey(B) কল করা হয়।) অন্য কোনো কী চেপে ধরা আছে কিনা তা জানার জন্য CheckKey() , IsKeyPressed() কে কল করতে পারে। (কী ইভেন্টের উপরের অনুক্রমে, যদি CheckKey(B) IsKeyPressed(A) কে কল করত, তাহলে এটি true রিটার্ন করত।)
CheckKey() তার ক্লাসে স্টেট বজায় রাখতে পারে; এটি কী-এর ক্রম শনাক্ত করতে কাজে আসতে পারে। এই উদাহরণটি একটি সামান্য বেশি জটিল সেটআপ দেখাচ্ছে: পাওয়ার বাটন চেপে ধরে ভলিউম-আপ বাটন চাপলে ডিসপ্লে টগল হয়, এবং পাওয়ার বাটনটি পরপর পাঁচবার চাপলে (মাঝখানে অন্য কোনো কী না চেপে) ডিভাইসটি সঙ্গে সঙ্গে রিবুট করা যায়।
class TardisUI : public ScreenRecoveryUI {
  private:
    int consecutive_power_keys;

  public:
    TardisUI() : consecutive_power_keys(0) {}

    virtual KeyAction CheckKey(int key) {
        if (IsKeyPressed(KEY_POWER) && key == KEY_VOLUMEUP) {
            return TOGGLE;
        }
        if (key == KEY_POWER) {
            ++consecutive_power_keys;
            if (consecutive_power_keys >= 5) {
                return REBOOT;
            }
        } else {
            consecutive_power_keys = 0;
        }
        return ENQUEUE;
    }
};
স্ক্রিনরিকভারিইউআই
ScreenRecoveryUI-এর সাথে আপনার নিজের ছবি (এরর আইকন, ইনস্টলেশন অ্যানিমেশন, প্রোগ্রেস বার) ব্যবহার করার সময়, আপনি animation_fps ভেরিয়েবলটি সেট করে অ্যানিমেশনের গতি ফ্রেম পার সেকেন্ড (FPS)-এ নিয়ন্ত্রণ করতে পারেন।
দ্রষ্টব্য: বর্তমান interlace-frames.py স্ক্রিপ্টটি আপনাকে সরাসরি ইমেজের মধ্যেই animation_fps তথ্য সংরক্ষণ করার সুযোগ দেয়। অ্যান্ড্রয়েডের পূর্ববর্তী সংস্করণগুলিতে animation_fps আপনাকে নিজে থেকেই সেট করতে হতো।
animation_fps ভেরিয়েবলটি সেট করতে, আপনার সাবক্লাসে ScreenRecoveryUI::Init() ফাংশনটি ওভাররাইড করুন। মানটি সেট করুন, তারপর ইনিশিয়ালাইজেশন সম্পূর্ণ করতে parent Init() ফাংশনটি কল করুন। ডিফল্ট মান (20 FPS) ডিফল্ট রিকভারি ইমেজগুলোর সাথে সামঞ্জস্যপূর্ণ; এই ইমেজগুলো ব্যবহার করার সময় আপনার কোনো Init() ফাংশন দেওয়ার প্রয়োজন নেই। ইমেজ সম্পর্কে বিস্তারিত জানতে, Recovery UI Images দেখুন।
ডিভাইসের শ্রেণী
আপনার একটি RecoveryUI ইমপ্লিমেন্টেশন তৈরি হয়ে গেলে, আপনার ডিভাইস ক্লাসটি সংজ্ঞায়িত করুন (যা বিল্ট-ইন Device ক্লাস থেকে সাবক্লাস করা হবে)। এটি আপনার UI ক্লাসের একটিমাত্র ইনস্ট্যান্স তৈরি করবে এবং GetUI() ফাংশন থেকে সেটি রিটার্ন করবে:
class TardisDevice : public Device {
  private:
    TardisUI* ui;

  public:
    TardisDevice() :
        ui(new TardisUI) {
    }

    RecoveryUI* GetUI() { return ui; }
স্টার্টরিকভারি
StartRecovery() মেথডটি রিকভারির শুরুতে কল করা হয়; এটি UI ইনিশিয়ালাইজ হওয়ার এবং আর্গুমেন্টগুলো পার্স করার পরে, কিন্তু কোনো অ্যাকশন নেওয়ার আগে করা হয়। এর ডিফল্ট ইমপ্লিমেন্টেশন কিছুই করে না, তাই আপনার সাবক্লাসে যদি করার মতো কিছু না থাকে, তবে এটি দেওয়ার প্রয়োজন নেই।
   void StartRecovery() {
       // ... do something tardis-specific here, if needed ....
    }
পুনরুদ্ধার মেনু সরবরাহ ও পরিচালনা করুন
সিস্টেমটি হেডার লাইনগুলোর তালিকা এবং আইটেমগুলোর তালিকা পেতে দুটি মেথড কল করে। এই ইমপ্লিমেন্টেশনে, এটি ফাইলের শীর্ষে সংজ্ঞায়িত স্ট্যাটিক অ্যারেগুলো রিটার্ন করে:
const char* const* GetMenuHeaders() { return HEADERS; }
const char* const* GetMenuItems() { return ITEMS; }
হ্যান্ডেলমেনুকী
এরপরে, একটি HandleMenuKey() ফাংশন দিন, যা একটি কী-প্রেস এবং মেনুর বর্তমান দৃশ্যমানতা গ্রহণ করে এবং কী পদক্ষেপ নিতে হবে তা নির্ধারণ করে:
   int HandleMenuKey(int key, int visible) {
        if (visible) {
            switch (key) {
              case KEY_VOLUMEDOWN: return kHighlightDown;
              case KEY_VOLUMEUP:   return kHighlightUp;
              case KEY_POWER:      return kInvokeItem;
            }
        }
        return kNoAction;
    }
এই মেথডটি একটি কী কোড (যা UI অবজেক্টের CheckKey() মেথড দ্বারা পূর্বেই প্রসেস করে কিউতে যুক্ত করা হয়েছে) এবং মেনু/টেক্সট লগের দৃশ্যমানতার বর্তমান অবস্থা গ্রহণ করে। এর রিটার্ন ভ্যালু একটি পূর্ণসংখ্যা। যদি মানটি ০ বা তার বেশি হয়, তবে সেটিকে একটি মেনু আইটেমের অবস্থান হিসেবে ধরা হয়, যা সাথে সাথেই কল করা হয় (নিচের InvokeMenuItem() মেথডটি দেখুন)। অন্যথায় এটি নিম্নলিখিত পূর্বনির্ধারিত কনস্ট্যান্টগুলোর মধ্যে যেকোনো একটি হতে পারে:
- kHighlightUp . মেনু হাইলাইটকে পূর্ববর্তী আইটেমে সরান।
- kHighlightDown . মেনু হাইলাইটকে পরবর্তী আইটেমে সরান।
- kInvokeItem . বর্তমানে হাইলাইট করা আইটেমটি চালু করুন।
- kNoAction . এই কী চাপলে কিছুই হবে না।
visible আর্গুমেন্টটি থেকে যেমনটা বোঝা যায়, মেনুটি দৃশ্যমান না থাকলেও HandleMenuKey() কল করা হয়। CheckKey() মতো নয়, রিকভারি যখন ডেটা মোছা বা প্যাকেজ ইনস্টল করার মতো কোনো কাজ করে, তখন এটি কল করা হয় না —এটি শুধুমাত্র তখনই কল করা হয় যখন রিকভারি নিষ্ক্রিয় থাকে এবং ইনপুটের জন্য অপেক্ষা করে।
ট্র্যাকবল প্রক্রিয়া
যদি আপনার ডিভাইসে ট্র্যাকবলের মতো ইনপুট ব্যবস্থা থাকে (যা EV_REL টাইপ এবং REL_Y কোড সহ ইনপুট ইভেন্ট তৈরি করে), তাহলে যখনই ট্র্যাকবলের মতো ইনপুট ডিভাইসটি Y অক্ষে গতি শনাক্ত করে, রিকভারি KEY_UP এবং KEY_DOWN কী-প্রেস তৈরি করে। আপনাকে শুধু KEY_UP এবং KEY_DOWN ইভেন্টগুলোকে মেনু অ্যাকশনের সাথে ম্যাপ করতে হবে। এই ম্যাপিংটি CheckKey() এর জন্য হয় না , তাই আপনি রিবুট করা বা ডিসপ্লে টগল করার জন্য ট্রিগার হিসেবে ট্র্যাকবলের গতি ব্যবহার করতে পারবেন না।
মডিফায়ার কী
মডিফায়ার হিসেবে কী চেপে ধরা আছে কিনা তা পরীক্ষা করতে, আপনার নিজের UI অবজেক্টের IsKeyPressed() মেথডটি কল করুন। উদাহরণস্বরূপ, কিছু ডিভাইসে রিকভারি মোডে Alt-W চাপলে মেনু দেখা যাক বা না যাক, ডেটা মুছে যাওয়া শুরু হতো। আপনি এটি এভাবে ইমপ্লিমেন্ট করতে পারেন:
   int HandleMenuKey(int key, int visible) {
        if (ui->IsKeyPressed(KEY_LEFTALT) && key == KEY_W) {
            return 2;  // position of the "wipe data" item in the menu
        }
        ...
    }
দ্রষ্টব্য: যদি 'visible' এর মান 'false' হয়, তাহলে মেনু নিয়ন্ত্রণকারী বিশেষ মানগুলো (যেমন হাইলাইট সরানো, হাইলাইট করা আইটেম চালু করা) রিটার্ন করার কোনো মানে হয় না, কারণ ব্যবহারকারী হাইলাইটটি দেখতে পায় না। তবে, চাইলে আপনি মানগুলো রিটার্ন করতে পারেন।
InvokeMenuItem
এরপরে, একটি InvokeMenuItem() মেথড দিন যা GetMenuItems() দ্বারা ফেরত আসা আইটেম অ্যারের পূর্ণসংখ্যার অবস্থানগুলিকে অ্যাকশনের সাথে ম্যাপ করে। টার্ডিস উদাহরণের আইটেম অ্যারের জন্য, ব্যবহার করুন:
   BuiltinAction InvokeMenuItem(int menu_position) {
        switch (menu_position) {
          case 0: return REBOOT;
          case 1: return APPLY_ADB_SIDELOAD;
          case 2: return WIPE_DATA;
          case 3: return WIPE_CACHE;
          default: return NO_ACTION;
        }
    }
এই মেথডটি BuiltinAction enum-এর যেকোনো মেম্বার রিটার্ন করতে পারে, যা সিস্টেমকে সেই অ্যাকশনটি নিতে নির্দেশ দেয় (অথবা NO_ACTION মেম্বারটি, যদি আপনি চান যে সিস্টেম কিছুই না করুক)। সিস্টেমে যা আছে তার বাইরে অতিরিক্ত রিকভারি কার্যকারিতা যোগ করার জন্য এটিই উপযুক্ত জায়গা: আপনার মেনুতে এর জন্য একটি আইটেম যোগ করুন, যখন সেই মেনু আইটেমটি কল করা হবে তখন এটি এখানে এক্সিকিউট করুন, এবং NO_ACTION রিটার্ন করুন যাতে সিস্টেম আর কিছুই না করে।
BuiltinAction-এ নিম্নলিখিত মানগুলি রয়েছে:
- NO_ACTION . কিছুই করবেন না।
- রিবুট করুন । রিকভারি থেকে বেরিয়ে আসুন এবং ডিভাইসটি স্বাভাবিকভাবে রিবুট করুন।
- APPLY_EXT, APPLY_CACHE, APPLY_ADB_SIDELOAD . বিভিন্ন স্থান থেকে একটি আপডেট প্যাকেজ ইনস্টল করুন। বিস্তারিত জানতে, সাইডলোডিং দেখুন।
- WIPE_CACHE . শুধুমাত্র ক্যাশ পার্টিশনটি রিফরম্যাট করুন। এটি তুলনামূলকভাবে নিরীহ হওয়ায় কোনো নিশ্চিতকরণের প্রয়োজন নেই।
- WIPE_DATA . ইউজারডেটা এবং ক্যাশ পার্টিশনগুলো রিফরম্যাট করুন, যা ফ্যাক্টরি ডেটা রিসেট নামেও পরিচিত। কাজটি শুরু করার আগে ব্যবহারকারীকে এটি নিশ্চিত করতে বলা হয়।
শেষ মেথড, WipeData() , ঐচ্ছিক এবং যখনই কোনো ডেটা মোছার অপারেশন শুরু করা হয় (হয় মেনুর মাধ্যমে রিকভারি থেকে অথবা যখন ব্যবহারকারী মূল সিস্টেম থেকে ফ্যাক্টরি ডেটা রিসেট করার সিদ্ধান্ত নেন), তখন এটি কল করা হয়। ইউজার ডেটা এবং ক্যাশ পার্টিশন মোছার আগে এই মেথডটি কল করা হয়। যদি আপনার ডিভাইস ঐ দুটি পার্টিশন ছাড়া অন্য কোথাও ইউজার ডেটা সংরক্ষণ করে, তবে আপনার এখানেই তা মুছে ফেলা উচিত। সফলতার জন্য আপনার 0 এবং ব্যর্থতার জন্য অন্য কোনো মান রিটার্ন করা উচিত, যদিও বর্তমানে রিটার্ন করা মানটি উপেক্ষা করা হয়। আপনি সফল বা ব্যর্থ যা-ই রিটার্ন করুন না কেন, ইউজার ডেটা এবং ক্যাশ পার্টিশন মোছা হয়ে যায়।
   int WipeData() {
       // ... do something tardis-specific here, if needed ....
       return 0;
    }
ডিভাইস তৈরি করুন
অবশেষে, recovery_ui.cpp ফাইলের শেষে make_device() ফাংশনের জন্য কিছু বয়লারপ্লেট কোড যোগ করুন, যা আপনার Device ক্লাসের একটি ইনস্ট্যান্স তৈরি করে এবং রিটার্ন করে:
class TardisDevice : public Device {
   // ... all the above methods ...
};

Device* make_device() {
    return new TardisDevice();
}
ডিভাইস পুনরুদ্ধারের জন্য তৈরি করুন এবং লিঙ্ক করুন
recovery_ui.cpp ফাইলটি সম্পূর্ণ করার পর, এটি বিল্ড করুন এবং আপনার ডিভাইসের রিকভারির সাথে লিঙ্ক করুন। Android.mk-তে একটি স্ট্যাটিক লাইব্রেরি তৈরি করুন যাতে শুধুমাত্র এই C++ ফাইলটি থাকবে:
device/yoyodyne/tardis/recovery/Android.mk
LOCAL_PATH := $(call my-dir)
include $(CLEAR_VARS)

LOCAL_MODULE_TAGS := eng
LOCAL_C_INCLUDES += bootable/recovery
LOCAL_SRC_FILES := recovery_ui.cpp

# should match TARGET_RECOVERY_UI_LIB set in BoardConfig.mk
LOCAL_MODULE := librecovery_ui_tardis

include $(BUILD_STATIC_LIBRARY)
এরপর, এই ডিভাইসের বোর্ড কনফিগারেশনে, TARGET_RECOVERY_UI_LIB-এর ভ্যালু হিসেবে আপনার স্ট্যাটিক লাইব্রেরিটি নির্দিষ্ট করুন।
device/yoyodyne/tardis/BoardConfig.mk
 [...]

# device-specific extensions to the recovery UI
TARGET_RECOVERY_UI_LIB := librecovery_ui_tardis
পুনরুদ্ধার UI ছবি
রিকভারি ইউজার ইন্টারফেসটি ছবি দিয়ে গঠিত। সাধারণত, ব্যবহারকারীরা কখনোই এই UI-এর সাথে ইন্টারঅ্যাক্ট করেন না: একটি সাধারণ আপডেটের সময়, ফোনটি রিকভারি মোডে বুট করে, ইনস্টলেশন প্রোগ্রেস বারটি পূরণ করে এবং ব্যবহারকারীর কোনো ইনপুট ছাড়াই নতুন সিস্টেমে ফিরে আসে। সিস্টেম আপডেটে কোনো সমস্যা হলে, ব্যবহারকারী শুধুমাত্র কাস্টমার কেয়ারে ফোন করতে পারেন।
শুধুমাত্র ছবি-ভিত্তিক ইন্টারফেসের জন্য স্থানীয়করণের প্রয়োজন হয় না। তবে, অ্যান্ড্রয়েড ৫.০ থেকে আপডেটটি ছবির সাথে একটি টেক্সট স্ট্রিং (যেমন "সিস্টেম আপডেট ইনস্টল করা হচ্ছে...") প্রদর্শন করতে পারে। বিস্তারিত জানতে, স্থানীয়কৃত রিকভারি টেক্সট দেখুন।
অ্যান্ড্রয়েড ৫.০ এবং তার পরবর্তী সংস্করণ
অ্যান্ড্রয়েড ৫.০ এবং এর পরবর্তী সংস্করণগুলোর রিকভারি ইউআই দুটি প্রধান ছবি ব্যবহার করে: এরর ইমেজ এবং ইনস্টলিং অ্যানিমেশন।
চিত্র ১. icon_error.png | চিত্র ২. icon_installing.png |
ইনস্টলিং অ্যানিমেশনটি একটি একক PNG ইমেজ হিসেবে উপস্থাপিত হয়, যেখানে অ্যানিমেশনের বিভিন্ন ফ্রেম সারি অনুযায়ী ইন্টারলেস করা থাকে (এ কারণেই চিত্র ২-কে সংকুচিত দেখাচ্ছে)। উদাহরণস্বরূপ, একটি 200x200 সাত-ফ্রেমের অ্যানিমেশনের জন্য, একটি একক 200x1400 ইমেজ তৈরি করুন যেখানে প্রথম ফ্রেমটি হলো সারি ০, ৭, ১৪, ২১, ...; দ্বিতীয় ফ্রেমটি হলো সারি ১, ৮, ১৫, ২২, ...; ইত্যাদি। সম্মিলিত ইমেজটিতে একটি টেক্সট চাঙ্ক অন্তর্ভুক্ত থাকে যা অ্যানিমেশন ফ্রেমের সংখ্যা এবং প্রতি সেকেন্ডে ফ্রেমের সংখ্যা (FPS) নির্দেশ করে। bootable/recovery/interlace-frames.py টুলটি এক সেট ইনপুট ফ্রেম গ্রহণ করে এবং সেগুলোকে একত্রিত করে রিকভারির জন্য প্রয়োজনীয় কম্পোজিট ইমেজ তৈরি করে।
ডিফল্ট ইমেজগুলো বিভিন্ন ডেনসিটিতে পাওয়া যায় এবং এগুলো bootable/recovery/res-$DENSITY/images ফোল্ডারে অবস্থিত (যেমন, bootable/recovery/res-hdpi/images )। ইনস্টলেশনের সময় একটি স্ট্যাটিক ইমেজ ব্যবহার করতে, আপনাকে কেবল icon_installing.png ইমেজটি সরবরাহ করতে হবে এবং অ্যানিমেশনের ফ্রেম সংখ্যা ০-তে সেট করতে হবে (এরর আইকনটি অ্যানিমেটেড নয়; এটি সর্বদা একটি স্ট্যাটিক ইমেজ)।
অ্যান্ড্রয়েড ৪.x এবং তার আগের সংস্করণ
অ্যান্ড্রয়েড ৪.x এবং এর পূর্ববর্তী সংস্করণগুলোর রিকভারি UI-তে উপরে দেখানো এরর ইমেজ, ইনস্টলিং অ্যানিমেশন এবং এর সাথে আরও কয়েকটি ওভারলে ইমেজ ব্যবহৃত হয়:
চিত্র ৩. icon_installing.png | চিত্র 4. icon-installing_overlay01.png |
চিত্র 5. icon_installing_overlay07.png |
ইনস্টলেশনের সময়, প্রথমে icon_installing.png ছবিটি এঁকে এবং তারপর এর উপরে সঠিক অফসেটে ওভারলে ফ্রেমগুলোর একটি এঁকে অন-স্ক্রিন ডিসপ্লেটি তৈরি করা হয়। এখানে, মূল ছবির উপরে ওভারলেটি কোথায় বসানো হয়েছে তা তুলে ধরতে একটি লাল বাক্স যুক্ত করা হয়েছে:
 চিত্র ৬. ইনস্টলেশন অ্যানিমেশন ফ্রেম ১ (icon_installing.png + icon_installing_overlay01.png) |  চিত্র ৭. অ্যানিমেশন ফ্রেম ৭ ইনস্টল করা হচ্ছে (icon_installing.png + icon_installing_overlay07.png) |
পরবর্তী ফ্রেমগুলো প্রদর্শনের জন্য, আগে থেকে থাকা ছবির উপরে শুধু পরবর্তী ওভারলে ছবিটি আঁকা হয়; মূল ছবিটি পুনরায় আঁকা হয় না।
অ্যানিমেশনের ফ্রেম সংখ্যা, কাঙ্ক্ষিত গতি এবং বেসের সাপেক্ষে ওভারলে-র x- ও y-অফসেট ScreenRecoveryUI ক্লাসের মেম্বার ভেরিয়েবল দ্বারা সেট করা হয়। ডিফল্ট ইমেজের পরিবর্তে কাস্টম ইমেজ ব্যবহার করার সময়, আপনার কাস্টম ইমেজের জন্য এই মানগুলি পরিবর্তন করতে আপনার সাবক্লাসে Init() মেথডটি ওভাররাইড করুন (বিস্তারিত জানতে ScreenRecoveryUI দেখুন)। bootable/recovery/make-overlay.py স্ক্রিপ্টটি প্রয়োজনীয় অফসেট গণনা সহ, রিকভারির জন্য প্রয়োজনীয় 'বেস ইমেজ + ওভারলে ইমেজ' ফর্মে এক সেট ইমেজ ফ্রেম রূপান্তর করতে সহায়তা করতে পারে।
ডিফল্ট ইমেজগুলো bootable/recovery/res/images ফোল্ডারে থাকে। ইনস্টলেশনের সময় একটি স্থির ইমেজ ব্যবহার করতে, আপনাকে কেবল icon_installing.png ইমেজটি সরবরাহ করতে হবে এবং অ্যানিমেশনের ফ্রেম সংখ্যা ০-তে সেট করতে হবে (এরর আইকনটি অ্যানিমেটেড হয় না; এটি সর্বদা একটি স্থির ইমেজ থাকে)।
স্থানীয় পুনরুদ্ধার পাঠ্য
অ্যান্ড্রয়েড ৫.x ছবির সাথে একটি টেক্সট স্ট্রিং (যেমন, "সিস্টেম আপডেট ইনস্টল করা হচ্ছে...") প্রদর্শন করে। যখন মূল সিস্টেম রিকভারি মোডে বুট করে, তখন এটি ব্যবহারকারীর বর্তমান লোকেলকে একটি কমান্ড-লাইন অপশন হিসেবে রিকভারিতে পাঠায়। প্রদর্শিত প্রতিটি বার্তার জন্য, রিকভারি প্রতিটি লোকেলের জন্য সেই বার্তার প্রি-রেন্ডার করা টেক্সট স্ট্রিং সহ একটি দ্বিতীয় কম্পোজিট ছবি অন্তর্ভুক্ত করে।
পুনরুদ্ধার টেক্সট স্ট্রিংগুলির নমুনা চিত্র:
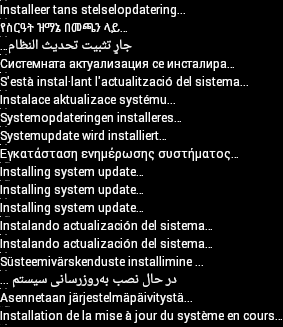
চিত্র ৮. পুনরুদ্ধার বার্তার জন্য স্থানীয় ভাষার পাঠ্য
পুনরুদ্ধারের টেক্সটে নিম্নলিখিত বার্তাগুলো প্রদর্শিত হতে পারে:
- সিস্টেম আপডেট ইনস্টল করা হচ্ছে...
- ভুল!
- মুছে ফেলা হচ্ছে... (ডেটা ওয়াইপ/ফ্যাক্টরি রিসেট করার সময়)
- কোনো কমান্ড নেই (যখন কোনো ব্যবহারকারী ম্যানুয়ালি রিকভারি মোডে বুট করেন)
bootable/recovery/tools/recovery_l10n/ ফোল্ডারে থাকা অ্যান্ড্রয়েড অ্যাপটি একটি বার্তার স্থানীয়করণ রেন্ডার করে এবং কম্পোজিট ইমেজ তৈরি করে। এই অ্যাপটি ব্যবহারের বিস্তারিত জানতে, bootable/recovery/tools/recovery_l10n/src/com/android/recovery_l10n/Main.java ফাইলের মন্তব্যগুলো দেখুন।
যখন কোনো ব্যবহারকারী ম্যানুয়ালি রিকভারি মোডে বুট করেন, তখন লোকেলটি উপলব্ধ নাও থাকতে পারে এবং কোনো টেক্সট প্রদর্শিত হয় না। টেক্সট মেসেজগুলোকে রিকভারি প্রক্রিয়ার জন্য গুরুত্বপূর্ণ করবেন না।
দ্রষ্টব্য: যে লুকানো ইন্টারফেসটি লগ বার্তা প্রদর্শন করে এবং ব্যবহারকারীকে মেনু থেকে অ্যাকশন নির্বাচন করার সুযোগ দেয়, সেটি শুধুমাত্র ইংরেজিতে উপলব্ধ।
অগ্রগতি বার
মূল ছবি (বা অ্যানিমেশন)-এর নিচে প্রোগ্রেস বার দেখানো যেতে পারে। প্রোগ্রেস বারটি দুটি ইনপুট ছবি একত্রিত করে তৈরি করা হয়, যেগুলোর আকার অবশ্যই একই হতে হবে:

চিত্র 9. progress_empty.png

চিত্র ১০. progress_fill.png
প্রোগ্রেস বার তৈরি করার জন্য ফিল ইমেজের বাম প্রান্তটি এম্পটি ইমেজের ডান প্রান্তের পাশে দেখানো হয়। অগ্রগতি বোঝানোর জন্য দুটি ইমেজের মধ্যবর্তী সীমানার অবস্থান পরিবর্তন করা হয়। উদাহরণস্বরূপ, উপরের ইনপুট ইমেজের জোড়াগুলো দিয়ে প্রদর্শন করুন:

চিত্র ১১। ১%-এ অগ্রগতি বার>

চিত্র ১২। ১০% এ অগ্রগতি বার

চিত্র ১৩। ৫০% এ অগ্রগতি বার
আপনি এই ইমেজগুলির ডিভাইস-নির্দিষ্ট সংস্করণ সরবরাহ করতে পারেন সেগুলিকে (এই উদাহরণে) device/yoyodyne/tardis/recovery/res/images এ রেখে। ফাইলের নাম অবশ্যই উপরে তালিকাভুক্ত নামগুলির সাথে মিলতে হবে; যখন সেই ডিরেক্টরিতে কোনো ফাইল পাওয়া যায়, তখন বিল্ড সিস্টেম সংশ্লিষ্ট ডিফল্ট ইমেজের পরিবর্তে সেটিকে অগ্রাধিকার দিয়ে ব্যবহার করে। শুধুমাত্র ৮-বিট কালার ডেপথ সহ RGB বা RGBA ফরম্যাটের PNG ফাইল সমর্থিত।
দ্রষ্টব্য: অ্যান্ড্রয়েড ৫.x-এ, যদি লোকেলটি রিকভারির কাছে পরিচিত থাকে এবং এটি একটি ডান থেকে বাম (RTL) ভাষা (যেমন আরবি, হিব্রু ইত্যাদি) হয়, তাহলে প্রোগ্রেস বারটি ডান থেকে বাম দিকে পূর্ণ হয়।
স্ক্রিন ছাড়া ডিভাইস
সব অ্যান্ড্রয়েড ডিভাইসে স্ক্রিন থাকে না। যদি আপনার ডিভাইসটি একটি হেডলেস অ্যাপ্লায়েন্স হয় অথবা এতে শুধুমাত্র অডিও ইন্টারফেস থাকে, তাহলে আপনাকে রিকভারি UI-এর আরও ব্যাপক কাস্টমাইজেশন করতে হতে পারে। ScreenRecoveryUI-এর সাবক্লাস তৈরি করার পরিবর্তে, সরাসরি এর প্যারেন্ট ক্লাস RecoveryUI-কে সাবক্লাস করুন।
RecoveryUI-তে নিম্ন-স্তরের UI অপারেশনগুলি পরিচালনা করার জন্য মেথড রয়েছে, যেমন "ডিসপ্লে টগল করা," "প্রোগ্রেস বার আপডেট করা," "মেনু দেখানো," "মেনু নির্বাচন পরিবর্তন করা," ইত্যাদি। আপনার ডিভাইসের জন্য একটি উপযুক্ত ইন্টারফেস প্রদান করতে আপনি এগুলিকে ওভাররাইড করতে পারেন। হতে পারে আপনার ডিভাইসে LED আছে যেখানে আপনি অবস্থা নির্দেশ করার জন্য বিভিন্ন রঙ বা ফ্ল্যাশিং প্যাটার্ন ব্যবহার করতে পারেন, অথবা হতে পারে আপনি অডিও চালাতে পারেন। (হতে পারে আপনি মেনু বা "টেক্সট ডিসপ্লে" মোড একেবারেই সমর্থন করতে চান না; সেক্ষেত্রে আপনি CheckKey() এবং HandleMenuKey() ইমপ্লিমেন্টেশন ব্যবহার করে সেগুলিতে অ্যাক্সেস প্রতিরোধ করতে পারেন, যেগুলি কখনও ডিসপ্লে চালু করে না বা কোনো মেনু আইটেম নির্বাচন করে না। এই ক্ষেত্রে, আপনার প্রয়োজনীয় RecoveryUI মেথডগুলির অনেকগুলিই কেবল খালি স্টাব হতে পারে।)
আপনাকে কোন মেথডগুলো সাপোর্ট করতে হবে তা দেখতে bootable/recovery/ui.h ফাইলে RecoveryUI-এর ডিক্লারেশনটি দেখুন। RecoveryUI একটি অ্যাবস্ট্রাক্ট ক্লাস—এর কিছু মেথড পিওর ভার্চুয়াল এবং সাবক্লাসগুলোকে অবশ্যই সেগুলো প্রদান করতে হয়—কিন্তু এতে কী-ইনপুট প্রসেসিং করার কোড থাকে। আপনার ডিভাইসে যদি কী না থাকে অথবা আপনি যদি সেগুলোকে ভিন্নভাবে প্রসেস করতে চান, তবে আপনি সেটিও ওভাররাইড করতে পারেন।
আপডেটার
আপনার আপডেটার স্ক্রিপ্টের ভেতর থেকে কল করা যায় এমন নিজস্ব এক্সটেনশন ফাংশন সরবরাহ করার মাধ্যমে আপনি আপডেট প্যাকেজ ইনস্টলেশনের সময় ডিভাইস-নির্দিষ্ট কোড ব্যবহার করতে পারেন। এখানে টারডিস ডিভাইসের জন্য একটি নমুনা ফাংশন দেওয়া হলো:
device/yoyodyne/tardis/recovery/recovery_updater.c
#include <stdlib.h>
#include <string.h>

#include "edify/expr.h"
প্রতিটি এক্সটেনশন ফাংশনের সিগনেচার একই রকম। আর্গুমেন্টগুলো হলো ফাংশনটিকে যে নামে কল করা হয়েছে সেই নাম, একটি State* কুকি, আগত আর্গুমেন্টের সংখ্যা এবং আর্গুমেন্টগুলোকে প্রতিনিধিত্বকারী Expr* পয়েন্টারের একটি অ্যারে। রিটার্ন ভ্যালুটি হলো একটি নতুনভাবে বরাদ্দকৃত Value* ।
Value* ReprogramTardisFn(const char* name, State* state, int argc, Expr* argv[]) {
    if (argc != 2) {
        return ErrorAbort(state, "%s() expects 2 args, got %d", name, argc);
    }
আপনার ফাংশন কল করার সময় আপনার আর্গুমেন্টগুলো ইভ্যালুয়েট করা হয় না—আপনার ফাংশনের লজিকই নির্ধারণ করে যে সেগুলোর মধ্যে কোনটি এবং কতবার ইভ্যালুয়েট হবে। সুতরাং, আপনি আপনার নিজস্ব কন্ট্রোল স্ট্রাকচার প্রয়োগ করতে এক্সটেনশন ফাংশন ব্যবহার করতে পারেন। একটি Expr* আর্গুমেন্ট ইভ্যালুয়েট করতে Call Evaluate() , যা একটি Value* রিটার্ন করবে। যদি Evaluate() NULL রিটার্ন করে, তবে আপনার ধরে রাখা যেকোনো রিসোর্স মুক্ত করে অবিলম্বে NULL রিটার্ন করা উচিত (এটি এডিফাই স্ট্যাকের ওপরে অ্যাবোর্ট ছড়িয়ে দেয়)। অন্যথায়, রিটার্ন করা Value-টির মালিকানা আপনার হবে এবং পরবর্তীতে সেটির ওপর FreeValue() কল করার দায়িত্বও আপনার থাকবে।
ধরা যাক, ফাংশনটির দুটি আর্গুমেন্ট প্রয়োজন: একটি স্ট্রিং-ভিত্তিক কী এবং একটি ব্লব-ভিত্তিক ইমেজ । আপনি আর্গুমেন্টগুলো এভাবে পড়তে পারেন:
   Value* key = EvaluateValue(state, argv[0]);
    if (key == NULL) {
        return NULL;
    }
    if (key->type != VAL_STRING) {
        ErrorAbort(state, "first arg to %s() must be string", name);
        FreeValue(key);
        return NULL;
    }
    Value* image = EvaluateValue(state, argv[1]);
    if (image == NULL) {
        FreeValue(key);    // must always free Value objects
        return NULL;
    }
    if (image->type != VAL_BLOB) {
        ErrorAbort(state, "second arg to %s() must be blob", name);
        FreeValue(key);
        FreeValue(image)
        return NULL;
    }
একাধিক আর্গুমেন্টের ক্ষেত্রে NULL চেক করা এবং পূর্বে মূল্যায়ন করা আর্গুমেন্টগুলো মুক্ত করা ক্লান্তিকর হয়ে উঠতে পারে। ReadValueArgs() ফাংশনটি এই কাজটি সহজ করে দিতে পারে। উপরের কোডটির পরিবর্তে, আপনি এটি লিখতে পারতেন:
   Value* key;
    Value* image;
    if (ReadValueArgs(state, argv, 2, &key, &image) != 0) {
        return NULL;     // ReadValueArgs() will have set the error message
    }
    if (key->type != VAL_STRING || image->type != VAL_BLOB) {
        ErrorAbort(state, "arguments to %s() have wrong type", name);
        FreeValue(key);
        FreeValue(image)
        return NULL;
    }
ReadValueArgs() টাইপ-চেকিং করে না, তাই আপনাকে এখানে তা করতে হবে; একটি if স্টেটমেন্ট দিয়ে এটি করা আরও সুবিধাজনক, যদিও ব্যর্থ হলে এরর মেসেজটি কিছুটা কম সুনির্দিষ্ট হয়। কিন্তু ReadValueArgs() প্রতিটি আর্গুমেন্ট ইভ্যালুয়েট করার কাজটি করে এবং কোনো ইভ্যালুয়েশন ব্যর্থ হলে পূর্বে ইভ্যালুয়েট করা সমস্ত আর্গুমেন্টকে মুক্ত করে দেয় (এবং একটি দরকারি এরর মেসেজও সেট করে)। পরিবর্তনশীল সংখ্যক আর্গুমেন্ট ইভ্যালুয়েট করার জন্য আপনি ReadValueVarArgs() নামক একটি সুবিধাজনক ফাংশন ব্যবহার করতে পারেন (এটি Value* এর একটি অ্যারে রিটার্ন করে)।
আর্গুমেন্টগুলো মূল্যায়ন করার পর, ফাংশনের কাজটি করুন:
   // key->data is a NUL-terminated string
    // image->data and image->size define a block of binary data
    //
    // ... some device-specific magic here to
    // reprogram the tardis using those two values ...
রিটার্ন ভ্যালুটি অবশ্যই একটি Value* অবজেক্ট হতে হবে; এই অবজেক্টটির মালিকানা কলারের কাছে চলে যাবে। এই Value* দ্বারা নির্দেশিত যেকোনো ডেটার—বিশেষত ডেটামেম্বারের—মালিকানা কলারের হাতে চলে যাবে।
এই ক্ষেত্রে, সফলতা বোঝাতে আপনি একটি 'true' বা 'false' ভ্যালু রিটার্ন করতে চাইবেন। এই নিয়মটি মনে রাখবেন যে, খালি স্ট্রিং হলো 'false' এবং অন্য সব স্ট্রিং হলো 'true '। আপনাকে অবশ্যই একটি 'Value' অবজেক্ট 'malloc' করতে হবে, যার মধ্যে রিটার্ন করার জন্য কনস্ট্যান্ট স্ট্রিংটির একটি কপি থাকবে, কারণ কলার উভয়কেই free() ' করবে। আপনার আর্গুমেন্টগুলো ইভ্যালুয়েট করে পাওয়া অবজেক্টগুলোর উপর FreeValue() কল করতে ভুলবেন না!
   FreeValue(key);
    FreeValue(image);

    Value* result = malloc(sizeof(Value));
    result->type = VAL_STRING;
    result->data = strdup(successful ? "t" : "");
    result->size = strlen(result->data);
    return result;
}
সুবিধাজনক ফাংশন StringValue() একটি স্ট্রিংকে একটি নতুন Value অবজেক্টে আবদ্ধ করে। উপরের কোডটি আরও সংক্ষিপ্তভাবে লিখতে এটি ব্যবহার করুন:
   FreeValue(key);
    FreeValue(image);

    return StringValue(strdup(successful ? "t" : ""));
}
এডিফাই ইন্টারপ্রেটারে ফাংশন সংযুক্ত করতে, Register_ foo ফাংশনটি প্রদান করুন, যেখানে foo হলো এই কোড ধারণকারী স্ট্যাটিক লাইব্রেরির নাম। প্রতিটি এক্সটেনশন ফাংশন রেজিস্টার করতে RegisterFunction() কল করুন। প্রচলিত নিয়ম অনুযায়ী, ভবিষ্যতে যোগ করা বিল্ট-ইন ফাংশনগুলির সাথে দ্বন্দ্ব এড়াতে ডিভাইস-নির্দিষ্ট ফাংশনগুলির নাম device . whatever
void Register_librecovery_updater_tardis() {
    RegisterFunction("tardis.reprogram", ReprogramTardisFn);
}
এখন আপনি আপনার কোড দিয়ে একটি স্ট্যাটিক লাইব্রেরি বিল্ড করার জন্য মেকফাইলটি কনফিগার করতে পারেন। (এটি সেই একই মেকফাইল যা আগের বিভাগে রিকভারি UI কাস্টমাইজ করতে ব্যবহৃত হয়েছিল; আপনার ডিভাইসে এখানে সংজ্ঞায়িত উভয় স্ট্যাটিক লাইব্রেরিই থাকতে পারে।)
device/yoyodyne/tardis/recovery/Android.mk
include $(CLEAR_VARS)
LOCAL_SRC_FILES := recovery_updater.c
LOCAL_C_INCLUDES += bootable/recovery
স্ট্যাটিক লাইব্রেরির নামটি অবশ্যই এর অন্তর্ভুক্ত Register_ libname ফাংশনের নামের সাথে মিলতে হবে।
LOCAL_MODULE := librecovery_updater_tardis
include $(BUILD_STATIC_LIBRARY)
অবশেষে, আপনার লাইব্রেরিটি অন্তর্ভুক্ত করার জন্য রিকভারির বিল্ড কনফিগার করুন। আপনার লাইব্রেরিটি TARGET_RECOVERY_UPDATER_LIBS-এ যোগ করুন (যেটিতে একাধিক লাইব্রেরি থাকতে পারে; সবগুলোই রেজিস্টার করা হয়)। যদি আপনার কোড এমন অন্য স্ট্যাটিক লাইব্রেরির উপর নির্ভর করে যেগুলো নিজেরা এডিফাই এক্সটেনশন নয় (অর্থাৎ, সেগুলোর Register_ libname ফাংশন নেই), তাহলে আপনি সেগুলোকে TARGET_RECOVERY_UPDATER_EXTRA_LIBS-এ তালিকাভুক্ত করতে পারেন, যাতে তাদের (অস্তিত্বহীন) রেজিস্ট্রেশন ফাংশন কল না করেই আপডেটারের সাথে লিঙ্ক করা যায়। উদাহরণস্বরূপ, যদি আপনার ডিভাইস-নির্দিষ্ট কোড ডেটা ডিকম্প্রেস করার জন্য zlib ব্যবহার করতে চায়, তাহলে আপনি এখানে libz অন্তর্ভুক্ত করবেন।
device/yoyodyne/tardis/BoardConfig.mk
 [...]

# add device-specific extensions to the updater binary
TARGET_RECOVERY_UPDATER_LIBS += librecovery_updater_tardis
TARGET_RECOVERY_UPDATER_EXTRA_LIBS +=
আপনার OTA প্যাকেজের আপডেটার স্ক্রিপ্টগুলো এখন অন্য যেকোনো ফাংশনের মতোই আপনার ফাংশনটিকে কল করতে পারে। আপনার টারডিস ডিভাইসটিকে রিপ্রোগ্রাম করার জন্য, আপডেট স্ক্রিপ্টটিতে থাকতে পারে: tardis.reprogram("the-key", package_extract_file("tardis-image.dat")) এটি বিল্ট-ইন ফাংশন package_extract_file() এর একক-আর্গুমেন্ট সংস্করণটি ব্যবহার করে, যা নতুন এক্সটেনশন ফাংশনের দ্বিতীয় আর্গুমেন্টটি তৈরি করার জন্য আপডেট প্যাকেজ থেকে এক্সট্র্যাক্ট করা একটি ফাইলের বিষয়বস্তুকে ব্লব হিসেবে রিটার্ন করে।
OTA প্যাকেজ তৈরি
চূড়ান্ত ধাপটি হলো OTA প্যাকেজ তৈরির টুলগুলোকে আপনার ডিভাইস-নির্দিষ্ট ডেটা সম্পর্কে জানানো এবং এমন আপডেটার স্ক্রিপ্ট তৈরি করা, যেগুলোতে আপনার এক্সটেনশন ফাংশনগুলোর কল অন্তর্ভুক্ত থাকে।
প্রথমে, বিল্ড সিস্টেমকে ডিভাইস-নির্দিষ্ট একটি ডেটা ব্লব সম্পর্কে জানান। ধরে নিন আপনার ডেটা ফাইলটি device/yoyodyne/tardis/tardis.dat এ আছে, আপনার ডিভাইসের AndroidBoard.mk-এ নিম্নলিখিতটি ঘোষণা করুন:
device/yoyodyne/tardis/AndroidBoard.mk
  [...]

$(call add-radio-file,tardis.dat)
এর পরিবর্তে আপনি এটি একটি Android.mk ফাইলে রাখতে পারেন, কিন্তু সেক্ষেত্রে এটিকে একটি ডিভাইস চেকের মাধ্যমে সুরক্ষিত রাখতে হবে, কারণ কোন ডিভাইসটি বিল্ড করা হচ্ছে তা নির্বিশেষে ট্রি-তে থাকা সমস্ত Android.mk ফাইল লোড হয়ে যায়। (যদি আপনার ট্রি-তে একাধিক ডিভাইস থাকে, তবে আপনি শুধু টার্ডিস ডিভাইসটি বিল্ড করার সময় tardis.dat ফাইলটি যোগ করতে চাইবেন।)
device/yoyodyne/tardis/Android.mk
  [...]

# an alternative to specifying it in AndroidBoard.mk
ifeq (($TARGET_DEVICE),tardis)
  $(call add-radio-file,tardis.dat)
endif
ঐতিহাসিক কারণে এগুলোকে রেডিও ফাইল বলা হয়; ডিভাইসের রেডিওর (যদি থাকে) সাথে এগুলোর কোনো সম্পর্ক নাও থাকতে পারে। এগুলো হলো কেবলই অস্বচ্ছ ডেটার পিণ্ড যা বিল্ড সিস্টেম OTA জেনারেশন টুল দ্বারা ব্যবহৃত টার্গেট-ফাইলস .zip-এ কপি করে। আপনি যখন একটি বিল্ড করেন, তখন tardis.dat ফাইলটি টার্গেট-ফাইলস.zip-এর মধ্যে RADIO/tardis.dat নামে সংরক্ষিত হয়। আপনি যতগুলো ফাইল চান, ততগুলো যোগ করার জন্য add-radio-file কমান্ডটি একাধিকবার ব্যবহার করতে পারেন।
পাইথন মডিউল
রিলিজ টুলস সম্প্রসারিত করতে, একটি পাইথন মডিউল লিখুন (যার নাম অবশ্যই releasetools.py হতে হবে) যা উপস্থিত থাকলে টুলসগুলো কল করতে পারবে। উদাহরণ:
device/yoyodyne/tardis/releasetools.py
import common

def FullOTA_InstallEnd(info):
  # copy the data into the package.
  tardis_dat = info.input_zip.read("RADIO/tardis.dat")
  common.ZipWriteStr(info.output_zip, "tardis.dat", tardis_dat)

  # emit the script code to install this data on the device
  info.script.AppendExtra(
      """tardis.reprogram("the-key", package_extract_file("tardis.dat"));""")
একটি পৃথক ফাংশন ইনক্রিমেন্টাল OTA প্যাকেজ তৈরির বিষয়টি পরিচালনা করে। এই উদাহরণের জন্য, ধরুন আপনাকে শুধুমাত্র তখনই টারডিস রিপ্রোগ্রাম করতে হবে যখন দুটি বিল্ডের মধ্যে tardis.dat ফাইলটি পরিবর্তিত হয়।
def IncrementalOTA_InstallEnd(info):
  # copy the data into the package.
  source_tardis_dat = info.source_zip.read("RADIO/tardis.dat")
  target_tardis_dat = info.target_zip.read("RADIO/tardis.dat")

  if source_tardis_dat == target_tardis_dat:
      # tardis.dat is unchanged from previous build; no
      # need to reprogram it
      return

  # include the new tardis.dat in the OTA package
  common.ZipWriteStr(info.output_zip, "tardis.dat", target_tardis_dat)

  # emit the script code to install this data on the device
  info.script.AppendExtra(
      """tardis.reprogram("the-key", package_extract_file("tardis.dat"));""")
মডিউল ফাংশন
আপনি মডিউলটিতে নিম্নলিখিত ফাংশনগুলো প্রদান করতে পারেন (শুধুমাত্র আপনার প্রয়োজনীয়গুলো বাস্তবায়ন করুন)।
-
FullOTA_Assertions() - একটি সম্পূর্ণ OTA তৈরি করার শুরুর দিকে এটি কল করা হয়। ডিভাইসের বর্তমান অবস্থা সম্পর্কে অ্যাসারশন জানানোর জন্য এটি একটি ভালো জায়গা। ডিভাইসে পরিবর্তন আনে এমন কোনো স্ক্রিপ্ট কমান্ড জানাবেন না।
-
FullOTA_InstallBegin() - ডিভাইসের অবস্থা সম্পর্কিত সমস্ত অ্যাসারশন সফল হওয়ার পর কিন্তু কোনো পরিবর্তন করার আগে এটি কল করা হয়। আপনি ডিভাইস-নির্দিষ্ট আপডেটের জন্য কমান্ড জারি করতে পারেন, যা ডিভাইসের অন্য কিছু পরিবর্তন করার আগেই অবশ্যই চালাতে হবে।
-
FullOTA_InstallEnd() - স্ক্রিপ্ট তৈরির শেষে, বুট এবং সিস্টেম পার্টিশন আপডেট করার জন্য স্ক্রিপ্ট কমান্ডগুলো নির্গত হওয়ার পর এটিকে কল করা হয়। আপনি ডিভাইস-নির্দিষ্ট আপডেটের জন্য অতিরিক্ত কমান্ডও নির্গত করতে পারেন।
-
IncrementalOTA_Assertions() -
FullOTA_Assertions()এর অনুরূপ, কিন্তু এটি একটি ইনক্রিমেন্টাল আপডেট প্যাকেজ তৈরি করার সময় কল করা হয়। -
IncrementalOTA_VerifyBegin() - ডিভাইসের অবস্থা সম্পর্কিত সমস্ত অ্যাসারশন সফল হওয়ার পর কিন্তু কোনো পরিবর্তন করার আগে এটি কল করা হয়। আপনি ডিভাইস-নির্দিষ্ট আপডেটের জন্য কমান্ড জারি করতে পারেন, যা ডিভাইসের অন্য কিছু পরিবর্তন করার আগেই অবশ্যই চালাতে হবে।
-
IncrementalOTA_VerifyEnd() - যাচাইকরণ পর্বের শেষে এটি কল করা হয়, যখন স্ক্রিপ্টটি নিশ্চিত করে যে এটি যে ফাইলগুলোতে কাজ করতে যাচ্ছে সেগুলোর প্রাথমিক বিষয়বস্তু প্রত্যাশিত মানের। এই পর্যায়ে ডিভাইসের কোনো কিছুই পরিবর্তন করা হয় না। আপনি অতিরিক্ত ডিভাইস-নির্দিষ্ট যাচাইকরণের জন্যও কোড পাঠাতে পারেন।
-
IncrementalOTA_InstallBegin() - যে ফাইলগুলো প্যাচ করা হবে, সেগুলোর প্রত্যাশিত পূর্ববর্তী অবস্থা যাচাই করার পর কিন্তু কোনো পরিবর্তন করার আগে এটি কল করা হয়। আপনি ডিভাইস-নির্দিষ্ট আপডেটের জন্য কমান্ড জারি করতে পারেন, যা ডিভাইসের অন্য কিছু পরিবর্তন করার আগেই অবশ্যই চালাতে হবে।
-
IncrementalOTA_InstallEnd() - এর সম্পূর্ণ OTA প্যাকেজের মতোই, বুট এবং সিস্টেম পার্টিশন আপডেট করার জন্য স্ক্রিপ্ট কমান্ডগুলো নির্গত হওয়ার পর, স্ক্রিপ্ট তৈরির শেষে এটিকে কল করা হয়। আপনি ডিভাইস-নির্দিষ্ট আপডেটের জন্য অতিরিক্ত কমান্ডও নির্গত করতে পারেন।
দ্রষ্টব্য: ডিভাইসটির বিদ্যুৎ সংযোগ বিচ্ছিন্ন হলে, OTA ইনস্টলেশন প্রথম থেকে পুনরায় শুরু হতে পারে। যেসব ডিভাইসে এই কমান্ডগুলো ইতোমধ্যে সম্পূর্ণ বা আংশিকভাবে চালানো হয়েছে, সেগুলোর জন্য প্রস্তুত থাকুন।
তথ্য অবজেক্টে ফাংশন পাস করুন
একটিমাত্র তথ্য অবজেক্টে ফাংশনগুলো প্রেরণ করুন, যেটিতে বিভিন্ন দরকারি আইটেম থাকে:
- info.input_zip . (শুধুমাত্র সম্পূর্ণ ওটিএ-এর জন্য) ইনপুট টার্গেট-ফাইল .zip-এর জন্য
zipfile.ZipFileঅবজেক্ট। - info.source_zip . (শুধুমাত্র ইনক্রিমেন্টাল OTA-এর জন্য) সোর্স টার্গেট-ফাইল .zip-এর জন্য
zipfile.ZipFileঅবজেক্ট (ইনক্রিমেন্টাল প্যাকেজটি ইনস্টল করার সময় ডিভাইসে আগে থেকে থাকা বিল্ড)। - info.target_zip . (শুধুমাত্র ইনক্রিমেন্টাল OTA-এর জন্য) টার্গেট target-files .zip-এর জন্য
zipfile.ZipFileঅবজেক্ট (এই বিল্ডটি ইনক্রিমেন্টাল প্যাকেজটি ডিভাইসে রাখে)। - info.output_zip . প্যাকেজ তৈরি করা হচ্ছে; লেখার জন্য একটি
zipfile.ZipFileঅবজেক্ট খোলা হয়েছে। প্যাকেজে একটি ফাইল যোগ করতে common.ZipWriteStr(info.output_zip, filename , data ) ব্যবহার করুন। - info.script . এটি একটি স্ক্রিপ্ট অবজেক্ট, যাতে আপনি কমান্ড যুক্ত করতে পারেন। স্ক্রিপ্টে টেক্সট আউটপুট করার জন্য
info.script.AppendExtra( script_text )কল করুন। নিশ্চিত করুন যে আউটপুট টেক্সটের শেষে একটি সেমিকোলন থাকে, যাতে এটি পরবর্তীতে নির্গত কমান্ডগুলোর সাথে মিশে না যায়।
info অবজেক্ট সম্পর্কে বিস্তারিত জানতে, পাইথন সফটওয়্যার ফাউন্ডেশনের ZIP আর্কাইভ সংক্রান্ত ডকুমেন্টেশন দেখুন।
মডিউলের অবস্থান নির্দিষ্ট করুন
আপনার BoardConfig.mk ফাইলে আপনার ডিভাইসের releasetools.py স্ক্রিপ্টের অবস্থান নির্দিষ্ট করুন:
device/yoyodyne/tardis/BoardConfig.mk
 [...]

TARGET_RELEASETOOLS_EXTENSIONS := device/yoyodyne/tardis
যদি TARGET_RELEASETOOLS_EXTENSIONS সেট করা না থাকে, তবে এটি ডিফল্টরূপে $(TARGET_DEVICE_DIR)/../common ডিরেক্টরিতে (এই উদাহরণে device/yoyodyne/common ) সেট হয়ে যায়। releasetools.py স্ক্রিপ্টটির অবস্থান স্পষ্টভাবে নির্ধারণ করে দেওয়াই শ্রেয়। টার্ডিস ডিভাইসটি বিল্ড করার সময়, releasetools.py স্ক্রিপ্টটি target-files .zip ফাইলের ( META/releasetools.py ) মধ্যে অন্তর্ভুক্ত থাকে।
যখন আপনি রিলিজ টুলস ( img_from_target_files অথবা ota_from_target_files ) চালান, তখন টার্গেট-ফাইলের .zip ফাইলে থাকা releasetools.py স্ক্রিপ্টটি (যদি থাকে) অ্যান্ড্রয়েড সোর্স ট্রি-র স্ক্রিপ্টের চেয়ে বেশি অগ্রাধিকার পায়। এছাড়াও আপনি -s (অথবা --device_specific ) অপশন ব্যবহার করে ডিভাইস-নির্দিষ্ট এক্সটেনশনগুলোর পাথ স্পষ্টভাবে উল্লেখ করতে পারেন, যা সর্বোচ্চ অগ্রাধিকার পায়। এর মাধ্যমে আপনি রিলিজটুলস এক্সটেনশনগুলোর ভুল সংশোধন করতে ও পরিবর্তন আনতে পারেন এবং সেই পরিবর্তনগুলো পুরোনো টার্গেট-ফাইলগুলোতে প্রয়োগ করতে পারেন।
এখন, যখন আপনি ota_from_target_files চালান, তখন এটি স্বয়ংক্রিয়ভাবে target_files .zip ফাইল থেকে ডিভাইস-নির্দিষ্ট মডিউলটি খুঁজে নেয় এবং OTA প্যাকেজ তৈরি করার সময় সেটি ব্যবহার করে:
./build/make/tools/releasetools/ota_from_target_files \
    -i PREVIOUS-tardis-target_files.zip \
    dist_output/tardis-target_files.zip \
    incremental_ota_update.zip
বিকল্পভাবে, আপনি ota_from_target_files চালানোর সময় ডিভাইস-নির্দিষ্ট এক্সটেনশনগুলি উল্লেখ করতে পারেন।
./build/make/tools/releasetools/ota_from_target_files \
    -s device/yoyodyne/tardis \
    -i PREVIOUS-tardis-target_files.zip \
    dist_output/tardis-target_files.zip \
    incremental_ota_update.zip
দ্রষ্টব্য: বিকল্পগুলির সম্পূর্ণ তালিকার জন্য, build/make/tools/releasetools/ota_from_target_files এ থাকা ota_from_target_files সম্পর্কিত মন্তব্যগুলি দেখুন।
সাইডলোডিং প্রক্রিয়া
রিকভারি সিস্টেমে একটি সাইডলোডিং ব্যবস্থা রয়েছে, যার মাধ্যমে মূল সিস্টেমের মাধ্যমে ওভার-দ্য-এয়ার ডাউনলোড না করেই ম্যানুয়ালি কোনো আপডেট প্যাকেজ ইনস্টল করা যায়। যেসব ডিভাইসে মূল সিস্টেম বুট করা যায় না, সেখানে ডিবাগিং বা পরিবর্তন আনার জন্য সাইডলোডিং বেশ কার্যকর।
ঐতিহাসিকভাবে, ডিভাইসের এসডি কার্ড থেকে প্যাকেজ লোড করার মাধ্যমে সাইডলোডিং করা হতো; যে ডিভাইসটি বুট হয় না, তার ক্ষেত্রে অন্য কোনো কম্পিউটার ব্যবহার করে প্যাকেজটি এসডি কার্ডে রাখা যেত এবং তারপর এসডি কার্ডটি ডিভাইসে প্রবেশ করানো যেত। অপসারণযোগ্য বাহ্যিক স্টোরেজবিহীন অ্যান্ড্রয়েড ডিভাইসগুলোর জন্য, রিকভারি সাইডলোডিংয়ের দুটি অতিরিক্ত পদ্ধতি সমর্থন করে: ক্যাশ পার্টিশন থেকে প্যাকেজ লোড করা, এবং adb ব্যবহার করে ইউএসবি-র মাধ্যমে সেগুলো লোড করা।
প্রতিটি সাইডলোড মেকানিজম চালু করার জন্য, আপনার ডিভাইসের Device::InvokeMenuItem() মেথডটি BuiltinAction-এর নিম্নলিখিত মানগুলি রিটার্ন করতে পারে:
- APPLY_EXT . Sideload an update package from external storage (
/sdcarddirectory). Your recovery.fstab must define the/sdcardmount point. This is not usable on devices that emulate an SD card with a symlink to/data(or some similar mechanism)./datais typically not available to recovery because it may be encrypted. The recovery UI displays a menu of .zip files in/sdcardand allows the user to select one. - APPLY_CACHE . Similar to loading a package from
/sdcardexcept that the/cachedirectory (which is always available to recovery) is used instead. From the regular system,/cacheis only writable by privileged users, and if the device isn't bootable then the/cachedirectory can't be written to at all (which makes this mechanism of limited utility). - APPLY_ADB_SIDELOAD . Allows user to send a package to the device via a USB cable and the adb development tool. When this mechanism is invoked, recovery starts up its own mini version of the adbd daemon to let adb on a connected host computer talk to it. This mini version supports only a single command:
adb sideload filename. The named file is sent from the host machine to the device, which then verifies and installs it just as if it had been on local storage.
A few caveats:
- Only USB transport is supported.
- If your recovery runs adbd normally (usually true for userdebug and eng builds), that will be shut down while the device is in adb sideload mode and will be restarted when adb sideload has finished receiving a package. While in adb sideload mode, no adb commands other than
sideloadwork (logcat,reboot,push,pull,shell, etc. all fail). - You cannot exit adb sideload mode on the device. To abort, you can send
/dev/null(or anything else that's not a valid package) as the package, and then the device will fail to verify it and stop the installation procedure. The RecoveryUI implementation'sCheckKey()method will continue to be called for keypresses, so you can provide a key sequence that reboots the device and works in adb sideload mode.