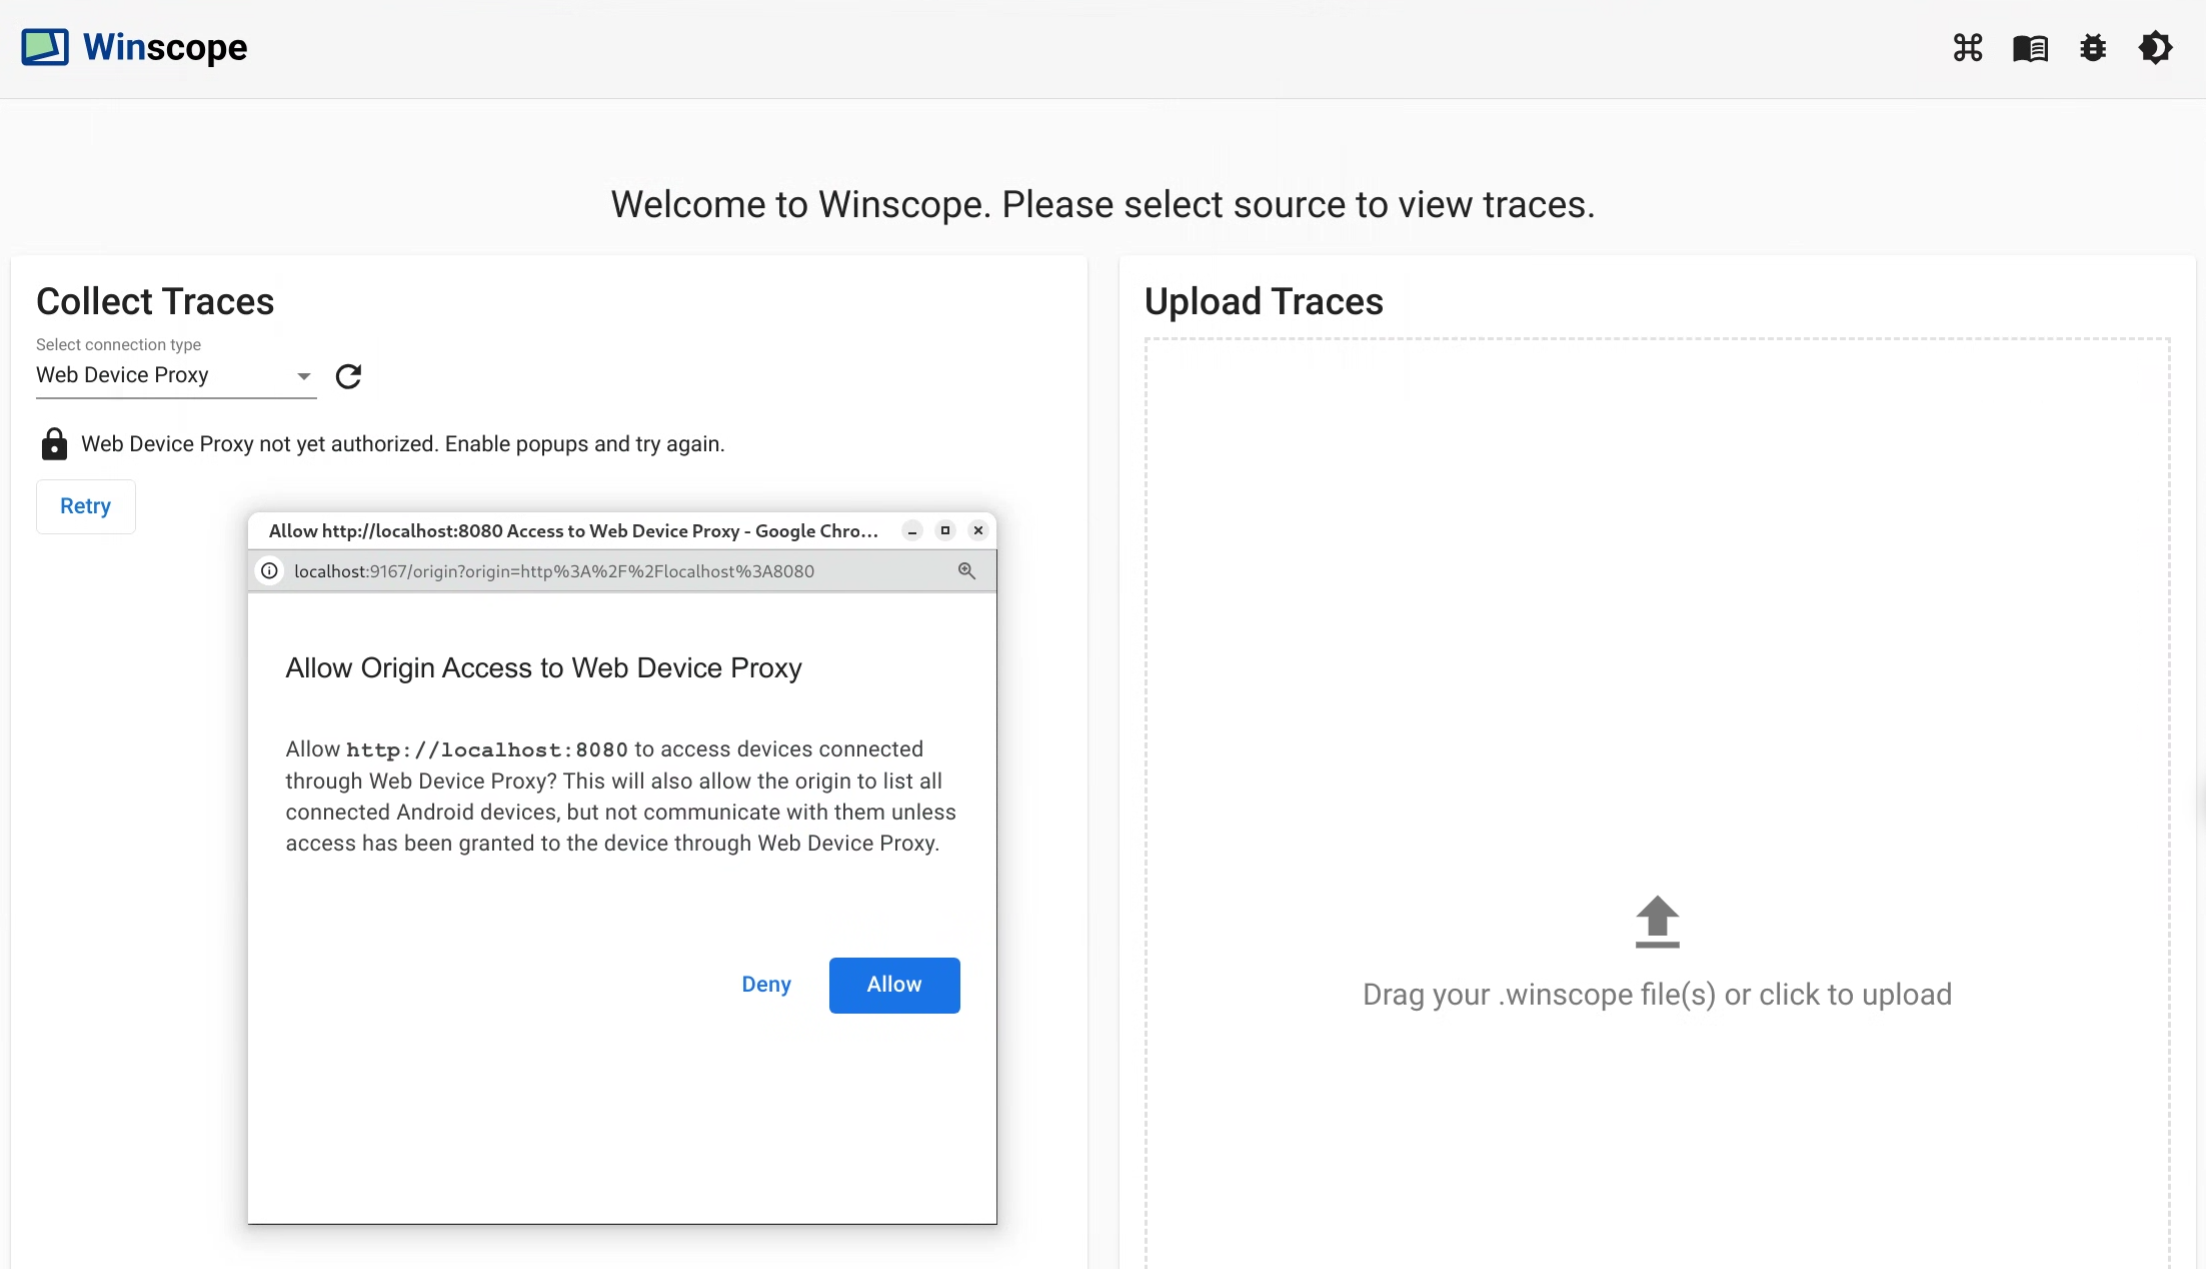
기기에 처음 연결할 때 각 새 기기의 액세스를 승인합니다.
대화상자가 자동으로 표시되지 않으면 기기 옆에 있는 lock_open 아이콘을 클릭합니다.
그림 5. 기기 승인
trace
트레이스를 수집하려면 다음 단계를 따르세요.
연결되면 캡처 프로세스를 시작하려면 타겟을 선택하고 설정을 구성합니다. 그런 다음 트레이스 시작을 클릭하여 캡처를 시작합니다.
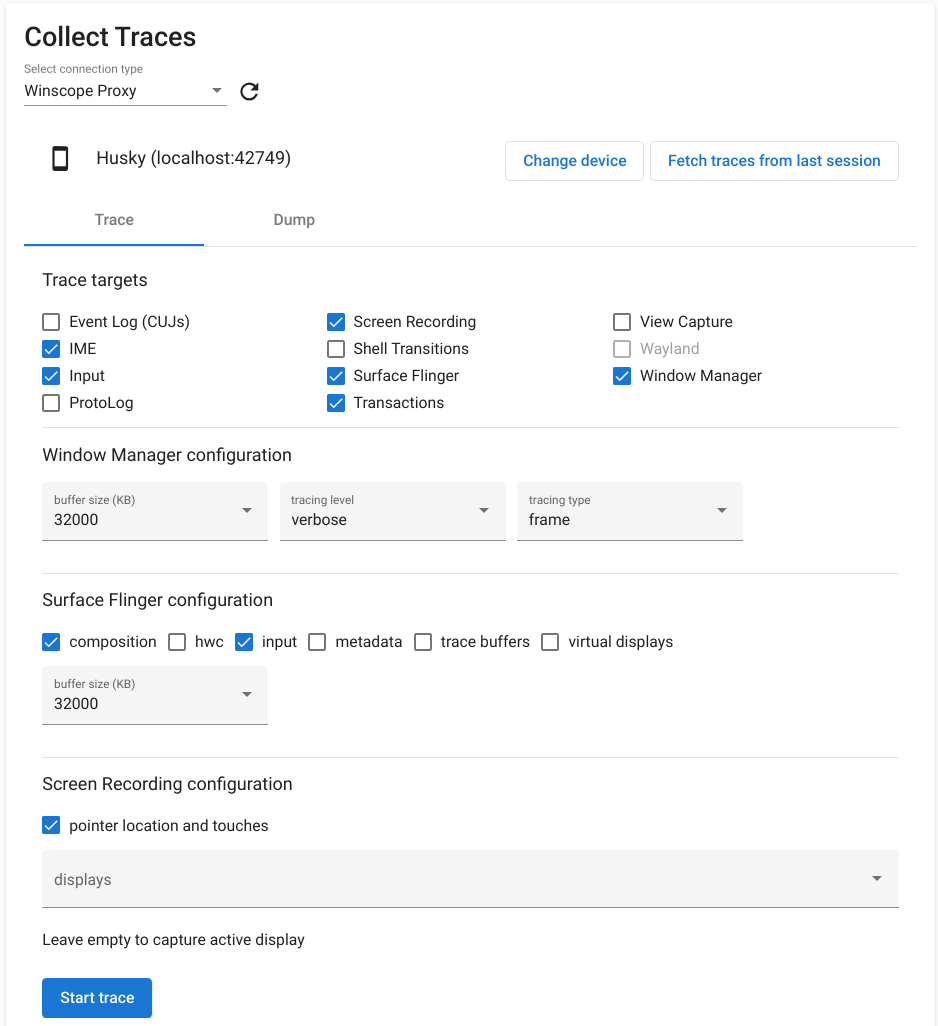
그림 6. Winscope에서 트레이스를 수집합니다.
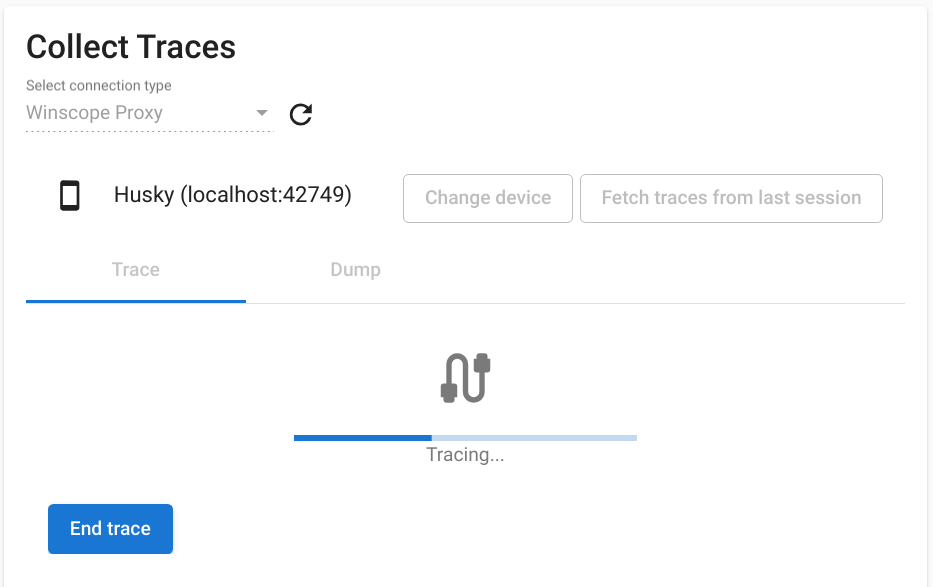
캡처를 중지하려면 트레이스 종료를 클릭합니다.
그림 7. Winscope에서 트레이스를 종료합니다.
트레이스 옵션
이 섹션에서는 각 트레이스 유형의 옵션을 설명합니다.
화면 녹화
Winscope를 사용하면 여러 디스플레이의 화면을 녹화할 수 있습니다. 메뉴에서 화면 녹화할 디스플레이를 선택합니다. 선택하지 않으면 Winscope는 기본적으로 활성 디스플레이를 기록합니다.
SurfaceFlinger
버퍼 크기: SurfaceFlinger 트레이스의 인메모리 링 버퍼 크기를 조정합니다. 버퍼가 클수록 더 많은 데이터를 수집할 수 있지만 메모리 사용량이 증가합니다.
입력: 노출 영역에 입력 데이터가 포함된 경우 입력 창의 세부정보를 추적합니다.
구성: 구성 유형과 표시 영역을 추적합니다.
메타데이터: 오프스크린 레이어를 비롯한 추가 노출 영역 메타데이터를 추적합니다.
HWC: 비정형 하드웨어 컴포저 메타데이터를 추가로 추적합니다.
트레이스 버퍼: 노출 영역의 모든 버퍼 변경사항을 추적하도록 SurfaceFlinger를 구성합니다. 기본적으로 SurfaceFlinger는 도형이 변경될 때만 새 상태를 추적합니다.
가상 디스플레이: 트레이스에 가상 디스플레이 레이어를 포함합니다.
WindowManager
버퍼 크기: WindowManager 트레이스의 인메모리 링 버퍼 크기를 조정합니다. 버퍼가 클수록 더 많은 데이터를 수집할 수 있지만 메모리 사용량이 증가합니다.
추적 유형: 상태 수집 빈도 옵션을 정의합니다.
프레임: 이 모드에서는 WindowManager가 프레임당 단일 상태를 덤프하여 유효한 WindowManager 상태만 캡처되도록 합니다. 이 모드의 성능 오버헤드는 가장 낮습니다.
transaction: 이 모드는 트랜잭션이 커밋될 때마다 WindowManager 상태를 기록합니다. 프레임 내에서 여러 트랜잭션을 커밋할 수 있으므로 프레임 중에 중간 WindowManager 상태를 디버그할 수 있습니다. 그러나 이 모드는 프레임 모드에 비해 성능 오버헤드가 더 큽니다.
추적 수준: WindowManager 트레이스의 상세 수준을 결정합니다.
상세: 각 창의 모든 창 및 구성 정보를 포함합니다. 이 모드의 메모리 및 성능 오버헤드가 가장 높습니다.
debug: 모든 창에 관한 정보를 포함하지만 요청된 재정의 구성이 포함된 경우에만 창 구성을 로깅합니다.
critical: 디버그 모드와 동일한 정보가 포함되지만 표시되는 창만 포함됩니다. 이 모드의 메모리 및 성능 오버헤드는 가장 작습니다.
덤프
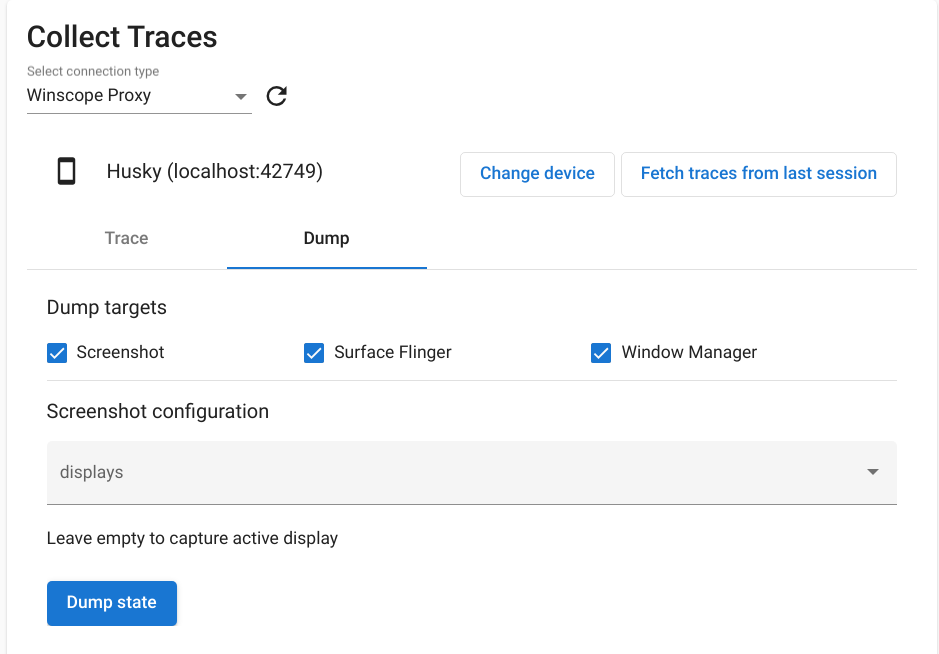
Winscope를 사용하여 상태 덤프를 실행하려면 홈페이지의 트레이스 수집에서 덤프 탭을 선택한 다음 상태 덤프를 클릭합니다.
그림 8. Winscope에서 상태를 덤프합니다.
스크린샷 구성
Winscope를 사용하면 여러 디스플레이의 스크린샷을 찍을 수 있습니다. 메뉴에서 스크린샷을 찍을 디스플레이를 선택합니다. 아무것도 선택하지 않으면 활성 디스플레이의 스크린샷이 수집됩니다.
이 페이지에 나와 있는 콘텐츠와 코드 샘플에는 콘텐츠 라이선스에서 설명하는 라이선스가 적용됩니다. 자바 및 OpenJDK는 Oracle 및 Oracle 계열사의 상표 또는 등록 상표입니다.
최종 업데이트: 2025-07-27(UTC)
[[["이해하기 쉬움","easyToUnderstand","thumb-up"],["문제가 해결됨","solvedMyProblem","thumb-up"],["기타","otherUp","thumb-up"]],[["필요한 정보가 없음","missingTheInformationINeed","thumb-down"],["너무 복잡함/단계 수가 너무 많음","tooComplicatedTooManySteps","thumb-down"],["오래됨","outOfDate","thumb-down"],["번역 문제","translationIssue","thumb-down"],["샘플/코드 문제","samplesCodeIssue","thumb-down"],["기타","otherDown","thumb-down"]],["최종 업데이트: 2025-07-27(UTC)"],[],[],null,["# Capture traces with Winscope\n\n[Run Winscope](/docs/core/graphics/winscope/run) locally or access it\nfrom a web server.\n\nYou can capture traces using Winscope for local development and debugging.\nWinscope uses [adb](https://developer.android.com/tools/adb), which supports\ndevice connection over USB or Wi-Fi.\n\nThe **Collect Traces** screen is displayed on launching Winscope.\n\nDevice connection\n-----------------\n\nYou can connect devices in Winscope using\n[Winscope Proxy](#winscope-proxy-setup)\nor\n[Web Device Proxy](#web-device-proxy-setup).\nBy default, the Winscope homepage shows the **Winscope Proxy** connection setup\nUI.\n\nTo start capturing traces, choose one of the following device connection\nmechanisms.\n\n### Winscope Proxy setup\n\nFollow these steps to set up Winscope Proxy:\n\n1. Under **Collect Traces** on the homepage, choose **Winscope Proxy** in the\n **Select connection type** drop-down:\n\n **Figure 1.** Capture traces using Winscope Proxy.\n2. Launch the Winscope ADB Connect proxy to capture traces directly from your\n browser, by running the following command:\n\n python3 $ANDROID_BUILD_TOP/development/tools/winscope/src/adb/winscope_proxy.py\n\n | **Note:** Python 3.10+ and adb are required.\n3. Note the Winscope proxy token displayed on the terminal after execution.\n\n4. After you launch the Winscope ADB Connect proxy, the screen changes as\n follows. To establish the initial connection to the proxy, input the\n Winscope proxy token from step 3 and click **Connect**.\n\n **Figure 2.** Connect to Winscope Proxy.\n\n### Web Device Proxy setup\n\nFollow these steps to set up Web Device Proxy:\n\n1. Under **Collect Traces** on the homepage, choose **Web Device Proxy** in the\n **Select connection type** drop-down:\n\n **Figure 3.** Capture traces using Web Device Proxy.\n2. If you don't have the Web Device Proxy daemon on your machine, click\n **Install** or run the\n [installer](https://tools.google.com/dlpage/android_web_device_proxy).\n\n | **Note:** Web Device Proxy is not yet supported on Mac.\n3. Approve origin access to Web Device Proxy through the dialog.\n\n **Figure 4.** Authorize origin.\n4. Approve access for each new device the first time you connect to the device.\n If the dialog does not automatically appear, click the `lock_open` icon next\n to the device:\n\n **Figure 5.** Authorize device.\n\nTraces\n------\n\nFollow these steps to collect traces:\n\n1. When connected, to initiate the capture process, select the targets and\n configure the settings. Then click **Start trace** to begin the capture:\n\n **Figure 6.** Collect traces in Winscope.\n2. To stop the capture, click **End trace**:\n\n **Figure 7.** End trace in Winscope.\n\nTrace options\n-------------\n\nThis section describes the options for each trace type.\n\n### Screen recording\n\nWith Winscope, you can record the screen of multiple displays. Choose a display\nfrom the menu to screen record. If you don't make a selection, Winscope records\nthe active display by default.\n| **Note:** Multi-display selection is available only with adb `screenrecord` v1.4 and higher, that is builds from September 2024 on. Single display selection is available for any version earlier than that.\n\n### SurfaceFlinger\n\n- **Buffer size:** Adjusts the size of the in-memory ring buffer for the\n SurfaceFlinger trace. A larger buffer enables the collection of more data\n but increases memory usage.\n\n | **Note:** Buffer size is deprecated starting in Android 15.\n- **Input:** If the surface contains input data, tracks the specifics of\n the input window.\n\n- **Composition:** Traces the composition type and visible region.\n\n- **Metadata:** Traces additional surface metadata, including offscreen\n layers.\n\n | **Warning:** Metadata is highly verbose and requires a large amount of memory.\n- **HWC:** Traces additional unstructured hardware composer metadata.\n\n | **Warning:** HWC is highly verbose and requires a large amount of memory.\n- **Trace buffers:** Configures SurfaceFlinger to trace all buffer changes on\n the surface. By default, SurfaceFlinger traces a new state only when the\n geometry is altered.\n\n- **Virtual displays:** Includes virtual display layers in the trace.\n\n### WindowManager\n\n- **Buffer size:** Adjusts the size of the in-memory ring buffer for the WindowManager trace. A larger buffer enables the collection of more data but increases memory usage.\n- **Tracing type:** Defines the frequency options for collecting states:\n\n - *frame:* In this mode, the WindowManager dumps a single state per frame, ensuring that only valid WindowManager states are captured. This mode has the lowest performance overhead.\n - *transaction:* This mode records a WindowManager state whenever a transaction is committed. You can commit multiple transactions within a frame, so this allows for debugging intermediate WindowManager states during a frame. However, this mode has a higher performance overhead compared to the frame mode.\n- **Tracing level:** Determines the verbosity of the WindowManager traces:\n\n - *verbose:* Includes all windows and configuration information for each window. This mode has the highest memory and performance overhead.\n - *debug:* Includes information about all windows, but logs only the window configuration if it contains a requested override configuration.\n - *critical:* Includes the same information as Debug mode, but includes only visible windows. This mode has the smallest memory and performance overhead.\n\nDumps\n-----\n\nTo take a state dump using Winscope, under **Collect Traces** on the homepage\nselect the **Dump** tab and then click **Dump state**:\n\n**Figure 8.** Dump state in Winscope.\n\n### Screenshot configuration\n\nWinscope allows taking a screenshot for multiple displays. Choose a display from\nthe menu to screenshot. If no selection is made, a screenshot is collected for\nthe active display."]]