
在 Android 12 中,您可以透過公開 API 實作視窗模糊效果,例如背景模糊和後方模糊。
視窗模糊或跨視窗模糊效果可用於模糊指定視窗後方的畫面。視窗模糊效果有兩種,可用於實現不同的視覺效果:
背景模糊功能可讓您建立背景模糊的視窗,營造出磨砂玻璃效果。
「模糊背景」可模糊 (對話方塊) 視窗後方的整個畫面,營造景深效果。
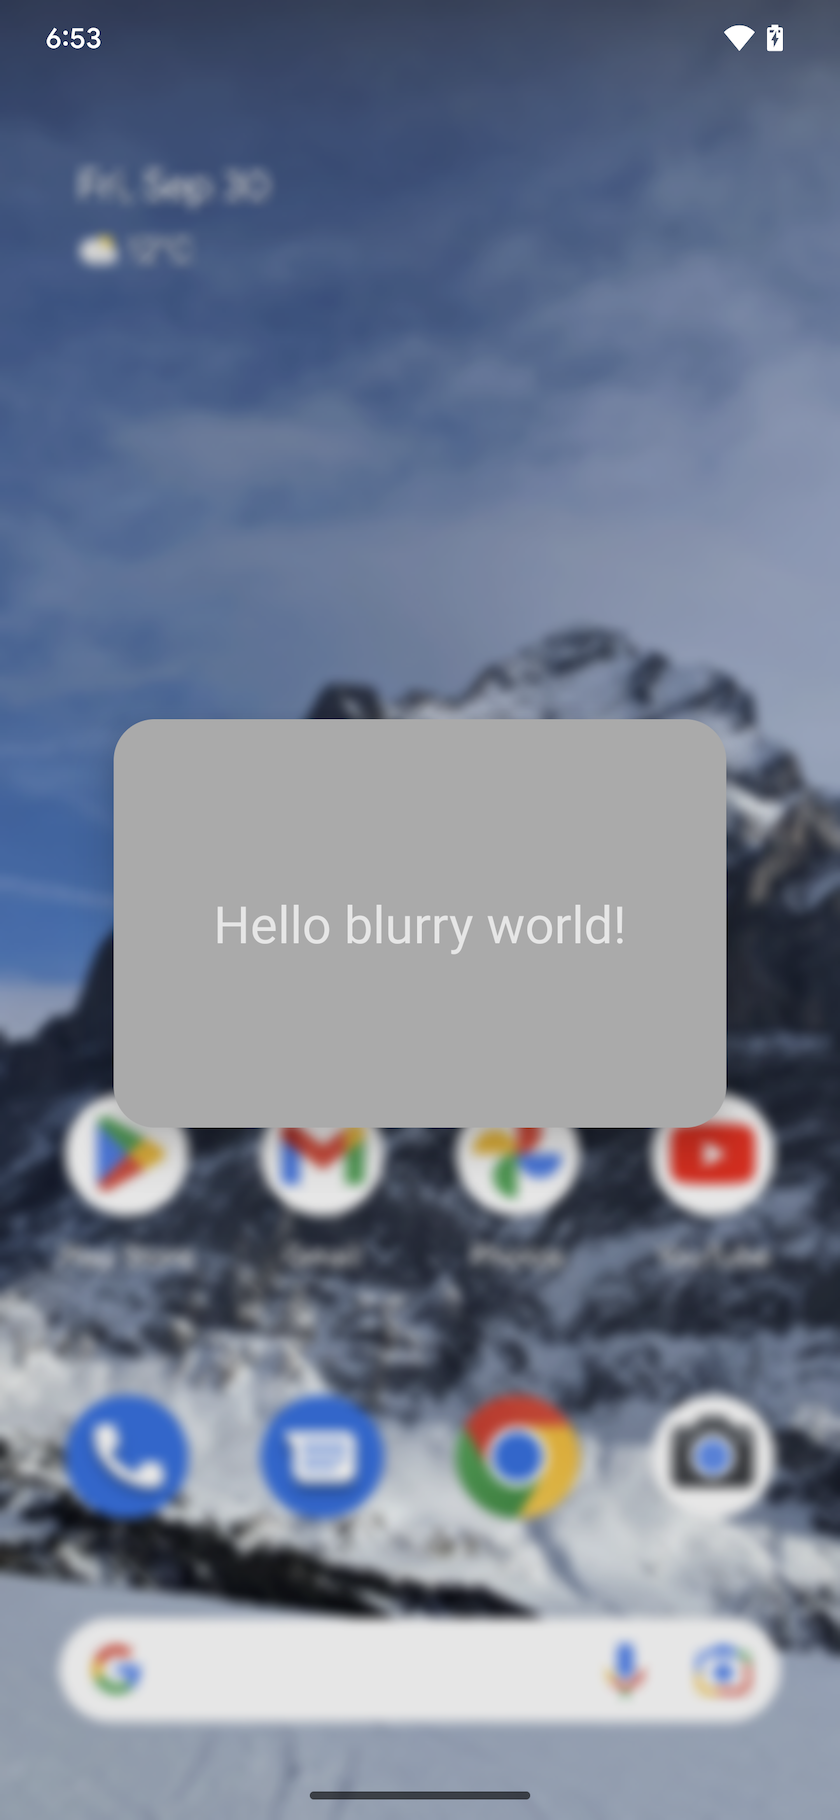
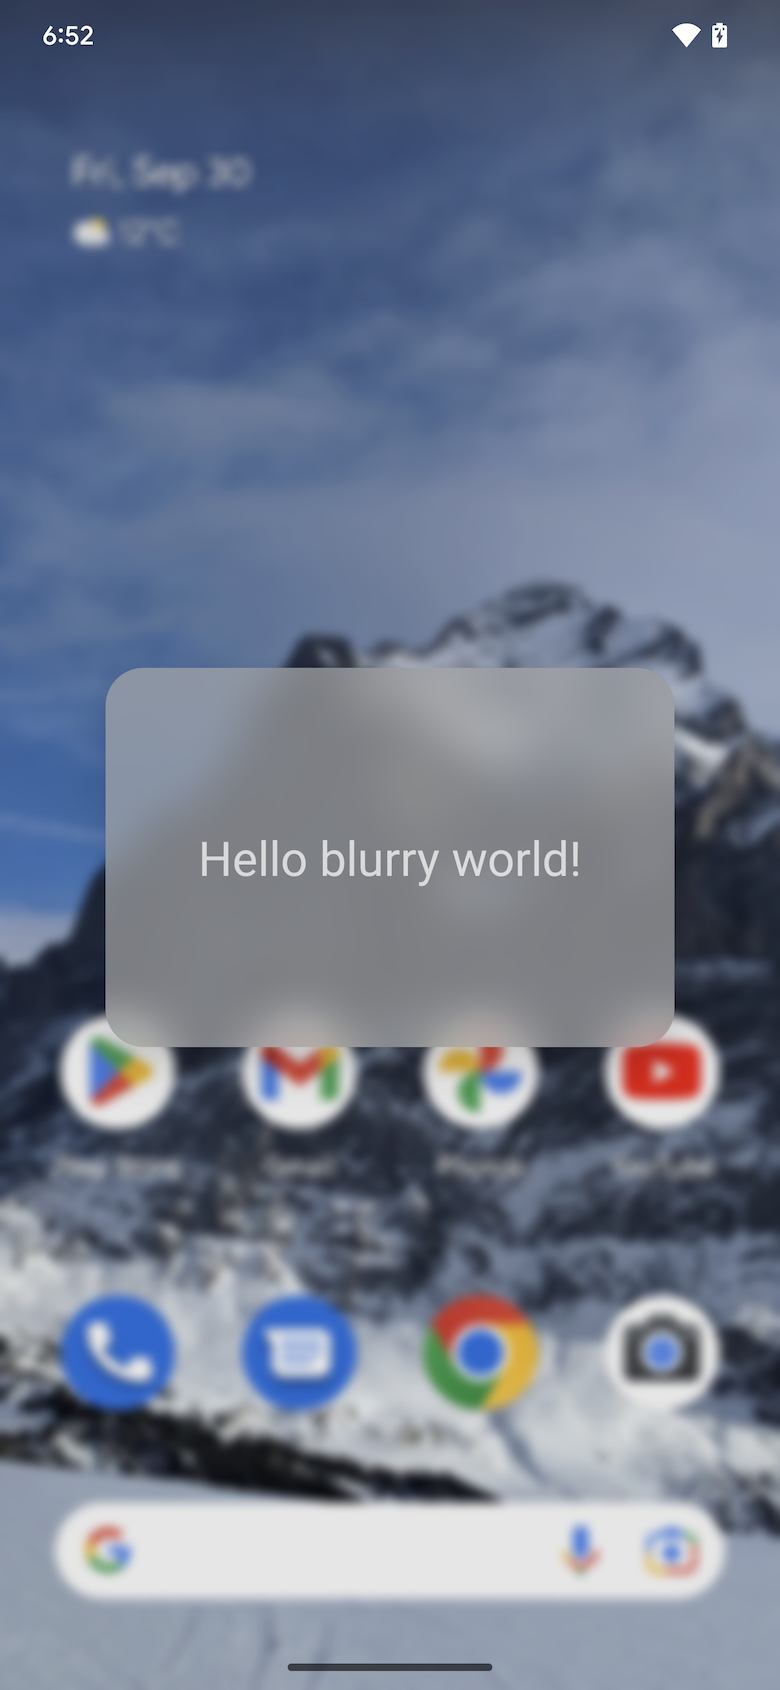
這兩種效果可以分開使用,也可以合併使用,如下圖所示:

a |
b |
 c |
圖 1. 僅模糊背景 (a)、僅模糊後方 (b)、模糊背景和後方 (c)
視窗模糊功能適用於所有視窗,因此即使視窗後方有其他應用程式,這項功能也能正常運作。這項效果與模糊算繪效果不同,後者會模糊同一視窗內的內容。視窗模糊效果適用於對話方塊、底部功能表和其他浮動視窗。
導入作業
應用程式開發人員
應用程式開發人員必須提供模糊半徑,才能建立模糊效果。 模糊半徑可控制模糊的密度,也就是半徑越大,模糊程度越高。模糊度為 0 像素表示沒有模糊效果。如要模糊處理後方內容,20 像素的半徑可產生良好的景深效果,而 80 像素的背景模糊半徑則可產生良好的毛玻璃效果。請避免使用大於 150 像素的模糊半徑,否則效能會受到顯著影響。
如要達到所需的模糊效果並提高可讀性,請選擇模糊半徑值,並搭配半透明的顏色圖層。
背景模糊
在浮動視窗中使用背景模糊效果,即可建立視窗背景效果,也就是將底層內容模糊處理。 如要為視窗新增模糊背景,請按照下列步驟操作:
呼叫 Window#setBackgroundBlurRadius(int) 即可設定背景模糊半徑。或者,在視窗主題中設定 R.attr.windowBackgroundBlurRadius。
將 R.attr.windowIsTranslucent 設為 true,即可將視窗設為半透明。模糊效果會繪製在視窗表面下方,因此視窗必須是半透明,才能顯示模糊效果。
您可以選擇呼叫 Window#setBackgroundDrawableResource(int),加入半透明色的矩形視窗背景可繪項目。或者,在視窗主題中設定 R.attr.windowBackground。
如要為圓角視窗的模糊區域設定圓角,請將具有圓角的 ShapeDrawable 設為視窗背景可繪項目。
處理啟用和停用模糊狀態。詳情請參閱「應用程式中使用視窗模糊效果的指南」一節。
模糊背景
模糊效果會套用至視窗後方的整個畫面。這項效果會模糊視窗後方的螢幕內容,引導使用者將注意力放在視窗內容上。
如要模糊處理視窗後方的內容,請按照下列步驟操作:
將
FLAG_BLUR_BEHIND新增至視窗旗標,即可啟用背景模糊效果。或者,在視窗主題中設定 R.attr.windowBlurBehindEnabled。呼叫
WindowManager.LayoutParams#setBlurBehindRadius即可設定模糊半徑。或者,在視窗主題中設定 R.attr.windowBlurBehindRadius。視需要選擇相輔相成的調暗量。
處理啟用和停用模糊狀態。詳情請參閱「應用程式中使用視窗模糊效果的指南」一節。
在應用程式中使用視窗模糊效果的指南
視窗模糊效果的支援情況取決於下列因素:
Android 版本:視窗模糊 API 僅適用於 Android 12 以上版本。查看裝置 SDK 的 Android 版本。
圖像效能:GPU 效能較低的裝置可能不會支援視窗模糊效果。
系統狀態:系統伺服器可能會在執行階段暫時停用視窗模糊效果,例如在省電模式下、播放特定類型的影片內容時,或因開發人員覆寫而停用。
如要確保應用程式與各種 Android 版本、裝置和系統狀態相容,請遵循下列指南:
透過 WindowManager#addCrossWindowBlurEnabledListener 新增監聽器,在啟用或停用視窗模糊效果時收到通知。此外,您可以使用
WindowManager#isCrossWindowBlurEnabled查詢目前是否已啟用視窗模糊效果。實作兩個版本的視窗背景,以因應視窗模糊效果的啟用或停用狀態。
啟用模糊效果後,視窗背景應為半透明,才能顯示模糊效果。在此狀態下,如果停用模糊效果,視窗內容會直接與底層視窗的內容重疊,導致重疊的視窗較難辨識。如要避免這種情況,請在停用視窗模糊效果時,按照下列方式調整應用程式的 UI:
如要模糊背景,請增加視窗背景可繪項目的 Alpha 值,使其更加不透明。
如要模糊處理後方背景,請新增調暗圖層,並調高調暗程度。
模糊背景和背景模糊效果範例
本節提供活動的運作範例,說明如何同時使用後方模糊和背景模糊效果。
以下 MainActivity.java 範例是半徑為 20 像素的對話方塊,背景模糊半徑為 80 像素。並在視窗背景可繪項目中以 XML 定義圓角。可正確處理不同 Android 版本、不同裝置 (可能不支援視窗模糊) 和啟用/停用執行階段模糊的變更。這項功能會調整視窗背景可繪項目 Alpha 值和視窗調暗量,確保在任何情況下都能清楚閱讀對話方塊內容。
public class MainActivity extends Activity {

    private final int mBackgroundBlurRadius = 80;
    private final int mBlurBehindRadius = 20;

    // We set a different dim amount depending on whether window blur is enabled or disabled
    private final float mDimAmountWithBlur = 0.1f;
    private final float mDimAmountNoBlur = 0.4f;

    // We set a different alpha depending on whether window blur is enabled or disabled
    private final int mWindowBackgroundAlphaWithBlur = 170;
    private final int mWindowBackgroundAlphaNoBlur = 255;

    // Use a rectangular shape drawable for the window background. The outline of this drawable
    // dictates the shape and rounded corners for the window background blur area.
    private Drawable mWindowBackgroundDrawable;

    @Override
    protected void onCreate(Bundle savedInstanceState) {
        super.onCreate(savedInstanceState);
        setContentView(R.layout.activity_main);

        mWindowBackgroundDrawable = getDrawable(R.drawable.window_background);
        getWindow().setBackgroundDrawable(mWindowBackgroundDrawable);

        if (buildIsAtLeastS()) {
            // Enable blur behind. This can also be done in xml with R.attr#windowBlurBehindEnabled
            getWindow().addFlags(WindowManager.LayoutParams.FLAG_BLUR_BEHIND);

            // Register a listener to adjust window UI whenever window blurs are enabled/disabled
            setupWindowBlurListener();
        } else {
            // Window blurs are not available prior to Android S
            updateWindowForBlurs(false /* blursEnabled */);
        }

        // Enable dim. This can also be done in xml, see R.attr#backgroundDimEnabled
        getWindow().addFlags(WindowManager.LayoutParams.FLAG_DIM_BEHIND);
    }

    /**
     * Set up a window blur listener.
     *
     * Window blurs might be disabled at runtime in response to user preferences or system states
     * (e.g. battery saving mode). WindowManager#addCrossWindowBlurEnabledListener allows to
     * listen for when that happens. In that callback we adjust the UI to account for the
     * added/missing window blurs.
     *
     * For the window background blur we adjust the window background drawable alpha:
     *     - lower when window blurs are enabled to make the blur visible through the window
     *       background drawable
     *     - higher when window blurs are disabled to ensure that the window contents are readable
     *
     * For window blur behind we adjust the dim amount:
     *     - higher when window blurs are disabled - the dim creates a depth of field effect,
     *       bringing the user's attention to the dialog window
     *     - lower when window blurs are enabled - no need for a high alpha, the blur behind is
     *       enough to create a depth of field effect
     */
    @RequiresApi(api = Build.VERSION_CODES.S)
    private void setupWindowBlurListener() {
        Consumer<Boolean> windowBlurEnabledListener = this::updateWindowForBlurs;
        getWindow().getDecorView().addOnAttachStateChangeListener(
                new View.OnAttachStateChangeListener() {
                    @Override
                    public void onViewAttachedToWindow(View v) {
                        getWindowManager().addCrossWindowBlurEnabledListener(
                                windowBlurEnabledListener);
                    }

                    @Override
                    public void onViewDetachedFromWindow(View v) {
                        getWindowManager().removeCrossWindowBlurEnabledListener(
                                windowBlurEnabledListener);
                    }
                });
    }

    private void updateWindowForBlurs(boolean blursEnabled) {
        mWindowBackgroundDrawable.setAlpha(blursEnabled && mBackgroundBlurRadius > 0 ?
                mWindowBackgroundAlphaWithBlur : mWindowBackgroundAlphaNoBlur);
        getWindow().setDimAmount(blursEnabled && mBlurBehindRadius > 0 ?
                mDimAmountWithBlur : mDimAmountNoBlur);

        if (buildIsAtLeastS()) {
            // Set the window background blur and blur behind radii
            getWindow().setBackgroundBlurRadius(mBackgroundBlurRadius);
            getWindow().getAttributes().setBlurBehindRadius(mBlurBehindRadius);
            getWindow().setAttributes(getWindow().getAttributes());
        }
    }

    private static boolean buildIsAtLeastS() {
        return Build.VERSION.SDK_INT >= Build.VERSION_CODES.S;
    }
}
如要為視窗建立圓角,請在 res/drawable/window_background.xml 中將視窗背景定義為具有 圓角的 ShapeDrawable,半徑為 20 dp,如下所示:
<shape xmlns:android="http://schemas.android.com/apk/res/android" android:shape="rectangle" >
    <corners android:radius="20dp"/>
    <solid android:color="#AAAAAA"/>
</shape>
視窗模糊效果會模糊活動下方的視窗內容。模糊處理的圖片會繪製在活動視窗「下方」,因此活動視窗必須是半透明,才能顯示模糊效果。如要讓視窗半透明,請在活動主題中設定 R.attr.windowIsTranslucent,如下所示:
<style name="Theme.BlurryDialog" parent="Theme.MaterialComponents.Dialog">
    <item name="android:windowIsTranslucent">true</item>
</style>
原始設備製造商 (OEM) 和合作夥伴
如要在裝置上模糊視窗,原始設備製造商必須聲明裝置支援視窗模糊功能。
如要確認裝置是否支援視窗模糊效果,請按照下列步驟操作:
確認裝置可處理額外的 GPU 負載。低階裝置可能無法處理額外負載,導致影格遺失。請只在 GPU 效能充足的測試裝置上啟用視窗模糊效果。
如果您使用自訂轉譯引擎,請確保轉譯引擎實作模糊處理邏輯。Android 12 的預設算繪引擎會在
BlurFilter.cpp中實作模糊處理邏輯。
確認裝置支援視窗模糊效果後,請設定下列 SurfaceFlinger sysprop:
PRODUCT_VENDOR_PROPERTIES += \
       ro.surface_flinger.supports_background_blur=1
驗證
如要驗證應用程式視窗在啟用模糊和停用模糊狀態之間切換時,是否能正確處理,請按照下列步驟操作:
開啟含有模糊效果的 UI。
如要啟用或停用視窗模糊效果,請開啟或關閉視窗模糊效果。
確認視窗 UI 會如預期切換模糊狀態。
開啟及關閉視窗模糊效果
如要測試視窗 UI 如何以視窗模糊效果呈現,請使用下列其中一種方法啟用或停用模糊效果:
透過「開發人員選項」:
依序前往「設定」->「系統」->「開發人員選項」->「硬體加速彩現」->「允許視窗層級模糊效果」
在已解鎖裝置上,透過終端機執行下列操作:
adb shell wm disable-blur 1 # 1 disables window blurs, 0 allows them
如要檢查 Android 12 以上版本裝置是否支援視窗模糊效果,以及目前是否已啟用視窗模糊效果,請在已解鎖裝置上執行 adb shell wm disable-blur。
疑難排解
請參考下列指南,在驗證期間排解問題。
未繪製模糊效果
確認目前已啟用模糊效果,且硬體支援這項功能。 請參閱「開啟或關閉視窗模糊處理」。
請務必設定半透明的視窗背景顏色。不透明的視窗背景顏色會隱藏模糊區域。
測試裝置不支援視窗模糊效果
- 在 Android 12 模擬器上測試應用程式。 如要設定 Android 模擬器,請參閱「設定 Android 模擬器」。使用模擬器建立的任何 Android 虛擬裝置都支援視窗模糊效果。
無圓角
- 設定視窗背景可繪項目 定義圓角。這個可繪項目會決定模糊區域的輪廓。
更新開發人員選項不會啟用模糊效果
- 檢查裝置是否處於省電模式,或是否使用多媒體通道。在某些電視裝置上,播放影片時也可能會停用視窗模糊效果。
背景模糊效果會繪製在全螢幕上,而非視窗邊界內
檢查 android:windowIsFloating ,確保視窗標示為浮動。
確認已設定視窗背景可繪項目。 這項設定會決定模糊區域的輪廓。
系統不會在畫面上套用接聽器的更新
- 系統可能將監聽器更新套用至舊視窗例項。 檢查視窗是否遭到毀損並重新建立,且具有正確的監聽器更新。