از 27 مارس 2025، توصیه می کنیم از android-latest-release
به جای aosp-main
برای ساختن و کمک به AOSP استفاده کنید. برای اطلاعات بیشتر، به تغییرات AOSP مراجعه کنید.
اجرای DTO
با مجموعهها، منظم بمانید
ذخیره و طبقهبندی محتوا براساس اولویتهای شما.
اجرای همپوشانی درخت دستگاه (DTOs) شامل تقسیم درخت دستگاه (DT)، ساخت، پارتیشن بندی و اجرا می شود. پس از اجرای کار، باید سازگاری بین دو DT را نیز حفظ کنید و یک استراتژی برای تضمین امنیت هر پارتیشن DT تعیین کنید.
DT را تقسیم کنید
با تقسیم DT به دو قسمت شروع کنید:
- DT اصلی بخش فقط SoC و تنظیمات پیش فرض ارائه شده توسط فروشنده SoC.
- روکش DT . پیکربندی های خاص دستگاه، ارائه شده توسط ODM/OEM.
پس از تقسیم DTها، باید از سازگاری بین DT اصلی و DT روکش اطمینان حاصل کنید تا ادغام DT اصلی و DT روکش منجر به یک DT کامل برای دستگاه شود. برای جزئیات بیشتر در مورد قالب و قوانین DTO، به نحو DTO مراجعه کنید. برای جزئیات بیشتر در مورد چند DT، به استفاده از چندین DT مراجعه کنید.
ساخت DT های اصلی و روکش
برای ساخت DT اصلی:
- DT
.dts
اصلی را در یک فایل .dtb
کامپایل کنید. - فایل
.dtb
را در یک پارتیشن قابل دسترسی در زمان اجرا بوت لودر فلش کنید (جزئیات در [Partition DTs] (#partition)).
برای ساخت همپوشانی DT:
- همپوشانی DT
.dts
را در یک فایل .dtbo
کامپایل کنید. در حالی که این فرمت فایل مشابه فایل .dtb
است که به صورت یک DT مسطح فرمت شده است، پسوند فایل متفاوت آن را از DT اصلی متمایز می کند. - فایل
.dtbo
را در یک پارتیشن قابل دسترسی در زمان اجرا بوت لودر فلش کنید (جزئیات در [Partition DTs] (#partition)).
برای جزئیات کامپایل با DTC و تأیید نتایج DTO در میزبان، به Compile and Verify مراجعه کنید.
پارتیشن های DT
برای قرار دادن .dtb
و .dtbo
، یک مکان قابل دسترسی و قابل اعتماد در زمان اجرا بوت لودر در حافظه فلش تعیین کنید.
مکان های نمونه برای DT اصلی:
- بخشی از پارتیشن بوت، اضافه شده به هسته (
image.gz
) - حباب های DT (
.dtb
) را در پارتیشن اختصاصی ( dtb
) جدا کنید
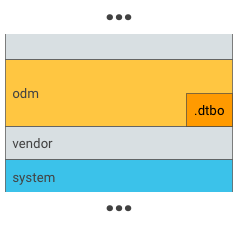
مکانهای نمونه برای DT روکش:

شکل 1. .dtbo را در یک پارتیشن odm قرار دهید (این کار را فقط در صورتی انجام دهید که بوت لودر شما توانایی بارگذاری داده ها از سیستم فایل یک پارتیشن odm را داشته باشد).
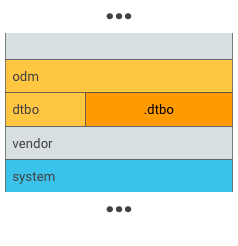
شکل 2. .dtbo را در یک پارتیشن منحصر به فرد، مانند پارتیشن dtbo قرار دهید.
توجه: اندازه پارتیشن DT روکش به دستگاه و میزان تغییرات مورد نیاز در بالای حباب اصلی DT بستگی دارد. به طور معمول، 8 مگابایت بیش از حد کافی است و در صورت نیاز، فضای بیشتری را در آینده ایجاد می کند.
برای دستگاههایی که از بهروزرسانیهای بدون درز (A/B) پشتیبانی میکنند، پارتیشنهای DT اصلی و DT روکش A/B:
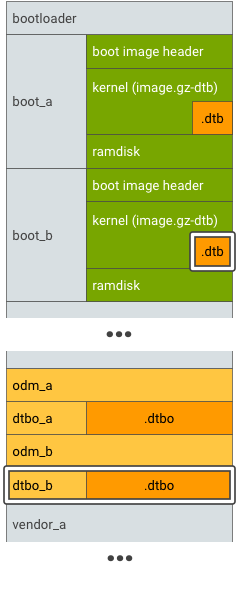
شکل 3. پارتیشن DTBO A/B، مثال 1.
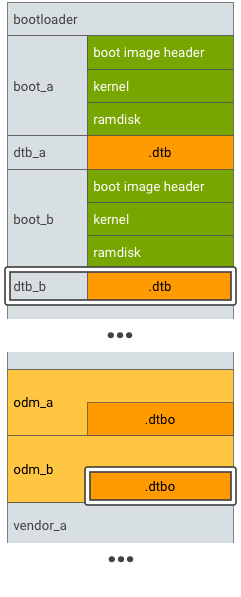
شکل 4. پارتیشن DTBO A/B، مثال 2.
در بوت لودر اجرا شود
برای اجرا:
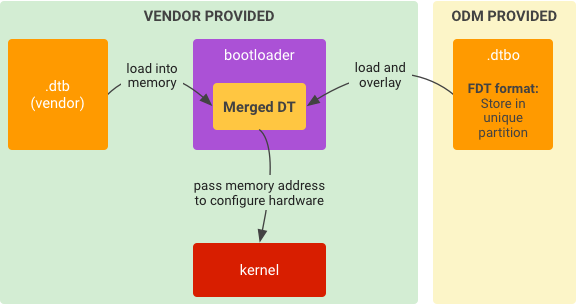
شکل 5. اجرای معمول زمان اجرا برای DTO در بوت لودر.
-
.dtb
از حافظه در حافظه بارگیری کنید. -
.dtbo
از حافظه در حافظه بارگیری کنید. - همپوشانی
.dtb
با .dtbo
تا یک DT ادغام شده باشد. - با توجه به آدرس حافظه DT ادغام شده، هسته را شروع کنید.
سازگاری را حفظ کنید
DTB اصلی (از فروشنده SoC) به عنوان یک سطح API برای DTBO ها در نظر گرفته می شود. پس از جدا کردن DT به یک بخش مشترک SoC و یک بخش خاص دستگاه، باید این دو قسمت را در آینده با یکدیگر سازگار نگه دارید، از جمله:
- تعریف DT در DT اصلی. به عنوان مثال، گره ها، ویژگی ها، برچسب ها. هرگونه تغییر تعریف در DT اصلی می تواند باعث ایجاد تغییرات در DT همپوشانی شود. به عنوان مثال، برای تصحیح نام گره در DT اصلی، یک برچسب "نام مستعار" تعریف کنید که به نام گره اصلی نگاشت شود (برای جلوگیری از تغییر روکش DT).
- محل فروشگاه روکش DT. به عنوان مثال، نام پارتیشن، فرمت فروشگاه.
امنیت را تضمین کند
بوت لودر باید مطمئن شود که DTB یا DTBO ایمن، اصلاح نشده و خراب است. می توانید از هر راه حلی برای ایمن سازی DTB یا DTBO استفاده کنید، به عنوان مثال، امضای تصویر بوت در VBoot 1.0 یا پاورقی AVB HASH (VBoot 2.0).
- اگر DTB یا DTBO در یک پارتیشن منحصر به فرد است، می توانید آن پارتیشن را به زنجیره اعتماد AVB اضافه کنید. زنجیره اعتماد از یک ریشه اعتماد محافظت شده توسط سخت افزار شروع می شود و به بوت لودر می رود که یکپارچگی و صحت پارتیشن DTB یا DTBO را تأیید می کند.
- اگر DTB یا DTBO در یک پارتیشن موجود باشد (مانند پارتیشن
odm
)، آن پارتیشن باید در زنجیره اعتماد AVB باشد. (پارتیشن DTBO می تواند یک کلید عمومی را با پارتیشن odm
به اشتراک بگذارد).
برای جزئیات، به بوت تایید شده مراجعه کنید.
محتوا و نمونه کدها در این صفحه مشمول پروانههای توصیفشده در پروانه محتوا هستند. جاوا و OpenJDK علامتهای تجاری یا علامتهای تجاری ثبتشده Oracle و/یا وابستههای آن هستند.
تاریخ آخرین بهروزرسانی 2025-07-29 بهوقت ساعت هماهنگ جهانی.
[[["درک آسان","easyToUnderstand","thumb-up"],["مشکلم را برطرف کرد","solvedMyProblem","thumb-up"],["غیره","otherUp","thumb-up"]],[["اطلاعاتی که نیاز دارم وجود ندارد","missingTheInformationINeed","thumb-down"],["بیشازحد پیچیده/ مراحل بسیار زیاد","tooComplicatedTooManySteps","thumb-down"],["قدیمی","outOfDate","thumb-down"],["مشکل ترجمه","translationIssue","thumb-down"],["مشکل کد / نمونهها","samplesCodeIssue","thumb-down"],["غیره","otherDown","thumb-down"]],["تاریخ آخرین بهروزرسانی 2025-07-29 بهوقت ساعت هماهنگ جهانی."],[],[],null,["# Implement DTOs\n\nImplementing device tree overlays (DTOs) involves dividing the device tree (DT), building,\npartitioning, and running. After you have a working implementation, you must also maintain\ncompatibility between the two DTs and determine a strategy for ensuring the\nsecurity of each DT partition.\n\nDivide the DT\n-------------\n\nStart by dividing the DT into two parts:\n\n- **Main DT**. The SoC-only part and the default configurations, provided by SoC vendor.\n- **Overlay DT**. The device-specific configurations, provided by ODM/OEM.\n\nAfter dividing the DTs, you must ensure compatibility between main\nDT and overlay DT so that merging main DT and overlay DT results in a complete\nDT for the device. For details on DTO format and rules, see\n[DTO syntax](/docs/core/architecture/dto/syntax). For details on\nmultiple DTs, see\n[Use multiple DTs](/docs/core/architecture/dto/multiple).\n\nBuild main and overlay DTs\n--------------------------\n\nTo build the main DT:\n\n1. Compile the main DT `.dts` into a `.dtb` file.\n2. Flash the `.dtb` file into a bootloader runtime-accessible partition (detailed in \\[Partition DTs\\](#partition)).\n\nTo build the overlay DT:\n\n1. Compile the overlay DT `.dts` into a `.dtbo` file. While this file format is the same as the `.dtb` file formatted as a flattened DT, the different file extension distinguishes it from the main DT.\n2. Flash the `.dtbo` file into a bootloader runtime-accessible partition (detailed in \\[Partition DTs\\](#partition)).\n\nFor details on compiling with DTC and verifying DTO results on the host, see\n[Compile and verify](/docs/core/architecture/dto/compile).\n\nPartition DTs\n-------------\n\nDetermine a bootloader runtime-accessible and trusted location in flash\nmemory to put `.dtb` and `.dtbo`.\n\nExample locations for the main DT:\n\n- Part of boot partition, appended to the kernel (`image.gz`)\n- Separate DT blobs (`.dtb`) in dedicated partition (`dtb`)\n\nExample locations for the overlay DT: \n\n**Figure 1.** Put .dtbo into an odm partition (do this only if your bootloader has\nthe capability to load data from the filesystem of an odm partition). \n\n**Figure 2.** Put .dtbo into a unique partition, such as a dtbo partition.\n\n**Note:** The size of the\noverlay DT partition depends on the device and the amount of changes needed on\ntop of the main DT blob. Typically, 8 MB is more than enough and allows room to\ngrow in the future if required.\n\nFor devices that support\n[seamless (A/B) updates](/docs/core/ota/ab_updates), A/B the\nmain DT and overlay DT partitions: \n\n**Figure 3.** DTBO partition A/B, example 1. \n\n**Figure 4.** DTBO partition A/B, example 2.\n\nRun in bootloader\n-----------------\n\nTo run:\n\n**Figure 5.** Typical runtime implementation for DTO in bootloader.\n\n1. Load `.dtb` from storage into memory.\n2. Load `.dtbo` from storage into memory.\n3. Overlay `.dtb` with `.dtbo` to be a merged DT.\n4. Start kernel given the memory address of the merged DT.\n\nMaintain compatibility\n----------------------\n\nThe main DTB (from SoC vendor) is treated as an API surface for DTBOs. After\nseparating the DT into a SoC-common part and a device-specific part,\nyou must keep the two parts mutually compatible in the future, including:\n\n- **DT definition in main DT.** For example, nodes, properties, labels. Any definition change in main DT could trigger changes in overlay DT. For example, to correct a node name in main DT, define an \"alias\" label that maps to the original node name (to avoid the change of overlay DT).\n- **Overlay DT store location.** For example, partition name, store format.\n\nEnsure security\n---------------\n\nBootloader must ensure the DTB or DTBO is secure, unmodified, and uncorrupted.\nYou could use any solution to secure DTB or DTBO, for example,\n[Boot image\nsignature](/docs/security/features/verifiedboot/verified-boot#signature_format) in VBoot 1.0 or\n[AVB\nHASH footer](https://android.googlesource.com/platform/external/avb/+/android16-release/README.md#The-VBMeta-struct) (VBoot 2.0).\n\n- If DTB or DTBO is in a unique partition, you can add that partition to the trust chain of AVB. The trust chain starts from a hardware-protected root of trust and goes to the bootloader, which verifies the integrity and authenticity of DTB or DTBO partition.\n- If DTB or DTBO is in an existing partition (such as the `odm` partition), that partition should be in the trust chain of AVB. (DTBO partition could share a public key with `odm` partition).\n\nFor details, refer to [Verified\nBoot](/docs/security/features/verifiedboot)."]]